Toro 22298 User manual

FormNo.3389-603RevA
21inHeavy-DutyRecycler®/Rear
BaggerLawnMower
ModelNo.22298—SerialNo.314000001andUp
Registeratwww.Toro.com.
OriginalInstructions(EN)*3389-603*A

Introduction
Thisrotary-blade,walk-behindlawnmowerisintended
tobeusedbyresidentialhomeownersorprofessional,
hiredoperators.Itisdesignedprimarilyforcuttinggrass
onwell-maintainedlawnsonresidentialorcommercial
properties.Itisnotdesignedforcuttingbrushorfor
agriculturaluses.
Readthisinformationcarefullytolearnhowtooperateand
maintainyourproductproperlyandtoavoidinjuryand
productdamage.Youareresponsibleforoperatingthe
productproperlyandsafely.
YoumaycontactTorodirectlyatwww.Toro.comforproduct
andaccessoryinformation,helpndingadealer,ortoregister
yourproduct.
Wheneveryouneedservice,genuineToroparts,oradditional
information,contactanAuthorizedServiceDealerorToro
CustomerServiceandhavethemodelandserialnumbersof
yourproductready.Figure1identiesthelocationofthe
modelandserialnumbersontheproduct.Writethenumbers
inthespaceprovided.
Figure1
1.Modelandserialnumberlocation
ModelNo.
SerialNo.
Thismanualidentiespotentialhazardsandhassafety
messagesidentiedbythesafetyalertsymbol(Figure2),
whichsignalsahazardthatmaycauseseriousinjuryordeath
ifyoudonotfollowtherecommendedprecautions.
Figure2
1.Safetyalertsymbol
Thismanualuses2wordstohighlightinformation.
Importantcallsattentiontospecialmechanicalinformation
andNoteemphasizesgeneralinformationworthyofspecial
attention.
WARNING
CALIFORNIA
Proposition65Warning
Thisproductcontainsachemicalorchemicals
knowntotheStateofCaliforniatocausecancer,
birthdefects,orotherreproductiveharm.
Theengineexhaustfromthisproduct
containschemicalsknowntotheStateof
Californiatocausecancer,birthdefects,
orotherreproductiveharm.
Important:Thisengineisnotequippedwithaspark
arrestermufer.ItisaviolationofCaliforniaPublic
ResourceCodeSection4442touseoroperatetheengine
onanyforest-covered,brush-covered,orgrass-covered
land.Otherstatesorfederalareasmayhavesimilarlaws.
ThissparkignitionsystemcomplieswithCanadianICES-002.
Theenclosed
Engine Owner's Man ual
issuppliedfor
informationregardingtheUSEnvironmentalProtection
Agency(EPA)andtheCaliforniaEmissionControl
Regulationofemissionsystems,maintenance,and
warranty.Replacementsmaybeorderedthroughthe
enginemanufacturer.
NetTorque
Thegrossornettorqueofthisenginewaslaboratoryrated
bytheenginemanufacturerinaccordancewiththeSocietyof
AutomotiveEngineers(SAE)J1940.Asconguredtomeet
safety,emission,andoperatingrequirements,theactualengine
torqueonthisclassofmowerwillbesignicantlylower.
©2014—TheToro®Company
8111LyndaleAvenueSouth
Bloomington,MN554202
Contactusatwww.Toro.com.
PrintedintheUSA
AllRightsReserved

Contents
Safety...........................................................................3
GeneralSafety.........................................................3
SafetyandInstructionalDecals.................................5
Setup............................................................................7
1InstallingtheHandle.............................................7
2FillingtheCrankcasewithOil.................................8
3AdjustingtheSelf-PropelDrive...............................9
4AssemblingtheGrassBag......................................9
ProductOverview.........................................................10
Operation....................................................................10
CheckingtheEngine-OilLevel.................................10
FillingtheFuelTankwithGasoline...........................11
AdjustingtheCuttingHeight....................................11
StartingtheEngine.................................................12
StoppingtheEngine...............................................12
OperatingtheSelf-PropelDriveandEngagingthe
CuttingBlade.....................................................12
CheckingtheBlade-BrakeClutch..............................13
RecyclingtheClippings...........................................13
BaggingtheClippings.............................................14
OperatingTips......................................................15
Maintenance.................................................................16
RecommendedMaintenanceSchedule(s)......................16
EngineMaintenance..................................................17
ServicingtheAirCleaner.........................................17
ChangingtheEngineOil.........................................17
ChangingtheEngine-OilFilter.................................18
ServicingtheSparkPlug..........................................19
DriveSystemMaintenance.........................................19
AdjustingtheSelf-PropelDrive................................19
BladeMaintenance.....................................................20
MaintainingtheBlade.............................................20
AdjustingtheBlade-BrakeCable...............................21
Cleaning...................................................................23
CleaningundertheMachine.....................................23
CleaningundertheBeltCover..................................24
CleaningtheBlade-Brake-ClutchShield.....................24
Storage........................................................................25
PreparingtheFuelSystem.......................................25
PreparingtheEngine..............................................25
GeneralInformation...............................................25
RemovingtheMachinefromStorage.........................25
Troubleshooting...........................................................26
Safety
ThismachinemeetsorexceedstheCPSCbladesafety
requirementsforwalk-behindrotarylawnmowers.
Improperlyusingormaintainingthislawnmowercan
resultininjury.Toreducethepotentialforinjury,
complywiththesesafetyinstructions.
Torodesignedandtestedthislawnmowerfortooffer
reasonablysafeservice;however,failuretocomplywiththe
followinginstructionsmayresultinpersonalinjury.
WARNING
Engineexhaustcontainscarbonmonoxide,an
odorless,deadlypoisonthatcankillyou.
Donotruntheengineindoorsorinanenclosed
area.
Toensuremaximumsafety,bestperformance,andto
gainknowledgeoftheproduct,itisessentialthatyou
andanyotheroperatorofthelawnmowerreadand
understandthecontentsofthismanualbeforetheengine
iseverstarted.Payparticularattentiontothesafetyalert
symbol(Figure2)whichmeansCaution,Warning,or
Danger.Readandunderstandtheinstructionbecause
ithastodowithsafety.Failuretocomplywiththe
instructionmayresultinpersonalinjury.
GeneralSafety
Thismachineiscapableofamputatinghandsandfeetand
ofthrowingobjects.Failuretoobservethefollowingsafety
instructionscouldresultinseriousinjuryordeath.
Thefollowinginstructionshavebeenadaptedfromthe
ANSI/OPEIB71.4-2012standard.
Training
•ReadtheOperator'sManualandothertrainingmaterial.If
theoperator(s)ormechanic(s)cannotreadEnglish,itis
theowner'sresponsibilitytoexplainthismaterialtothem.
•Becomefamiliarwiththesafeoperationoftheequipment,
operatorcontrols,andsafetysigns.
•Alloperatorsandmechanicsshouldbetrained.The
ownerisresponsiblefortrainingtheusers.
•Neverletchildrenoruntrainedpeopleoperateorservice
theequipment.Localregulationsmayrestricttheageof
theoperator.
•Theowner/usercanpreventandisresponsiblefor
accidentsorinjuriesoccurringtothemselves,other
people,orproperty.
Preparation
•Useonlyaccessoriesandattachmentsapprovedbythe
manufacturer.
3

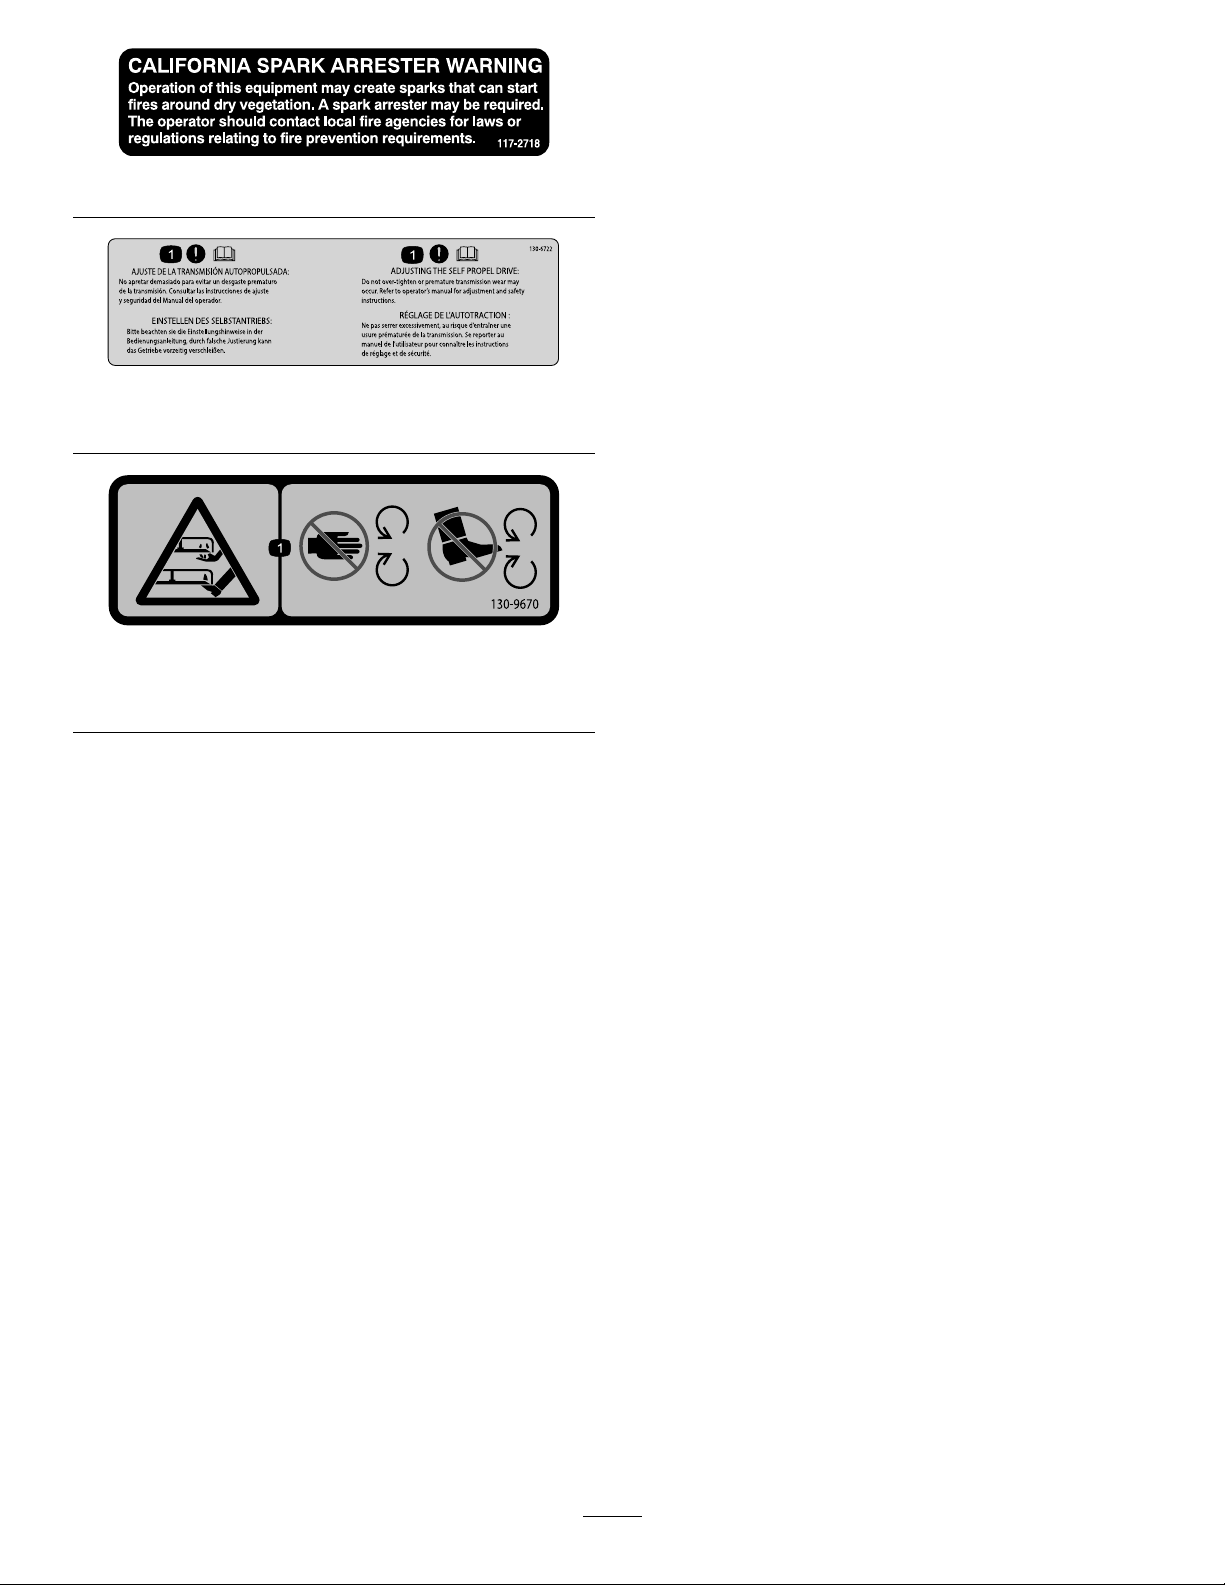
•Wearappropriateclothingincludinghardhat,safety
glasses,andearprotection.Longhair,looseclothingor
jewelrymaygettangledinmovingparts.
•Inspecttheareawheretheequipmentistobeusedand
removeallobjects,suchasrocks,toys,andwire,which
canbethrownbythemachine.
•Checkthatoperator'spresencecontrols,safetyswitches,
andshieldsareattachedandfunctioningproperly.Donot
operatethemachineunlesstheyarefunctioningproperly.
SafeHandlingofFuels
•Toavoidpersonalinjuryorpropertydamage,use
extremecareinhandlinggasoline.Gasolineisextremely
ammableandthevaporsareexplosive.
•Extinguishallcigarettes,cigars,pipes,andothersources
ofignition.
•Useonlyanapprovedfuelcontainer.
•Neverremovefuelcaporaddfuelwiththeengine
running.
•Allowtheenginetocoolbeforerefueling.
•Neverrefuelthemachineindoors.
•Neverstorethemachineorthefuelcontainerwherethere
isanopename,spark,orpilotlight,suchasonawater
heateroronotherappliances.
•Neverllcontainersinsideavehicleoronatruckor
trailerbedwithaplasticliner.Alwaysplacecontainerson
thegroundawayfromyourvehiclebeforelling.
•Removetheequipmentfromthetruckortrailerand
refuelitontheground.Ifthisisnotpossible,thenrefuel
suchequipmentwithaportablecontainerratherthan
fromafueldispensernozzle.
•Keepthenozzleincontactwiththerimofthefueltank
orcontaineropeningatalltimesuntilfuelingiscomplete.
•Donotuseanozzlelockopendevice.
•Iffuelisspilledonclothing,changeclothingimmediately.
•Neveroverllthefueltank.Replacefuelcapandtighten
securely.
Operation
•Neverrunanengineinanenclosedarea.
•Operatethemachineonlyingoodlight,keepingaway
fromholesandhiddenhazards.
•Starttheengineonlyfromtheoperatingposition.
•Besureofyourfooting,especiallywhenbackingup.
Walk,don'trun.Neveroperatethemachineonwetgrass.
Reducedfootingcouldcauseslipping.
•Slowdownanduseextracareonhillsides.Besureto
travelsidetosideonhillsides.Turfconditionscanaffect
thestabilityofthemachine.Usecautionwhileoperating
themachineneardrop-offs.
•Donotoperatethemachinewithouteitherthegrass
catcherortheguardinplace.
•Donotchangetheenginegovernorsettingoroverspeed
theengine.
•Stopthemachineonlevelgroundandshutofftheengine
beforeleavingtheoperatingpositionforanyreason,
includingemptyingthecatcheroruncloggingthechute.
•Stopthemachineandinspectthebladeafterstriking
objectsorifanabnormalvibrationoccurs.Make
necessaryrepairstothemachinebeforeresuming
operation.
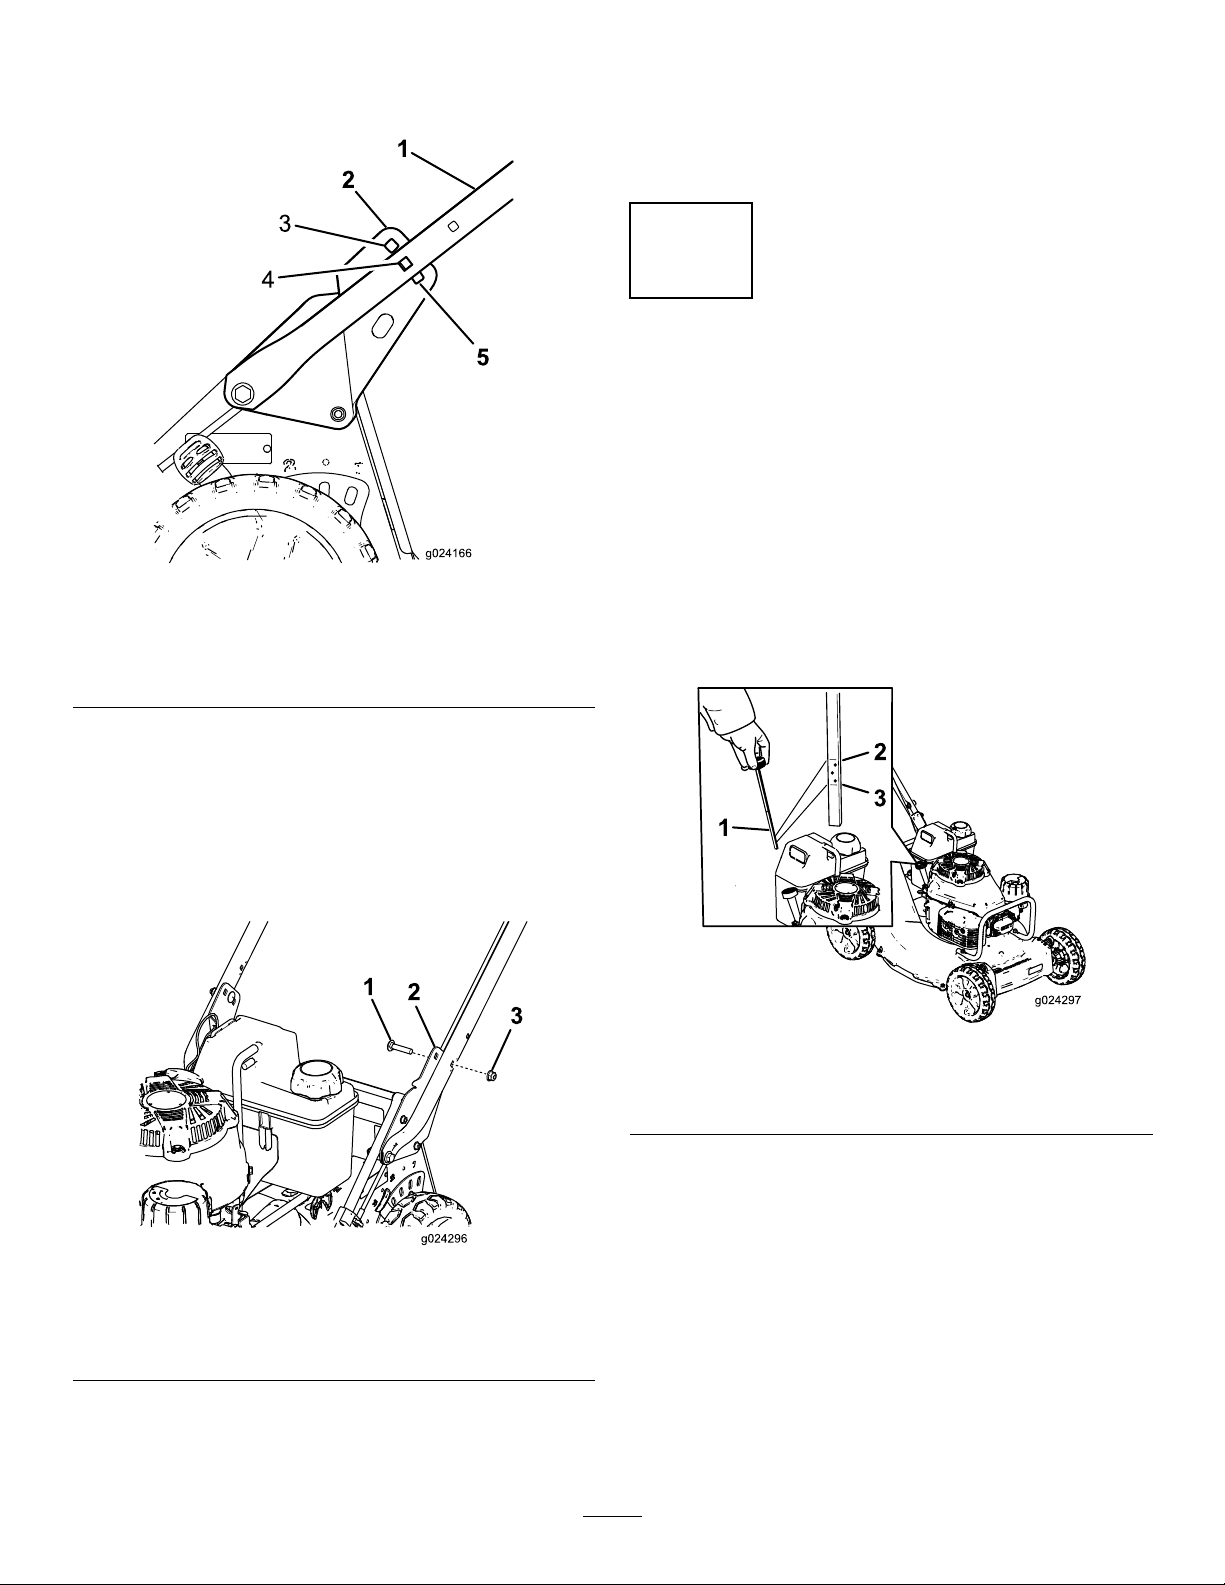
•Keephandsandfeetawayfromthecuttingunits.
•Lookbehindanddownbeforebackinguptobesureof
aclearpath.
•Keeppetsandbystandersaway.
•Slowdownandusecautionwhencrossingroadsand
sidewalks.Stopthebladeifyouarenotmowing.
•Beawareofthemachinedischargedirectionanddonot
pointitatanyone.
•Donotoperatethemachinewhileundertheinuence
ofalcoholordrugs.
•Usecarewhenloadingorunloadingthemachineintoa
trailerortruck.
•Usecarewhenapproachingblindcorners,shrubs,trees,
orotherobjectsthatmayobscurevision.
MaintenanceandStorage
•Stoptheengineanddisconnectthespark-plugwire.Wait
forallmovementtostopbeforeadjusting,cleaning,or
repairingthemachine.
•Cleangrassanddebrisfromthecuttingunit,drive,
mufer,andenginetohelppreventres.Cleanupoil
orfuelspills.
•Lettheenginecoolbeforestoringthemachine,anddo
notstoreitnearaame.
•Shutoffthefuelwhilestoringortransportingthe
machine.Donotstorefuelnearamesordrainfuel
indoors.
•Neverallowuntrainedpersonneltoservicethemachine.
•Removethespark-plugwirebeforemakinganyrepairs.
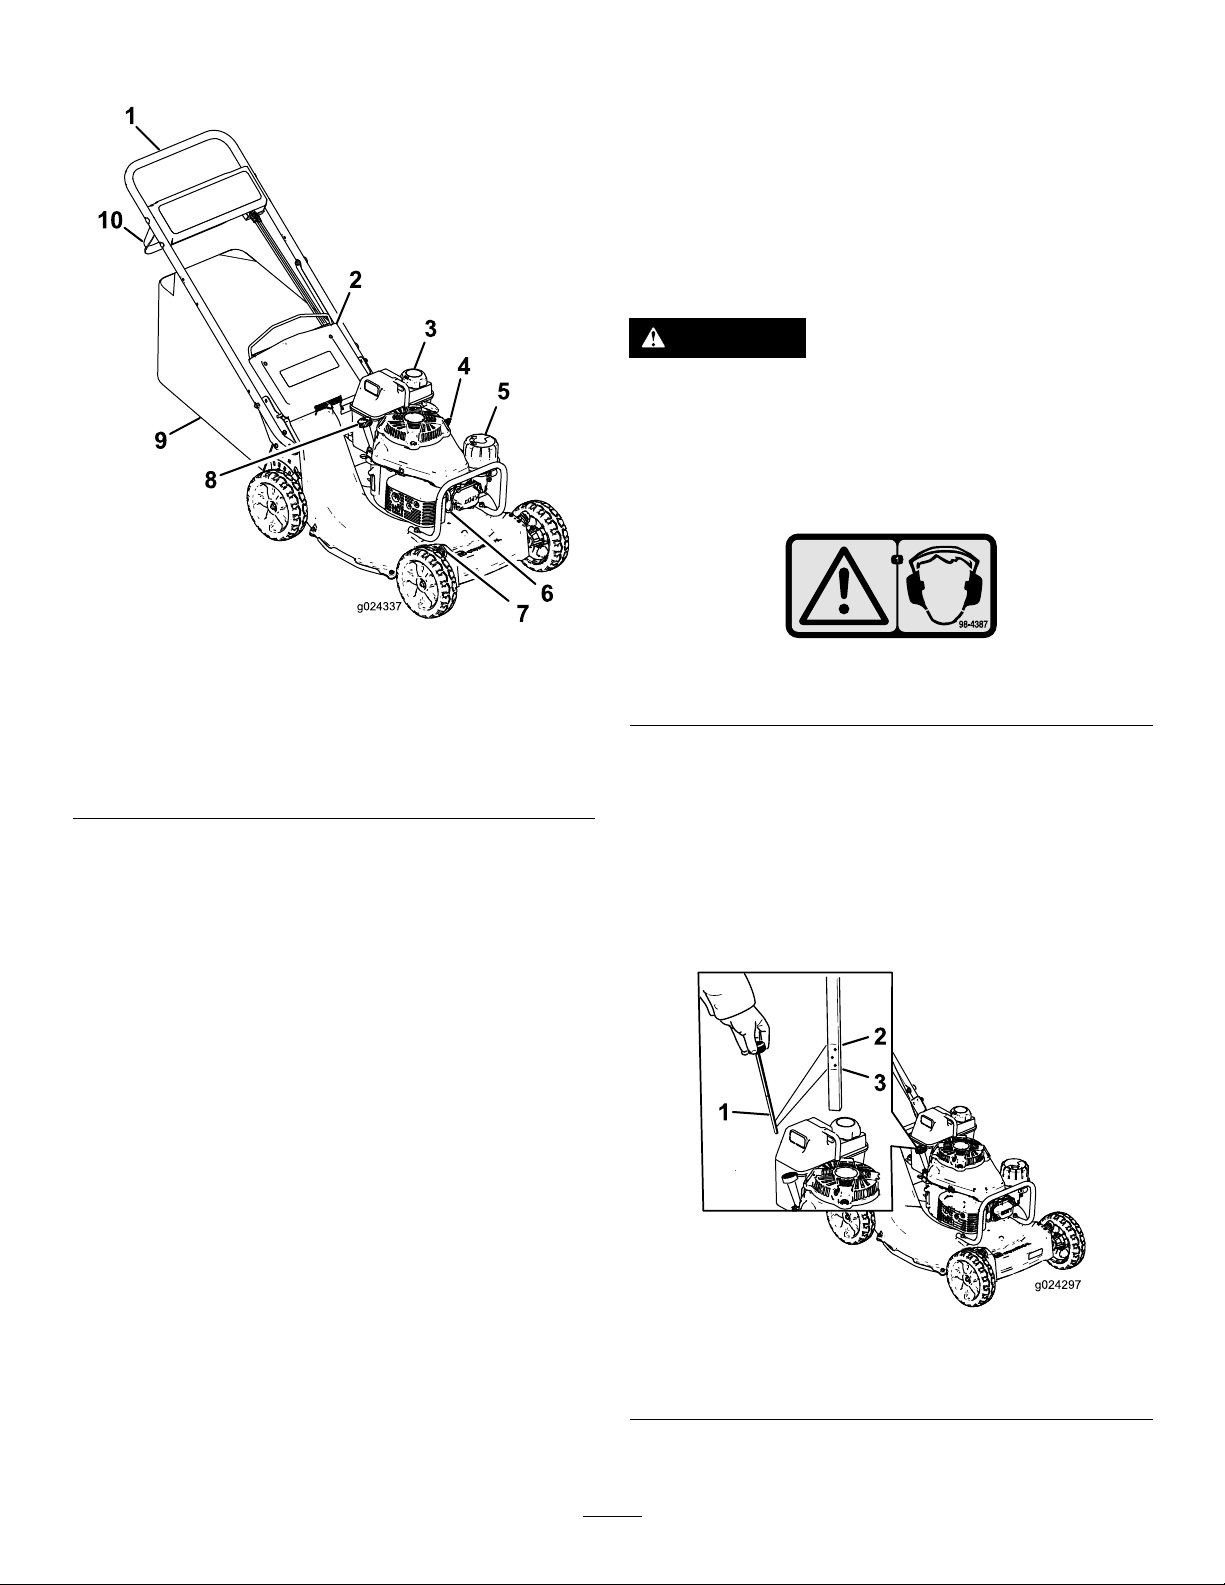
•Usecarewhencheckingtheblade.Wrapthebladeor
weargloves,andusecautionwhenservicingtheblade.
Onlyreplacetheblade;neverstraightenorweldit.
•Keephandsandfeetawayfrommovingparts.Ifpossible,
donotmakeadjustmentstothemachinewhiletheengine
isrunning.
•Keepallpartsingoodworkingconditionandallhardware
tightened.Replaceallwornordamageddecals.
•Tobestprotectyourinvestmentandmaintainoptimal
performanceofyourToroequipment,countonToro
genuineparts.Whenitcomestoreliability,Torodelivers
replacementpartsdesignedtotheexactengineering
specicationsofourequipment.Forpeaceofmind,insist
onTorogenuineparts.
4

Hauling
•Usecarewhenloadingorunloadingthemachineintoa
trailerortruck.
•Usefull-widthrampsforloadingthemachineintoa
traileroratruck.
•Tiethemachinedownsecurelyusingstraps,chains,cable,
orropes.Boththefrontandtherearstrapsshouldbe
directeddownandoutwardfromthemachine.
SafetyandInstructionalDecals
Safetydecalsandinstructionsareeasilyvisibletotheoperatorandarelocatednearanyareaofpotential
danger.Replaceanydecalthatisdamagedorlost.
Manufacturer'sMark
1.Indicatesthebladeisidentiedasapartfromtheoriginal
machinemanufacturer.
94-8072
114-3415
116-7583
1.Warning–ReadtheOperator’sManual.Donotoperatethis
machineunlessyouaretrained.
4.Cutting/dismembermenthazardofhandorfoot,mower
blade—stayawayfrommovingparts;keepallguardsinplace.
2.Thrownobjecthazard—keepbystandersasafedistancefrom
themachine.
5.Warning—wearhearingprotection.
3.Thrownobjecthazard—Donotoperatethemowerwithoutthe
reardischargeplugorbaginplace.
6.Cutting/dismembermenthazardofhandorfoot,mower
blade—Donotoperateupanddownslopes;operatesideto
sideonslopes;stoptheenginebeforeleavingtheoperating
position—pickupobjectsthatcouldbethrownbytheblades;
andlookbehindyouwhenbackingup.
5

117–2718
130-6722
1.Attention—readtheOperator'sManual.
130-9670
1.Severinghazardofhandorfoot;mowerblade—keepaway
frommovingparts;keepallguardsandshieldsinplace.
6

Setup
LooseParts
Usethechartbelowtoverifythatallpartshavebeenshipped.
ProcedureDescriptionQty.Use
Handle1
Hex-head-angebolt(5/16x1-1/2
inches)2
Carriagebolt(5/16x1-1/2inches)2
1
Flangenut(5/16inch)4
Installthehandle.
2Nopartsrequired–Fillthecrankcasewithoil.
3Nopartsrequired–Adjusttheself-propeldrive.
4Nopartsrequired–Assemblethegrassbag.
Note:Determinetheleftandrightsidesofthemachine
fromthenormaloperatingposition.
1
InstallingtheHandle
Partsneededforthisprocedure:
1Handle
2Hex-head-angebolt(5/16x1-1/2inches)
2Carriagebolt(5/16x1-1/2inches)
4Flangenut(5/16inch)
Procedure
1.Removethecableguardfromthehandle(Figure3)by
removingthe2carriageboltsand2locknutsthathold
thecableguardtothehandle.
Figure3
1.Cableguard4.Flangenut—5/16inch(2)
2.Locknut(2)5.Hex-head-ange
bolt—5/16x1-1/2inches
(2)
3.Carriagebolt—1/4x1-1/2
inches(2)
Note:Savetheguard,thecarriagebolts,andthe
locknutssothatyoucaninstallitontothehandlelater
inthisprocedure.
2.Installthehandleendsontothemowerhousingwith
2hex-head-angebolts(5/16x1-1/2inches)and2
angenuts(5/16inch)asshowninFigure3.
3.Setthemachinetothedesiredcuttingheight;referto
AdjustingtheCuttingHeight(page11).
7

4.Standbehindthemachineintheoperatingpositionto
determinethehandleheightthatismostcomfortable
foryou(Figure4).
Figure4
1.Handle4.Mediumhandleheight
2.Handlebracket(2)5.Lowesthandleheight
3.Highesthandleheight
5.Securethehandleontothehandlebracketsatyour
desiredhandleheightwith2carriagebolts(5/16x
1-1/2inches)and2angenuts(5/16inch)asshown
inFigure5.
Important:Ensurethattheboltheadsareon
theinsideofthehandleandthenutsareonthe
outsideofthehandle.
Figure5
1.Carriagebolt—5/16x
1-1/2inches(2)
3.Flangenut—5/16inch(2)
2.Handlebracket(2)
6.Positionthecableguardontothehandlewiththe
cable(s)insidetheguard,andsecuretheguardtothe
handlewiththe2carriageboltsandthe2locknutsthat
youpreviouslyremoved(Figure3).
Important:Ensurethatyoudonotpinchthe
cable(s)tothehandlewithwhenyouinstallthe
cableguardsontothehandle.
2
FillingtheCrankcasewithOil
NoPartsRequired
Procedure
Theenginecrankcaseisshippedwithoutoil.Before
startingtheengine,llthecrankcasewithoil.Theengine
crankcase(withoillter)canhold0.85L(29oz)ofoil.Use
onlyhigh-qualitySAE10W-30weightdetergentoilthathas
theAmericanPetroleumInstitute(API)serviceclassication
SH,SJ,orequivalent.
Beforeeachuse,ensurethattheoillevelisbetweentheAdd
andtheFullmarksonthedipstick(Figure6).
Figure6
1.Dipstick3.Addmark
2.Fullmark
Note:Whenthecrankcaseisempty,pourabout3/4ofthe
crankcasecapacityofoilinthecrankcase,thenfollowthe
procedureinthissection.
1.Movethemachineontoalevelsurface.
2.Cleanaroundthedipstick(Figure6).
3.Removethedipstickbyrotatingthecap
counterclockwiseandpullingitout.
4.Wipethedipstickcleanwithacleancloth.
5.Insertthedipstickintothellerneck,thenremovethe
dipstick.
6.Readtheoillevelonthedipstick.
8

•IftheoillevelisbelowtheAddmarkonthe
dipstick,slowlypourasmallamountofoilinto
theoil-lltube,wait3minutes,andrepeatsteps4
through6untiltheoillevelisattheFullmarkon
thedipstick.
•IftheoillevelisabovetheFullmarkonthe
dipstick,draintheexcessoiluntiltheoillevelon
thedipstickisattheFullmark.RefertoChanging
theEngineOil(page17).
Important:Iftheoillevelinthecrankcaseis
toolowortoohighandyouruntheengine,
youmaydamagetheengine.
7.Insertthedipstickintothellerneckandrotatethecap
clockwiseuntilitistight.
3
AdjustingtheSelf-PropelDrive
NoPartsRequired
Procedure
Important:Youmustadjusttheself-propel-drivecable
beforeyouoperatethemachineforthersttime.Refer
toAdjustingtheSelf-PropelDrive(page19).
4
AssemblingtheGrassBag
NoPartsRequired
Procedure
1.SlipthegrassbagovertheframeasshowninFigure7.
1
23
g027289
Figure7
1.Handle3.Grassbag
2.Frame
Note:Donotslipthebagoverthehandle(Figure7).
2.Hookthebottomchannelofthebagontothebottom
oftheframe(Figure8).
g027290
Figure8
3.Hookthetopandsidechannelsofthebagontothetop
andsidesoftheframe,respectively(Figure8).
9

ProductOverview
Figure9
1.Handle6.Sparkplug
2.Reardoor7.Cutting-heightlever(4)
3.Fuel-tankcap8.Oilll/dipstick
4.Throttle-controllever9.Grassbag
5.Aircleaner10.Blade-controlbar
Operation
Note:Determinetheleftandrightsidesofthemachine
fromthenormaloperatingposition.
Eachtimebeforeyoumow,ensurethattheself-propeldrive
andtheblade-controlbaroperateproperly.Whenyourelease
theblade-controlbar,thebladeandtheself-propeldrive
shouldstop.Iftheydonot,contactanAuthorizedService
Dealer.
CAUTION
Thismachineproducessoundlevelsinexcessof
85dBAattheoperator'searandcancausehearing
lossthroughextendedperiodsofexposure.
Wearhearingprotectionwhenoperatingthis
machine.
Figure10
1.Warning—wearhearingprotection.
CheckingtheEngine-OilLevel
ServiceInterval:Beforeeachuseordaily—Checkthe
engine-oillevel.
Beforeyouusethemachine,ensurethattheoillevelis
betweentheAddandtheFullmarksasshownonthedipstick
(Figure11).
Figure11
1.Dipstick3.Addmark
2.Fullmark
10

IftheoillevelisbelowtheAddmark,addoil.Referto2
FillingtheCrankcasewithOil(page8).
FillingtheFuelTankwith
Gasoline
DANGER
Gasolineisextremelyammableandexplosive.A
reorexplosionfromgasolinecanburnyouand
others.
•Topreventastaticchargefromignitingthe
gasoline,placethecontainerand/ormachine
directlyonthegroundbeforelling,notina
vehicleoronanobject.
•Fillthetankoutdoorswhentheengineiscold.
Wipeupspills.
•Donothandlegasolinewhensmokingoraround
anopenameorsparks.
•Storegasolineinanapprovedfuelcontainer,out
ofthereachofchildren.
•Forbestresults,useonlyclean,fresh(lessthan30days
old),unleadedgasolinewithanoctaneratingof87or
higher((R+M)/2ratingmethod).
•Oxygenatedfuelwithupto10%ethanolor15%MTBE
byvolumeisacceptable.
•Ethanol:Gasolinewithupto10%ethanol(gasohol)
or15%MTBE(methyltertiarybutylether)byvolume
isacceptable.EthanolandMTBEarenotthesame.
Gasolinewith15%ethanol(E15)byvolumeisnot
approvedforuse.Neverusegasolinethatcontains
morethan10%ethanolbyvolume,suchasE15
(contains15%ethanol),E20(contains20%ethanol),or
E85(containsupto85%ethanol).Usingunapproved
gasolinemaycauseperformanceproblemsand/orengine
damagewhichmaynotbecoveredunderwarranty.
•Donotusegasolinecontainingmethanol.
•Donotstorefueleitherinthefueltankorinfuel
containersoverthewinterunlessafuelstabilizerisused.
•Donotaddoiltogasoline.
Important:Toreducestartingproblems,addfuel
stabilizertothefuelallseason,mixingitwithgasoline
lessthan30daysold.
Note:Thecapacityofthefueltankis3.8L(1.0USgallon).
AdjustingtheCuttingHeight
Youcanchangethecuttingheightateachwheelbyadjusting
acutting-heightlever.Cuttingheightsare25mm(1inch),38
mm(1-1/2inches),51mm(2inches),64mm(2-1/2inches),
76mm(3inches),89mm(3-1/2inches),102mm(4inches),
114mm(4-1/2inches).
DANGER
Adjustingthecutting-heightleverscouldbringyour
handsintocontactwithamovingbladeandresult
inseriousinjury.
•Stoptheengineandwaitforallmovementto
stopbeforeadjustingthecuttingheight.
•Donotputyourngersunderthehousingwhen
adjustingthecuttingheight.
1.Pullthecutting-heightlevertowardthewheel(Figure
12)andmovethelevertothedesiredsetting.
Figure12
1.Rearcutting-heightlever(2)
2.Frontcutting-heightlever(2)
2.Releasethecutting-heightleverandseatitsecurelyin
thenotch.
3.Adjustallthewheelstothesamecutting-heightsetting.
11

StartingtheEngine
1.Connectthespark-plugwiretothesparkplug.
2.Openthefuelvalve(Figure13).
Figure13
1.Throttle-controllever2.Fuelvalve
3.Movethethrottle-controllever(Figure13)tothe
Chokeposition.
Note:Donotusethechokewhentheengineiswarm.
4.Pullthestarterhandlelightlyuntilyoufeelresistance,
thenpullitsharply.
Note:Allowtheropetoreturnslowlytotherope
guideonthehandle.
5.Whentheenginestarts,movethethrottle-controllever
totheFastposition.
StoppingtheEngine
Releasetheblade-controlbarandmovethethrottle-control
lever(Figure13)totheStopposition.
Note:Closethefuelvalve(Figure13)ifyouwillnotbe
startingtheenginesoonafterward.
OperatingtheSelf-Propel
DriveandEngagingthe
CuttingBlade
Thismachineisequippedwithablade-brakeclutch.
Important:Toensurethattheblade-brakeclutchis
workingproperly,refertoCheckingtheBlade-Brake
Clutch(page13).
Themachinehas3groundspeeds:1(slow),2(medium),
and3(fast).Theself-propel-driveleverislocatedbelowand
behindthefueltank(Figure14).
Figure14
1.Self-propel-drivelever
•Tooperatetheself-propeldrivewithoutengaging
theblade:Raisetheblade-controlbartothehandle
(Figure15).
G019671
1
Figure15
1.Raisetheblade-controlbartothehandle.
•Tooperatetheself-propeldriveandengagethe
blade:Movetheblade-controlbarallthewaytotheright
andraiseittothehandle(Figure16).
12

G019672
2
1
Figure16
1.Movetheblade-control
bartotheright.
2.Raisetheblade-control
bartothehandle.
•Todisengagetheself-propeldriveandtheblade:
Releasetheblade-controlbar.
Note:Youcanvarythegroundspeedbyincreasingor
decreasingthedistancebetweentheblade-controlbarandthe
handle.Lowerthebartodecreasethegroundspeedwhenyou
aremakingaturnorifthemachineismovingtoofastforyou.
Ifyoulowerthebartoofar,themachinestopsself-propelling.
Squeezethebarclosertothehandletoincreasetheground
speed.Whenyouholdthebartightagainstthehandle,the
machineself-propelsatthemaximumgroundspeed.Move
theself-propel-drivelevertotheNeutralpositionwhenyou
usethemachinefortrimming.
CheckingtheBlade-Brake
Clutch
Checktheblade-controlbarbeforeeachusetoensurethat
theblade-brakeclutchisoperatingproperly.
CheckingwiththeGrassBag
1.Installtheemptygrassbagonthemachine.
2.Starttheengine.
3.Engagetheblade.
Note:Thebagshouldbegintoinate,indicatingthat
thebladeisengagedandrotating.
4.Releasetheblade-controlbar.
Note:Ifthebagdoesnotimmediatelydeate,the
bladeisstillrotating.Theblade-brakeclutchmaybe
deterioratingand,ifignored,couldresultinanunsafe
operatingcondition.Havethemachineinspectedand
servicedbyanAuthorizedServiceDealer.
5.Stoptheengineandwaitforallmovingpartstostop.
CheckingwithouttheGrassBag
1.Movethemachineontoapavedsurfaceinanon-windy
area.
2.Setall4wheelstothe76mm(3inch)cutting-height
setting;refertoAdjustingtheCuttingHeight(page11).
3.Takeahalfsheetofnewspaperandcrumpleitintoa
ballsmallenoughtogounderthemachinehousing
(about76mmor3inchesindiameter).
4.Placethenewspaperballabout13cm(5inches)in
frontofthemachine(Figure17).
Figure17
5.Starttheengine.
6.Engagetheblade.
7.Releasetheblade-controlbar.
8.Immediatelypushthemachineoverthenewspaperball.
9.Stoptheengineandwaitforallmovingpartstostop.
10.Gotothefrontofthemachineandcheckthe
newspaperball.
Note:Ifthenewspaperballdidnotgounderthe
machine,repeatsteps4through10.
Note:Ifthenewspaperisunravelledorshredded,
thebladedidnotstopproperly,whichcouldresultin
anunsafeoperatingcondition.ContactanAuthorized
ServiceDealer.
RecyclingtheClippings
Thismachinecomesfromthefactoryreadytorecyclegrass
andleafclippingsbackintothelawn.Topreparethemachine
torecycle:
•Ifthegrassbagisonthemachine,removeit;referto
RemovingtheGrassBag(page14).
•Iftherear-dischargeplugisnotinstalled,gripitby
thehandle,raisethereardoor,andinsertitintothe
rear-dischargechuteuntilthelatchlocksintoplace
(Figure18).
13

Figure18
1.Rear-dischargeplug2.Reardoor
WARNING
Operatingthemachinetorecyclelawnclippings
withoutthepluginplaceallowsobjectstobe
throwninyourdirectionorinthedirectionof
bystanders.Also,contactwiththebladescould
occur.Thrownobjectsorbladecontactcancause
seriousinjuryordeath.
Ensurethattherear-dischargeplugisinplace
beforeyourecycletheclippings.Neverengagethe
bladeswithouteithertherear-dischargeplugorthe
grassbaginstalledonthemachine.
BaggingtheClippings
Usethegrassbagwhenyouwanttocollectgrassandleaf
clippingsfromthelawn.
WARNING
Aworngrassbagcouldallowsmallstonesand
othersimilardebristobethrowntowardyouor
bystanders,resultinginseriouspersonalinjuryor
death.
Checkthegrassbagfrequently.Ifitisdamaged,
installanewTororeplacementbag.
WARNING
Thebladesaresharp;contactingthebladescan
resultinseriouspersonalinjury.
Stoptheengineandwaitforallmovingpartstostop
beforeleavingtheoperatingposition.
InstallingtheGrassBag
1.Stoptheengineandwaitforallmovingpartstostop.
2.Raiseandholdupthereardoor(Figure19).
Figure19
1.Reardoor3.Notch(2)
2.Bag-rodend(2)
3.Removetherear-dischargeplugbypushinginthelatch
withyourthumbandpullingtheplugoutfromthe
machine(Figure18).
4.Installthebag-rodendsintothenotchesatthebaseof
thehandle,androckthebagbackandforthtoensure
thatthebag-rodendsareseatedatthebottomofboth
notches(Figure19).
5.Lowerthereardooruntilitrestsonthegrassbag.
RemovingtheGrassBag
DANGER
Themachinecanthrowgrassclippingsandother
objectsthroughanopeninginthemowerhousing.
Objectsthrownwithenoughforcecouldcause
seriouspersonalinjuryordeathtoyouorto
bystanders.
•Neverremovethegrassbagandthenstartthe
enginewithoutthedischargepluginstalledon
themachine.
•Neveropenthereardooronthemachinewhen
theengineisrunning.
1.Stoptheengineandwaitforallmovingpartstostop.
2.Raisethereardoor.
3.Removethebagrodonthegrassbagfromthenotches
atthebaseofthehandle(Figure19).
4.Installthedischargeplug;refertoRecyclingthe
Clippings(page13).
5.Lowerthereardoor.
14

OperatingTips
GeneralTips
•Reviewthesafetyinstructionsandreadthismanual
carefullybeforeoperatingthemachine.
•Cleartheareaofsticks,stones,wire,branches,andother
debristhatthebladecouldhitandthrow.
•Keepeveryone,especiallychildrenandpets,awayfrom
theareaofoperation.
•Avoidstrikingtrees,walls,curbs,orothersolidobjects.
Neverdeliberatelymowoveranyobject.
•Ifthemachinestrikesanobjectorstartstovibrate,
immediatelystoptheengine,disconnectthewirefrom
thesparkplug,andexaminethemachinefordamage.
•Maintainasharpbladethroughoutthecuttingseason.
Periodicallyledownnicksontheblade.
•ReplacethebladewhennecessarywithanoriginalToro
replacementblade.
•Mowonlydrygrassorleaves.Wetgrassandleavestend
toclumpontheyardandcancausethemachinetoplug
ortheenginetostall.
WARNING
Wetgrassorleavescancauseseriousinjuryif
youslipandcontacttheblade.
Mowonlyindryconditions.
•Cleanunderthemachineaftereachmowing;referto
CleaningundertheMachine(page23).
•Keeptheengineingoodrunningcondition.
•Cleantheairlterfrequently.Mulchingstirsupmore
clippingsanddustwhichclogstheairlterandreduces
engineperformance.
•Settheenginespeedtothefastestpositionforthebest
cuttingresults.
WARNING
Operatingamachinewithitsenginerunning
ataspeedgreaterthanthefactorysettingcan
causethemachinetothrowapartofthebladeor
engineatyouorbystanders,resultinginserious
personalinjuryordeath.
–Donotchangetheenginespeedsetting.
–Ifyoususpecttheenginespeedisfaster
thannormal,contactanAuthorizedService
Dealer.
CuttingGrass
•Grassgrowsatdifferentratesatdifferenttimesofthe
year.Inthesummerheat,itisbesttocutgrassatthe64
mm(2-1/2inch),76mm(3inch),or89mm(3-1/2inch)
cutting-heightsettings.Cutonlyaboutathirdofthegrass
bladeatatime.Donotcutbelowthe64mm(2-1/2inch)
settingunlessthegrassissparseoritislatefallwhen
grassgrowthbeginstoslowdown.
•Whencuttinggrassover15cm(6inches)tall,rstmow
atthehighestcuttingheightsettingandwalkslower;then
mowagainatalowersettingforthebestlawnappearance.
Ifthegrassistoolongandtheleavesclumpontopofthe
lawn,themachinemayplugandcausetheenginetostall.
•Alternatethemowingdirection.Thishelpsdispersethe
clippingsoverthelawnforevenfertilization.
Ifthenishedlawnappearanceisunsatisfactory,try1or
moreofthefollowing:
•Sharpentheblade.
•Walkataslowerpacewhilemowing.
•Raisethecuttingheightonyourmachine.
•Cutthegrassmorefrequently.
•Overlapcuttingswathsinsteadofcuttingafullswath
witheachpass.
•Setthecuttingheightonthefrontwheelsanotchlower
thantherearwheels.Forexample,setthefrontwheels
at64mm(2-1/2inches)andtherearwheelsat76mm
(3inches).
CuttingLeaves
•Aftercuttingthelawn,ensurethathalfofthelawnshows
throughthecutleafcover.Youmayneedtomakemore
thanasinglepassovertheleaves.
•Forlightleafcoverage,setallthewheelsatthesame
cuttingheightsetting.
•Iftherearemorethan13cm(5inches)ofleavesonthe
lawn,setthefrontcuttingheight1or2notcheshigher
thantherearcuttingheight.Thismakesiteasiertofeed
theleavesunderthemachine.
•Slowdownyourmowingspeedifthemachinedoesnot
cuttheleavesnelyenough.
15

Maintenance
Note:Determinetheleftandrightsidesofthemachinefromthenormaloperatingposition.
RecommendedMaintenanceSchedule(s)
MaintenanceService
IntervalMaintenanceProcedure
Aftertherst8hours•Changetheengineoilandtheoillter.
Aftertherst25hours•Tightenanyloosefasteners.
Beforeeachuseordaily
•Checktheengine-oillevel.
•Inspectthemowerbladesforwearordamage.
•Inspecttheacceleratorforwearordamage.
•Removegrassclippingsanddirtfromunderthehousing.
•Checkthestoppingtimeofthebladebrake.Theblademuststopwithin3seconds
ofreleasingtheblade-controlbar;ifitdoesnot,contactanAuthorizedService
Dealerforrepair.
•Checkforlooseormissingfastenersontheengine.
•Checkforfueloroilleaks.
•Checkorcleantherecoilstarterandtheair-intakescreen.
Every25hours•Cleanthefoampre-cleaner(morefrequentlyindustyconditions).
Every50hours
•Sharpenorreplacetheblade.Maintainitmorefrequentlyiftheedgedullsquicklyin
roughorinsandyconditions.
•Removegrassclippingsanddebrisfromunderthebeltcover.
•Cleantheblade-brake-clutchshield.
Every100hours
•Changetheengineoil.
•Inspect,clean,andadjustthesparkpluggap;replacethesparkplugifnecessary.
•Tightenanyloosefasteners.
•Checkorcleantherecoilstarterandtheair-intakescreen.
Every200hours
•Changetheengine-oillter.
•Haveanauthorizedengineservicingdealercheckforleaksinthefuelsystemand/or
adeterioratingfuelhose.Replacepartsifnecessary.
Every300hours
•Replacethepaperairlter(morefrequentlyindustyconditions).
•Cleanthecylinderandthecylinder-headns.
•Haveanauthorizedengineservicingdealercheckandadjusttheengineidlespeed.
•Haveanauthorizedengineservicingdealercleanthecombustionchamber.
•Haveanauthorizedengineservicingdealercheckandadjustthevalveclearance.
•Haveanauthorizedengineservicingdealercleanandlapthevalveseatingsurface.
Important:Refertoyourengineowner'smanualforadditionalmaintenanceprocedures.
CAUTION
Ifyouleavethewireonthesparkplug,someonecouldaccidentlystarttheengineandseriouslyinjure
youorotherbystanders.
Disconnectthewirefromthesparkplugbeforeyoudoanymaintenance.Setthewireasidesothatitdoes
notaccidentlycontactthesparkplug.
16

EngineMaintenance
ServicingtheAirCleaner
ServiceInterval:Every25hours—Cleanthefoam
pre-cleaner(morefrequentlyindusty
conditions).
Every300hours—Replacethepaperairlter(more
frequentlyindustyconditions).
Important:Donotoperatetheenginewithoutthe
airlterassemblyinplace;otherwise,extremeengine
damagewilloccur.
1.Stoptheengineandwaitforallmovingpartstostop.
2.Disconnectthewirefromthesparkplug.
3.Removethecoverandcleanitthoroughly(Figure20).
Figure20
1.Cover3.Air-cleanerbase
2.Foampre-cleanerand
paperairlter
4.Removeandthefoampre-cleanerandthepaper-air
lterfromtheair-cleanerbase(Figure20)
5.Removethefoampre-cleanerfromthepaperairlter,
andwashthefoampre-cleanerwithamilddetergent
andwater,thenblotitdry.
6.Inspectthepaperairlter,andreplaceitifitis
excessivelydirty.
Important:Donottrytocleanapaperlter.
7.Installthefoampre-cleanerontothepaperairlter.
8.Installthefoampre-cleanerandpaperairlteronto
theair-cleanerbase.
9.Installthecover.
ChangingtheEngineOil
ServiceInterval:Aftertherst8hours
Every100hours
OilCapacity
Withoillter0.85L(29oz)
Withoutoillter0.65L(22oz)
1.Runtheenginetowarmtheengineoil.
Note:Warmoilowsbetterandcarriesmore
contaminants.
WARNING
Oilmaybehotafterenginehasbeenrun,and
contactwithhotoilcancauseseverepersonal
injury.
Avoidcontactingthehotengineoilwhenyou
drainit.
2.Stoptheengineandwaitforallmovingpartstostop.
3.Disconnectthewirefromthesparkplug.
4.Closethefuelvalve(Figure13).
5.Drainthegasolinefromthefueltank.
6.Placeasuitabledrainpanunderthedipstick/oildrain.
7.Cleanaroundthedipstick.
8.Removethedipstickbyrotatingthecap
counterclockwiseandpullingitout.
9.Tipthemachineontoitsrightside(airlterup)to
draintheoilintothedrainpan.
10.Afterdrainingtheoil,returnthemachinetothe
operatingposition.
11.FillthecrankcasetotheFullmarkonthedipstickwith
freshoil;referto2FillingtheCrankcasewithOil(page
8).
12.Insertthedipstickintothellerneckandrotatethecap
clockwiseuntilitistight.
13.Wipeupanyspilledoil.
14.Recycletheusedoilaccordingtolocalcodes.
17

ChangingtheEngine-OilFilter
ServiceInterval:Every200hours
1.Runtheenginetowarmtheoil.
WARNING
Oilmaybehotaftertheenginehasbeenrun,
andcontactwithhotoilcancausesevere
personalinjury.
Avoidcontactingthehotengineoilwhenyou
drainit.
2.Stoptheengineandwaitforallmovingpartstostop.
3.Disconnectthewirefromthesparkplug.
4.Drainthegasolinefromthefueltank.
5.Draintheengineoil;refertoChangingtheEngineOil
(page17).
6.Placearagundertheoillter(Figure21)tocatchany
oilthatmayleakoutasyouremovetheoillter.
Figure21
1.Oillter
7.Removetheoillter.
8.Useyourngertocoatthegasketonthenewoillter
withoil(Figure26).
Figure22
1.Gasket
9.Installthenewlterbyrotatingitclockwiseuntilthe
sealcontactsthelterhousing,thenrotatethelteran
additional3/4turnbyhand.
10.FillthecrankcasetotheFulllineonthedipstickwith
freshoil;referto2FillingtheCrankcasewithOil(page
8).
11.Connectthewiretothesparkplug.
12.Runtheengineforabout3minutes.
13.Stoptheengine,waitforallmovingpartstostop,and
checkforoilleakagearoundthelter.
14.Addoiltocompensatefortheoilintheoillter.Refer
toCheckingtheEngine-OilLevel(page10).
15.Recycletheusedoillterproperly.
18

ServicingtheSparkPlug
ServiceInterval:Every100hours—Inspect,clean,and
adjustthesparkpluggap;replacethe
sparkplugifnecessary.
UseanNGKBPR5ESsparkplugorequivalent.
1.Stoptheengineandwaitforallmovingpartstostop.
2.Disconnectthewirefromthesparkplug.
3.Cleanaroundthesparkplug.
4.Removethesparkplugfromthecylinderhead.
Important:Replaceacracked,fouled,ordirty
sparkplug.Donotcleantheelectrodesbecause
gritenteringthecylindercandamagetheengine.
5.Setthegapontheplugto0.76mm(0.030inch);refer
toFigure23.
Figure23
1.Center-electrodeinsulator
2.Sideelectrode
3.Airgap(nottoscale)
6.Carefullyinstallthesparkplugbyhand(toavoidcross
threading)untilitishandtight.
7.Tightenthesparkplugto23N-m(2.3kgf-m,17ft-lb).
Important:Aloosesparkplugcanbecomevery
hotandcandamagetheengine;overtighteninga
sparkplugmaydamagethethreadsinthecylinder
head.
8.Connectthewiretothesparkplug.
DriveSystem
Maintenance
AdjustingtheSelf-PropelDrive
Ifthemachineisnew,doesnotself-propel,orittendsto
creepforward,adjustthedrivecable.
1.Movethemachineoutsideandontoapavedsurface
nearasolidwalltosafelypreventthemachinefrom
movingforwardwhiletheengineisrunning.
2.Positionthemachinewiththefronttiresagainstthe
wall.
Note:Ensurethattheareaiswellventilatedandclear
ofdebristhatcouldbethrownbythemachine.
3.Shiftthetransmissiontothirdgear.
4.Starttheengine;refertoStartingtheEngine(page12).
5.Pulltheself-propel-drivebartothehandle.
Note:Thewheelsshouldstarttoturnasthe
self-propel-drivebarjusttouchesthehandle.
6.Shutofftheengine.
7.Ifyoumustadjustthemachine,dothefollowing:
•Ifthewheelsdonotspinwhenyouengagethe
self-propel-drivebar,thetractionbeltistooloose.
Rotatethewheel-drive-controlknob(Figure24)
clockwise1turnandrepeatsteps4through6.
Figure24
1.Wheel-drive-controlknob
•Ifthewheelsspinbeforeyoufullyengagethe
self-propel-drivebar,thetractionbeltistootight.
Rotatethewheel-drive-controlknob(Figure24)
counterclockwise1turnandrepeatsteps4through
6.
8.Foranewtractionbelt,rotatethedrivecable
adjustmentknobclockwise1additionalturntoallow
forthenormalstretchingofthebeltduringthebreak-in
period.
Note:Youcanskipthisstepifyouareadjustinga
usedbelt.
19

BladeMaintenance
MaintainingtheBlade
Alwaysmowwithasharpblade.Asharpbladecutscleanly
andwithouttearingorshreddingthegrassblades.
1.Stoptheengineandwaitforallmovingpartstostop.
2.Disconnectthewirefromthesparkplug.
3.Closethefuelvalvebymovingthefuel-valveleverto
theleft(Figure13).
4.Drainthegasolinefromthefueltank.
5.Tipthemachineontoitsrightside(aircleanerup)as
showninFigure25.
Figure25
1.Blade3.Accelerator
2.Bladenuts
InspectingtheBlade
ServiceInterval:Beforeeachuseordaily—Inspectthe
mowerbladesforwearordamage.
Carefullyexaminethebladeforsharpnessandwear,especially
wheretheatandthecurvedpartsmeet(Figure26A).
Becausesandandabrasivematerialcanwearawaythemetal
thatconnectstheatandcurvedpartsoftheblade,check
thebladebeforeusingthemachine.Ifyounoticeaslotor
wear(Figure26BandFigure26C),replacetheblade;referto
RemovingtheBlade(page21).
Figure26
1.Sail3.Wear
2.Flatpartoftheblade4.Slotformed
Note:Forthebestperformance,installanewbladebefore
themowingseasonbegins.Duringtheyear,ledownany
smallnickstomaintainthecuttingedge.
DANGER
Awornordamagedbladecanbreak,andapiece
ofthebladecouldbethrowninyourdirectionor
inthedirectionofbystanders,resultinginserious
personalinjuryordeath.
•Inspectthebladeperiodicallyforwearor
damage.
•Replaceawornordamagedblade.
InspectingtheAccelerator
ServiceInterval:Beforeeachuseordaily—Inspectthe
acceleratorforwearordamage.
Carefullyexaminetheacceleratorforexcessivewear(Figure
27).Becausesandandabrasivematerialcanwearawaythe
metal(especiallyintheareashownasitem2inFigure27),
checktheacceleratorbeforeusingthemachine.Ifyounotice
thatatabontheacceleratorhasbeenworndowntoasharp
edgeorthereisacrack,replacetheaccelerator;referto
RemovingtheBlade(page21).
1 2 3
4
g027496
Figure27
1.Accelerator3.Tab
2.Weararea4.Crackformed
20
Other manuals for 22298
2
Table of contents
Other Toro Lawn Mower manuals

Toro
Toro TimeCutter SS 4200 User manual

Toro
Toro 30339 User manual

Toro
Toro 407570000 User manual

Toro
Toro Groundsmaster 360 User manual

Toro
Toro TimeCutter HD X4850 User manual

Toro
Toro GrandStand 74504 User manual

Toro
Toro 74385 TimeCutter ZS 3200 User manual

Toro
Toro Z Master 74141TE Manual

Toro
Toro 70082 User manual

Toro
Toro Super Recycler 20057 User manual