Toro 30857 User manual

FormNo.3366-738RevC
Groundsmaster®4500-Dor
4700-DTractionUnit
ModelNo.30857—SerialNo.310000501andUp
ModelNo.30858—SerialNo.310000501andUp
ToregisteryourproductordownloadanOperator'sManualorPartsCatalogatnocharge,gotowww.Toro.com.OriginalInstructions(EN)

ThisproductcomplieswithallrelevantEuropean
directives,fordetailspleaseseetheseparateproduct
specicDeclarationofConformity(DOC)sheet.
WARNING
CALIFORNIA
Proposition65Warning
Dieselengineexhaustandsomeofits
constituentsareknowntotheStateof
Californiatocausecancer,birthdefects,
andotherreproductiveharm.
Becauseinsomeareastherearelocal,state,orfederal
regulationsrequiringthatasparkarresterbeusedonthe
engineofthismachine,asparkarresterisincorporated
withthemuferassembly.
GenuineTorosparkarrestersareapprovedbytheUSDA
ForestryService.
Important:Thisengineisequippedwithaspark
arrestermufer.ItisaviolationofCaliforniaPublic
ResourceCodeSection4442touseoroperate
theengineonanyforest-covered,brush-covered,
orgrass-coveredlandwithoutasparkarrester
mufermaintainedinworkingorder,ortheengine
constricted,equipped,andmaintainedforthe
preventionofre.Otherstatesorfederalareasmay
havesimilarlaws.
ThissparkignitionsystemcomplieswithCanadian
ICES-002.
Theenclosed
Engine Owner's Man ual
issupplied
forinformationregardingtheUSEnvironmental
ProtectionAgency(EPA)andtheCalifornia
EmissionControlRegulationofemissionsystems,
maintenance,andwarranty.Replacementsmaybe
orderedthroughtheenginemanufacturer.
Introduction
Thismachineisaride-on,rotary-bladelawnmower
intendedtobeusedbyprofessional,hiredoperatorsin
commercialapplications.Itisprimarilydesignedfor
cuttinggrassonwell-maintainedlawnsinparks,golf
courses,sportselds,andoncommercialgrounds.Itis
notdesignedforcuttingbrush,mowinggrassandother
growthalongsidehighways,orforagriculturaluses.
Readthisinformationcarefullytolearnhowtooperate
andmaintainyourproductproperlyandtoavoidinjury
andproductdamage.Youareresponsibleforoperating
theproductproperlyandsafely.
YoumaycontactTorodirectlyatwww.Toro.comfor
productandaccessoryinformation,helpndingadealer,
ortoregisteryourproduct.
Wheneveryouneedservice,genuineToroparts,
oradditionalinformation,contactanAuthorized
ServiceDealerorToroCustomerServiceandhave
themodelandserialnumbersofyourproductready.
Figure1identiesthelocationofthemodelandserial
numbersontherightfrontframememberofthe
product.Writethenumbersinthespaceprovided.
Figure1
1.Modelandserialnumberlocation
ModelNo.
SerialNo.
Thismanualidentiespotentialhazardsandhassafety
messagesidentiedbythesafetyalertsymbol(Figure2),
whichsignalsahazardthatmaycauseseriousinjury
ordeathifyoudonotfollowtherecommended
precautions.
Figure2
1.Safetyalertsymbol.
Thismanualusestwootherwordstohighlight
information.Importantcallsattentiontospecial
mechanicalinformationandNoteemphasizesgeneral
informationworthyofspecialattention.
©2012—TheToro®Company
8111LyndaleAvenueSouth
Bloomington,MN554202
Contactusatwww.Toro.com.
PrintedintheUSA.
AllRightsReserved

Contents
Introduction.................................................................2
Safety...........................................................................4
SafeOperatingPractices.......................................4
ToroRidingMowerSafety....................................6
SoundPowerLevel...............................................7
SoundPressureLevel...........................................7
VibrationLevel....................................................7
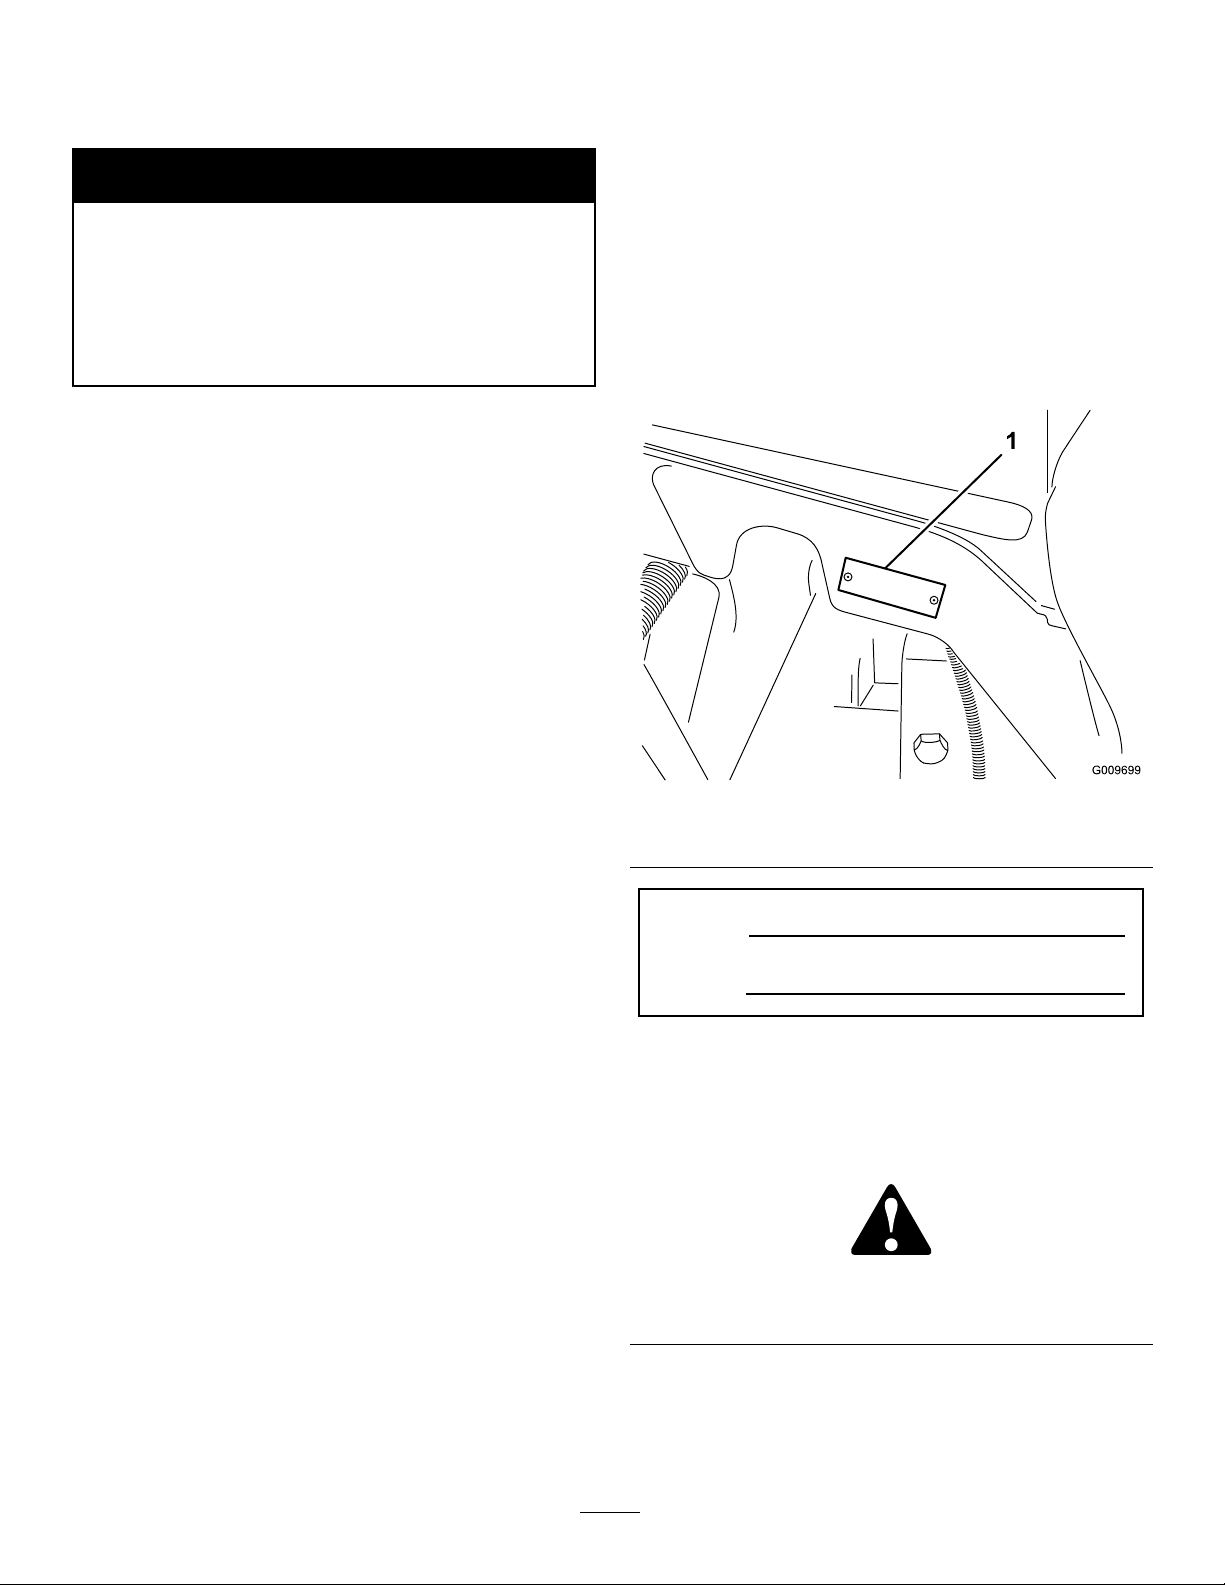
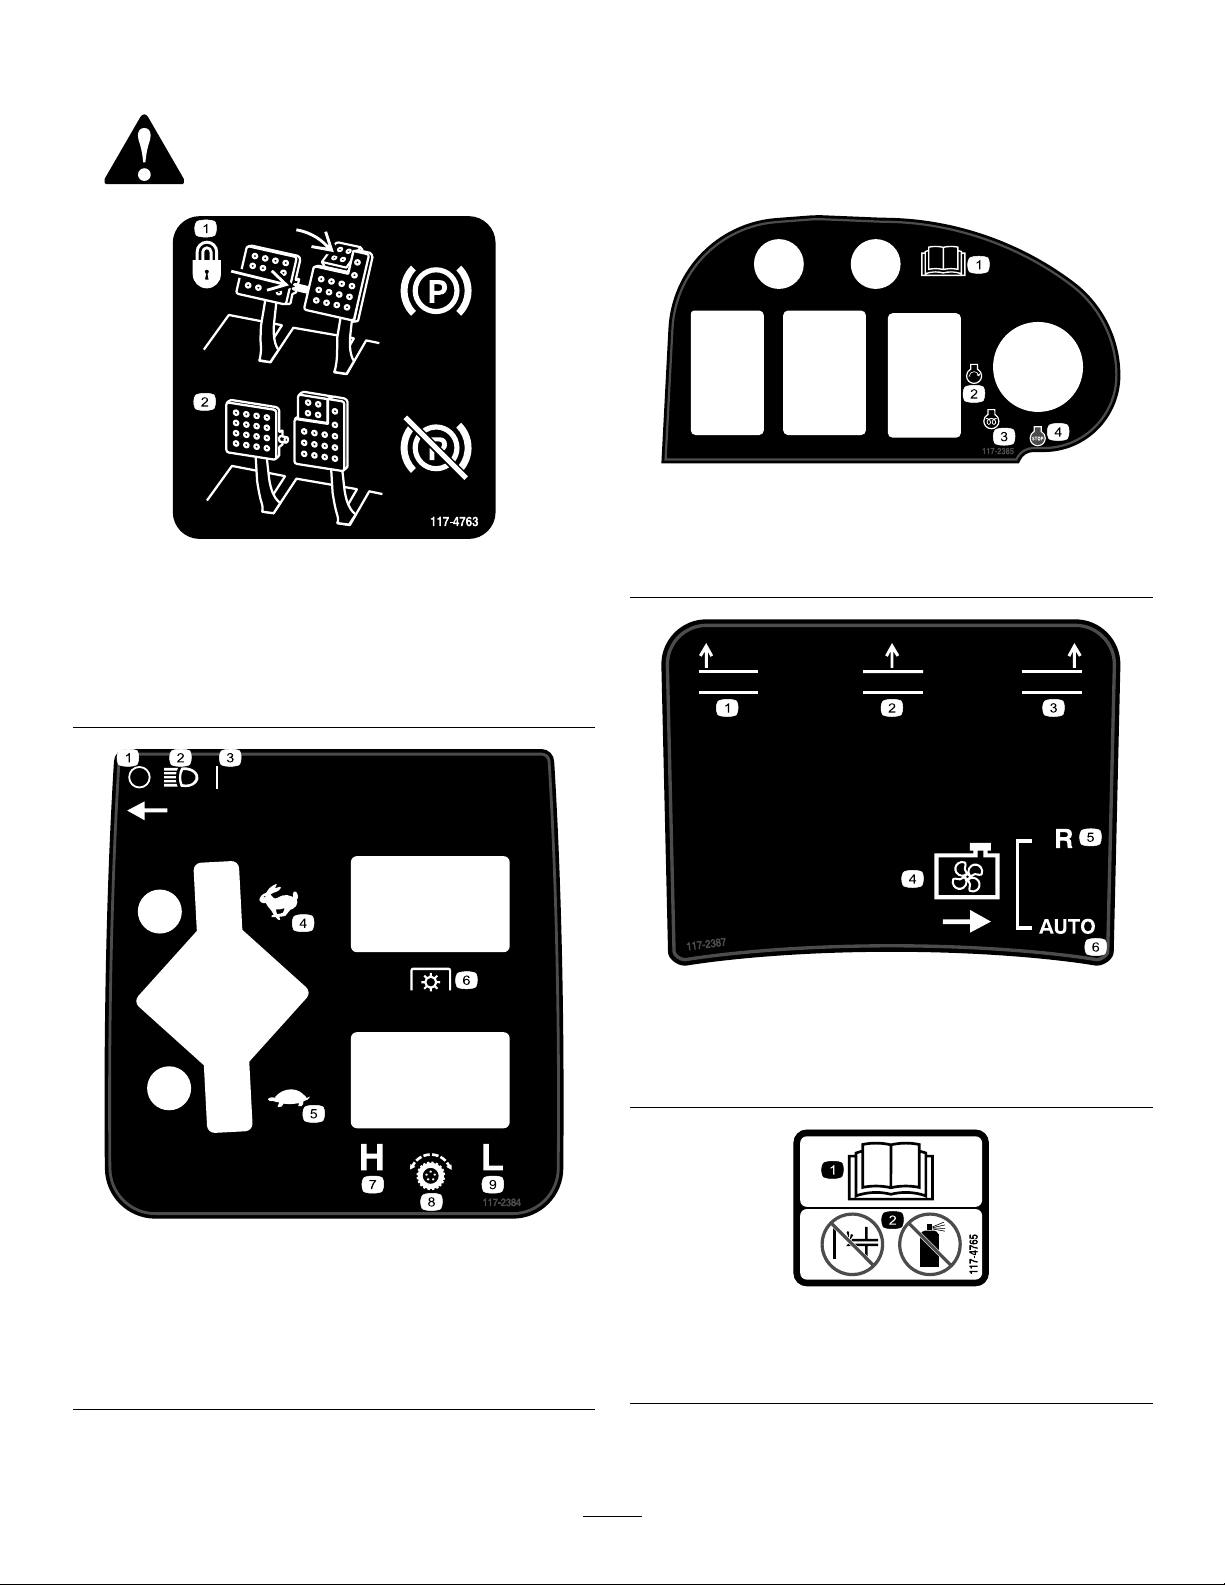
SafetyandInstructionalDecals.............................8
Setup.........................................................................12
1ReplacingtheWarningDecalforCE
Compliance....................................................13
2InstallingtheHoodLatch(CEOnly)................13
3InstallingtheThrottleStopforCE
CompliancewhenInstallingOptionalHigh
LiftBlades......................................................14
4GreasingtheMachine......................................14
5CheckingFluidLevels......................................14
ProductOverview......................................................15
Controls.............................................................15
Specications.....................................................19
TractionUnitSpecications................................19
Attachments/Accessories...................................19
Operation...................................................................20
CheckingtheEngineOilLevel............................20
CheckingtheCoolingSystem..............................20
FillingtheFuelTank...........................................21
CheckingtheHydraulicFluidLevel.....................22
CheckingtheTirePressure.................................23
StartingandStoppingtheEngine........................23
CheckingtheInterlockSwitches.........................24
PushingorTowingtheMachine..........................24
JackingPoints.....................................................25
TieDowns.........................................................25
OperatingCharacteristics...................................25
EngineCoolingFanOperation...........................25
OperatingTips...................................................26
Maintenance...............................................................27
RecommendedMaintenanceSchedule(s)................27
DailyMaintenanceChecklist...............................28
ServiceIntervalChart.........................................29
PremaintenanceProcedures....................................30
RemovingtheHood...........................................30
Lubrication.............................................................30
GreasingtheBearingsandBushings....................30
EngineMaintenance...............................................32
ServicingtheAirCleaner....................................32
ServicingtheEngineOilandFilter......................33
AdjustingtheThrottle........................................34
FuelSystemMaintenance.......................................34
FuelTank...........................................................34
FuelLinesandConnections................................34
ServicingtheWaterSeparator.............................34
FuelPickupTubeScreen....................................35
BleedingAirfromtheInjectors...........................35
ElectricalSystemMaintenance................................36
ChargingandConnectingtheBattery..................36
BatteryCare.......................................................37
Fuses..................................................................37
DriveSystemMaintenance.....................................38
CheckingtheTorqueoftheWheel
Nuts...............................................................38
CheckingthePlanetaryGearDrive
Oil..................................................................38
ChangingthePlanetaryGearDrive
Oil..................................................................39
CheckingtheRearAxleLubricant.......................39
ChangingtheRearAxleLubricant.......................40
AdjustingtheTractionDriveforNeutral.............40
CheckingtheRearWheelToe-In.........................40
CoolingSystemMaintenance..................................41
ServicingtheEngineCoolingSystem..................41
BrakeMaintenance.................................................42
AdjustingtheServiceBrakes...............................42
BeltMaintenance....................................................43
ServicingtheAlternatorBelt...............................43
HydraulicSystemMaintenance...............................43
ChangingtheHydraulicFluid.............................43
ReplacingtheHydraulicFilters...........................43
CheckingtheHydraulicLinesandHoses.............44
ChangingtheCounterbalanceSettings................44
Cleaning.................................................................46
ServicingtheSparkArrestorMufer...................46
Storage.......................................................................46
TractionUnit......................................................46
Engine...............................................................46
Schematics.................................................................47
3

Safety
ThismachinemeetsorexceedsCENstandardEN
836:1997(whenappropriatedecalsapplied),andANSI
B71.4-2004specicationsineffectatthetimeof
production.
Improperuseormaintenancebytheoperatoror
ownercanresultininjury.Toreducethepotential
forinjury,complywiththesesafetyinstructions
andalwayspayattentiontothesafetyalertsymbol,
whichmeansCAUTION,WARNING,orDANGER-
"personalsafetyinstruction."Failuretocomplywiththe
instructionmayresultinpersonalinjuryordeath.
SafeOperatingPractices
ThefollowinginstructionsarefromtheCENstandard
EN836:1997,ISOstandard5395:1990,andANSI
B71.4-2004.
Training
•Readtheoperator'smanualandothertraining
materialcarefully.Befamiliarwiththecontrols,
safetysigns,andtheproperuseoftheequipment.
•Iftheoperatorormechaniccannotreadthelanguage
ofthismanual,itistheowner'sresponsibilityto
explainthismaterialtothem.
•Neverallowchildrenorpeopleunfamiliarwiththese
instructionstouseorservicethemower.Local
regulationsmayrestricttheageoftheoperator.
•Nevermowwhilepeople,especiallychildren,orpets
arenearby.
•Keepinmindthattheoperatororuserisresponsible
foraccidentsorhazardsoccurringtootherpeopleor
theirproperty.
•Donotcarrypassengers.
•Alldriversandmechanicsshouldseekandobtain
professionalandpracticalinstruction.Theowneris
responsiblefortrainingtheusers.Suchinstruction
shouldemphasize:
–theneedforcareandconcentrationwhen
workingwithride-onmachines;
–controlofaride-onmachineslidingonaslope
willnotberegainedbytheapplicationofthe
brake.Themainreasonsforlossofcontrolare:
◊insufcientwheelgrip;
◊beingdriventoofast;
◊inadequatebraking;
◊thetypeofmachineisunsuitableforthetask;
◊lackofawarenessoftheeffectofground
conditions,especiallyslopes;
•Theowner/usercanpreventandisresponsiblefor
accidentsorinjuriesoccurringtohimselforherself,
otherpeople,orproperty.
Preparation
•Whilemowing,alwayswearsubstantialfootwear,
longtrousers,hardhat,safetyglasses,andhearing
protection.Longhair,looseclothing,orjewelrymay
gettangledinmovingparts.Donotoperatethe
equipmentwhenbarefootorwearingopensandals.
•Thoroughlyinspecttheareawheretheequipment
istobeusedandremoveallobjectswhichmaybe
thrownbythemachine.
•Warning-Fuelishighlyammable.Takethe
followingprecautions:
–Storefuelincontainersspecicallydesignedfor
thispurpose.
–Refueloutdoorsonlyanddonotsmokewhile
refueling.
–Addfuelbeforestartingtheengine.Never
removethecapofthefueltankoraddfuelwhile
theengineisrunningorwhentheengineishot.
–Iffuelisspilled,donotattempttostartthe
enginebutmovethemachineawayfromthe
areaofspillageandavoidcreatinganysourceof
ignitionuntilfuelvaporshavedissipated.
–Replaceallfueltankandcontainercapssecurely.
•Replacefaultysilencers/mufers.
•Evaluatetheterraintodeterminewhataccessories
andattachmentsareneededtoproperlyand
safelyperformthejob.Onlyuseaccessoriesand
attachmentsapprovedbythemanufacturer.
•Checkthatoperator'spresencecontrols,safety
switchesandshieldsareattachedandfunctioning
properly.Donotoperateunlesstheyarefunctioning
properly.
Operation
•Donotoperatetheengineinaconnedspacewhere
dangerouscarbonmonoxidefumescancollect.
•Mowonlyindaylightoringoodarticiallight.
•Beforeattemptingtostarttheengine,disengageall
bladeattachmentclutches,shiftintoneutral,and
engagetheparkingbrake.
•Donotputhandsorfeetnearorunderrotatingparts.
Keepclearofthedischargeopeningatalltimes.
4

•Rememberthereisnosuchthingasasafeslope.
Travelongrassslopesrequiresparticularcare.To
guardagainstoverturning:
–donotstoporstartsuddenlywhengoingupor
downhill;
–machinespeedsshouldbekeptlowonslopes
andduringtightturns;
–stayalertforhumpsandhollowsandother
hiddenhazards;
–nevermowacrossthefaceoftheslope,unless
themowerisdesignedforthispurpose.
–Usecounterweight(s)orwheelweightswhen
suggestedintheoperator'smanual.
•Stayalertforholesintheterrainandotherhidden
hazards.
•Watchoutfortrafcwhencrossingornearroadways.
•Stopthebladesfromrotatingbeforecrossing
surfacesotherthangrass.
•Neveroperatethemachinewithdamagedguards,
shields,orwithoutsafetyprotectivedevicesinplace.
Besureallinterlocksareattached,adjustedproperly,
andfunctioningproperly.
•Donotchangetheenginegovernorsettingsor
overspeedtheengine.Operatingtheengineat
excessivespeedmayincreasethehazardofpersonal
injury.
•Beforeleavingtheoperator'sposition:
–stoponlevelground;
–disengagethepowertake-offandlowerthe
attachments;
–settheparkingbrake;
–stoptheengineandremovethekey.
Important:Allowenginetoidlefor5
minutesbeforeshuttingitoffafterafull
loadoperation.Failuretodosomayleadto
turbo-chargertrouble.
•Stoptheengine
–beforerefuelling;
–beforemakingheightadjustment.
–beforeclearingblockages;
–beforechecking,cleaningorworkingonthe
mower;
–afterstrikingaforeignobjectorifanabnormal
vibrationoccurs.Inspectthemowerfordamage
andmakerepairsbeforerestartingandoperating
theequipment.
•Reducethethrottlesettingduringenginerun-out.
•Keephandsandfeetawayfromthecuttingunits.
•Lookbehindanddownbeforebackinguptobesure
ofaclearpath.
•Slowdownandusecautionwhenmakingturnsand
crossingroadsandsidewalks.Stopbladesfrom
rotating.
•Beawareofthemowerdischargedirectionanddo
notpointitatanyone.
•Donotoperatethemowerundertheinuenceof
alcoholordrugs
•Lightningcancausesevereinjuryordeath.If
lightningisseenorthunderisheardinthearea,do
notoperatethemachine;seekshelter.
•Usecarewhenloadingorunloadingthemachine
intoatrailerortruck
•Usecarewhenapproachingblindcorners,shrubs,
trees,orotherobjectsthatmayobscurevision.
MaintenanceandStorage
•Keepallnuts,boltsandscrewstighttobesurethe
equipmentisinsafeworkingcondition.
•Neverstoretheequipmentwithfuelinthetank
insideabuildingwherefumesmayreachanopen
ameorspark.
•Allowtheenginetocoolbeforestoringinany
enclosure.
•Toreducetherehazard,keeptheengine,
silencer/mufer,batterycompartmentandfuel
storageareafreeofgrass,leaves,orexcessivegrease.
•Keepallpartsingoodworkingconditionandall
hardwareandhydraulicttingstightened.Replaceall
wornordamagedpartsanddecals.
•Ifthefueltankhastobedrained,dothisoutdoors.
•Becarefulduringadjustmentofthemachineto
prevententrapmentofthengersbetweenmoving
bladesandxedpartsofthemachine.
•Onmulti-spindlemowers,takecareasrotatingone
bladecancauseotherbladestorotate.
•Disengagedrives,lowerthecuttingunits,setparking
brake,stopengineandremoveignitionkey.Waitfor
allmovementtostopbeforeadjusting,cleaningor
repairing.
•Cleangrassanddebrisfromcuttingunits,drives,
silencers/mufers,andenginetohelppreventres.
Cleanupoilorfuelspillage.
•Usejackstandstosupportcomponentswhen
required.
•Carefullyreleasepressurefromcomponentswith
storedenergy.
5

•Disconnectbatterybeforemakinganyrepairs.
Disconnectthenegativeterminalrstandthe
positivelast.Reconnectpositiverstandnegative
last.
•Usecarewhencheckingtheblades.Wearglovesand
usecautionwhenservicingthem.
•Keephandsandfeetawayfrommovingparts.If
possible,donotmakeadjustmentswiththeengine
running.
•Chargebatteriesinanopenwellventilatedarea,
awayfromsparkandames.Unplugchargerbefore
connectingordisconnectingfrombattery.Wear
protectiveclothinganduseinsulatedtools.
•Storethemachinewiththecuttingunitsinthe
loweredpositionorsecurethewingdeckswiththe
storagelatchestopreventthemfromunintentionally
lowering.
ToroRidingMowerSafety
Thefollowinglistcontainssafetyinformationspecic
toToroproductsorothersafetyinformationthatyou
mustknowthatisnotincludedintheCEN,ISO,or
ANSIstandard.
Thisproductiscapableofamputatinghandsand
feetandthrowingobjects.Alwaysfollowallsafety
instructionstoavoidseriousinjuryordeath.
Useofthisproductforpurposesotherthanitsintended
usecouldprovedangeroustouserandbystanders.
WARNING
Engineexhaustcontainscarbonmonoxide,which
isanodorless,deadlypoisonthatcankillyou.
Donotrunengineindoorsorinanenclosedarea.
•Knowhowtostoptheenginequickly.
•Donotoperatethemachinewhilewearingtennis
shoesorsneakers.
•Wearingsafetyshoesandlongpantsisadvisableand
requiredbysomelocalordinancesandinsurance
regulations.
•Handlefuelcarefully.Wipeupanyspills.
•Checkthesafetyinterlockswitchesdailyforproper
operation.Ifaswitchshouldfail,replacetheswitch
beforeoperatingthemachine.
•Beforestartingtheengine,sitontheseat.
•Usingthemachinedemandsattention.Toprevent
lossofcontrol:
–Donotdriveclosetosandtraps,ditches,creeks,
embankments,orotherhazards.
–Reducespeedwhenmakingsharpturns.Avoid
suddenstopsandstarts.
–Whennearorcrossingroads,alwaysyieldthe
right-of-way.
–Applytheservicebrakeswhengoingdownhillto
keepforwardspeedslowandtomaintaincontrol
ofthemachine.
•WhenoperatingamachinewithROPS(roll-over
protectionsystem)neverremovetheROPSand
alwaysusetheseatbelt.
•Raisethecuttingunitswhendrivingfromonework
areatoanother.
•Donottouchtheengine,silencer/mufer,or
exhaustpipewhiletheengineisrunningorsoon
afterithasstoppedbecausetheseareascouldbehot
enoughtocauseburns.
•Onanyhill,thereisthepossibilityoftippingor
rollingover,buttheriskincreasesastheslopeangle
increases.Steephillsshouldbeavoided.
Cuttingunitsmustbeloweredwhengoingdown
slopestomaintainsteeringcontrol
•Engagetractiondriveslowly,alwayskeepfooton
tractionpedal,especiallywhentravelingdownhill.
Usereverseontractionpedalforbraking.
•Ifthemachinestallswhenclimbingaslope,do
notturnthemachinearound.Alwaysbackslowly,
straightdowntheslope.
•Whenapersonorpetappearsunexpectedlyin
ornearthemowingarea,stopmowing.Careless
operation,combinedwithterrainangles,ricochets,
orimproperlypositionedguardscanleadtothrown
objectinjuries.Donotresumemowinguntilthe
areaiscleared.
MaintenanceandStorage
•Makesureallhydrauliclineconnectorsaretightand
allhydraulichosesandlinesareingoodcondition
beforeapplyingpressuretothesystem.
•Keepyourbodyandhandsawayfrompinhole
leaksornozzlesthatejecthydraulicuidunder
highpressure.Usepaperorcardboard,notyour
hands,tosearchforleaks.Hydraulicuidescaping
underpressurecanhavesufcientforcetopenetrate
theskinandcauseseriousinjury.Seekimmediate
medicalattentionifuidisinjectedintoskin.
•Beforedisconnectingorperforminganyworkon
thehydraulicsystem,allpressureinthesystemmust
berelievedbystoppingtheengineandloweringthe
cuttingunitsandattachmentstotheground.
6

•Checkallfuellinesfortightnessandwearona
regularbasis.Tightenorrepairthemasneeded.
•Iftheenginemustberunningtoperforma
maintenanceadjustment,keephands,feet,clothing,
andanypartsofthebodyawayfromthecutting
units,attachments,andanymovingparts.
•Toensuresafetyandaccuracy,haveanAuthorized
ToroDistributorcheckthemaximumenginespeed
withatachometer.
•Ifmajorrepairsareeverneededorifassistanceis
desired,contactanAuthorizedToroDistributor.
•UseonlyToro-approvedattachmentsand
replacementparts.Thewarrantymaybevoidedif
usedwithunapprovedattachments.
SoundPowerLevel
Thisunithasaguaranteedsoundpowerlevelof105
dBA,whichincludesanUncertaintyValue(K)of1dBA.
Soundpowerlevelwasdeterminedaccordingtothe
proceduresoutlinedinISO11094.
SoundPressureLevel
Thisunithasasoundpressurelevelattheoperator’s
earof90dBA,whichincludesanUncertaintyValue(K)
of1dBA.
Soundpressurelevelwasdeterminedaccordingtothe
proceduresoutlinedinEN836.
VibrationLevel
Groundsmaster4500
Hand-Arm
Measuredvibrationlevelforrighthand=.57m/s2
Measuredvibrationlevelforlefthand=1.02m/s2
UncertaintyValue(K)=0.5m/s2
Measuredvaluesweredeterminedaccordingtothe
proceduresoutlinedinEN836.
WholeBody
Measuredvibrationlevel=.49m/s2
UncertaintyValue(K)=0.5m/s2
Measuredvaluesweredeterminedaccordingtothe
proceduresoutlinedinEN836.
Groundsmaster4700
Hand-Arm
Measuredvibrationlevelforrighthand=1.21m/s2
Measuredvibrationlevelforlefthand=1.25m/s2
UncertaintyValue(K)=0.5m/s2
Measuredvaluesweredeterminedaccordingtothe
proceduresoutlinedinEN836.
WholeBody
Measuredvibrationlevel=.46m/s2
UncertaintyValue(K)=0.5m/s2
Measuredvaluesweredeterminedaccordingtothe
proceduresoutlinedinEN836.
7

SafetyandInstructionalDecals
Safetydecalsandinstructionsareeasilyvisibletotheoperatorandarelocatednearanyareaof
potentialdanger.Replaceanydecalthatisdamagedorlost.
117-4763
1.T oengagetheparking
brake,securethebrake
pedalswiththelockingpin,
presstheparkingbrake
pedalsandengagethetoe
pedal.
2.T odisengagetheparking
brake,disengagethe
lockingpinandreleasethe
pedals.
117–2384
1.Off6.PowerTake-off(PTO)
2.Headlights7.High
3.On8.Tractioncontrol
4.Fast9.Low
5.Slow
117–2385
1.ReadtheOperators
Manual.
3.Engine—preheat
2.Engine—start4.Engine—stop
117–2387
1.Raiseleftdeck4.Coolingfan
2.Raisecenterdeck5.Reverse
3.Raiserightdeck6.Automatic
117-4765
1.ReadtheOperator'sManual.
2.Donotusestartingaids.
8

117-4766
1.Cutting/dismembermenthazard;fan—stayawayfrom
movingparts.
106-6755
1.Enginecoolantunder
pressure.
3.Warning—donottouchthe
hotsurface.
2.Explosionhazard—read
theOperator'sManual.
4.Warning—readthe
Operator'sManual.
117-4764
1.Thrownobjecthazard—keepbystandersasafedistance
fromthemachine.
2.Cuttinghazardofhand,mowerblade—stayawayfrom
movingparts,keepallguardsandshieldsinplace.
3.Cuttinghazardoffoot,mowerblade—stayawayfrom
movingparts,keepallguardsandshieldsinplace.
98-4387
1.Warning—wearhearingprotection.
106-6754
1.Warning—donottouchthehotsurface.
2.Cutting/dismembermenthazard,fanandentanglement
hazard,belt—stayawayfrommovingparts.
112-5297
1.Warning—readtheOperator'sManual,donotoperatethis
machineunlessyouaretrained.
2.Warning—readtheOperator'sManualbeforetowingthe
machine.
3.Tippinghazard—slowmachinebeforeturning,donotturn
athighspeeds;lowerthecuttingunitwhendrivingdown
slopes;usearolloverprotectionsystemandweartheseat
belt
4.Warning—donotparkthemachineonslopes;engagethe
parkingbrake,lowerthecuttingunits,stoptheengineand
removetheignitionkeybeforeleavingthemachine.
5.Thrownobjecthazard—keepbystandersasafedistance
fromthemachine.
6.Entanglementhazard,belt—stayawayfrommovingparts,
keepallguardsandshieldsinplace.
9

112-5298
(Afxoverpartno.112–5297forCE*
*Thissafetydecalincludesaslopewarningrequiredonthemachinefor
compliancetotheEuropeanLawnMowerSafetyStandardEN836:1997.The
conservativemaximumslopeanglesindicatedforoperationofthismachineare
prescribedbyandrequiredbythisstandard.
1.Warning—readtheOperator'sManual,donotoperatethis
machineunlessyouaretrained.
2.Warning—readtheOperator'sManualbeforetowingthe
machine.
3.Tippinghazard—donotoperateonslopesgreaterthan15°;
lowerthecuttingunitswhenoperatingonslopes;wearthe
safetybelt.
4.Warning—donotparkthemachineonslopes;engagethe
parkingbrake,lowerthecuttingunits,stoptheengineand
removetheignitionkeybeforeleavingthemachine.
5.Thrownobjecthazard—keepbystandersasafedistance
fromthemachine.
6.Entanglementhazard,belt—stayawayfrommovingparts,
keepallguardsandshieldsinplace.
117-4761
1.Starter,20A6.GM4500controller,2A
2.Worklight,10A7.Powersupplied,7.5A
3.Seat,10A8.GM4700controller,2A
4.Powerpoint,10A9.Enginepreheat,60A
5.Gauges,10A
BatterySymbols
Someorallofthesesymbolsareonyourbattery
1.Explosionhazard6.Keepbystandersasafe
distancefromthebattery.
2.Nore,opename,or
smoking.
7.Weareyeprotection;
explosivegasescan
causeblindnessandother
injuries
3.Causticliquid/chemical
burnhazard
8.Batteryacidcancause
blindnessorsevereburns.
4.Weareyeprotection9.Flusheyesimmediately
withwaterandgetmedical
helpfast.
5.ReadtheOperator's
Manual.
10.Containslead;donot
discard.
10

93-7272
(Models30630&30631)
1.Cutting/dismembermenthazard;fan—stayawayfromoving
parts.
117–2718
117-4758
11

Setup
LooseParts
Usethechartbelowtoverifythatallpartshavebeenshipped.
ProcedureDescriptionQty.Use
1Warningdecal1Usedonlyonmachinesrequiring
EuropeanCECompliance.
Lockbracket1
Rivet2
Washer1
Screw,1/4x2inches1
2
Locknut,1/4inch1
InstalltheHoodLatch(CE).
Throttlestop1
3Setscrew1
Usedonlyonmachinesrequiring
EuropeanCECompliancewhen
installingoptionalhighliftblades.
4Nopartsrequired–Greasethemachine.
5Nopartsrequired–Checktherearaxlelubricant,hydraulic
uid,andengineoillevels
MediaandAdditionalParts
DescriptionQty.Use
Operator'sManual1Readbeforeoperatingmachine
EngineOperator'sManual1Readbeforeoperatingengine
PartsCatalog1Usetoreferencepartnumbers
OperatorTrainingMaterial1Viewbeforeoperatingmachine
Note:Determinetheleftandrightsidesofthemachinefromthenormaloperatingposition.
12

1
ReplacingtheWarningDecal
forCECompliance
Partsneededforthisprocedure:
1Warningdecal
Procedure
OnmachinesrequiringEuropeanCECompliance,
replacethewarningdecal,partno.112–5297withthe
warningdecalpartno.112-5298.
2
InstallingtheHoodLatch(CE
Only)
Partsneededforthisprocedure:
1Lockbracket
2Rivet
1Washer
1Screw,1/4x2inches
1Locknut,1/4inch
Procedure
1.Unhookthehoodlatchfromthehoodlatchbracket.
2.Removethe(2)rivetssecuringthehoodlatchbracket
tothehood(Figure3).Removethehoodlatch
bracketfromthehood.
G012628
1
2
Figure3
1.Hoodlatchbracket2.Rivets
3.Whilealigningthemountingholes,positiontheCE
lockbracketandthehoodlatchbracketontothe
hood.Thelockbracketmustbeagainstthehood
(Figure4).Donotremoveboltandnutassembly
fromthelockbracketarm.
G012629
1
2
Figure4
1.CElockbracket2.Boltandnutassembly
4.Alignthewasherswiththeholesontheinsideofthe
hood.
5.Rivetthebracketsandthewasherstothehood
(Figure4).
6.Hookthelatchontothehoodlatchbracket
(Figure5).
13

G012630
1
Figure5
1.Hoodlatch
7.Screwtheboltintotheotherarmofhoodlock
brackettolockthelatchinposition(Figure6).
Tightenboltsecurelybutdonottightennut.
G012631
1
2
3
Figure6
1.Bolt3.Armofhoodlockbracket
2.Nut
3
InstallingtheThrottleStop
forCECompliancewhen
InstallingOptionalHighLift
Blades
Partsneededforthisprocedure:
1Throttlestop
1Setscrew
Procedure
1.Loosenthesetscrewonthethrottlestop(Figure7).
2.Slidethethrottlestopontothehighidlestopscrew
(Figure7).Thechamferedendofthethrottlestopis
tobepositionedoutward.
Figure7
1.Throttlestop2.Setscrew
3.Starttheengineandallowittorunfor5to10
minutes.
4.Adjustthehighidleto2650rpmwiththecutting
unitsdisengaged.
5.Tightenthesetscrew .
6.Applyadhesiveintothesetscrewtoprevent
tampering.
4
GreasingtheMachine
NoPartsRequired
Procedure
Beforethemachineisoperated,itmustbegreasedto
ensureproperlubrication.RefertoLubricationsection.
Failuretoproperlygreasethemachinewillresultin
prematurefailureofcriticalparts.
14

5
CheckingFluidLevels
NoPartsRequired
Procedure
1.Checktherearaxlelubricantlevelbeforetheengine
isrststarted,refertoCheckingtheRearAxle
LubricantinDriveSystemMaintenance.
2.Checkthehydraulicuidlevelbeforetheengineis
rststarted,refertoCheckingtheHydraulicFluid
LevelinOperation.
3.Checktheengineoillevelbeforeandaftertheengine
isrststarted,refertoCheckingtheEngineOil
LevelinOperation.
ProductOverview
Controls
BrakePedals
Twofootpedals(Figure8)operateindividualwheel
brakesforturningassistanceandtoaidinobtaining
bettersidehilltraction.
PedalLockingLatch
Thepedallockinglatch(Figure8)connectsthepedals
togethertoengagetheparkingbrake.
ParkingBrakePedal
Toengagetheparkingbrake,(Figure8)connectthe
pedalstogetherwiththepedallockinglatch,pushdown
ontherightbrakepedalwhileengagingthetoepedal.To
releasetheparkingbrake,pressoneofthebrakepedals
untiltheparkingbrakelatchretracts.
Figure8
1.Brakepedal4.Tractionpedal
2.Pedallockinglatch5.Tiltsteeringpedal
3.Parkingbrakepedal
TractionPedal
Thetractionpedal(Figure8)controlsforwardand
reverseoperation.Depressthetopofthepedaltomove
forwardandthebottomtomovebackward.Ground
speeddependsonhowfarthepedalisdepressed.For
noload,maximumgroundspeed,fullydepressthepedal
whilethethrottleisinFast.
Tostop,reduceyourfootpressureonthetractionpedal
andallowittoreturntothecenterposition.
TiltSteeringPedal
Totiltthesteeringwheeltowardsyou,pressthefoot
pedal(Figure8)down,andpullthesteeringtower
15

towardyoutothemostcomfortablepositionandthen
releasethepedal.
SpeedLimiterScrews
Adjustthescrew(s)(Figure9)tolimittheamountthe
tractionpedalcanbedepressedintheforwardorreverse
directiontolimitspeed.
Important:Thespeedlimiterscrewmuststopthe
tractionpedalbeforethepumpreachesfullstroke
ordamagetothepumpmayoccur.
Figure9
1.Forwardspeedlimiter
screw
2.Reversespeedlimiter
screw
DiagnosticLight
Thediagnosticlight(Figure10)willilluminateshoulda
systemfaultberecognized.
EngineCoolantTemperatureGauge
Duringnormaloperatingconditionsthegauge
(Figure10)shouldbeinthegreenrange.Checkthe
coolingsystemifthegaugegoestotheyelloworred
range.
EngineOilPressureWarningLight
Thelight(Figure10)illuminateswhentheengineoil
pressureisdangerouslylow.
ChargeIndicator
Thechargeindicator(Figure10)illuminateswhenthe
systemchargingcircuitmalfunctions.
KeySwitch
Thekeyswitch(Figure10)hasthreepositions:Off,
On/Preheat,andStart.
PTOSwitch
ThePTOswitch(Figure10)hastwopositions:Out
(start)andIn(stop).PullthePTObuttonouttoengage
thecuttingunitblades.Pushinthebuttontodisengage
thecuttingunitblades.
Hi-LoSpeedControl
Theswitch(Figure10)allowsthespeedrangetoincrease
fortransportofthemachine.Cuttingdeckswillnot
operateinhighrange.Also,thedeckscannotbelowered
fromthetransportpositionwhentheswitchisinthe
highrange.
Figure10
1.Diagnosticlight8.Liftswitches(GM4700
only)
2.Enginecoolant
temperaturegauge
9.Liftswitch(GM4500and
4700)
3.Engineoilpressure
warninglight
10.Throttlecontrol
4.Chargeindicator11.Lightswitch
5.Keyswitch12.Glowplugindicatorlight
6.PTOswitch13.Enginecoolant
temperaturewarning
light
7.Hi-Lospeedcontrol
LiftSwitches
Theliftswitches(Figure10)raiseandlowerthecutting
units.Presstheswitchesforwardtolowerthecutting
unitsandbackwardtoraisethecuttingunits.When
startingthemachine,withthecuttingunitsinthedown
position,presstheliftswitchdowntoallowthecutting
unitstooatandmow.
16

Note:ThedeckswillnotlowerwhileintheHIspeed
rangeandtheywillnotraiseorloweriftheoperatoris
outoftheseatwhentheengineisrunning.
ThrottleControl
Movethecontrol(Figure10)forwardtoincreasethe
enginespeedandrearwardtodecreasethespeed.
LightSwitch
Presstheloweredgeoftheswitch(Figure10)toturnon
thelights.Presstheupperedgeoftheswitchtoturn
offthelights.
GlowPlugIndicatorLight
Whenlit,theglowplugindicatorlight(Figure10)
indicatesthattheglowplugsareon.
EngineCoolantTemperatureWarning
Light
Thelight(Figure10)illuminatesandthecuttingunits
shutdown(PTOdisengages).Ifthetemperature
continuestorisetheenginewillshutdown.
PowerPoint
Thepowerpoint(Figure11)isusedtopoweroptional
12voltelectricalaccessories.
Figure11
1.Powerpoint3.Bagholder
2.Enginecoolingfanswitch4.Hourmeter
EngineCoolingFanSwitch
Themachineisequippedwithahydraulicallydriven
autoreversingenginecoolingfan.Thefanswitch
(Figure11)hastwopositionsR(manualreverse)and
Auto(normal).RefertoEngineCoolingFanOperation
intheOperationSectionofmanual.
BagHolder
Usethebagholder(Figure11)forstorage.
HourMeter
Thehourmeter(Figure11)showsthetotalhoursthat
themachinehasbeenoperated.
FuelGauge
Thefuelgauge(Figure12)indicatestheleveloffuelin
thetank.
Figure12
1.Fuelgauge
SeatAdjustments
ForeandAftAdjustingLever
Pulloutonthelevertoslidetheseatforeoraft
(Figure13).
SeatArmRestAdjustingKnob
Rotatetheknobtoadjusttheseatarmrestangle
(Figure13).
SeatBackAdjustingLever
Movethelevertoadjusttheseatbackangle(Figure13).
Weightgauge
Indicateswhentheseatisadjustedtotheweightofthe
operator(Figure13).Heightadjustmentismadeby
positioningthesuspensionwithintherangeofthegreen
region.
17

Figure13
1.Weightgauge4.Seatbackadjustinglever
2.Weightadjustinglever5.Armrestadjustingknob
3.ForeandAftadjusting
lever
WeightAdjustingLever
Adjustforoperatorweight(Figure13).Pulluponthe
levertoincreasetheairpressureandpushdownto
decreasetheairpressure.Theproperadjustmentis
attainedwhentheweightgaugeisinthegreenregion.
18

Specications
Note:Specicationsanddesignaresubjecttochange
withoutnotice.
TractionUnitSpecications
4500-D4700-D
Widthofcut109inches(2.8m)150inches(3.8m)
Overallwidth,
cuttingunits
down
112.8inches(286cm)153.8inches(391cm)
Overallwidth,
cuttingunitsup
(transport)
88.25inches(224cm)88.25inches(224cm)
Overalllength145.8inches(370cm)145.8inches(370cm)
Heightwith
ROPS
85inches(216cm)85inches(216cm)
Ground
clearance
6inches(15cm)6inches(15cm)
TrackWidth,
front
88.25inches(224cm)88.25inches(224cm)
TrackWidth,rear55.5inches(141cm)55.5inches(141cm)
Wheelbase67-1/2inches(171cm)67-1/2inches(171cm)
NetWeight(with
cuttingunitsand
nouids)
4400lb(1995kg)4950lb(2245kg)
Attachments/Accessories
AselectionofToroapprovedattachmentsand
accessoriesareavailableforusewiththemachineto
enhanceandexpanditscapabilities.Contactyour
AuthorizedServiceDealerorDistributororgoto
www.Toro.comforalistofallapprovedattachments
andaccessories.
19

Operation
Note:Determinetheleftandrightsidesofthe
machinefromthenormaloperatingposition.
CAUTION
Thismachineproducessoundlevelsinexcessof
85dBAattheoperator'searandcancausehearing
lossthroughextendedperiodsofexposure.
Wearhearingprotectionwhenoperatingthis
machine.
CAUTION
Ifyouleavethekeyintheignitionswitch,someone
couldaccidentlystarttheengineandseriously
injureyouorotherbystanders.
Removethekeyfromtheignitionbeforeyoudo
anymaintenance.
CheckingtheEngineOilLevel
ServiceInterval:Beforeeachuseordaily
Theengineisshippedwithoilinthecrankcase;
however,theoillevelmustbecheckedbeforeandafter
theengineisrststarted.
Thecrankcasecapacityisapproximately10qt.(9.5l)
withthelter.
Usehigh-qualityengineoilthatmeetsthefollowing
specications:
•APIClassicationLevelRequired:CH-4,CI-4or
higher.
•Preferredoil:SAE15W-40(above0°F)
•Alternateoil:SAE10W-30or5W-30(all
temperatures)
Note:ToroPremiumEngineoilisavailable
fromyourdistributorineither15W-40or10W-30
viscosity.Seethepartscatalogforpartnumbers.
Note:Thebesttimetochecktheengineoilis
whentheengineiscoolbeforeithasbeenstarted
fortheday.Ifithasalreadybeenrun,allowthe
oiltodrainbackdowntothesumpforatleast10
minutesbeforechecking.Iftheoillevelisator
belowthe‘add’markonthedipstick,addoilto
bringtheoilleveltothe‘full’mark.Donotoverll.
Iftheoillevelisbetweenthe‘full’and‘add’marks,
nooiladditionisrequired.
1.Parkthemachineonalevelsurface.
2.Unlocktheenginecoverlatchesandopenthe
enginecover.
3.Removethedipstick,wipeitclean,installthe
dipstickintothetube,andpullitoutagain.
Theoillevelshouldbeinthesaferange(Figure14).
Figure14
1.Dipstick
4.Iftheoilisbelowthesaferange,removethellcap
(Figure15)andaddoiluntilthelevelreachesthe
FULLmark.Donotoverll.
Figure15
1.Oilllcap
Note:Whenusingdifferentoil,drainalloldoil
fromthecrankcasebeforeaddingnewoil.
5.Installtheoilllcapanddipstick.
6.Closetheenginecoverandsecureitwiththelatches.
CheckingtheCoolingSystem
ServiceInterval:Beforeeachuseordaily
20
This manual suits for next models
3
Table of contents
Other Toro Lawn Mower manuals

Toro
Toro HoverPro 450 User manual

Toro
Toro TurfMaster 22205TE User manual

Toro
Toro 20018 User manual

Toro
Toro 30672 User manual

Toro
Toro 30360 User manual

Toro
Toro TimeMaster 20975 User manual

Toro
Toro Recycler 20017 User manual

Toro
Toro Z Master Z500 Series User manual

Toro
Toro Groundsmaster 3300 Series User manual

Toro
Toro Groundsmaster 4500-D User manual

Toro
Toro Groundsmaster 4500-D User manual

Toro
Toro GrandStand 78596 User manual

Toro
Toro 77505 User manual

Toro
Toro 30881 User manual

Toro
Toro 78477 User manual

Toro
Toro 74920 User manual

Toro
Toro Groundsmaster 4300-D User manual

Toro
Toro 72028 User manual

Toro
Toro 73471 User manual

Toro
Toro 20831 User manual