Toro HoverPro 400 User manual

FormNo.3425-143RevA
HoverPro®400Machine
ModelNo.02615—SerialNo.403230000andUp
Operator'sManual
Introduction
Thismachineisintendedtobeusedbyhired,
commercialoperatorsandresidentialhomeownersfor
maintainingturfonslopes,tightundulations,areas
nearwater,orbunkerlips.Usingthisproductfor
purposesotherthanitsintendedusecouldprove
dangeroustoyouandbystanders.
Readthisinformationcarefullytolearnhowtooperate
andmaintainyourproductproperlyandtoavoid
injuryandproductdamage.Youareresponsiblefor
operatingtheproductproperlyandsafely.
Visitwww.Toro.comformoreinformation,including
safetytips,trainingmaterials,accessoryinformation,
helpndingadealer,ortoregisteryourproduct.
Wheneveryouneedservice,genuineToroparts,or
additionalinformation,contactanAuthorizedService
DealerorToroCustomerServiceandhavethemodel
andserialnumbersofyourproductready.Figure1
identiesthelocationofthemodelandserialnumbers
ontheproduct.Writethenumbersinthespace
provided.
g017415
Figure1
1.Modelandserialnumberplate
ModelNo.
SerialNo.
Thismanualidentiespotentialhazardsandhas
safetymessagesidentiedbythesafety-alertsymbol
(Figure2),whichsignalsahazardthatmaycause
seriousinjuryordeathifyoudonotfollowthe
recommendedprecautions.
g000502
Figure2
Safety-alertsymbol
Thismanualuses2wordstohighlightinformation.
Importantcallsattentiontospecialmechanical
informationandNoteemphasizesgeneralinformation
worthyofspecialattention.
ThisproductcomplieswithallrelevantEuropean
directives;fordetails,pleaseseetheseparateproduct
specicDeclarationofConformity(DOC)sheet.
ItisaviolationofCaliforniaPublicResourceCode
Section4442or4443touseoroperatetheengineon
anyforest-covered,brush-covered,orgrass-covered
landunlesstheengineisequippedwithaspark
arrester,asdenedinSection4442,maintainedin
effectiveworkingorderortheengineisconstructed,
equipped,andmaintainedforthepreventionofre.
Formodelswithstatedenginehorsepower,thegross
horsepoweroftheenginewaslaboratoryratedbythe
enginemanufacturerinaccordancewithSAEJ1349.
Asconguredtomeetsafety,emission,andoperating
requirements,theactualenginehorsepowerofthis
classofmachinewillbesignicantlylower.
©2018—TheToro®Company
8111LyndaleAvenueSouth
Bloomington,MN55420
Registeratwww.T oro.com.OriginalInstructions(EN)
PrintedintheUK
AllRightsReserved*3425-143*A

WARNING
CALIFORNIA
Proposition65Warning
Theengineexhaustfromthisproduct
containschemicalsknowntotheStateof
Californiatocausecancer,birthdefects,
orotherreproductiveharm.
Useofthisproductmaycauseexposure
tochemicalsknowntotheStateof
Californiatocausecancer,birthdefects,
orotherreproductiveharm.
Contents
Introduction...............................................................1
Safety.......................................................................2
GeneralSafety...................................................2
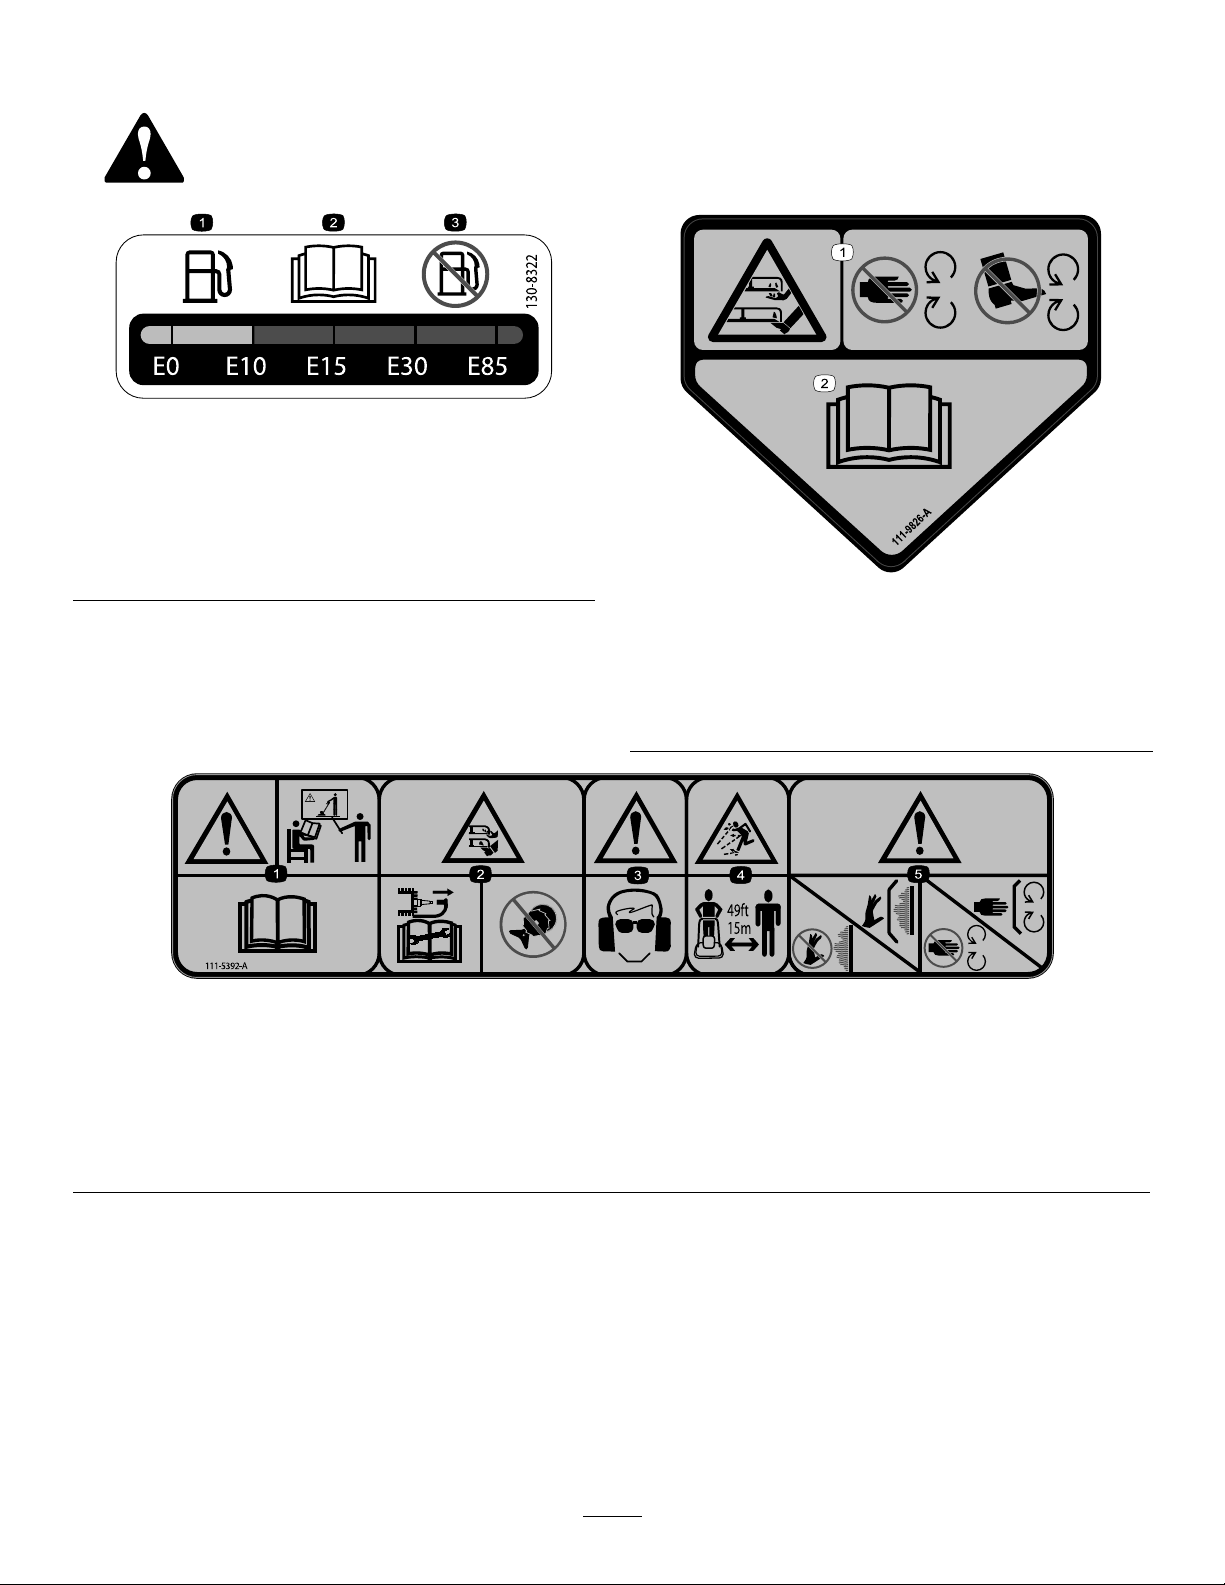
SafetyandInstructionalDecals..........................3
Setup........................................................................5
1AssemblingtheHandle....................................5
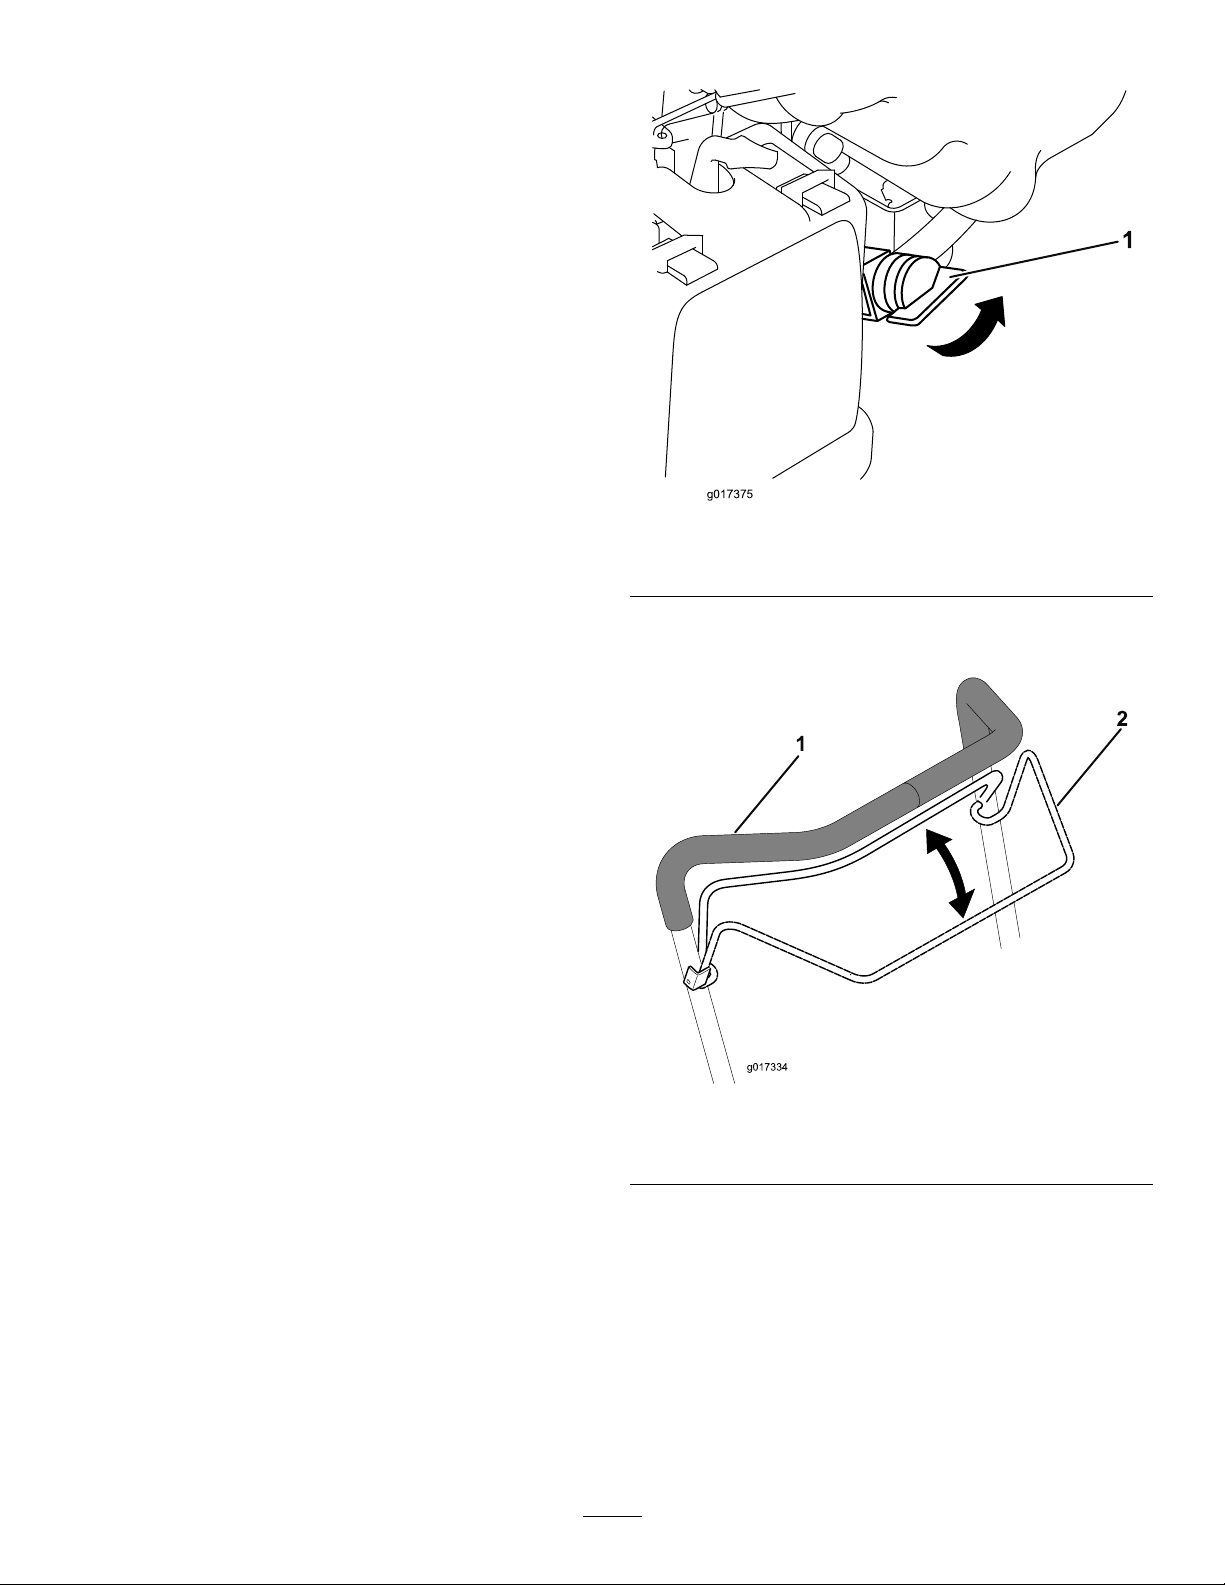
2FillingtheEnginewithOil.................................6
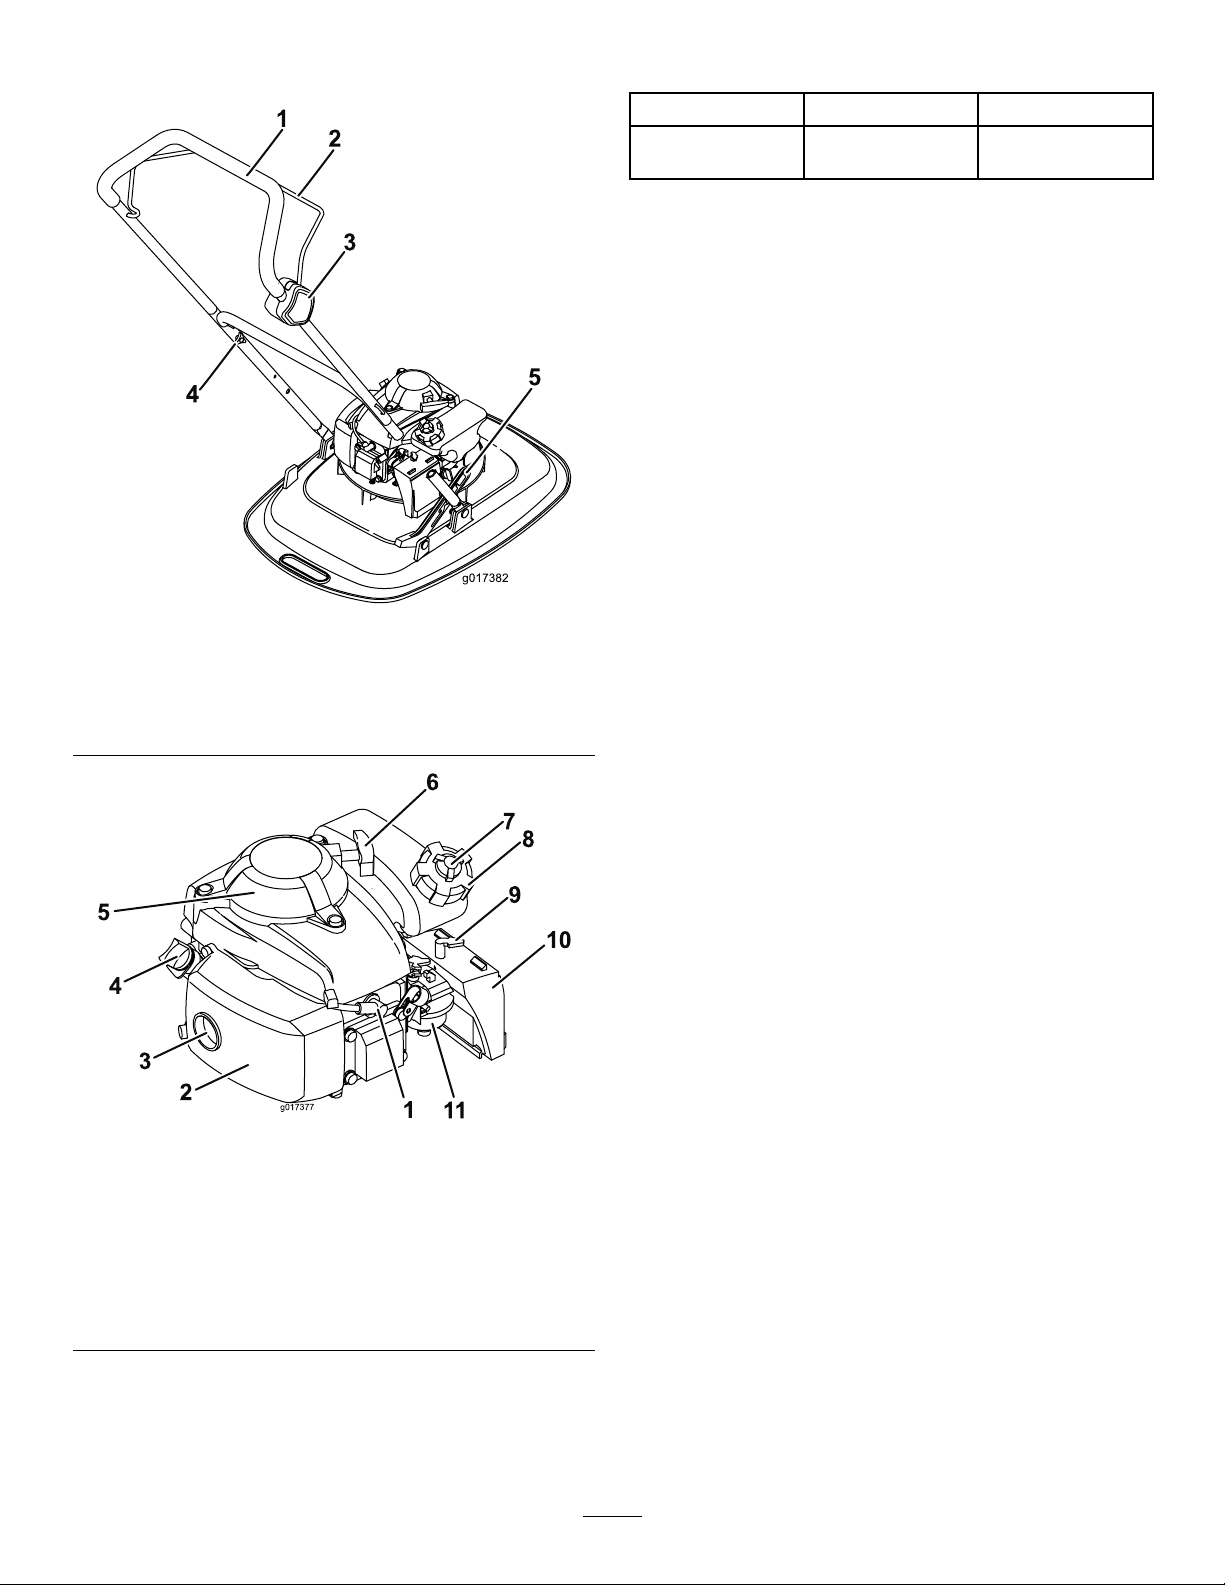
ProductOverview.....................................................7
Specications....................................................7
Attachments/Accessories...................................7
Operation..................................................................8
BeforeOperation...................................................8
BeforeOperationSafety.....................................8
FillingtheFuelTank............................................8
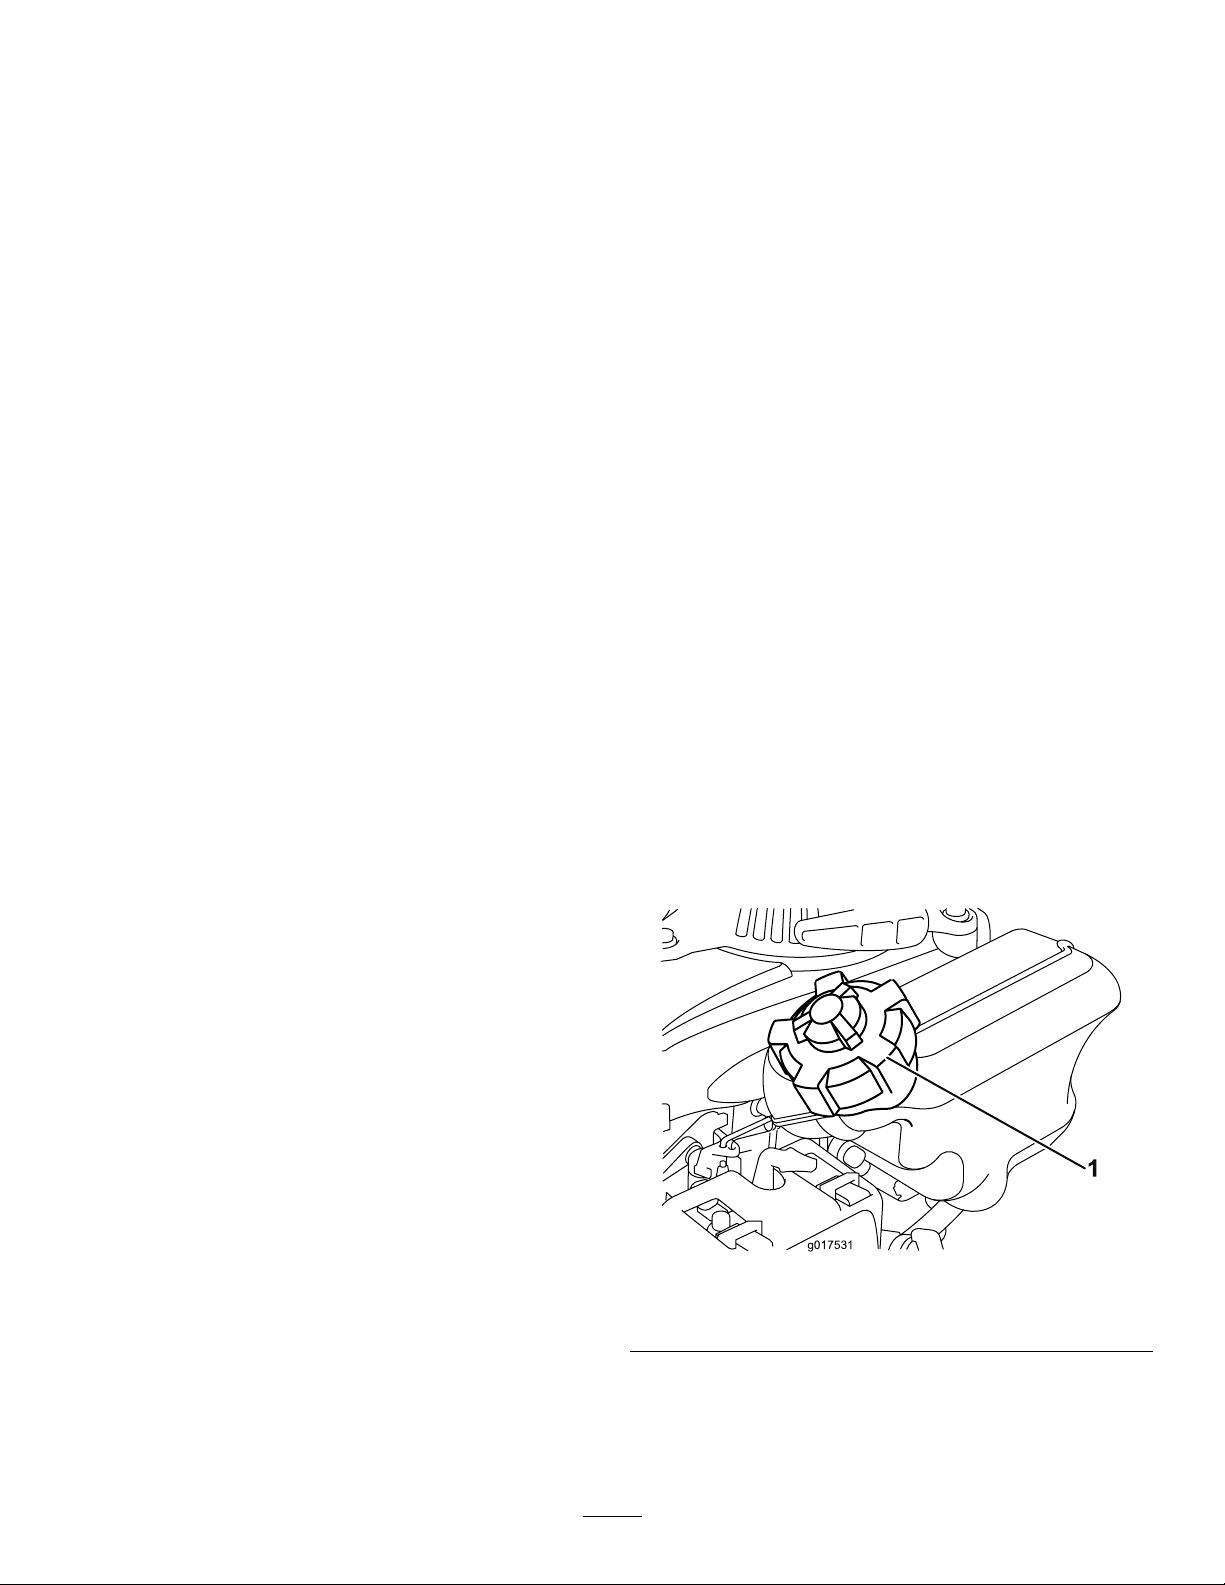
CheckingtheEngine-OilLevel............................9
AdjustingtheCuttingHeight...............................9
DuringOperation.................................................10
DuringOperationSafety...................................10
StartingtheEngine...........................................10
AdjustingtheHandlePosition...........................12
ShuttingOfftheEngine.....................................12
OperatingTips.................................................13
AfterOperation....................................................13
AfterOperationSafety......................................13
Maintenance...........................................................14
RecommendedMaintenanceSchedule(s)...........14
MaintenanceSafety..........................................14
PreparingforMaintenance...............................15
ServicingtheAirFilter.......................................15
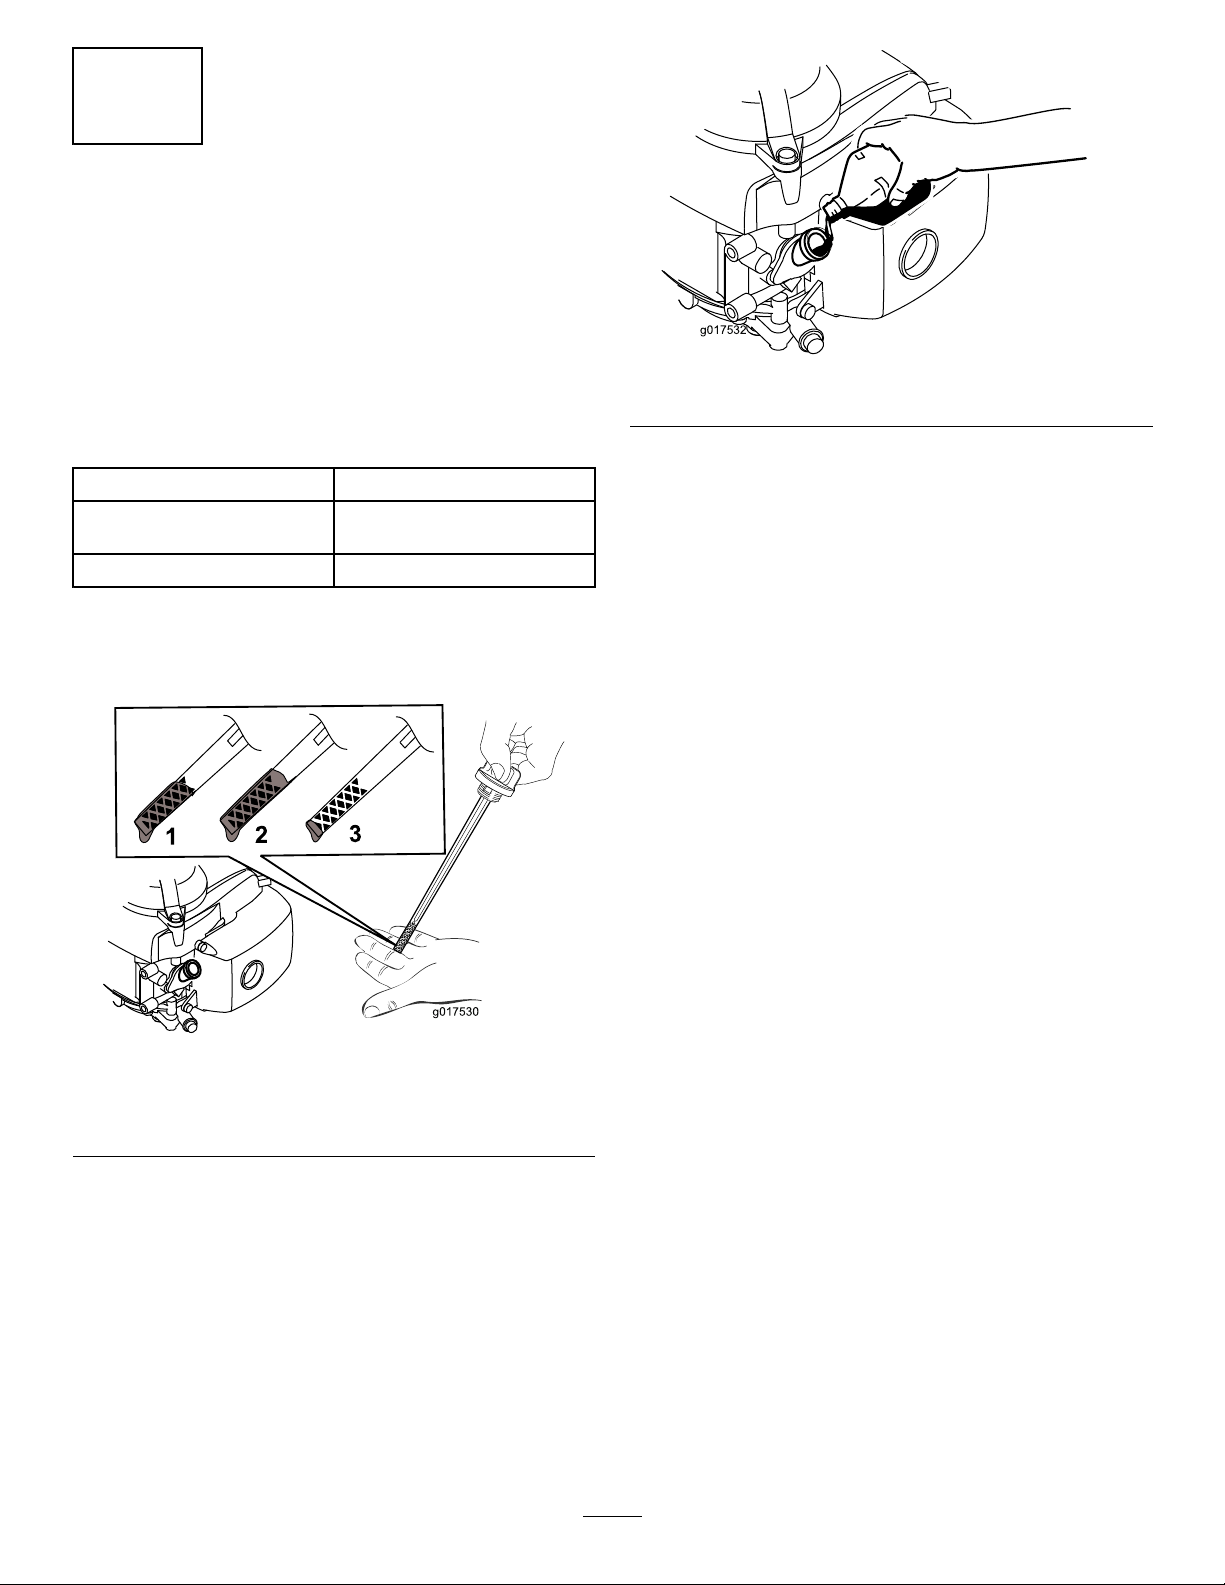
ChangingtheEngineOil...................................16
ServicingtheSparkPlug...................................16
ReplacingtheCuttingLine................................17
CleaningtheMachine.......................................17
Storage...................................................................18
GeneralSafety.................................................18
PreparingtheMachineforStorage...................18
Troubleshooting......................................................19
Safety
ThefollowingsafetysectionisadaptedfromANSI
B71.4–2017andEN14910:2007+A1:2009.
GeneralSafety
Thisproductiscapableofinjuringhandsandfeet
andofthrowingobjects.Alwaysfollowallsafety
instructionstoavoidseriouspersonalinjury.
•Readandunderstandthecontentsofthis
Operator’sManualbeforestartingtheengine.
•Donotputyourhandsorfeetnearmoving
componentsofthemachine.
•Donotoperatethemachinewithoutallguards
andothersafetyprotectivedevicesinplaceand
functioningproperlyonthemachine.
•Keepbystandersandchildrenoutoftheoperating
area.Donotallowchildrentooperatethemachine.
Allowonlypeoplewhoareresponsible,trained,
familiarwiththeinstructions,andphysically
capabletooperatethemachine.
•Stopthemachine,shutofftheengine,andwaitfor
allmovingpartstostopbeforeservicing,fueling,
oruncloggingthemachine.
Improperlyusingormaintainingthismachinecan
resultininjury.Toreducethepotentialforinjury,
complywiththesesafetyinstructionsandalways
payattentiontothesafety-alertsymbol,which
meansCaution,Warning,orDanger—personalsafety
instruction.Failuretocomplywiththeseinstructions
mayresultinpersonalinjuryordeath.
2

SafetyandInstructionalDecals
Safetyandinstructionaldecalsareeasilyvisibleandarelocatednearareasofpotential
danger.Replaceanydamagedormissingdecal.
decal130-8322
130-8322
1.Onlyusefuelwithan
alcoholcontentbyvolume
under10%.
3.Donotusefuelwithan
alcoholcontentbyvolume
greaterthan10%.
2.ReadtheOperator's
Manualformore
informationonfuel.decal111-9826
111–9826
1.Cutting/dismemberment
hazardofhandorfoot,
cuttingunit—keepyour
handsandfeetawayfrom
movingparts.
2.ReadtheOperator’s
Manual.
decal111-5392
111-5392
1.Warning—Receivetrainingontheproduct;readthe
Operator’sManual.
4.Thrownobjecthazard;keepbystandersatleast15m(49ft)
awayfromthemachine.
2.Cutting/dismembermenthazardofhandorfoot,nylonline;
disconnectthewirefromthesparkplugbeforeworkingonthe
machine;nevertmetalcuttingparts.
5.Warning—donottouchhotsurfaces;keepguardsinplace;
Stayawayfrommovingparts;keepguardsinplace.
3.Warning—weareyeandhearingprotection.
3

decal94-8072
94-8072
g017410
H295159
1.Enginestop(shutoff)
decal133-8062
133-8062
4

Setup
Note:Determinerightandleftsideofthemachine
fromnormaloperatingposition.
1
AssemblingtheHandle
NoPartsRequired
Procedure
1.Slidethelowerhandleintotheframe(Figure3).
g017374
Figure3
1.Footstop4.Retainingpin
2.Hairpin5.Washer
3.Bolt6.Locknut
2.Secureeachsidewitharetainingpinanda
hairpin(Figure3).
3.Securethefootstoptotherightsideofthelower
handleusinganM6nut,andM6bolt,and2
washers(Figure3).
4.Attachthefootstoptotheframewitharetaining
pinandahairpin(Figure3).
5.Connecttheupperhandletothelowerhandleby
securingeachsidewithaU-bolt,anM6washer,
andahandwheel(Figure4).
g017373
Figure4
1.Upperhandle4.U-bolt
2.Handwheel5.Lowerhandle
3.Washer
5

2
FillingtheEnginewithOil
NoPartsRequired
Procedure
Important:Yourmachinedoesnotcomewithoil
intheengine.Beforestartingtheengine,llthe
enginewithoil.
EngineOilSpecications
Engineoilcapacity0.59L(20oz)
OilviscositySAE10W-30multigrade
mineraloil
APIserviceclassicationSJorhigher
1.Movethemachinetoalevelsurface.
2.Removethedipstickbyrotatingthecap
counterclockwiseandpullingitout(Figure5).
g017530
Figure5
1.Full3.Low
2.High
3.Carefullypourabout3/4oftheenginecapacity
ofoilintotheoil-lltube(Figure6).
g017532
Figure6
4.Wait3minutesfortheoiltosettleintheengine.
5.Wipethedipstickcleanwithacleancloth.
6.Insertthedipstickintotheoil-lltube,butdonot
screwitin,thenremovethedipstick.
7.Readtheoillevelonthedipstick(Figure5).
•Iftheoillevelonthedipstickistoolow,
carefullypourasmallamountofoilintothe
oil-lltube,wait3minutes,andrepeatsteps
5through7untiltheoilonthedipstickisat
thecorrectlevel.
•Iftheoillevelonthedipstickistoohigh,drain
theexcessoiluntiltheoilonthedipstickis
atthecorrectlevel;refertoChangingthe
EngineOil(page16).
Important:Iftheoillevelintheengineistoo
lowortoohighandyouruntheengine,you
maydamagetheengine.
8.Installthedipstickandhandtightenitsecurely.
Important:Changetheengineoilafterthe
rst5operatinghours;changeityearly
thereafter.RefertoChangingtheEngineOil
(page16).
6

ProductOverview
g017382
Figure7
1.Handle4.Handlebarsecuringknob
2.Operator-presencecontrol5.Footstop
3.Switchbox
g017377
Figure8
1.Sparkplug7.Fuel-cap-ventknob
2.Exhaustguard8.Fuelcap
3.Exhaust9.Chokelever
4.Dipstick10.Aircleaner
5.Fingerguard11.Carburetor
6.Recoil-starthandle
Specications
ModelCuttingwidthProductwidth
02615400mm(15-3/4
inches)
500mm(19-11/16
inches)
Attachments/Accessories
AselectionofToroapprovedattachmentsand
accessoriesisavailableforusewiththemachine
toenhanceandexpanditscapabilities.Contact
yourAuthorizedServiceDealerorauthorizedToro
distributororgotowww.Toro.comforalistofall
approvedattachmentsandaccessories.
Toensureoptimumperformanceandcontinuedsafety
certicationofthemachine,useonlygenuineToro
replacementpartsandaccessories.Replacement
partsandaccessoriesmadebyothermanufacturers
couldbedangerous,andsuchusecouldvoidthe
productwarranty.
7

Operation
Note:Determinetheleftandrightsidesofthe
machinefromthenormaloperatingposition.
BeforeOperation
BeforeOperationSafety
GeneralSafety
•Alwaysshutoffthemachine,waitforallmoving
partstostop,andallowthemachinetocoolbefore
adjusting,servicing,cleaning,orstoringit.
•Becomefamiliarwiththesafeoperationofthe
equipment,operatorcontrols,andsafetysigns.
•Checkthatallguardsandsafetydevicesarein
placeandworkingproperly.
•Alwaysinspectthemachinetoensurethatthe
cuttingunitbolt,line,anddiscarenotwornor
damaged.
•Inspecttheareawhereyouwillusethemachine
andremoveallobjectsthatcouldinterferewith
theoperationofthemachineorthatthemachine
couldthrow.
•Adjustingthecuttingheightmaybringyouinto
contactwiththemovingdisc,causingserious
injury.
FuelSafety
•Fuelisextremelyammableandhighlyexplosive.
Areorexplosionfromfuelcanburnyouand
othersandcandamageproperty.
–Topreventastaticchargefromignitingthefuel,
placethecontainerand/ormachinedirectlyon
thegroundbeforelling,notinavehicleoron
anobject.
–Fillthefueltankoutdoors,inanopenarea,
whentheengineiscold.Wipeupanyfuelthat
spills.
–Donothandlefuelwhensmokingoraroundan
openameorsparks.
–Donotremovethefuelcaporaddfueltothe
tankwhiletheengineisrunningorhot.
–Ifyouspillfuel,donotattempttostartthe
engine.Avoidcreatingasourceofignitionuntil
thefuelvaporshavedissipated.
–Storefuelinanapprovedcontainerandkeep
itoutofthereachofchildren.
•Fuelisharmfulorfatalifswallowed.Long-term
exposuretovaporscancauseseriousinjuryand
illness.
–Avoidprolongedbreathingofvapors.
–Keepyourhandsandfaceawayfromthe
nozzleandthefuel-tankopening.
–Keepfuelawayfromyoureyesandskin.
FillingtheFuelTank
•Forbestresults,useonlyclean,fresh,unleaded
gasolinewithanoctaneratingof87orhigher
((R+M)/2ratingmethod).
•Oxygenatedfuelwithupto10%ethanolor15%
MTBEbyvolumeisacceptable.
•Donotuseethanolblendsofgasoline,such
asE15orE85,withmorethan10%ethanolby
volume.Performanceproblemsand/orengine
damagemayresult,whichmaynotbecovered
underwarranty.
•Donotusegasolinecontainingmethanol.
•Donotstorefueleitherinthefueltankorinfuel
containersoverthewinterunlessfuelstabilizer
hasbeenaddedtothefuel.
•Donotaddoiltogasoline.
Fillthefueltankwithfreshunleadedregulargasoline
fromamajorname-brandservicestation(Figure9).
Important:Toreducestartingproblems,addfuel
stabilizer/conditionertofreshfuelasdirectedby
thefuel-stabilizermanufacturer.
Refertoyourengineowner’smanualforadditional
information.
g017531
Figure9
1.Fuelcap
8

CheckingtheEngine-Oil
Level
1.Movethemachinetoalevelsurface.
2.Removethedipstickbyrotatingthecap
counterclockwiseandpullingitout(Figure10).
g017530
Figure10
1.Full3.Low
2.High
3.Wipethedipstickcleanwithacleancloth.
4.Insertthedipstickintotheoil-lltube,butdonot
screwitin,thenremovethedipstick.
5.Readtheoillevelonthedipstick(Figure10).
•Iftheoillevelonthedipstickistoolow
(Figure10),carefullypourasmallamountof
multigrademineralSAE10W-30oilwithan
APIseriesclassicationofSJorhigherinto
theoil-lltube,wait3minutes,andrepeat
steps3through5untiltheoilonthedipstick
isatthecorrectlevel.
•Iftheoillevelonthedipstickistoohigh
(Figure10),draintheexcessoiluntiltheoil
onthedipstickisatthecorrectlevel;referto
ChangingtheEngineOil(page16).
Important:Iftheoillevelintheengineistoo
lowortoohighandyouruntheengine,you
maydamagetheengine.
6.Installthedipstickintotheoil-lltubesecurely.
Important:Changetheengineoilafterthe
rst5operatinghours;changeityearly
thereafter.RefertoChangingtheEngineOil
(page16).
AdjustingtheCutting
Height
WARNING
Adjustingthecuttingheightmaybringyou
intocontactwiththemovingcuttingunit,
causingseriousinjury.
•Shutofftheengineandwaitforallmoving
partstostop.
•Weargloveswhilehandlingthecutting
unit.
CAUTION
Iftheenginehasbeenrunning,themufer
willbehotandcanseverelyburnyou.
Keepawayfromthehotmufer.
Adjustthecuttingheightasdesired.
1.TurnthefuelswitchtotheOFFposition.
2.Disconnectthewirefromthesparkplug.
3.Tiltthemachineonitsside,withthedipstick
down.
4.Wearingprotectivegloves,removethenylon
cuttingline.
5.Installthecuttinglineatthedesiredheight.
g017371
Figure11
1.High3.Low
2.Middle
9

DuringOperation
DuringOperationSafety
GeneralSafety
•Wearappropriateclothing,includingeye
protection;longpants;substantial,slip-resistant
footwear;andhearingprotection.Tiebacklong
hairanddonotwearlooseclothingorloose
jewelry.
•Useyourfullattentionwhileoperatingthe
machine.Donotengageinanyactivitythat
causesdistractions;otherwise,injuryorproperty
damagemayoccur.
•Donotoperatethemachinewhileill,tired,or
undertheinuenceofalcoholordrugs.
•Contactingthediscorlinecanresultinpersonal
injury.Shutofftheengineandwaitforallmoving
partstostopbeforeleavingtheoperatingposition.
•Whenyoureleasetheoperator-presencecontrol,
theengineshouldshutoffandthecuttingunit
shouldstopwithin7seconds.Ifnot,stop
usingyourmachineimmediatelyandcontactan
AuthorizedServiceDealer.
•Keepbystandersoutoftheoperatingarea.Keep
smallchildrenoutoftheoperatingareaandunder
thewatchfulcareofaresponsibleadultwhois
notoperatingthemachine.Stopthemachineif
anyoneentersthearea.
•Operatethemachineonlyingoodvisibilityand
appropriateweatherconditions.Donotoperate
themachinewhenthereistheriskoflightning.
•Useextremecarewhenapproachingblind
corners,shrubs,trees,orotherobjectsthatmay
blockyourview.
•Watchforholes,ruts,bumps,rocks,orother
hiddenobjects.Uneventerraincouldcauseyou
toloseyourbalanceorfooting.
•Ifthemachinestrikesanobjectorstartsto
vibrate,immediatelyshutofftheengine,waitfor
allmovingpartstostop,anddisconnectthewire
fromthesparkplugbeforeexaminingthemachine
fordamage.Makeallnecessaryrepairsbefore
resumingoperation.
•Iftheenginehasbeenrunning,itwillbehotand
canseverelyburnyou.Keepawayfromthehot
engine.
•Useaccessoriesandattachmentsapprovedby
Toroonly.
StartingtheEngine
1.Openthefueltankventbyturningtheventknob
atleast2or3turnscounterclockwise.
2.TurnthefuelvalvetotheONposition(Figure12).
g017375
Figure12
1.Fuelvalve
3.Holdtheoperator-presencecontrolagainstthe
handle(Figure13).
g017334
Figure13
1.Handle2.Operator-presencecontrol
4.Placeyourfootonthedeckandtiltthemachine
towardyou(Figure14).
10

g017329
Figure14
5.Pulltherecoil-starthandle.
Note:Donotallowtherecoil-starthandleto
snapbackagainsttheengine.Returnitgently
topreventdamagetothestarter.
Note:Ifthemachinedoesnotstartafterseveral
attempts,contactanAuthorizedServiceDealer.
11

AdjustingtheHandle
Position
RefertoFigure15forthedifferenthandlepositions.
g025627
Figure15
1.Hangingstorage/transportposition4.Storage/transportposition
2.Lowerworkingposition5.Serviceposition
3.Upperworkingposition
Note:Fortheproperstorageprocedure,referto
Storage(page18).
ShuttingOfftheEngine
ServiceInterval:Beforeeachuseordaily
Toshutofftheengine,releasetheoperator-presence
control(Figure16).
Important:Whenyoureleasethe
operator-presencecontrol,theengine
shouldshutoffandthecuttinglineshouldstop
within7seconds.Iftheydonotstopproperly,
stopusingyourmachineimmediatelyandcontact
anAuthorizedServiceDealer.
g017546
Figure16
12

OperatingTips
GeneralMowingTips
Important:Operatingthemachineonslopesof
morethan25°willcausesevereenginedamage
duetoalackoflubrication.Donotoperatethe
machineonslopesgreaterthan25°.
•Inspecttheareawhereyouwillusethemachine
andremoveallobjectsthatthemachinecould
throw.
•Avoidstrikingsolidobjectswiththecuttingline.
Neverdeliberatelymowoveranyobject.
•Ifthemachinestrikesanobjectorstartstovibrate,
immediatelyshutofftheengine,disconnect
thewirefromthesparkplug,andexaminethe
machinefordamage.
•Forbestperformance,installnewcuttinglines
beforethecuttingseasonbegins.
•ReplacethecuttinglinewhennecessarywithT oro
replacementcuttingline.
•Ensurethatthereplacementcuttinglineisthe
samelengthastheintactcuttingline.
CuttingGrass
•Cutonlyaboutathirdofthegrassbladeatatime.
Donotcutbelowthehighestsetting(30mmor1.2
inches)unlessthegrassissparseoritislatefall
whengrassgrowthbeginstoslowdown.Referto
AdjustingtheCuttingHeight(page9).
•Mowinggrassover15cm(6inches)inlengthis
notrecommended.Ifthegrassistoolong,the
machinemayplugandcausetheenginetostall.
•Wetgrassandleavestendtoclumpontheyard
andcancausethemachinetoplugortheengine
tostall.Avoidmowinginwetconditions.
•Beawareofapotentialrehazardinverydry
conditions,followalllocalrewarnings,andkeep
themachinefreeofdrygrassandleafdebris.
•Ifthenishedlawnappearanceisunsatisfactory,
try1ormoreofthefollowing:
–Inspecttheundersideofthecuttingunitfor
wornordamagedcomponents(e.g.,thecutting
line)andrepairorreplacethemifnecessary.
–Walkataslowerpacewhilemowing.
–Raisethecuttingheightonyourmachine.
–Cutthegrassmorefrequently.
–Overlapcuttingswathsinsteadofcuttingafull
swathwitheachpass.
CuttingLeaves
•Aftercuttingthelawn,ensurethathalfofthelawn
showsthroughthecutleafcover.Youmayneed
tomakemorethanasinglepassovertheleaves.
•Mowinggrassover15cm(6inches)inlengthis
notrecommended.Iftheleafcoveristoothick,the
machinemayplugandcausetheenginetostall.
•Slowdownyourmowingspeedifthemachine
doesnotcuttheleavesnelyenough.
AfterOperation
AfterOperationSafety
GeneralSafety
•Alwaysshutoffthemachine,waitforallmoving
partstostop,andallowthemachinetocoolbefore
adjusting,servicing,cleaning,orstoringit.
•Cleangrassanddebrisfromthemachinetohelp
preventres.Cleanupoilorfuelspills.
•Neverstorethemachineorfuelcontainerwhere
thereisanopename,spark,orpilotlight,such
asonawaterheateroronotherappliances.
HaulingSafety
•Securethemachine.
•Usecarewhenloadingandunloadingthe
machine.
13

Maintenance
RecommendedMaintenanceSchedule(s)
MaintenanceService
IntervalMaintenanceProcedure
Beforeeachuseordaily•Ensurethattheengineshutsoffwithin7secondsafterreleasingthe
operator-presencecontrol.
Aftereachuse•Cleangrassclippingsanddirtfromtheentiremachine.
Every100hours•Servicethesparkplugandreplaceitifnecessary.
Beforestorage
•Emptythefueltankbeforerepairsasdirectedandbeforeannualstorage.
•Cleanthecoolingsystem;removegrassclippings,debris,ordirtfromtheengine
aircoolingnsandstarter.Cleanthesystemmorefrequentlyindirtyorhigh-chaff
conditions.
Yearly
•Servicetheairlter;serviceitmorefrequentlyindustyoperatingconditions.
•Changetheengineoil.
•Replacethecuttingline.
MaintenanceSafety
•Disconnectthespark-plugwirefromthesparkplug
beforeperforminganymaintenanceprocedure.
•Wearglovesandeyeprotectionwhenservicing
themachine.
•Nevertamperwithsafetydevices.Checktheir
properoperationregularly.
•Tippingthemachinemaycausethefueltoleak.
Fuelisammableandexplosive,andcancause
personalinjury.Runtheenginedryorremovethe
fuelwithahandpump;neversiphonthefuel.
•Toensureoptimumperformanceofthemachine,
useonlygenuineTororeplacementpartsand
accessories.Replacementpartsandaccessories
madebyothermanufacturerscouldbedangerous,
andsuchusecouldvoidtheproductwarranty.
14

PreparingforMaintenance
WARNING
Tippingthemachinemaycausethefuelto
leak.Fuelisammable,explosiveandcan
causepersonalinjury.
Runtheenginedryorremovethefuelwitha
handpump;neversiphon.
1.Shutofftheengineandwaitforallmovingparts
tostop.
2.Disconnectthespark-plugwirefromthe
sparkplug(Figure17)beforeperformingany
maintenanceprocedure.
Important:Alwaystipthemachineontoits
side,withthedipstickdown.Ifthemachine
istippedinanotherdirection,oilmayllthe
valvetrain,requiringatleast30minutesto
drain.
g017533
Figure17
1.Spark-plugwire
3.Afterperformingthemaintenanceprocedure(s),
connectthespark-plugwiretothesparkplug.
ServicingtheAirFilter
ServiceInterval:Yearly
1.Pressdownonthelatchtabsontopofthe
air-ltercover(Figure18).
g017381
Figure18
1.Filter2.Latchtabs
2.Openthecover(Figure18).
3.Removetheairlter(Figure18).
4.Inspecttheairlter.
A.Iftheairlterisdamagedoriswetwithoil
orfuel,replaceit.
B.Iftheairlterisdirty,tapitonahardsurface
severaltimesorblowcompressedairless
than207kPa(30psi)throughthesideof
thelterthatfacestheengine.
Note:Donotbrushthedirtoffthelter;
brushingforcesdirtintothebers.
5.Removedirtfromtheair-lterbodyandcover
usingamoistrag.Donotwipedirtintothe
airduct.
6.Inserttheairlterintotheair-lterbody(Figure
18).
7.Installthecover(Figure18).
15

ChangingtheEngineOil
ServiceInterval:Yearly
Note:Runtheengineafewminutesbeforechanging
theoiltowarmit.Warmoilowsbetterandcarries
morecontaminants.
EngineOilSpecications
Engineoilcapacity0.59L(20oz)
OilviscositySAE10W-30multigrade
mineraloil
APIserviceclassicationSJorhigher
1.Ensurethatthefueltankcontainslittleornofuel
sothatthefueldoesnotleakwhenyoutipthe
engineontoitsside.
2.RefertoCheckingtheEngine-OilLevel(page9).
3.Removethedipstickbyrotatingthecap
counterclockwiseandpullingitout(Figure19).
g017530
Figure19
1.Full3.Low
2.High
4.Tipthemachineontoitsside(sothattheairlter
isup)todraintheusedoilfromtheoil-lltube.
5.Afterdrainingtheusedoil,returnthemachineto
theoperatingposition.
6.Carefullypourabout3/4oftheenginecapacity
ofoilintotheoil-lltube.
7.Wait3minutesfortheoiltosettleintheengine.
8.Wipethedipstickcleanwithacleancloth.
9.Insertthedipstickintotheoil-lltube,butdonot
screwitin,thenremovethedipstick.
10.Readtheoillevelonthedipstick(Figure19).
•Iftheoillevelonthedipstickistoolow,
carefullypourasmallamountofoilintothe
oil-lltube,wait3minutes,andrepeatsteps
8through10untiltheoillevelonthedipstick
iscorrect.
•Iftheoillevelonthedipstickistoohigh,
draintheexcessoiluntiltheoillevelonthe
dipstickiscorrect.
Important:Iftheoillevelintheengineistoo
lowortoohighandyouruntheengine,you
maydamagetheengine.
11.Installthedipstickintotheoil-lltubesecurely.
12.Recycletheusedoilproperly.
ServicingtheSparkPlug
ServiceInterval:Every100hours
UseaChampionRN9YCsparkplugorequivalent.
1.Shutofftheengineandwaitforallmovingparts
tostop.
2.Disconnectthewirefromthesparkplug.
3.Cleanaroundthesparkplug.
4.Removethesparkplugfromthecylinderhead.
Important:Replaceacracked,fouled,or
dirtysparkplug.Donotcleantheelectrodes
becausegritenteringthecylindercan
damagetheengine.
5.Setthegapontheplugto0.76mm(0.030inch)
asshowninFigure20.
g000533
Figure20
1.Center-electrodeinsulator
2.Sideelectrode
3.Airgap(nottoscale)
6.Installthesparkplug.
7.Torquetheplugto20N∙m(15ft-lb).
8.Connectthewiretothesparkplug.
16

ReplacingtheCuttingLine
ServiceInterval:Yearly
1.TurnthefuelvalvetotheOFFpositionandclose
theventknob.
2.Disconnectthewirefromthesparkplug.
3.Turnthemachineonitsside,withthedipstick
facingdown.
4.Wearingprotectivegloves,removethenylon
cuttingline.
5.Place1lengthofnyloncuttinglineintothe
desiredcutting-heightsetting.Ensurethata
secondlineofthesamelengthisplacedinthe
correspondingcuttingheightontheopposite
sideofthecuttingdisc.
Note:Ifusingasparereel,cutthelinetoalength
of20cm(7-7/8inches).
CleaningtheMachine
ServiceInterval:Aftereachuse
WARNING
Themachinemaydislodgematerialfrom
underthemachinehousing.
•Weareyeprotection.
•Stayintheoperatingposition(behindthe
handle).
•Donotallowbystandersinthearea.
1.Tipthemachineonitsside,withthedipstick
down.
2.Useabrushorcompressedairtoremovegrass
anddebrisfromtheexhaustguard,thetopcowl,
andthesurroundingdeckareas.
17

Storage
Storethemachineinacool,clean,dryplace.
GeneralSafety
•Alwaysshutoffthemachine,waitforallmoving
partstostop,andallowthemachinetocoolbefore
adjusting,servicing,cleaning,orstoringit.
•Allowtheenginetocoolbeforestoringthemachine
inanyenclosure.
•Neverstorethemachineorfuelcontainerwhere
thereisanopename,spark,orpilotlight,such
asonawaterheateroronotherappliances.
PreparingtheMachinefor
Storage
WARNING
Fuelvaporscanexplode.
•Donotstorefuelmorethan30days.
•Donotstorethemachineinanenclosure
nearanopename.
•Allowtheenginetocoolbeforestoringit.
1.Onthelastrefuelingoftheyear,addfuel
stabilizertothefuelasdirectedbytheengine
manufacturer.
2.Runthemachineuntiltheengineshutsofffrom
runningoutoffuel.
3.Primetheengineandstartitagain.
4.Allowtheenginetorununtilitshutsoff.
Whenyoucannolongerstarttheengine,itis
sufcientlydry.
5.Ifyouarestoringthemachinehangingonawall,
switchthefuelvalveoffandclosetheventof
thefuelcap.
6.Disconnectthewirefromthesparkplug.
7.Removethesparkplug,add30ml(1oz)of
oilthroughthespark-plughole,andpullthe
starterropeslowlyseveraltimestodistribute
oilthroughoutthecylindertopreventcylinder
corrosionduringtheoff-season.
8.Installthesparkplugandtightenitwithatorque
wrenchto20N∙m(15ft-lb).
9.Tightenallnuts,bolts,andscrews.
18

Troubleshooting
ProblemPossibleCauseCorrectiveAction
1.Thewireisnotconnectedtothespark
plug.
1.Connectthewiretothesparkplug.
2.Theholeinthefuel-capventis
plugged.
2.Cleantheholeinthefuel-capventor
replacethefuelcap.
3.Thesparkplugispitted,fouled,orthe
gapisincorrect.
3.Checkthesparkplugandadjustthe
gapifnecessary.Replacethespark
plugifitispitted,fouled,orcracked.
Theenginedoesnotstart.
4.Thefueltankisemptyorthefuel
systemcontainsstalefuel.
4.Drainand/orllthefueltankwithfresh
fuel.Iftheproblempersists,contactan
AuthorizedServiceDealer.
1.Thefuelcapventholeisplugged.1.Cleanthefuelcapventholeorreplace
thefuelcap.
2.Theair-lterelementisdirtyandis
restrictingtheairow.
2.Cleantheair-lterelementand/or
replaceit.
3.Theundersideofthemachinehousing
containsclippingsanddebris.
3.Cleanunderthemachinehousing.
4.Thesparkplugispitted,fouled,orthe
gapisincorrect.
4.Checkthesparkplugandadjustthe
gapifnecessary.Replacethespark
plugifitispitted,fouled,orcracked.
5.Theengineoillevelistoolow,toohigh,
orexcessivelydirty.
5.Checktheengineoil.Changetheoilif
itisdirty;addordraintheoiltoadjust
theoilleveltotheFullmarkonthe
dipstick.
Theenginestartshardorlosespower.
6.Thefueltankcontainsstalefuel.6.Drainandllthefueltankwithfresh
fuel.
1.Thewireisnotconnectedtothespark
plug.
1.Connectthewiretothesparkplug.
2.Thesparkplugispitted,fouled,orthe
gapisincorrect.
2.Checkthesparkplugandadjustthe
gapifnecessary.Replacethespark
plugifitispitted,fouled,orcracked.
Theenginerunsrough.
3.Theair-lterelementisdirtyandis
restrictingtheairow.
3.Cleantheair-lterelementand/or
replaceit.
1.Theundersideofthemachinehousing
containsclippingsanddebris.
1.Cleanunderthemachinehousing.
2.Theenginemountingboltsareloose.2.Tightentheenginemountingbolts.
Themachineorenginevibrates
excessively.
3.Thecuttingdiscboltisloose.3.Tightenthecuttingdiscbolt.
1.Youaremowinginthesamepattern
repeatedly.
1.Changethemowingpattern.
Thereisanunevencuttingpattern.
2.Theundersideofthemachinehousing
containsclippingsanddebris.
2.Cleanunderthemachinehousing.
19

Notes:
Other manuals for HoverPro 400
2
Table of contents
Other Toro Lawn Mower manuals

Toro
Toro 75744 User manual

Toro
Toro Z597 Z Master Manual

Toro
Toro Super Recycler 20837 User manual

Toro
Toro HoverPro 450 User manual

Toro
Toro ProLine 30333 User manual

Toro
Toro GrandStand 74534 User manual

Toro
Toro 74212 User manual

Toro
Toro ProLine H800 User manual

Toro
Toro 30531 User manual

Toro
Toro 04358 Greensmaster 3150 User manual

Toro
Toro VACU-POWER User manual

Toro
Toro 03863 Reelmaster 6500 User manual

Toro
Toro 30433 User manual

Toro
Toro 30367 User manual

Toro
Toro 74959 User manual

Toro
Toro TimeCutter MX 5075 User manual

Toro
Toro 30551 User manual

Toro
Toro 03530 User manual

Toro
Toro Super Recycler 20381 User manual

Toro
Toro 20831 User manual