TORQTECH CA-10RC-ENDO User manual

CA-10RC-ENDO
Geared Contra Angle Handpiece
*1 Use burs that conform to ISO 1797-1
*2 To use canal measurement function with the CA-10RC-ENDO, make sure that both the treatment unit and micromotor
have canal measurement capability of the CA-10RC-ENDO.
[Specifications may be changed without prior notice due to improvements.]
• Wear safety glasses or similar eye protection to prevent eye injury from cutting debris.
• Run the handpiece outside the oral cavity before using it and make sure the bur or file does not wobble
and that it runs at the correct speed and in the right direction.
• If a bur or file comes out during use, stop using the handpiece immediately and have the handpiece
repaired.
• Do not press the push button until the handpiece comes to a complete stop. Otherwise, the inside of the
button could wear out and make it hard to insert and remove burs or files.
• If the handpiece makes abnormal noise, vibrates too much, or overheats, take out the bur and replace it
with a new one. If the same problem persists, have the handpiece repaired.
• Follow all recommendations of the bur manufacturer concerning bur rotation speed and direction.
• Even new burs and files are sometimes poorly balanced; if a bur or file makes a loud, metallic noise
during rotation, stop using it.
• Spray and tip air are not emitted.
• The maximum input rotation for the CA-10RC-ENDO (speed reduction model for endodontics) is 20,000
rpm (2,000 rpm as file rotation). Do not input more than 20,000 rpm. Otherwise, this may result in over-
heating the head or the handpiece could be damaged.
• The head heats up if it runs at 2,000 rpm. Do not use it for more than 3 minutes at 2,000 rpm.
• Do not force the handpiece inside the oral cavity if the mouth is not open wide enough. It could contact
the opposing tooth, and inadvertently press the push button. Running the handpiece with the push button
held down could cause the push button to overheat and damage the opposing tooth. It could also burn
the patient or the dentist and the bur or file could come out.
• After maintenance, do not cover the handpiece with gauze when operating it to remove excess oil. If the
push button is inadvertently held down, the head could overheat or the handpiece could break down.
• In cases of tooth extractions, split teeth, endodontic treatment etc. or incision or open wounds in soft
tissue, the tip air must be turned off to avoid causing a subcutaneous emphysema due to emitted air from
the handpiece.
• The CA-10RC-ENDO must not be connected to or used in combination with any other apparatus or system.
It must not be used as an integral component of any other apparatus or system.
• Never use excessive force to insert the file.
• Never use excessive force to advance the file down the canal. (Using excessive force could break a Ni-Ti
file.)
• All files eventually break due to metal fatigue. Replace old files in a timely manner.
• Never use stretched, deformed or bent files.
• Do not get chemical solutions such as FC or hypo-chlorite on the head or contrary electrode. These could
cause inflammation.
• Before use, read all relevant instructions that come with the dental treatment unit thoroughly.
• Before use, touch the file in the CA-10RC-ENDO with the contrary electrode on the probe cord connected to
the dental treatment unit, and make sure all the bars in the meter for the measurement display on the chair
light up. If they do not, do not use the handpiece. Something is probably wrong with the display.
• Some files do not work with the built-in electrode inside the CA-10RC-ENDO. Be sure to test the hand-
piece as described above.
• The built-in electrode will work for only some types of files.
It will not work if there is no conductivity between the file and shank or if the shank does not conduct
electricity. Do not use these types of files.
• If a file will not work with the built-in electrode inside the CA-10RC-ENDO, you can install a separate
external file electrode that will work.
• Canal measurement cannot be performed with contra angles and micromotors that do not have this
capability. For canal measurement, make sure the dental treatment unit, micromotor and CA-10RC-ENDO
all have this capability.
• Accurate measurement cannot be performed if the built-in or external file electrode is worn out.
Replace the electrode with a new one.
• If the dental treatment unit’s canal length indicator measurement readings are unstable, stop using the
handpiece immediately and replace the built-in electrode or external file electrode.
• When using canal measurement functions, do not operate this handpiece faster than 1,200 rpm. The
meter may be somewhat erratic.
• If a chemical solution such as sodium hypochlorite gets on the head, wash it off immediately. Otherwise,
metal contacts could be corroded and prevent accurate measurement of the canal.
• Always use a rubber dam for preparing root canals.
Always use burs and files with clean shanks.
Always carefully remove all cleaning fluids before inserting a bur into the chuck; some cleaning fluids are corrosive
and can ruin the chuck.
Wait for the handpiece to come to a complete stop before inserting or removing burs or files.
Wait for the bur or file to stop rotating before taking it out of the oral cavity.
Remove burs and files before returning the handpiece to its holder in the dental treatment unit;
otherwise there is a risk of injury or damage.
• Never use the following types of burs and files; they could come out and injure the patient or be swallowed:
Those which do not conform to ISO standards. Those with scratched or bent heads or shanks. Those which are rusty,
chipped or broken. Those which have been modified or altered such as those having shortened shanks.
Symbols
Specifications
Prohibitions
Warnings and Cautions
Geared Contra Angle Handpiece Attachment
Type CA-10RC-ENDO
Indications for Use The TORQTECH transmits rotation of the motor to
dental burs or reamers which cut or grind teeth or
dentures with the same or transformed rotation.
Rotation Speed Ratio 10 : 1 (reduction)
Maximum Motor Speed [rpm] 20,000
Length [mm] Approx. 94
Weight [g] Approx. 55
Usable Burs *1 Shank Type 1 (CA)
Chuck Type Push Button
Connectable Micromotors TR-SII-R-O, TR-S3-R-O*2
Usable Shank Length for Burs and Files [mm] Minimum 12
Usable Bur Diameter [mm] 2.334 to 2.350
* If a dirty bur or file or ones with cleaning fluid have been inserted by mistake, contact your local dealer or J. MORITA
OFFICE. to have the handpiece inspected.
Operation 1/4 2018-03-21 Pub. No.: L111-62001-500
TORQTECH
Atmospheric pressure
limitation
Fragile
Temperature limitation
Keep away from rain
Type BF applied part
Humidity limitation
This way up
Supports high-temperature
cleaning and disinfection
This instrument must not be used for any purpose other than the provision of dental treatment.
• Do not use the TORQTECH on patients who have implanted pacemakers or defibrillators.
• No modification of the TORQTECH is allowed.
• Do not perform maintenance while using the TORQTECH for treatment.
• Do not use the wireless transmission devices listed below in the examination area:
1. Cell phone terminals.
2. Wireless transmitting devices such as ham radios, walkie-talkies, and transceivers.
3. Personal Handy-phone System (PHS)
4. Routers for intra-building paging systems, wireless LAN, cordless analogue telephones, and other electric
wireless devices.
Serial number E.g., G00001
E.g., L111G00001K
Year of Manufacture (G: 2018, H: 2019...)
1
Autoclavable up to +135°C
(+275°F)
File Usage
(Nickel-Titanium files are easily broken. Keep the following points in mind to minimize file breakage.)
Using the Endodontic Contra Angles with Units and Micromotors that Have Canal
Measurement Capability
EU authorized representa-
tive under the European
Directive 93/42/EEC
1
1
: This indicates when not to use the device.
Manufacturer Date of manufacture
Refer to instructions for use
GS1 DataMatrix
ENDO
The user (e.g., healthcare facility, hospital, clinic, etc.) is responsible for supervising the use and maintenance of medical devices.
This instrument must not be used by anyone other than a dentist, doctor or other legally qualified professional.
The following symbols and expressions indicate the degree of danger and harm that could result from ignoring the
instructions they accompany:
Thank you for purchasing the TORQTECH geared contra angle handpiece.
For optimum performance, efficiency, avoiding hazards, preventing patient injury, and safety, read the instruction
manual thoroughly before use, and follow all cautionary remarks and usage instructions. Keep this manual in a
handy place for ready reference.
Service and Contacts
The TORQTECH may be repaired and serviced by:
For repairs or other types of service, contact your local dealer or J. MORITA OFFICE.
• The technicians of J. MORITA's subsidiaries all over the world.
• Technicians employed by authorized J. MORITA dealers and specially trained by J. MORITA.
• Independent technicians specially trained and authorized by J. MORITA.
Maintenance and Inspection
* This instrument should be inspected every 3 months.
* Maintenance and inspection are generally considered to be the duty and obligation of the user, but if, for some reason, the user
is unable to carry out these duties, the user may rely on a qualified medical device serviceman. Contact your local dealer or J.
MORITA OFFICE for details. Inspect the following items: 1. Micromotor connection. 2. Bur and file insertion. 3. Handpiece rota-
tion. 4. Overheating. 5. Canal length meter display.
* For repairs, contact your local dealer or J. MORITA OFFICE.
1. Malfunction or damage resulting from repairs made by personnel not authorized by J. MORITA MFG. CORP.
2. Any unauthorized modifications to its products
3. Malfunction or damage resulting from maintenance or repairs carried out using parts or components other than those specified
by J. MORITA MFG. CORP.
4. Malfunction of or damage to MORITA products caused by products made by other manufacturers unless they were supplied by
J. MORITA MFG. CORP.
5. Malfunction or damage resulting from failure to observe the safety precautions or operating procedures described in these
Operating Instructions
6. Malfunction or damage resulting from ambient conditions that do not conform to the operating conditions specified in these
Operating Instructions, such as an improper electrical power supply or installation environment
7. Malfunction or damage resulting from a natural disaster, such as a fire, earthquake, flood or lightning
* Replace parts as necessary based on the degree of wear and length of use.
* Motor usage and handling: Read all instruction materials thoroughly before use and follow all cautionary remarks and usage
instructions.
J. MORITA MFG. CORP. maintains supplies of service parts for 10 years after discontinuation of their production.
For the duration of this period, we will supply replacement parts and be able to repair the product.
J. MORITA MFG. CORP. will not be responsible for the following matters, even during the warranty period.
Disclaimer
Standards and Procedures for the Disposal of Medical Devices
If there is a possibility that a medical device is contaminated, the dentist or doctor responsible for the patient's treatment must
confirm that it is uncontaminated, and must then have it disposed of by a healthcare facility or an agent licensed and qualified to
handle standard industrial waste and industrial waste requiring special treatment.
In Case of Accident
If an accident occurs, this instrument must not be used until repairs have been completed by a qualified and trained technician
authorized by the manufacturer.
This warns the user of the possibility of serious injury or death to the patient, damage or complete
destruction of the instrument or other valuable property, and fire.
This warns the user of the possibility of slight or moderate injury to the patient.
This alerts the user of important points concerning operation of the instrument or the risk of dam-
age to it.
Operating,Transport and Storage Environments
* Do not expose the handpiece to direct sunlight for an extended period of time.
* If the handpiece will not be used for an extended period of time, store it in a clean, dry place after autoclaving it.
* The useful life of the TORQTECH is 7 years (based on self-certification) from the date of shipment provided it is
regularly and properly inspected and maintained.
CE(0197) marking
Conforms with the European
Directive, 93/42/EEC.
CE marking
Conforms with the European
Directive, 2011/65/EU.
Eligible Patients for the TORQTECH:
Children to elderly who can stay still during treatment. A person’s weight, gender, and nationality are not considered.
Operating Temperature: +10°C to +35°C (+50°F to +95°F); Humidity: 30% to 80% (without condensation);
Atmospheric Pressure: 70 kPa to 106 kPa
Transport and Storage Temperature: -10°C to +70°C (+14°F to +158°F); Humidity: 10% to 85% (without condensation);
Atmospheric pressure: 70 kPa to 106 kPa
Operation Instructions
[Some symbols may not be used.]
* Use the guide bar
when replacing the
built-in electrode or
external file electrode.
Accessories
• Make sure the micromotor’s connection cylinder is free of dust, dirt, and debris.
• Handle the handpiece carefully. Do not drop it or let it swing and bang against the dental treatment unit. Otherwise,
it may result in poor rotation.
* Make sure the O-rings on the micromotor connection are properly installed.
* To make a canal measurement, connect the TR-SII-R-O or TR-S3-R-O.
Slide the handpiece straight onto the micromotor’s connection cylinder. Line up the hole in the motor
connections with the projection in handpiece and fit the two together until there is an audible click.
Projection
Hole
• Do not use the CA-10RC-ENDO if the cap or set screw is loose. These could come off and be swallowed by the
patient. Accurate canal measurement may not be performed.
To use canal measurement function with the CA-10RC-ENDO, make sure that both the dental treatment unit and
micromotor have canal measurement capability.
Give the handpiece a light tug before using it to make sure it is securely connected.
Wait for the micromotor to come to a complete stop before connecting or disconnecting the handpiece.
• Make sure the screw for the file electrode is tightened up properly. If it comes out, it could be swallowed by the patient or accurate measurements may not be made.
Do not fit the electrode onto the cutting surface of the file. The file electrode will wear out very quickly.
*The TORQTECH is not autoclaved before shipping. Be sure to autoclave it before using it for the first time. Follow the instructions below.
Make sure the cap and screw are not loose and that the cap fits flush up against the head. Make sure
there are no cracks, misalignment or other defects.
Make sure the chuck opening is rust-free and clean. Make sure the joint is clean and not damaged.
Connect the handpiece to the micromotor and step on the foot pedal to operate it. Make sure it runs
smoothly without any abnormal noise or vibration.
For Canal Measurement
Touch the file with the contrary electrode that is connected to the dental treatment unit and make sure
all the bars on the canal measurement display light up clearly without exception.
1. Before Use
2. Motor Connection
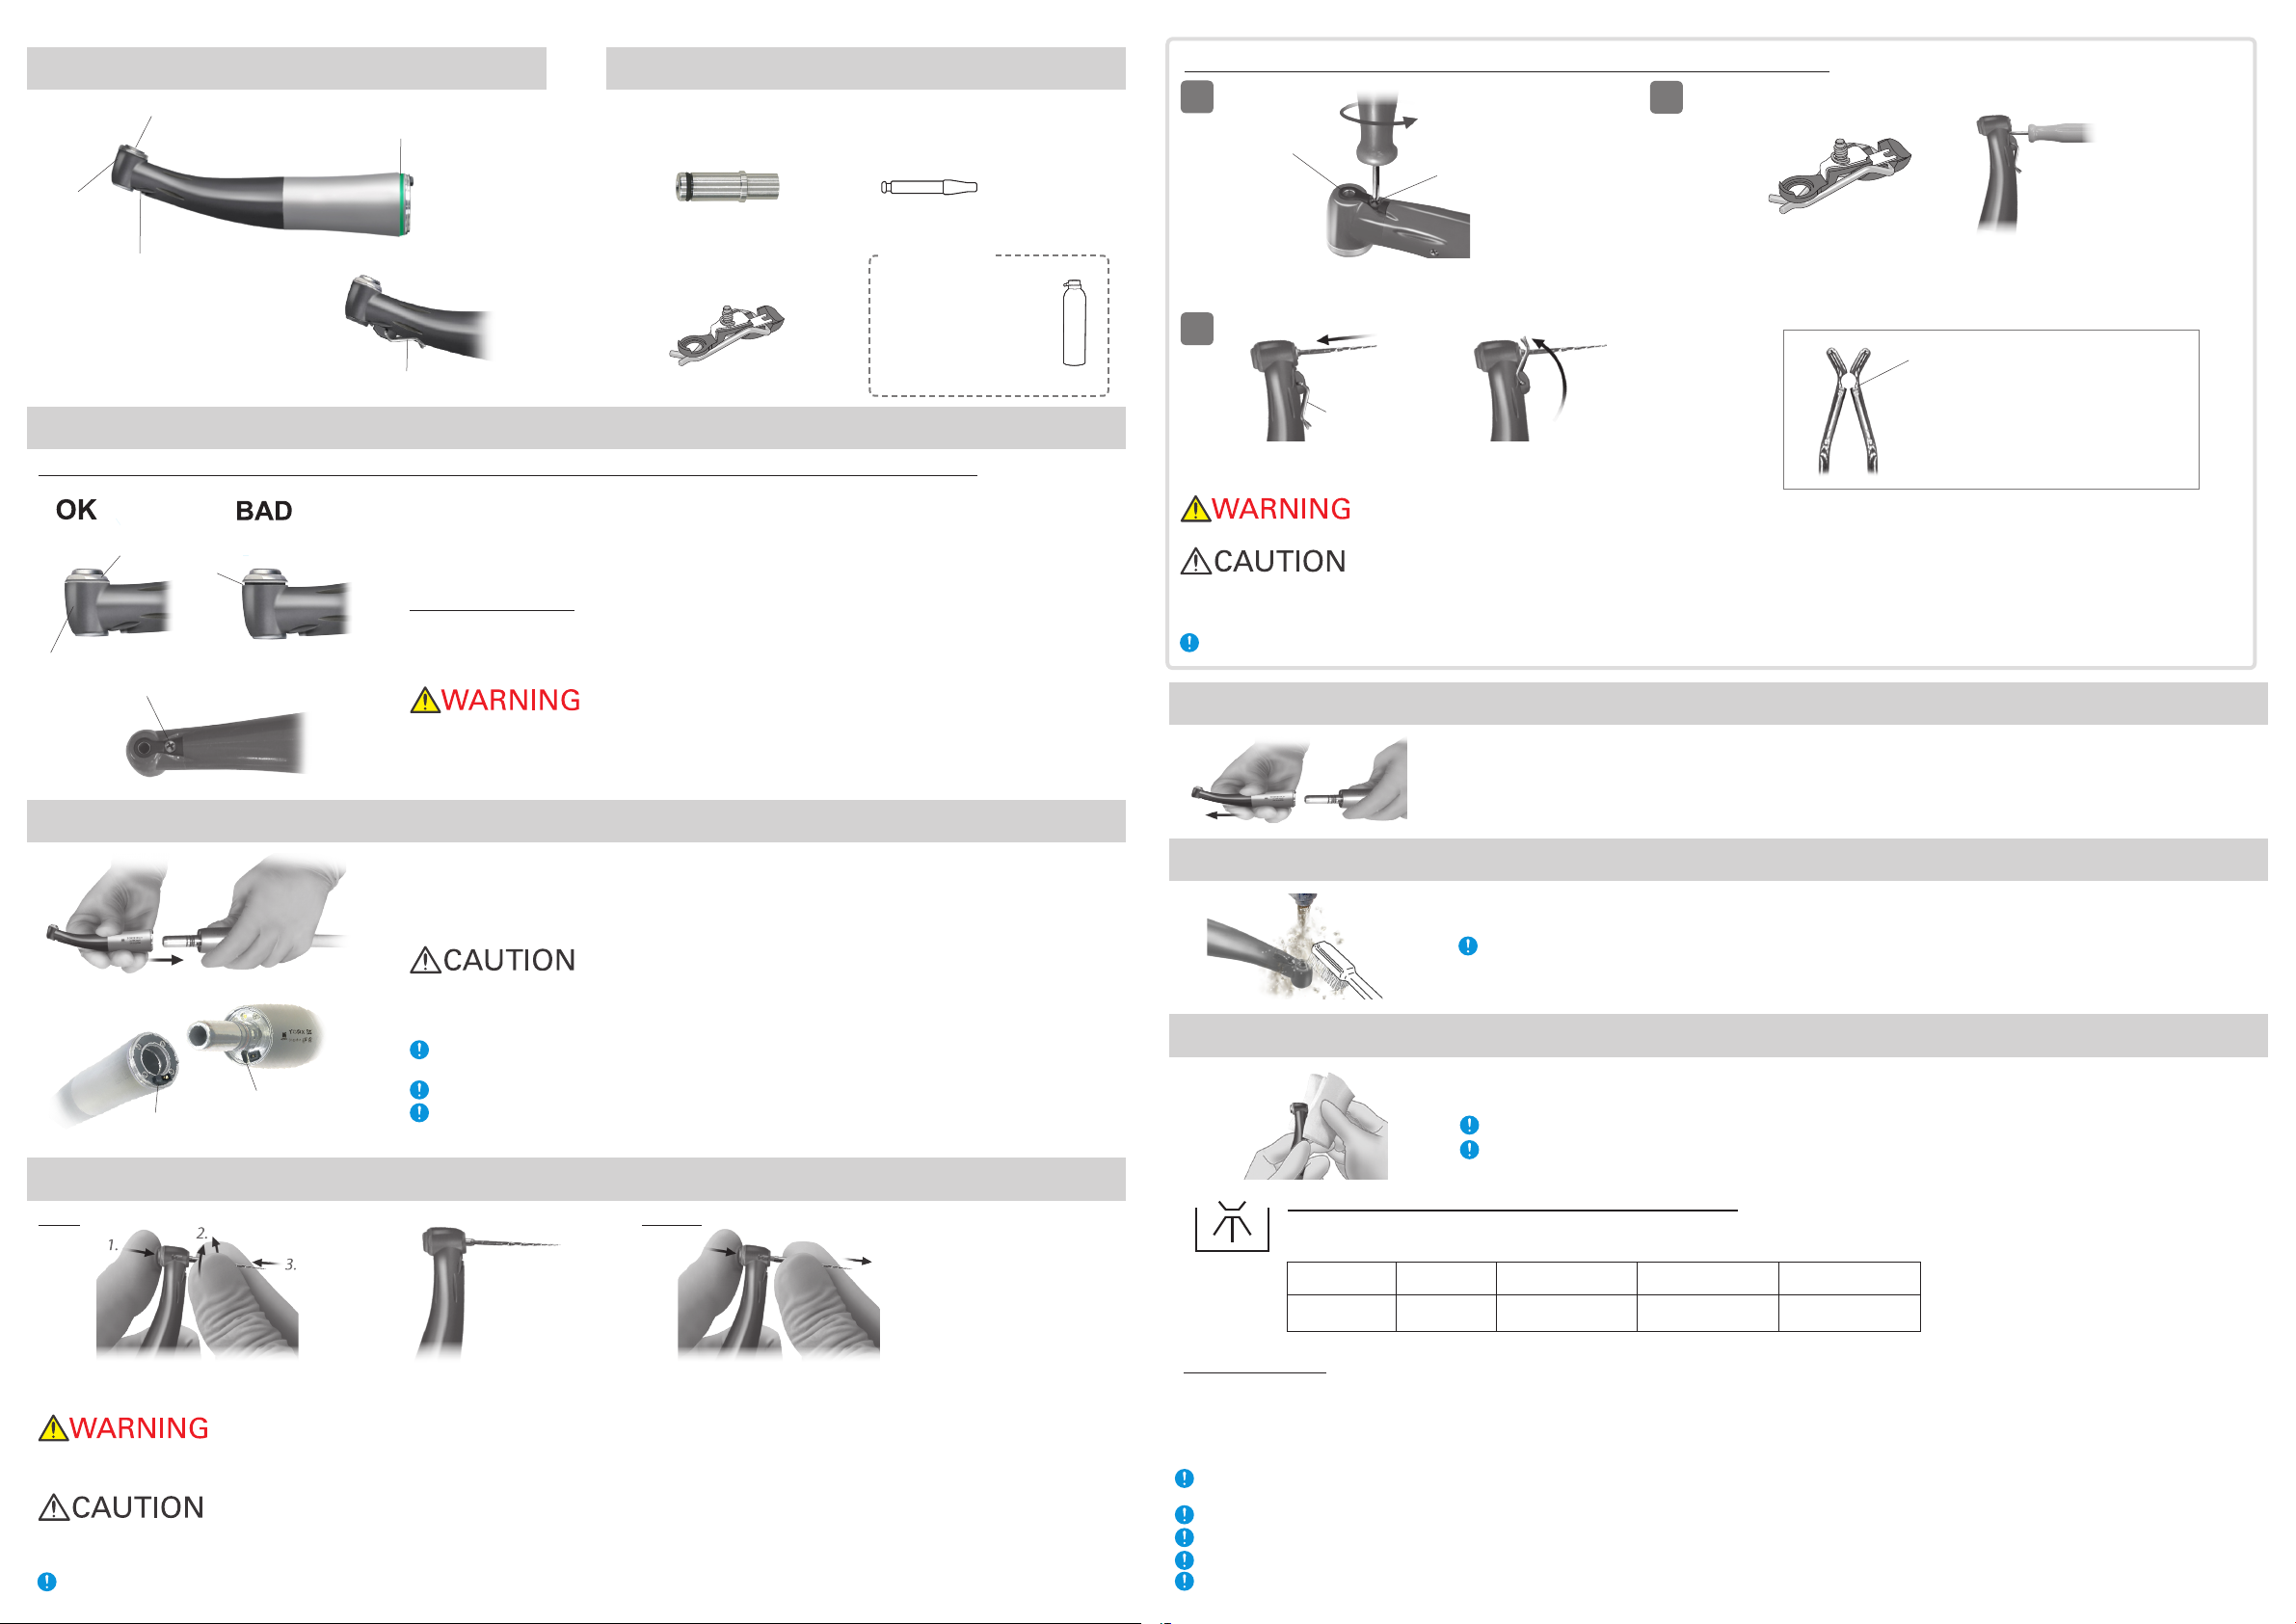
If there is no conductivity between the file shank and cutting part, install the external file electrode.
1.
Built-in
Electrode
Screw
Fix with screw
2.
3.
Install the external file electrode.
*For details, see 2 to 5 of “10. Parts Replacement” section.
Put file in (see “3. Insert and Remove Burs and Files” section).
Swing the file electrode up and clip it on the file.
Take out the screw and then the built-in electrode.
Worn out
4. After Use
5. Cleaning
Take out the bur or file and detach the handpiece from the micromotor.
*Leaving burs or files in the handpiece can make it difficult to get them out later.
Clean off the cutting debris in running water with a soft brush.
Be sure to lubricate the handpiece with the LS SPRAY or MORITA MULTI SPRAY after washing it.
Cap
Gap
Head
Screw
Operation 2/4 2018-03-21 Pub. No.: L111-62001-500
3. Insert and Remove Burs and Files
Spray Nozzle
Code No. 5071343
External File Electrode (with cap)
Code No. 5071377
Sold separately
* For parts that wear out and need periodic replacement, see “Maintenance and In-
spection” and “10. Replacement Parts” sections whenever necessary.
Head
Push Button
Parts Identification
Guide Bar
Code No. 8491763
LS SPRAY
Code No.7927568
or 5071340
MORITA MULTI SPRAY
Code No.7914113
or 5010201
Built-in Electrode
External File Electrode
• Make sure files go all the way into the chuck. Give them a light tug to make sure they are securely installed.
• Never use stretched or damaged files.
• Take care not to injure your fingers when inserting and removing burs and files.
• Be sure to push the push button when inserting and removing burs and files. Otherwise, it could damage the chuck and fail to hold burs and files.
Use specified Ni-Ti or stainless steel files.
Hold down the push button and rotate the file or bur until it lines up with
the notch inside the chuck and goes all the way in. Then release the button.
Hold down the push button and pull the bur or file straight out.
Insert Remove
Replace the external file electrode if it
is damaged or worn out, as shown in
the illustration to the left.
6. Disinfection
Do not use anything except ethanol. Do not use too much ethanol; it could seep inside and damage the handpiece.
Never wipe the handpiece with corrosive solutions such as electrolytic acids, strong alkaline solutions, or other special cleaning
solutions commonly available.
Wipe the handpiece with a piece of gauze that has been dampened with Ethanol for Disinfection (Ethanol 70 vol% to 80
vol%) and wrung out thoroughly.
* When using a high-temperature washer-disinfector to clean the handpiece, strictly adhere to the conditions specified below.
Operating Precautions
High-temperature cleaning conditions
Operating conditions for high-temperature washer-disinfectors
If the handpiece is washed without using the handpiece holder, it could result in corrosion or clog in the air or water line and damage the handpiece due to impurities or
remaining medical agents.
Inappropriate cleaning methods and solutions will damage the handpiece.
Do not clean the handpiece using strong acidic or alkaline solutions that could cause the metal to corrode.
Any moisture left inside the handpiece could result in the remaining water coming out during use and cause corrosion, or poor lubrication and sterilization.
Do not leave the handpiece inside a high-temperature washer-disinfector.
• Always use a handpiece holder when washing the handpiece, making sure to rinse the inside of the handpiece thoroughly.
• For details on handling medical agents or adjusting their concentration, refer to the user manual for the washing device.
• After washing is complete, check to see if the handpiece, including its inside, is completely dry. If any water remains inside the handpiece, expel it with an air gun or another
such tool. Failure to do so could result in the remaining water coming out during use and cause poor lubrication or sterilization.
• Always lubricate the handpiece after washing.
* After cleaning, there may be streaks or white spots on the handpiece. Use a neutralizer only if there are streaks or white spots.
Unit Name Mode Detergent
(concentration)
Neutralizer*
(concentration)
Rinse
(concentration)
Miele G7881 Vario TD neodisher MediClean
(0.3% to 0.5%)
neodisher Z
(0.1% to 0.2%)
neodisher Mielclear
(0.02% to 0.04%)
File Electrode
External File Electrode
(Ethanol disinfectable) (Ethanol disinfectable)
(Ethanol disinfectable)
(Autoclavable)
• The file electrode may work for some types of files.
• The file electrode cannot be used with files that have a shank diameter greater than 1.2 mm, shanks that are not circular, large cutting heads such as Largo Burs, and Gadsden
reamers.
Identification Ring
(Green: reduction)

Place the handpiece in a sterilization pouch and autoclave it.
After autoclaving, store the handpiece in a dry environment.
Do not use any lubricant except the LS SPRAY or MORITA MULTI SPRAY.
Always use the spray bottle in a vertical position. Always use the special spray nozzle provided.
• The handpiece will fail if it is not lubricated and cleaned with the spray regularly.
• Spraying for more than 5 seconds can cause extreme cooling and freezing.
• Always cover the handpiece with gauze before spraying. If spray accidentally gets into your eyes, wash them out with plenty of water and see a doctor. Use soap and water to
wash off any spray on your skin.
• Do not use the spray in an enclosed area which is not properly ventilated. Do not point the spray nozzle at anyone and do not use the spray near an open flame.
Take out the bur or file and detach the
handpiece from the micromotor.
Insert the spray nozzle into the connection
end of the handpiece, hold it firmly and
then spray for about 2 seconds.
Put the spray nozzle on the spray
can.
* Lubricate with the LS SPRAY (sold separately) or MORITA MULTI SPRAY (sold separately) before autoclaving and
after morning and afternoon treatment sessions.
7. Lubrication
11.Troubleshooting
Do not sterilize in any way except autoclave.
Remove the bur or file before autoclaving.
Failure to clean and lubricate the handpiece before autoclaving will result in a malfunction.
The sterilization and drying temperatures must not exceed 135°C (275°F). A drying temperature in excess of 135°C (275°F) will result in contamination of the handpiece or cause
it to malfunction.
High autoclave temperatures can damage the O-rings etc. Keep the handpiece from directly contacting heat sources or the inside of the autoclave by putting it into a sterilization
pouch.
Do not leave the handpiece inside the autoclave.
• To prevent the spread of serious, life-threatening infections such as HIV and hepatitis B, the TORQTECH must be autoclaved after finishing the treatment of each patient.
• Instruments are extremely hot after autoclaving; do not touch them until they cool off.
10. Replacement Parts
9. Packaging and Sterilization
Operation 3/4 2018-03-21 Pub. No.: L111-62001-500
1 2 3
8. Remove Excess Oil
Using an air blow gun, blow the handpiece connection for 20 to 30 seconds to get rid of
any moisture left inside the handpiece. Wipe the excess oil from the handpiece with a
gauze.
• After handpiece lubrication, be sure to remove the excess oil. If any oil seeps inside the micromotor, it could result in a malfunction. Also, excess oil could cause the handpiece to over-
heat.
You can use MORITA's threeway syringe instead of an air blow gun.
(In this case, attach the air nozzle to the tip of the threeway syringe. The air nozzle comes
with a micromotor or its optional accessory.)
Recommended Temperature and Time:
In a sterilization pouch, minimum 6 minutes at +134°C (+273.2°F) or minimum 60 minutes at +121°C
(+249.8°F)
* Autoclaving and drying temperatures must not exceed +135°C (+275°F)
* Minimum drying time after sterilization: 10 minutes
◆Bur or File does not go into chuck.
• Lubricate the handpiece, and then use a new bur or file to check if the problem has been resolved. If this does not resolve the problem, have the hand-
piece repaired.
◆Bur does not rotate.
• Make sure the micromotor is properly connected to its tube. Remove the handpiece from the micromotor and step on the foot control. Does the micro-
motor run?
If micromotor runs:
Make sure the handpiece is connected to the micromotor correctly, then step on the foot control to see the bur runs. If the bur does not run, have the
handpiece repaired.
If micromotor does not run:
Refer to the accompany user manual for the micromotor.
◆Cannot make a canal measurement.
• Touch the file and the contrary electrode together. Do all the meter bars light up without flickering?
If all the meter bars light up:
The handpiece is normal.
If some bars do not light up or they flicker:
Replace the built-in electrode or external file electrode. If this does not resolve the problem, have the handpiece repaired.
• Make sure the fixing screw for the built-in electrode or external file electrode is not loose. If it is not, tighten the screw properly.
Before inspection and adjustment, make sure the dental treatment unit power is on.
If the apparatus does not work properly after being inspected and adjusted, contact your local dealer or J. MORITA OFFICE.
Screw Screw
123123
12
12
Replace Built-in Electrode Replace External File Electrode
* If all the canal length indicator bars on the canal measurement display do not light up or if they flicker when the file touches the contrary electrode connected to the
dental treatment unit, the built-in electrode or external file electrode is worn out. Replace it with a new one.
Loosen the screw and remove the built-in
electrode.
Loosen the screw and remove the ex-
ternal file electrode.
Hold down the push button, insert the
guide bar and turn it back and forth until
it fits into the latch groove. Then release
the push button to secure the guide bar.
Hold down the push button, insert the
guide bar and turn it back and forth until
it fits into the latch groove. Then release
the push button to secure the guide bar.
Slide the new built-in electrode onto the
guide bar and line up the screw holes.
Slide the new external file electrode
onto the guide bar and line up the
screw holes.
Slowly turn the screw and make sure
the built-in electrode goes into the head
properly.
Slowly turn the screw and make sure
the external file electrode goes into the
head properly.
Tighten the screw and then hold down
the push button and pull out the guide
bar.
Tighten the screw and then hold down
the push button and pull out the guide
bar.
Make sure the cap is properly placed.
After Replacement
• Always use the guide bar and make sure it
will not come out. If the guide bar cannot be
properly fixed in place, the internal contact
could be bent, and then the instrument might
not be able to make accurate measurements
or else it might malfunction.
• Do not run the micromotor with the guide bar
inserted. This could damage the handpiece.
• Always use the guide bar and make sure it
will not come out. If the guide bar can-
not be properly fixed in place, the internal
contact could be bent, and then the instru-
ment might not be able to make accurate
measurements or else it might malfunction.
• Do not run the micromotor with the guide
bar inserted. This could damage the hand-
piece.
• Make sure the screw is tightened properly.
Otherwise, it might come out and be swal-
lowed. Also, canal measurements might not
be accurate.
• Make sure the screw is tightened properly.
Otherwise, it might come out and be swal-
lowed. Also, canal measurements might
not be accurate.
The cap is misaligned.
Cap
1 1
2 2
3 3
4 4
5 5
OK BAD

For Electronic Measurement
Operation 4/4 2018-03-21 Pub. No.: L111-62001-500
Root canal that has an exceptionally large apical foramen due
to a lesion or incomplete development cannot be accurately
measured.
If the crown is broken and a section of the gingival tissue
intrudes into the cavity surrounding the canal opening, contact
between the gingival tissue and the file will result in electrical
leakage and an accurate measurement cannot be obtained. In
this case, build up a barrier with cement to insulate the gingival
tissue.
The gutta-percha must be completely removed to eliminate its
insulating effect. After removing the gutta-percha, pass a small
file all the way through the apical foramen and then put a little
saline in the canal, but do not let it overflow the canal opening.
If blood overflows from the opening of the root canal and
contacts the gums, this will result in electrical leakage and an
accurate measurement cannot be obtained. Wait for bleeding
to stop completely. Clean the inside and opening of the canal
thoroughly to get rid of all blood and then make a measurement.
If a chemical solution overflows from the opening of the root
canal, an accurate measurement cannot be obtained. Clean
the inside and opening of the canal thoroughly to get rid of the
chemical solution and then make a measurement.
Fractured tooth will cause electrical leakage and an accurate
measurement cannot be obtained.
A branch canal will also cause electrical leakage.
Accurate measurement cannot be obtained if the file touches
a metal prosthesis that is touching gingival tissue. In this case,
widen the opening at the top of the crown so that the file will
not touch the metal prosthesis before taking a measurement.
In this case, electrical leakage through the caries infected area
to the gums will make it impossible to obtain an accurate mea-
surement.
If the canal is extremely dry, the meter may not move until it is
quite close to the apex. In this case, try moistening the canal
with oxydol or saline.
Thoroughly remove all cutting debris on the tooth.
Thoroughly remove all the pulp inside the canal; otherwise, an
accurate measurement cannot be made.
The meter will not move if the canal is blocked.
Open the canal all the way to the apical constriction to measure
it.
Root Canal with a Large Apical Foramen
Root Canal with Chemical Solution Overflowing from the Opening
Fractured Tooth, Leakage through a Branch Canal
Broken Crown
Re-treatment of a Root Filled with Gutta-percha
Root Canal with Blood Overflowing from the Opening
Root Canals Not Suitable for Electronic Measurement
Accurate measurement cannot be obtained with the root canal conditions shown below. There may be cases other than these where an accurate measurement cannot be made.
Crown or Metal Prosthesis Touching Gingival Tissue Caries Touching the Gums
Extremely Dry Canal
Cutting Debris on Tooth, Pulp Inside Canal
Blocked Canal
Clean Build-up
Pulp
Caries touches
gums
Debris
Crown
Clean
Electrical Meter Readings and Radiography
Sometimes the canal meter reading and the X-ray image will not correspond. This does not
mean that the meter is not working properly or that the X-ray exposure is a failure.
Depending on the angle of the X-ray beam, the apical foramen may appear to be located differ-
ently than it actually is.
X-ray Film
X-ray Tube
In the example above, the X-ray seems to show that the file has not reached the apical fora-
men because the actual foramen does not correspond with the anatomical apex. This is not
uncommon.
2018. 03. Printed in Japan
12 Months
TERMS AND CONDITIONS
J. MORITA MFG. CORP. warrants the Product as follows:
1. Warranty Term.
J. MORITA MFG. CORP. warrants that the Product will be free from defects in materials and workmanship for 12 months.
2. Items Not Covered by Warranty.
This Warranty will not cover parts of the Product or consumables which normally need to be replaced such as glass or rubber components,
file electrode and the like. Further, this warranty will not cover defects or damage caused by:
a. Failure to operate or use the Product in accordance with the Operation Instructions or warning/cautionary labels.
b. Modifications of the Product, connecting the Product to other products, or using components or replacement parts not specified
or approved by J. MORITA MFG. CORP.
c. Repairs performed by parties not designated by J. MORITA MFG. CORP.
d. Accidents or forces outside of J. MORITA MFG. CORP.’s control, such as dropping the Product or collision of the Product with
other objects, fire, flood, natural disaster, etc.
e. Use or operation of the Product in settings or under conditions not specified by J. MORITA MFG. CORP. or set forth in the
Operation Instructions including, without limitation, unauthorized changes in equipment settings, connection to unauthorized
devices.
3. Remedies of Customer.
Customer must present this Warranty when claiming coverage or application thereof, and either ship or deliver the Product to an
authorized location of J. MORITA MFG. CORP. or its subsidiaries or authorized dealers. Upon receipt and verification of this Warranty,
inspection of the Product, and determination of coverage by this Warranty, J. MORITA MFG. CORP. will, at its sole option, supply the
parts or components either replaced or repaired free of charge to the Customer. Delivery and shipping charges are the responsibility
of the Customer.
4. LIMITATIONS AND EXCLUSIONS FROM WARRANTY.
The remedy set forth in paragraph 3 is the sole and exclusive remedy of Customer. J. MORITA MFG. CORP. MAKES NO OTHER
EXPRESS OR IMPLIED WARRANTIES AND SPECIFICALLY EXCLUDES ALL OTHER WARRANTIES INCLUDING, WITHOUT LIMITA-
TION, ANY IMPLIED WARRANTIES OF MERCHANTABILITY OR FITNESS FOR A PARTICULAR PURPOSE. IN NO EVENT SHALL J.
MORITA MFG. CORP. BE LIABLE FOR ANY INCIDENTAL OR CONSEQUENTIAL, DIRECT OR INDIRECT, OR SPECIAL DAMAGES
OF ANY KIND INCLUDING, WITHOUT LIMITATION, DAMAGES FOR LOSS OF REVENUE, LOSS OF BUSINESS OR BUSINESS
OPPORTUNITY, OR OTHER SIMILAR FINANCIAL LOSS ARISING OUT OF THE PERFORMANCE, USE OR INTERRUPTED USE OF
THE PRODUCT.
5. Repairs Not Covered by Warranty.
With respect to repairs not within the period of this Warranty or otherwise not covered by this Warranty, J. MORITA MFG. CORP. will
perform the same, timely, efficiently, and for an appropriate cost.


