Phone (828)323-8914
Web www.utilitysolutionsinc.com
101 33rd Street Drive SE · Hickory, NC 28602
© 2018-2022 Utility Solutions Inc.
C-00601 USJJ-003/008 Instruction Manual
(9-8-22)
The Jack Jumper®Cutout Bypass Tool should be stretched slightly and visually inspected prior to utilization
to ensure that the copper coil is not frayed or separated. If fraying or separation of the copper coil has
occurred do not utilize the tool.
Inspection
Maintenance
The Jack Jumper®Cutout Bypass Tool is designed to withstand usual operational usage. Proper care and
handling will increase the longevity of service. Periodically inspect the Jack Jumper®Cutout Bypass Tool for
corrosion and copper coil fraying/separation. The Jack Jumper®Cutout Bypass Tool is sold as a complete
unit. Any maintenance, disassembly or misuse voids any and all warranties, guarantees, or liability.
Warranty
Utility Solutions warrants the Jack Jumper®Cutout Bypass Tool for any defects in manufacturing for the
period of one year. If the tool is returned within that time period, Utility Solutions will replace the tool free of
charge. No warranty is made if spring is overextended.
Installation
Removal
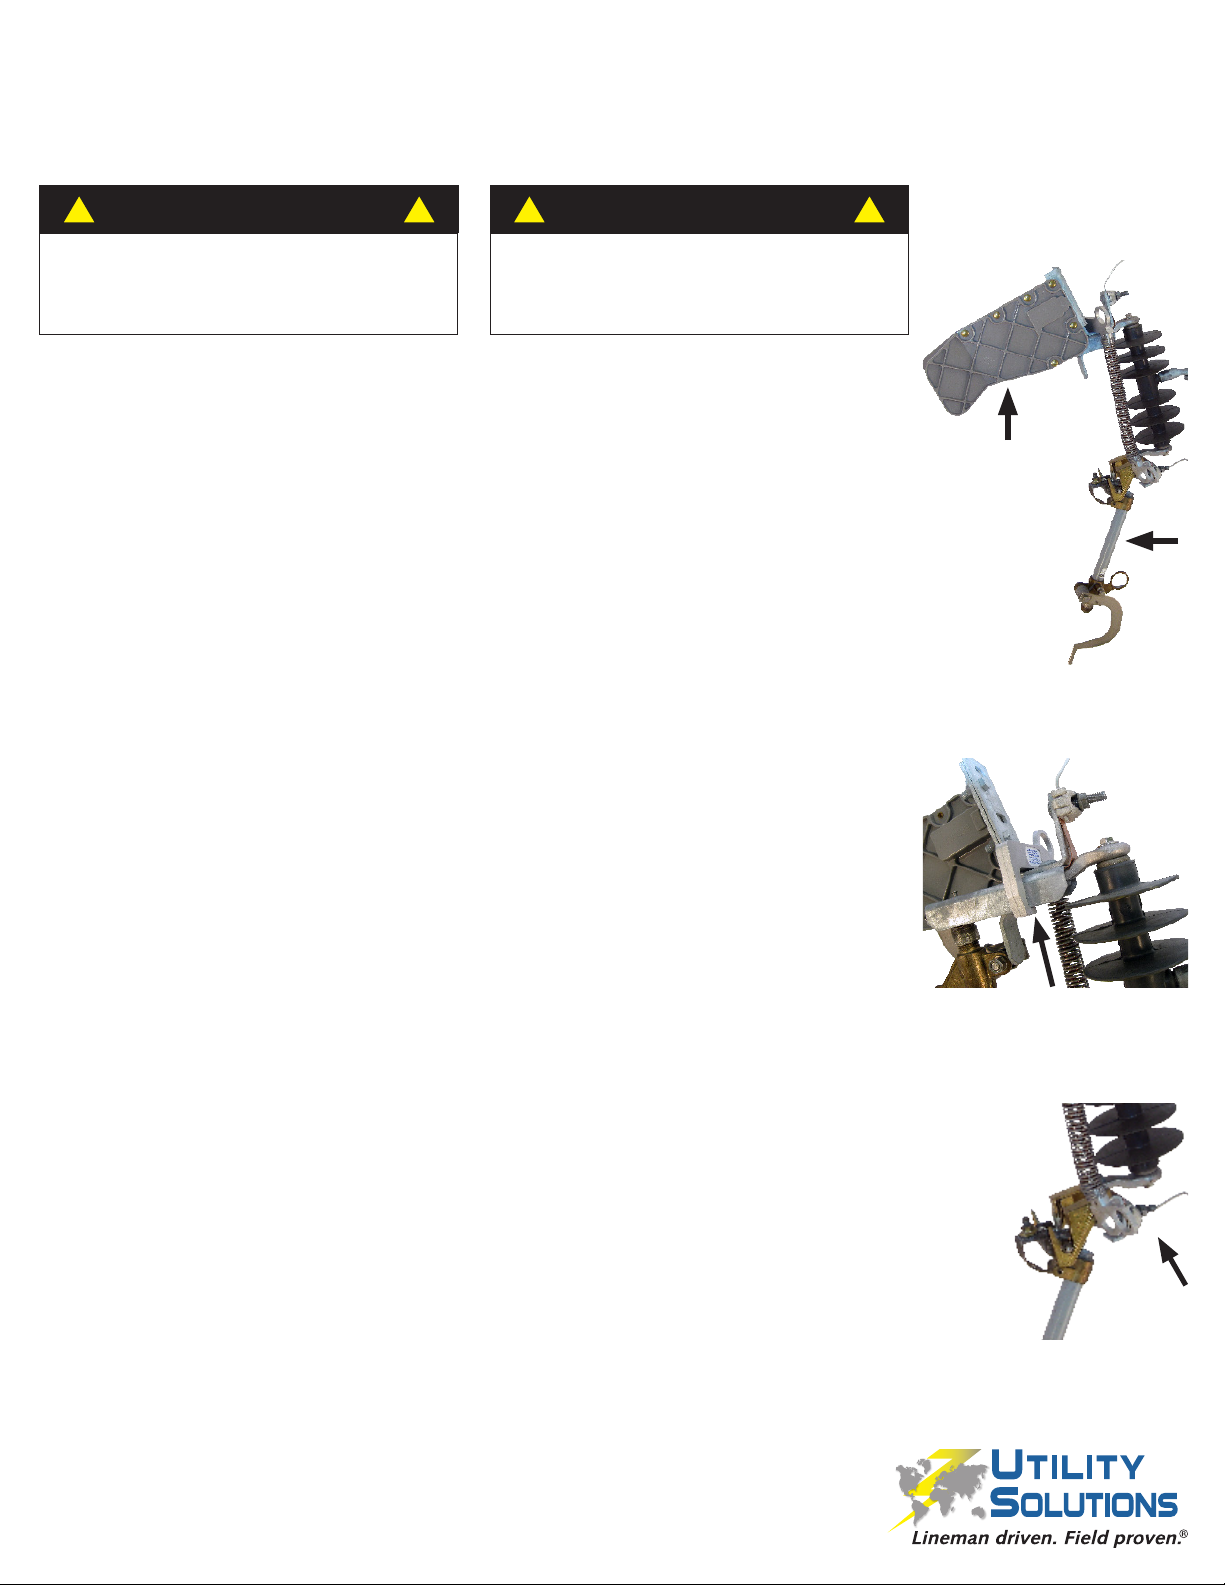
Upper Attachment Point
Figure A
Lower Attachment Point
Figure B
Arcing Bridge
Fuse
1. Do not install the Jack Jumper®Cutout Bypass Tool on an open cutout.
2. Using an appropriately rated and approved insulated shotgun stick, attach and lock the bottom in-line ring
of the Jack Jumper®Cutout Bypass Tool so it extends straight out from the stick.
3. Hang the upper attachment hook over the top cutout bracket behind the arcing bridge. Ensure that the
“hook” portion extends around the entire bracket. This can be done on either side of the cutout (Figure A).
4. Pull down to install the lower attachment hook on the fuse door hinge (Figure B).
5. Be sure the Jack Jumper®Cutout Bypass Tool is secure and will not interfere with removal of the fuse
door.
6. Release the Jack Jumper®Cutout Bypass Tool from the shotgun stick. The fuse door may now be opened
temporarily as necessary.
1. Do not remove the Jack Jumper®Cutout Bypass Tool from an open cutout.
2. Attach and lock the bottom in-line ring of the Jack Jumper®Cutout Bypass Tool to a shotgun stick.
3. Pull down to remove the lower attachment hook (Figure B).
4. Carefully remove the Jack Jumper®Cutout Bypass Tool until the upper attachment hook is free. Maintain
proper distance from any adjacent energized equipment.
5. It is recommend to store the Jack Jumper®Cutout Bypass Tool in a soft case.
Safety Procedures
Follow all basic and necessary procedures to secure the electrical site before beginning work. Follow all existing codes, requirements and
instructions for all equipment used in conjunction with the Jack Jumper® Cutout Bypass Tool. Inspect the cutout carefully for damage or corrosion.
Use standard electrical procedures to clean the connection points prior to utilizing the Jack Jumper®Cutout Bypass Tool.
Inspect the porcelain for any damage or cracks. If either condition is found, do not use the Jack Jumper®Cutout Bypass Tool.
Trouble Shooting
If the Jack Jumper® Cutout Bypass Tool appears to be malfunctioning do not attempt to repair it. Immediately
remove it from service, tag it as defective, note the specic problem, and return it to Utility Solutions for
inspection. Any disassembly will invalidate any and all product guarantees, claims and warranties.
! !
WARNING
Only install the Jack Jumper®Cutout Bypass Tool with the use
of an insulated shotgun stick. When attaching or detaching the
Jack Jumper®Cutout Bypass Tool do not use abrupt or rough
movements, be gentle and do not hurry.
! !
WARNING
If you are servicing a fuse, replace the fuse as quickly as possible.
The fuse is a protective device. The Jack Jumper®Cutout Bypass
Tool DOES NOT FUNCTION AS A FUSE. If you must leave the
area, replace any fuses and remove the Jack Jumper® Cutout
Bypass Tool. It is not a fuse replacement or permanent by-
pass mechanism.


