Toshiba DWS-22AHK User manual

English
DISHWASHER
INSTRUCTION MANUAL
Model:
DWS-22AHK
Read these instructions carefully before using your
DISHWASHER, and keep it carefully.

02

Instruction
Prohibit
Do not touch the inside of the cabinet, steam jetsfor during operation or 30
minutes after operation.
There is a fear of burning.
Instruction
Please ask the agent you purchased for inspection / repair. There is a danger of
electric shock, electric leakage short-circuiting.
Do not use extension cord.
Prohibit
No touch
by wet
hand
Electric
shock
No water
spraying
Away from
materials
Disconnect
power plug
Wipe
Do not connect or disconnect the power plug by wet hand.
This may cause electric shock or fault and cause injuries.
Do not use damaged power lines, power plug or loose power socket.
alcohol etc. as well as dishes having such matters into the dishwasher.
Do not spray water directly onto the parts of the main body of the dishwasher.
This may cause accidents of electric shock or short circuit.
Do not damage power line.
Do not damage, cut, process power line or bend, pull, twist or bind power line.
Besides, do not yank the metal part of the power line, or put weights on the line
or clamp the power line.
power line is damaged, the damaged line must be replaced by the
prevent
No
dis-assembly
and repair
without
permission
dangers.
T
03
English

Insert plug
Instruction
Prohibit
Insert the power plug securely to the base and let the cord go downward.
to electric or heat generation.
Do not operate by putting easily combustible items such as towels and cloth inside
the cabinet of the dishwa er.
Prohibit
Do not place anything on the main unit
Do not place heavy objects or hot objects on top of the main unit, containers
of water or hot water, heat appliances, glasses electricproducts, cutlery etc.
Falling by opening and closing the door may cause injury. Also, spilled water may
Do not place the dishwasher near f ire.
Separate from the heat source such as gas stove 15 cm or more.
Do not put the burning candle or cigarette on the dishwasher. It may cause f ire.
Away from
materials
Careful
installation
Correct
grounding
The dishwasher must be grounded.
The current resistance are minimum after grounding, and this can reduce the danger
of electric shock when dishwasher fault . The electric wires of
have grounding wire and grounding plug.
service men for inspection.
Do not change the plug without permission.
When the plug does not match the socket, proper power socket shall be installed by
Make sure the dishwasher can be set at a smooth drainage location.
professional electricians.
04

Caution
When disconnecting the plug from the socket, do not pull the power line by force.
Pull out by grasping the power plug. t may cause electric shock or fault and cause
injuries.
No pulling
by force
No use
No
washing
Application
environ-
ment
No
climbing
Do not use soap, washing powder or other hand sanitizer. Only dishwashing powder
suitable for automatic dishwasher. t may cause machine fault.
Do not wash plastic utensils.
For plastic utensils, only those marked with safety for dishwasher or other
similar situations, can be washed by dishwasher. For plastic utensils without
marks, the utensil manufacturer.
Only for indoor use.
Such home appliance is for household use, e.g.:
- Farmhouse;
- Use for customers in hotel, car hotel and other residence environments;
- Environments of inns
o not sit or stand on the dish rack or door of the dishwasher.
may cause dangers of injuries due to deformation or damage.
the power socket and close the dishwasher door.
Electric shock or short circuit may be caused due to the degradation of insulating
material.
The door shall keep close, to prevent stumble.
It is very dangerous to open the door during washing, and hot water may cause
scald.
When install the items (dishes, utensils etc) into the dishwasher:
1. Be careful to put sharp utensil to prevent it from scratch the door sealing strip.
2. Warning: the cutters and other sharp tools must be put in the basket, and the
sharp end is put downwards or horizontally.
Moisten the soft cloth by mild cleaning solution, then wipe the machine, and
wipe it dry by dry cloth.
After washing, check if the dishwashing powder is emptied.
using the dishwasher.
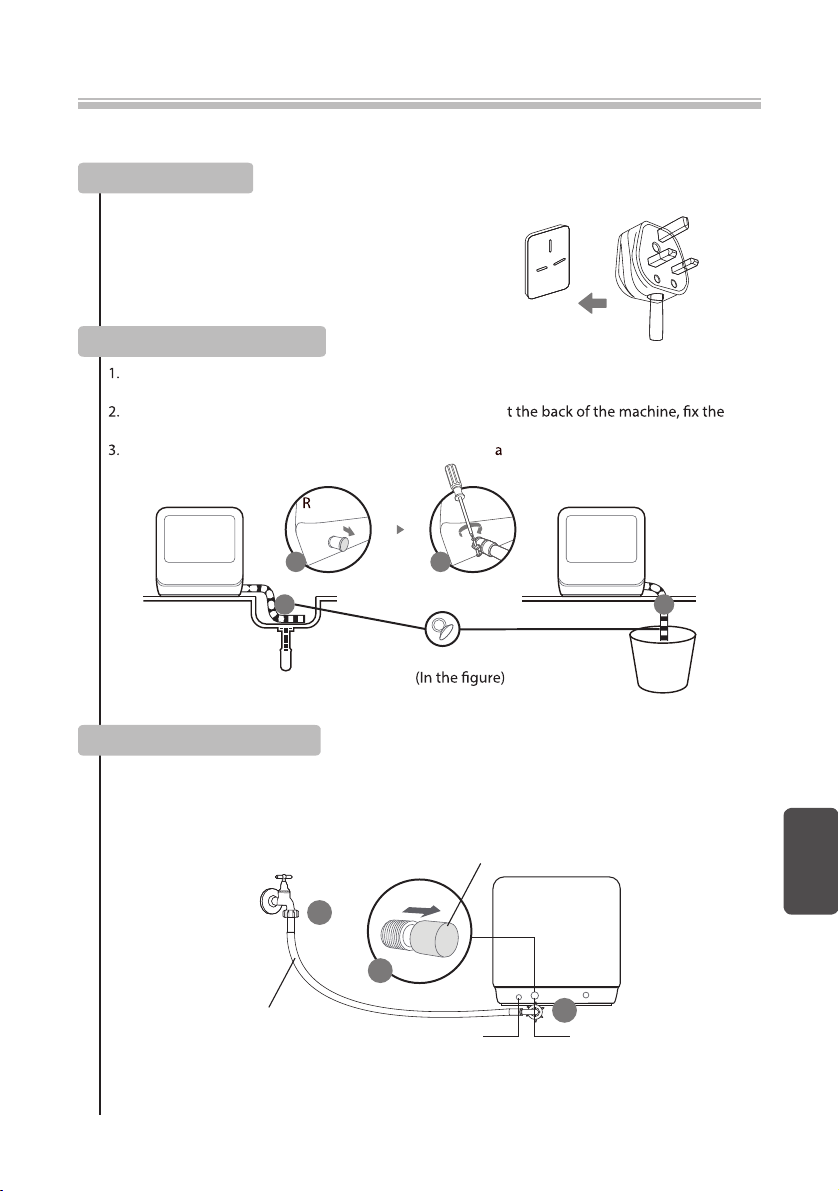
When installing the dishwasher, use new water hose. Do not use the current
water hose.
Maximum inlet water pressure is 1MPa.
Minimum water inlet pressure is 0.04MPa.
power plug
Care about
the door
Care for
safety
Care for
cleaning
Attention
05
English

Prohibit
Do not strongly push open door and main body, nor put the downward
pressure to the door. Falling may cause injuries.
Attention
to pinching
Prohibit
Do not get close to the exhaust port.
Steam or hot air may cause the burns.
Attention
to burn
While using or after using the dishwasher, pay attention to hot water
drained out.
High temperature hot water may come out, there is a risk of burns.
Prohibit
hit or tap the dishwasher .
Residues clogs, causing breakdown.
Prohibit
Do not put light and small dishes such as plastic containers.
If it is dropped by water pressure of the water spray, it may cause malfunction
due to clogging the dishwasher.
Prohibit
Do not use for purposes other than dishwasher dryer.
It may cause a malfunction.
Instruction
Make the main unit a solid level surface.
Normal operation may not be possible. It may cause water leakage.
Instruction
Fix the connection of drainage pipe certainly.
It may cause water leakage.
Instruction
Quantity of tableware advised: 22 pieces (soup bowl ×2 +rice bowl×3 +dish×4
+rice spoon ×1 +chopsticks×3)
Loading
capacity
06

The packing material may be dangerous to children!
The disposal of package and machine shall be submitted to the
recycle center.
close the machine door.
The cardboard package is made by recycled paper and shall be collected for recycling.
If the generated rubbish cannot be treated properly, they will be harmful to the environment
and human health, and they shall be properly disposed to prevent potential threat.
For more details of product recycle, please contact relevant departments of local government or
the service center for domestic refuse management.
Warning
Such warning sign is used to prevent dangers to you and others.
Please follow it strictly.
After reading, please store it properly for use just in case.
Warning
Handle the package of the dishwasher with extreme care.
All packages are recyclables.
Plastic parts are marked with abbreviation of international standard;
Treatments
PE Polyethylene, e.g., tableted package material
Polystyrene, e.g., packing material
Polymethyl, e.g., plastic clip
Polymer, e.g., control panel
Polypropylene, e.g., inner wall
PS
POM
ABS
PP
07
English

Please carefully read the instruction manual before using the dishwasher,
Contents
and this is helpful for the use and maintenance of the product.
Use the dishwasher
Put the dishwashing powder into the addition place
Troubleshooting
Before connecting customer service center
Error code
Installation
Preparation before installation
Where to place
Power connection
Drainage pipe connection
Cleaning and care
Filter
Filter cleaning
Care and maintenance
Recognize the dishwasher
Dishwasher features
Control panel
Accessories
Program Setting
Washing program
Startup
End of washing program
Quick instruction manual 09
12
12
13
01
14
02
03
04
05
06
07
Install dishwasher bowl basket
Put additional dishes in
08
18
19
19
21
22
23
24
24
24
25
26
28
29
19
17

Quick instruction manual
For detailed operation methods, read the manual carefully.
Connect power
Rated voltage: 220V- Frequency: 50Hz
Connect the pipedrainage
Power outlet: 220V-10A
Before connecting the drainage pipe, remove the rubber stopper on drainage port at the back of
the machine;
Put one end of the drainage pipe into the drainage port a
connection with a clamp, and tighten it with a screwdriver;
Connect the other end of the drainage pipe to a sink or bucket.
Fix the drainage pipe to the suction cup
Or 33
ubber
stopper
09
English
1 2
1. Before connecting the inlet pipe, remove the inlet valve cap from the inlet valve at the back of
the machine.
2. Rotating the screw cap to the inlet valve screw.
3. Connecting other side of the inlet pipe to the water tap.
Water Inlet
Drain Pipe
Water tap
1
3
2
Inlet pipe
Inlet valve cap
Attention: If you choose manual water (by hands) adding way, please keep the inlet valve cap on
Connect the inlet pipe

Add water to the dishwasher tank
Turn on the dishwasher by pressing ON/OFF button. Open the tank lid and add water to the
dishwasher tank.
There are two ways to indicate that the tank is full
1. Before starting:
When the tank is full, it will beep.
2. After starting:
If the water is sufficient, the indicator still lights up, please contact qualified repairman for help.
Or
Way 1:Byhands
Way 2:Byautomatically
Water Inlet
Drain Pipe
Water tap
Inlet pipe
Note: If the water is insufficient in 3 minutes, the indicator will be flicking and machine will
beep every 1 minute, please check as below:
1. Checking the water tap is opened in automatically adding water way, if so, you should
open the water tap and press button to active the machine again.
2. If there is enough water in water tank, please contact qualified repairman for help.
10
In the first minute after switch on the power, press the button of “Intensive” and
“Rapid” together to switch the water inlet mode from “By hand” to “By automatically”.
By automatically
By hands
3.
或
水龍頭
進水口
排水管
進水管

Remove larger residues
Before putting dishes into the dishwasher, please
remove larger residues.
Open the door, put in the dishes and dishwashing powder
Close the door, turn on the dishwasher, select the program, and
Place them from the two sides to the center according to the size. It is the best to place
press Start/Pause
in interruption of cleaning process and unsatisfactory cleaning results.
Improper orientation of dishes can also
Try to direct the dirty side toward the spray arm. Put the dishwashing powder
at the adding place
Left side Right side
11
English

12
Recognize the dishwasher
Important:
ensure the best results.
Water kettle, Bowl basket, Chopstick basket, Water tank lid, Drainage pipe,
Filtration device, Top nozzle, Lower spray arm.
Dishwasher features
Accessories
Handle
Control panel
Top nozzle
Filter
Chopstick
basket
Inner door
Tank lid
Flashlight
Lower spray arm
Cup holder
Dishwashing powder
Adding place
Bowl basket
When the machine in power-on or stand-by. If opening the door, Flashlight will turn-on
automatically. If the door be opened for more than 5 mins or be closed, flashlight will turn off
automatically.
When the machine is at working status, if you control the buttons on the panel, the flashlight
will turn on automatically. If there is no button control in 5 minutes, the flashlight will turn off
automatically.
Note:

13
3
Control panel
2 1433
Power
Program
Display
To start or pause the washing process of the dishwasher.
When a program is selected, it shows the highest temperature
and length of the program.
when program starts, it shows the actual water temperature
and the remaining time of the program.
Select the appropriate washing program and corresponding
indicator will light up.
GLASS For slight dirty dishes and glasses.
With the best washing performance. With
steam at the rst ve minutes to soften stains.
Have the eect of removing bacteria.
FRESH
STEAM WASH
Storage: remove odor, moisture, prevent
dishes moldy.
INTENSIVE For dishes with oil stains and heavy dirty cooking
utensils and dishes.
RAPID For slight dirty dishes, the required cleaning
time is relatively short.
ECO For general dirty dishes and utensils (such
as pots, plates, glasses, pans) .
2
Start/Pause
4
1
Waterinsufficientindicator
3
English

14
Use the dishwasher
Suggestion
Purchase dishes suitable for dishwasher.
Use a suitable mild dishwashing powder. If necessary, consult the manufacturer for more
information.
For special appliances, try to select a washing program that with a lower temperature.
Do not take out the glass dishes immediately after the program ends to prevent damage.
Not for:
Install dishwasher bowl basket
Limited use:
Wooden, ivory, porcelain or pearl shank tool
Non heat-resistant plastic products
Stale non heat-resistant cutters with glue
adhesive part
Cohesive knives or dishes
Tin or copper vessels
Crystal glass
Rusty steel products
Wooden utensils
Cups, glasses, pots and so on are placed face down.
All utensils should be placed safely and must not be overturned.
All utensils should be placed that the arms can rotate freely during washing.
The open of hollow tablewares (such as cups, glasses, pots, etc.) should face downward so
that water does not easily remain in the container or grooves.
Dishes and knives should not be placed in other utensils, and they can’t overlaid each other.
Do not place glass close to each other to avoid damage.
For long knives, placing upright is very dangerous.
After several cleanings, some glassware
will become dull
Silver or aluminum products tend to change
color during cleaning
Color of smooth dishes may fade out if often
washed
Use the dishwashing machine rationally
For small objects, it is easy to fall out from the basket, which should not be
placed in the dishwasher.
Attention
Precautions before and after the bowl basket is placed
Soften the residue of burnt food left on the pan. It is not necessary to rinse dishes with water

15
Long or sharp knives (eg. meat cleavers) should be placed horizontally in the basket.
Bowl Basket (with drawing)
No appliance shall protrude from the bottom. Make sure the sharp tip of
tableware face downwards!
Caution
Place the dishes and utensils properly to avoid being moved by the water stream.
In order to allow the spray water column to clean the surface, the dirty surface must face inside.
Align the hole at the bottom of chopstick basket with the positioning post of rack, and press down rmly
to x it on the rack.
Soy sauce dish
Bowl
Soup bowl
Soup spoon
Meal spoon
cup
Dishes
Chopsticks and spoon
Glass cup
Do not use the dishwasher overloaded so that you can get better cleaning performance.
English

16
Height is less than 23 cm. Place the tableware upwards. Avoid
scratching when placing knives.
*Knives and other sharp ware must be placed in the basket with the
The basket has an adjustable row. Adjust this row to achieve the best washing results.
Chopsticks and spoon
Use of baskets
Use of cup holders
The cup holder on the left side of basket can hold small objects such as chopsticks, and can
also hold red wine glasses.
For chopsticks For red wine glass

17
Put the dishwashing r into the addition placepowde
Addition
position
Only dishwashing powder is specially designed for dishwashers can be used.
Do not use other dishwashing powders to avoid machine damage.
The dishwashing powder is corrosive! Keep the dishwashing powder in
a place where children cannot reach.
Caution
Concentrated dishwashing powder
Traditional alkaline dishwashing powder with corrosive ingredients.
Concentrated weak alkaline dishwashing powder with natural enzymes.
Normal washing programs with concentrated dishwashing powder can reduce contamination
and dishes damage.
Cleaning tablets
washing program, there are certain cleansing tablets that cannot completely dissolve and fully
function. Therefore, the use of cleaning tablets requires long-term washing programs to ensure
complete removal of cleaning tablets.
Dishwashing powder
Prior to each washing program, re-add the dishwashing powder according to the instructions
provided in the washing program . Dishwashers use less dishwashing powder than table at page 17
traditional ones. In general, only one spoon of dishwashing powder is required for normal washing
and general dirty dishes. Heavy dirty dishes need to add more powder. Please add dishwashing
Add the dishwashing powder
English

18
Following table shows best cleaning procedures and amount of dishwashing
powder required according to the dirty level of the dishes, as well as the
relevant procedure information.
Program Setting
Washing program
cup ×1 + glass cup ×2 + spoon ×3 + soup ladle ×1 +r ice spoon ×1 +chopsticks ×3)
The above program data is for reference only. Test conditions are as follows:
Attention
Power consumption at shutdown state and standby state similarly are 0.49w.
Dishwashing
powder (g)
NA
6
6
6
6
6
Highest Water
Temperature
NA
60℃
60℃
70℃
70℃
72℃
Time
(min)
48
120
89
#
29
119
Power
(KWh)
0.42
0.5
0.57
0.03
0.34
0.47
Water
(L)
5
5
5
/
5
5
Program
Fresh Light on: Fresh run after each program to dry dishes.
Fresh Light off: No Fresh function run.
If Fresh is selected to run with each program, when the program finished, Fresh will
run for 72 hours to dry dishes. It could be stopped by pressing ON/OFF button or stop
automatically after 72 hours.

19
After 5 seconds
If you press “Start/ Pause” button in the process of washing, the beeps at dishwasher
every 60 seconds until started up again by pressing the “Start/ Pause” button.
Attention
To start the program:
50 Hz type, with socket of 10 A 220 VAC
Then,pass”Start/Pause”button to start.
.
Startup
Additional dishes can be placed in at any time before dishwasher program start.
If you
want to reload dishes in the process of washing, please follow instructions below:
1. Press “Start/Pause” button to pause washing program;
2. Wait for 5 seconds to open the door;
3. Put the additional dishes in;
4. Close the door;
5. Press “Start/Pause” button and after 10 seconds, the dishwasher will start again.
Put dishes in additional
After the program f inishes, the machine show”End”and the buzzer beeps for 8
seconds. If you want to stop the machine immediately, press ON/OFF button.
Then, wait a few minutes to avoid burns before open the door and clear the
dishwasher. Be careful of hot dishes. Keep the Fresh function on, you will get
ON/OFF
better drying performance, the fresh function can last 72 hours at most.
dishwasher.
End of washing program
English

20
It is extremely dangerous to open the door in ereves esuac yam siht sa gnihsaw fo ssecorp eht
burn by hot water.
Warning
Open the door carefully
Hot dishes are more likely to be damaged. The dishes shall be cool for about 15 minutes and then
taken out from the dishwasher.
Clear thedishwasher
It is normal that the dishwasher still remains wet inside.
Table of contents
Other Toshiba Dishwasher manuals

Toshiba
Toshiba DW-08T1CIS-UA User manual

Toshiba
Toshiba DW-15F3(BS)-NZ User manual

Toshiba
Toshiba DW-14F2MESS User manual

Toshiba
Toshiba DWS-34AHK User manual

Toshiba
Toshiba DW-08T1(S)-MY User manual

Toshiba
Toshiba DW-14F1ME(W)-IQ User manual

Toshiba
Toshiba DW-15F5(SS)-NZ User manual

Toshiba
Toshiba DWS-22A Series User manual

Toshiba
Toshiba DW-14F1(SS)-NZ User manual