Toshiba VC-GC31CPT User manual

Follow-up Service
Do not attempt to repair it by yourself.
Go to Toshiba Repair Center nearby with the appliance and warranty to
get service.
Please call Customer Service number: 18001529 for further support.
Please call Customer Service number: 02-511-7777 for further support.
If the appliance
still cannot work
after check
Vietnam
Follow-up Service
Do not attempt to repair it by yourself.
Go to Toshiba Repair Center nearby with the appliance and warranty to
get service.
If the appliance
Nếu thiết bịvẫn
không hoạt động
sau khi kiểm tra
still cannot work
after check
Thailand
โปรดติดต่อศูนย์บริการลูกค้าหมายเลข 02-511-7777
บริการหลังการขาย
อย่าพยายามซ่อมเครื่องด้วยตัวเอง
นำเครื่องพร้อมใบรับประกันไปยังศูนย์ซ่อมของ Toshiba เพื่อเข้ารับบริการ
สำหรับรายละเอียดเพิ่มเติม
หากเครื่องไม่ส
ามารถใช้งานไ
ด้หลังจากตรวจ
สอบแล้ว
ไทย
Theo dõi Dịch Vụ
Không tự tháo lắp hay sửa chữa thiết bị.
Mang thiết bị đến Trạm bảo hành ủy quyền của Toshiba Việt Nam gần nhất
để được sửa chữa.
Vui lòng gọi đến số điện thoại của Trung tâm tư vấn và hỗ trợ khách hàng
của Toshiba 18001529 (miễn phí) để được hỗ trợ thêm.
Việt Nam
40
VC-GC32,31CP

VC-GC31CPT
VC-GC32CPT
VC-GC31CPV
VC-GC32CPV
Owner's Manual
TOSHIBA Household
Vacuum Cleaner
Hướng dẫn sử dụng
Máy hút bụi TOSHIBA
dùng trong gia đình
คู่มือสำหรับผู้ใช้
เครื่องดูดฝุ่น Toshiba
สำหรับใช้ภายในบ้าน
Model No. / Kiểu máy / ชื่อรุ่น
Please read this manual carefully in order to operate the machine properly, and store it safely after reading.
ภาษาไทย English
Tiếng Việt
Vui lòng đọc kỹhướng dẫn trong sách này để sửdụng thiết bịđúng cách. Cất giữhướng dẫn cẩn thận
để tham khảo khi cần
โปรดอ่านคู่มือนี้โดยละเอียดเพื่อให้สามารถใช้งานได้อย่างถูกต้องและจัดเก็บในที่ที่ปลอดภัยหลัง
จากอ่านแล้ว
VC-GC32,31CP

Contents
Safety Precautions 3
Product Structure 5
Parts identification 5
Accessories 5
How to operate your vacuum cleaner 6
Schematic diagram 6
How to clean floor and carpet 6
Dust Cup 7
1. Structure 7
2. Disassembly and assembly of dust cup 7
3. Disassembly of dust cup parts 8
4. Assembly of dust cup parts 8
How to clean 9
1. How to clean the dust cup 9
2. How to clean the pleat filter 10
Storage Instruction 10
Function of Accessories 11
Maintenance 12
How to clean the appliance and accessories 12
How to clean the dust cup 12
Troubleshooting 13
Specifications 13
Follow-up Service 40
2
VC-GC32,31CP

Safety Precautions Please Do Comply.
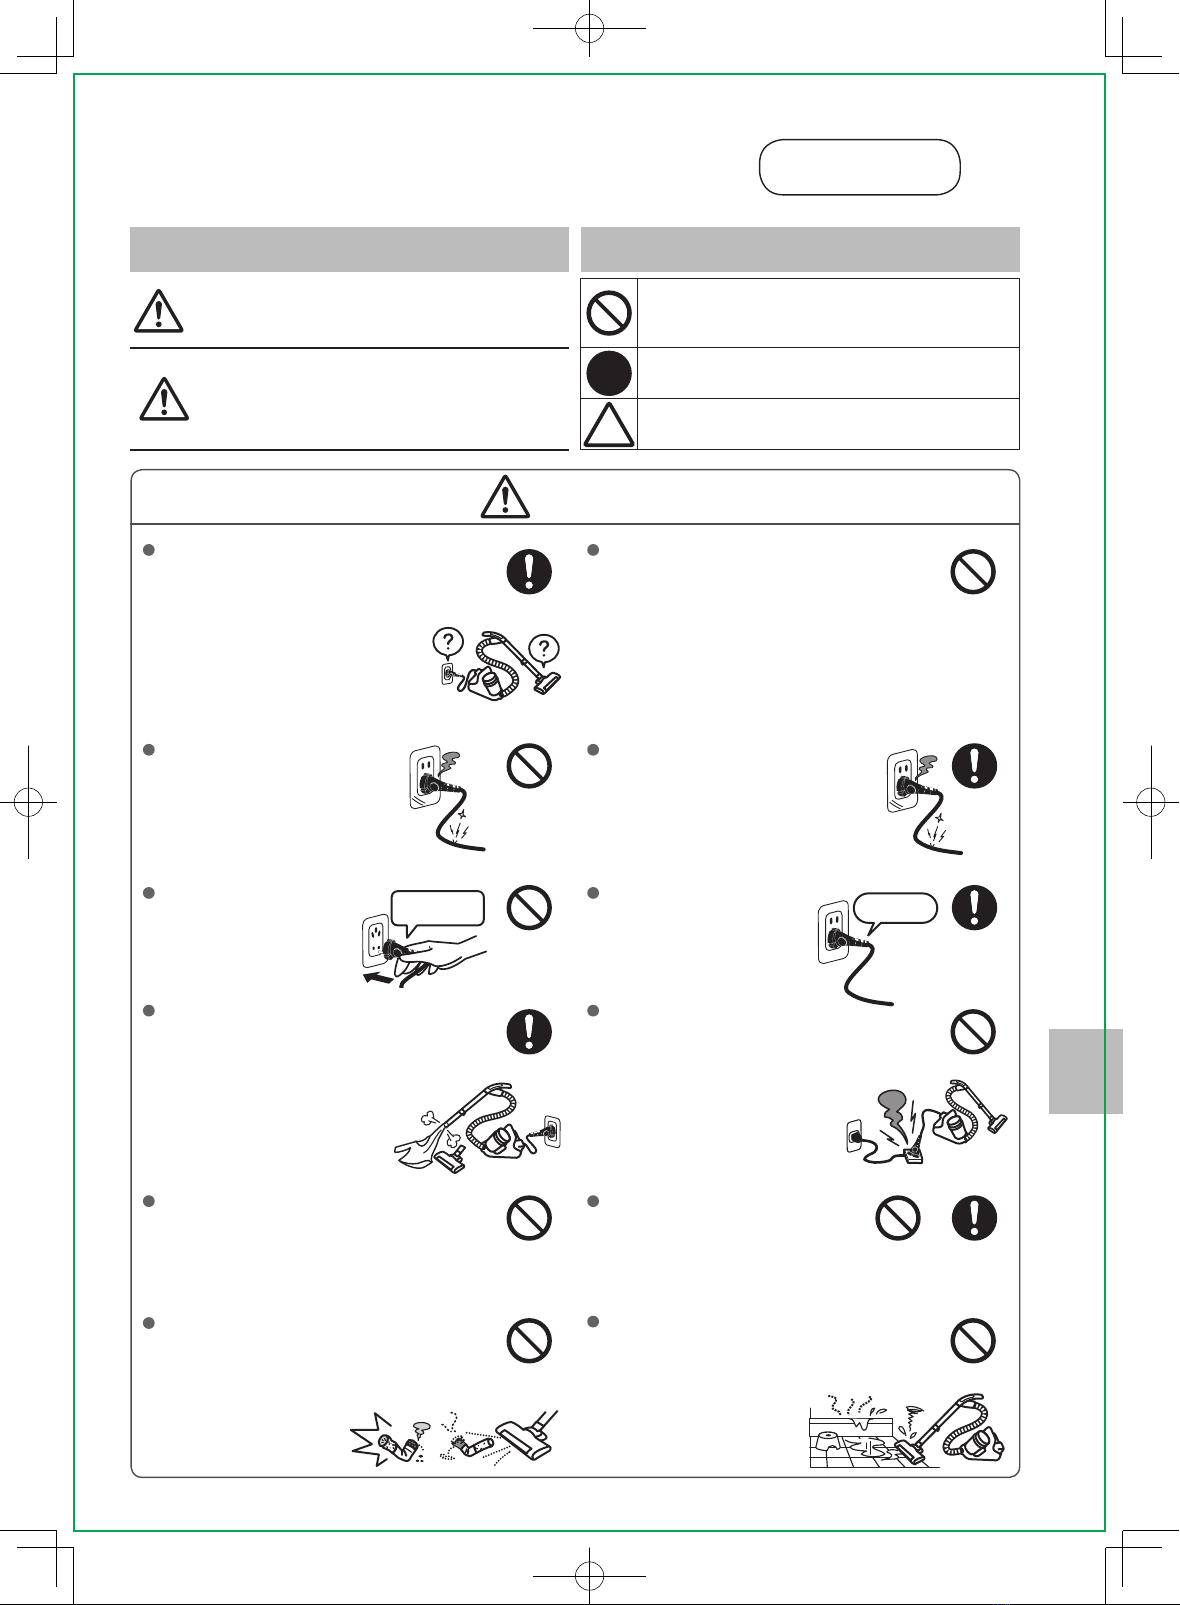
Caution Mark Interpretation
Caution Mark Indication
Warning
Death or serious injury may occur
if the safety requirements are
ignored while using this product.
Never do what the mark describes.
Caution
Injury or property damage may
result if the safety requirements
are ignored while using this
product.
Always do what the mark describes.
Caution what the mark describes.
Warning
Check if the rated voltage indicated
on the appliance corresponds to
the local mains voltage to protect
the appliance.
This appliance is not intended for
use by children or infirm person, or
peop l e w i t h reduce d phys ical ,
sensory or mental capabilities, or
lack of experience and knowledge, unless
they have been given supervision or
instruction by a responsible person to
ensure that they can use the vacuum cleaner
safely to avoid an electrical shock or injury.
Do not use the product if
the supply cord is
damaged or plug is loose
to avoid short circuit, an
electrical shock or fire.
If the supply cord is
damaged, it must be replaced
by the manufacturer, its
service agent or similarly
qualified person to avoid an
electrical shock or injury.
Do not handle the
plug with wet hands
to avoid an electrical
shock or injury.
Do use a socket with
rated voltage of 220V,
rated current of
8A singly.
Always disconnect the electrical
supply before connecting or
dismantling hose, telescopic wand
or other accessories to avoid
injury.
Do not use extension cord or plug
with low bearing capacity for
current to avoid an electrical shock
or fire.
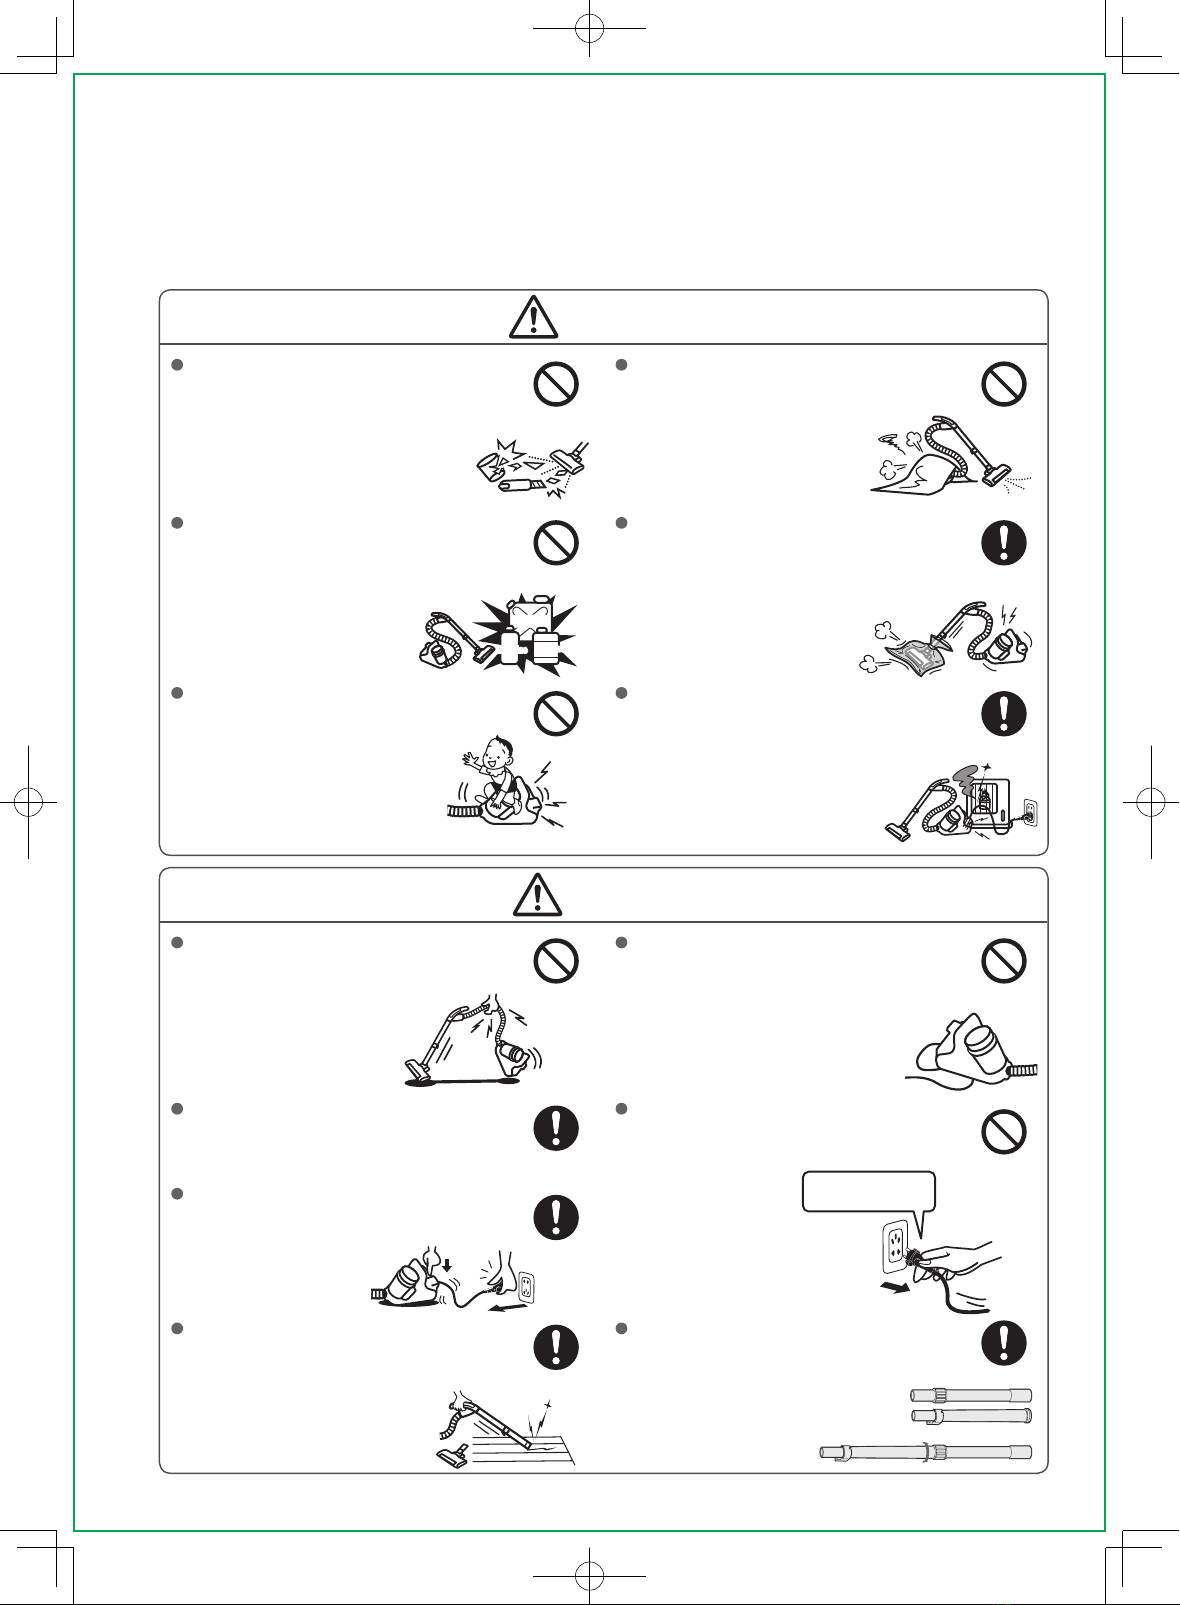
Do not keep hair, fingers, feet and
all parts of body close to suction
inlet and moving parts to avoid
injury.
Disconnect the electrical
supply and do not leave the
unit before unplugging to
avoid an electrical shock or
injury.
Do not use the appliance to pick up
flammable or combustible material
such as cigarette end, gasoline,
thinner and paint to avoid injury or
fire.
Never vacuum liquids (e.g. water)
and wet surface such as bath or do
outdoor cleaning to avoid an
electrical shock.
220V,8A
Indication
Indication
Indication
Indication
Indication
Prohibition
Prohibition
Prohibition
Prohibition
Prohibition
Prohibition
Prohibition
Prohibition
English
3
VC-GC32,31CP
Please dry
your hands first.

Warning
Do not try to vacuum sharp
fragments such as glass, pin,
blades and other objects with
sharp edges to avoid damaging
the appliance or injury.
Do not block the air vent while
operating the appliance to avoid
fire.
Do not keep the appliance close to
flammable materials such as
gasoline and thinner to avoid fire
burst.
Do not operate the appliance when
the suction inlet is blocked and
promptly clean up to avoid
deformation because of
overheating or fire.
Do not allow it to be used as a toy
to avoid damaging of the appliance
or injury.
Keep the appliance far away
from objects with high
temperature and avoid
leaving the appliance in high
temperature environment for
long time to avoid short
circuit, fire or injury.
Caution
Do not lift the appliance by the
hose or cord to avoid damaging the
appliance or the floor.
Do not scrunch the cord when
using the appliance. Do not scrape,
modify, damage, over bend, jerk or
tie up the cord to avoid an electrical
shock or fire.
Always remove the plug from the
socket outlet after using to avoid
injury or fire resulting from current
leakage or an electrical shock.
Always hold the plug to wind up the
cord slowly. If not, it may cause
plug deformation or injury because
of overexertion.
Do not grasp the cord when pulling
out the plug to avoid damaging the
plug or the cord causing short
circuit or fire.
Do assemble the hose, telescopic
wand, floor head or other
accessories before use to avoid
injury or damaging the floor.
Twist the locking device tightly
when assembling the telescopic
wand to avoid injury caused by
retracting.
Alcohol
Gasoline
Thinner
Please hold the plug
and then pull it out.
Indication
Indication
Indication
Indication
Indication
Indication
ProhibitionProhibition
Prohibition
Prohibition Prohibition
Prohibition
Prohibition
4
VC-GC32,31CP

Product Structure
Parts identification
Telescopic wand
(with ring)
Floor head
Change-over
switch
For cleaning floor
For cleaning carpet
Telescopic wand (Non ring)
Tighten
Loosen
Stand holder
Handgrip
Cord rewind button
Handle
Plug
Red mark
ehtgnilluppotS*
cord as it is nearly
the end.
Yellow mark
drocehtlluptonoD*
beyond the yellow
mark. (Otherwise, the
cord will be damaged.)
Anti-allergen
filter
(The anti-allergen
filter setted in the
main body can
suppress allergens.)
Power cord
*
Do not pull or rewind
the cord when operating
the appliance.
Ring for adjusting the length
of telescopic wand. Twist it
tightly in a clockwise
direction before cleaning.
Handgrip of
Dust cup
Rear wheel
Dust cup
Install the dust cup and
filter properly before
use to avoid damaging
the appliance or injury.
Power switch
Accessories:
Hose Telescopic Wand Floor Head Crevice Nozzle Futon Brush Round Brush
5
English
VC-GC31CPT/CPV
VC-GC32CPT/CPV
VC-GC31CPT/CPV
VC-GC32CPT/CPV
VC-GC31CPT/CPV
VC-GC32CPT/CPV
VC-GC31CPT/CPV
VC-GC32CPT/CPV
VC-GC32,31CP
VC-GC32CPT/CPV only VC-GC32CPT/CPV only

How to operate your vacuum cleaner
Schematic diagram
Fuse Power switch
Self-resetting
thermal cut-out
Motor
Power cord
Warning
Do not use the vacuum cleaner without proper installation of the dust
cup and filter.
How to clean floor and carpet
Clean carpet
Move floor head lightly along the carpet.
Clean floor
To increase the cleaning effect and avoid
scratching the floor surface, move floor head
lightly along the floor.
1Check if the dust cup and filter are installed.
2Pull out the cord straight and insert the plug to the socket outlet.
3Assemble the hose, telescopic wand and other accessories.
4Press the power switch to operate the appliance to clean.
5Turn off the power switch and unplug the appliance after cleaning.
6Hold the plug and press the cord rewind button to wind up the cord slowly.
Caution
Disconnect all the electrical supply and remove the plug if electricity
supply is cut off while using the appliance.
6
VC-GC32,31CP

Dust Cup
1. Structure
Cup cover
Pleat filter
Rubber sealing
ring
Dust cleaning
slider
Separation net
Dust cup
Cleaning brush
Air vent
The back The bottom
Separation
chamber
Dust cup
Cup button
Max. line
Do install the pleat
filter properly to
avoid motor
smoking or fire.
Do not jerk or
disassemble the
rubber sealing ring.
Slide it right and left
to clean the dust
attached on the pleat
filter.
The dust should not
exceed the Max. line
to avoid suction
declining because of
stacking.
2. Disassembly and assembly of dust cup
nottubgnivomerehtsserP
to disassemble the dust cup
as shown in figure.
nwodpuctsudehtsserP
until the "clic k" sound is
heard.
Do not disassemble the dust
cup if the unit is in an up-right
position to avoid dust spilling
from air inlet.
click
Removing button
Air inlet
English
7
VC-GC32,31CP

3. Disassembly of dust cup parts
"kramehtotrevocpucehtnruT " in the
direction of the arrow to remove it.
Press the cup button to remove the pleat filter
and separation net.
Press the button on both sides of the pleat
filter to disassemble it.
* Disassemble the pleat filter above the garbage bin,
for the disassembly would cause dust dropping.
* Do not jerk or disassemble the rubber sealing ring.
4. Assembly of dust cup parts
Assembly of pleat filter
Align the sunken part of the pleat filter with
the protruding part of the separation net and
press until the "click" sound is heard.
Assembly of dust cup
Align the protruding part of the separation net
with the mark" " of the dust cup and press
until the "click" sound is heard.
Assembly of cup cover
Turn the cup cover to the mark" " in the
direction of the arrow to assemble it.
The sunken part
The protruding part
Rubber sealing ring
Do not jerk or
disassemble the rubber
sealing ring.
The protruding part
"" Mark
Cup buttton
Rubber sealing ring
Button
Cup
cover
8
VC-GC32,31CP

naelcotwoH
Caution
Increase the cleaning frequency of the pleat filter and separation net after
frequent suction to avoid blocking.
It is advisable for allergy sufferers to wear disposable gloves and a face mask
while emptying the cleaner.
Do clean the dust cup when the dust reaches the Max. line to avoid the suction
declining.
.tceffegninaelcrettebrofnoitautissihttaretliftaelpehtdnatsudehtnaelcesaelP*
puctsudehtnaelcotwoH.1
tsudehtllupdnanottubgnivomerehtsserP
cup up in the slanted direction.
taelpehtelbmessasidotnottubpucehtsserP
filter and separation net,then empty the dust
cup.
ehtnaelc,retlifehtdeniamersitsudehtnehW
filter using the cleaning brush placed on the
bottom of the dust cup.
dluocgnirgnilaesrebburehtnodehcattatsudehT*
be removed with the cleaning brush or a moist
cloth.
"kramehtngilA " of the cup cover with the
mark" " of the cup button and press until the
"click" sound is heard.
* Do not disassemble the dust cup if the unit is in an up-right position to avoid dust spilling from air inlet.
Cleaning the pleat filter promptly when it is dirty or the suction power declines.
Removing button
Cup button
Air inlet
Cleaning brush
Rubber sealing ring*
Do not jerk or disassemble the rubber sealing ring.
Filter
English
9
VC-GC32,31CP

retliftaelpehtnaelcotwoH.2
kramehtotrevocpucehtnruT " " in the
direction of the arrow to remove it.
Slide the dust cleaning slider right and left for
about 5 times.
Press the button on both sides of the pleat
filter to disassemble it.
retliftaelpehtnodehcattatsudehtevomeR
using the cleaning brush and then empty the
separation net.
ehtgninaelcretfadenaelcebdluocretliftaelpehT*
dust cup.
* Do not press the cup button when emptying the
separation net to avoid dropping.
erusneesaelp,ksirsihteziminimoT.tsudoterusopxediovaottluciffidsitirenaelcmuucavynagniytpmenehW*
.puctsudehtdnuorelbissopsaylthgitsagabehtesolcdnatiytpmeotgabegralanipuc
tsudehtesacneuoytaht
Remove the dust cup and close the bag as tightly and quickly as possible and dispose of this immediately. It is
advisable to wear disposable gloves and a face mask while emptying the cleaner. If at all possible, ask a non
allergy sufferer to empty the dust cup when required.
Storage Instruction
Store the vacuum cleaner as the following way after use.
Hole
Stand Holder
Storage Methods:
.dnawcipocseletehtotesohehtdniW
.ydobecnailppaehtotesolcdaehroolfehtlluP
ehtfoelohehtotniredlohdnatsehttresnI
appliance while keeping the telescopic wand
stand straight.
Dust cleaning slider
Cup
cover
Button Button
10
VC-GC32,31CP

Function of Accessories
Handgrip
The handgrip could be
For Model:
VC-GC31CPT/CPV
VC-GC32CPT/CPV
For Model:
VC-GC31CPT/CPV
VC-GC32CPT/CPV
For Model:
VC-GC31CPT/CPV
VC-GC32CPT/CPV
For Model:
VC-GC31CPT/CPV
VC-GC32CPT/CPV
For Model:
VC-GC32CPT/CPV
For Model:
VC-GC32CPT/CPV
disconnected from the hose.
Telescopic wand
Crevice nozzle
Floor head
Futon brushRound brush
English
11
*
Crevice nozzle's
continuous use
shall not exceed
20 minutes to
avoid causing
motor overload.
VC-GC32,31CP

Maintenance
How to clean the appliance and accessories
Warning
The appliance should not be washed with water or a dripping rag to
avoid an electrical shock or a breakdown.
The parts should be hung in the shade to dry after cleaning. Do not
attempt to dry with a hair dryer, electric heater or warm fans to avoid
mechanical injury or performance decline.
How to clean the appliance and accessories
Wash the appliance and accessories with water or neutral detergent.
ehtfognikcarcronoitamrofed,noitarolocsidesuacthgimhcihwrehcaelbrolohocla,lortepynaesutonoD*
appliance.
Water
Neutral wash
solution
How to clean the dust cup
To keep the best suction ability, clean the dust cup termly.
Flush the dust cup with water. Do not flush pleat filter and separation net with water.
Immerse them in water to clean.
Do not jerkor disassemble the rubber sealing ring
to avoid damage.
* Clean the pleat filter and dust cup promptly to avoid decreasing the suction ability.
Caution
Make sure the accessories are totally dry before assembling them.
Caution
Replace the old or broken accessories promptly to avoid decreasing
the suction ability.
Contact the supplier to purchase the accessories for replacement.
12
VC-GC32,31CP

Check these following items before applying for service.
•
Do not attempt to repair it by yourself when the appliance breaks down to avoid an electrical shock,
fire or injury.
Problems Possible Cause Possible Solution
Vacuum cleaner
stops during
operation.
Thermal protector activates.
hgihnidesusiecnailppaehtfI
temperature or used constantly for a very
long time, thermal protector would
activates.
The suction inlet or air vent may be blocked
up. Check and remove the obstruction.
Reuse it after a while (around one hour).
Unplugged the socket outlet. Plug in firmly.
Suction power
decreases.
Accessories are blocked up.
Disconnect the electrical supply Unplug
Dismount the accessories Remove the
trash
Pleat filter is dirty. Clean the pleat filter.
Cord can't fully
rewind or pull out.
Cord doesn't wind properly. Pull it out one or two meters and wind it up
again.
Cord is twisted. Pull out and wind the cord repeatedly while
pressing the cord rewind button.
The noise
becomes bigger
suddenly.
sidaehroolfrodnawcipocselet,esoH
blocked up.
ytefasehtdnapudekcolbsiretliftaelP
valve opens.
Remove the trash.
Clean the pleat filter and restart the vacuum
cleaner.
Vacuum cleaner
causes smell
during operation.
.swedlimhsarT Clean the pleat filter and dust cup.
Vacuum cleaner belongs to class II appliance.
Vacuum cleaner suits for household and similar cleaning only. Do not use it outdoors or for other non-cleaning purpose.
Troubleshooting
English
13
Specifications
Vacuum cleaner complies with the standards: IEC 60335-1, IEC 60335-2-2
Model No. VC-GC31CPT/CPV VC-GC32CPT/CPV
Rated Voltage 220V 220V
Rated Frequency 50Hz 50Hz
Rated Input Power 950W 950W
5m
0.25L
L310×H255×W220
2.7kg
Power Cord Length 5m
0.25L
L310×H255×W220
2.7kg
●Telescopic Wand (Non Ring)(1 pcs)
●Telescopic Wand (With Ring)(1 pcs)
●Hose(1 pcs)
●Floor Head(1 pcs)
●Crevice Nozzle(1 pcs)
●Telescopic Wand (Non Ring)(1 pcs)
●Telescopic Wand (With Ring)(1 pcs)
●Hose(1 pcs)
●Floor Head(1 pcs)
●Crevice Nozzle(1 pcs)
●Round Brush(1 pcs)
●Futon Brush(1 pcs)
Dust Capacity
Dimensions
Net Weight
Accessories
VC-GC32,31CP

Nội dung
Cẩn trọng an toàn 15
Cấu tạo của thiết bị 17
Xác định các bộ phận 17
Phụ kiện 17
Vận hành máy hút bụi 18
Sơ đồ mạch điện 18
Cách vệ sinh sàn và thảm 18
Hộp chứa bụi 19
1. Cấu tạo 19
2. Tháo và lắp hộp chứa bụi 19
3. Cách tháo phụ kiện hộp chứa bụi 20
4. Cách lắp phụ kiện hộp chứa bụi 20
Cách vệ sinh 21
1. Vệ sinh hộp chứa bụi 21
2. Vệ sinh bộ lọc xếp ly 22
Hướng dẫn bảo quản 22
Chức năng các phụ kiện 23
Bảo dưỡng 24
Vệ sinh thiết bị và phụ kiện 24
Vệ sinh đầu hút 24
Xử lý sự cố 25
Thông số kỹ thuật 25
Theo dõi Dịch vụ 40
14
VC-GC32,31CP

Cẩn trọng an toàn Vui lòng làm theo
hướng dẫn.
Giải thích các ký hiệu Giải thích các biểu tượng
Cảnh báo
Nguy cơ chết người hay thương thích
nghiêm trọng nếu không tuân thủ theo
yêu cầu về an toàn khi sử dụng thiết bị.
Biểu tượng cấm thực hiện.
Cẩn trọng
Nguy cơ gây thương tích hoặc
thiệt hại về tài sản nếu không tuân
thủ theo yêu cầu về an toàn khi sử
dụng thiết bị.
Biểu tượng bắt buộc thực hiện.
Biểu tượng cẩn trọng khi thực hiện.
Cảnh báo
Kiểm tra xem mức điện áp hiển thị
trên nhãn của thiết bị có phù hợp
với lưới điện sử dụng trong gia
đình hay không để đảm bảo
an toàn cho thiết bị.
Thiết bị này không được sử dụng bởi
trẻ nhỏ, người không đủ sức khỏe,
giác quan hay thần kinh, hoặc thiếu
kinh nghiệm, thiếu hiểu biết trừ khi
có sự giám sát hay hướng dẫn của
người có trách nhiệm để đảm bảo rằng
họ có thể sử dụng thiết bị an toàn tránh
được nguy cơ điện giật hay bị thương tích.
Không sử dụng dây nguồn
hỏng hay phích cắm lỏng
lẻo để tránh tình trạng
ngắn mạch, điện giật
hay hỏa hoạn.
Nếu dây cấp nguồn bị hỏng, nó
phải được thay thế bởi nhà
sản xuất, trạm bảo hành ủy
quyền của Toshiba hay người
có trình độ chuyên môn để tránh
bị điện giật hay thương tích.
Không rút hay cắm phích
cắm khi tay ướt để
tránh bị điện giật
hay bị thương tích.
Sử dụng ổ cắm riêng biệt
với điện áp 220V - 50Hz,
dòng điện 8 A.
Luôn ngắt điện nguồn trước khi
kết nối hoặc tháo ống ruột gà, ống
lồng (để tăng giảm chiều dài) hoặc
các phụ kiện khác để tránh bị
thương tích.
Không sử dụng dây nối dài hay phích
cắm không đủ dòng để tránh bị
điện giật hay hỏa hoạn.
Không để tóc, ngón tay, chân hay
những bộ phận khác của cơ thể
chạm vào đầu hút và những phần
chuyển động của thiết bị để tránh
bị thương tích.
Ngắt điện thiết bị và không bỏ
đi khi chưa rút phích cắm
ra khỏi ổ điện để tránh những
rủi ro như điện giật, hỏa hoạn.
Không sử dụng thiết bị để hút các
vật dễ cháy, nổ như tàn thuốc, xăng
dầu, dung môi và sơn để tránh bị
thương tích hay cháy nổ.
Không được hút chất lỏng (như nước...)
hay sử dụng ở những nơi ẩm ướt
như phòng tắm để tránh
bị điện giật.
Hãy lau khô
tay bạn trước
220V,8A
Hiển thị
Hiển thị
Hiển thị
Hiển thị
Hiển thị
Ngăn cấm
Ngăn cấm
Ngăn cấm
Ngăn cấm
Ngăn cấm
Ngăn cấm
Ngăn cấm
Ngăn cấm
Tiếng Việt
15
VC-GC32,31CP

Cảnh báo
Không hút các mảnh sắc như thủy
tinh, kim, lưỡi dao và những vật khác
có cạnh sắc nhọn để tránh bị thương
tích hay làm hư hỏng thiết bị.
Không để thiết bị gần các vật dễ cháy
như xăng dầu, dung môi để tránh
cháy nổ.
Không được phép xem thiết bị như đồ
chơi để tránh xảy ra hư hỏng hay
thương tích.
Cẩn trọng
Không cầm ống ruột gà hay dây
nguồn để di chuyển thiết bị để tránh
làm hỏng thiết bị hay sàn nhà.
Không dẫm lên dây nguồn khi sử
dụng thiết bị. Không cắt, cạo, sửa
đổi, làm hỏng, uốn cong, giật mạnh
hay buộc gập dây nguồn để tránh
bị điện giật hay hỏa hoạn.
Sau khi sử dụng xong, luôn rút dây nguồn
ra khỏi ổ cắm để tránh bị thương hay
hỏa hoạn do rò điện hay điện giật.
Luôn cầm phích cắm để quấn dây nguồn
chầm chậm. Nếu không, phích có thể bị
biến dạng hay bạn bị thương do dây
nguồn rút rút quá nhanh.
Khi rút dây nguồn, không được nắm
phần dây để rút. Phải nắm phần phích
cắm để rút nhằm tránh làm đứt
dây điện hoặc gây
ngắn mạch hay
hỏa hoạn.
Lắp ráp ống ruột gà, ống lồng, đầu
hút và các phụ kiện khác trước
khi sử dụng để tránh
làm hư sàn nhà.
Xoắn chặt khớp nối ống khi lắp ống lồng vào
để tránh bị thương tích khi ống thụt vào.
Vui lòng nắm phích
khi rút dây nguồn
Hiển thị
Hiển thị
Hiển thị
Hiển thị
Hiển thị
Hiển thị
Ngăn cấmNgăn cấm
Ngăn cấm
Ngăn cấm Ngăn cấm
Ngăn cấm
Ngăn cấm
16
è Cồn
è Xăng
dầu
è Dung
môi
Không để vật gì che chắn khe thông
gió khi thiết bị hoạt động để tránh làm
hỏng thiết bị
Không sử dụng thiết bị khi ống hút bị
tắc nghẽn và nhanh chóng xử lý để
tránh biến dạng do quá nhiệt hay hỏa
hoạn.
Không để thiết bị gần nguồn nhiệt
hay môi trường có nhiệt độ cao để
tránh ngắn mạch, hỏa hoạn hay
thương tích.
VC-GC32,31CP

Cấu tạo của thiết bị
Xác định các bộ phận
Ống lồng
(với khớp nối)
Đầu hút trên sàn
Nút chuyển
đổi
Vệ sinh sàn
Vệ sinh thảm
Ống lồng (không khớp nối)
Vặn chặt
Nới lỏng
Móc treo vào thân máy
Tay cầm
Nút nhấn cuộn dây
Tay nắm
Phích cắm
Dấu màu đỏ
Ngưng kéo dây tiếp
vì nó đã gần cuối.
*
Dấu màu vàng
Dừng kéo dây quá dấu
màu vàng vì nó có thể
làm hỏng dây nguồn.
*
Bộ lọc chống
dị ứng
(Bộ lọc chống dị
ứng được đặt bên
trong thân máy có
thể ngăn chặn chất
gây dị ứng)
Dây nguồn
*
Không kéo hay cuộn
dây nguồn khi máy
đang hoạt động
Khớp nối để điều chỉnh
độ dài của ống lồng. Vặn
chặt nó theo ngược chiều
kim đồng hồ trước khi hút bụi.
Tay cầm của
hộp chứa bụi
Bánh xe
Hộp
chứa bụi
Lắp đặt hộp chứa bụi
và bộ lọc đúng cách để
tránh làm hỏng thiết bị
hay bị thương tích.
Công tắc nguồn
Phụ kiện:
Ống ruột gà Ống lồng (để tăng giảm chiều dài) Đầu hút trên sàn Đầu hút khẻ hở nhỏ Đầu hút trên nệm Bàn chải tròn
17
VC-GC31CPT/CPV
VC-GC32CPT/CPV
VC-GC31CPT/CPV
VC-GC32CPT/CPV
VC-GC31CPT/CPV
VC-GC32CPT/CPV
VC-GC31CPT/CPV
VC-GC32CPT/CPV Chỉ cho VC-GC32CPT/CPV Chỉ cho VC-GC32CPT/CPV
Tiếng Việt
VC-GC32,31CP

Vận hành máy hút bụi
Sơ đồ mạch điện
Cầu chì Công tắc nguồn
Cầu chì nhiệt
(tự khởi động)
Động cơ
Dây nguồn
Cảnh báo
Không sử dụng máy hút bụi nếu không lắp hộp chứa bụi và bộ lọc
đúng cách
Cách vệ sinh sàn và thảm
Vệ sinh thảm
Di chuyển nhẹ nhàng đầu hút bụi dọc theo
sàn nhà.
Vệ sinh sàn
Để tăng hiệu quả làm sạch và tránh làm trầy bề
mặt sàn, di chuyển nhẹ nhàng đầu hút bụi dọc
theo sàn nhà.
1Kiểm tra xem lắp hộp chứa bụi và bộ lọc đúng cách chưa.
2Kéo thẳng dây nguồn và cắm phích cắm vào ổ điện.
3Lắp ống ruột gà, ống lồng và các phụ kiện khác.
4Nhấn nút công tắc nguồn để vận hành máy hút bụi.
5Tắt công tắc nguồn và rút phích cắm sau khi hút bụi xong.
6Giữ phích cắm và nhấn nút cuộn dây để quấn dây lại từ từ.
Cẩn trọng
Ngắt nguồn điện và rút phích cắm nếu mất điện khi đang sử
dụng thiết bị.
18
VC-GC32,31CP

Tiếng Việt
19
Hộp chứa bụi
1. Cấu tạo
Nắp đậy hộp
Bộ lọc xếp ly
Vòng đệm
cao su
Núm gạt làm sạch
bụi
Lưới lọc
Hộp chứa
bụi
Chổi vệ sinh
Đường
khí vào
Lổ thông khí
Phía sau Phía dưới
Ngăn
riêng
Hộp
chứa bụi
Nút mở hộp
Vạch tối đa
Lắp bộ lọc xếp ly
đúng cách để tránh
làm nóng hoặc
cháy động cơ
Không kéo mạnh
hay tháo bỏ vòng
đệm cao su.
Trượt qua trái, phải
để làm sạch bụi bám
trên bộ lọc xếp ly.
Bụi không được vượt
quá vạch tối đa để tránh
lực hút bị giảm vì đầy
bụi.
2. Tháo và lắp hộp chứa bụi
Nhấn nút để tháo hộp chứa bụi
như hình bên dưới.
Để lắp vào, nhấn hộp chứa
bụi xuống đến khi nghe
tiếng "click".
Nút nhấn để tháo
click
Không tháo hộp chứa bụi
khi máy hút bụi đang để
đứng như hình bên dưới để
tránh làm văng bụi ra từ
đường khí vào.
VC-GC32,31CP
This manual suits for next models
3
Table of contents
Languages:
Other Toshiba Vacuum Cleaner manuals