Totoku LV22E4-N1 / N16 User manual

Graphics Card LV22E4-N1 / N16
User's Manual
グラフィックスカード LV22E4-N1 / N16
取扱説明書


Graphics Card LV22E4-N1/N16
User's Manual

ENGLISH - 2 -
FCC Information
FCC (U.S. Federal Communications Commission)
This equipment has been tested and found to comply with the limits for a Class A digital
device, pursuant to part 15 of the FCC Rules. These limits are designed to provide
reasonable protection against harmful interference in a residential installation. This
equipment generates, uses, and can radiate radio frequency energy, and if not installed
and used in accordance with the instructions, may cause harmful interference to radio
communications. However, there is no guarantee that interference will not occur in a
particular installation. If this equipment does cause unacceptable interference to radio or
television reception, which can be determined by turning the equipment off and on, the
user is encouraged to try to correct the interference by one or more of the following
measures:
• Reorient or relocate the receiving antenna.
• Increase the separation between the equipment and receiver.
• Connect the equipment into an outlet on a circuit different from that to which the
receiver is connected.
• Consult your dealer or an experienced radio/TV technician for help.
FCC Warning
To assure continued FCC compliance, the user must use a grounded power supply cord
and the provided shielded video interface cable with bonded ferrite cores. Also, any
unauthorized changes or modications to this monitor would void the user's authority to
operate this device.
Responsible party located within the United States
TOTOKU North America, Inc.
1425 Greenway Dr., Ste. 565
Irving, TX 75038, U.S.A
Tel: (469) 442-0122
CE Certication
This device complies with the requirements of the EMC directive 89/336/EEC
"Electromagnetic Compatibility."
Warning
• Concerning disposal of waste, please consult the dealer you have
purchased this device from.

ENGLISH
- 3 -
Contents
1. Introduction........................................................................................................4
Package contents................................................................................................4
Hardware requirements.......................................................................................4
Safety precautions...............................................................................................4
2. Hardware Installation ........................................................................................5
Disconnecting power cables................................................................................5
Installing the graphics card..................................................................................5
Connecting the display ........................................................................................6
Connecting the power cables ..............................................................................7
3. Software Installation and Setup ......................................................................8
Installing the display driver software ...................................................................8
Setting up display settings.................................................................................11
For multi-display environments on Windows 2000.......................................12
For single-display environments on Windows 2000 and
all Windows XP users.....................12
For all Windows Vista users .........................................................................14
Portrait orientation on ME201L/ME251i/CCL202/CCL212/CCL250i............14
4. Software Uninstallation...................................................................................16
5. Multi-Display Modes ........................................................................................17
Changing Multi-Display modes..........................................................................18
6. Q&A...................................................................................................................19
Prior to installation.............................................................................................19
Installation .........................................................................................................19
Display setup.....................................................................................................22
Miscellaneous....................................................................................................24
7. Technical Specication ...................................................................................25
* Company and product names mentioned herein may be the trademarks of their
respective owners.
ENGLISH - 4 -
1. Introduction
This manual explains how to use this graphics card along with TOTOKU LCD displays.
Package contents
Conrm that the package contains the following items.
Graphics card LV22E4-N1/N16 ..........1
Driver CD............................................1
Dual DVI Cable...................................1
Low-Prole Bracket ............................1
User’s Manual ....................................1
Hardware requirements
• DOS/V PC or a workstation with an Intel Pentium4- or Athlon64-equivalent processor
or higher
• PCI Express x1 compliant slot (x1) for LV22E4-N1, PCI Express x16 compliant slot (x1)
for LV22E4-N16
• Microsoft Windows 2000/XP, Windows Vista
• System memory: 1GB or more (2GB or more recommended)
• Hard disk space: 140MB or more
• CD-ROM drive (for installation of the supplied display driver)
• Power supply above 350W
• Supported displays:
Pixels Display model
2MP ME201L, ME213L, ME251i, ME253i2,
CCL202, CCL212, CCL250i, CCL252i2, CCL254i2
3MP ME315L, ME351i, ME355i2, CCL316, CCL350i, CCL352i2,
CCL354i2
Important: LV22E4-N1/N16 do not support dual-link DVI.
Safety precautions
Please take the following precautions for your safety in using this graphics card.
• Do not try to repair or alter the product. It could cause re, an electric shock, and/or
other injuries.
• If any abnormalities are detected such as odor, sound, and overheat, turn off the power
and disconnect it immediately. Otherwise, it could cause re and or an electric shock.
• Do not touch the product with wet hands. It could cause an electric shock.
• This product is easily damaged by static electricity. Be careful when installing, storing,
and handling.
• Do not touch the electric terminals directly.
• Keep this product away from magnetized places and objects.
• Do not leave this product on the oor. If you accidentally step on it, you could get
injured or it could damage the product.

ENGLISH
- 5 -
2. Hardware Installation
Notices
Please read the following notices before installing the graphics card.
● Make sure that your operating system is installed properly.
● Uninstall all previously installed drivers and display-related software such as Pivot.
● Log in as a user with administrative privileges to install the driver.
● Remove all currently installed old graphics card.
● Proper operation of this graphics card is not guaranteed when used with other graphics
cards for a multi-display setup. If an error occurs, see Q&A in this manual.
Disconnecting power cables
Disconnect power cables of the computer and other peripheral devices.
Installing the graphics card
1Remove the cover of the computer. (See the computer instruction manual.)
Caution: ESD (Electrostatic Discharge) Breakdown
Static electricity could damage delicate components of the computer and the graphics
card. Discharge static electricity by touching metal parts of the computer prior to
installation. Do not touch electric parts or terminals.
2Remove the old card or a bracket from an appropriate slot.
Caution: Burn
Internal parts may be hot if the computer has been turned on previously.
3 Install the graphics card in the slot rmly. Make sure it does not touch any part of the
computer.
Caution: Ventilation
Ensure the proper airow for cooling the graphics card.
Install this graphics card in the slot where ambient temperatures are 55 degrees
C or lower.
Slot: Leave the adjacent slot or slot that is close to heat producing components open
if multiple slots are available to release heat around the card sufciently.
Inadequate heat release could shorten the product lifetime or cause some troubles.
Dust: Dust inside the computer could restrict ventilation to cool off the card and result
in failure.
Important: Our warranty may not apply to the damages arising from those facts.
4Secure the bracket to the chassis of the computer.
5Put the cover back on the computer.
ENGLISH - 6 -
Connecting the display
When using LV22E4-N1/N16 on i2 model displays (CCLxxxi2 and MExxxi2) ...
i2 model displays can be used in both landscape and portrait operation by switching two
sets of Extended Display Identication Data (EDID) loaded with the displays. EDID is
a data structure describing its own information including supporting resolution. See the
display user manual for instructions on how to switch EDIDs.
On CCL252i2, CCL254i2, and ME253i2:
The one EDID supports both landscape and portrait display modes (resolutions), but the
boot sequence is displayed in landscape mode only in both modes. In order to use the
display in portrait, switching the EDID to the other, portrait only mode is recommended.
By default, “Landscape + Portrait” is selected.
On CCL352i2, CCL354i2, and ME355i2:
The two EDIDs respectively support landscape and portrait modes, but they need to be
manually switched. By default, it is set to portrait.
Check the table below to nd out in what orientation the i2 model LCDs are.
Note The DVI cable needs to be disconnected from the display when checking the EDID.
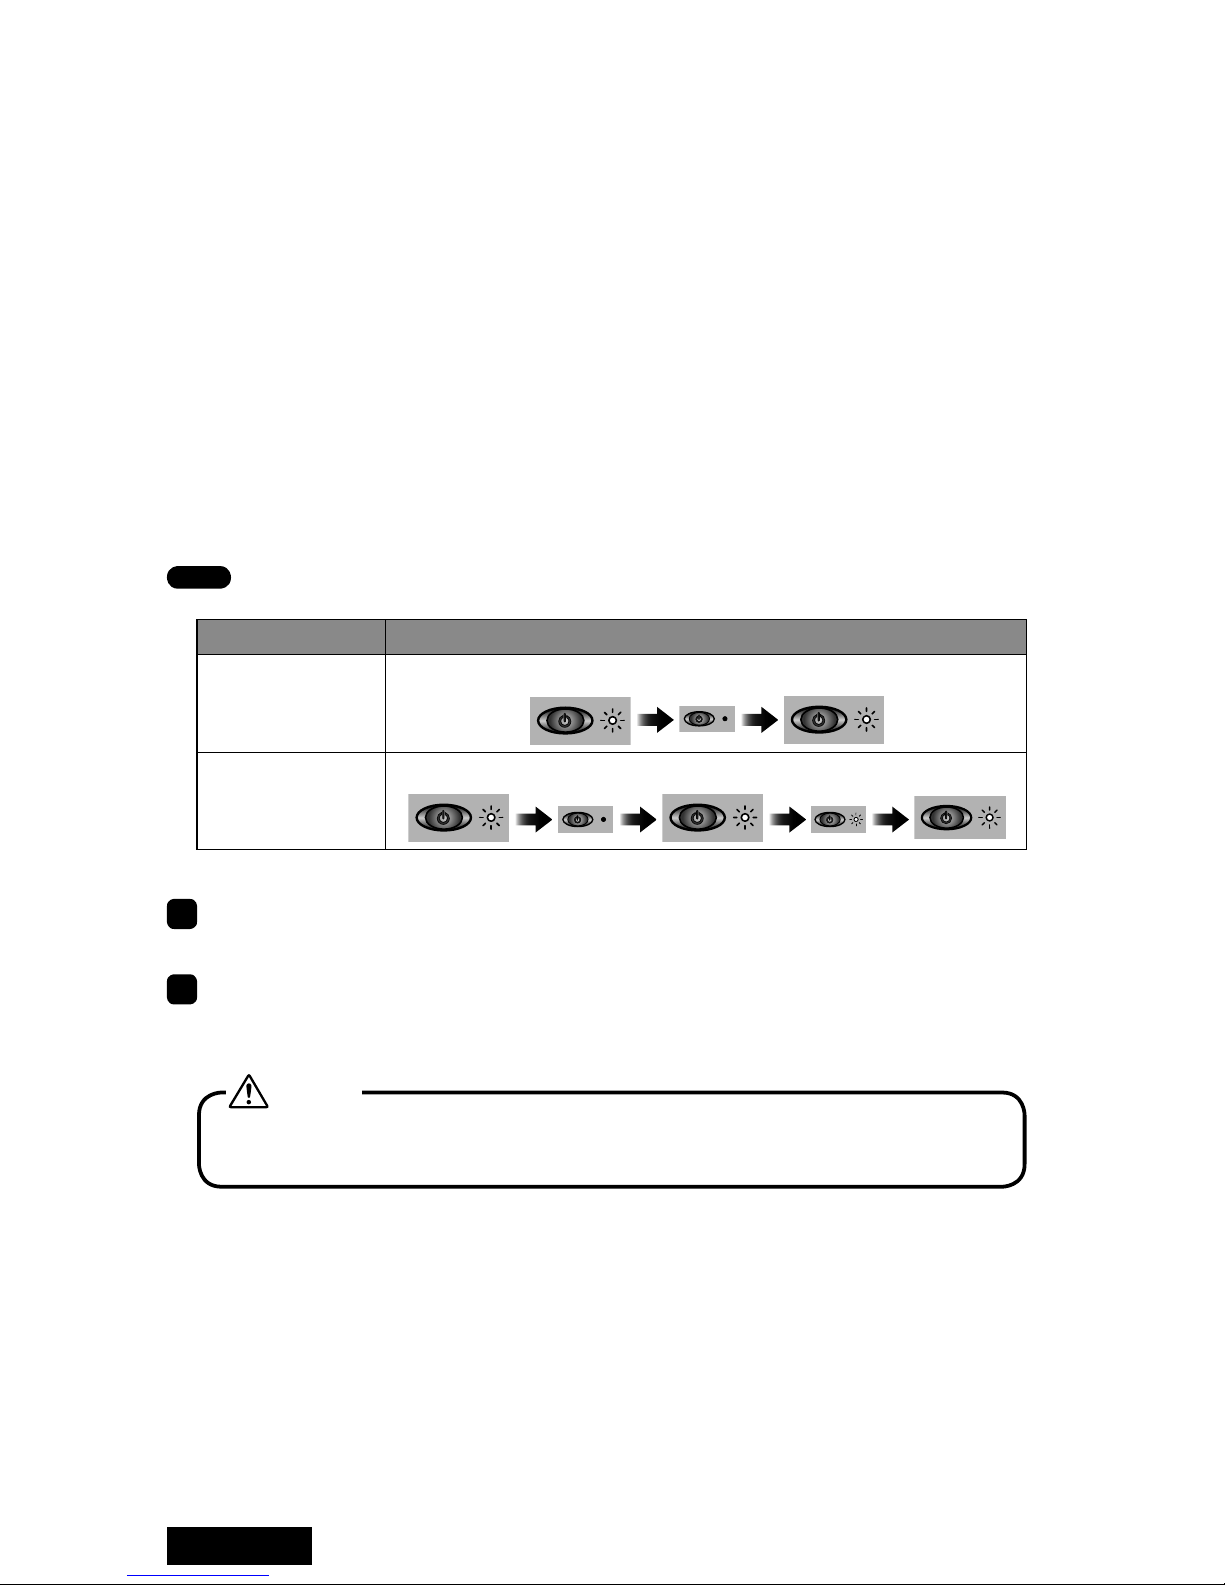
Display mode LED behavior upon turn-on
Portrait
The LED blinks twice.
Landscape
The LED blinks three times.
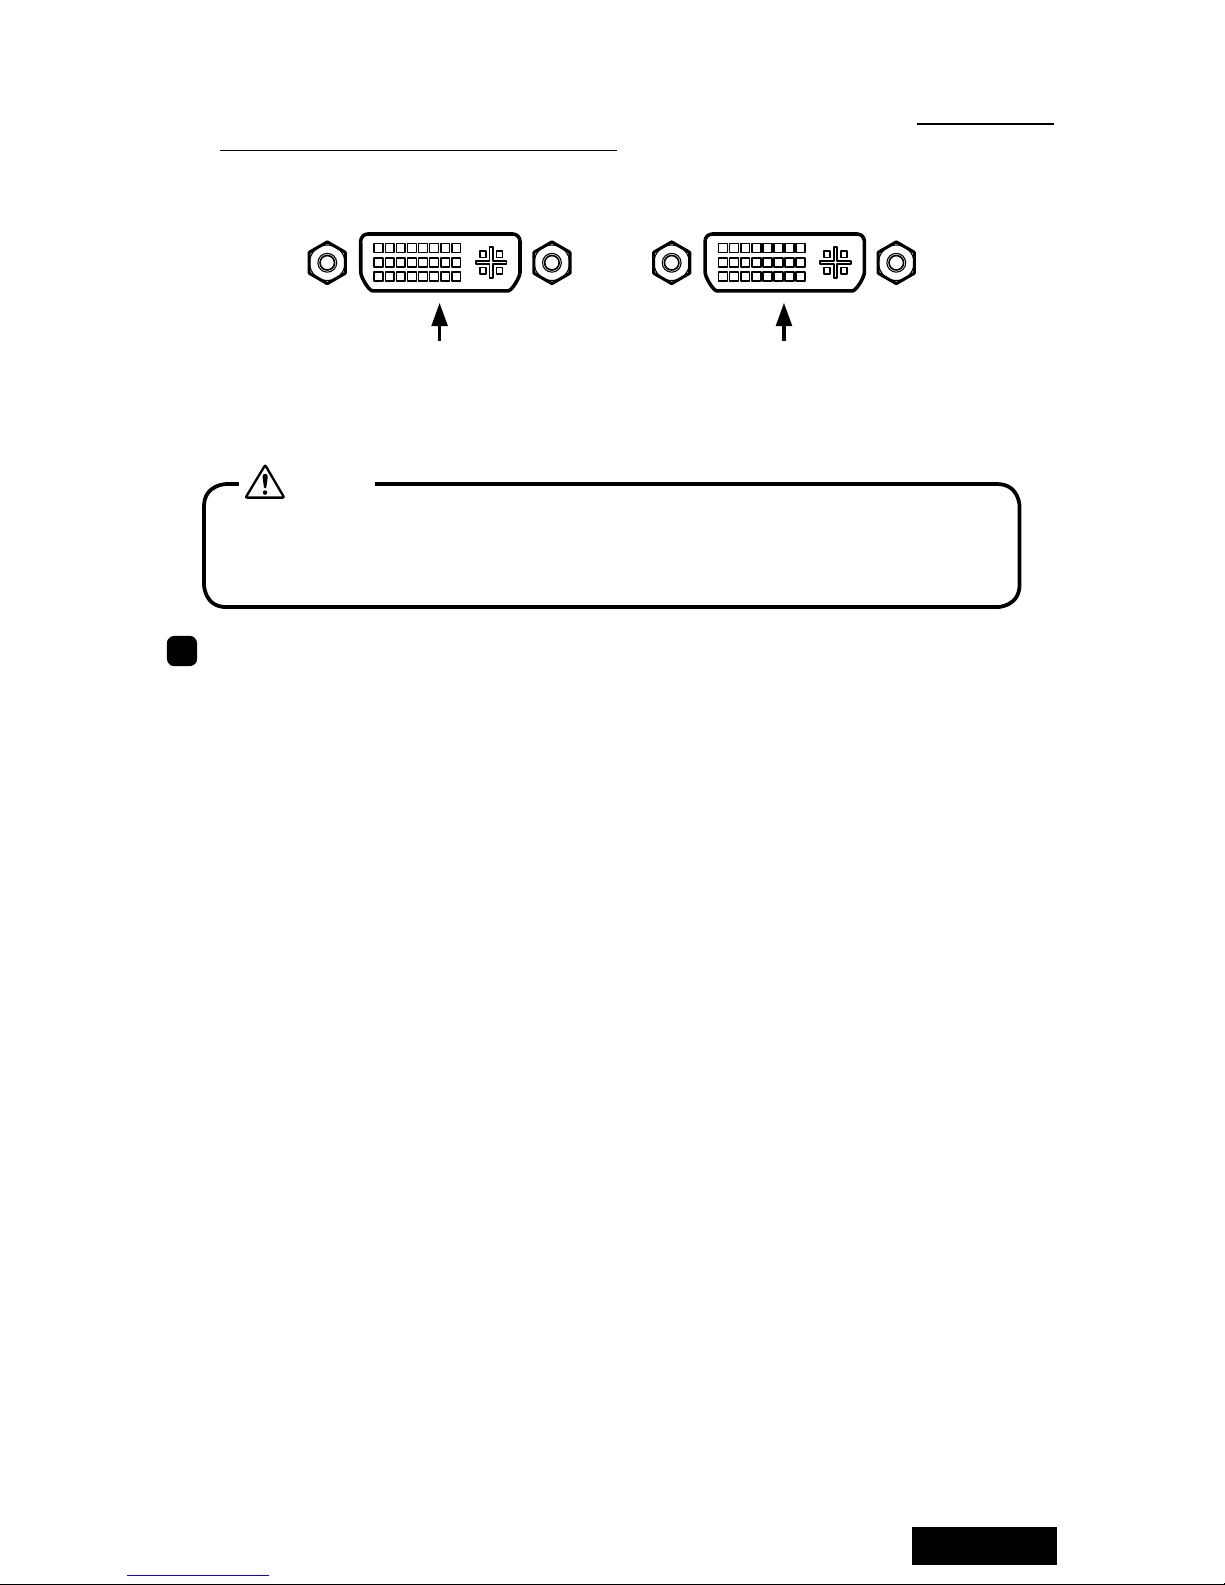
1Connect the supplied dual DVI cable to the DMS59 connector on the LV22E4-N1/N16
and tighten the screws on the connector.
2Connect one end of the DVI cable supplied with the display to Connector 1 of the
dual DVI cable connected to the LV22E4-N1/N16 and the other end to the display
and tighten the screws on the connectors.
Careful not to break the connector pins by trying to insert the DMS59 and DVI
connectors at an angle.
Caution
ENGLISH
- 7 -
Note:
• Two connectors of the dual DVI cable are numbered with “1” and “2”. Make sure to
connect the rst display to Connector 1.
DVI Connector 2
Connect the second
display (on the right)
DVI Connector 1
Connect the rst display
(on the left)
Do not connect/disconnect the DVI cable while the display is turned on. It could
cause a graphics card failure. Connect/disconnect the DVI cables with the
display disconnected.
Caution
3To use two displays, connect the other display as well.
Connecting the power cables
Connect all power cables to the wall outlets, including the computer, the display, and
other peripheral devices.

ENGLISH - 8 -
3. Software Installation and Setup
Follow the instructions below to install the software (display driver) and set it up using the
setup program included in the accompanying CD-ROM. See Q&A if any problem occurs.
Installing the display driver software
1Turn on the display and start up the computer.
2 Conrm that the VGA boot screen appears followed by the Windows startup screen.
3Log into Windows as a user with administrative privileges.
4Select Control Panel>Add/Remove Programs from the Start menu, and verify that
NVIDIA programs are not installed previously. If programs such as "NVIDIA Display
Driver" or "NVIDIA Windows 2000/XP Display Drivers" are listed, remove them and
restart the computer (see Q&A: Uninstallation). In Window Vista, Select Control
Panel>Uninstall a program from the Start menu, remove "NVIDIA Drivers", and
restart the computer. When the Found New Hardware wizard appears, click "Cancel."
(Pre-installed driver on Windows Vista will not need to be removed.)
5Install the driver using the setup program included in the accompanying CD-ROM.
Note: If installation fails, follow the instructions in Q&A (pages 17 and 18) on
reinstallation.
1) The Welcome to the Found New Hardware Wizard appears by itself. Whichever
screen appears, click "Cencel."

ENGLISH
- 9 -
2) Insert the driver CD in the CD-ROM drive. If the following screen appears, click
"Cancel."
3) Double-click Setup.exe in the appropriate directory below included in the CD-
ROM.
XP/2000: DriverCD/XP2K
Vista 32-bit: DriverCD/VISTA/32bit
Vista 64-bit: DriverCD/VISTA/64bit
In Windows Vista, when "A program needs your permission to contine" screen
appears, click "Continue."
4) If the Hardware Installation screen appears, click "Continue Anyway."
5) When the InstallShield Wizard starts up, click "Next."

ENGLISH - 10 -
6) At the end of installation, the InstallShield Wizard Complete screen appears. For
those using two displays on Windows 2000, select "No, I will restart my computer
later" and click "Finish;" for those using a single display on Windows 2000 and all
Windows XP and Vista users, select "Yes, I want to restart my computer now" and
click "Finish."
Windows 2000 (single-display) & XP & Vista
Windows 2000 (multi-displays)

ENGLISH
- 11 -
Setting up the display settings
For those who are using two displays on Windows 2000, start from 2K-1 below and move
on to For single-display environments on Windows 2000 and all Windows XP users;
for those using a single display on Windows 2000 and all Windows XP users, start from
For single-display environments on Windows 2000 and all Windows XP users. For
all Windows Vista users, start from For all Windows Vista users.
For those who are using ME201L, ME251i, CCL202, CCL212, or CCL250i and wish to
use the display in portrait orientation, follow the instructions on page 13.See the table
below for supported displays and their resolutions and refresh rates.
Pixel Display mode Resolution Refresh
rate (Hz) Display model
2MP Landscape
Portrait
1200 x 1600
1600 x 1200 60
ME201L, ME213L, ME251i,
ME253i2*,
CCL202, CCL212, CCL250i,
CCL252i2*, CCL254i2*
3MP Landscape
Portrait
1536 x 2048
2048 x 1536 30
ME315L, ME351i, ME355i2*,
CCL316, CCL350i, CCL352i2*,
CCL354i2*
Note:
* Display modes for i2 models depend on the display orientation setting within the
display. See the display user manual on how to change orientation.

ENGLISH - 12 -
For multi-display environments on Windows 2000:
2K-1: Access the Display Properties dialog box and click the Settings tab.
2K-2: Select "Ture Color (32bit)" from the Colors drop-dowm menu.
2K-3: Set a resolution using the Screen Area slider.
2K-4: Click "Advanced" on the Settings tab, and another dialog box appears.
2K-5: Select the Quadro NVS290 tab, and click "Start the NVIDIA Control Panel."
Note: When another graphics card coexists, the Quadro NVS290 tab will not appear.
In that case, a display on another card needs to be detached for now. Right-click
the subject display icon on the Settings tab and uncheck "Attached" on the right-
click menu, or uncheck "Extend my Windows desktop onto this monitor."
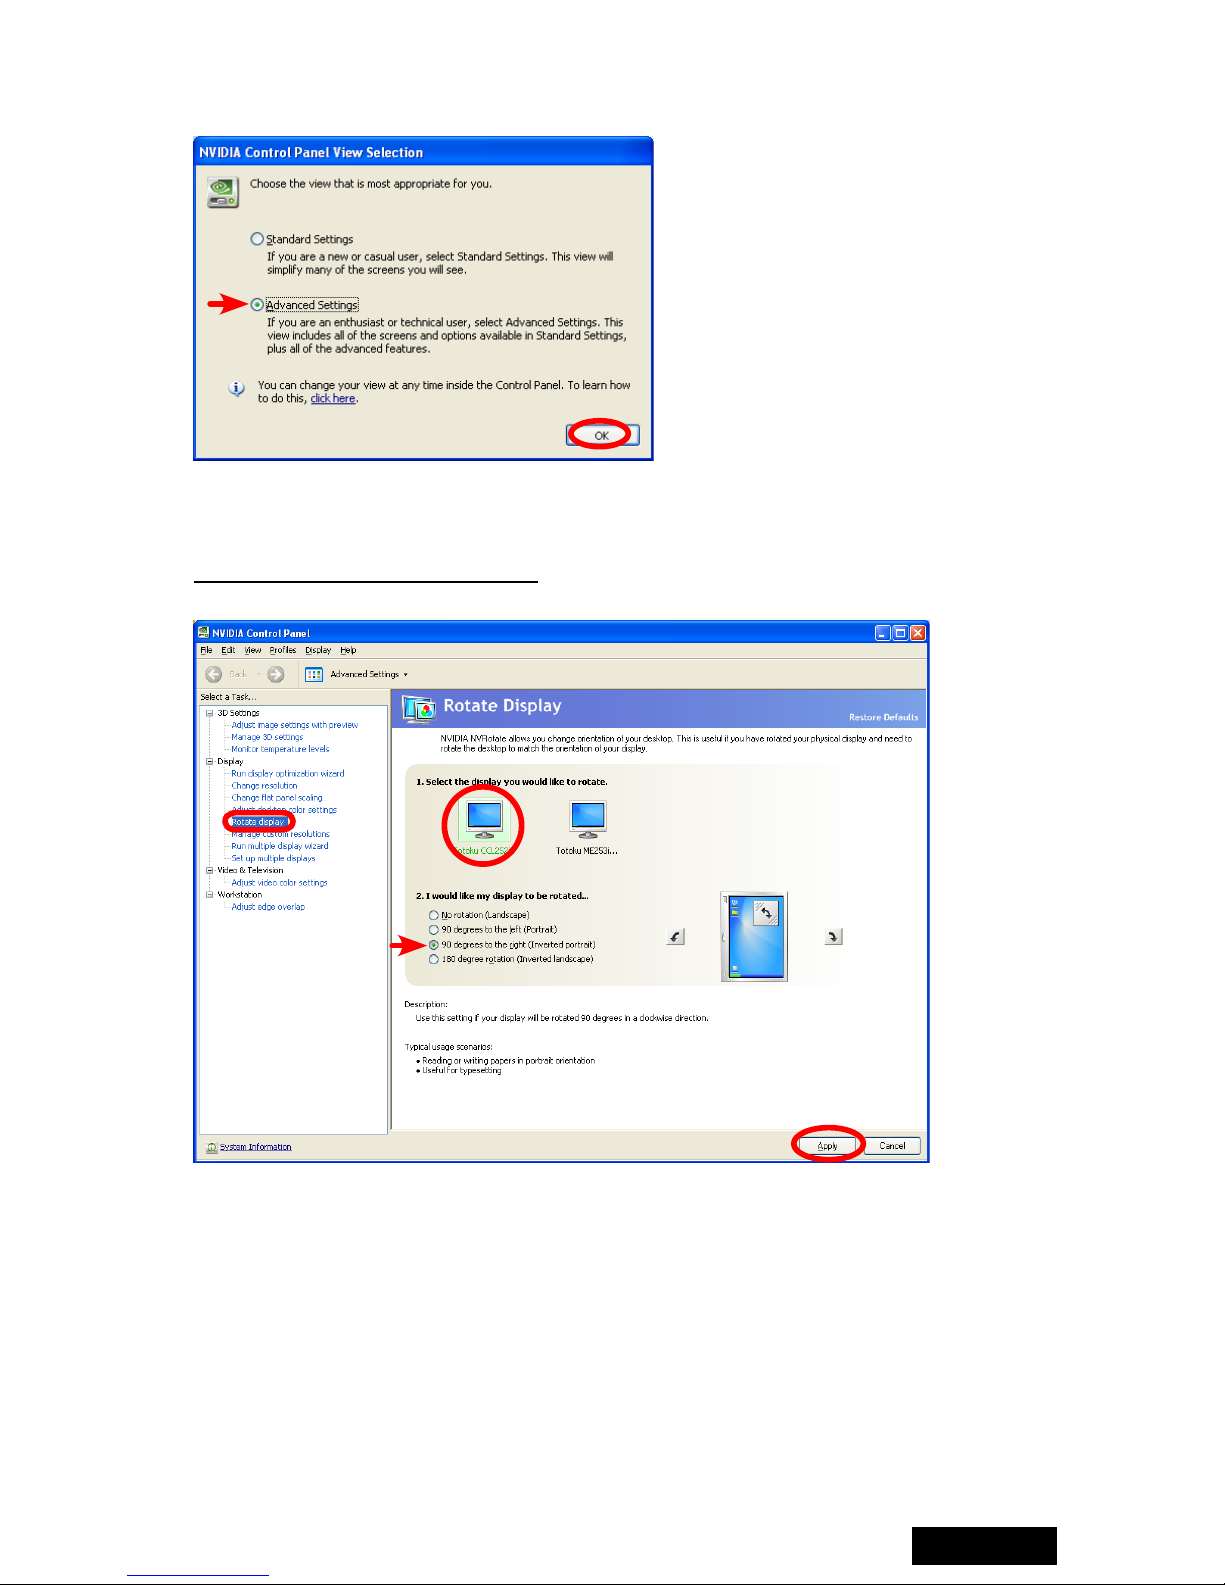
2K-6: When the "NVIDIA Control Panel View Selection" screen appears, select
"Advanced Settings" and click "OK." (This screen appears only for the rst setting.)
2K-7: When the "NVIDIA Control Panel appears," select "Set up multiple displays" from
the "Select a Task..." section.
2K-8: Select the displays you would like to use and the display you want Windows to use
as primary, and click "Apply."
Note: See Chapter 5 for detailed information on multi-display modes.
2K-9: When a message prompting restart of the computer appears, click "Restart now."
2K-10: After restarting the computer, click "Finish" on the set up multiple displays
installation completion message.
2K-11: A message prompting restart of the computer appears again. Restart the
computer. (Go on to For single-display environments on Windows 2000 and all
Windows XP users below or Portrait orientation on ME201L/ME251i/CCL202/
CCL212/CCL250i on page 14.)
For single-display environments on Windows 2000 and
all Windows XP users:
1Select Display Properties>Settings(tab).
Select a display icon, and if the Display section says "Plug and Play monitor on Elza
TOTOKU LV22E4-N1/N16," the corresponding display is connected to LV22E4-N1/
N16.
2 In a multi-display setup, select the icon for the rst display on this card and verify
"Extend my Windows desktop onto this monitor" is checked.
3Set a resolution using the Screen resolution slider.
4Select 32 bit color from the Color quality drop-down menu.
Note: "True Color (32bit)" on Windows 2000, "High (32bit)" on Windows XP.

ENGLISH
- 13 -
5Click "Advanced," select the Monitor tab, and check the refresh rate.
6(Windows XP users) When two displays are connected, repeat Steps 2 to 5 for the
second display by selecting the second display's icon instead.
7If necessary, change multi-display modes (see Chapter 4 for detailed information).
8In a multi-display setup, check the display arrangement by clicking "Identify" on
the Settings tab. The same number as the selected display icon's appears on the
corresponding display. If necessary, rearrange the icons by dragging them to match
the actual display arrangement.
9In a multi-display setup, determine a primary display, select the corresponding display
icon, check "Use this device as the primary monitor."
10
Click "OK," and remove the driver CD from the CD-ROM drive.
For all Windows Vista users
1Double-click on the desk top, and click "Personalize." Click "Display Settings." Select
a display icon, and if the section below the icon says "Plug and Play monitor on Elza
TOTOKU LV22E4-N1/N16," the corresponding display is connected to LV22E4-N1/
N16.
2 In a multi-display setup, select the icon for the rst display on this card and verify
"Extend my Windows desktop onto this monitor" is checked.
3Set a resolution using the Screen resolution slider.
4Select 32 bit color from the Color quality drop-down menu.
5Click "Advanced Settings...," select the Monitor tab, and check the refresh rate (see
the table on the previous page). If necessary, select an appropriate refresh rate and
click "OK."

ENGLISH - 14 -
Portrait orientation on ME201L/ME251i/CCL202/CCL212/CCL250i:
To use ME201L, ME251i, CCL202, CCL212, and CCL250i in portrait orientation, follow
the instructions below.
Note: In a multi-display setup, horizontal span mode is not available (see Chapater 4 for
detailed information on multi-display modes).
1) Select Display Properties>Settings(tab).
2) Select a display icon and click "Advanced."
3) Select the Quadro NVS290 tab, and click "Start the NVIDIA Control Panel."
Note: When another graphics card coexists, the Quadro NVS290 tab will not appear.
In that case, a display on another card needs to be detached for now. Right-click the
subject display icon on the Settings tab and uncheck "Attached" from the right-click
menu, or uncheck "Extend my Windows desktop onto this monitor."
ENGLISH
- 15 -
4) When the "NVIDIA Control Panel View Selection" screen appears, select "Advanced
Settings" and click "OK." (This screen appears only for the rst setting.)
5) Turn the LCD panel into portrait orientation.
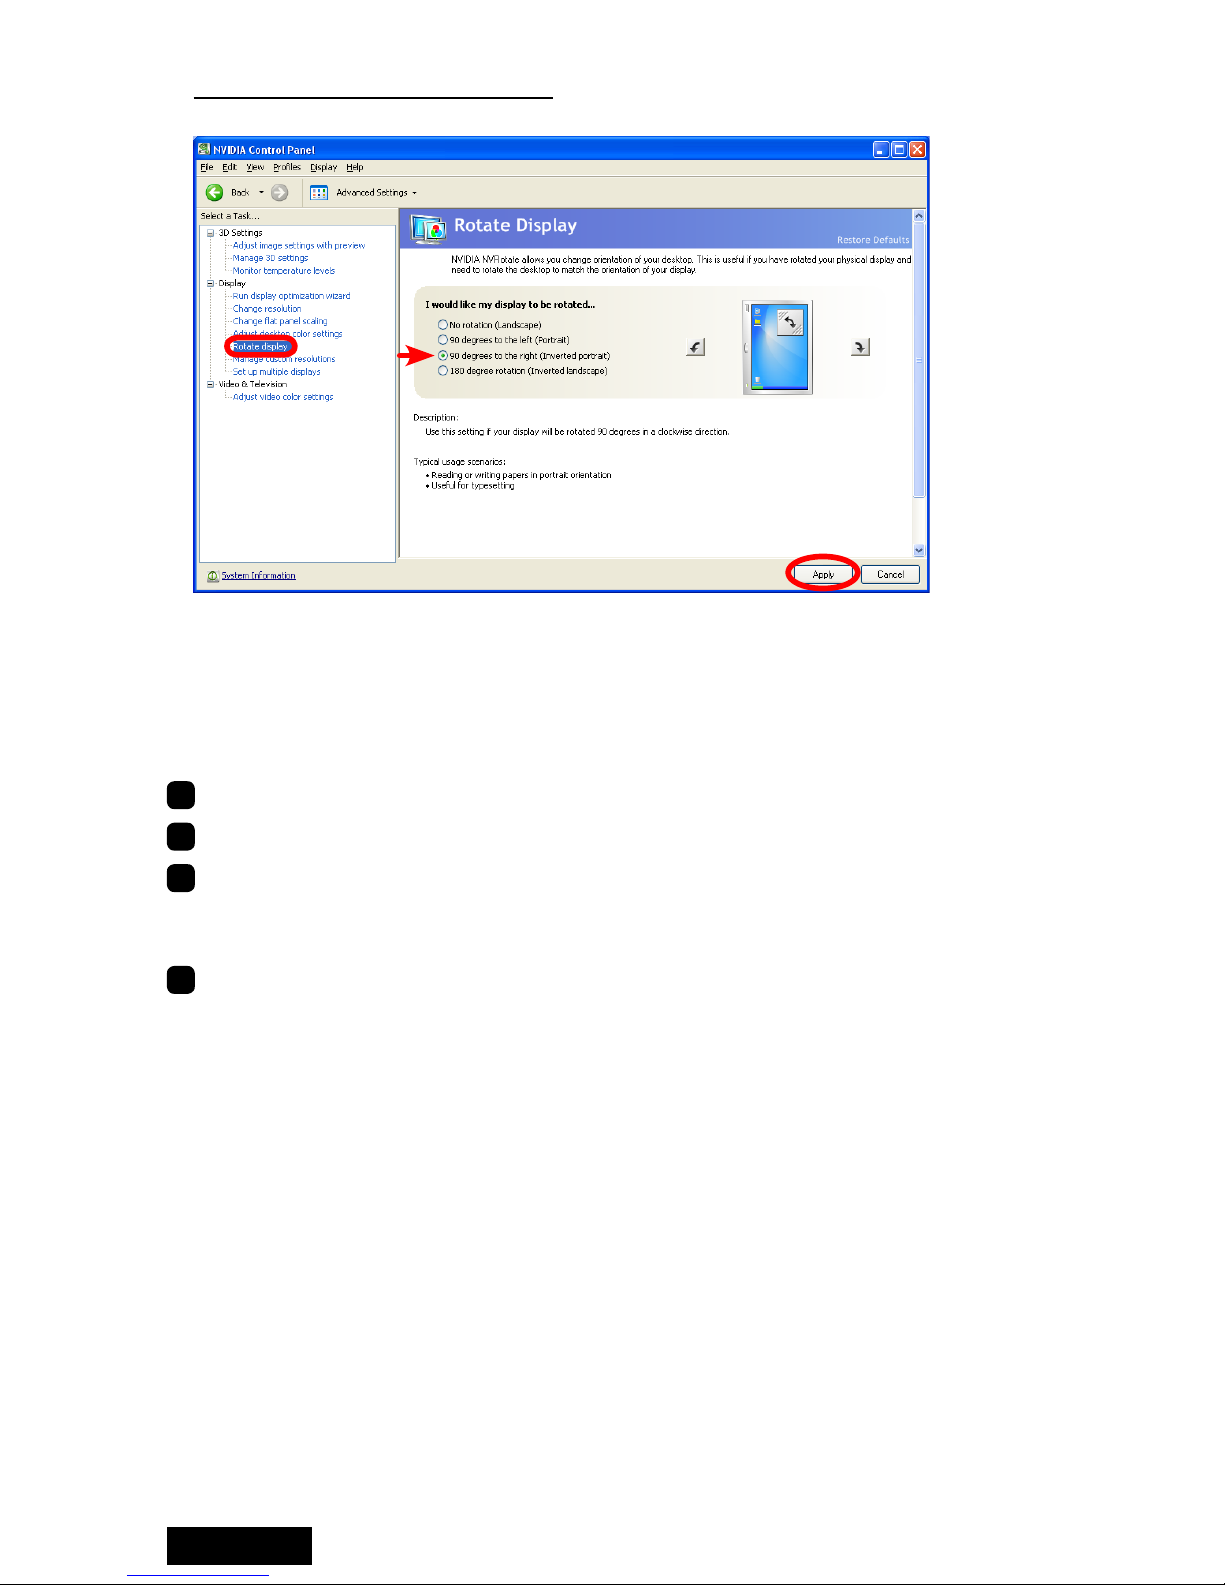
6) Select "Rotate display" from the "Select a Task..." section in the NVIDIA Control Panel.
When two displays are connected, select the display you would like to rotate and "90
degrees to the right (Inverted portrait)," and click "Apply."
Repeat steps 2 to 6 for the other display.
ENGLISH - 16 -
When a single display is connected, select "90 degrees to the right (Inverted portrait),"
and click "Apply."
4. Software Uninstallation
Follow the instructions below to uninstall the display driver for LV22E4-N1/N16.
1Log into Windwos as a user with administrative privileges.
2Select Control Panel>Add/Remove Programs from the Start menu.
3Delete "NVIDIA drivers" from the Currently installed programs list.
Note: If a program named "NVIDIA Windows 2000/XP Display Drivers" exists,
uninstall it as well.
4End all applications and restart the computer.
Note: To complete uninstallation, make sure to restart the computer.

ENGLISH
- 17 -
5. Multi-Display Modes
There are the following four multi-display modes are available:
Multi-display mode 1 Display/card 2 Displays/card
Single display:
Single-display setup 1
Clone:
Two displays on the same card display the
same image respectively.
11
Horizontal span:
Two displays on the same card are combined into
one desktop (side-by-side). 1
Vertical span*:
Two displays on the same card are combined into
one desktop (one above the other). 1
Dualview:
Two displays on the same card are working
independently and separately
2
112
Note: Vertical span mode is only supported by ME213L.

ENGLISH - 18 -
Changing multi-display modes
1Select Display Properties>Settings(tab) and select a subject display's icon.
2Select Advanced>Quadro NVS290(tab) and click "Start the NVIDIA Control Panel."
Note: When another graphics card coexists, the Quadro NVS290 tab will not appear.
In that case, a display on another card needs to be detached for now. Right-click the
subject display icon on the Settings tab and uncheck "Attached" on the right-click
menu, or uncheck "Extend my Windows desktop onto this monitor."
3When the "NVIDIA Control Panel appears," select "Set up multiple displays" from the
"Select a Task..." section.
4Choose the nView display mode to use (see Chapter 5. Malti-display modes for
detailed information). Select the displays you would like to use and the displays you
want Windows to use as primary, and click “Apply.“
This manual suits for next models
2
Table of contents
Languages:
Other Totoku Video Card manuals


Popular Video Card manuals by other brands


Nvidia
Nvidia VCQFX5600 supplementary guide

ATI Technologies
ATI Technologies Radeon X300 Series user manual

ATI Technologies
ATI Technologies X1800 - 100-435705 Radeon XT 512MB GDDR3 SDRAM PCI Express x16 Graphics... user guide

EVGA
EVGA GeForce GTX 460 SuperClocked Specifications

Aztech
Aztech M64-32 Easy start

Jaton
Jaton Video-198PCI-64 user manual


