Totoku LV32E2 User manual

Graphics card LV32E2/LV32P4
User's Manual
グラフィックスカード LV32E2/LV32P4
取扱説明書


ENGLISH
- 1 -
Graphics Card LV32E2/LV32P4
User’s Manual

- 2 -
ENGLISH
FCC Information
FCC (U.S. Federal Communications Commission)
This equipment has been tested and found to comply with the limits for a Class A digital
device, pursuant to part 15 of the FCC Rules. These limits are designed to provide
reasonable protection against harmful interference in a residential installation. This
equipment generates, uses, and can radiate radio frequency energy, and if not installed
and used in accordance with the instructions, may cause harmful interference to radio
communications. However, there is no guarantee that interference will not occur in a
particular installation. If this equipment does cause unacceptable interference to radio or
television reception, which can be determined by turning the equipment off and on, the
user is encouraged to try to correct the interference by one or more of the following
measures:
- Reorient or relocate the receiving antenna.
- Increase the separation between the equipment and receiver.
- Connect the equipment into an outlet on a circuit different from that to which the
receiver is connected.
- Consult your dealer or an experienced radio/TV technician for help.
FCC Warning
To assure continued FCC compliance, the user must use a grounded power supply cord
and the provided shielded video interface cable with bonded ferrite cores. Also, any
unauthorized changes or modifications to this monitor would void the user's authority to
operate this device.
Responsible Party Located within the United States
Totoku North America, Inc.
1425 Greenway Dr., Ste. 565
Irving, TX 75038, U.S.A
Tel: (469)-442-0122
CE Certification
This device complies with the requirements of the EMC directive 89/336/
EEC "Electromagnetic Compatibility."
Warning
- When using at 240 V in United States, supply must be from center-tapped, 240 V,
single phase circuit.
- Concerning disposal of waste, please consult the dealer you have purchased this
device from.

ENGLISH
- 3 -
Content
Introduction ............................................................................................................ 4
Package Contents ............................................................................................... 4
Hardware Requirements ...................................................................................... 4
Safety Precautions ............................................................................................... 4
Hardware Installation ............................................................................................ 5
Disconnecting power cables ................................................................................ 5
Installing the graphics card .................................................................................. 5
Connecting the display ........................................................................................ 6
Connecting the power cables .............................................................................. 7
Software Installation and Setup .......................................................................... 8
Installing software ................................................................................................ 8
Display settings .................................................................................................... 8
Multi-Display Modes ............................................................................................ 13
About multi-display modes ................................................................................. 13
Changing multi-display modes ........................................................................... 13
Grayscale Mode ................................................................................................... 15
About grayscale modes ..................................................................................... 15
Changing grayscale modes ............................................................................... 15
Q & A .................................................................................................................. 17
Prior to installation ............................................................................................. 17
Installation .......................................................................................................... 17
Uninstallation ..................................................................................................... 19
Driver setup ....................................................................................................... 19
Miscellaneous .................................................................................................... 19
Technical Specifications ..................................................................................... 21
LV32E2 .............................................................................................................. 21
LV32P4 .............................................................................................................. 22
After-Sale Service ................................................................................................ 23
Repair ................................................................................................................ 23
Driver updates ................................................................................................... 23
Disposing of the product .................................................................................... 23
* Company names and product names are brand names or registered brand names.

- 4 -
ENGLISH
Introduction
This manual explains how to use this graphics card along with TOTOKU LCD displays.
Package Contents
Confirm that the package contains the following items.
Graphics Card ........... 1
Driver CD ................... 1
User’s Manual ........... 1
Hardware Requirements
● PC/AT compatible computer with a processor equivalent to or higher than Intel Pentium
4 or Athlon
● For LV32E2: PCI Express x16 compatible slot
For LV32P4: 32 bit/33MHz PCI slot
● Microsoft Windows 2000, Windows XP
● System Memory: 256MG or more (Recommended: 512MB or more)
● Hard Disk Space: 20MB or more
● CD-ROM Drive
● TOTOKU LCD Display(s) (ME/CCL series)
Safety Precautions
Please take the following precautions for your safety in using this graphics card.
● Do not try to repair or alter the product. It could cause fire, an electric shock, and/or
other injuries.
● If any abnormalities are detected such as odor, sound, and overheat, turn off the power
and disconnect it immediately. Otherwise, it could cause fire and or an electric shock.
● Do not touch the product with wet hands. It could cause an electric shock.
● This product is easily damaged by static electricity. Be careful when installing, storing,
and handling.
● Do not touch the electric terminals directly.
● Keep this product away from magnetized places and objects.
● Do not leave this product on the floor. If you accidentally step on it, you could get
injured or it could damage the product.

ENGLISH
- 5 -
Hardware Installation
Notices
Please read the following notices before installing the graphics card.
● Make sure that your operating system is installed properly.
● Uninstall all previously installed drivers and display-related software such as Pivot.
● Log in as a user with administrative privileges to install the driver.
● Remove all currently installed old graphics card.
● Make sure to disable the on-board graphic controller on the computer’s motherboard if
it is enabled. Contact the computer manufacturer on how to disable it.
● Proper operation of this graphics card is not guaranteed when used with other graphics
cards for multi-display. If an error occurs, see Q&A in this manual.
Disconnecting power cables
Disconnect power cables of the computer and other peripheral devices.
Installing the graphics card
1 Remove the cover of the computer. (See the user’s manual for your computer.)
Caution: ESD (Electrostatic Discharge) Breakdown
Static electricity could damage delicate components of the computer and the graphics
card. Discharge static electricity by touching metal parts of the computer prior to
installation. Do not touch electric parts or terminals.
2 Remove the old card or a bracket from the slot.
Caution: Burn
Internal parts may be hot if the computer has been turned on previously.
3 Install the graphics card in the appropriate slot on the computer firmly so that it does
not touch any part of the computer.
See the following table for compatibility between the card and PCI slots.
LV32E2 LV32P4 Slot Shape
AGP
Yes PCI Express x 16
PCI Express x 1
Yes PCI 32 bit
Yes PCI 64bit
Caution: Ventilation
Ensure the proper airflow for cooling the graphics card: leave the adjacent slot
unoccupied, keep the computer's internal cables away from the cooling fan, or keep
things away that could get caught in the fan. (e.g., labels are easy to peel off when
heated.)
Important: If the computer is used without the fan working, it could cause a failure.

- 6 -
ENGLISH
4 Secure the bracket to the chassis of the computer.
Note: When the bracket is not installed completely, the DVI cable cannot be inserted
all the way in. You can connect the DVI cable supplied with the display to the graphics
card first, and then secure it to the chassis.
5 When installing two LV32E2/LV32P4 cards, repeat the above steps until all cards are
installed.
Note: There is a limit to the number of the cards one computer can take, which
vary according to the types of cards, operating systems, and display drivers. Do not
exceed the number limit.
6 Put the cover back on the computer.
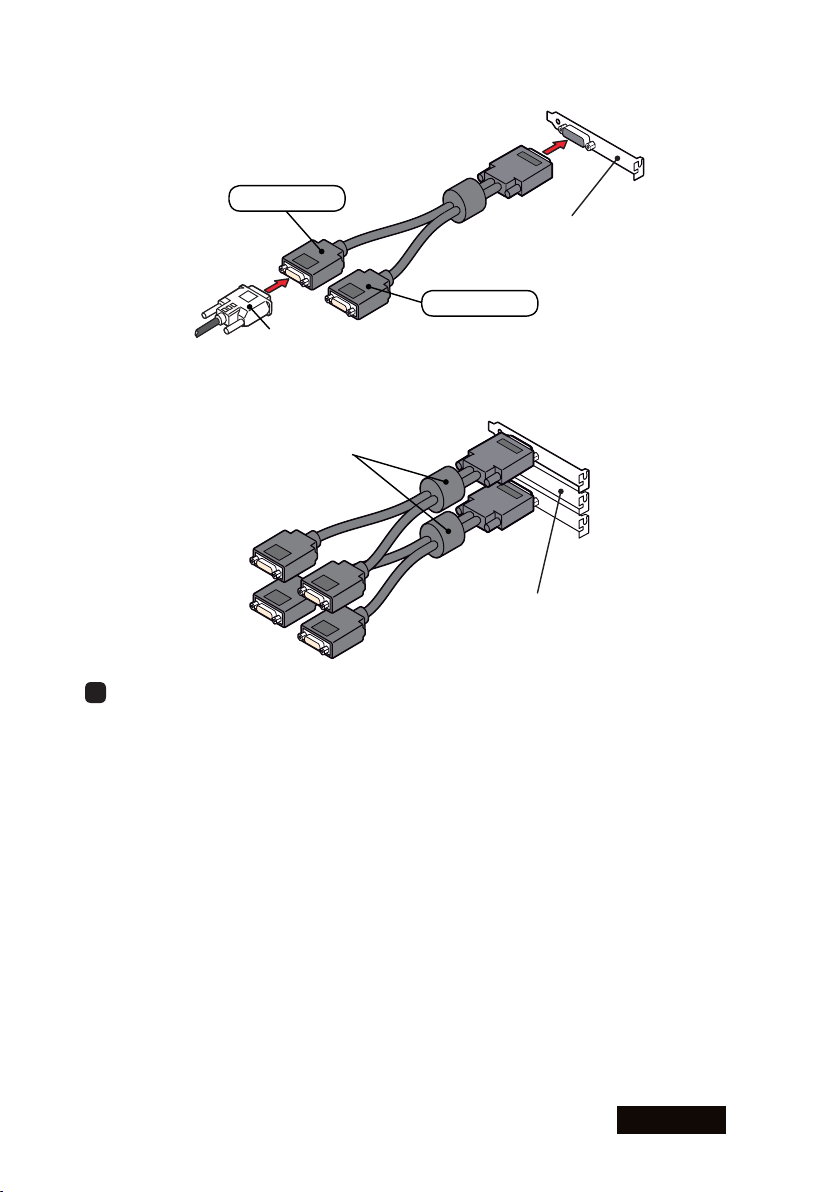
Connecting the display
1 Connect the DVI cable supplied with the display between the graphics card's DVI
connector and the display and tighten the screws.
Do not connect/disconnect the DVI cable while the display is turned on. It could
cause a graphics card failure. Connect/disconnect the DVI cables with the
display disconnected.
Caution
LV32E2
Attention: This graphics card has two DVI connectors; A and B. Make sure to
connect the first display to Connector A.
Connect the second display
(on the right)
DVI Connector B
Connect the first display
(on the left)
DVI Connector A
PCI Slot
A
B
LV32P4
• Connect the supplied DVI branch cable to LFH60 on the card and tighten the screws on
the connector.
Note: Do not force the connector into the card at an angle. It could damage the
connector pins or the mold.
• Connect the DVI cable supplied with the display between the branch cable's DVI
connector and the display and tighten the screws.
Attention: This branch cable has two DVI connectors. Make sure to connect the first
display to "450MMS-2/4."
ENGLISH
- 7 -
DVI Branch Cable
DVI Connector of Display 1
LFH60 (Graphics Card)
G450MMS-2/4
G450MMS-1/3
Note: The branch cable has a round core where the cable . When installing two
LV32E2/LV32P4 cards, leave a slot open between two cards to save enough space for
the cores.
Core
Unoccupied slot
2 When using multiple displays, repeat step 1 until all displays are connected.
Connecting the power cables
Plug all power cables to the wall outlets, including the computer, the display(s) and other
peripheral devices.

- 8 -
ENGLISH
Software Installation and Setup
Follow the instructions below for software installation and display setup. See Q&A if any
trouble occurs.
Installing software
1 Start up the computer in VGA mode and turn on the display.
2 Confirm that the VGA boot screen appears followed by the Windows startup screen.
3 Log into Windows as a user with administrative privileges.
4 When the Found New Hardware Wizard starts up, cancel it.
Note: One of the following messages appears. Cancel the wizard properly according
to the message you see on your screen.
Welcome to the Found New Hardware Wizard (Windows 2000/XP): Click "Cancel."
Digital Signature Not Found (Windows 2000): Click "No" and "Finish."
Hardware Installation (Windows XP): Click "Stop Installation" and "Finish."
5 Insert the driver CD in the CD-ROM drive on your computer.
6 If not installed yet, install Microsoft .NET Framework 2.0 by running the following file
according to the on-screen instructions. This is required to display the PowerDesk-HF
menu.
DriverCD/Microsoft/dotnetfV20x86.exe
7 Select and install a display driver following the on-screen instructions.
Gray mode in landscape orientation: DriverCD/XP2K/Gray/Landscape/Setup.exe
Color mode in landscape orientation: DriverCD/XP2K/Color/Landscape/Setup.exe
Digital Signature Not Found (Windows 2000): Click "Yes."
Hardware Installation (Windows XP): Click "Continue Anyway."
Note: During installation, the display may black out. Please wait for a moment.
8 Restart the computer.
Display settings
Follow the instructions below after restarting the computer.
1 Log into Windows as a user with administrative privileges.
2 Confirm that the PowerDesk-HF icon is added in the taskbar.
Note:
• It takes more than 30 seconds for the icon to appear on the taskbar.
• When another graphics card coexists, the icon may not appear. In that case, select
the display connected to this card on the Settings tab in the Display Properties
dialog box.
ENGLISH
- 9 -
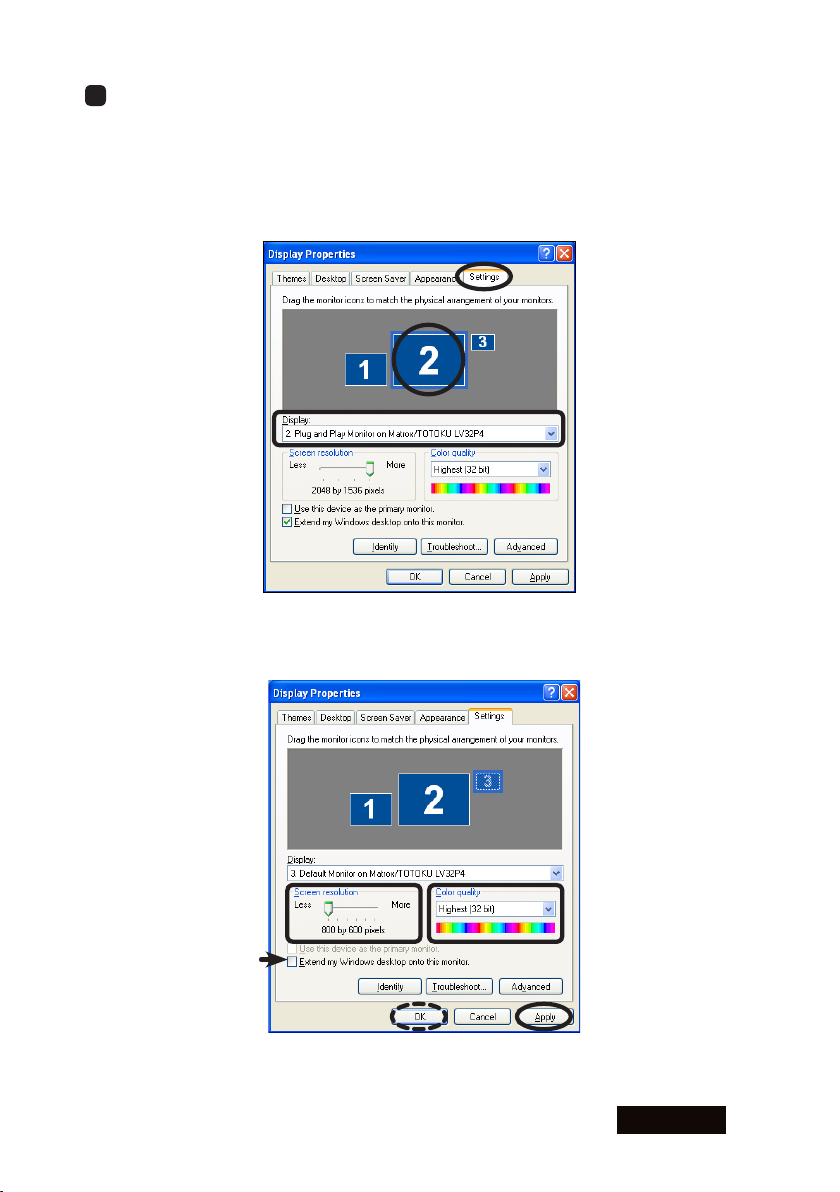
3 Set resolution and color for each display connected to this card by following the
instructions below.
1) Select the Settings tab in the Display Properties dialog box.
When a display icon is selected, the Display section shows display and card
information. If it shows "Plug and Play Monitor on Matrox/TOTOKU LV32xx," it
indicates that the display is connected to this card. If it shows "Default Monitor on
Matrox/TOTOKU LV32xx," it means that there is no display connected.
2) Select a display that is connected to this card and set appropriate Screen
resolution and Color quality referring to the following notes and the table. Make
sure "Extend my Windows desktop onto this monitor" is checked.
- 10 -
ENGLISH
Note:
• To use the display in color mode, select "True Color" in Windows 2000 or "Highest
[32 bit]" in Windows XP in the Screen resolution section using the slider.
• To use the display in grayscale mode,
In Windows 2000: select "256 Colors" in the Color quality section.
In
Windows XP: click "Advanced," select the Adapter tab, and set appropriate
resolution in the List All Modes section referring to the following table.
Predetermined Resolution
Resolution Landscape Display
3 MP 2048 x 1536 ME315L/CCL316/CCL350i/ME351i/CCL352i2/
ME355i2
2 MP 1600 x 1200 ME201L/CCL202/ME203L/CCL212/ME213L/
CCL250i/ME251i/CCL252i2/ME253i2
3) Click "Apply."
4) If another display is connected to this card, repeat step 2.
5) Select a display that says "Default Monitor on Matrox Rad PCI" in the Display
section, and uncheck "Extend my Windows desktop onto this monitor" so that this
display icon become inactive.
6) Click "OK" to apply the all settings.
4 To set the vertical timing, there are two methods. Follow the instructions below
according to your display.
● Method 1
This method works only on the following dislays. For other displays, perform Method 2.
Resolution Landscape Display
3 MP 1536 x 2048 ME315L/CCL316/CCL350i/ME351i/
CCL352i2/ME355i2
2 MP 1200 x 1600 ME203L/ME213L/CCL252i2/ME253i2
Note:
• Do not apply this method in combination with card's pivot function "Orientation."
• Method 2 can be used as well.
1) Select Display Properties>Settings.
2) Select the subject display's icon, click "Advanced," and select the Monitor tab.
3) Uncheck "Hide modes that this monitor cannot display" and click "OK."

ENGLISH
- 11 -
4) Select appropriate vertical timing (see the table above) in the Display Properties
dialog box, and click "Apply."
5) Repeat steps 1 through 4 for another display and click "OK."
● Method 2
This method can be applied on all displays.
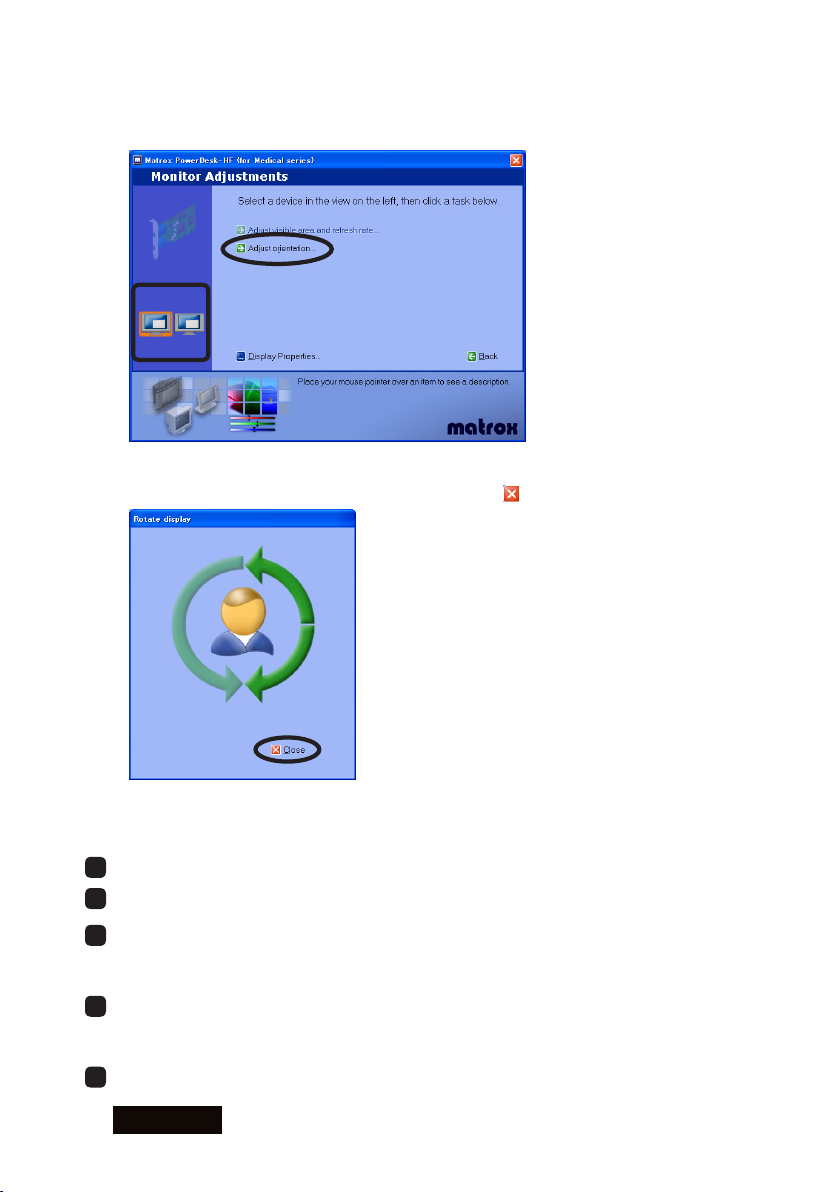
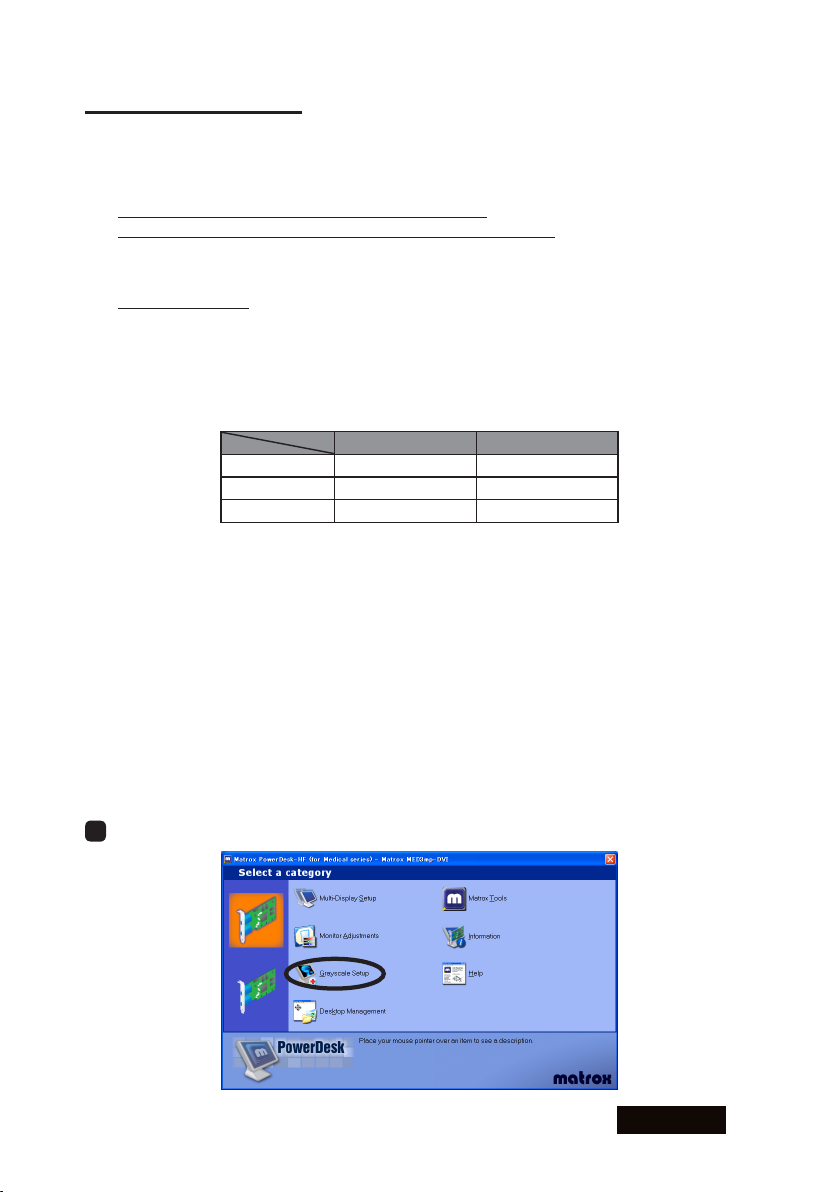
1) Open the PowerDesk-HF menu by using one of the following methods:
• Double click the PowerDesk-HF icon in the taskbar, or
• Select Display Properties>Settings(tab)>Advanced>
PowerDesk(tab) and click "Power Desk HF."
2) The "Select a category" screen appears. Select a subject card on the left, click
"Monitor Adjustments." When there is only one card installed, you do not need to
select a card.
- 12 -
ENGLISH
3) The Monitor Adjustments screen appears. Select a display on the left and click
"Adjust orientation." When there is only one display connected, you do not need to
select a display.
4) The Rotate display screen appears on the subject display. Click on an arrow, and a
confirmation message appears. Click "Yes." Click to close the screen.
5) Repeat steps 1 through 4 until all displays are set up.
5 If necessary, change grayscale modes (see "Grayscale Mode").
6 If necessary, change multi display modes (see "Multi Display Mode").
7 When in the multi-display environment, check the physical arrangement of displays:
select Display Properties>Settings(tab), click "Identify," rearrange displays by
dragging the icons if necessary, and click "Apply."
8 When in the multi-display environment, confirm your primary display: select Display
Properties>Settings(tab), select the subject display's icon, check "Use this device
as the primary monitor," and click "OK."
9 Setup is complete. Remove the driver CD from the CD-ROM drive.
ENGLISH
- 13 -
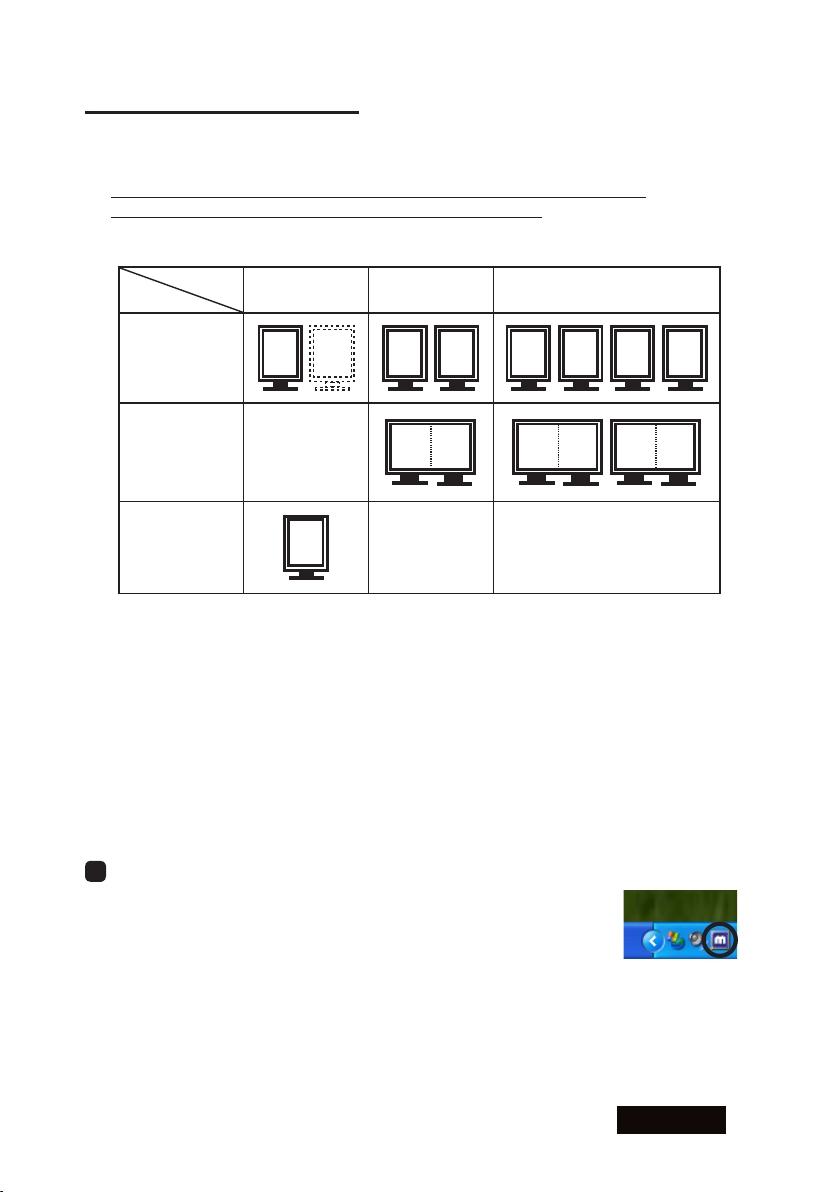
Multi-Display Modes
About multi-display modes
The following modes are available:
● Independent Mode: two displays working independently and separately
● Stretched Mode: two displays combined into one desktop
● Single Display Mode: only one display working
Mode
1 Display on
1 Card
2 Displays on
1 Card
4 Displays on 2 Cards
(LV32P4 only)
Independent
Mode 2
11221 3 4
Stretched
Mode 12
1
Single Display
Mode 1
Independent Mode allows two displays working independently and separately, which is a
very common multi-display configuration in Windows 2000 and XP. Each Display needs
to be set up separately.
Stretched Mode is where two displays, connected to the same card and running at
the same resolution, are combined into one wide screen desktop. This configuration is
usually used in Windows NT4.0.
Note: Four displays that are connected to two cards cannot be combined into one wide
screen desktop.
Changing multi-display modes
1 Open the PowerDesk-HF menu by using one of the following methods:
• Double click the PowerDesk-HF icon in the taskbar, or
• Select Display Properties>Settings(tab)>Advanced>
PowerDesk(tab) and click "Power Desk HF."

- 14 -
ENGLISH
2 Select "Multi-Display Setup."
3 Select a multi-display mode.
Stretched Mode : Select "2 displays, Stretched mode."
Independent Mode : Select "2 displays, Independent mode."
Single Display Mode : Select "1 display."
4 Repeat step 3 for each card and click "Yes."
Note: When switching from or to Independent Mode, the computer restarts
automatically.
5 Confirm the multi-display mode settings you have selected.
When in Stretched Mode:
1) Check the physical arrangement of the two displays (see step 7 on page 12).
2) Select Display Properties>Settings(tab) and check the display icons and
resolution.
When in Independent Mode (Independent mode):
1) Select Display Properties>Settings(tab) and check the display icons and
resolution.
2) Select PowerDesk-HF>Grayscale Settings and check the
settings for each display.
ENGLISH
- 15 -
Grayscale Mode
About grayscale modes
The following modes are available:
8 bit Grayscale (256 shades of gray)
● Static linear gray palette/Fixed linear gray palette (default)
● Static non-linear gray palette/Fixed non-linear gray palette
● Dynamic gray palette/Programmable gray palette (not recommended)
Color
● 32 bit color mode
● 16 bit color (not recommended)
● 8 bit color (not recommended)
Note:
• The modes we do not recommend do not support display of 256 shades of gray.
• See the table below for the names of color modes in your operating system.
Windows 2000 Windows XP
32 bit Color True Color Highest [32 bit]
16 bit Color High Color Medium [16 bit]
8 bit Color 256 Colors Low [8 bit]
For color displays, use 32 bit color mode.
For monochrome displays, 8 bit grayscale modes and 32 bit color mode are available.
We recommend "Static linear gray palette/Fixed linear gray palette" if you prefer drawing
speed.
When a color display is included, we recommend 32 bit color mode if you wish to avoid
color palette-related problems. However, the drawing speed in 32 bit color mode may be
slower than when in gray palette modes.
To realize multi gradation display with the use of certain applications (viewers) or to use
DIrect3D or OpenGL, 32 bit color mode is recommended.
Changing grayscale modes
1 Select PowerDesk-HF>Grayscale Settings.

- 16 -
ENGLISH
2 Select a grayscale mode.
8 bit Grayscale Mode: Select "Use 8-bit grayscale (256 shades)" and "Fixed linear
gray palette.
32 bit Color Mode : Select "Use color mode."
3 Repeat step 2 for each display and click "OK," and a warning message appears
asking whether or not to restart the computer. Click "Yes" to restart the computer
automatically.
4 Confirm the grayscale mode settings you have selected.
When in 8 bit Grayscale Mode, select PowerDesk-HF>Grayscale
Settings and check the settings for each display.
When in 32 bit Color Mode, select Display Properties>Settings(tab)
and check the settings for each display. If necessary, make corrections as follows.
• If you are using Windows 2000, select "True Color."
• If you are using Windows XP, select "Highest [32 bit]."

ENGLISH
- 17 -
Q & A
Prior to installation
What are the supported operating systems?
Windows 2000 and Windows XP
How many displays can this card take?
2 displays per graphics card
LV32E2: Up to 2 displays/card guaranteed
LV32P4: Up to 4 displays on 2 cards guaranteed
What are the supported TOTOKU displays?
The followings are the supported TOTOKU LCD displays.
3MP displays: ME315L, CCL316, CCL350i, ME351i, CCL352i2, ME355i2
2MP displays: ME201L, CCL202, ME203L, CCL212, ME213L, CCL250i, ME251i,
CCL252i2, ME253i2
What are the possible resolutions?
3MP x 2 screens: 1536x2048, 2048x1536
3MP x 2MP: 1536x2048, 2048x1536
2MP x 2 screens: 1200x1600, 1600x1200
(In addition, 640x480, 800x600, 1024x768 are possible.)
Is multi-display possible when multiple graphics cards are used?
Yes, however we do not guarantee proper operation of this card with any other
graphics card(s).
Which PCI slot should I insert this card to?
For LV32E2, use only PCI Express x16. For LV32P4, both 32 bit PCI and 64 bit PCI
slots are useable. Also make sure that there is enough room for the card inside the
computer.
Does this card support OpenGL?
Yes, when set to 32 bit color (and 16 bit color). However, there are some restrictions.
Please check the performance on your system. OpenGL is not supported in any 8 bit mode.
Installation
Which display driver should I use?
Use the supplied driver or the designated customized driver for TOTOKU displays. We
do not guarantee proper operation when other display drivers are used.
The VGA boot screen (POST) does not appear at startup.
Check for the followings:
● The display is not turned on, or the signal cable is not connected properly.
● The display is not connected to the right card; output is from the on-board VGA
adapter or other graphics card to which the display is not connected.
●
The system BIOS is set to AGP primary or on-board VGA primary, instead of VGA boot.
● Other graphics cards including the on-board VGA are interfering.
● The display is not connected to DVI Connector A on this card.
Can I reinstall the display driver by over writing?
No. Make sure to uninstall the driver once to update the driver, add/remove cards, or

- 18 -
ENGLISH
change slots and install it again.
(Prior to driver installation) The Windows startup screen doesn't look right: pure white
or horizontal misalignment.
Restart the computer in VGA mode.
The new graphics card doesn't get detected as new hardware.
Check for the followings:
● The graphics card is not inserted all the way in the slot.
● An older version of the display driver may have been installed. If so, uninstall the
old one first and then install the latest display driver.
● Another coexisting graphics card may be interfering. Remove it.
●
Even the wizard does not detect it, it may be detected as "[!] Video Controller (VGA
compatible)" in the Other devices section in the Device Manager. Install it from there.
The graphics card I installed doesn’t get recognized.
Confirm that the card is inserted all the way in the slot, and a proper graphics card
and/or a display driver is installed. If another graphics card coexists, remove it.
I can’t install the display driver when another graphics card coexists.
Remove another card once, insert this card, install and setup the display driver. Now
remove this card, insert another card in another slot, install and setup a display driver.
Put this card back into the slot where it was inserted.
The computer freezes at the Windows startup screen when restarting after the driver
is installed.
This happens when another graphics card coexists. Reinstall cards according to the
instructions above.
When I add another card after setting up this card, the computer freezes at the
Windows startup screen.
Remove this card once. Insert another card in another slot, install and set up a driver,
and put this card back into the slot where it was inserted.
The display blacks out during driver installation.
Wait for a while.
Any other measures for multi-display-related problems?
Try the followings as measures.
● Use the CMOS switch if the computer has one.
● Set the system BIOS from VGA boot to PCI primary.
● Share the same IRQ with all graphics cards.
● Install cards one by one.
● Check the card for the secondary display if it can be used for a secondary display.
● Update the computer motherboard BIOS.
● Use the latest chip set driver on the computer.
● Update the driver for another graphics card.
● Disable the on-board VGA in the system BIOS settings.
● Use a different slot.
● Remove PCI cards such as sound card.
● Change the driver version.
This manual suits for next models
1
Table of contents
Languages:
Other Totoku Video Card manuals


Popular Video Card manuals by other brands


Gigabyte
Gigabyte GV-N62-512L user manual

AMD
AMD RADEON PRO W7000 Series Quick setup guide

VideoLogic
VideoLogic Apocalypse 3D user guide

EVGA
EVGA GeForce GTX 590 Classified Quad SLI 2 Pack specification

ATI Technologies
ATI Technologies Radeon HD 3450 manual

Nvidia
Nvidia 4000 - e-GeForce MX 128MB DDR PCI Graphics... user manual

AMD
AMD ATI Radeon HD 3800 Series user guide

HP
HP B180L installation guide

MSI
MSI RX9800PRO-TD128 Quick installation guide

Diamond Multimedia
Diamond Multimedia Radeon X1950XTX overview

Diamond Multimedia
Diamond Multimedia Viper Radeon 9600XT Specification sheet

ATI Technologies
ATI Technologies V3300 - Firegl Tm Pcie user guide