Touchstone Sideline Elite Series User manual

Sideline Elite®Series
Electric Fireplace Heater
OWNER’S MANUAL
42” / 50” / 60” / 72” / 84” /100”
Sideline Elite®Series Recessed Electric Fireplace
AC 110-120V 60Hz 1500W
Model # : 80036, 80037, 80038, 80042, 80044, 80050

800.215.1990 touchstonehomeproducts.com
rev.121222
2
IMPORTANT SAFETY INFORMATION 3
CSA Approval Listing Information 4
Fireplace Specifications 4
Serial Number Label 5
DIMENSIONAL DRAWINGS 6
80036 – Sideline Elite®50” Dimensions 6
80037 – Sideline Elite®60” Dimensions 7
80038 – Sideline Elite®72” Dimensions 8
80042 – Sideline Elite®42” Dimensions 9
80050 – Sideline Elite®84” Dimensions 11
UNPACKING YOUR FIREPLACE 12
Parts and Hardware 12
Tools Required 12
What’s in the Box 12
Unpacking and Setup 12
Wiring 13
Testing the Fireplace Prior to Installation 13
3-prong Outlet Installation 13
Hard Wire Connection 14
INSTALLATION 15
Choosing Installation Location 15
Removing the Glass Panel 16
Recessed Installation 17
Installing the Crystal Embers and Driftwood Logs 20
Re-installing the Glass Panel 21
Wall Mounted Installation 22
OPERATING THE FIREPLACE 25
Power 25
Control Panel Operation 25
Wireless Remote Control Operation 25
Control Panel Functions 26
Wireless Remote Control Functions 27
Remote Control Operation 29
Temperature Limiting Control 29
CARE, CLEANING AND MAINTENANCE 30
WARRANTY 31

800.215.1990 touchstonehomeproducts.com
rev.121222
3
Important Safety Information
PLEASE READ CAREFULLY FOR SAFE OPERATION
§ THIS FIREPLACE IS HOT WHEN IN OPERATION AND CAN CAUSE SEVERE BURNS.
§ Do not operate fireplace before reading and understanding operating instructions. Failure to operate
fireplace according to operating instructions could cause fire or injury.
§ Risk of injury. This fireplace is HOT when in operation and heating element is ON. Power to the
fireplace should be turned OFF and the fireplace allowed to cool before servicing. To disconnect
power to the fireplace, turn controls to OFF, then remove plug from outlet.
§ Do not install damaged, incomplete, or substitute components.
§ Young children should be carefully supervised when they are in same room with fireplace. Toddlers,
young children and others may be susceptible to accidental contact burns. A physical barrier is
recommended if there are at-risk individuals in the house. To restrict access to the fireplace, install
an adjustable safety gate to keep at-risk individuals away from the fireplace and hot surfaces.
§ Clothing and other flammable material should not be placed on or near the fireplace.
§ Due to high temperatures, the fireplace should be located out of traffic and away from furniture and
draperies.
§ It is imperative that the control compartments, circulating blower, and its passageway are kept clean.
§ Under no circumstances should this fireplace be modified.
§ Do not use the fireplace if any part has been under water.
§ Do not operate the fireplace with the glass panel removed, cracked or broken.
§ Keep the packaging material out of the reach of children. As with all plastic bags, these are not toys
and should be kept away from children and infants.
§ Servicing should only be done while the fireplace is disconnected from the power outlet.
§ Unplug fireplace if not being used for an extended period of time.
§ Always plug this fireplace into a wall outlet or receptacle. Never plug this fireplace into a
surge protector, extension cord, or relocatable power tap.
§ Do not operate this fireplace with a damaged cord or plug after the fireplace malfunctions, has been
dropped, or damaged in any manner.
§ Do not use outdoors.
§ Never locate fireplace where it may fall into a bathtub or other water container.
§ Do not place the cord under carpeting. Do not cover cord with throw rugs, runners, or the like.
Arrange cord away from traffic area and where it will not be tripped over.
§ Connect to properly grounded outlets or hard wire connection only.
§ Do not insert foreign objects into any ventilation or exhaust opening as this may cause electric
shock, fire, or damage to the fireplace.
§ To prevent a possible fire, do not block the air intakes or exhaust in any manner. Do not use on soft
surfaces, like a carpet, where openings may be blocked.
§ Ensure clearances to combustibles are maintained when building a mantel or shelves above the
fireplace. Elevated temperatures on the wall or in the air above the fireplace can cause melting,
discoloration or damage to decorations, television or other electronic components.

800.215.1990 touchstonehomeproducts.com
rev.121222
4
CSA Approval Listing Information
This fireplace has been tested in accordance with the CSA Standards for fixed and location-dedicated
electric room appliances in the United States and Canada. If you need assistance during installation, please
contact our technical support department at 800-215-1990.
Note: This fireplace must be electrically wired and grounded in accordance with local codes or, in the
absence of local codes, with National Electric Code ANSI/NFPA 70-latest edition in the United States or the
Canadian Electric Code, CSA C22.1 in Canada.
Fireplace Specifications
Model Number
80036
80037
80038
Description
Sideline Elite®50”
Sideline Elite®60”
Sideline Elite®72”
Voltage
120v AC
120v AC
120v AC
Watts
Max 1500W
Max 1500W
Max 1500W
Amps
15 AMP
15 AMP
15 AMP
Fireplace Width
49 ¾”
59 ¾”
71 ¾”
Fireplace Height
19 ¾”
19 ¾”
19 ¾”
Fireplace Depth
5 ½”
5 ½”
5 ½”
Shipping Weight
63 lbs.
73 lbs.
90 lbs.
Fireplace Weight
50 lbs.
60 lbs.
77 lbs.
Model Number
80042
80044
80050
Description
Sideline Elite®42”
Sideline Elite®100”
Sideline Elite®84”
Voltage
120v AC
120v AC
120v AC
Watts
Max 1500W
Max 1500W
Max 1500W
Amps
15 AMP
15 AMP
15 AMP
Fireplace Width
41 ¾”
99 ¾”
83 ¾”
Fireplace Height
19 ¾”
19 ¾”
19 1/4”
Fireplace Depth
5 ½”
5 ½”
5 ½”
Shipping Weight
48 lbs.
140 lbs.
120 lbs.
Fireplace Weight
40 lbs.
127 lbs.
102 lbs.

800.215.1990 touchstonehomeproducts.com
rev.121222
5
Serial Number Label
Each Touchstone Home Products Electric Fireplace contains a serial number label on the shipping box.
Please remove the shipping label and place the label on the back page of this manual for future reference.

800.215.1990 touchstonehomeproducts.com
rev.121222
6
Dimensional Drawings
80036 – Sideline Elite®50” Dimensions

800.215.1990 touchstonehomeproducts.com
rev.121222
7
80037 – Sideline Elite®60” Dimensions

800.215.1990 touchstonehomeproducts.com
rev.121222
8
80038 – Sideline Elite®72” Dimensions

800.215.1990 touchstonehomeproducts.com
rev.121222
9
80042 – Sideline Elite®42” Dimensions
800.215.1990 touchstonehomeproducts.com
rev.121222
10
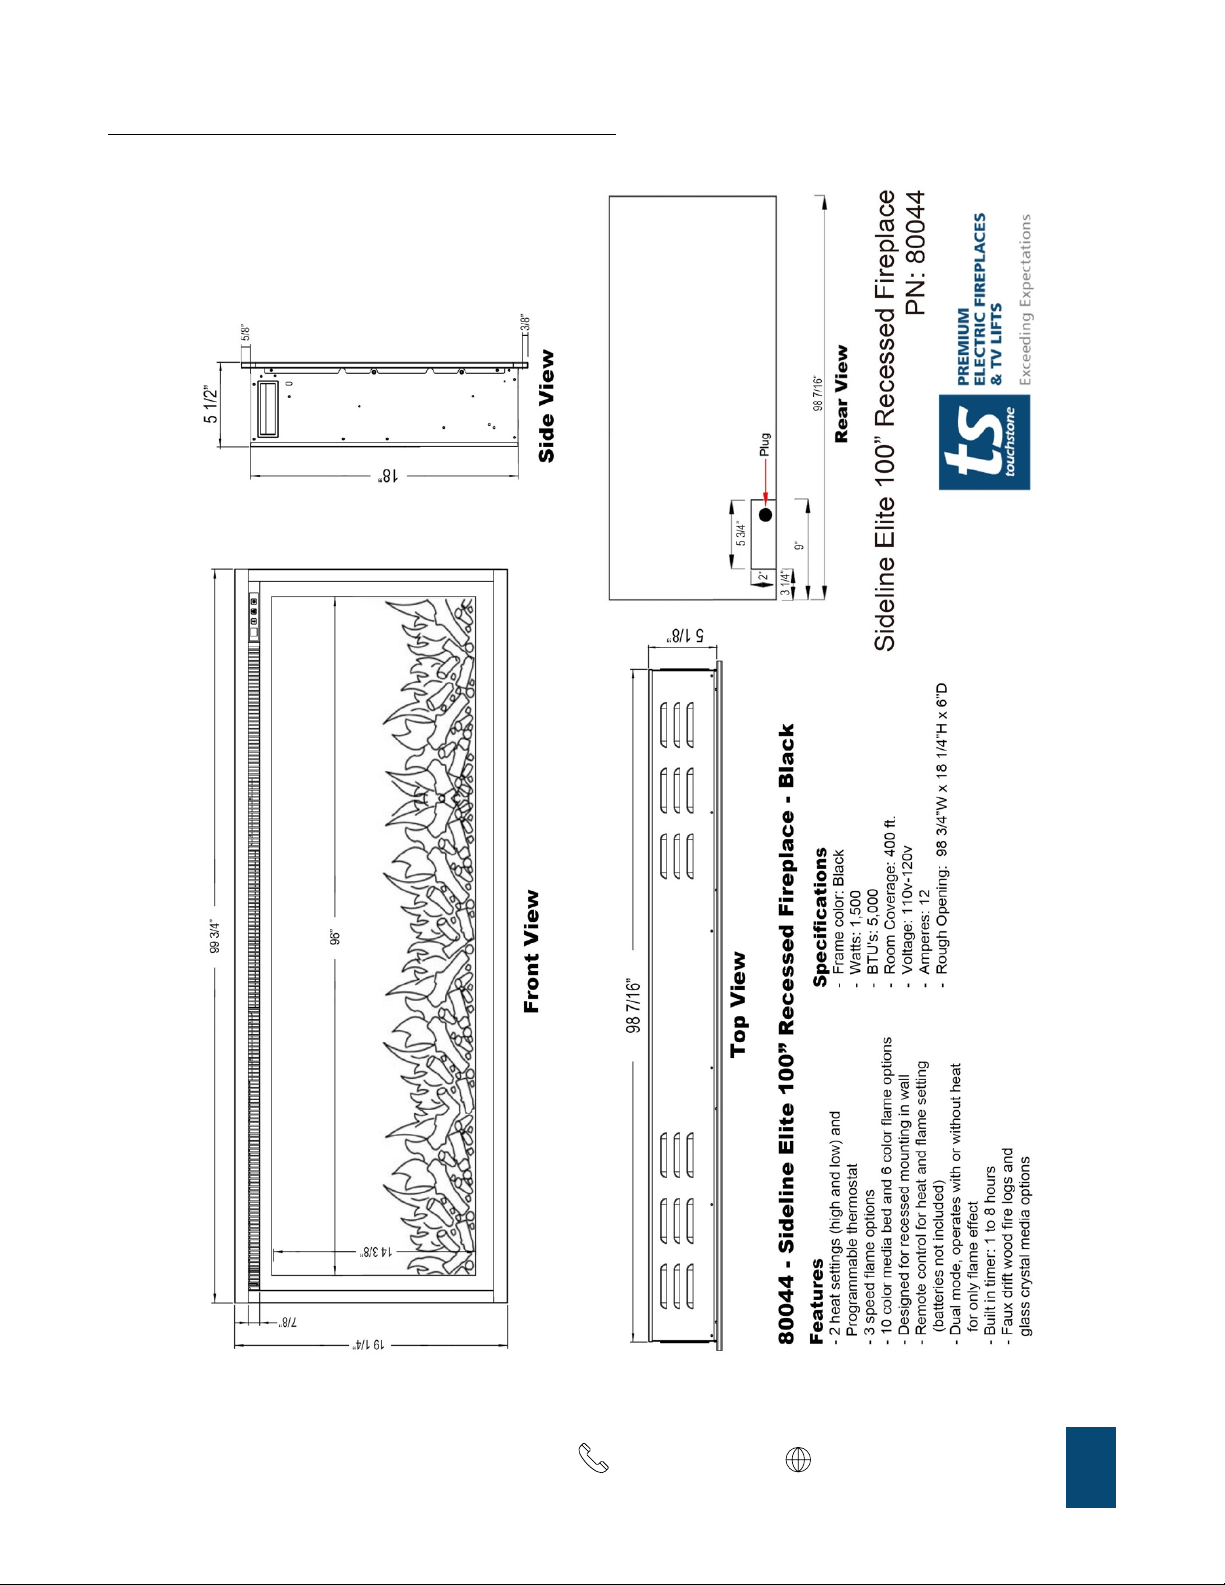
80044 – SIDELINE ELITE®100” DIMENSIONS

800.215.1990 touchstonehomeproducts.com
rev.121222
11
80050 – Sideline Elite®84” Dimensions
800.215.1990 touchstonehomeproducts.com
rev.121222
12
Unpacking Your Fireplace
Parts and Hardware
Tools Required
§ Phillips screwdriver
§ Stud finder
§ Level
§ Tape measure
§ Electric drill
§ 1/4” wood drill bit
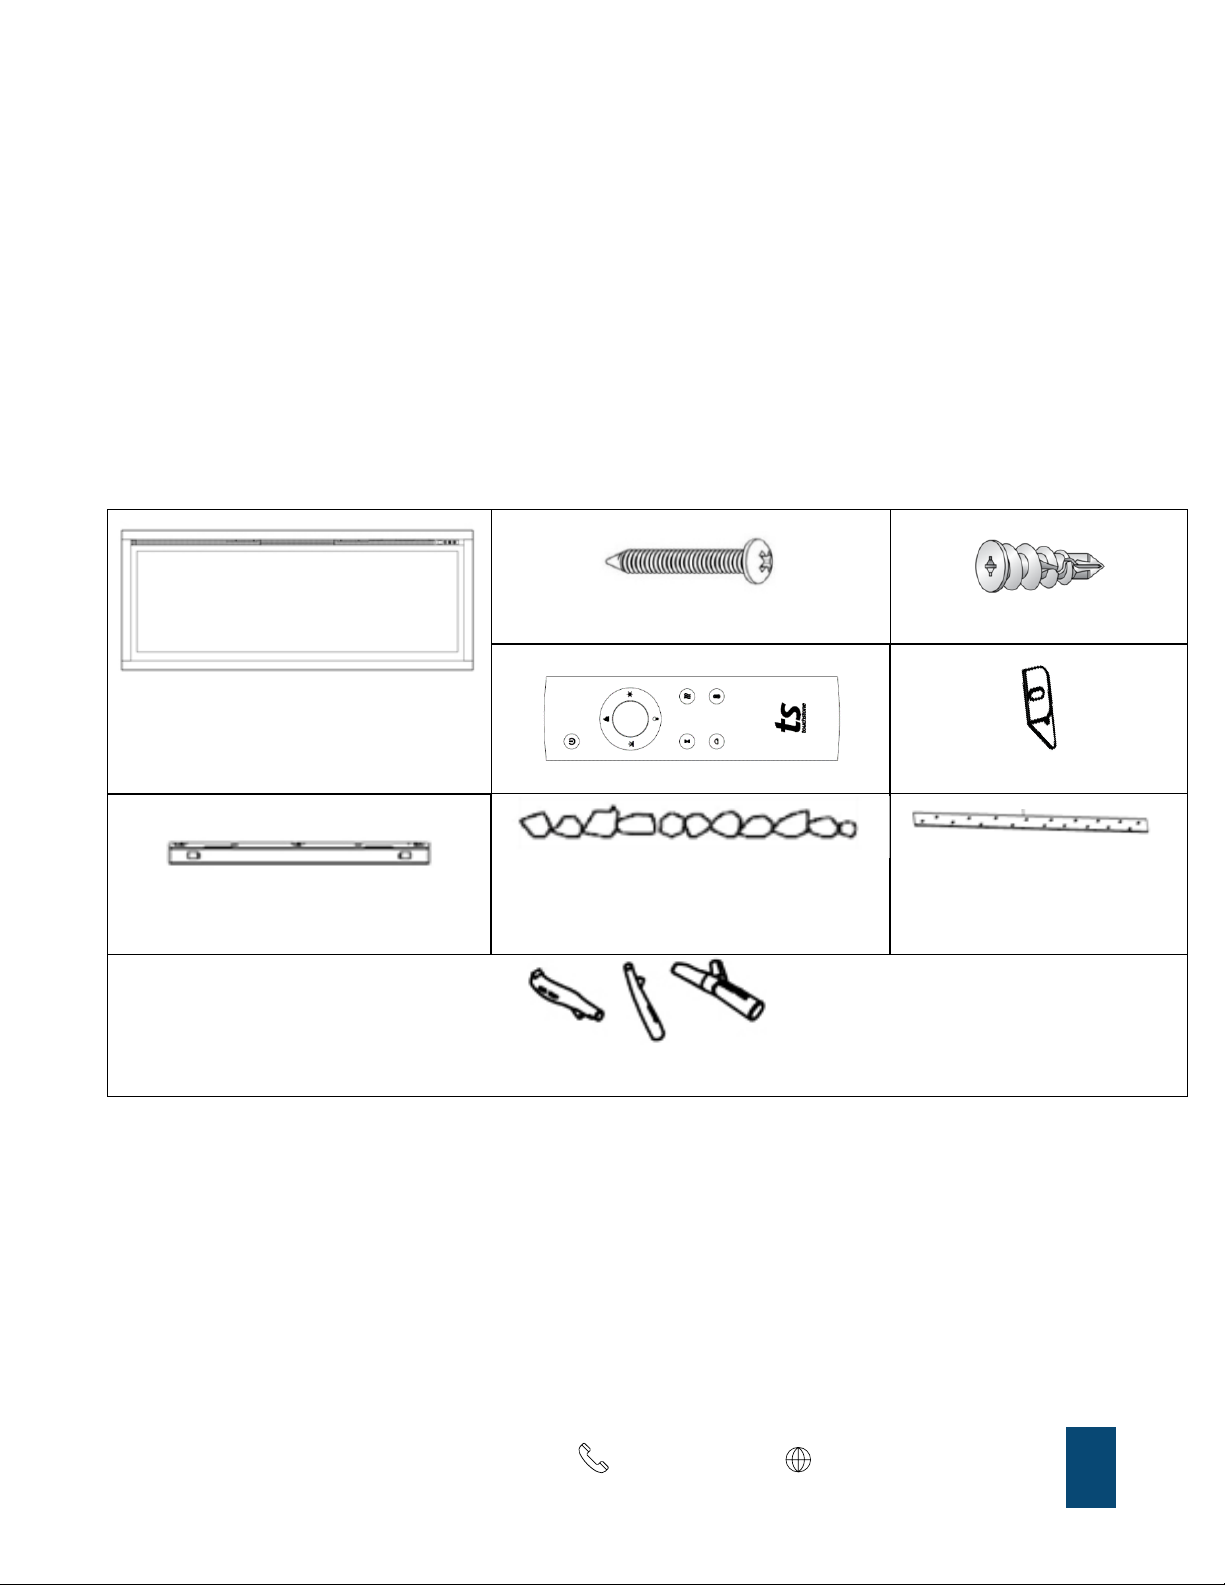
What’s in the Box
Sideline Elite Fireplace
Wood Screws - 6
Drywall Anchors - 6
Remote Control
Metal Bracket
Wall Mount Bracket
(attached to back of fireplace)
Crystal Embers
(Large and Small)
Plastic Tray
(installed under log set in fireplace)
Drift Wood Fire Logs
Unpacking and Setup
Remove all parts and hardware from the carton and place them on a clean, soft, dry surface. Check the
parts list to make sure no parts are missing. If parts are missing, please contact technical support at 800-
215-1990 for replacement parts.
NOTE: Dispose of plastic bag, as it may cause choking hazard with young children. Do not let children play
with plastic bag.

800.215.1990 touchstonehomeproducts.com
rev.121222
13
Wiring
The Sideline® Elite series recessed fireplace can either be plugged into a grounded 3-prong outlet or hard
wire connection.
Testing the Fireplace Prior to Installation
§ Before installing the fireplace, test the fireplace to make sure that it operates properly.
§ Plug fireplace into approved outlet and power on fireplace. Once fireplace is tested, continue with
installation.
§ If you have any problems, please contact technical support at 800-215-1990.
3-prong Outlet Installation
§ Only use this fireplace on a 120V AC, 15-Amp grounded circuit. Never overload the circuit. If this
fireplace trips the circuit breaker, unplug all other appliances on the same circuit before the next use.
Avoid plugging other appliances into the same circuit as this fireplace.
§ Always check the fireplace plug and connections before each use.
§ Never plug this fireplace into an outlet that is cracked or has any loose wires or connections.
Plugging this fireplace into a faulty outlet could result in the outlet overheating or catching fire.
§ Always plug this fireplace into a wall outlet or receptacle. Never plug this fireplace into a surge
protector, extension cord, or relocatable power tap.
§ Make sure this plug fits securely into the outlet. Faulty wall outlet connections or loose plugs can
cause the outlet to overheat. If the outlet or faceplate is hot, discontinue use immediately and have a
qualified electrician inspect and/or replace the faulty outlet.
§ The power cord supplied with the heater has three prongs: two flat blades (live and neutral) and one
round pin (ground). If a 3-slot receptacle is not available, an adapter MUST be used. The adapter
MUST be properly grounded to the outlet box (see figure below).
NOTE: Adapter NOT INCLUDED.

800.215.1990 touchstonehomeproducts.com
rev.121222
14
Hard Wire Connection
If it is necessary to hard wire this appliance, a qualified electrician must remove the cord connection, and
wire the appliance directly to the household wiring.
This appliance must be electrically connected and grounded in accordance with local codes, if hard wired. In
the absence of local codes, use the current ANSI/NFPA 70 NATIONAL ELECTRICAL CODE in the United
States or the current CSA C22.1 CANADIAN ELECTRICAL CODE in Canada.
A. Remove the cover plate from the right side bottom of the appliance by removing the three screws as
shown in Fig. 1. Save screws for installation of new cover plate.
B. Remove the wire connectors from the power cord. Keep the power cord, in case needed in the
future.
C. Remove the power cable and wires from the cover plate. Thread your wiring through the hole in the
cover plate for connecting to the wires in the Sideline Elite®fireplace.
D. Using the wire connectors, connect the ground green wires (G) and the common white wires (N)
together, and then connect the hot black wires (L) Refer to Figure 3 when complete.
E. Reinstall the cover plate using the three screws, as shown in Figure 1.

800.215.1990 touchstonehomeproducts.com
rev.121222
15
Installation
WARNINGS
§ Due to high temperatures, keep the fireplace out of high traffic locations.
§ Keep combustible materials, such as furniture, pillows, bedding, papers, clothes, and curtains at
least 36” away from the front of the fireplace.
§ Never install the fireplace where it may fall into a bathtub or other body of water.
§ Wear safety gloves and safety glasses for protection during installation. Broken glass may cause
injury or harm.
§ Prevent contact with loose insulation. Do not install the fireplace against a vapor barrier or exposed
insulation.
§ Do not expose the fireplace to the elements, such as rain, snow, etc.
Choosing Installation Location
§ Measure wall location to ensure that fireplace will fit on desired wall location.
§ Minimum clearances (measurements taken from front of glass panel):
§ Select a location that is not prone to moisture and is located at least 36” away from combustible
materials such as curtains, drapes, furniture, bedding, or other combustible materials.
§ See Safety Information on p. 3 for warnings about safe placement, safe installation, and proper use
of this product.
Removing Rubber Feet
• For in-wall, recessed installations, the rubber feet on the bottom of the fireplace are removeable.
• Use a Philips-head screwdriver to remove the four rubber feet on the bottom of the fireplace as
shown below.
Bottom of Fireplace to Floor:
6”
Sides of Fireplace:
0”
Back of Fireplace:
0”
Top of Fireplace:
8” to mantel
Top of Fireplace:
8” to TV
Top of Fireplace:
8” to ceiling

800.215.1990 touchstonehomeproducts.com
rev.121222
16
Removing the Glass Panel
Remove the glass panel prior to installation. Please remove glass panel as per instructions below:
Instructions:
1. There are 2 screws in the top vent opening, one on the far left and one on the far right that secure the left
and right trim pieces in place. Remove both screws to remove the trim pieces.
2. After removing screws, tilt glass panel away from the fireplace. Lift the glass panel away from the
fireplace to remove the glass panel. Store the glass panel in a soft, dry place.
CAUTION: It is recommended that 2 people remove the glass panel to minimize chance of breakage.

800.215.1990 touchstonehomeproducts.com
rev.121222
17
Recessed Installation
§ Due to many different finish materials used on walls, it is highly recommended that you consult your
local builder before you install this fireplace in the wall.
§ Select a location that is not prone to moisture and is located at least 36” away from combustible
materials such as curtains, drapes, furniture, bedding.
§ To avoid the possibility of exposed insulation or vapor barrier coming in contact with the fireplace, it
is recommended that the walls of the fireplace enclosure be “finished” (i.e. Sheetrock, drywall, etc.)
as you would finish any other outside wall of your home. This will ensure that clearance to
combustibles is maintained within the wall cavity.
§ Never install fireplace into load-bearing walls. When recessing fireplace in a wall, recess into non-
load bearing walls ONLY!
Instructions:
1. Choose a location in the wall to install fireplace.
2. Create opening in the wall that is no more than ¼” larger than metal firebox portion of fireplace.
Rough Opening Dimensions
Model
A (Width)
B (Height)
C
(Depth)
80036
48 ¾”
18 ¼”
6”
80037
58 ¾”
18 ¼”
6”
80038
70 ¾”
18 ¼”
6”
80042
40 ¾”
18 ¼”
6”
80044
98 ¾”
18 ¼”
6”
80050
80 ¾”
18 ¼”
6”

800.215.1990 touchstonehomeproducts.com
rev.121222
18
Recessed Installation – continued
3. Install the wall anchors (if wall opening is covered in sheetrock) according to the dimensions shown in the
drawing below:
a. Install wall anchors
b. Close-up for dimensions for wall anchor
installation
4. Remove the 2 brackets on each side of the flame area as shown below. Keep the screws and brackets
handy, as they will be reinstalled later.
a. Remove screws holding brackets in place
b. Remove brackets

800.215.1990 touchstonehomeproducts.com
rev.121222
19
Recessed Installation – continued
5. With the help of a second person, insert the fireplace into the wall opening. Use the screws provided to
fasten the fireplace to your framing studs.
6. Once the fireplace is secure, reinstall the 2 brackets removed in step 4.
The fireplace is now ready to have the crystal embers and drift wood logs placed inside of the fireplace.

800.215.1990 touchstonehomeproducts.com
rev.121222
20
Installing the Crystal Embers and Driftwood Logs
Once the fireplace is installed in the wall, place crystal embers or driftwood in the fireplace.
Crystal Ember Installation
Installing the Driftwood Logs
1. Place driftwood log pieces in the fireplace as shown below.
1. Remove the log set from the
fireplace. Once the log set is removed,
a plastic strip will be beneath the log
set.
Note: If the LED lights can clearly be
seen, then the crystal strip is missing.
Please call customer service for a
replacement if missing.
2. Carefully, place crystal embers on
plastic strip as illustrated in the picture
to the right. Apply an even layer from
side to side.
This manual suits for next models
6
Table of contents
Other Touchstone Heater manuals


Popular Heater manuals by other brands


ECO HOUZNG
ECO HOUZNG NT15-14B instruction manual

MrHeater
MrHeater MHVFRD20BT LP Operating instructions and owner's manual

Life Smart
Life Smart LS1006HH13 Owners installation and operating manual

Thermo Sphere
Thermo Sphere HA24-100M instruction manual

MrHeater
MrHeater 50KR Operating instructions and owner's manual

MrHeater
MrHeater MHVFBF10NG Operating instructions and owner's manual


