TQC SATO SK-L200THII User manual

1 |
DATALOGGER SATO SK-L200THII
HM8020
1 WHAT YOU CAN DO WITH DATALOGGER (FEATURES)
Datalogger is a device that logs data of temperature and/or humidity and
stores this data in its memory so that you can manage or analysis it on a
computer.
• Storage of up to 8100 lines of data. ( →P.43)
Ensuring long-term measurement:
If the Datalogger is set to log data every 30 minutes, approximately 165
days.
If the Datalogger is set to log data every 90 minutes, approximately 480
days.
• Four logging options to allow for selection of the setting
that best suits your needs ( →P.43)
1. Once (default)
The Datalogger keeps logging until the memory becomes full or 8100
lines of data are collected.
2. Repeatedly (overwriting)
The Datalogger overwrites the existing data from the start once the 8100
lines of data are collected. This setting is ideal for collecting data during
a certain period.
3. Ends at… (limited amount)
The Datalogger only collects a certain amount of data (up to 8100 lines)
as specified by the user. This setting is ideal when you want to limit the
amount of data to be collected.
4. By pages (partitioning)
The Datalogger performs four different logging tasks in sequence by
storing each task's data in the four divided memory blocks. This setting is
ideal if you want to collect data from multiple sites with one Datalogger.
• Scheduled logging ( →P.51)
You can preset the time to start logging. This setting is ideal if you want to
start logging automatically.
• Real-time communications ( →P.54)
The logged data of temperature and/or humidity can be downloaded to
computers while the Datalogger is still logging.
• USB connection
USB easily offers a connectivity to your computers than the conventional RS-232C.

2 |
• Displays the approximate amount of memory currently used. ( →P.44)
Easy to determine how much more logging is possible.
• Probes can be interchangeablely used.
The sensors are fully compatible among the series models so that, in case
of probe failure, it is easy to replace by interchanging with another probe.
• 14 logging intervals ( →P.42)
The logging intervals available are in seconds (1, 2, 5, 10, 15, 30) and in
minutes (1, 2, 5, 10, 15, 30, 60, 90).
• ID on each Datalogger ( →P.40)
The ID numbers of 1 to 9 can be set for easy identification when multiple
Dataloggers are used.
• No data loss even if the batteries go dead
There is no data loss even if there is a power failure, as the logged data is
stored in the EEPROM.
• Warning display for upper/lower limit of temperature or humidity
The Alarm mark lights on the LCD if the temperature or humidity exceeds
the preset threshold. This helps to prevent damage to your product.
• Easy to use software program for data analysis
The logged data can be fully utilized by plotting in graphs and displaying
in real time. Data can also be saved in CSV format and analyzed by
commercial spreadsheet software.
2. WHAT'S IN THE BOX?
The following items are included in the box.
Check the box contents and place a check mark in the box next to each
item.
If you find any item missing, please contact the store where you purchased
this product or our Service Network.
□Datalogger 1
□Hand strap 1
□USB port cap (Factory set) 1
□This Instruction Manual 1
□Software program CD 1
□USB cable 1
□Alkaline batteries, AAA/R6 2
* Probe is an option and has not been included in the box.

3 |
3. SYSTEM REQUIREMENTS
To use the Datalogger for Windows, your computer must meet the following
requirements.
• OS: Windows 2000 (SP 4 or later), Windows XP
• CPU: Pentium III 700 MHz or higher
• RAM: Minimum 256MB
• Hard disk drive: 150MB or more free space
• USB interface
• CD-ROM drive to install the software program
Please read the instructions of the USB hub if you use one to connect the
Datalogger to a computer. Note that the proper communications will not be
guaranteed when a USB hub is used.
Tips: There are two types of USB hubs: a "self-powered" by an external
power source with an AC adapter and "bus-powered" by USB.
Depending on the total power used by the devices connected to your
computer, we recommend that you use the self-powered hub for
secure operation.
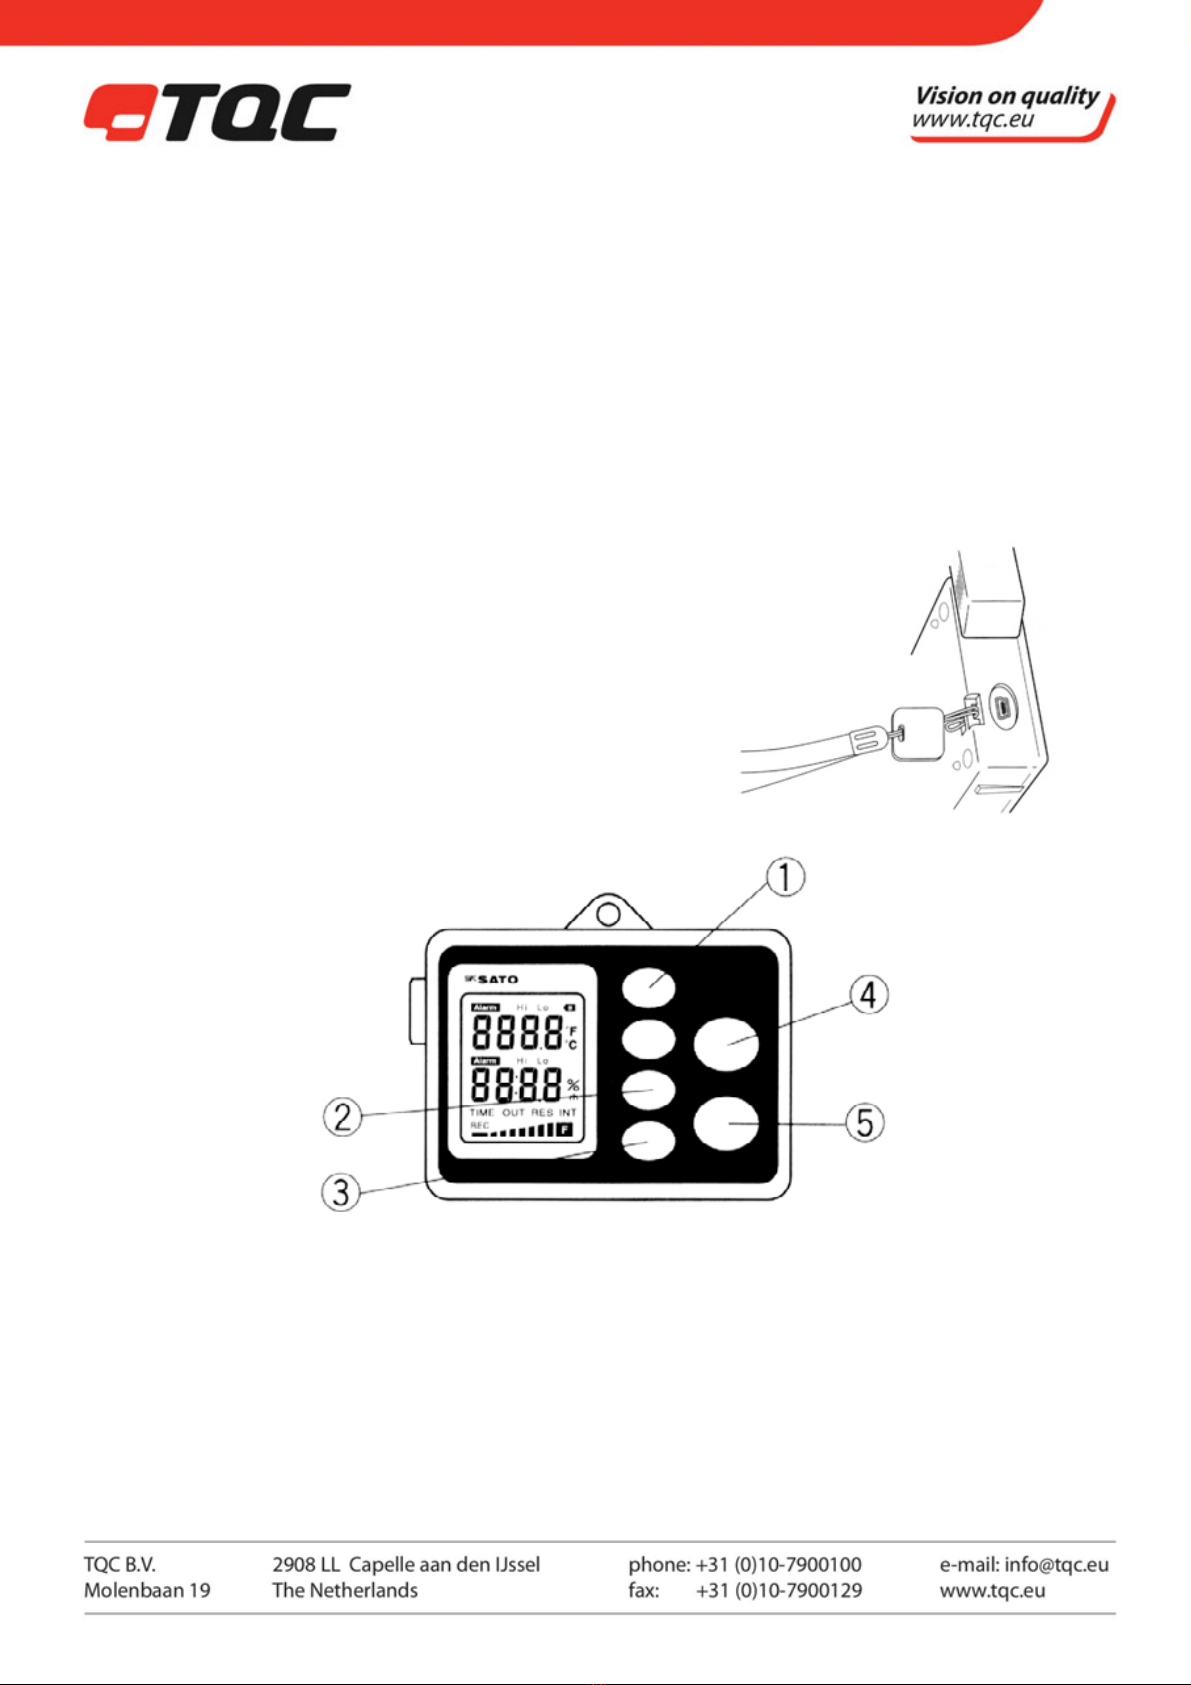
4. NAMES AND FUNCTIONS OF PARTS
3-1 Main Unit
(For SK-L200T II and SK-L200TH IIα)
Front view Rear view
Left side vie
w
4 |
1. Sensor connector
Temperature probe or temperature/humidity probe is connected.
For connecting or removing the probe, please see section 1 "Installing the
Batteries and Probe" of Chapter 4 "Getting Started."
Never rotate the sensor unit. It will cause the device to fail.
2. Wall mounting hole
3. Battery cover
*Temperature unit switch
Display of temperature unit (°C and °F) can be changed by a switch located in a battery compartment.
°C (default) : Slide the switch to upward
°F : Slide the switch to downward
4 .Hand strap mount
5. USB port
Use to plug in the USB cable connecting the Datalogger and
the computer.
While not being used, the dedicated USB port cap should be in
place. In order not to lose the cap, we recommend that you
attach the dedicated hand strap to the cap.
Function keys
(For SK-L200T II
and SK-L200TH IIα)
1. UP/DOWN key
• Pressing the ▲key will increase the value. Pressing the ▼key will decrease the value.
Holding down ▲/ ▼will change the value rapidly.
• Pressing ▲and ▼simultaneously for one second or more while measuring will erase the logged data.
2. CALL/OUT key
• Pressing the CALL/OUT key while measuring will start real-time communication.
• Pressing the CALL/OUT key while logging will display the current reading on the LCD.
• Pressing the CALL/OUT key while setting will return to the measurement state.

5 |
3. MODE key
• Used to display Current Date and Time, ID, Logging Interval, Logging Option, Warning Thresholds or
Preset Start.
4. REC/STOP key
• Pressing the REC/STOP key for two seconds or more while measuring will start logging.
• Pressing the REC/STOP key for two seconds or more will end logging and return to measuring
temperature and/or humidity.
• Pressing the REC/STOP key upon setting will confirm the newly set value.
5. Power ON/OFF key
• Pressing the POWER ON/OFF key will turn the unit on or off.
• Pressing the POWER ON/OFF key while the unit is off will turn it on.
• Pressing the key once again will turn off the unit.
NOTES: Be sure to press and hold the Power ON/OFF key for one second or
more. This feature prevents the unit from being turned on or off accidently.
LCD display
(For SK-L200T II and SK-L200TH IIα)
1. Alphanumeric display (LCD)
Displays the current reading of temperature and/or humidity
or setting information. No humidity will be displayed on an
SK-L200T II (temperature) model.
2. Alarm
Lights up when the upper or lower threshold is reached.
3. Hi and Lo
The indicator "Hi" lights up when the upper threshold is
exceeded. The indicator "Lo" lights up when the lower
threshold is exceeded.
4. mark
Flashes when the battery power becomes low. If it happens, immediately replace the batteries. Data will be
retained even if the batteries are replaced, but logging will stop the moment the batteries are removed from
the unit and all settings will be reset to the defaults.
5. TIME
Lights up while a date and time is being set or while they are displayed.
6. OUT
Lights up while the temperature and/or humidity data is being transmitted.
7. RES
Flashes while in standby for preset start.

6 |
8. Memory indicator
Indicates the approximate level of memory consumption. For further
information on the memory indicator, see section 3 "Setting Logging
Options" of Chapter 7 "Advanced Operations."
9. °F °C % rh: Indicates the unit of measurement.
NOTE: The temperature unit is set with °C. For displaying temperature reading with °F, slide the switch that is in
the battery compartment to downward. For returning to °C display, slide the switch to upward.
10. REC: Flashes when logging starts and lights up while logging.
3-2 Probes
NOTE: The probes are not interchangeable between the different types of models. The probe for SK-L200T II
(temperature) cannot be used for SK-L200TH IIα (temperature and humidity) and vice versa. For
further information, please see the Specifications at the end of this manual.
• Plug-in type probe
• Probe with sensor cord type
For SK-L200T II
For SK-L200TH IIα
1. Sensor
2. Sensor unit
3. Connector

7 |
5. GETTING STARTED
5-1. Installing Probe and Batteries
(1) Loosen the screw on the battery lid on the back of the main unit by rotating it counterclockwise with a coin
or the like.
TIP: The screw has been designed to be undetachable from the unit to prevent loosing it.
(2) Remove the battery cover.
(3) Load two AAA/R6 batteries. Be sure to place them in the correct directions.
(4) Install the battery cover.
(5) Install the temperature/temperature and
humidity probe as follows:
Push the sensor unit into the sensor connector
until you hear a “click”.
To remove the sensor, pull it straight toward
you in the reverse direction of the
installation. Never rotate the
sensor unit while pulling.
5-2. Setting Current Date and Time
(1) Press the POWER ON/OFF key for one second or more to turn the unit on. The LCD turns on to indicate that
the SK-L200T II or SK-L200TH IIα is in the measurement state for temperature or temperature and humidity,
respectively.
(2) Press the MODE key twice.
(3) The TIME mark lights and the "year" display flashes. Use the ▲or ▼key to set the year (ex. “2006”)
TIPS:
• Hold down the ▲/ ▼key to quickly change the value.
• Press the MODE key to skip the current setting and to proceed to
• the next item.
• If no key is pressed for one minute, the unit returns to the measurement state.
(4) Press the REC/STOP key to confirm the year setting.
(5) The "month" display flashes. Use the ▲or ▼key to set the month (ex. “3” for March)
(6) Press the REC/STOP key to confirm the month setting.
(7) The "date" display flashes. Use the ▲or ▼key to set to "1". (For the day)
(8) Press the REC/STOP key to confirm the date setting.
(9) The "hour" display flashes. Use the ▲or ▼key to set to "10". (For the hour)
(10) Press the REC/STOP key to confirm the hour setting.

8 |
NOTE: The Datalogger uses the 24-hour clock format.
(11) The "minute" display flashes. Use the ▲or ▼key to set to "30". (For the minutes)
(12) Press the REC/STOP key to confirm the minute setting. The Datalogger starts clocking from the "00"
seconds.
(13) Press the CALL/OUT key once. Now the setting of current date and time is complete. The SK-L200T II
or SK-L200TH IIα returns to the measurement state for temperature or temperature and humidity,
respectively.
(14) Press and hold the POWER ON/OFF key for one second or more to turn off the unit.
!! Caution !!
6. CAUTION ON USE
• Be sure to observe the operating temperature range of your Datalogger. Although the SK-L200T II
Datalogger can be used for measuring low temperatures or high temperatures with the probe with sensor
cord, never bring the unit to the ultra-low temperature or ultra-high temperature atmosphere or place it in
such an environment. Doing so will damage the electronic circuit inside. The operating temperature range of
the Datalogger is -10 to 60°C. For further information, please see "Specifications" on page 64.
• When the Datalogger is used at the temperature 5°C or below Always turn off the Datalogger at the ambient
temperature if it was used at 5°C or lower. Moving the Datalogger to a warmer place (room temperature) to
turn it off may form condensation inside and outside of the unit. Condensation can cause an unstable
electronic circuit, resulting in a malfunction.
NOTE: It is not necessary to observe the above caution when the Datalogger stops operation due to a memory
full state, as it automatically turns off. However, be sure that the unit surface is dry and no water drops
are present before turning it on again.
• Never wet the Datalogger, as it is not waterproof.
• The air vent on the sensor is designed to improve the response speed. Do not cover the vent with vinyl tape
or the like. Protect the vent from water splash.
• When the unit is hung on the wall, make sure that it is securely fastened.
•
7. INSTALLING DATALOGGER FOR WINDOWS
• If you use Windows 2000 or XP, you must log on as an Administrator before you can setup DATALOGGER for
Windows.
• Turn off your anti-virus program or any other programs currently runningon your system.
• Make sure any previous version of DATALOGGER for Windows has been uninstalled.
• DATALOGGER for Windows can be used for the SK-L200T or SK-L200TH
models. However, the functions specific to the SK-L200T II, SK-L200TH II
or SK-L200TH IIα are not available with the SK-L200T or SK-L200TH.
• The real-time function is automatically installed.

9 |
• The older-version files can be read with this DATALOGGER for Windows, and are automatically saved in .sk6
format.
• The following instructions are based on Windows 2000 installation
instructions, but they can also be applied to Windows XP.
• Do not connect the Datalogger to your computer until the installation is completed.
(1) Turn on your computer.
(2) Insert the "DATALOGGER for Windows" CD on your CD-ROM drive.
The installation process starts automatically and the caution message
shown above appears. Click OK to proceed.
TIP: If the installation does not start automatically:
1. Click Start on the task bar and select Run.
2. Type "x:\SKInstaIIer.exe" and click OK. (Where "x" is the CD drive letter such as D, E or F)
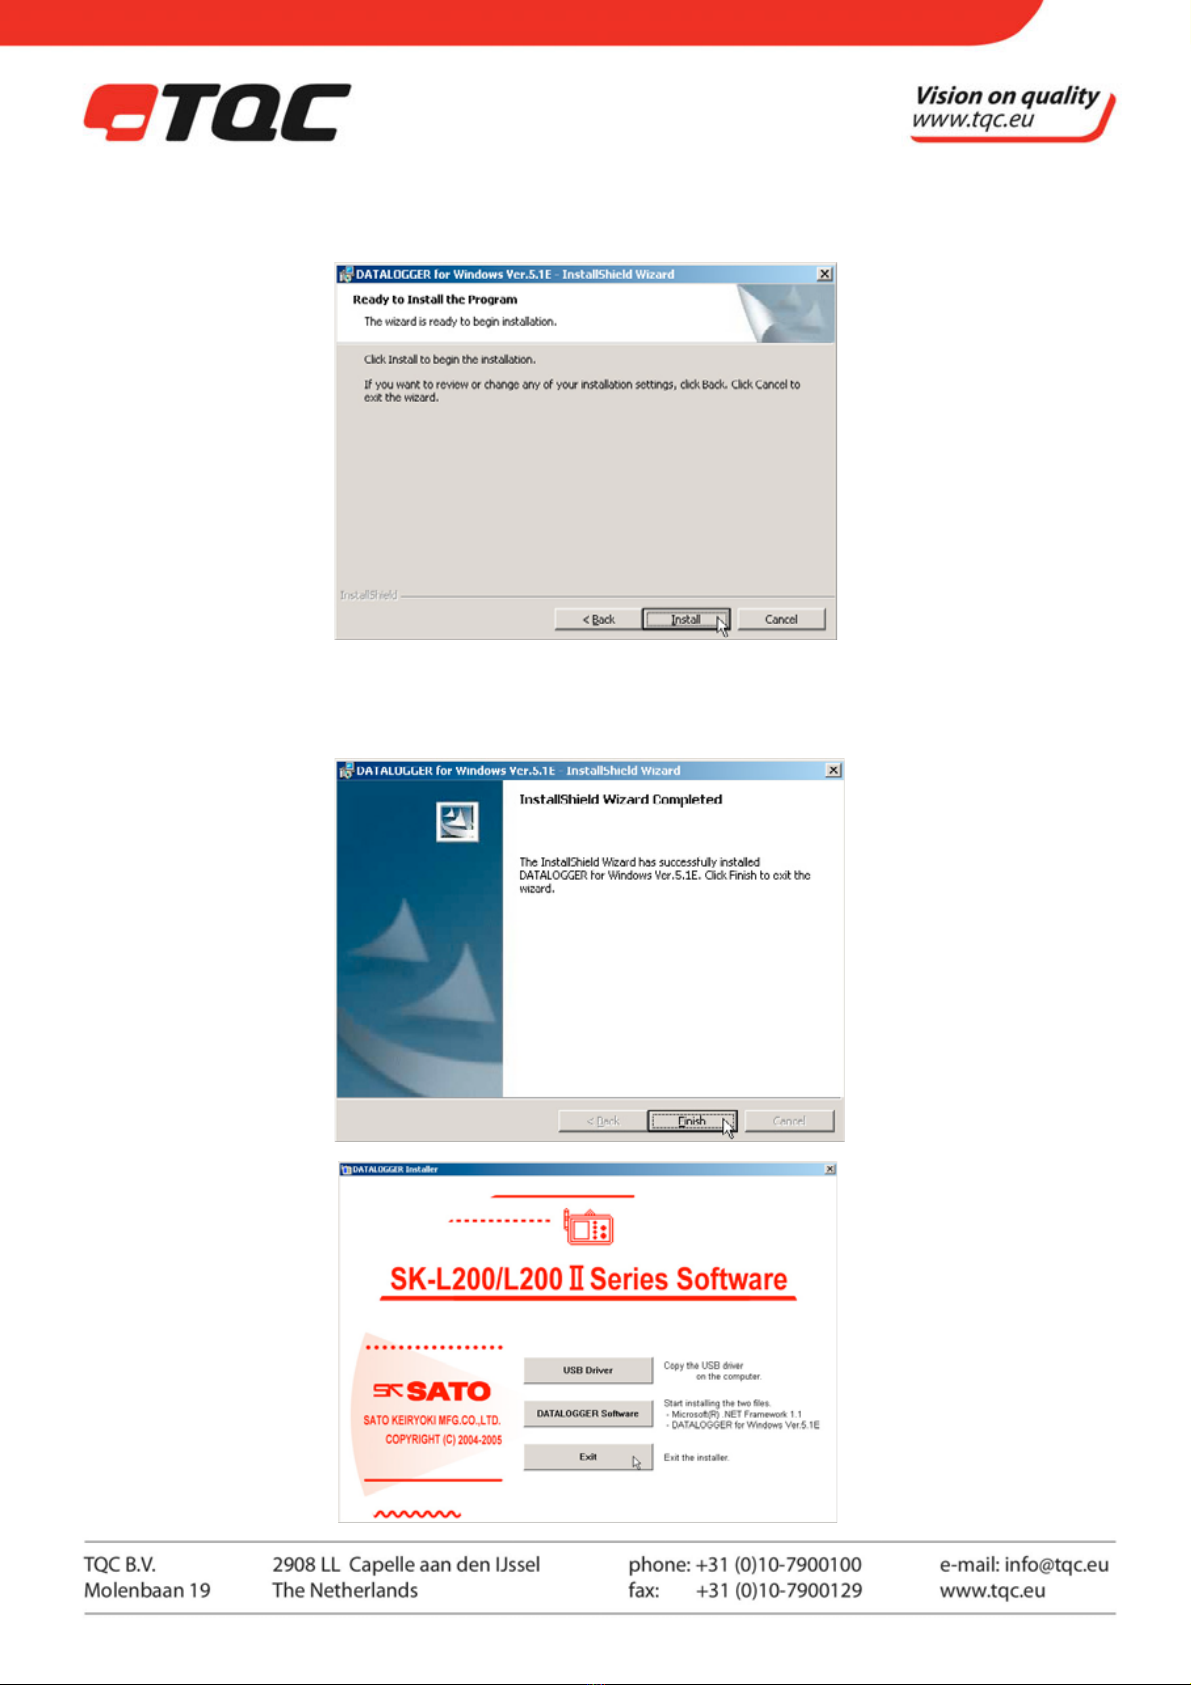
(3) Click USB Driver on the main menu of the Installer window.
(4) Click Install.

10 |
(7) The Install Shield Wizard for DATALOGGER for Windows appears.
Click Next.
It may take much time to ready to click Next depending on the computer being used.
(8) Do not change the default installation folder. Click Next.
11 |
(9) The window indicating that you are now ready to install appears. Click Install.
(10) Click Finish to complete the installation. Now you have successfully installed the necessary programs.
(11) Click Exit to
close the main
menu.

12 |
(12) Next, connect the Datalogger to your computer using the provided USB cable. The system will set up the
USB connection automatically.
NOTE: For Windows XP, a warning message may appear during the installation. In this case, click Continue
to proceed with the installation. DATALOGGER for Windows has been tested to run
on Windows XP without any known problems.
NOTE: Communications may become unstable if the Datalogger is connected to the computer through a
USB hub. Connect the Datalogger directly to the computer with the supplied USB cable. Refer to
Chapter 2 System Requirements.
(11) Click Exit to close the main menu.
(12) Next, connect the Datalogger to your computer using the provided USB cable. The system will set up the
USB connection automatically.
NOTE: For Windows XP, a warning message may appear during the installation. In this case, click Continue
to proceed with the installation. DATALOGGER for Windows has been tested to run on Windows XP
without any known problems.
NOTE: Communications may become unstable if the Datalogger is connected to the computer through a
USB hub. Connect the Datalogger directly to the computer with the supplied USB cable. Refer to
Chapter 2 System Requirements.
(13) Check if the drivers have been properly installed. Click Start on the task bar, Settings and Control Panel.
(For Windows XP, click Start and Control Panel.)
Next, double click the System icon and then click the Hardware tab followed by the Device Manager
button. On the System Properties window, click the plus sign (+) next to USB (Universal Serial Bus)
Controllers to display SK-L200 SERIES Composite Device.

13 |
Then, click the plus sign (+) next to Port (COM & LPT). Check for SK-L200 SERIES Serial Port Drivers [WDM]
[COMx]. (Where "x" is the port number being used on your computer)
Make a note of the port number, as this is the number needed for setting up the first time you start
DATALOGGER for Windows.
Now you are ready to use DATALOGGER for Windows.
Please read Chapter 6 "Basic Operation" before you start.
* If you want to use a different USB port, return to section (15) and follow the steps from there.
8. BASIC OPERATION
Let's start with an example to view data using DATALOGGER for Windows.
Tips: Make sure that the date and time have been set on the Datalogger
(see Chapter 4 “Getting Started”), and DATALOGGER for Windows
has been installed to your computer (see Chapter 5 "Installing
DATALOGGER for Windows").
6-1. Operating the Datalogger
Follow the steps below to log test data with the Datalogger.
(1) Press and hold the POWER ON/OFF key for one second or more to turn on the unit.
The LCD turns on to indicate that the SK-L200T II or SK-L200TH IIα is in the measurement state for
temperature or temperature and humidity, respectively.
(2) Press the MODE key seven times to set the logging interval.
(3) The INT mark of the LCD lights. Use the ▲or ▼key to set the second as "00:01."
(4) Press the REC/STOP key to confirm.
(5) Press the CALL/OUT key once. The SK-L200T II or SK-L200TH IIα returns to the measurement state for
temperature or temperature and humidity, respectively.
(6) Press and hold the REC/STOP key for two seconds or more. The LCD goes out, and then the REC mark and
the leftmost bar of the memory indicator light up to indicate that the logging has started.
(7) Wait for three minutes, then press and hold the REC/STOP key for two seconds or more. The logging ends
and the unit returns to the measuring state. Now you have collected about 180 readings for a 3-minute
measurement period using the logging interval of one second.
(8) Press and hold the POWER ON/OFF key for one second or more to turn off the unit.
NOTE: The logged data will not be erased even the power is turned off.
14 |
6-2. Operating the Computer
Follow the steps below to download the test data to your computer. The following instructions are based on
Windows 2000, but they can also be applied to Windows XP.
(1) Make sure that the Datalogger is connected to your computer with the provided USB cable.
(2) Press and hold the POWER ON/OFF key for one second or more to turn on the Datalogger. The LCD turns
on to indicate that the SK-L200T II or SK-L200TH IIα is in the measurement state for temperature or
temperature and humidity, respectively.
TIP: If you connect the USB cable to a port different from the one described in Chapter 5 "Installing
DATALOGGER for Windows," Windows may recognize that a new device has been connected on
startup.In this case, check for the COM port number by referring to section (8) of Chapter 5 "Installing
DATALOGGER for Windows."
(3) Click Start, Programs, SK
SATO Application, and then click DATALOGGER for Windows to run the program.
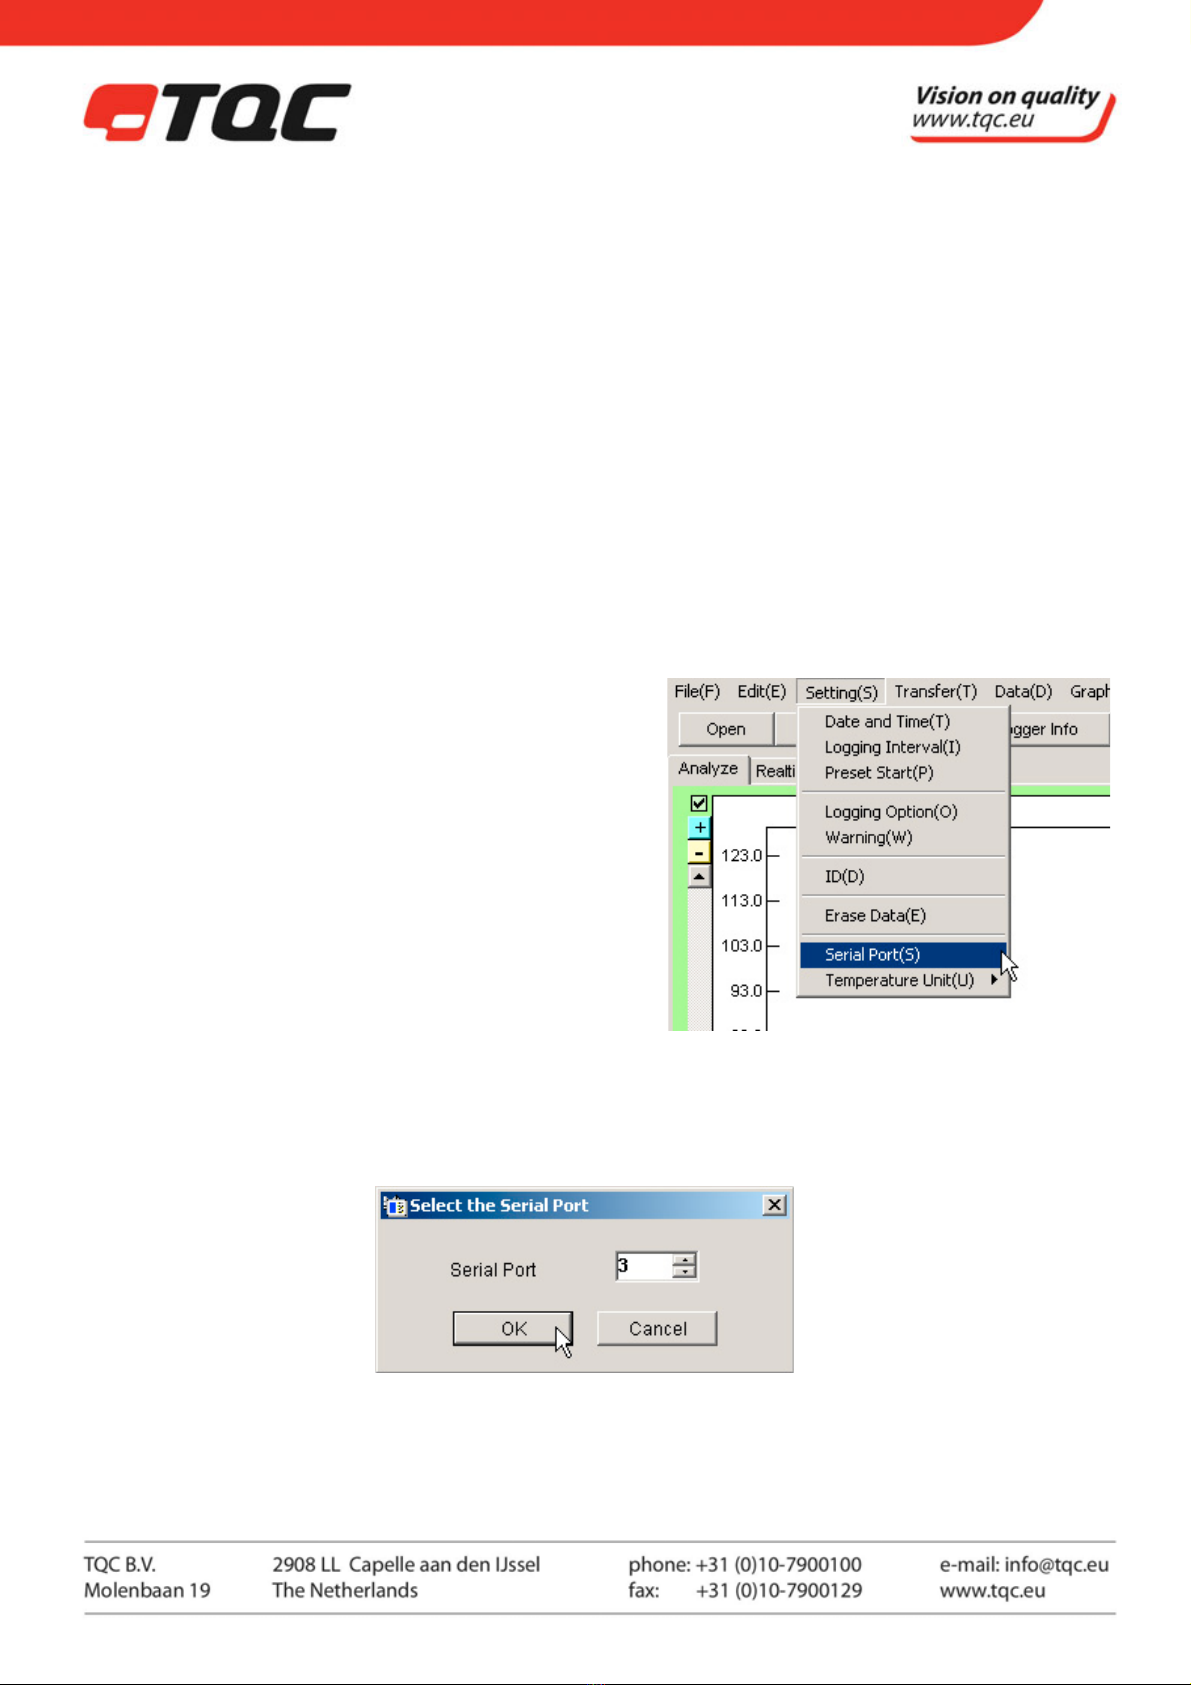
(4) From the Setting menu, click Serial Port(s).
(5) Set the serial port number.
TIP: The serial port number may vary depending on the computer being used.
Check for the serial (COM) port number by referring to section (8) of Chapter 5 "Installing
DATALOGGER for Windows".
(6) The message "Connection is correct" appears when the Datalogger and the computer are correctly
connected. Click OK.

15 |
TIP: If the message "connection is incorrect" appears, check the serial port number again and make sure
that the USB cable is plugged into the port properly.
(7) From the Communication menu, click Download (D).
(8) When downloading is completed, check the data and click Close. Now you have successfully downloaded
the test data. For details on how to use DATALOGGER for Windows, please refer to the online Help.
(9) Erase the old data on the Datalogger. Click Erase Data from the Setting menu, or press the ▲and ▼keys
together for one second or more. The memory indicator flashes to indicate that the logged data on the
Datalogger is being erased.
NOTE: Always download the necessary data in one operation. Any data remaining on the Datalogger will
be erased in the next logging operation.
9. ADVANCED OPERATIONS
The table below shows the operations performed by the Datalogger and
computer.
Datalogger Computer
Turning Datalogger on or off Yes No
Setting Current Date and Time Yes Yes
Start/End logging Yes Yes
Starting data download No Yes
Setting the unit ID No Yes
Setting the logging option Yes Yes
Setting logging interval Yes Yes
Setting preset start Yes Yes
Confirming preset start info Yes Yes
Canceling preset start Yes Yes
Setting warning thresholds Yes Yes
Starting/Ending real-time communication Yes Yes
Erasing collected data Yes Yes
16 |
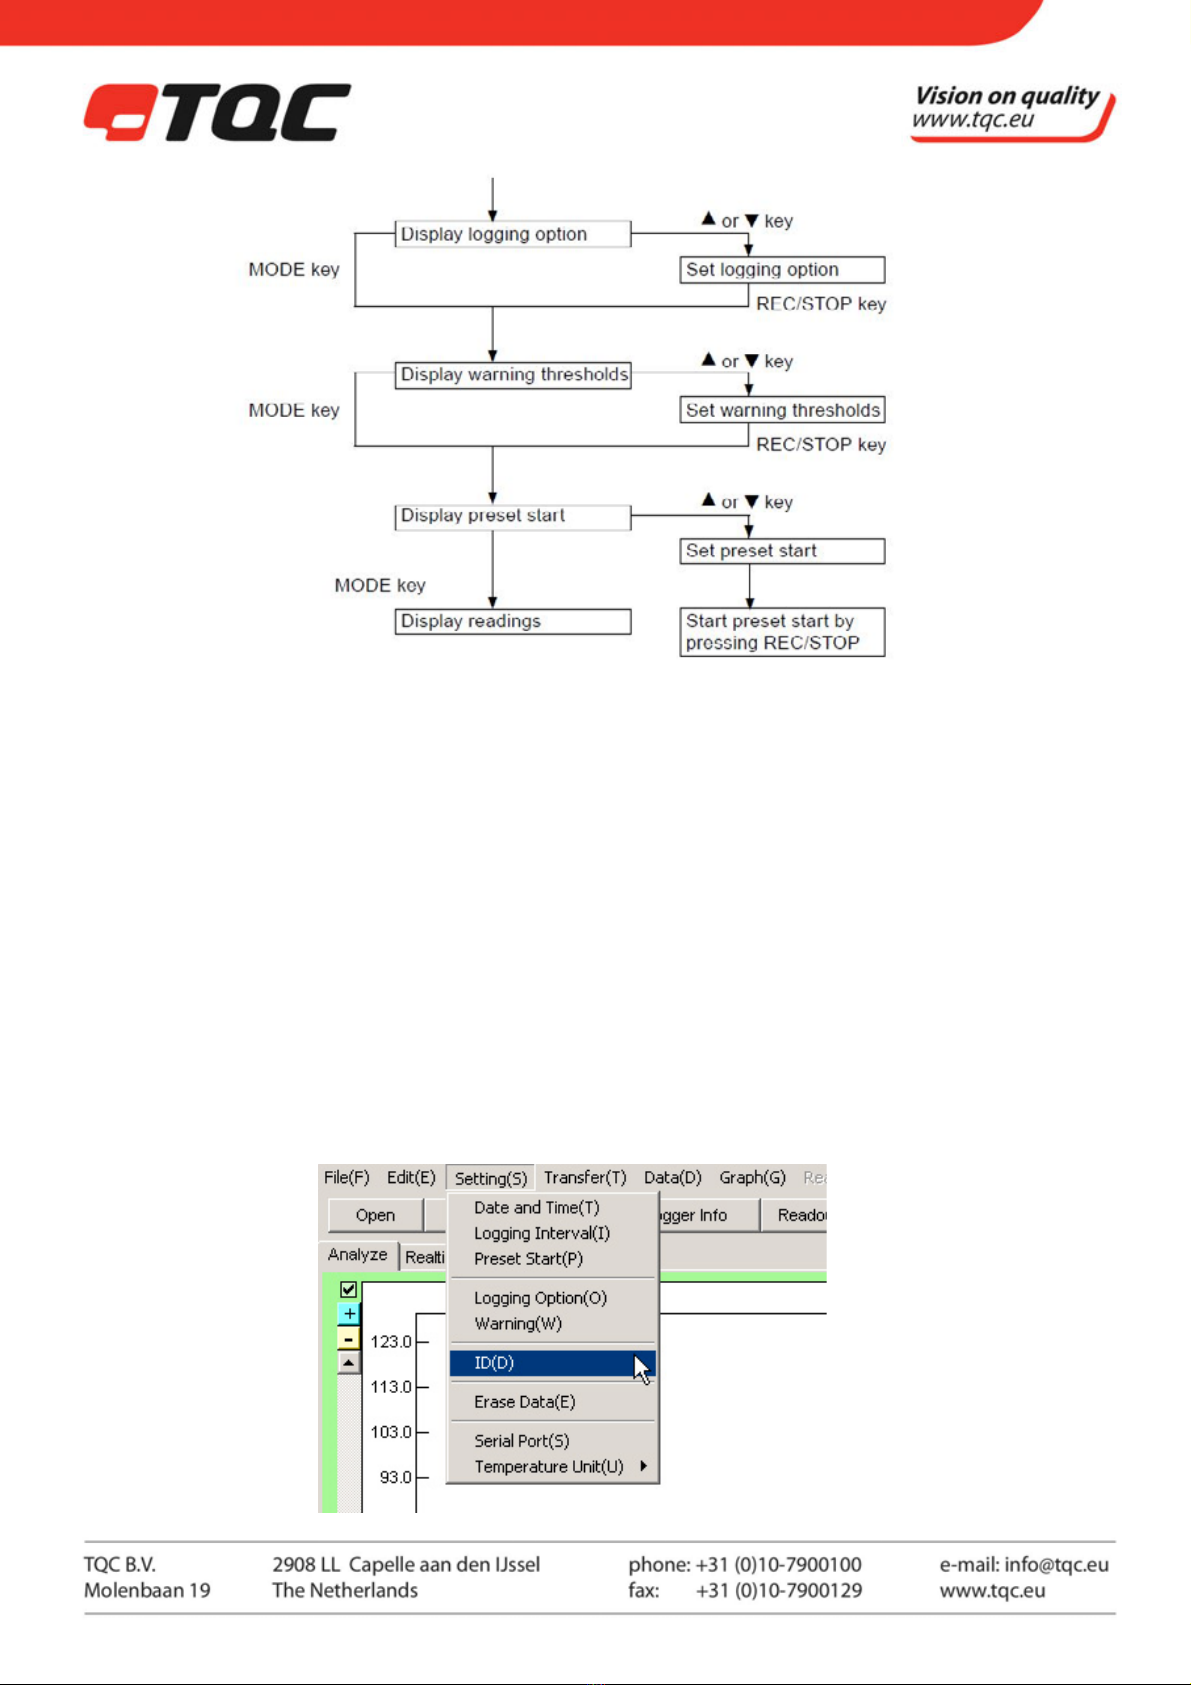
7-1. Setting the Datalogger ID
This function is used to identify multiple Dataloggers. An ID number from 1
to 9 can be assigned to each Datalogger used.
TIPS: You can only set the ID from DATALOGGER for Windows. Be sure toerase all the data stored on the
Datalogger before setting. For instructions on how to erase the data, please refer to step (9) of
Chapter 6 "Basic Operation."
(1) Make sure that the Datalogger is connected to your computer with the provided USB cable.
(2) Press and hold the POWER ON/OFF key for one second or more to turn on the Datalogger. The LCD turns
on to indicate that the SK-L200T II or SK-L200TH IIα is in the measurement state for temperature or
temperature and humidity, respectively.
(3) Start DATALOGGER for Windows
(4) From the Setting menu, click Set ID (D).
17 |
(5) The confirmation message appears. Click OK.
TIP: You can set the logging interval from DATALOGGER for Windows. For
further information, please refer to the online Help.
(1) Press and hold the POWER ON/OFF key for one second or more to
turn on the Datalogger. The LCD turns on to indicate that the SK-L200T II
or SK-L200TH IIα is in the measurement state for temperature or
temperature and humidity, respectively.
(2) Press the MODE key seven times.
(3) The INT mark of the LCD lights. Use the ▲or ▼key to set the desired logging interval. The first two digits
represent the "minute" and last two represent the "second." (Example: The display of "05:00" represents five
minutes.)
(4) Press the REC/STOP key to confirm.
(5) Press the CALL/OUT key. The SK-L200T II or SK-L200TH IIα returns to the measurement state for temperature
or temperature and humidity, respectively.
7-3. Setting the Logging Option
There are four logging options to choose: Once (default), Repeatedly (overwriting), Ends at... (limited amount),
By pages (partitioning).
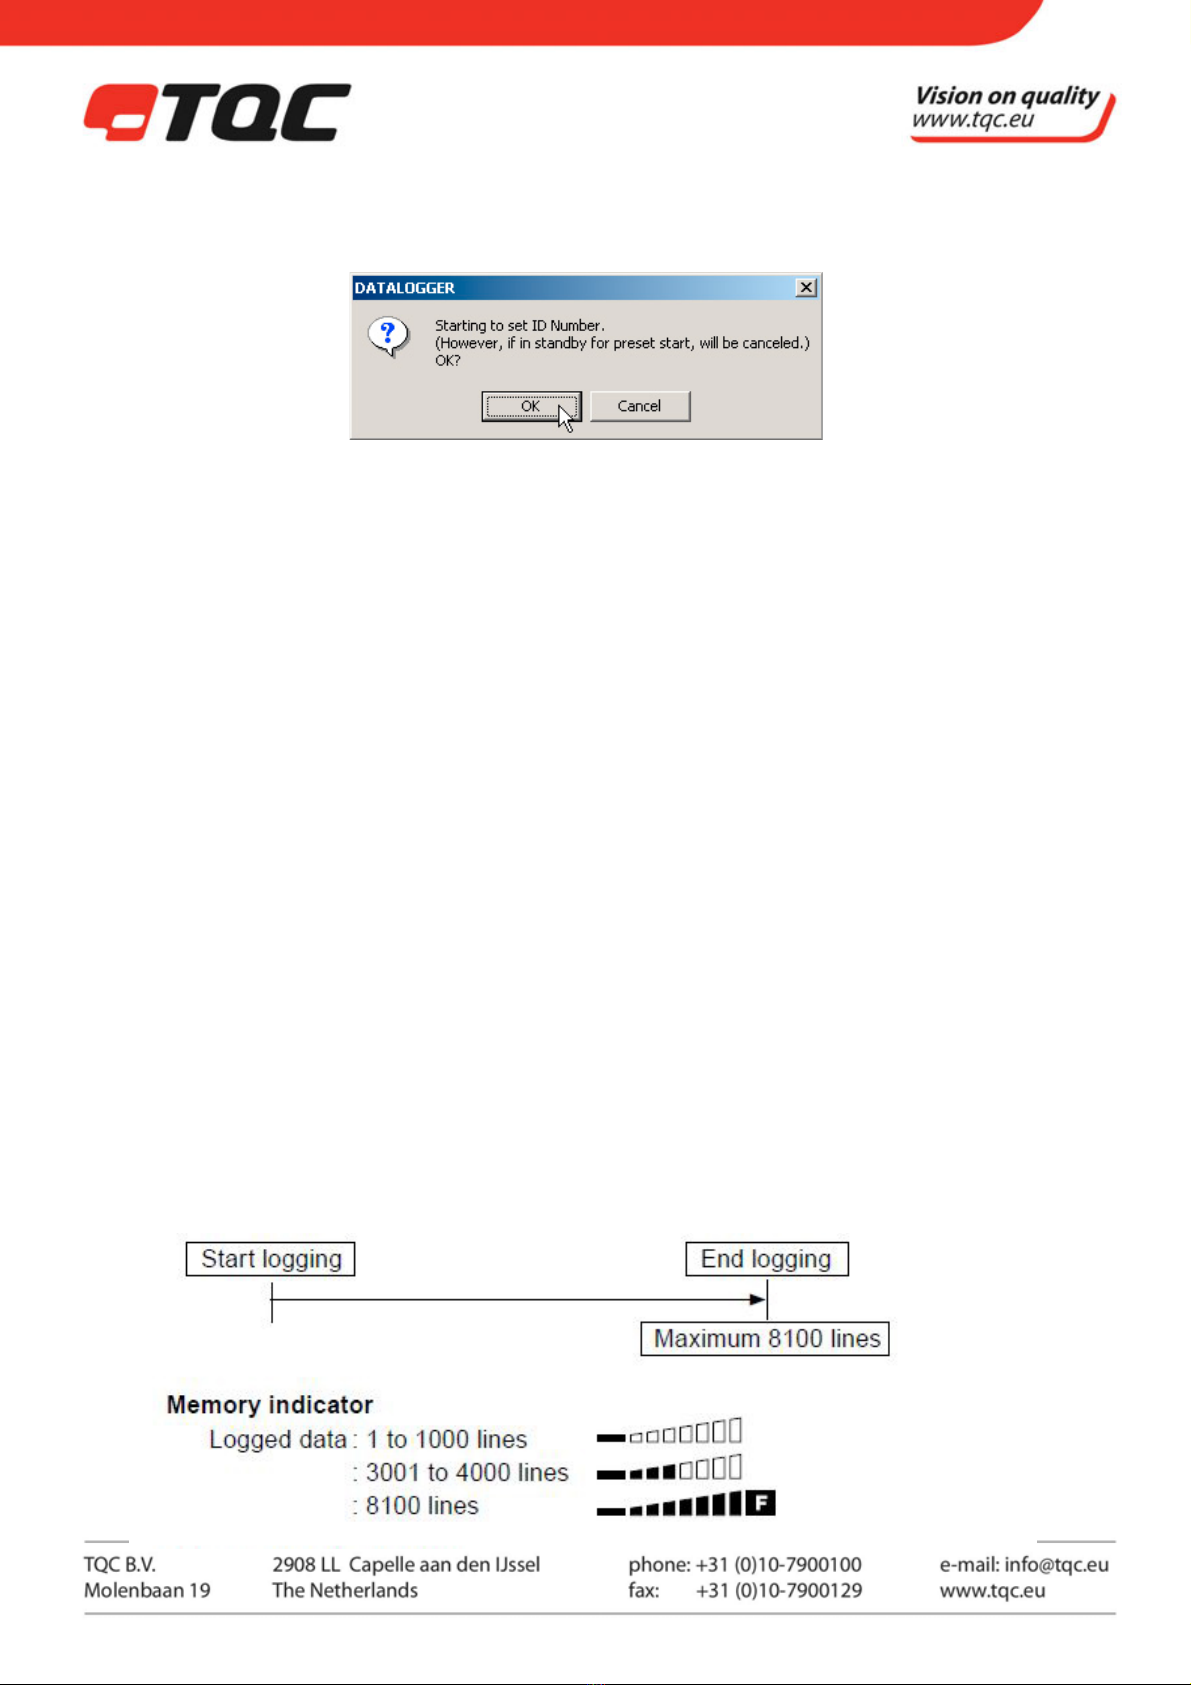
Once (default)
When Once is chosen, the Datalogger keeps logging until the memory becomes full. The Datalogger stops
logging when 8100 lines of data are recorded.
18 |
Repeatedly (overwriting)
The Datalogger overwrites the existing data from the start once the 8100 lines of data are recorded. This is ideal
for collecting data during a certain period.
Be sure to make a note of the time logging ends. You will need it to analyze the data with the Datalogger for
Windows.
Memory indicator
Logged data : 1 to 1000 lines
: 7001 to 8100 lines
: 8101 to 9000 lines
: 9001 to 10000 lines
From here, the dim bar is shifted to the right in succession.
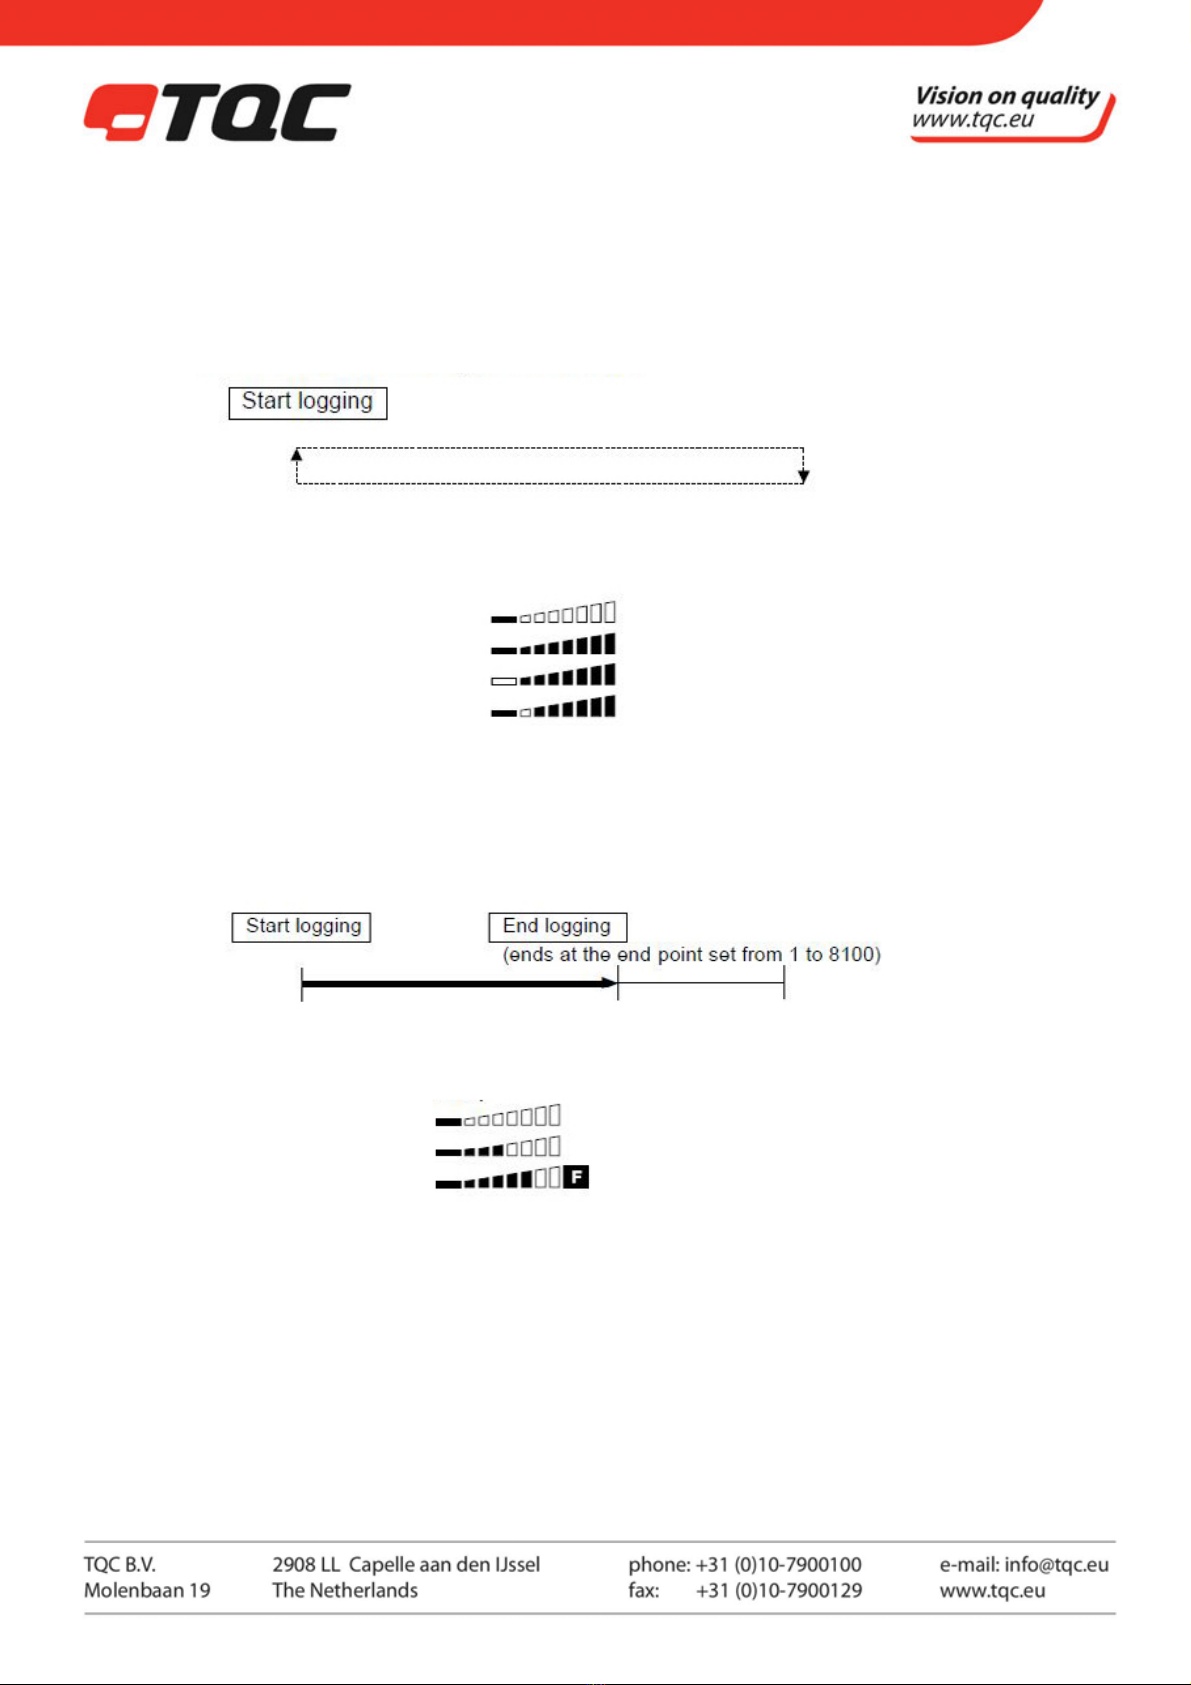
Ends at… (limited amount)
With this logging option, you can specify the end-point for the Datalogger to stop logging. This setting is ideal
when you want to limit the amount of data to be collected
Memory indicator (example: end-point is 5500)
Logged data : 1 to 1000 lines
: 3001 to 4000 lines
: 5500 lines
By pages (partitioning)
The storage memory is partitioned into four blocks, each having the capacity to store 2000 lines of data. This
enables the Datalogger to perform.
four different tasks in sequence while storing each task’s data in one of the four different memory blocks
(pages). This is ideal when you want to collect data from multiple sites using one Datalogger.
TIPS: The memory is used on a page-by-page basis. Therefore, even if there are less than 2000 stored data
lines at the end of logging (REC/STP pressed), the entire page containing any number of lines becomes
unavailable for further use. Upon logging again, the new data will be stored in a different unused
page. When the four pages are used up, erase all the data before performing the next logging.

19 |
Memory indicator (two bars represent 2000 lines of data per page)
Example 1 : The first page has 500 and the second page has 1500 lines.
Example 2 : The first and fourth pages have 500 lines each, the second has1500 lines and the third has 1200
lines.
(4) Use the ▲or ▼key to set the number (1 to 4) representing the logging option desired on the upper LCD.
(5) Press the REC/STOP key to confirm.
(6) If the “Ends at…” (3 on the LCD) is chosen, proceed to step 7 below. For other options (1 for Once, 2 for
Repeatedly, 3 for By pages), press the CALL/OUT key once. The SK-L200T II or SK-L200TH IIα returns to the
measurement state for temperature or temperature and humidity, respectively.
(7) The left two digits start flashing. Use the ▲or ▼key to display the desired number from 0 to 81. (Example:
For 7500 lines, choose "75.")
(8) Press the REC/STOP key to confirm.
(9) The right two digits start flashing. Use the ▲or ▼key to display the desired number from 0 to 99.
(Example: For 7500 lines, choose "00.")
(10) Press the REC/STOP key to confirm.
(11) Press the CALL/OUT key. The SK-L200T II or SK-L200TH IIα returns to the measurement state
for temperature or temperature and humidity, respectively.
7-4. Setting the upper and lower thresholds for warning
This function is used to turn on the Alarm mark (Hi or Lo) when the temperature or humidity threshold is
triggered.
NOTE : No sound is produced while the Alarm mark is lit.
TIP : Aside from the steps below, you can set this function from DATALOGGER for Windows. For further
information, please refer to the online Help.

20 |
(1) Press and hold the POWER ON/OFF key for one second or more to turn on the Datalogger.
The LCD turns on to indicate that the SK-L200T II or SK-L200TH IIα is in the measurement state for
temperature or temperature and humidity, respectively. Set the upper limit for the temperature first.
(2) Press the MODE key nine times.
(3) The Alarm and Hi marks light. Press the ▲and ▼keys at the same time
TIP: Pressing the ▲key and ▼key simultaneously one more time will turn off the warning function.
(4) Use the ▲or ▼key to display the desired value for upper limit.
(5) Press the REC/STOP key to confirm. Next, set the lower limit for temperature.
TIP: If the lower limit is not necessary, press the CALL/OUT key once. The SK-L200T II or SK-L200TH IIα returns to
the measurement state for temperature or temperature and humidity, respectively.
(6) The Alarm and Hi marks light. Press the ▲and ▼keys at the same time
NOTE: Pressing the ▲key and ▼key simultaneously one more time will turn the warning function off.
(7) Use the ▲or ▼key to display the desired value for lower limit.
(8) Press the REC/STOP key to confirm.
TIPS: If the lower limit is not necessary, press the CALL/OUT key once. The SK-L200T II or SK-L200TH IIα returns
to the measurement state for temperature or temperature and humidity, respectively. For setting
the humidity upper/lower limit in the SK-L200TH II α model, repeat steps (3) to (8) above.
(9) Press the CALL/OUT key once to complete the setting. The SK-L200T II or SK-L200TH IIα returns to the
measurement state for temperature or temperature and humidity, respectively.
7-5. Setting the Preset Start
Setting the Date and Time
This function is used to specify the date and time to start logging
automatically.
NOTES: Starting this operation clears the logged data stored on the Datalogger depending on the logging
option that has been set. Always download the necessary data before setting this function.
For further information, please see the table below.
Table of contents
Popular Other manuals by other brands

HTC
HTC Vive Focus Get started

TMC Aquarium
TMC Aquarium REEF-Fill Instructions for installation and use

Ultra Reef
Ultra Reef UKS-180 instruction manual

Robinson
Robinson R-66 Series Lithium-Ion installation instructions

Sony
Sony CMT-A70 - Personal Component System Limited warranty

Aquadistri
Aquadistri SuperFish Mini Waterfall Pond Instructions for use

MadgeTech
MadgeTech UltraShock-5 Product user guide

Dover
Dover OPW 12VW-AX Series manual

Oase
Oase StreamMax Classic 2000 operating instructions

sammi
sammi SM-R400 user manual

Trox
Trox FKRS-EU Supplementary installation manual

Roger Technology
Roger Technology BIONIK Instruction and warnings for the installer


