Trader BEAR BESMOKEY10WM User manual
BESMOKEY10WM
Smoke Alarm Module
Wireless for use with BESMOKEY10
Thank you for purchasing our product. This instruction contains important information on the correct
installation and operation of your smoke alarm. Read this instruction fully before attempting installation and
retain them for future reference.
Introduction:
This module can be installed into the alarm to achieve wireless interconnection
Caution: Only install one pluggable module per group of wired interconnected alarms.
Install module: Disconnect the battery and AC power. Install a pluggable module then energize.
(See pictures on next page)
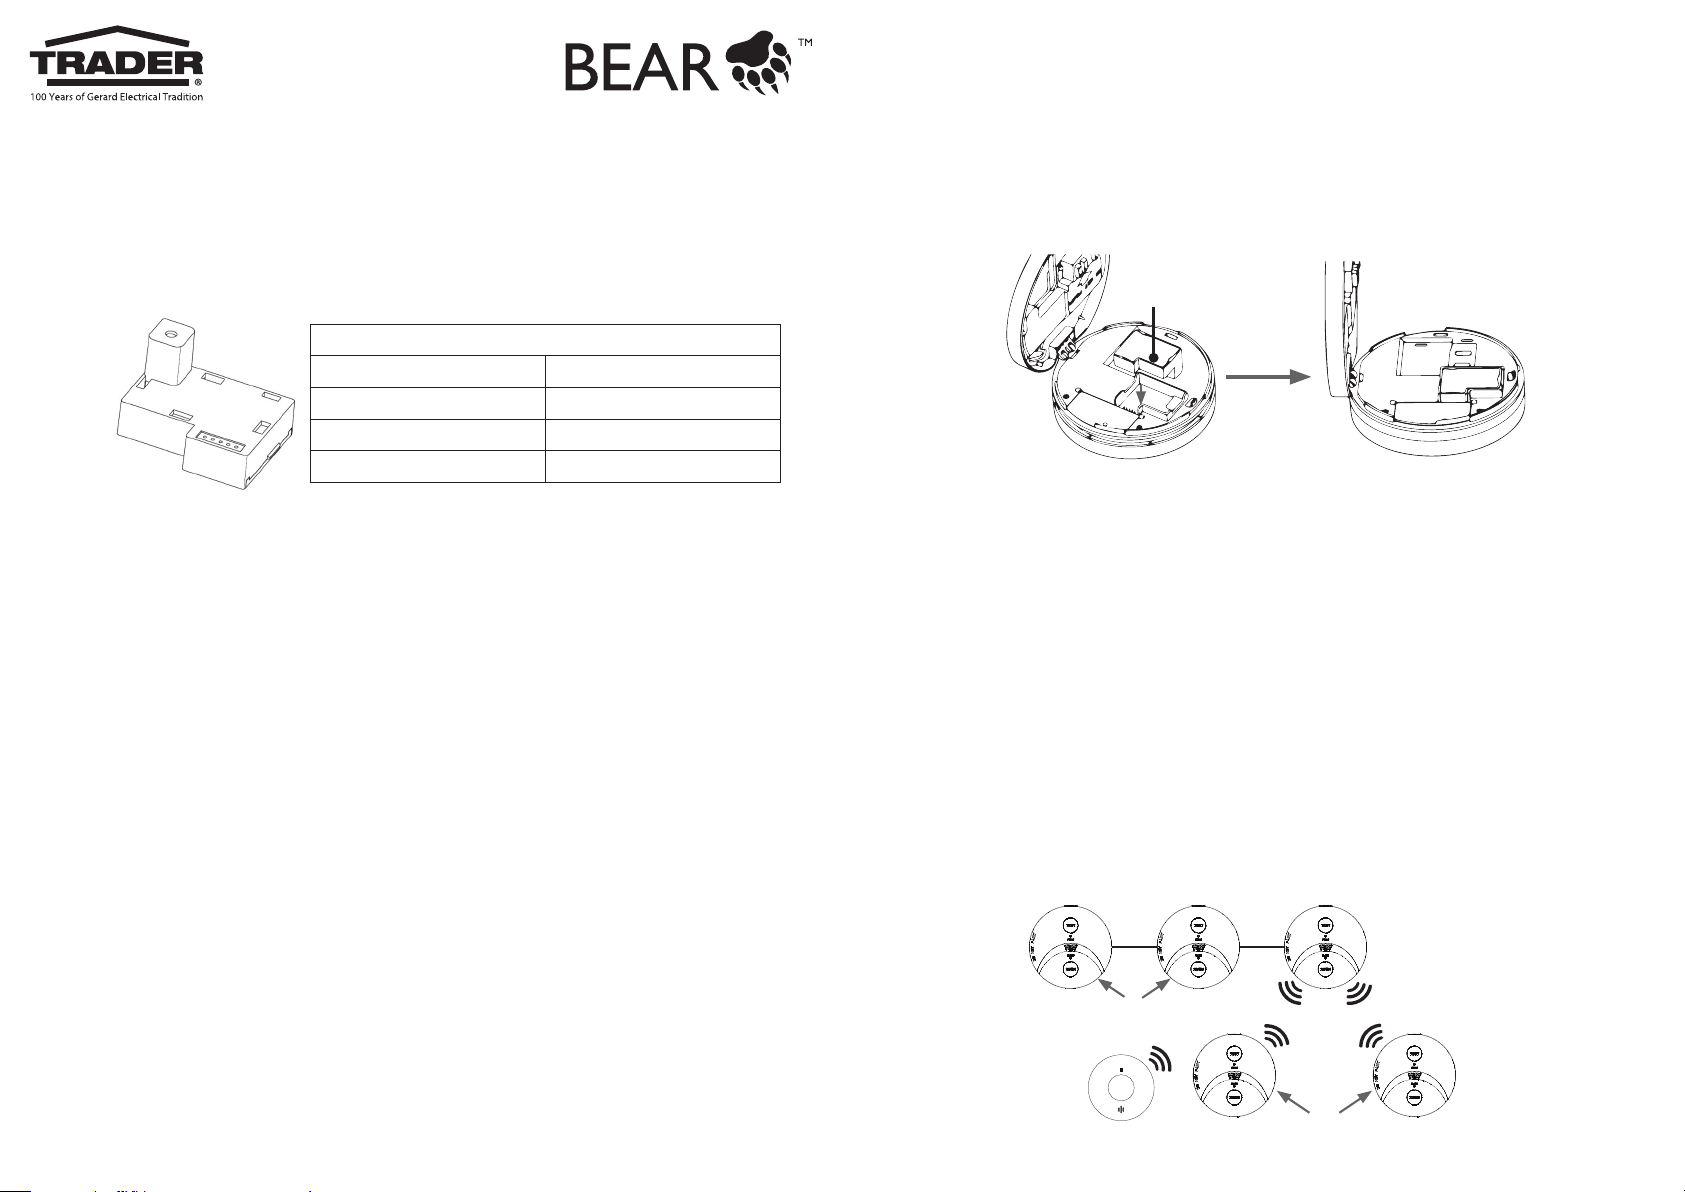
Specications:
Wireless frequency 433MHz
Wireless distance >60m
Transmission power 13dB
Interconnect Number 40 Max
Introducing Wireless Alarm Option into the network with the BESMOKEY10WM module
1. Prior to installation determine if there is a need for the use of wireless alarms in the network.
2. This module can be installed into the BESMOKEY10 by rst disconnecting the power and opening
one of the mains powered alarms and disconnecting the battery, (if yellow tag has already been
removed for battery to connect, then remove the battery from alarm), replace the blank housing
with the BESMOKEY10WM wireless module (diagram 1).
3. The BESMOKEY10WM communicates at 433.42MHz and can operate at range greater than 60m.
4. With the power o select one mains wired alarm to be the master for the wireless link and install
the BESMOKEY10WM. Caution: Only install one pluggable BESMOKEY10WM module into a group
of mains-wired interconnected alarms. If there is more than one installed with wired connections, it
will not work.
5. Insert the battery, remove the yellow tag and close alarm. The alarm will automatically search for the
module after being closed. The red LED ashes continuously while the unit checks if the module is
installed.
6. If no other alarms are found to pair with, the red LED will extinguish after 8 seconds, and unit will
beep 3 times in quick succession. The red LED will then ash twice quickly, every 8 seconds. This
indicates that while the module has been recognized, the unit is not yet paired.
7. If the module was not installed correctly, or otherwise not recognized by the alarm, the red LED
will extinguish after 8 seconds, no beeps will be heard, and the red LED will not ash twice every 8
seconds.
All Master and Slave BESMOKEY10 require a BESMOKEY10WM to be connected wirelessly
Tip for easy set up: Connect all wireless units on the ground prior to installation.
Pairing the Alarm
1. Press the TEST button of the rst alarm 3 times in the space of 2 seconds. The Red LED should remain
illuminated. This alarm remains the Master. (It is best to use the mains powered alarm as the Master if
there is a mix)
2. Move to the next alarm and press the TEST button of this alarm 3 times in the space of 2 seconds. The
red LED will illuminate briey, and the unit will give one loud 0.5 second beep. The unit is now paired.
3. Repeat this process with all remaining alarms to be paired.
4. Return to the Master (rst) alarm. The Red LED should still be illuminated. Press the TEST button for 1
second, to complete pairing.
5. All paired units will have the red light ashing once every 40 seconds (example of network diagram 2).
6. To run a test, press the alarm button for at least 2 seconds and the alarm will sound and the other
interconnected alarms should go through their test cycle, with a series of beeps, within a few seconds.
7. The BESMOKEY10 with BESMOKEY10WM can also pair to BESMOKEY10BW 10 Year Lithium Wireless
Smoke Alarm. Follow instructions for that model.
8. Repeat these steps with all alarms to be interconnected.
9. Additional Wireless 10 Year Lithium powered alarms can be added to the network by combining the
BESMOKEY10 and inserting the BESMOKEY10WM module without wiring to the mains and using the
10 Year Lithium Battery option only. These can be paired with the wireless master (Pairing the Alarm,
Diagram 2).
10. Turn ON Mains power
11. To test the alarms, press the TEST button for at least 2 seconds. The unit will alarm, and the light will
ash for as long as the TEST button is pressed.
BESMOKEY10WM
Pluggable module
Diagram 1
Diagram 2 NETWORK CONFIGURATION EXAMPLE
BESMOKEY10
(wired)
240V~
MASTER
BESMOKEY10 (wired)
+ BESMOKEY10WM
240V~ Connected
BESMOKEY10
+ BESMOKEY10WM
BESMOKEY10BW
Disposal:
Waste electrical products and batteries should not be disposed of with your other household waste.
The alarm is ideally suited for disposal within the waste electronic and electrical equipment (WEEE)
recycling scheme. Please recycle where facilities exist. Check with your local authority, retailer or
contact our Technical Support team for recycling/disposal advice as regional variations apply. Once
the batteries are removed, the low battery warning chirp will stop. The batteries should always be
removed before disposal.
Function Operate the alarm Indication Description
Networking Press the TEST button 3
times within 2 seconds
Networking status indication:
The Red LED illuminates continuously.
Networking success indication
MASTER: The Red LED illuminates
continuously, and buzzer “beeps” for
0.5 second.
SLAVE: The Red LED extinguish, and
buzzer “beeps”for 0.5 second.
The rst alarm to enter networking
acts as the MASTER. Later enter
networking acts as SLAVE.
Exit network
Press and hold the test
button at least 3 seconds
in networking.
The Red LED light o.
Networking status will last
5 minutes. If exit, press and hold
the test button above 3 seconds,
exit net working after the Red LED
extinguished
Note: If there’s no pluggable module in existing alarm, it operates in standalone mode and to add a pluggable
module, disconnect AC power and battery, add the module then energize. The alarm will search module after
re-energise.
The power consumption will increase if the module not networked is searching for other modules. So network the
module as soon as possible to ensure battery life is maintained.
10 Year Manufacturer’s Warranty
This product has been manufactured to the highest quality standards.
This product is warranted to the original purchaser and is not transferable.
The product is guaranteed to be free from defects in workmanship and parts for a period of 10 Years from the
date of purchase. Defects that occur within this warranty period, under normal use and care will be repaired,
replaced or refunded. The benets conferred by this warranty are in addition to all other rights and remedies
of the consumer under Commonwealth, State and Territory laws in relation to the goods or services to which
this warranty relates and Australian Consumer Law. Risk in regard to the product to be repaired shall at all
times remain with the Purchaser. The warranty is given on the condition that the product to which it applies is
used for the purpose and in the manner intended by its construction and for no other purposes whatsoever.
GSM Electrical (Australia) Pty Ltd shall not be responsible for damage of any kind, caused by accidents, power
surges, electrical storm damage, incorrect power current, infestation (vermin or insect), incorrect installation,
incorrect electricity or plumbing installation, improper use of controls or failure to use the product in
accordance with the operating instructions, general misuse or abuse or from normal wear and tear. Any
attempt by an unauthorised person to repair or tamper with the equipment shall render the warranty
null and void.
GSM Electrical (Australia) Pty Ltd’s liability under this warranty is limited to the replacement and/or repair of
the defective parts within the warranty period and does not extend to installation or removal of the product.
Acceptance of liability by GSM Electrical (Australia) Pty Ltd contained herein is to the exclusion of any other
remedy whatsoever and howsoever arising in respect of any equipment to which it applies.
10
Warranty
10
Warranty
Yr
Yr
Other Trader Security System manuals


