TRAK Kayaks T-1600 Installation instructions

1
Assembly and
Disassembly Guide

2
toc
Table of Contents:
Unpacking your TRAK kayak ..............................................................3
Getting to know your TRAK.............................................................4-7
Instructions:frompacktowater.......................................................8-29
Frameassembly:bowandsternsections..........................................7
Insert frames into shell...........................................................10
ConnecttheCoaming ...........................................................13
Inserting the Tri-active Performance System™ (TPS) jacks..........................14
Install the Command Seat........................................................20
Close the Keder..................................................................24
Rigging and Finishing............................................................25
Instructions:fromwatertopack......................................................34-47
Disassemblingthecockpit.......................................................35
Removingframefromshell ......................................................40
Collapsing the frame sections ....................................................42
Folding the shell.................................................................44
PlacingpartsintheTRAKpack...................................................45
February 2010
A
B
D
C
1
1
2
2
3
3
4
4
5
5
6
7
3
A
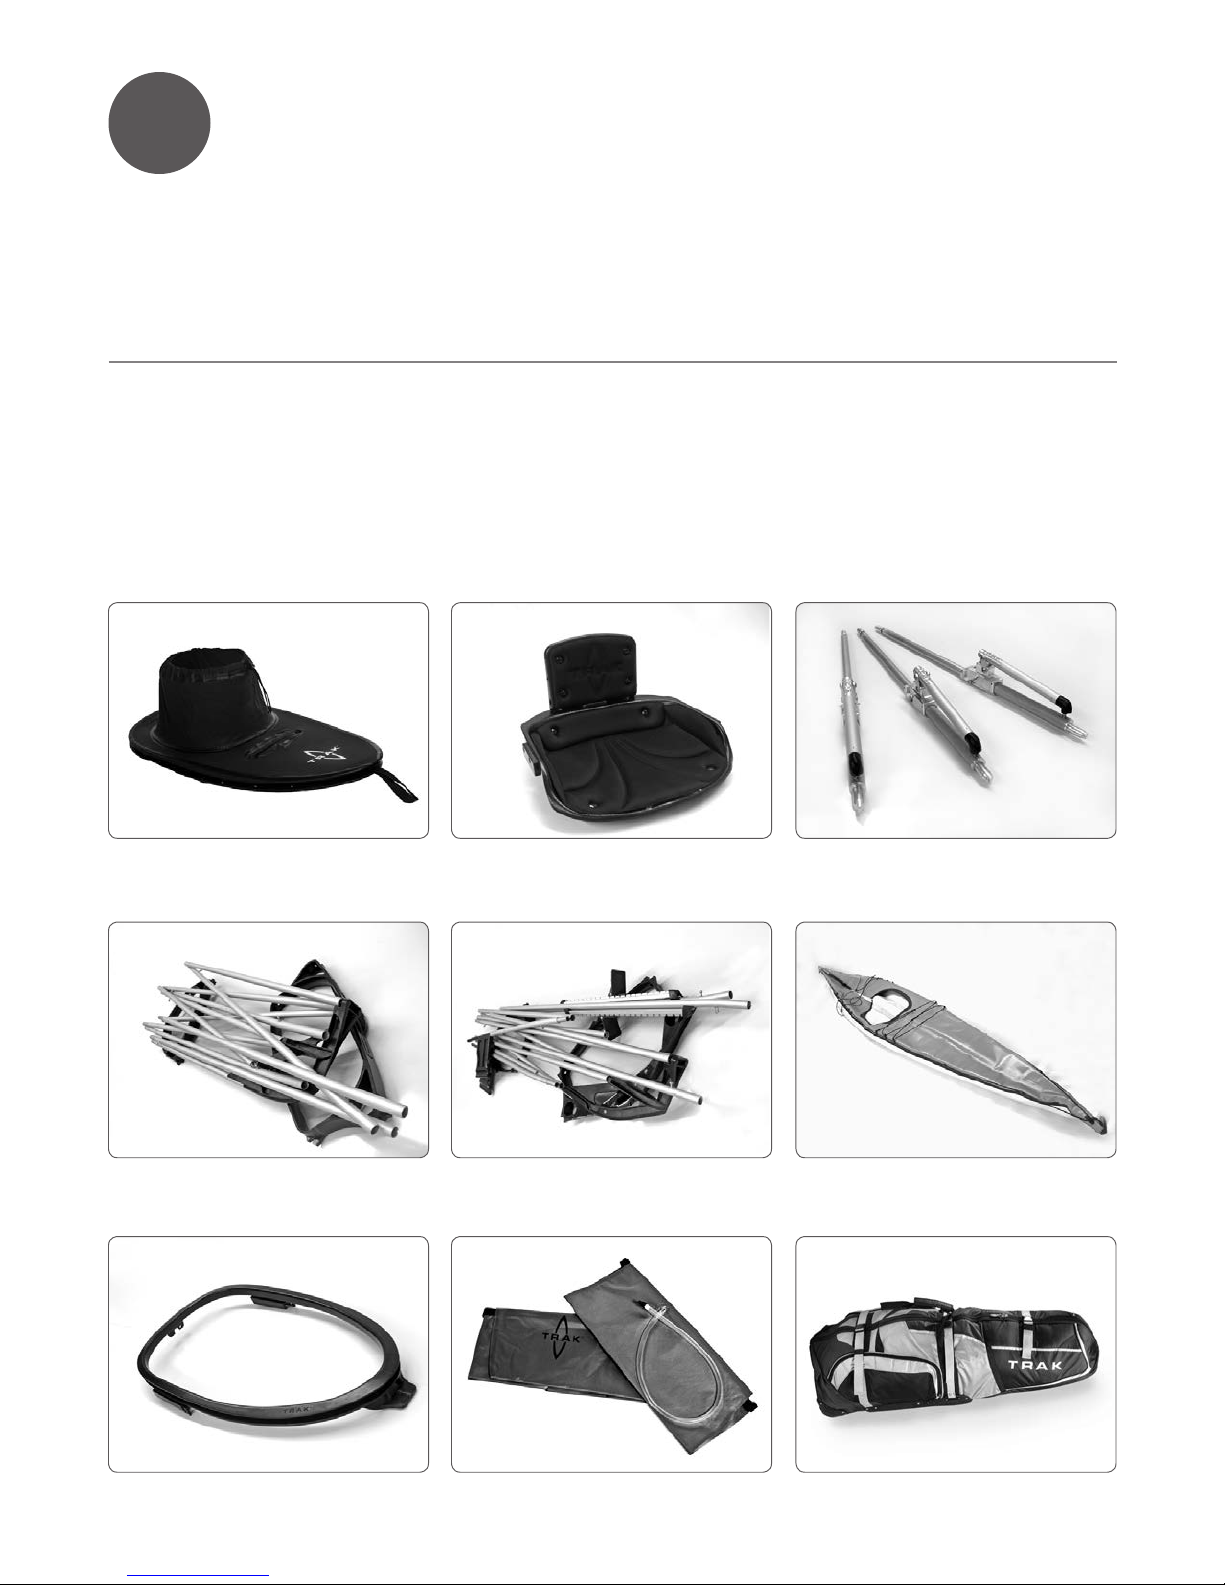
Unpacking your TRAK kayak:
Parts checklist:
1 x Spray Skirt 1 x Command Seat 3 x Jacks (Tri-active Performance System™)
1 x Bow Frame Section (Stern) 1 x Stern Frame Section (Bow) 1 x PolyTRAK Shell™
1 x Coaming 2 x Gear/Float Bags 1 x Pack

4
B
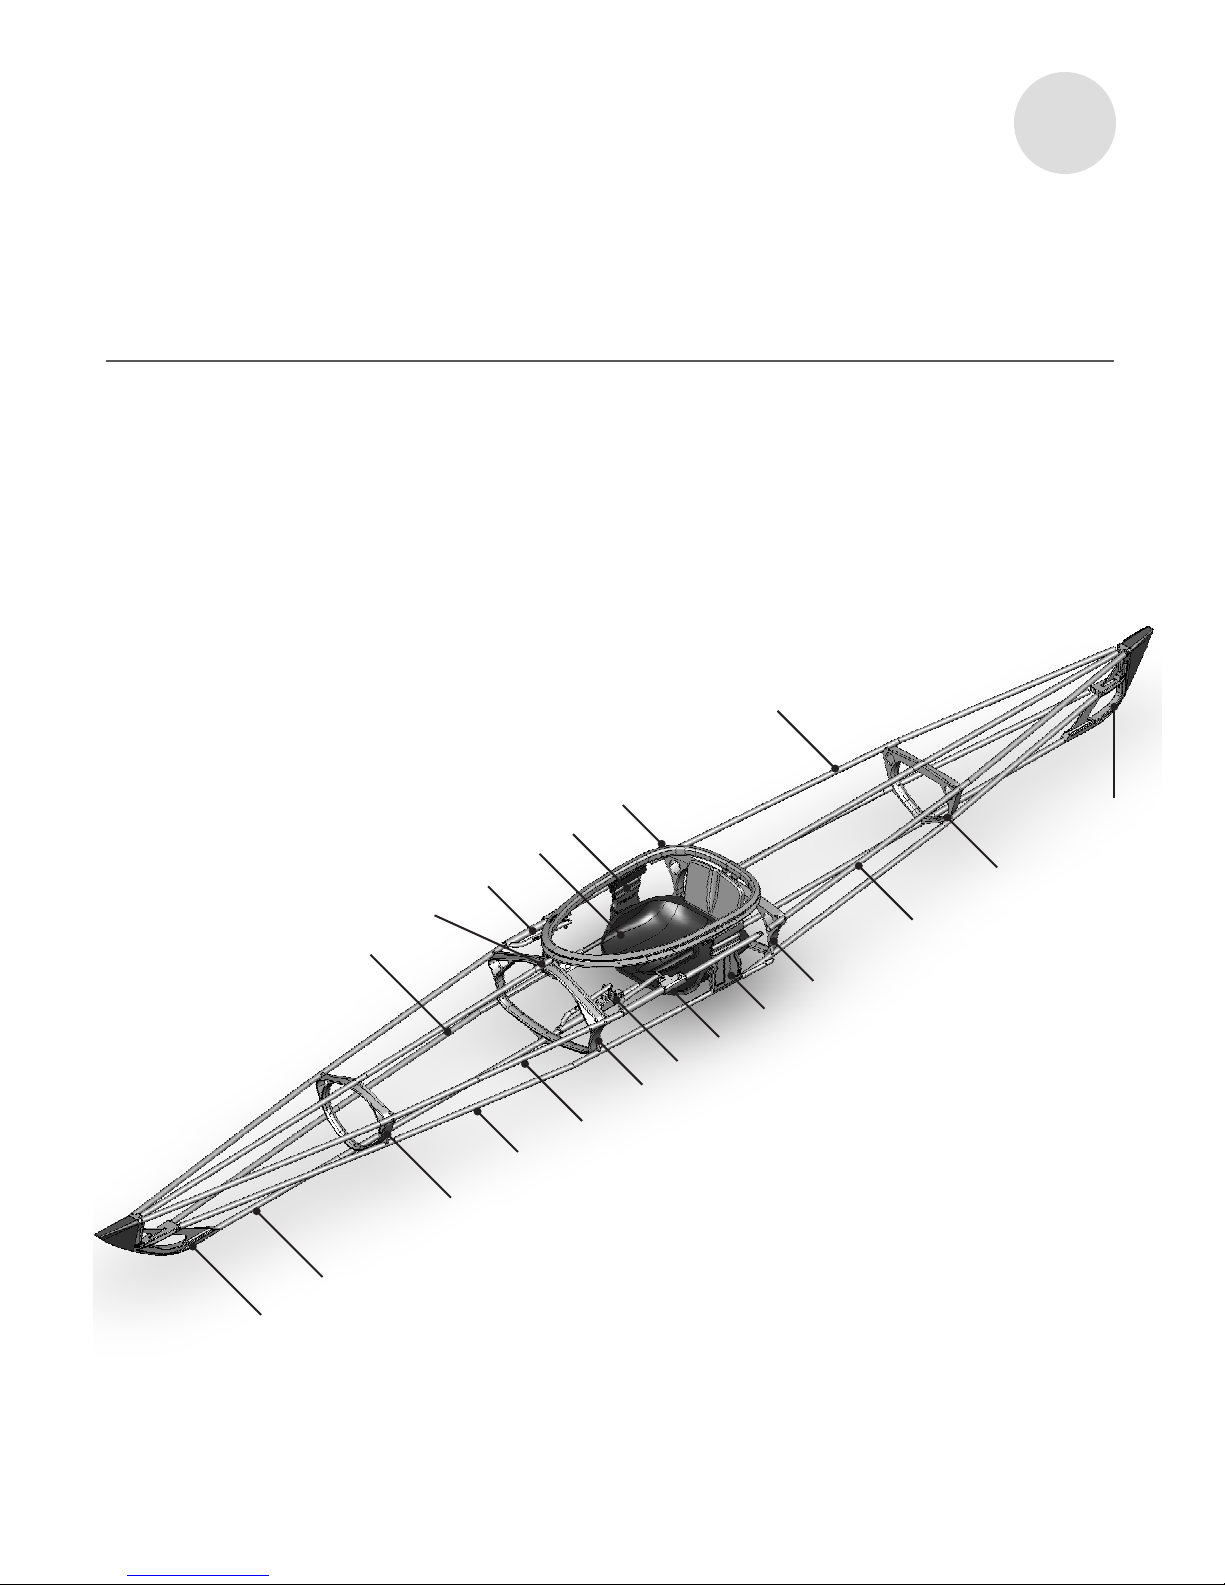
Getting to know your TRAK:
Top prole:
Side prole:
Tow Handle Keder Keder
Handle
Seat Keel Strip Deck Rigging Grab Line Tow Handle
Deck
Rigging
Coaming Coaming
Seal
Tri-active Performance
System Jacks (3)
Stern BowKeel HullDeck
5
1 Bow plate
2 Keel tube
3 Rib A
4 Foot brace
5 Gunwales tube
6 Keel jack (TPS)
7 Rib B
8 Gunwale jack (TPS)
9 Seat Pillar
10 Rib C
Components:
1
2
3
5
6
7
8
9
10
11
12
13
14
15
16
17
18
19
20
4
11 Keel tube
12 Rib D
13 Stern plate
14 Foot brace
15 Opening for coaming
16 Gunwale jack (TPS)
17 Seat
18 Seat pillar
19 Coaming
20 Gunwales tube
B
6
About the Tri-active Performance System™ (TPS)
What is so amazing about TPS?
TPS is what allows TRAK to perform like no other kayak ever created.
First, RigiTEK™ Rigidity Technology creates a rigid, hydrodynamic skeleton over which the PolyTRAK Shell™ is tightly
formed. This provides high end speed and responsivness. Second, VariTRAK™ and VariTRIM™ allow you to change the
shape of your TRAK, so you can adapt to constantly changing wind and water conditions, and stay in command of your
kayak.
The power of TPS Jacks:
All of this is achieved through the use of three TPS Jacks: one in the center along the keel, and two along the gunwales
(sides) of the kayak frame. By adjusting these jacks, your kayaking experience is signicantly enhanced.
How do the TPS Jacks work?
The rst couple of pulls on the TPS Jacks add rigidity to the PolyTRAK Shell™. Once the boat is rigid, if you continue pulling
on the TPS Jacks they begin to adjust the hull shape. This is where it gets really interesting and fun!
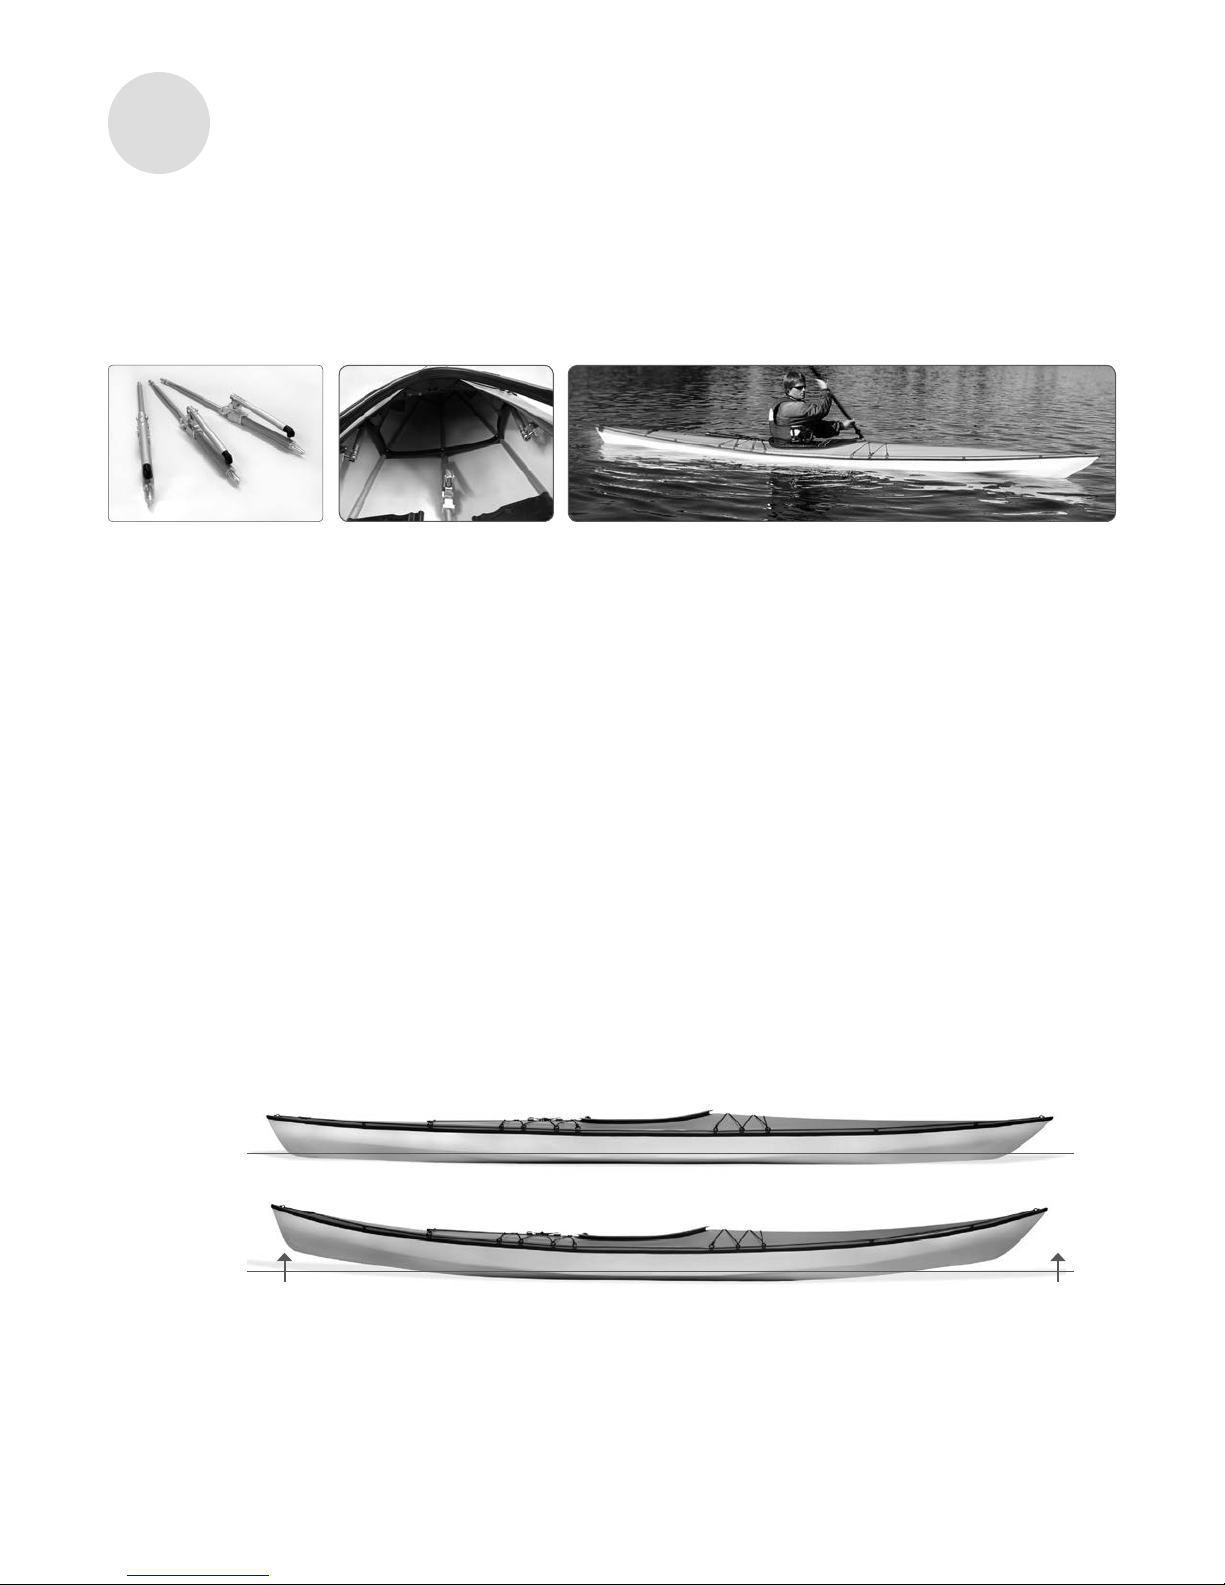
VariTRAK Adjustable Rocker™:
The TPS Jack in the keel allows you to adjust the rocker of your TRAK, which increases or decreases its maneuverability
and stability. Every pull on the keel jack increases the rocker. As the tips start to lift out of the water-line, the amount of
keel in the water“shortens”making TRAK extremely maneuverable and more stable. Ever spun a sea kayak?
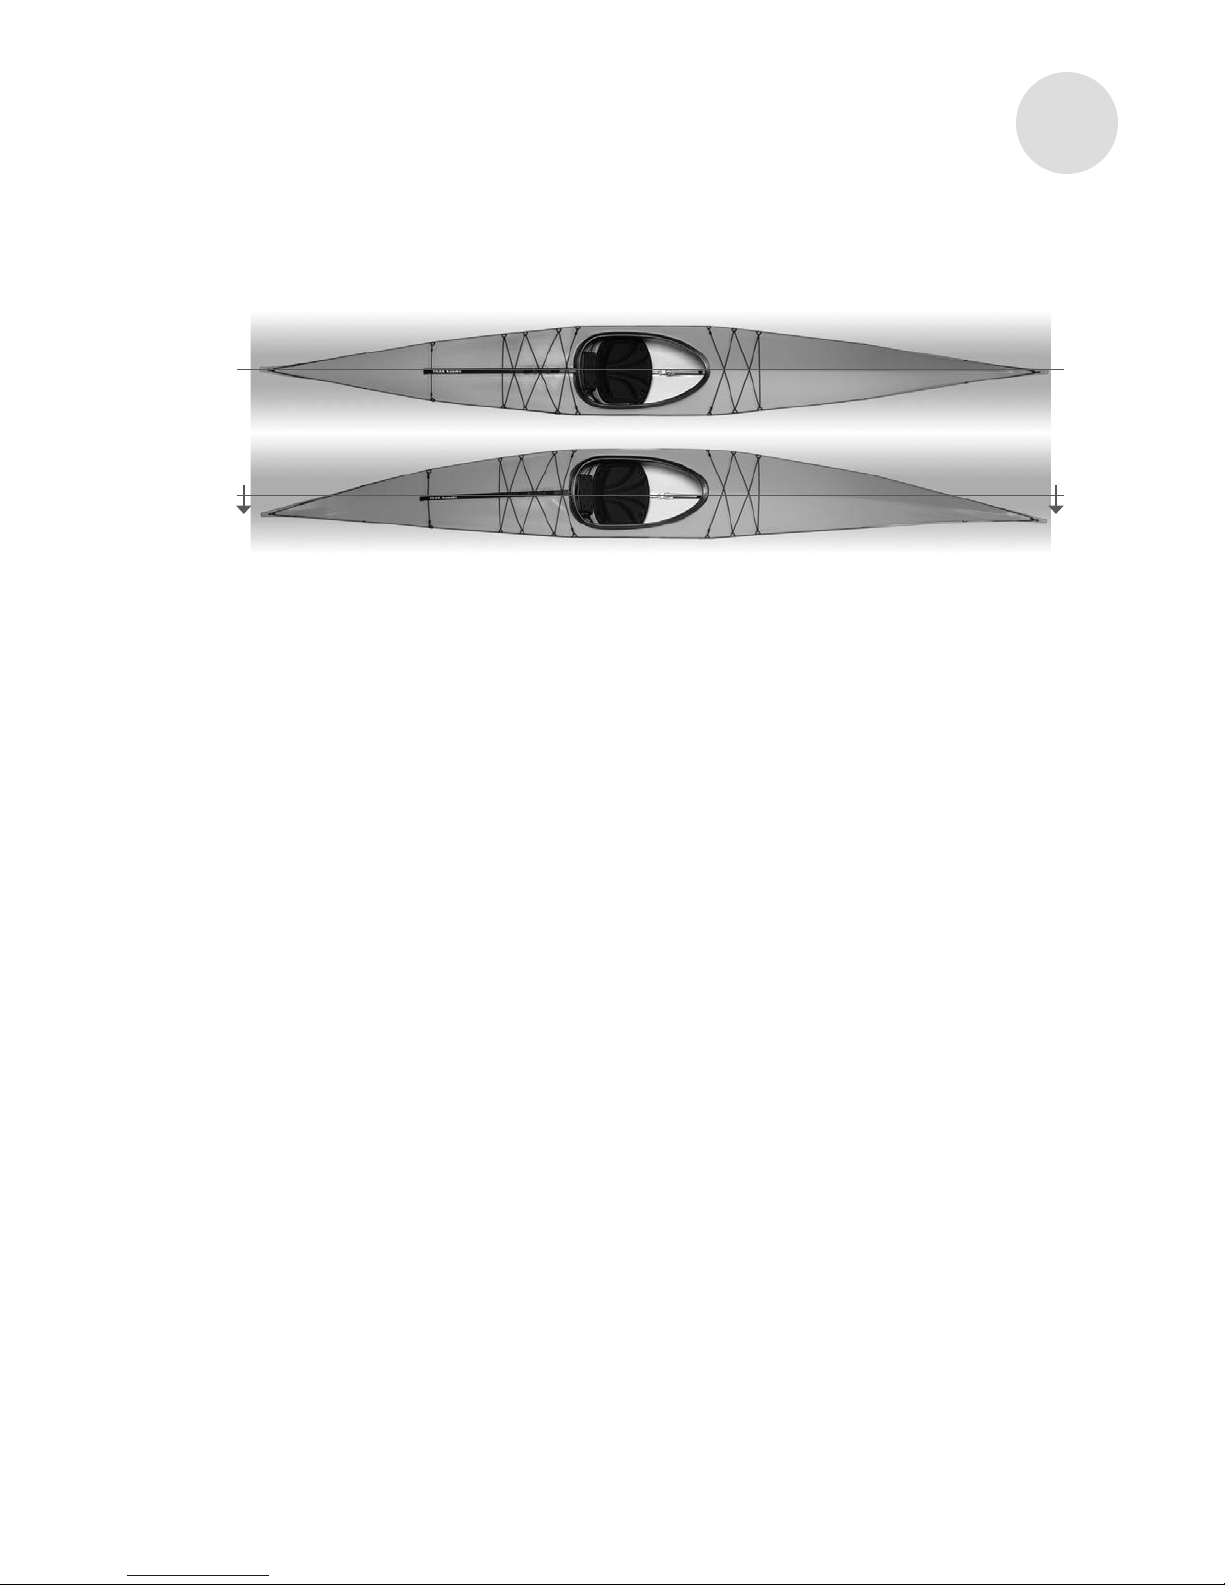
VariTRIM Lateral Adjustment™:
The two gunwale TPS Jacks are used instead of a cumbersome rudder or skeg. You can adjust in seconds for changing
crosswinds or cross currents – to the left, or to the right. There are also ergonomic advantages. You can adjust TRAK to
compensate for a dominant arm (which most humans have) and keep yourself paddling straight all day.
Flat for straight
speed
Rocker for
maneuverability
and stability
B
7
Every pull on the gunwale jacks adjusts the arc (trim) of your TRAK. Depending on which side you adjust, the boat will pull
in that direction at your command. This technological advancement has its roots in aircraft technology and works on the
same principal as the wing of an airplane.
Increasing the tension on one side will arc the kayak in the opposite direction: the right-side gunwale jack arcs the kayak
to the left, and the left-side gunwale jack arcs the kayak to the right. To increase the arc using a TPS gunwale jack, simply
pull the handle like you would on the keel jack. The more times you pull, the more it adjusts.
Must I adjust each jack to its the maximum to use it?
No. You can incrementally adjust all three jacks to suit the conditions. A few pulls creates minor adjustments. Several pulls
will more signicantly adjust the shape of your TRAK. Release the tension, and TRAK goes back to its ‘normal’ shape.
Can I use the keel and the gunwale jacks at the same time?
Yes. The TPS Jacks can be used in any combination and to any degree, all at the same time. Meaning you do not have
to equalize tension on the other two jacks when you use one. Every pull on a jack after the rst two or three pulls
(remember, the rst few are used to tighten up the PolyTRAK shell) will begin to change the shape either on the keel or
gunwales of the kayak.
For example: you could adjust the left gunwale TPS Jack with 4 pulls, the keel TPS Jack 12 pulls and the right gunwale TPS
Jack 3 pulls. Any combination of the 3 TPS Jacks that gives you the desired hull shape you need for optimum paddling
performance.
Can I over-adjust the jacks and harm my TRAK?
No, but use common sense. It is ok to max out the TPS Jack; nothing bad will happen. The PolyTRAK shell will not burst,
the jacks will not break.
The TPS Jacks have a built-in limit that prevents over-adjustment. As they reach their limit, the pulls will become
increasingly more dicult until nally the handle will be loose and there is nothing left but air. Roughly 20 pulls of a TPS
Jack will max them out. All 3 TPS Jacks can also slide down and out of the way to allow for extra room in the cockpit, the
entire TPS Jack can rotate up or down in the tubes.
Which jack is which?
Doesn’t matter. All three TPS jacks are exactly the same, are interchangeable and work the same way.
What kind of jacks are they?
Each TPS Jack is a self contained hydraulic jack, meaning there is hydraulic uid in the body of the jack. They are well
sealed, rugged and warranty guaranteed!
Straight trim
Adjusted trim
B

8
C
Instructions: from pack to water
TEN-&-IN Portability: 7 steps, 8 pieces, 10 minutes, no joke.
Owning the world’s rst performance folding kayak means that you can enjoy unsurpassed performance,
adaptability, durability and portability. To get the most out of your kayak’s portability, the design team at TRAK
has made the assembly process as quick and easy as possible.
The TRAK kayak is designed to go from pack to water, or back again, in 10 minutes or less. There are only seven
assembly steps to put your kayak together, and only eight separate parts to the kayak. To help you master the
TEN-&-IN assembly, we’ve included a simple “play by play” photo guide to make it even easier.
Yes, it can easily be assembled in ten minutes – even less – but probably not on your rst try.
Follow these instructions. If you have problems, we’re here. If you have suggestions for how we can improve,
we welcome your feedback. Call us at 1.888.35.KAYAK or email sales@RethinkKayak.com.

9
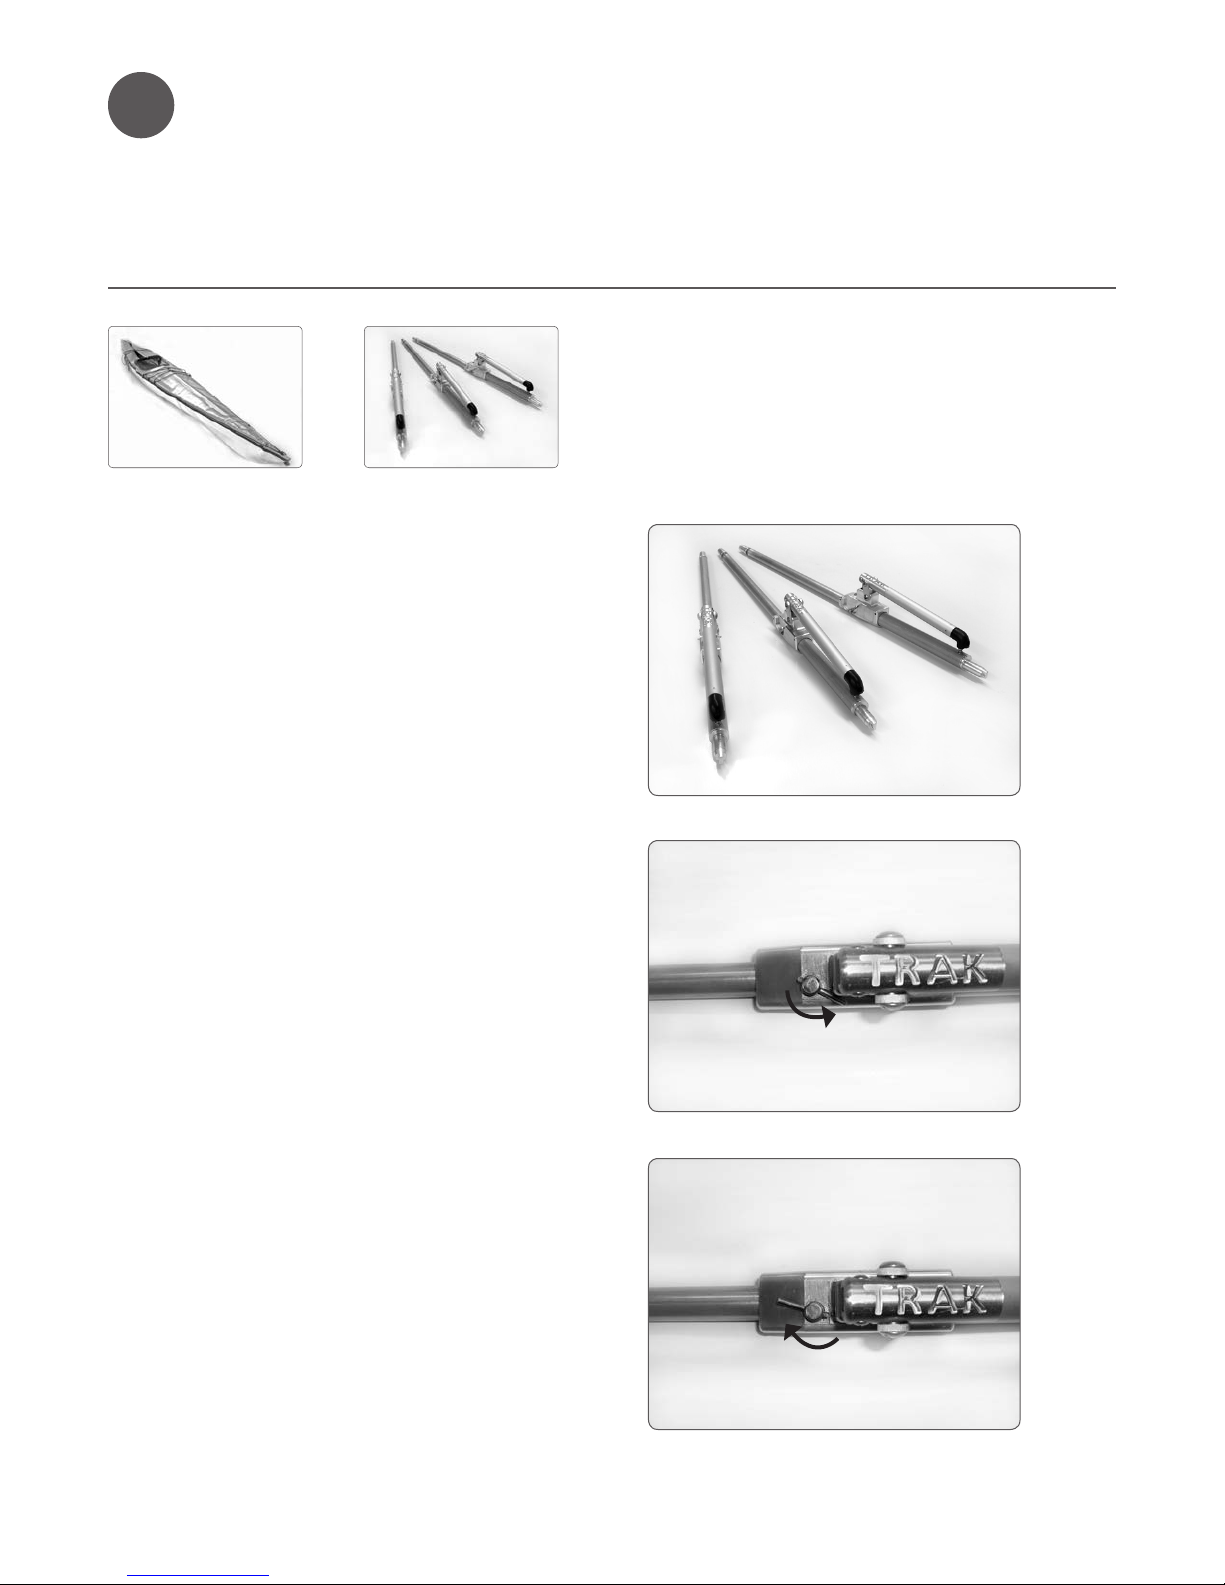
Each half of the frame is completely
connected.
• Youcanstartwitheithertheboworsternsection.
• Allsectionsoftheframeareshockcordedtogether.
• Therearenoloosepiecesontheboworstern
section of the frame.
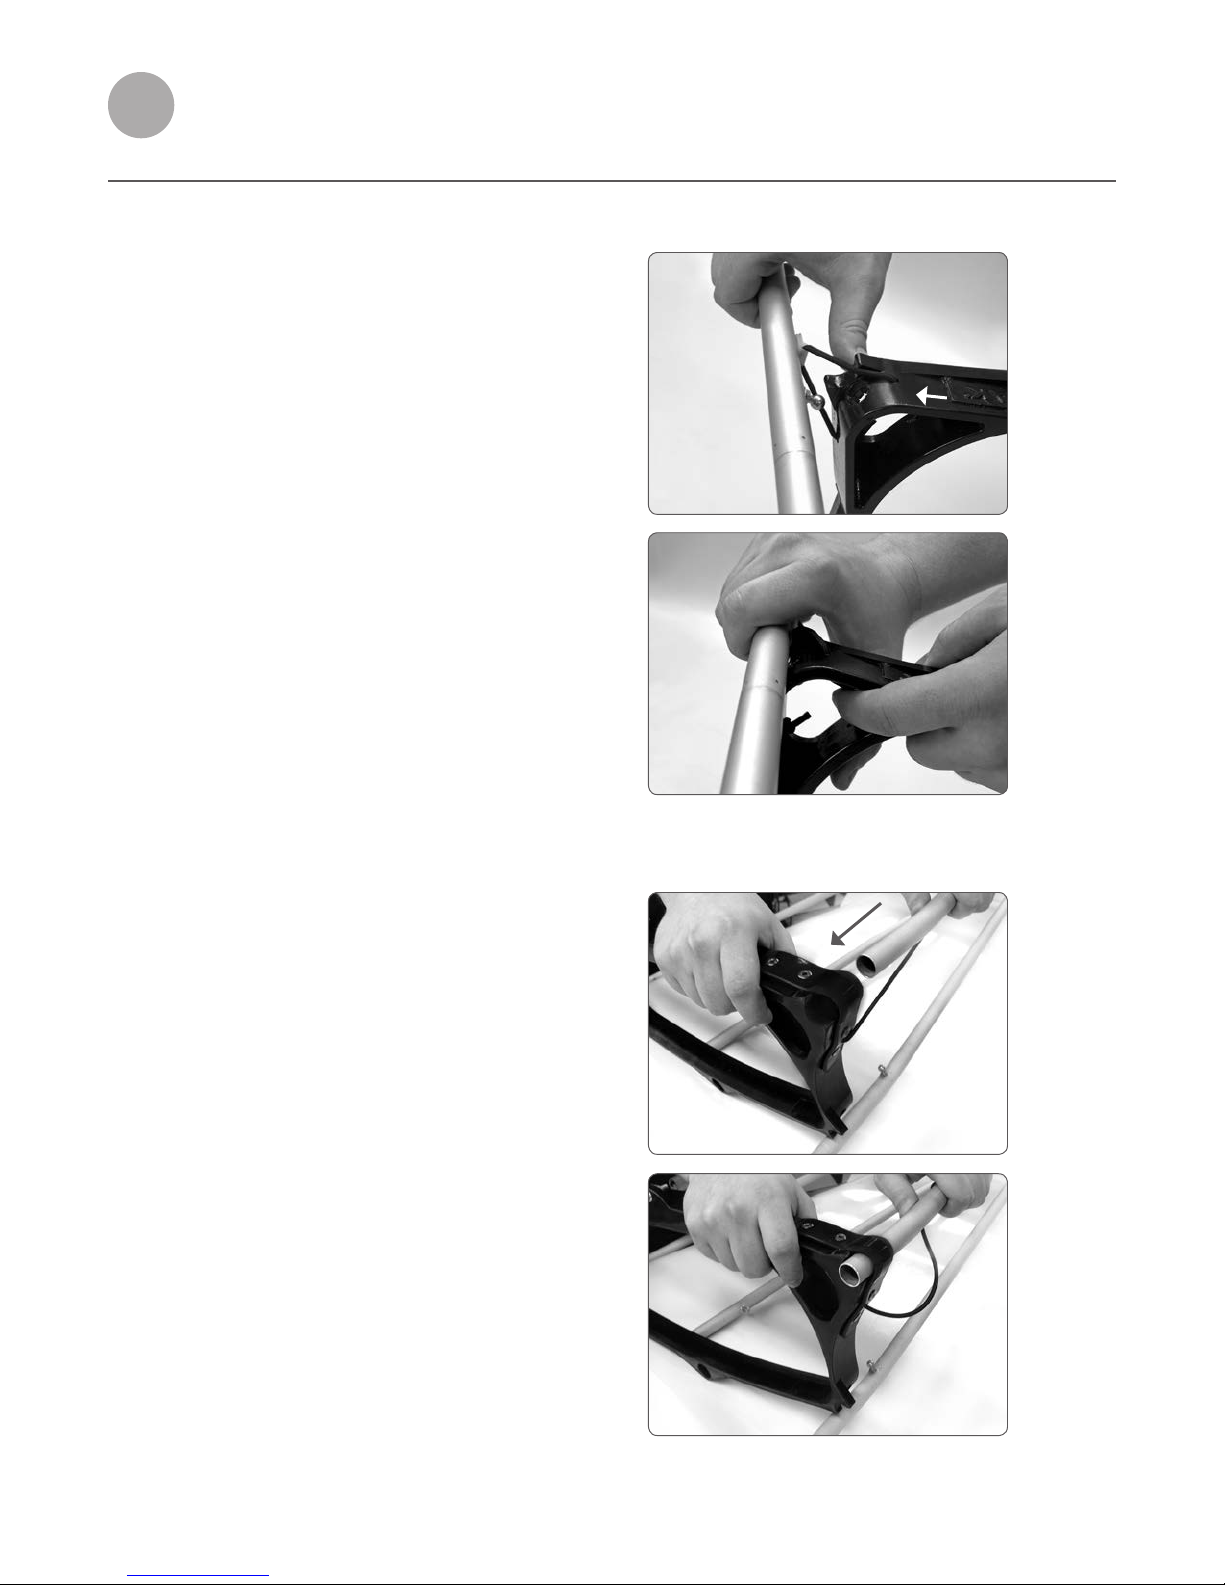
• Onthetopmiddletubeofthebowframeisaspring-
pin.
• PRESSthespring-pinsothatitcanslideunderthe
outer tube.
• ThenMOVEitundertheholeintheoutertubeuntil
it POPS back out into place.
• Thisspring-pinhelpsholdthetubestogether.
Frame assembly: bow and stern sections
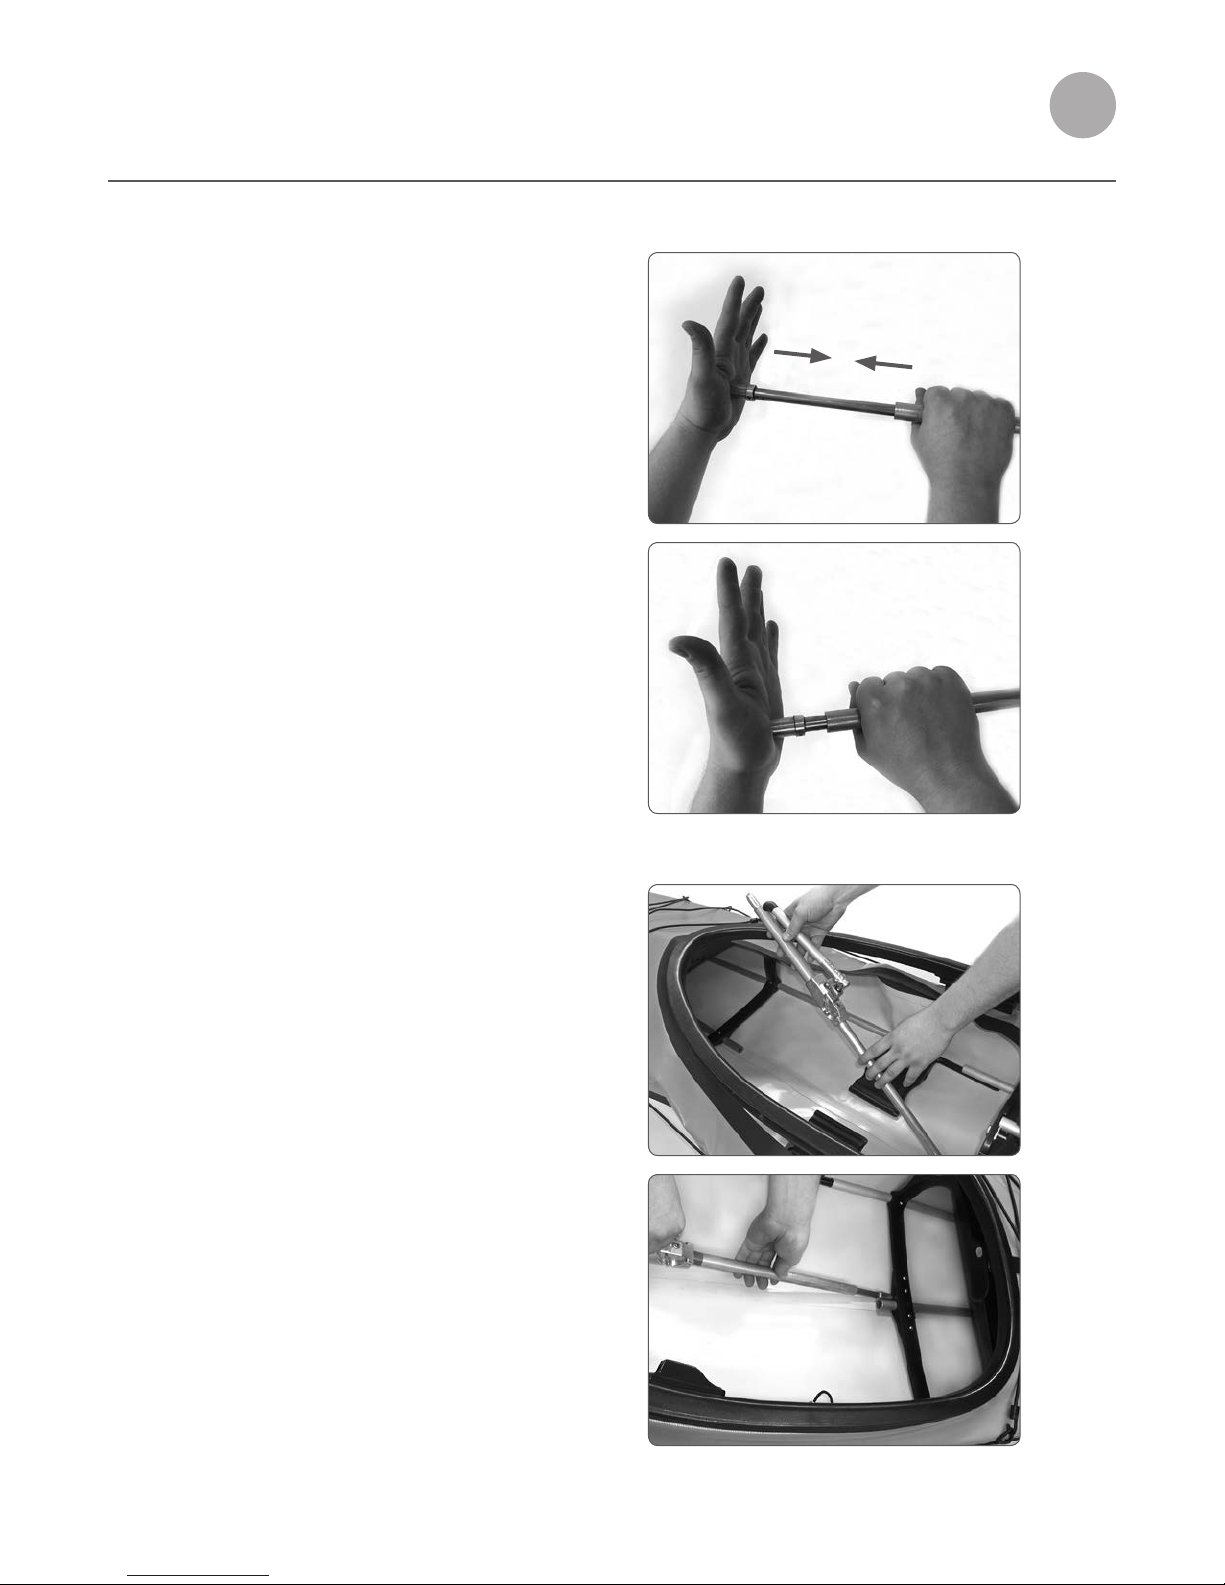
1
“Shake out” the frame to connect tubing.
• HOLDtheframesectionbytheboworsternplate
(black end).
• LIFTitupintheairandsimply“shakeout”each
section of the frame, the poles should begin to
connect themselves.
• CONNECTtherestofthetubingmanually.
NOTE. ..
You can shake out the frame, or you may prefer to
lay the frame on the oor to assemble.
+
10
Connect the ribs to the frames, starting with
the STERN (rear) section.
• Eachframesectionhastworibs.
• Eachribisattachedtotheframewithasingle
bungee. Use this bungee connection as your
starting point.
• STARTwiththeSMALLERriboneachsection.
Connect the smaller rib, starting with the
bungee connected corner.
• PLACEtheballstudsintotheribsasstraightlyas
possible.
• FOLLOW the holes around the rib, PUSHING each
ball stud into its corresponding hole.
NOTE.. .
On the larger rib, the top corner and keel tubes
SLIDE into place instead of using ball studs.
1
Small rib:
ball stud
corners
Connect the larger rib, starting with the
bungee connected corner.
• SLIDEthetopcornertubesandkeel(center)tubes
through the receiving holes in the larger rib.
• Followtherestoftheholesaroundtherib,PUSHING
each ball stud into its corresponding hole.
11
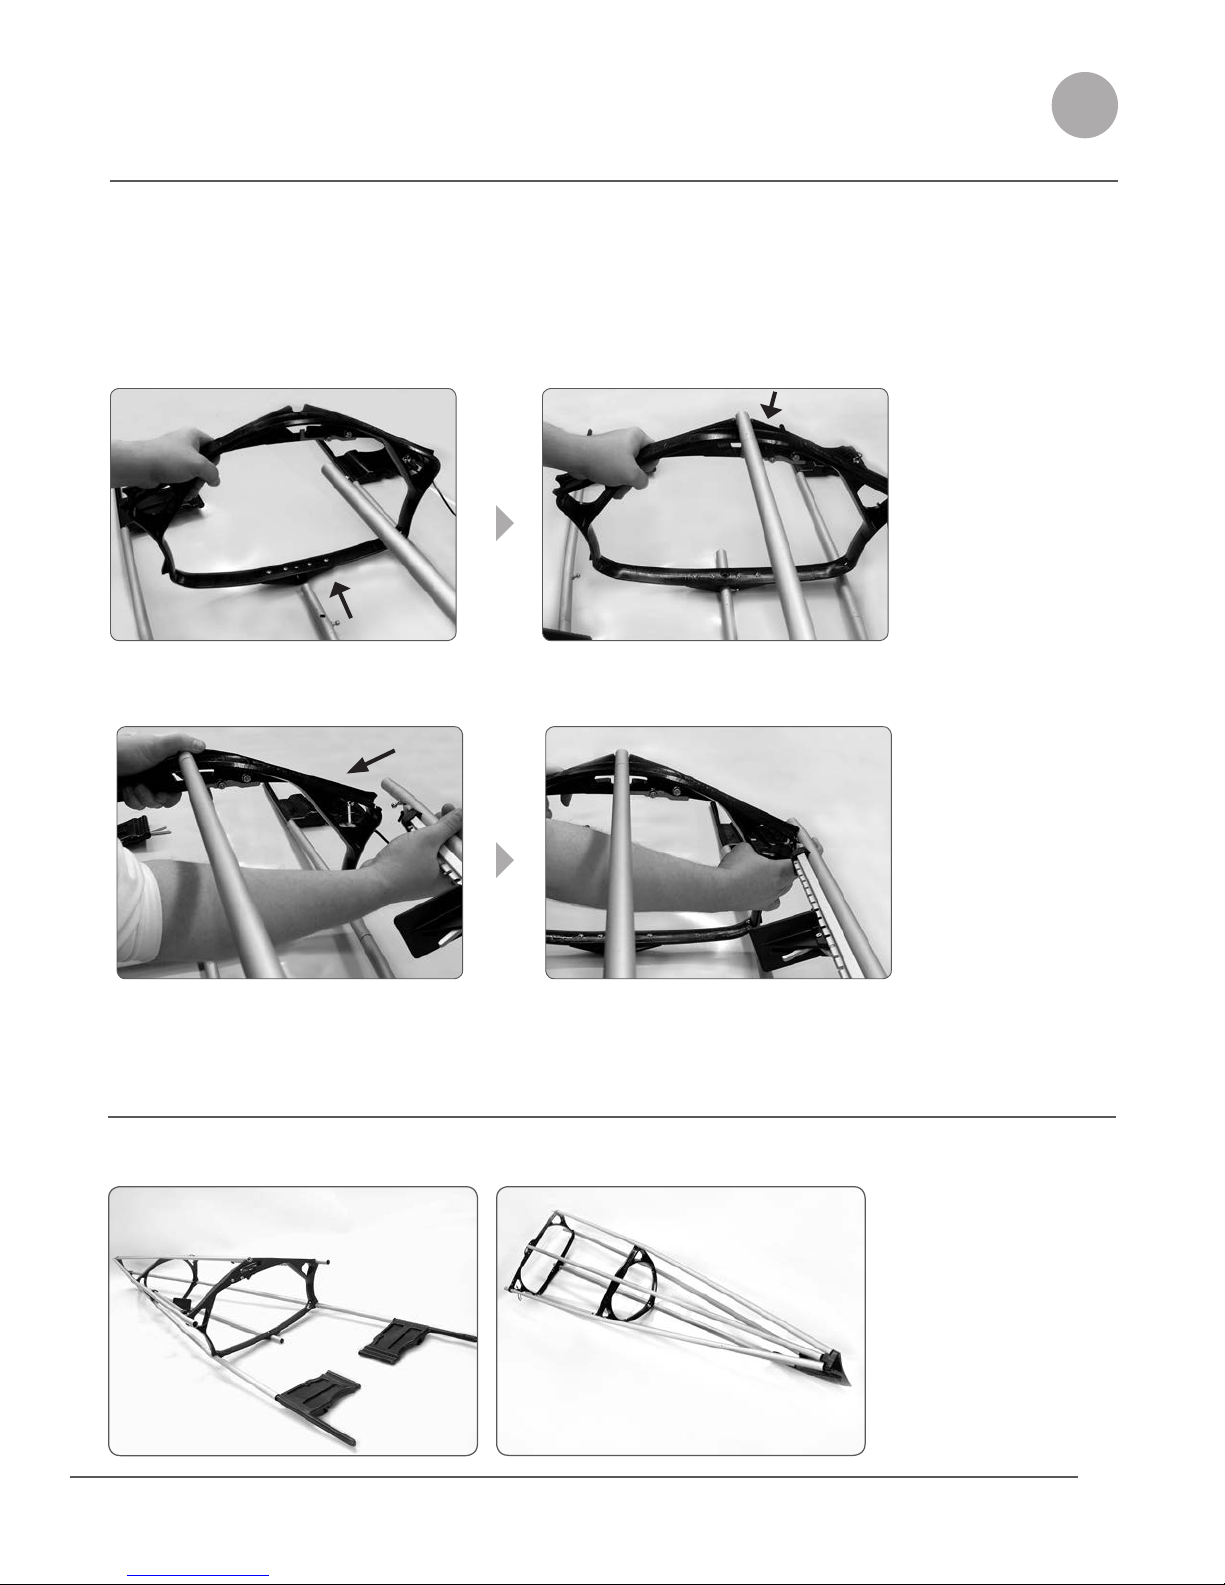
CHECKPOINT: Both sections of the frame are assembled.
Bow section Stern section
Now assemble the BOW (front) section.
• ASSEMBLEsameassternsection,beginningwiththesmallestrib.
• Whenattachingthelargerrib,rstSLIDEthebottomtubeintoplace,pastthespringpin.
1
• ThenATTACHtheballstudsintotheirrespectiveholes.
12
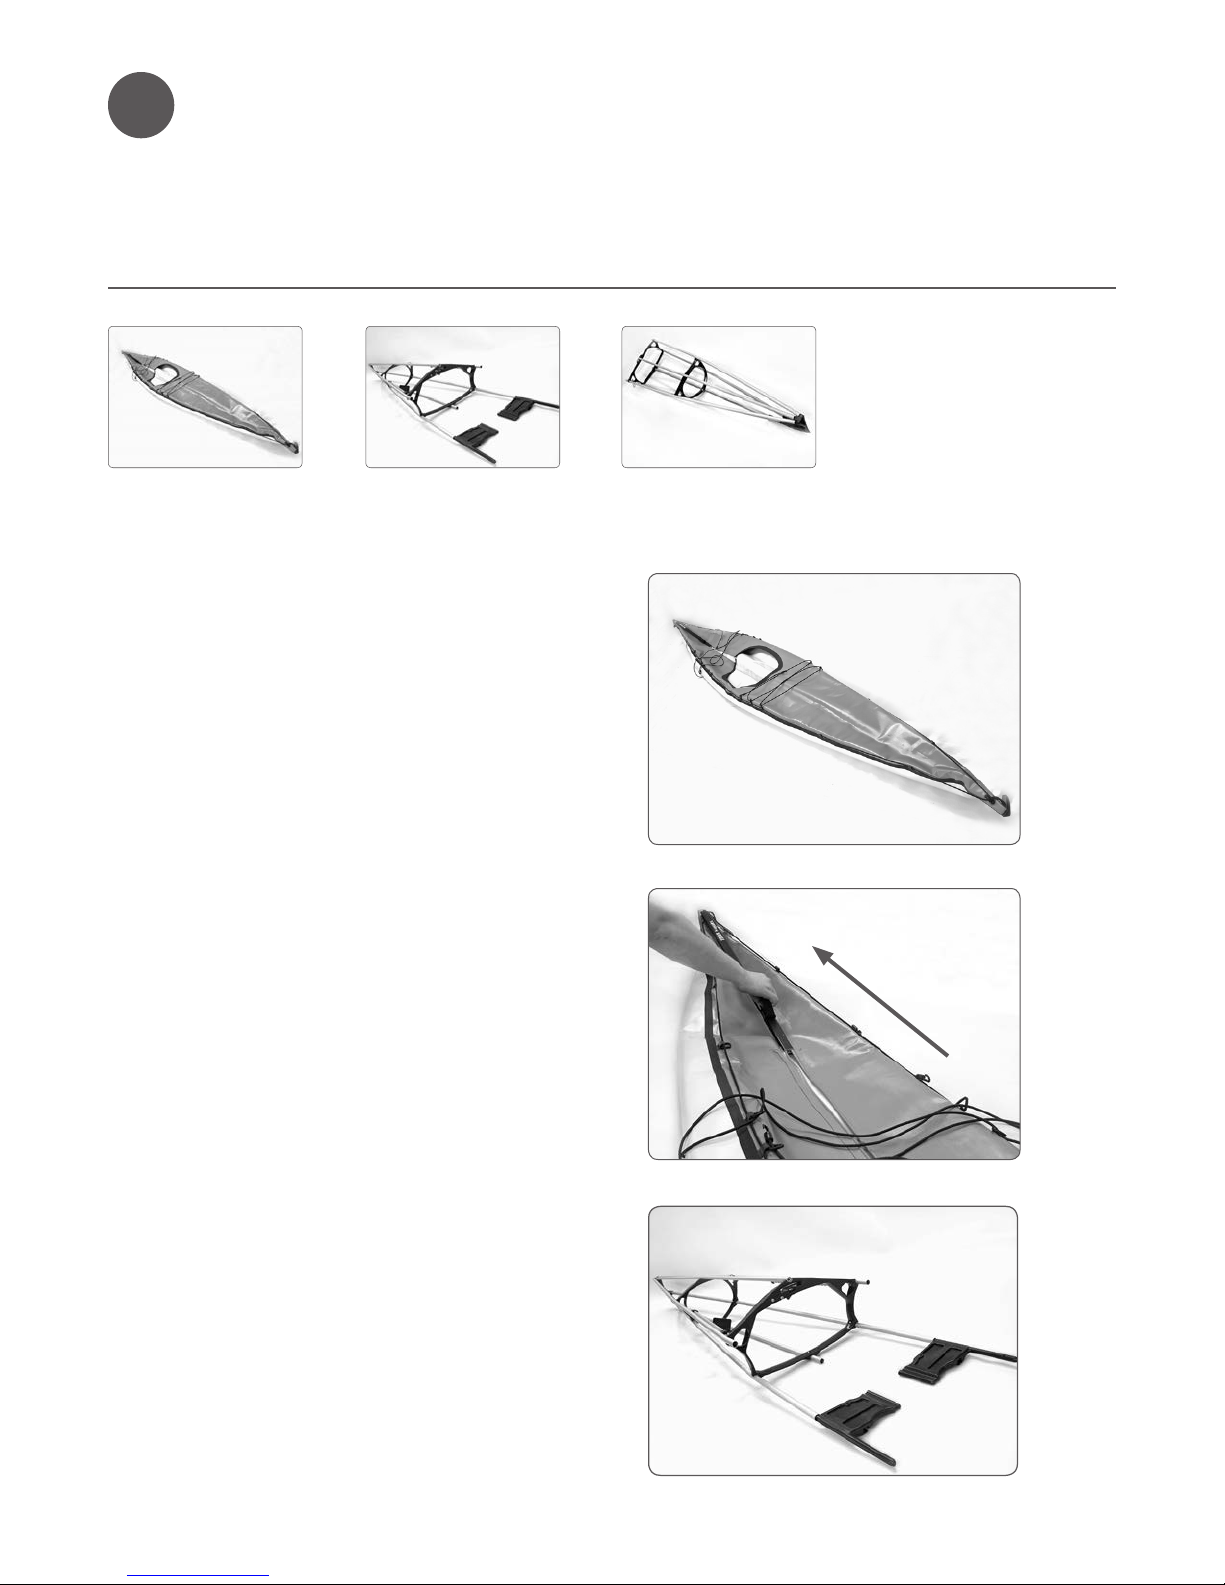
Lay out the shell.
• SPREADOUTtheshell,decksideup
(colored side up).
• TrytoFLATTENouttheshellasmuchaspossible.
2
Open Keder.
• MakesuretheKederisPULLED BACK all the way
towards the tip of the stern (so that the back “aps”
on the shell are accessible).
pull
Insert front frame section (bow) into
the shell.
• Thebowsectionhasthefootbracesandtheseat
pillars attached to it.
• Itisalsothelongerofthetwoframesections.
Insert frames into shell:
bow
stern
+ +
Bow section

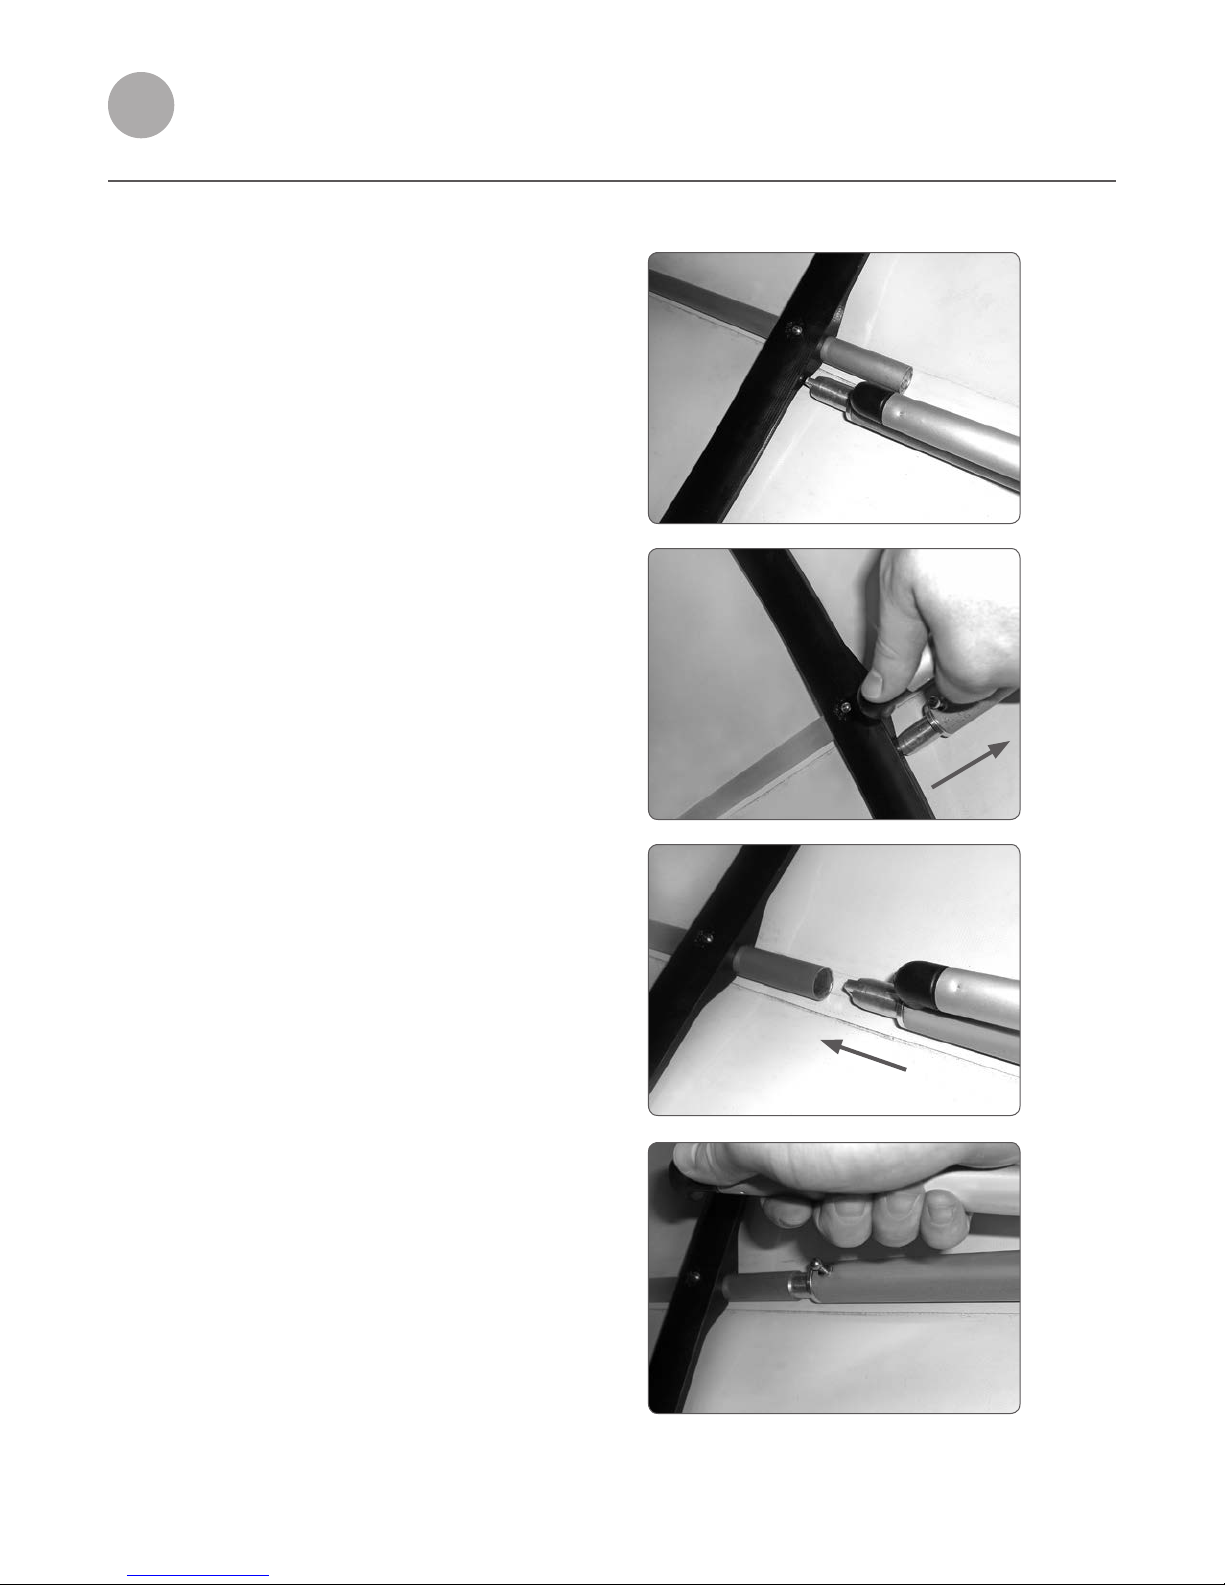
13
2
• FromthecockpitINSERT the bow section into the
shell.
• LINE UP the keel tube (bottom tube) with the inner
keel strip (the center white strip that runs the length
of the bottom of the kayak).
• UseaSLIDE/LIFT motion.
• PUSH the frame in as far in as it will go by bracing
one hand on the shell and the other on the rib.
• PUSH on both top and bottom of the rib
simultaneously.
NOTES...
You may have to straighten out the tip of the shell
midway to allow the frame to slide in easier.
You may want to stand inside the cockpit to push
the frame in.
• Theframewillnotgoallthewayatthispoint.
• LEAVE the end of the top frame tube EXPOSED to
approximately ush with the edge of the skin.
bow
keel strip
14
2
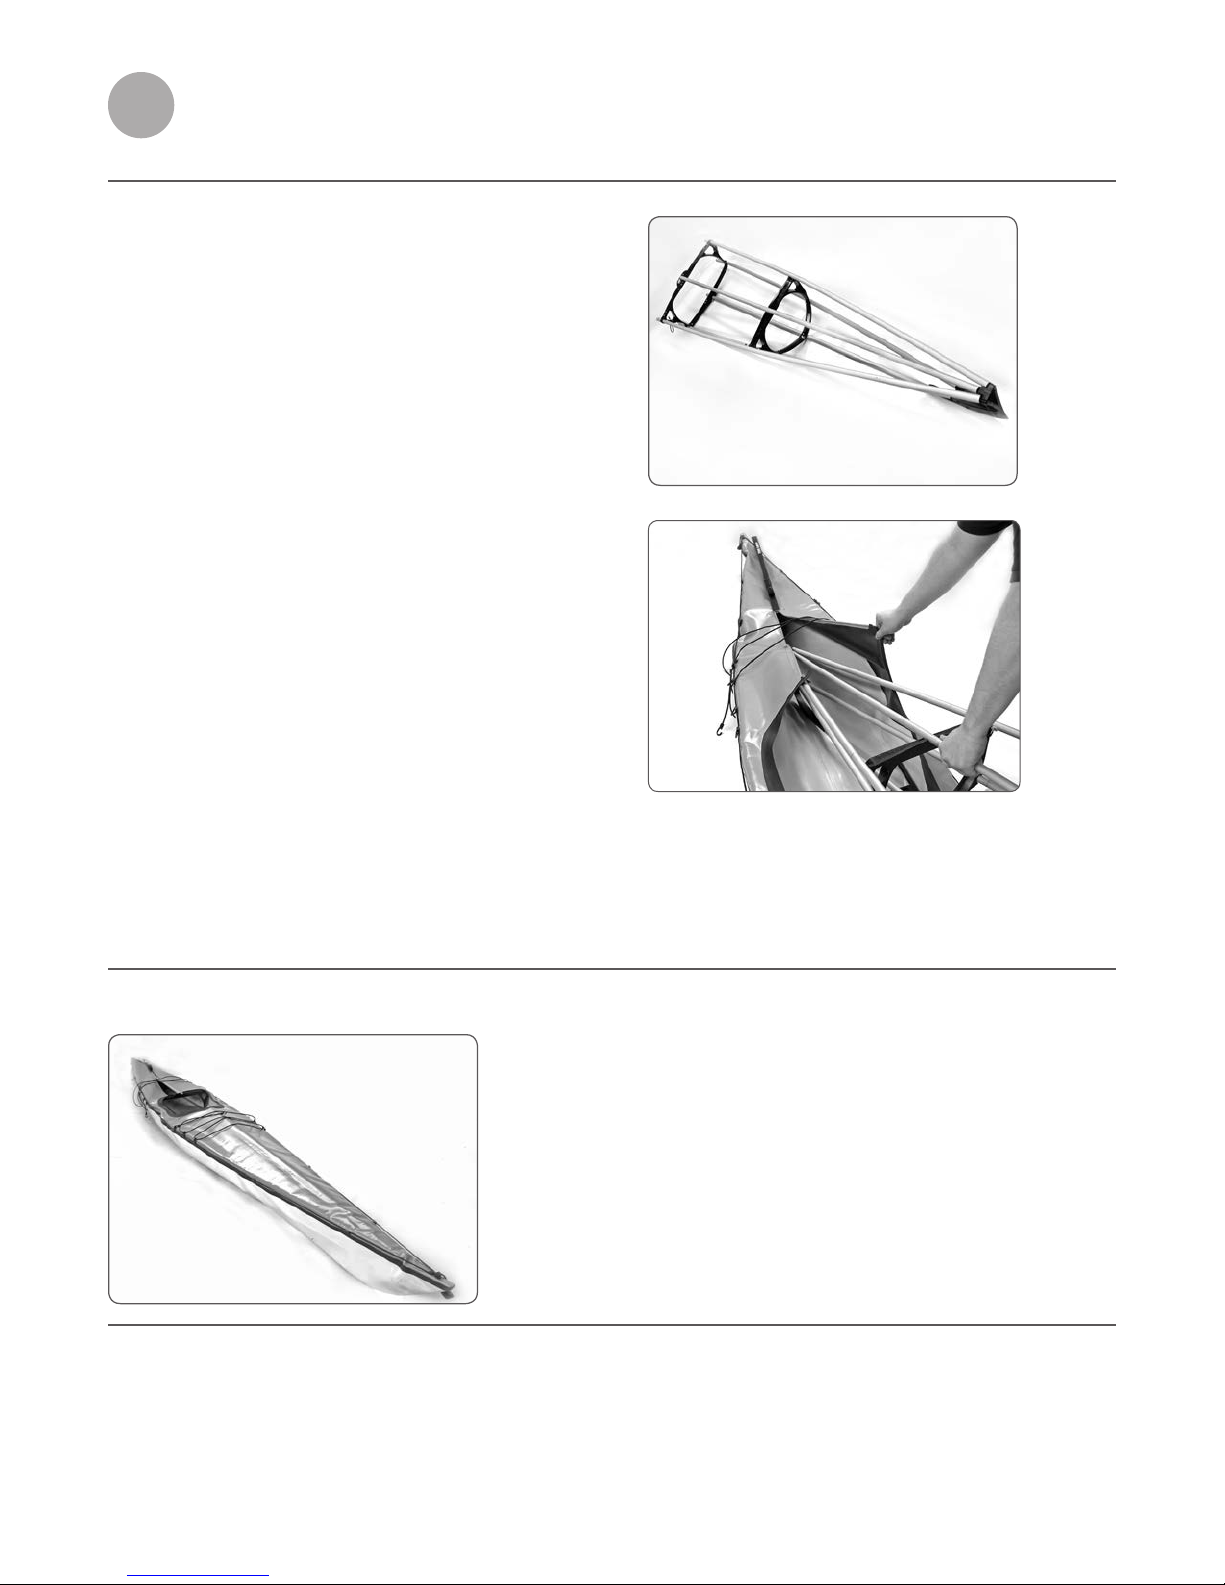
CHECKPOINT: Both sections of the frame are inside the shell but are not connected.
Stern section
Insert back frame section (stern) into
the shell.
• Thesternsectionistheshorterofthetwo.
• INSERT in same manner as bow section.
• Theframewillnotgoallthewayatthispoint.
15
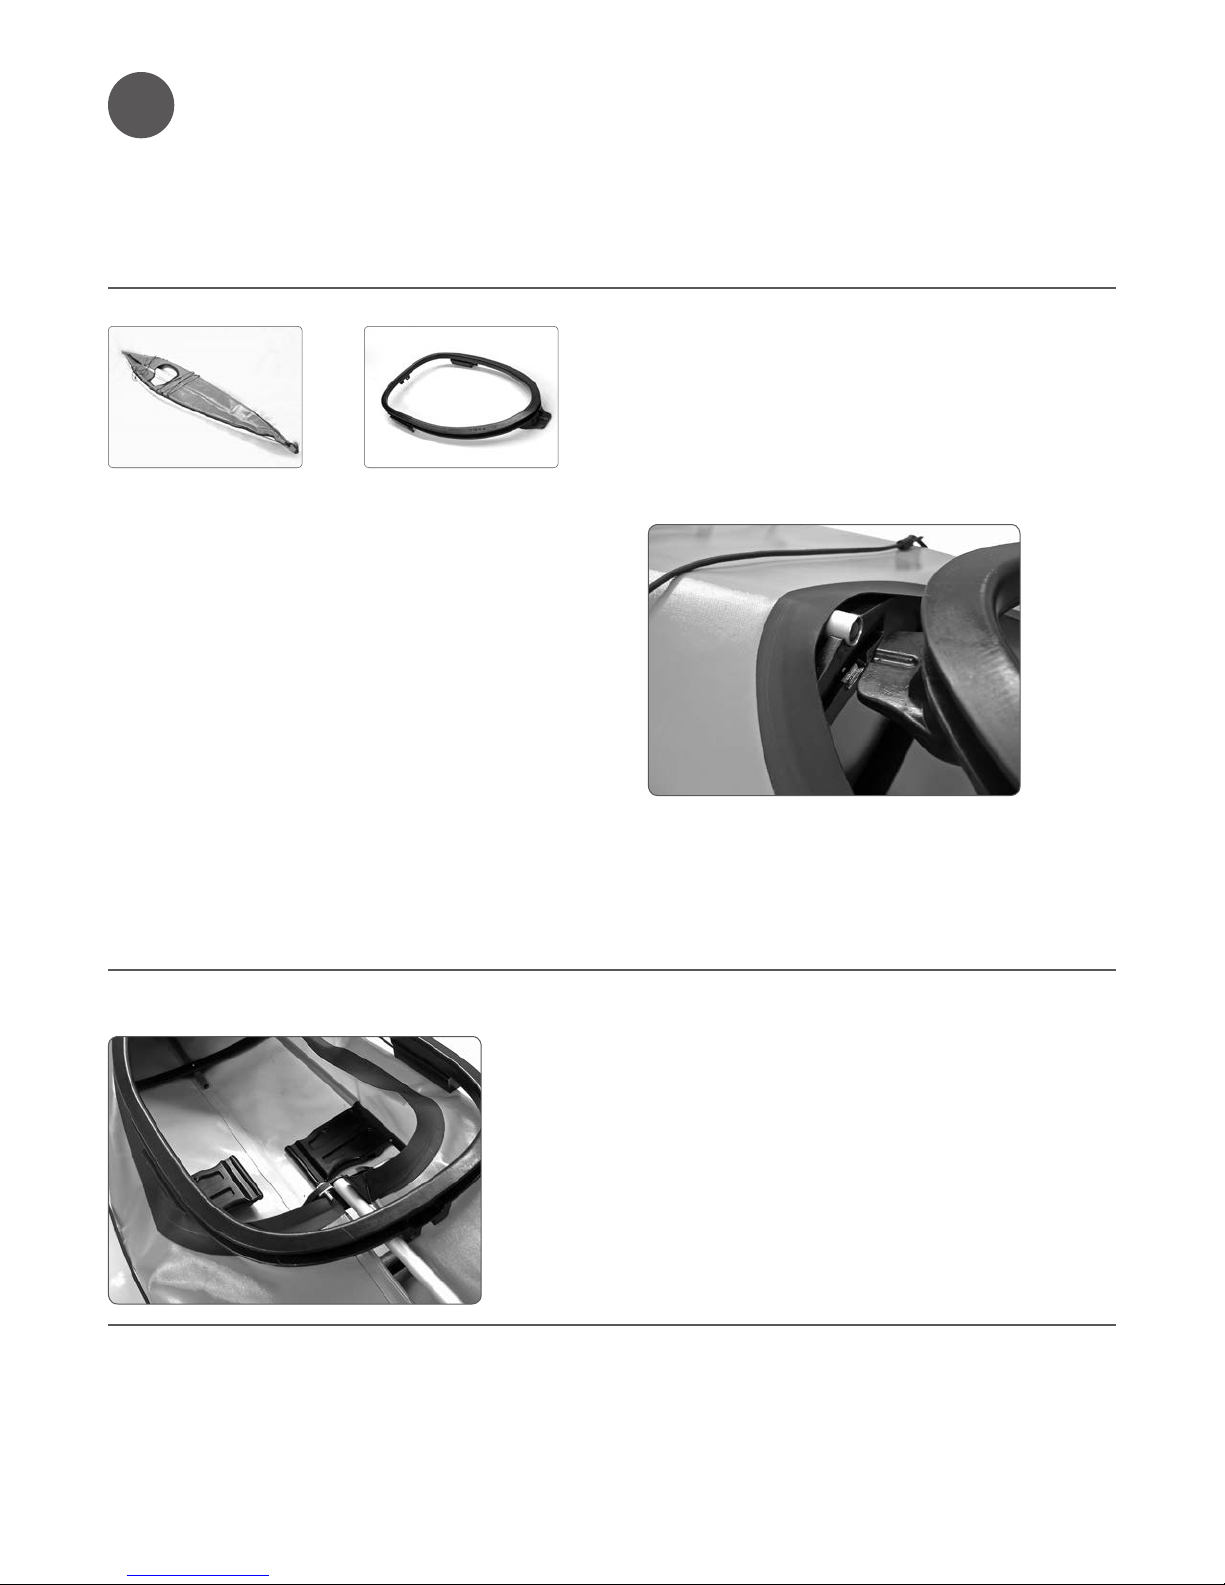
Click the coaming into place.
• HOLD the coaming in one hand with the tip or bill
facing forward toward the front or bow section of
the kayak, and PUSH it into the opening slot on top
of rib.
• Youwillknowitissecureifyoutakeyourhandoit
and it remains in place.
• Thecoamingwillnotappearsecureasitisonly
connected to the front of the frame. It will eventually
REST on the stern section of the kayak at a later step.
• Wrapthecoamingseal(skin)aroundthecoamingso
it is ready to be fully assembled.
3
Connect the coaming:
+
CHECKPOINT: The coaming is secured to the bow section of the frame, resting on the stern.
16
About the TPS system:
• Allthreejacksareexactlythesame,andcanbeused
interchangeably.
4
Inserting the Tri-active Performance System™ (TPS) jacks
+
TPS switch “release” position:
• Ifthejacksareinreleasepositioninsidethekayak,
there will be no tension on the frame.
• Whenthevalveissettorelease(asinthephoto)the
piston can be manually adjusted.
TPS switch “ready” position:
• Whenthevalveissetto“ready”(asinthephoto)the
jack is ready to be used.
• Whenthehandleispulledupward,thepistonwill
extend and this will increase the tension in the
kayak.
Release
Ready
17
4
Before inserting the TPS jacks into the frame:
• Ensureeachvalveisinreleaseposition.
• ThenmanuallyINSERT the extending tube into the
housing.
NOTE:
Practice adjusting the jack switch from Ready to
Release and extending and compressing the jack
piston so you get used to how it works.
Connect the keel (center) jack rst:
• Thejackhandleshouldbefacingtowardthefrontof
the kayak.
Start with the back (stern) end:
• First,PLACEthebackendofthejackAGAINSTtherib
of the stern frame.
NOTE:
Before inserting the jack in the keel tube, you will
simply place it against the ribs and use the jack to
spread the ribs apart. This will then make it easier
to then insert the jack.
18
Insert the jack into the bow end:
• Next,you’llINSERT the front (handle) end of the
centre jack into the bow frame section.
NOTE:
You may not be able to easily spread the frames
apart enough to t the keel jack into place. Don’t
worry! You can let the jack do this for you.
• SimplyPLACE the front tip of the jack against the rib.
• SET the jack switch to READY.
• ThenPULL the jack handle several times. This will
extend the jack and spread the frames apart.
• Whenthejackhasextendedenoughsothatthereis
room to easily maneuver it into the bow keel tube,
SET the jack switch to RELEASE.
• ThensimplyINSERT the front end of the jack into the
keel tube of the bow frame section. And INSERT the
back end of the jack into the keel tube of the stern
frame section.
• SET the jack switch to READY, and PULL it several
times so it extends into the tube.
Note:
The more the handled is pulled, the more tension
is applied to the frame, thus pushing the frame
into the shell and the tightening the coaming seal
around the coaming.
4

19
4
Insert the side (gunwale) TPS jacks:
• Thehandleonthejackshouldbefacingtothefront
of the kayak (the same direction of the keel TPS jack).
• INSERT jack into the gunwale tube.
• Ifitdoesnotslideeasilyorthereisnotenoughroom
to insert it, simply ADD more TENSION to the keel
(center) jack until it ts.
• SWITCH the valve position on the gunwale jack to
READY.
• PULL the handle several times to secure it in place.
• REPEAT on the opposite gunwale.

20
Tuck the coaming seal (shell) into the
coaming grooves:
• Startingatthefrontofthecoaming,TUCK the
coaming seal into the grooves in the coaming, if this
is not already the case.
• Therewillbesomespacebetweenthecoaming
closure seal and the coaming.
4
Other manuals for T-1600
1
Table of contents
Other TRAK Kayaks Boat manuals


