Trane Technologies THERMO KING E-200 Series User manual

Revision B
November 2020 TTKK 6611669944--1188--IIMM--EENN
Vehicle Powered Truck Edition
E-200 Series
Single and Multi Temperature Sy tem
Installation Manual

©2020 Trane Technologie TK 61694-18-IM-EN
Introduction
Thi manual wa written to a i t with the general in tallation of Thermo King®component onto truck de igned and
built for refrigerated application . The TThheerrmmoo KKiinngg IInn ttaallllaattiioonn SSttaannddaarrdd aanndd PPrroocceedduurree GGuuiiddee provide more
detailed information that mu t be followed to afely and properly complete the entire in tallation.
Due to it complexity, you hould not attempt thi in tallation unle you:
• Are an experienced mechanic.
• Can afely lift 34 kilo (75 lb .).
• In the U.S., EPA 608 certified and trained in the repair and maintenance of tran port refrigeration y tem .
• Have a ba ic under tanding of electricity and electrical wiring.
• Have the nece ary tool and equipment to complete the in tallation.
• Have a truck body de igned and built to meet the requirement of thi in tallation.
• Follow all afety precaution outlined in the Thermo King In tallation Standard and Procedure Guide.
Thi manual i publi hed for informational purpo e only. Thermo King make no repre entation warrantie expre
or implied, with re pect to the information recommendation and de cription contained herein. Information provided
hould not be regarded a all-inclu ive or covering all contingencie . If further information i required, Thermo King
Corporation Service Department hould be con ulted.
TThheerrmmoo KKiinngg’’ wwaarrrraannttyy hhaallll nnoott aappppllyy ttoo aannyy eeqquuiippmmeenntt wwhhiicchh hhaa bbeeeenn ““ oo iinn ttaalllleedd,, mmaaiinnttaaiinneedd,, rreeppaaiirreedd
oorr aalltteerreedd aa ,, iinn tthhee mmaannuuffaaccttuurreerr’’ jjuuddggmmeenntt,, ttoo aaffffeecctt iitt iinntteeggrriittyy..””
MMaannuuffaaccttuurreerr sshhaallll hhaavvee nnoo lliiaabbiilliittyy ttoo aannyy ppeerrssoonn oorr eennttiittyy ffoorr aannyy ppeerrssoonnaall iinnjjuurryy,, pprrooppeerrttyy ddaammaaggee oorr aannyy
ootthheerr ddiirreecctt,, iinnddiirreecctt,, ssppeecciiaall,, oorr ccoonnsseeqquueennttiiaall ddaammaaggeess wwhhaattssooeevveerr,, aarriissiinngg oouutt ooff tthhee uussee ooff tthhiiss mmaannuuaall oorr
aannyy iinnffoorrmmaattiioonn,, rreeccoommmmeennddaattiioonnss oorr ddeessccrriippttiioonnss ccoonnttaaiinneedd hheerreeiinn.. TThhee pprroocceedduurreess ddeessccrriibbeedd hheerreeiinn sshhoouulldd
oonnllyy bbee uunnddeerrttaakkeenn bbyy ssuuiittaabbllyy qquuaalliiffiieedd ppeerrssoonnnneell.. FFaaiilluurree ttoo iimmpplleemmeenntt tthheessee pprroocceedduurreess ccoorrrreeccttllyy mmaayy ccaauussee
ddaammaaggee ttoo tthhee TThheerrmmoo KKiinngg uunniitt oorr ootthheerr pprrooppeerrttyy oorr ppeerrssoonnaall iinnjjuurryy..
Revision History
Revision A (07/19) New manual format.
Revision B (11/20) TK Holdover Battery Installation
Custo er Satisfaction Survey
Let your voice be heard!
Your feedback will help improve our manual . The urvey i acce ible through any internet-connected device with a
web brow er.
Scan the Quick Re pon e (QR) code or click or type the web addre http ://tranetechnologie .iad1.qualtric .com/jfe/
form/SV_2octfSHoUJx k6x?Q_CHL=qr&Q_JFE=qdg to complete the urvey.

TK 61694-18-IM-EN 3
SSaaffeettyy PPrreeccaauuttiioonn ............................................................................................................................................................ 55
Danger, Warning, Caution, and Notice . . . . . . . . . . . . . . . . . . . . . . . . . . . . . . . . . . . . . . . . . . . . . . . . . . . . . . . . . . . . 5
Safety Precaution . . . . . . . . . . . . . . . . . . . . . . . . . . . . . . . . . . . . . . . . . . . . . . . . . . . . . . . . . . . . . . . . . . . . . . . . . . . . . . 5
Recover Refrigerant . . . . . . . . . . . . . . . . . . . . . . . . . . . . . . . . . . . . . . . . . . . . . . . . . . . . . . . . . . . . . . . . . . . . . . . . . . . . . 5
RReeqquuiirreedd TTooooll .................................................................................................................................................................... 77
RReeqquuiirreedd SSuuppppoorrtt MMaatteerriiaall ........................................................................................................................................ 99
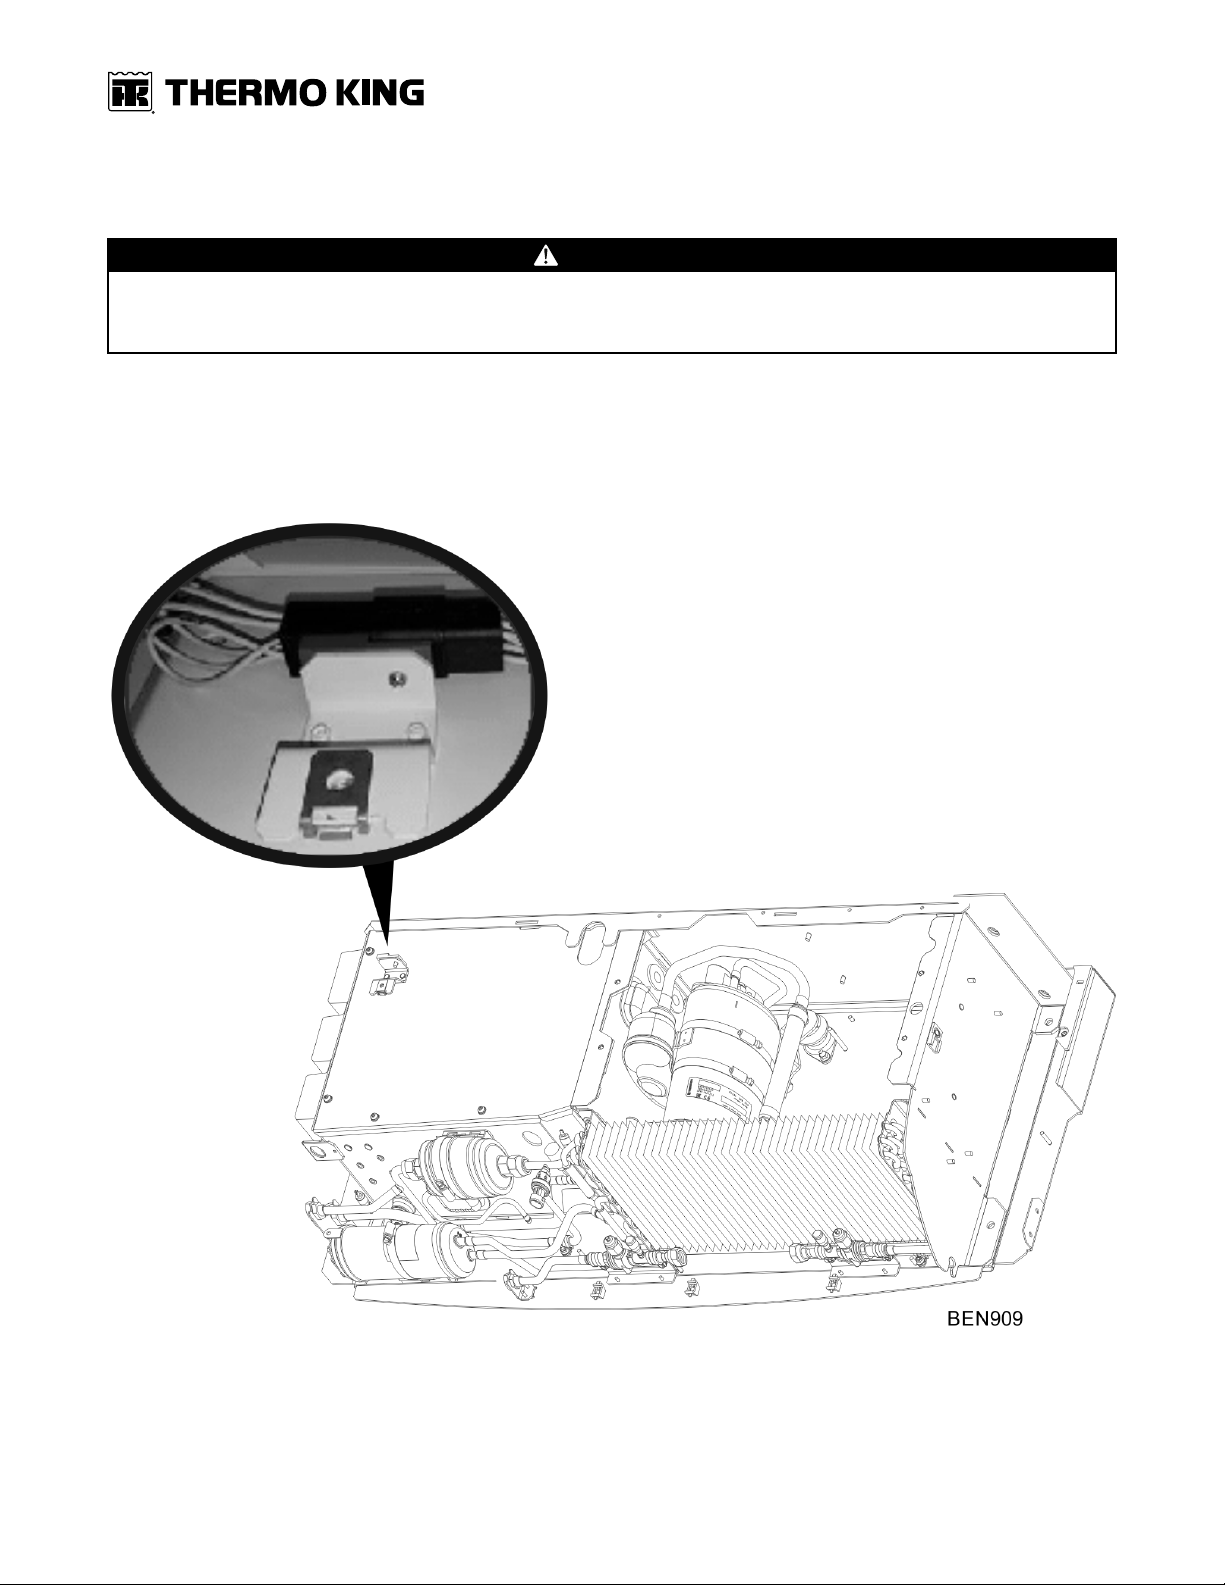
AAuuttoo SSttaarrtt HHaarrdd SSttoopp // DDii aabbllee CCoonnnneeccttoorr.. ........ ........ ............ ........ ........ .. .... .......... .......... .......... ........ ............ .... 1100
PPrreeppaarriinngg CCoonnddeenn eerr ffoorr IInn ttaallllaattiioonn.................................................................................................................... 1111
Cover and Fan Hou ing Removal (All Model ) . . . . . . . . . . . . . . . . . . . . . . . . . . . . . . . . . . . . . . . . . . . . . . . . . . . . 11
Fan Hou ing Modification (No emount In tallation Only) . . . . . . . . . . . . . . . . . . . . . . . . . . . . . . . . . . . . . . . 12
CCoonnddeenn eerr IInn ttaallllaattiioonn.................................................................................................................................................. 1133
EEvvaappoorraattoorr IInn ttaallllaattiioonn .. ........ .......... .......... .......... .......... ........ ............ ........ ........ ............ ........ .......... ............ ........ ........ 1144
HHoo ee CCoonnnneeccttiioonn .. ...... .......... ........ .. .... .......... .......... .......... ........ ............ ........ .......... .......... .......... ........ ............ ........ ........ 1155
IInn ttaalllliinngg tthhee FFiilltteerr DDrriieerr aanndd SSiigghhtt GGllaa .......................................................................................................... 2211
WWiirriinngg CCoonnnneeccttiioonn MMooddeell 2200 && 5500.. .......... ........ .......... .......... ........ ............ ........ .......... ............ ........ ........ ............ .. 2222
IInn ttaalllliinngg tthhee IInn--CCaabb CCoonnttrroolllleerr.... .......... .......... .......... ........ ............ ........ ........ .. .... .......... .......... .......... ........ ............ .. 2244
OOppttiioonnaall DDIINN AAddaappttoorr ((bbyy oorrddeerr oonnllyy)) .................................................................................................................. 2277
TTKK LLiitthhiiuumm IIoonn HHoollddOOvveerr BBaatttteerryy IInn ttaallllaattiioonn.. ........ ............ ........ ........ ............ ........ .. .... .......... ........ ............ .... 2288
TK Lithium Ion Batterie (if equipped) . . . . . . . . . . . . . . . . . . . . . . . . . . . . . . . . . . . . . . . . . . . . . . . . . . . . . . . . . . . 28
1 Battery Option . . . . . . . . . . . . . . . . . . . . . . . . . . . . . . . . . . . . . . . . . . . . . . . . . . . . . . . . . . . . . . . . . . . . . . . . . . . . . . . 28
2 Battery Option . . . . . . . . . . . . . . . . . . . . . . . . . . . . . . . . . . . . . . . . . . . . . . . . . . . . . . . . . . . . . . . . . . . . . . . . . . . . . . . 36
BMS In tallation . . . . . . . . . . . . . . . . . . . . . . . . . . . . . . . . . . . . . . . . . . . . . . . . . . . . . . . . . . . . . . . . . . . . . . . . . . . . . . . 38
TK Lithium Ion Battery Option Configuration and Te ting . . . . . . . . . . . . . . . . . . . . . . . . . . . . . . . . . . . . . . . . . 40
HoldOver Activation . . . . . . . . . . . . . . . . . . . . . . . . . . . . . . . . . . . . . . . . . . . . . . . . . . . . . . . . . . . . . . . . . . . . . . . . 40
HoldOver Te t . . . . . . . . . . . . . . . . . . . . . . . . . . . . . . . . . . . . . . . . . . . . . . . . . . . . . . . . . . . . . . . . . . . . . . . . . . . . . 40
Charging Te t . . . . . . . . . . . . . . . . . . . . . . . . . . . . . . . . . . . . . . . . . . . . . . . . . . . . . . . . . . . . . . . . . . . . . . . . . . . . . . 40
CCoonnnneeccttiinngg ttoo TThhiirrdd PPaarrttyy HHoollddoovveerr BBaatttteerryy OOppttiioonn .................................................................................... 4422
Hold-over Option In tallation Guideline . . . . . . . . . . . . . . . . . . . . . . . . . . . . . . . . . . . . . . . . . . . . . . . . . . . . . . . . . 43
Controller Set-up . . . . . . . . . . . . . . . . . . . . . . . . . . . . . . . . . . . . . . . . . . . . . . . . . . . . . . . . . . . . . . . . . . . . . . . . . . . 43
In tallation Guideline . . . . . . . . . . . . . . . . . . . . . . . . . . . . . . . . . . . . . . . . . . . . . . . . . . . . . . . . . . . . . . . . . . . . . . 43
........................................................................................... 44
SSttaarrtt//SSttoopp FFuunnccttiioonnaalliittyy .. ...... .......... .......... .......... .......... ........ ............ ........ ........ .. .... .......... .......... .......... ........ ............ .. 4455
Concept....................................................................................... 45
Part Required before Starting In tallation . . . . . . . . . . . . . . . . . . . . . . . . . . . . . . . . . . . . . . . . . . . . . . . . . . . . . . . 46
Table of Contents

4TK 61694-18-IM-EN
In tallation Guideline . . . . . . . . . . . . . . . . . . . . . . . . . . . . . . . . . . . . . . . . . . . . . . . . . . . . . . . . . . . . . . . . . . . . . . . . . 47
IInnccrreeaa eedd IIddllee SSppeeeedd SSeettuupp.. ........ ........ ............ ........ .......... .......... .......... ........ ............ ........ .......... .......... .......... .......... 4499
Concept....................................................................................... 49
Part Required before Starting In tallation . . . . . . . . . . . . . . . . . . . . . . . . . . . . . . . . . . . . . . . . . . . . . . . . . . . . . . . 50
In tallation Guideline . . . . . . . . . . . . . . . . . . . . . . . . . . . . . . . . . . . . . . . . . . . . . . . . . . . . . . . . . . . . . . . . . . . . . . . . . 51
VVeehhiiccllee BBaatttteerryy CCoonnnneeccttiioonn ........ .......... .......... .......... ........ ............ ........ .......... .......... .......... .......... .......... ........ ............ 5533
SSttaannddbbyy RReecceeppttaaccllee BBooxx IInn ttaallllaattiioonn ((MMooddeell 2200 aanndd 5500 OOnnllyy)).............................................................. 5544
EEvvaappoorraattoorr DDrraaiinn HHoo ee IInn ttaallllaattiioonn.. .......... ........ .......... .......... ........ ............ ........ .......... ............ ........ ........ ............ .. 5555
ES-100N/ES150 . . . . . . . . . . . . . . . . . . . . . . . . . . . . . . . . . . . . . . . . . . . . . . . . . . . . . . . . . . . . . . . . . . . . . . . . . . . . . . . . 55
CCoommpplleettiinngg tthhee IInn ttaallllaattiioonn.......... ........ ............ .......... ........ ............ ........ ........ ............ ........ .......... .......... .......... .......... 5577
SSuuccttiioonn PPrree uurree RReegguullaattoorr ((SSPPRR)) AAddjjuu ttmmeenntt PPrroocceedduurree -- MMAAXX ...... ............ ........ .......... .......... ...... 5588
DDii cchhaarrggee PPrree uurree RReegguullaattoorr ((DDPPRR)) AAddjjuu ttmmeenntt PPrroocceedduurree -- MMAAXX................................................ 5599
CCoommpprree oorr OOiill AAmmoouunntt aanndd TTyyppee .. .......... .......... ........ ............ ........ ........ ............ ........ .. .... .......... ........ ............ .... 6600
RReeccoommmmeennddeedd RReeffrriiggeerraanntt CChhaarrggee bbyy MMooddeell.................................................................................................. 6611
CCoonnddeenn eerr aanndd EEvvaappoorraattoorr DDiimmeenn iioonn ............................................................................................................ 6622
TTaabbllee ooff CCoonntteenntt

TK 61694-18-IM-EN 5
Safety Precautions
Danger, Warning, Caution, and Notice
Thermo King®recommend that all ervice be performed by a Thermo King dealer and to be aware of everal general
afety practice .
Safety advi orie appear throughout thi manual a required (refer to example below). Your per onal afety and the
proper operation of thi unit depend upon the trict ob ervance of the e precaution .
DDAANNGGEERR
EExxaammppllee!!
IInnddiiccaattee aann iimmmmiinneennttllyy hhaazzaarrddoouu iittuuaattiioonn wwhhiicchh,, iiff nnoott aavvooiiddeedd,, wwiillll rree uulltt iinn ddeeaatthh oorr eerriioouu iinnjjuurryy..
WWAARRNNIINNGG
EExxaammppllee!!
IInnddiiccaattee aa ppootteennttiiaallllyy hhaazzaarrddoouu iittuuaattiioonn wwhhiicchh,, iiff nnoott aavvooiiddeedd,, ccoouulldd rree uulltt iinn ddeeaatthh oorr eerriioouu iinnjjuurryy..
CCAAUUTTIIOONN
EExxaammppllee!!
IInnddiiccaattee aa ppootteennttiiaallllyy hhaazzaarrddoouu iittuuaattiioonn wwhhiicchh,, iiff nnoott aavvooiiddeedd,, ccoouulldd rree uulltt iinn mmiinnoorr oorr mmooddeerraattee iinnjjuurryy aanndd
uunn aaffee pprraaccttiiccee ..
NN TTIICCEE
EExxaammppllee!!
IInnddiiccaattee aa iittuuaattiioonn tthhaatt ccoouulldd rree uulltt iinn eeqquuiippmmeenntt oorr pprrooppeerrttyy--ddaammaaggee oonnllyy aacccciiddeenntt ..
Safety Precautions
IImmppoorrttaanntt:: Additional Safety Precautions must be followed when installing this unit. See “Section 2 - Safety
Precautions” in the Thermo King Vehicle Powered Truck Installation Standards and Procedures Guide (TK
56430).
CCAAUUTTIIOONN
RRii kk ooff IInnjjuurryy!!
TThheerrmmoo KKiinngg ccoonnddeenn eerr uunniitt aanndd rreemmoottee eevvaappoorraattoorr aarree hhiippppeedd wwiitthh aa 3355 kkPPaa ((55 pp ii)) hhoollddiinngg cchhaarrggee ooff
HHeelliiuumm.. BBee ccaarreeffuull wwhheenn rreemmoovviinngg ccaapp.. TThhii hhoollddiinngg cchhaarrggee mmaayy bbee aaffeellyy vveenntteedd iinnttoo tthhee aattmmoo pphheerree..
Recover Refrigerant
At Thermo King®, we recognize the need to pre erve the environment and limit the potential harm to the ozone layer
that can re ult from allowing refrigerant to e cape into the atmo phere.
We trictly adhere to a policy that promote the recovery and limit the lo of refrigerant into the atmo phere.
When working on tran port temperature control y tem , a recovery proce that prevent or minimize refrigerant
lo to the atmo phere i required by law. In addition, ervice per onnel mu t be aware of the appropriate European
Union, National, Federal, State, and/or Local regulation governing the u e of refrigerant and certification of
technician . For additional information on regulation and technician program , contact your local THERMO KING
dealer.
SSeerrvviiccee TTooooll - U e the proper ervice tool . Gauge manifold et hould include appropriate hutoff valve or
di connect near the end of each ervice line.
RReeccoovveerryy EEqquuiippmmeenntt - Recovery equipment mu t be u ed. Proper recovering, toring and recycling of refrigerant i
an important part of all ervice work.

6TK 61694-18-IM-EN
SSeerrvviiccee PPrroocceedduurree - Recommended procedure mu t be u ed to minimize refrigerant lo .
CCoommppoonneenntt mmaayy bbee ii oollaatteedd by clo ing ervice valve and performing y tem pump-down .
CCoommppoonneenntt uunnaabbllee ttoo bbee ii oollaatteedd for ervice mu t be repaired only after refrigerant i properly recovered.
SSaaffeettyy PPrreeccaauuttiioonn

TK 61694-18-IM-EN 7
Required Tools
NNoottee:: Equipment such as scales, gauges, refrigerant leak detectors, and torque wrenches should be in good working
condition and routinely calibrated to assure accurate readings.
Figure 1.
BED760
1. Electric drill 13. Protective gloves 25. Electrical terminal press
2. Set of drill bits 14. File 26. Pincers for hose clips
3. Set of glass-shaped cutters 15. Plastic flanges 27. Gauge manifold
4. Protective goggles 16. Riveter 28. Vacuum pump

8TK 61694-18-IM-EN
5. Adhesive tape 17. Electric connectors 29. Leak detector
6. Measuring tape 18. Electrical wire 30. Nitrogen cylinder
7 Drilling template 19. Voltmeter 31. Refrigerant cylinders
8. Pencil 20. Set of screwdrivers 32. Table-mounted vice
9. Socket wrenches 21. Hose cutters 33. Crane or hoist
10. Fixed wrenches 22. Wire strippers 34. TK refrigerant oil
11. Monkey wrench 23. Wire cutters 35. Open Y wrench
12. Silicone 24. Electric and hand saws 36. Torx Tube Wrench
37. Torque Wrench
RReeqquuiirreedd TTooooll

TK 61694-18-IM-EN 9
Required Support Materials
Plea e have the following upport material to hand prior to tarting your in tallation - a they are li ted a reference
throughout thi manual:
1. Vehicle Powered Truck In tallation Standard and Procedure Guide EMEA - located in Infocentral: Technical
Publication
2. Commercial Brochure for your unit - include weight pecification and applicable unit option : Commercial
Brochure
3. FFoorr MMuullttii--TTeemmppeerraattuurree UUnniitt oonnllyy -Multi-Temperature Configuration Guide

10 TK 61694-18-IM-EN
Auto Start Hard Stop / Disable Connector
DDAANNGGEERR
HHaazzaarrddoouu VVoollttaaggee!!
TTaakkee ccaarree tthhaatt tthhii ccoonnnneeccttoorr ddooee nnoott ddii ccoonnnneecctt tthhee AACC vvoollttaaggee iinnppuutt.. IIff eerrvviiccee ooff tthhee eelleeccttrriiccaall bbooxx ii
rreeqquuiirreedd,, yyoouu MMUUSSTT uunnpplluugg tthhee AACC SShhoorree PPoowweerr bbeeffoorree pprroocceeeeddiinngg..
Thi connector ha the following two main functionalitie :
1. HHaarrdd SSttoopp - thi connector i wired directly to the power relay . When you di connect (unplug thi connector), the
relay and the circuit open immediately topping the unit.
2. DDii aabbllee AAuuttoo ttaarrtt - during unit commi ioning or while any maintenance i being carried out on the unit, and a
power off I needed, i recommended to unplug thi connector. In thi ca e, the power relay remain open and the
machine cannot tart.

TK 61694-18-IM-EN 11
Preparing Condenser for Installation
Cover and Fan Housing Re oval (All Models)
To acce the unit mounting hole :
1. Remove pla tic conden er cover.
2. Remove the fan hou ing a embly. (Remove the fan connector).
3. Remove “Power Off Device” Connector and Electric Box Cover.
4. Mounting hole are now acce ible.

12 TK 61694-18-IM-EN
Fan Housing Modifications (Nose ount Installations Only)
Turn fan hou ing over and u e a hand aw to trim the area hown for refrigeration ho e clearance.
NNoottee:: The fan housing assembly will be reinstalled later.
1. Access for Hoses and Harnesses
PPrreeppaarriinngg CCoonnddeenn eerr ffoorr IInn ttaallllaattiioonn

TK 61694-18-IM-EN 13
Condenser Installation
IImmppoorrttaanntt:: See Section 4 - Unit Installation Standards and Procedures in the Thermo King Vehicle Powered Truck
Installation Standards and Procedures Guide. THESE PR CEDURES MUST BE F LL WED!
NNoottee:: Nose mount and roof top condenser mounting and access hole dimensions can be found at the back of this
manual.
WWAARRNNIINNGG
EEqquuiippmmeenntt DDaammaaggee!!
SSeeaall aallll tthhee hhoollee iinn iiddee tthhee eelleeccttrriicc bbooxx wwhhiicchh aarree nnoott uu eedd ffoorr iinn ttaallllaattiioonn ((ddeeppeennddiinngg nnoo ee mmoouunntt//rrooooff ttoopp))..
OOtthheerrwwii ee wwaatteerr wwiillll ggeett iinnttoo tthhee eelleeccttrriicc bbooxx aanndd ddaammaaggee tthhee ccoommppoonneenntt ..
Figure 2. Condenser Mounting Bolts
1. Mounting holes when unit is mounted on the Front of the Truck (6)
2. Mounting holes when unit is mounted on the Roof of the Truck (6)
T=10
min.
BED760
=12 3 4 5 678
9 10 13

14 TK 61694-18-IM-EN
Evaporator Installation
IImmppoorrttaanntt:: See Section 4 - Unit Installation Standards and Procedures in the Thermo King Vehicle Powered Truck
Installation Standards and Procedures Guide (TK 61588). THESE PR CEDURES MUST BE F LL WED!
NNoottee:: Evaporator mounting hole locations can be found at the back of this manual.
Figure 3. Standard Evaporator (10 and 20 Models) Mini u distance fro cargo wall to rear of evaporator shown.
1. Return Air
2. Discharge Air

TK 61694-18-IM-EN 15
Hose Connections
IImmppoorrttaanntt:: See Section 6 - Refrigerant Hose and Fittings Standards in the Thermo King Vehicle Powered Truck
Installation Standards and Procedures Guide (TK 61588). THESE PR CEDURES MUST BE F LL WED!
CCAAUUTTIIOONN
SSeerrvviiccee PPrroocceedduurree!!
TThhii uunniitt ii uupppplliieedd wwiitthh eerrvviiccee vvaallvvee cclloo eedd.. TThhee IInn ttaalllleerr hhaa ttoo mmoouunntt tthhee ffiilltteerr ddrryyeerr aanndd iigghhtt ggllaa
bbeeffoorree cchhaarrggiinngg tthhee uunniitt wwiitthh rreeffrriiggeerraanntt .. AAfftteerr rreeffrriiggeerraanntt cchhaarrggee,, tthhee eerrvviiccee vvaallvvee hhaallll bbee lleefftt ooppeenn aanndd aa
ttaammppeerr pprrooooff eeaall ffiitttteedd ((aa rreeccoommmmeennddeedd bbyy EENN 337788--22)) ((aavvooiidd rrii kk tthhaatt nnoott--eedduuccaatteedd uu eerr cclloo ee vvaallvvee
ttrraappppiinngg lliiqquuiidd iinn tthhee ddrryyeerr))..

TK 61694-18-IM-EN 17
Legend
1. O-RING (#4, o-ring seal) 7. 90 degree Fitting (straight, #6 fitting, #4 hose)
2. Straight Fitting (female o-ring seal, #4 fitting, #4 hose) 8. O-RING (#10, o-ring seal)
3. O-RING (#6, o-ring seal) 9. 90 degree Fitting (female o-ring seal, #10 fitting, #10 hose)
4. 90 degree Fitting (female o-ring seal, #6 fitting, #6 hose) 10. Hose (Liquid Line) (#4, 50 ft)
5. O-RING (#8, o-ring seal) 11. Hose (Defrost Line) (#6, 50 ft)
6. 90 degree Fitting (female o-ring seal, #8 fitting, #10 hose) 12. Hose (Suction Line) (#10, 50 ft)
HHoo ee CCoonnnneeccttiioonn

18 TK 61694-18-IM-EN
Figure 5. Hose Connection Single Te perature Model 50
Legend
1. O-RING (#4, o-ring seal) 8. Straight Fitting (female o-ring seal, #6 fitting, #8 hose)
2. Straight Fitting (female o-ring seal, #4 fitting, #4 hose) 9. O-RING (#10, o-ring seal)
3. O-RING (#6, o-ring seal) 10. 90 degree Fitting (female o-ring seal, #10 fitting, #10 hose)
4. 90 degree Fitting (female o-ring seal, #6 fitting, #6 hose) 11. Hose (Liquid Line) (#4, 50 ft)
5. O-RING (#8, o-ring seal) 12. Hose (Defrost Line) (#6, 50 ft)
6. 90 degree Fitting (female o-ring seal, #8 fitting, #10 hose) 13. Hose (Suction Line) (#10, 50 ft)
7. 90 degree Fitting (straight, #6 fitting, #4 hose)
HHoo ee CCoonnnneeccttiioonn

TK 61694-18-IM-EN 19
Figure 6. Hose Connection Multi Te perature (2 Zone)
Legend
1. O-RING (#4, o-ring seal) 9. O-RING (#10, o-ring seal)
2. Straight Fitting (female o-ring seal, #4 fitting, #4 hose) 10. EE - splicer (#4)
3. O-RING (#6, o-ring seal) 11. TEE - splicer (#10)
4. 90 degree Fitting (female o-ring seal, #6 fitting, #6 hose) 12. Hose Fitting (straight, #6 hose #8 fitting)
5. O-RING (#8, o-ring seal) 13. Hose (Liquid Line) (#4, 50 ft)
6. 90 degree Fitting (female o-ring seal, #6 fitting, #10 hose) 14. Hose (Defrost Line) (#6, 50 ft)
HHoo ee CCoonnnneeccttiioonn
Other manuals for THERMO KING E-200 Series
1
Table of contents
Other Trane Technologies Refrigerator manuals

Trane Technologies
Trane Technologies Thermo King A Series User manual

Trane Technologies
Trane Technologies Thermo King T-590 Series User manual

Trane Technologies
Trane Technologies Thermo King Precedent C-600 User manual

Trane Technologies
Trane Technologies Thermo King Advancer A360 User manual

Trane Technologies
Trane Technologies Thermo King SLXi DRC User manual