Transistor modeX 3.0 Teacher User manual
ENGLISH ..................................... page 2
DANSK .......................................side 17
NEDERLANDS............................. Pag. 32
NORSK........................................side 47
SVENSKA..................................sidan 62
Manual
3.0
Ordering number
modeX Teacher:
186 19 000
Ordering number
modeX Student:
186 18 900
Teacher/Student/
Charger

2
ENGLISH
Contents
1. modeX system ..................................................... 3
1.2 modeX system microphones and chargers ............... 4
2. Preparing for use ................................................ 5
2.1 Mounting the battery charger (Charger, modeX
Teacher/Student)...................................................... 5
2.2 Charging the teacher and student microphones....... 6
2.3 Replacing the batteries in the teacher and student
microphones ............................................................ 7
2.4 Programming the teacher and student microphones. 8
3. Using the student and teacher microphones. 12
3.1 How to wear the microphones ............................... 12
3.2 Switching on the microphone/speaking ................. 12
3.3 Listening ................................................................ 13
3.4 Connecting external sound sources to the teacher’s
microphone............................................................ 13
4. Troubleshooting................................................ 13
5. Care and safety ................................................. 15
6. Ordering information and accessories ........... 16
7. Technical data.....................................................17
3
ENGLISH
Transmission via FM
Transmission from inductive loop
Inductive loop
modeX Receiver
Loop amplifier
modeX Transmitter
modeX
Student
modeX
Teacher
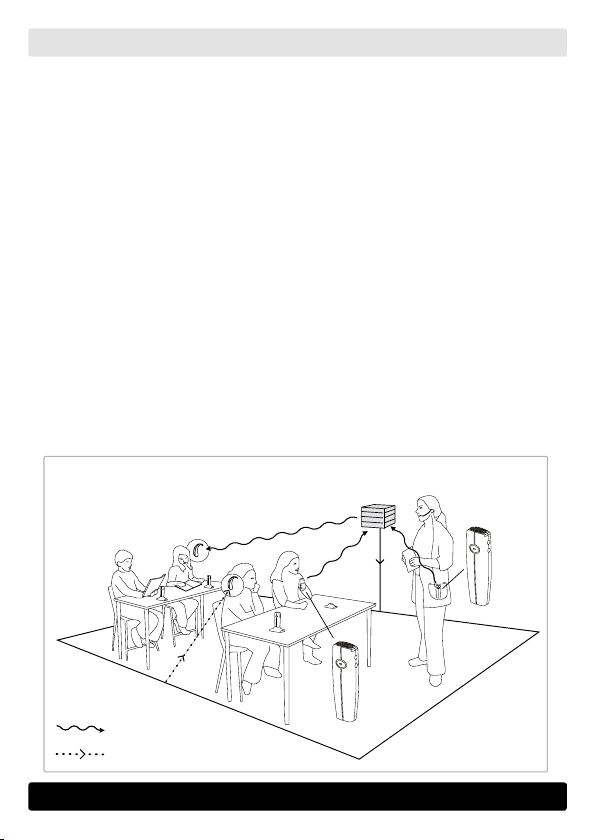
1. modeX system
modeX is a wireless communication system used, for example, when
teaching hard-of-hearing students. The system is compatible with our
earlier school system (the 904 system) and corresponding products
from other manufacturers. modeX works with an inductive loop and
with FM hearing instruments.
With inductive loop: There are two different types of microphones
with transmitters, one for the teacher (modeX Teacher) and one for
the students (modeX Student). The sound from the microphone is
transmitted wirelessly to the fixed modeX Receiver. From there the
sound is passed to a loop amplifier (e.g. Transett 32) and on to the
inductive loop. The teacher’s microphone uses one frequency and the
student microphones use another one. One student can speak at a time.
With FM hearing instruments: As above, but the loop amplifier is replaced
or supplemented by an FM transmitter (modeX Transmitter). If only
one microphone is used, it can transmit the sound directly to the
hearing instrument’s FM receiver.

4
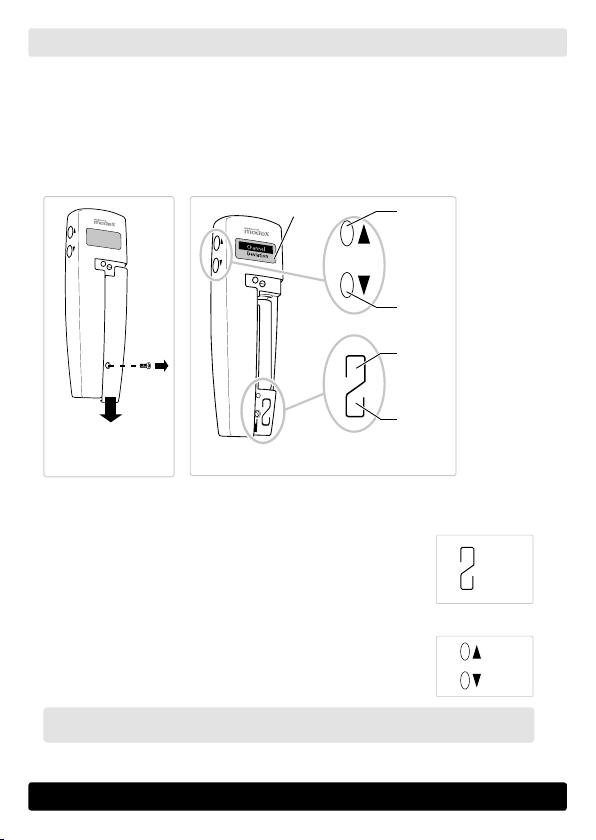
Front of microphone
(modeX Teacher/Student)
UP
button
DOWN
button
LED
Red = low battery
Green = battery OK
On/off
button
Microphone
Battery cover
Input (3.5 mm)
for microphone/antenna/
Line In
Display
• Programming
• Shows channel and
frequency when the
microphone is
switched on
• Battery level
Belt clip
(modeX Teacher
only) BACK button
(for programming)
Battery
SET button
(for programming)
Charging
cable
ENGLISH
Rear of microphone
(modeX Teacher/Student) Under the microphone’s battery
cover (modeX Teacher/Student)
1.2 modeX system microphones and chargers
Teacher’s microphone
(modeX Teacher):
The ON/OFF button is pressed
once to switch the microphone on
or off. When switching on modeX
Teacher the LED will be on for
about 1 minute and thereafter
twinkle once per second. When
switching off modeX Teacher the
blue button should be pressed
down for about one second.
Student microphone
(modeX Student):
The ON/OFF button is spring-
loaded and is held down while
speaking.
5
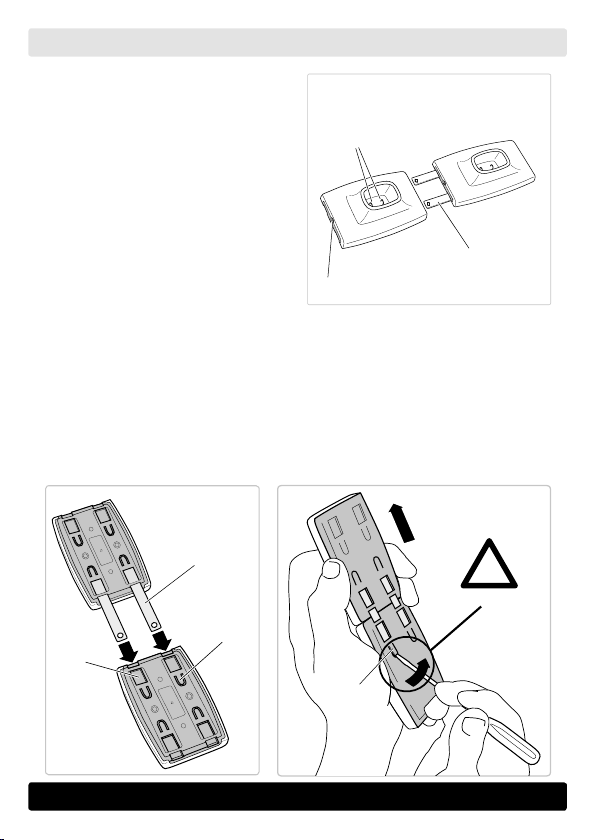
TAKE CARE
Charger
(Charger, modeX Teacher/Student)
6 V input
Charging pins
Contact plates
for connecting the charger
Snap
fastener
Contact plate
Groove
Snap
fastener
ENGLISH
2. Preparing for use
2.1 Mounting the battery charger (Charger, modeX T/S)
Several chargers can be connected and powered by the same power
supply unit (purchased separately, see Accessories). The chargers can be
placed on a table or suspended on the wall.
Charger
(Charger modeX Teacher/
Student):
Used as a charger for the teacher
and student microphones. The mi-
crophones are charged overnight.
Do not use alkaline batteries.
Connecting the chargers Separating the chargers

6
ENGLISH
Connection
for mains
adapter
(6 V).
The microphone can be
turned in the charger.
LED
Red = still charging
Green = fully charged
2.2 Charging the teacher and student microphones
First use – for best battery performance
Make sure that the battery is fully charged the first time it is used.
Charging the battery
The charging time depends
on how discharged the battery
is. A discharged battery takes
12 hours to charge fully. The
microphones can be left in the
chargers even when they are
fully charged. The charging
current is automatically
adjusted for the best battery
performance. The microphone
is switched off automatically
during charging.
Battery level indicator
When the battery is becoming flat the LED on the microphone lights
up/blinks red. A battery level indication is also given in the display.
Natural discharging
If the microphone is not used and is not kept in the battery charger,
the battery may discharge completely after about 30 days (this is
normal). Always keep the microphone in the charger to prevent it from
discharging.

7
ENGLISH
1a. Open the battery
cover
1.
1b. Lift out the battery
with the positive pole
first
1c. Take out the battery
connector
student
2.
2. Insert a new battery in a similar manner (but in reverse order).
2.3 Replacing the batteries in the teacher and
student microphones
The rechargeable battery is equipped with a connector for charging.
1. Take out the old battery:

8
ENGLISH
2.4 Programming the teacher and student microphones
Before the microphones can be put into operation, the channel (Channel)
must be set. The modulation level (Deviation), microphone sensitivity
(Mic Sensitivity) and read-aloud function (Speech key) can also be set.
Programming modes
A) Channel
The microphone and receivers must be set to the same channel so that
they can communicate. Channels close together can interfere with one
another.
Select channel: There are 80 pre-programmed channels to choose between
on channels 20-99. Channels 00-19 do not have a pre-programmed
frequency and can be adjusted as required (see “Change frequency” below).
Select frequency: You can change channels 00-19 to any frequency (in
25 kHz increments). These channels do not work if no frequency value
is selected.
B) Deviation (modulation level)
The deviation can be set to 5 or 15 kHz. The default setting is 15 Hz.
This deviation provides the best sound quality but the risk that dif-
ferent channels will interfere with one another increases with greater
deviation.
NOTE: The deviation for the microphones should be the same as the
deviation for the receiver(s), otherwise the sound received will be dis-
torted. Many hearing instruments with FM receivers have a deviation
of 5 kHz. If the microphones have a higher deviation than the FM
receivers, distortion may be produced.

9
ENGLISH
C) Mic Sensitivity (microphone sensitivity)
The sensitivity does not normally need to be adjusted. But if a person
speaks very loudly or softly, this can be compensated for by reducing or
increasing the microphone sensitivity. The preset value is 0, and it can
be adjusted from -12 to +12 dB. Access the Mic Sensitivity program-
ming mode. Speak into the microphone. Adjust the sensitivity until
the green LED lights up and occasionally blinks red. If the LED is
completely red, the sensitivity should be reduced.
D) Speech key (read-aloud function, modeX Student only)
When the Speech key is activated in programming mode, the student
microphone can be switched on without needing to hold in the push-
to-talk button (see page 11).
E) Side keys (three different function modes for the Up/Down buttons,
only modeX Teacher)
Normal: The Up/Down buttons have no function. This is default.
Speech key: The Up button turns the microphone on. The Down
button turns the microphone off. The function of the blue button is
deactivated.
Volume: The Up button increases the volume of the microphone (the
mic sensitivity) with 3 dB for each press. The down buttton decreases
the volume with 3 dB for each press. The default value is 0 dB. You
can increase and decrease the volume respectively with maximum
6 dB. If the microphone is already set on +12 dB or -12 dB in Mic
Sensitivity, it is not possible to get past these limits with the Up/Down
button.
10
Function of the programming buttons
SET • Takes you to the next level.
• Saves your settings.
BACK • Takes you back a level.
• Quits programming mode.
UP/DOWN • Takes you between programming modes.
• Increases/reduces a value.
SET
BACK
UP
DOWN
IMPORTANT When you have selected a setting, press SET to save.
ENGLISH
Programming buttons
1.
2.
UP
DOWN
SET
BACK
Display
student
Open the
battery cover
Set the microphone to programming mode
1. Open the battery cover.
2. Press the SET button. Channel is shown in the display.
3. Then use the programming buttons to move around the
programming menu (see next page) and change settings.

11
S
B
S
B
S
B
S
B
S
B
S
S
S
B
S
B
S
S
S
Normal mode
(display off)
Programming mode
Save setting and
back to Channel
Set Channel
Deviation
Set Channel
34 173.450
Edit Channel
13 178.000
Channel
Deviation
Save
setting,
back to
Channel
Deviation
5 (kHz)
Mic sensitivity
0 (dB)
kHz
kHzChannel
dB
Deviation
Mic sensitivity
Speech key
Active
Active/Disabled
Mic sensitivity
Speech key
Up a level
Back a level
Save setting
and back to
Deviation
Save setting
and back to
Mic Sensitivity
Save setting
and back to
Speech key
B
Set Channel
Edit Channel
Edit Channel
13 178.000
S
B
B
Back to
normal
mode
B
B
Channel
Deviation
Back to
normal
mode
Back to
normal
mode
Mic sensitivity
Side keys
S
B
Side keys
Normal
SSave setting
and back to
Mic
Sensitivity
* Only
modeX Teacher
Volume
Speech key
Normal
B
Back to
normal
mode
* Only
modeX Student
Programming menu
ENGLISH

12
3. Using the teacher and student microphones
3.1 How to wear the microphones
Teacher’s microphone:
• Can be worn in the pocket/belt together with an external microphone.
• Can be fastened to the top/shirt with a clip (near the mouth).
• Can also be worn round the neck using a neck loop.
NOTE: Do not use the Teacher microphone without antenna/headset
since it will decrease battery time to around three hours.
3.2 Switching on the microphone/speaking
Teacher’s microphone:
Switch on: Gently press the On/Off button. Switch off: Hold in the
On/Off button for about 1 second. The LED goes out.
NB! Check if the function Speech Key is Active (see section 2.4 E).
Student microphone:
Speak: Hold in the On/Off button while speaking. The LED comes
on. One student can speak at a time.
Read-aloud function (Speech key): Activated in programming mode
and means that the student microphone can be switched on without
holding in the On/Off button, e.g. when reading aloud. The button
is then used to switch the microphone on and off. The On/Off button
works as normal.
Built-in antenna: The student microphone has a built-in antenna for
maximum comfort and user friendliness. If interference occurs with
the built-in antenna, this may be due to poor radio reception condi-
tions or the receiver sensitivity may be inadequate. To minimise this
interference, use the external wire antenna supplied.
Student microphone:
• Place it in the table stand for quick and easy access.
ENGLISH

13
ENGLISH
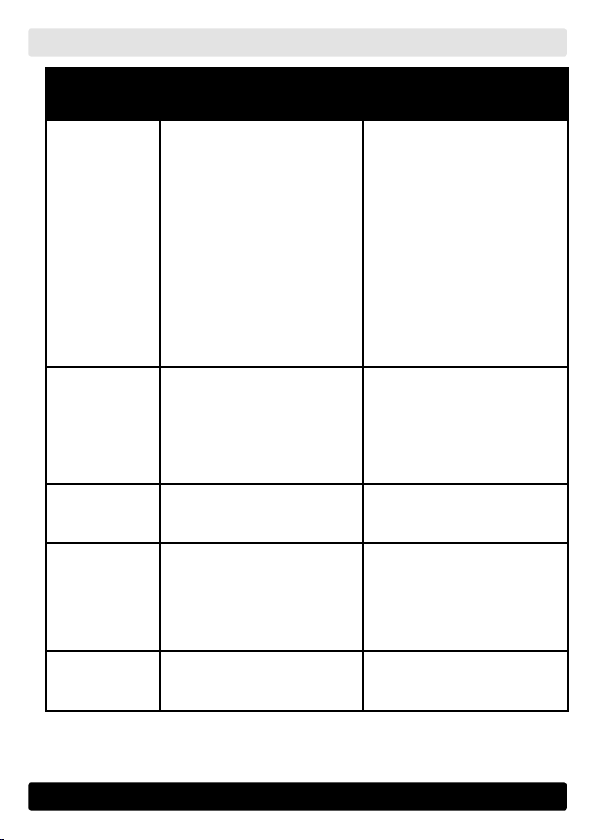
4. Troubleshooting
Type of
fault
Likely cause Action
No sound can
be heard, when
you speak into
the teacher
or student
microphone.
1. The microphone is not
switched on.
2. The microphone is not set
to the same channel as the
receiver.
3. The receiver is not switched
on.
4. The squelch on the receiver
is set too high (so it does
not allow the signal in).
1. Switch on the microphone
(refer to 3.2).
2. Change the channel setting
(refer to 2.4).
3. Switch on the receiver.
4. Adjust the squelch (refer to
receiver user manual).
The sound is
weak when you
speak into the
microphone.
1. The microphone sensitivity
(Mic sensitivity) is set too
low.
2. The receiver’s AF output
level is set too low.
1. Adjust the microphone
sensitivity (refer to 2.4).
2. Refer to the receiver user
manual.
3.3 Listening
Via inductive loop: Set the hearing instrument to the T or MT position.
Via hearing instrument with FM receiver: Set the hearing instrument
to the FM position.
3.4 Connecting external sound sources to the
teacher’s microphone
The teacher’s microphone can be used as a transmitter for external sound
sources such as a DVD/MP3 player, radio/TV etc. The sound source is
then connected to the microphone input on the teacher’s microphone.
14
Type of
fault
Likely cause Action
The sound
quality
is poor.
1. The microphone and
receiver deviations are not
set to the same value.
2. The microphone sensitivity
(Mic sensitivity) is set too
high.
3. Nearby channels are causing
interference.
4. The internal antenna for
the student microphone is
too weak.
5. Several microphones are
being used on the same
channel at the same time.
1. Adjust the deviation on the
microphone (refer to 2.4)
or receiver (refer to receiver
manual).
2. Adjust the microphone
sensitivity (refer to 2.4).
3. Change the channel
settings for the micro-
phone (refer to 2.4) and
receiver (refer to receiver
user manual).
4. Connect the wire antenna.
5. Use only one at a time.
The lamp
does not come
on when the
microphone is
charged.
1. Poor contact between the
microphone and charger.
2. The battery is low.
3. An alkaline battery has
been inserted in the micro-
phone.
1. Clean the contacts at the
bottom of the microphone
and in the charger.
2. Change the battery.
3. Never use alkaline batteries.
The battery
quickly becomes
discharged.
The battery is worn out. Replace with a new battery.
The student
microphone
cannot be
switched on
in read-aloud
mode.
The Speech key has not been
activated. Activate the Speech key (refer
to 2.4).
It is not possible
to change
channels.
The SET button has not
been pressed to confirm the
selection of a channel.
Change channel and press
SET (refer to 2.4).
ENGLISH
15
ENGLISH
5. Care and safety
Cleaning and maintenance
Wipe the outside of the product with a damp cloth. Never use cleaning products
or solvents. From time to time check that the cords and connections are intact.
The rechargeable battery can be completely recharged about 300 times. Refer
to 2.3 for how to change the battery.
Repairs
If your product malfunctions, it must be repaired by a qualified technician.
Do not attempt to open the case of the device since this would invalidate the
warranty. If your product requires service, please contact your hearing care
professional for assistance.
Press down the DOWN button in order to see the serial number and version
number of the microphone on the display.
Waste disposal
This product contains electrical and/or electronic equipment and
must be treated as electronic waste. The product must not be disposed
of in household waste when it reaches the end of its life, but taken to
a recycling point or to the dealer. Please contact your local hearing
care professional concerning disposal of the product.
General precautions
• Low-energy radiation (e.g. from burglar alarms, room surveillance systems,
radio equipment and mobile telephones) is not harmful to the product.
These types of radiation could, however, momentarily affect the sound
quality or create noise in the device.
• If the batteries are inserted incorrectly or the wrong type is used, there is
a risk of them exploding. Only approved rechargeable batteries from AB
Transistor Sweden may be used (see Accessories). For scrapped batteries,
refer to Waste disposal.
• Mains adapter. Only approved mains adapters from AB Transistor Sweden
may be used (see Accessories).
• Never use alkaline batteries.
Any issues relating to the EU Medical Devices Directive
93/42/EEC should be directed to AB Transistor Sweden.

16
ENGLISH
Microphones Part No.
modeX Teacher (battery + antenna supplied) 18619000
modeX Student (battery + antenna supplied) 18618900
Accessories
modeX Receiver (receiver), grey 18619100
modeX Receiver (receiver), white 4120850
modeX Transmitter (FM transmitter), grey 18619400
modeX Transmitter (FM transmitter), white 4120853
Charger, modeX Teacher Student (charger without mains adapter)18619300
PS Universal, modeX (mains adapter, model: GT-41052-1506) 4120875
Battery, 1.2 V, NiMH for modeX (rechargeable battery) 16285100
Mic, Lapel, 1.2 m, 3.5 mm inv. (lapel microphone) 4110330
Mic, 3-in-1 for 904 & modeX (adjustable microphone) 4110339
Mic, behind the ears, 904 & modeX (headset microphone) 4110344
Mic, single-ear, modeX (microphone for one ear) 4120873
Neck Hook, modeX (neck loop) 4140270
Stand, modeX Student (table stand) 18619200
Antenna, wire, modeX Teacher/Student (wire antenna) 4120858
Charger steel 2 (charger stands for two chargers) 4120882
Charger steel 5 (charger stands for up to five chargers) 4120883
6. Ordering information and accessories

17
ENGLISH
7. Technical data
modeX Teacher/Student
Radio frequency: 168-218 MHz.
Output power: 2-10 dBm ERP.
Deviation: ± 5, 15 kHz.
Type of modulation: FM.
Frequency range: 250-20 000 Hz.
Distortion: < 1 % THD.
Microphone/antenna input: 3.5 mm stereo jack (casing: signal earth/
antenna, intermediate ring: signal, tip: not used).
Power source: Rechargeable NiMH batteries. (Duracell,
1.2 V, AAA)
Charging time: 12 hours maximum.
Operating time: Ca 8 hours with antenna/headset, ca 3 hours
with built-in antenna.
Microphone type: Built-in round omnidirectional electret
microphone, with volume control.
Switches: modeX Student: Spring-loaded.
modeX Teacher: On/Off.
Level limiter/AGC: Strong sound signals are reduced to avoid
overmodulation.
Signal/noise: > 60 dB at 15 kHz deviation.
Preset channels: See www.transistor.se , modeX manuals for
channel 20-99 etc.
Dimensions: 35 x 20 x 105 mm.
Weight: 50 g, including battery.
Charger, modeX Teacher/Student
Dimensions: 81 x 54 x 28 mm.

18
DANSK
Indholdsfortegnelse
1. modeX-systemet ............................................... 19
1.2 modeX-systemets mikrofoner og oplader............... 20
2. Forberedelse til brug ........................................ 21
2.1 Montering af batteriopladeren (Charger, modeX
Teacher/Student) ................................................... 21
2.2 Opladning af lærer- og elevmikrofonerne............... 22
2.3 Udskiftning af batteri på lærer- og elevmikrofonerne. 23
2.4 Programmering af lærer- og elevmikrofonerne....... 24
3. Anvendelse af elev- og lærermikrofonerne... 27
3.1 Sådan bærer man mikrofonerne............................. 27
3.2 Tænde for mikrofonen / tale................................... 27
3.3 Lytte....................................................................... 28
3.4 Tilslutning af eksterne lydkilder til lærermikrofonen . 28
4. Fejlsøgning ........................................................ 28
5. Pleje og sikkerhed............................................. 30
6. Bestillingsinformation og tilbehør ................. 31
7. Tekniske data..................................................... 32

19
DANSK
Overførsel via FM
Overførsel fra teleslynge
Teleslynge
modeX Receiver
Slyngeforstærker
modeX Transmitter
modeX
Student
modeX
Teacher
1. modeX-systemet
modeX er et trådløst kommunikationssystem til f.eks. undervisning af
hørehæmmede. Systemet er kompatibelt med vores tidligere skolesy-
stem (904-systemet) og tilsvarende produkter fra andre producenter.
modeX fungerer både med teleslynge og med FM-høreapparater.
Med teleslynge: Der findes to forskellige typer mikrofoner med sender,
en til læreren (modeX Teacher) og en til eleverne (modeX Student).
Lyden fra mikrofonen overføres trådløst til den stationære modtager
modeX Receiver. Derfra går lyden til en slyngeforstærker (f.eks.
Transett 32) og videre ud i teleslyngen. Lærermikrofonen benytter én
frekvens og elevmikrofonerne en anden. Én elev kan tale ad gangen.
Med FM-høreapparater: Som ovenfor, men slyngeforstærkeren udskiftes
eller suppleres med en FM-sender (modeX Transmitter). Hvis der kun
benyttes en mikrofon, kan denne sende lyden direkte til høreappara-
tets FM-modtager.

20
DANSK
Forside af mikrofon
(modeX Teacher/Student)
knap
OP
knap
NED
Lysdiode
Rød = svagt batteri
Grøn = batteri OK
Til/fra-
knap
Mikrofon
Batteridæksel
Indgang (3,5 mm)
til mikrofon/antenne/
Line in
Display
• Programmering
• Viser kanal og frek-
vens, når mikrofonen
er slået til
• Batteriniveau
Bælteclip
(kun modeX Teacher) Knap BACK
(til programmering)
Batteri
Knap SET
(til programmering)
Opladnings-
kabel
1.2 modeX-systemets mikrofoner og oplader
Lærermikrofonen
(modeX Teacher):
TIL/FRA-knappen trykkes ind
én gang for at tænde/slukke for
mikrofonen. Når man tænder
for modeX Teacher vil lysdioden
lyse i ca. ét minut og derefter
blinke én gang/sekund. Når
man slukker for modeX Teacher
skal den blå knap holdes inde i
ca ét sekund.
Elevmikrofonen
(modeX Student):
TIL/FRA-knappen er fjeder-
belastet og holdes trykket ind,
mens man taler.
Bagside af mikrofon
(modeX Teacher/Student)
Under mikrofonens batteridæksel
(modeX Teacher/Student)
This manual suits for next models
3
Table of contents
Languages:
Other Transistor Microphone System manuals


