Transonic TC-29E9TV User manual

6PR6-E259
29 inch Colour Television
Instruction Manual
Model TC-29E9TV
Please read theseinstructions carefully andretain for futurereference.

-1-
Help line
For assistance during normal working hours 9am-5pm, Mon-Fri, New Zealand local time
call Oriental Pacific International Ltd.
NZ call: 0800 89 85 80
Email:
SYMBOLS
The graphic symbols used in this manual or on the back cover of the set
mean the following:
Read this manual in full before use.
Class II Double insulated Appliance
The lightning flash symbol is intended to alert the user to the
enclosures that contain hazardous voltages.
The exclamation symbol is intended to alert the user to the
presence of important operating and maintenance (servicing)
instructions in the literature accompanying the appliance.

-2-
IMPORTANT SAFEGUARDS
When using any electrical apparatus always observe safety regulations
and use basic safety precautions to reduce the risk of fire, electric
shock and personal injury, including the following
Read, Keep and Follow these instructions, heeding all Warnings.
WARNING! Do not remove any cover.
WARNING! No objects filled with liquid, such as vases, shall be placed on this
equipment or in any position where liquid may fall into this equipment or any other
electrical apparatus.
WARNING! Do not insert any objects into any openings of this equipment or any
other electrical apparatus.
WARNING! Do not use this apparatus near water. To avoid the risk of fire or electric
shock, do not expose this apparatus to rain or moisture. The apparatus shall not be
exposed to dripping or splashes and is strictly for indoor use only.
WARNING! Do not immerse in any liquid whilst in use or cleaning. Clean only with a
damp cloth, dry with a dry towel. Do not use harsh abrasives as these may damage
the plastic parts.
WARNING! DO NOT block any ventilation openings. Keep away from curtains,
newspapers and restricted areas. Install in accordance with any specific
Manufacturer's instructions. Always allow a sufficient gap around the apparatus to
avoid overheating.
WARNING! Do not install near any heat sources such as radiators, gas heaters,
stoves or other apparatus (including amplifiers) that produce heat. Do not leave in
direct sunlight.
WARNING! Do not place any naked flame source, such as lighted candles on any
electrical apparatus.
WARNING! Connect to a suitable 230-240V ~ 50 Hz power supply only.
WARNING! Keep out of reach of young children. This apparatus is not suitable for
use by young children or infirm persons without supervision. Young children must be
supervised to ensure that they do not play with the apparatus. Ensure young children
have enough knowledge to operate the equipment safely if they do have access to
this equipment.
WARNING! Do not abuse or damage a power cord. If any power cord is damaged,
the manufacturer, its service agent or a similarly qualified person in order to avoid a
hazard, must replace it. A replaceable cord must be replaced with an authorised
replacement from an authorised service agent only.
WARNING! Only use attachments/accessories specified by the manufacturer.
WARNING! Unplug completely from the power source this apparatus during
lightening storms or when unused for long periods of time.

WARNING! Attention is drawn to the environmental aspects of disposing of any
battery.
WARNING! Refer all servicing to qualified personnel. Servicing is required when the
apparatus has been damaged in any way, such as when the power supply cord or
plug is damaged, liquid has been spilled or objects have fallen into the apparatus, the
apparatus has been exposed to rain or moisture, does not operate normally, or has
been dropped.
WARNING! For household use only, this apparatus is not intended for commercial
use.
WARNING! If this apparatus is to be used by a third party, please supply these
instructions with it.
WARNING!
No liability will be accepted for any personal injury or damage
caused by failure to follow these instructions.
CLEANING
WARNING! Before you attempt to clean the television screen or cabinet, always
disconnect the appliance from the mains power and remove the plug from the main
power outlet.
Clean the television with a soft dry cloth only. Never use any harsh chemical
cleaning agent or water as this may damage the television.
WARNING! Never allow water splashes to enter the appliance. Do not
immerse in water.
WARNING! Never remove the rear cover. Do not attempt to service this
equipment.
-3-

-4-
SPECIFICATIONS
Description 29 Colour Television
Power input AC230-240V 50Hz
Power consumption 115W
Colour system
PAL (NTSC playback)
Sound system
BG
Channel memory
249
Colour Picture Tube
29 Pure Flat
Viewable size
68cm (diagonally)
Sound output
Net weight
40kg
Dimensions
780(W)x480(D)x575(H)mm
Note: Design and specifications are subject to change without prior notice for the purpose of performance
improvement. The pictures in the handbook may bear slight differences from the real one. Please take actual
products as the standard.
4W x 2

-5-
Control Location
1. Speaker
2. SideAV In
3. AV/TV Button
4. Menu Button
5. VolumeDown Button
6. VolumeUp Button
7.Program Down Button
8. Program UpButton
9. Power Indicator
10. Remote Sensor
11. Main Switch
12. Speaker
13. ACpower Cord
14. Audio/Video-input/output
15. Terminal Antenna(75Ohm)
Front and Back Control Panel
15
14
22
111212
991010
1111
33
44
55
77
66
88

-6-
INSTALLATION & BASIC OPERATION
Note: when first using this television, it has to process Auto Search to
memorize the number of the program channels.
1. ANTENNA CONNECTION
Connect the 75 OHM coaxial cable from the antenna to the RF socket
on the rear panel, as shown above.
For better reception, especially in outlying areas or where
ghosting or interference occurs, an external roof- mounted
antenna is recommended.
For UHF channel reception, use the specified UHF antenna.
When using 300 flat cable, a 300 -75 adapter should be
used for a proper connection to RF socket. The 300 -75
adapter is not supplied.
2. POWER CONNECTION
Plug the power cord into an AC outlet (AC 230-240V ~ 50Hz)
Press POWER button to turn on the television, press POWER
button again to turn off the television.
3. PRESETTING TV CHANNELS
Press MENU button on the remote controller until the Search
Menu appears on the screen.
Press <P+> or <P-> button to highlight AUTO TUNE function on
the screen, press <V+> button to start AUTO searching.
After AUTO searching, this TV set can memorize the numbers of
program channel from 0 to 248. Once the TV stops at the channel
0. the television is ready for watching.

AC230V
AC230V
Y
Cr
Cb
This TV set can be connected to videotape player, DVD player,
video camera, game player or audio player.
NOTE:
Video/Audio equipment can be connected to the rear AV-in socket
as well.
DVD PLAYER
Y
Cr
Cb
TV
Connection to Other Equipment
L
IN
OUT
V
R
L
V
R
Back AV terminal
VIDEO OUT
R AUDIO
OUT
L
DVD PLAYER
Side AV terminal
-7-

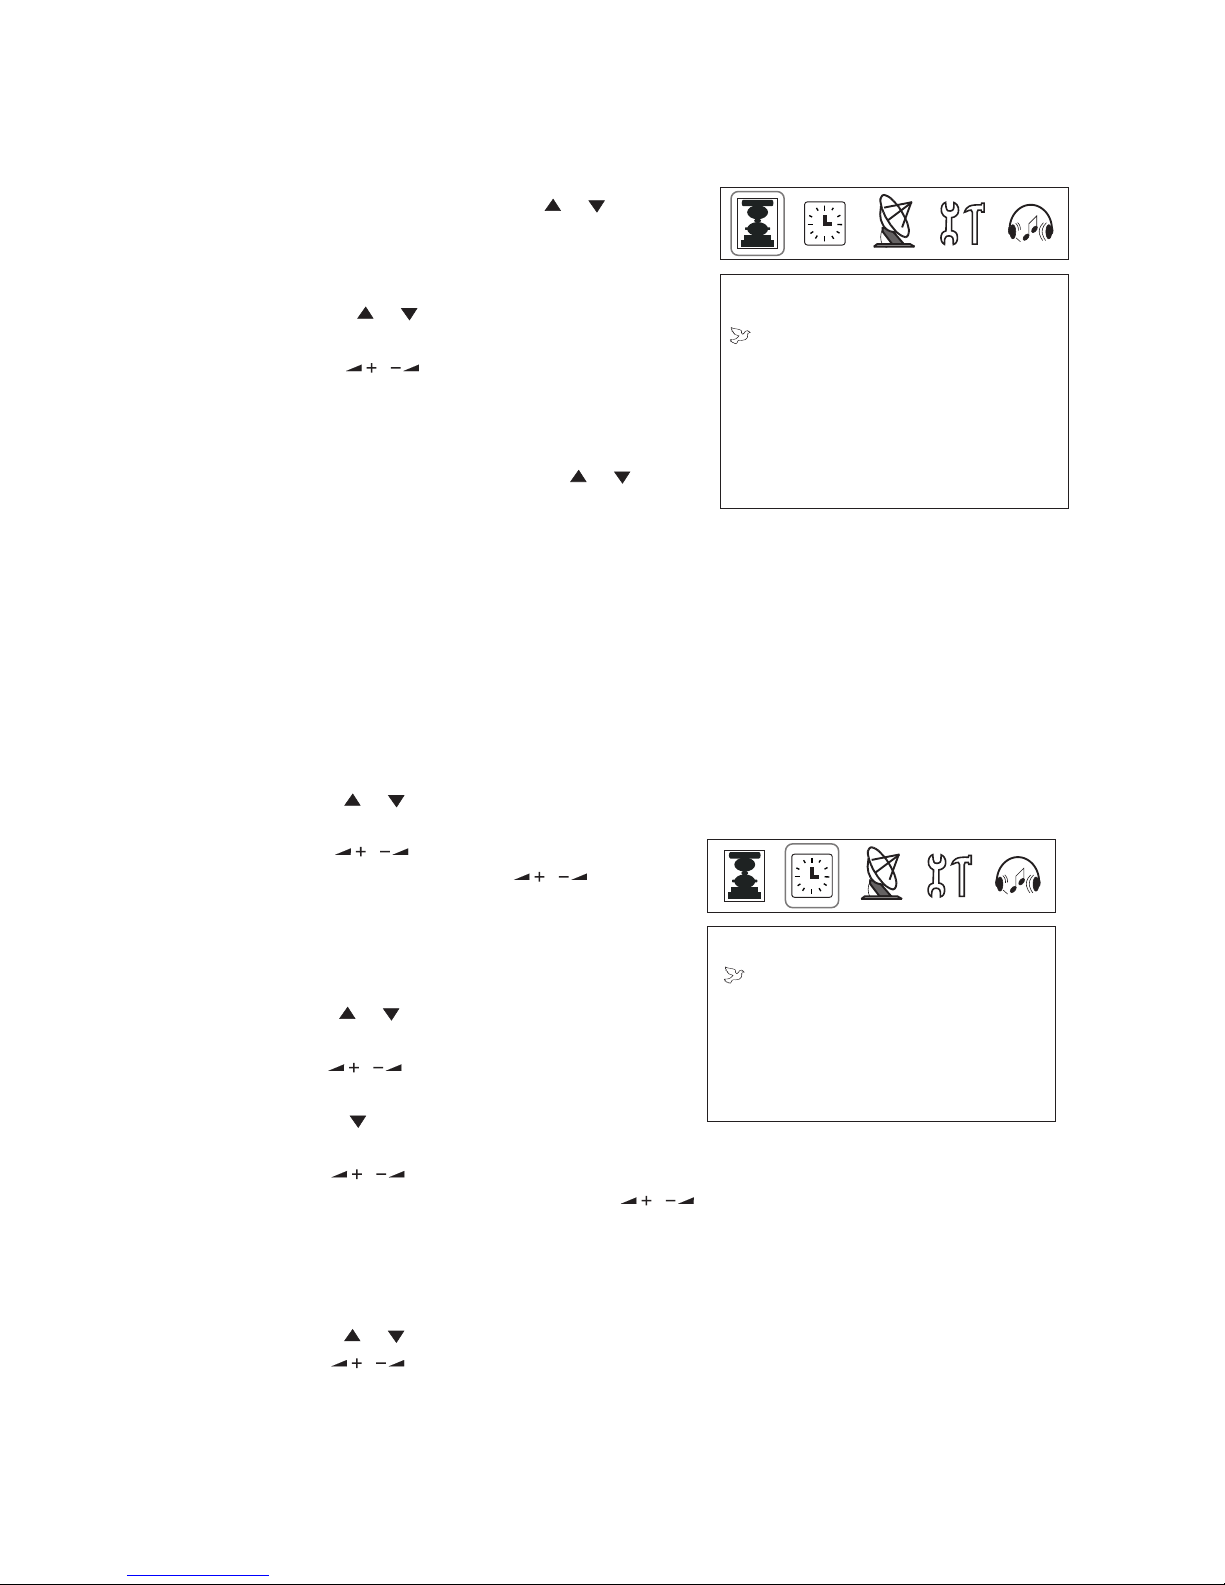
1.Main Menu
Operation of Function Menu
-8-
SEARCH
UHF
V-L
V-H
POSITION 099
BAND V-L
MFT
SEARCH
AUTO TUNE
SEARCH
1. 1 Press MENU key, menu
will appear, as shown in the
right figure.
1.2. Select from the following five
Items by pressing MENU key.
2.1 AutomaticSearch
1) Press " / "button to choose the
AUTO TUNE option of automatic search.
2) Press " "button to start automatic
search. Press " " to stop automatic
search.
3) It will return to "0" automatically after
the end of automatic search.
2.2 Manual Search
1) Press " / " button to choose the MFT option of manual search.
2) Press " / "button to start manual search.
3) Each program found in search will be stored in TV position.
2.3 Wave Band
1) Press " / "button to choose the BAND option of wave band.
2) Press " / "button to switch wave band.
2. Search Menu
PICTURE TIMER SEARCH FUNCTION SOUND
P
P
P
P
P
P
-9-
PICTURE
BRIGHT 50
CONTRAST 50
COLOR 50
SHARP 50
NOISE REDU. OFF
TIME
CLOCK 0:07
OFF TIMER
OFF 0:00
ON TIMER
OFF 0:00
POSITION 0
4.1 Clock Adjustment
1) Press " / "button to choose the
time you wish to set .
2) Press " / "button to set the
current time. (Holding " / "button
will increase/decrease the clock by
ten minutes.)
4.2 ON Timer/OFF Timer
1)Press " / "button to choose the
option of "OFF TIMER";
Press " / "button to set the OFF
TIMER mode (same day or every day);
2) Press " " button choose the option
of OFF TIMER mode (same day or every day).
3) Press " / "button to set the time
for turning off the unit. (Holding " / "button will increase/decrease
the clock by ten minutes.)
4) Set the time for turning on the unit in the similar way.
4.3 Position
1) Press " / "button to choose the option of position.
2) Press " / "button to adjust the position. The position setting is the
default channel number for timing on.
4. Time Setting
Press "MENU" buttonto choose the
"PICTURE" menu. Press" / "
button to enterthe option ofimage
setting.
3.1 Press " / "button to choose
the option tobe adjusted.
3.2 Press " / "button to adjust the
content of theoption. In thismenu,
the brightness, contrast,color,
sharpness and noisereduction may
be adjusted bypressing " / "
button directly.
3. Image Setting
Press"MENU"button to choose time option. Set the appropriate time based
on 24 hourssystem.
P
P
P
P
P
P
P
P
P
P
P
P
P

-10-
FUNCTION
LANG. ENGLISH
TEMP. STANDARD
ALC OFF
CALENDAR
B/G
STANDARD COOL WARM
Press"MENU"button to choose
"SEARCH" menu. Press " / "
button to go to paging and to enter
"CHANNEL EDITING" menu. Press
" / "button to adjust the current
menu option.
5.1 Position Setting
1) Press " / "button to choose
"CURRENT POSITION"/TARGET
POSITION. Press " / "button to
choose current program.
2) Press " / "button to choose
"CONFIRM" option. Press " / "button
to confirm it. Now OK is displayed on the screen and the tune is completed.
5.2 Sound System
Press " / "button to enter the SOUND optionof sound system to display
current sound system.
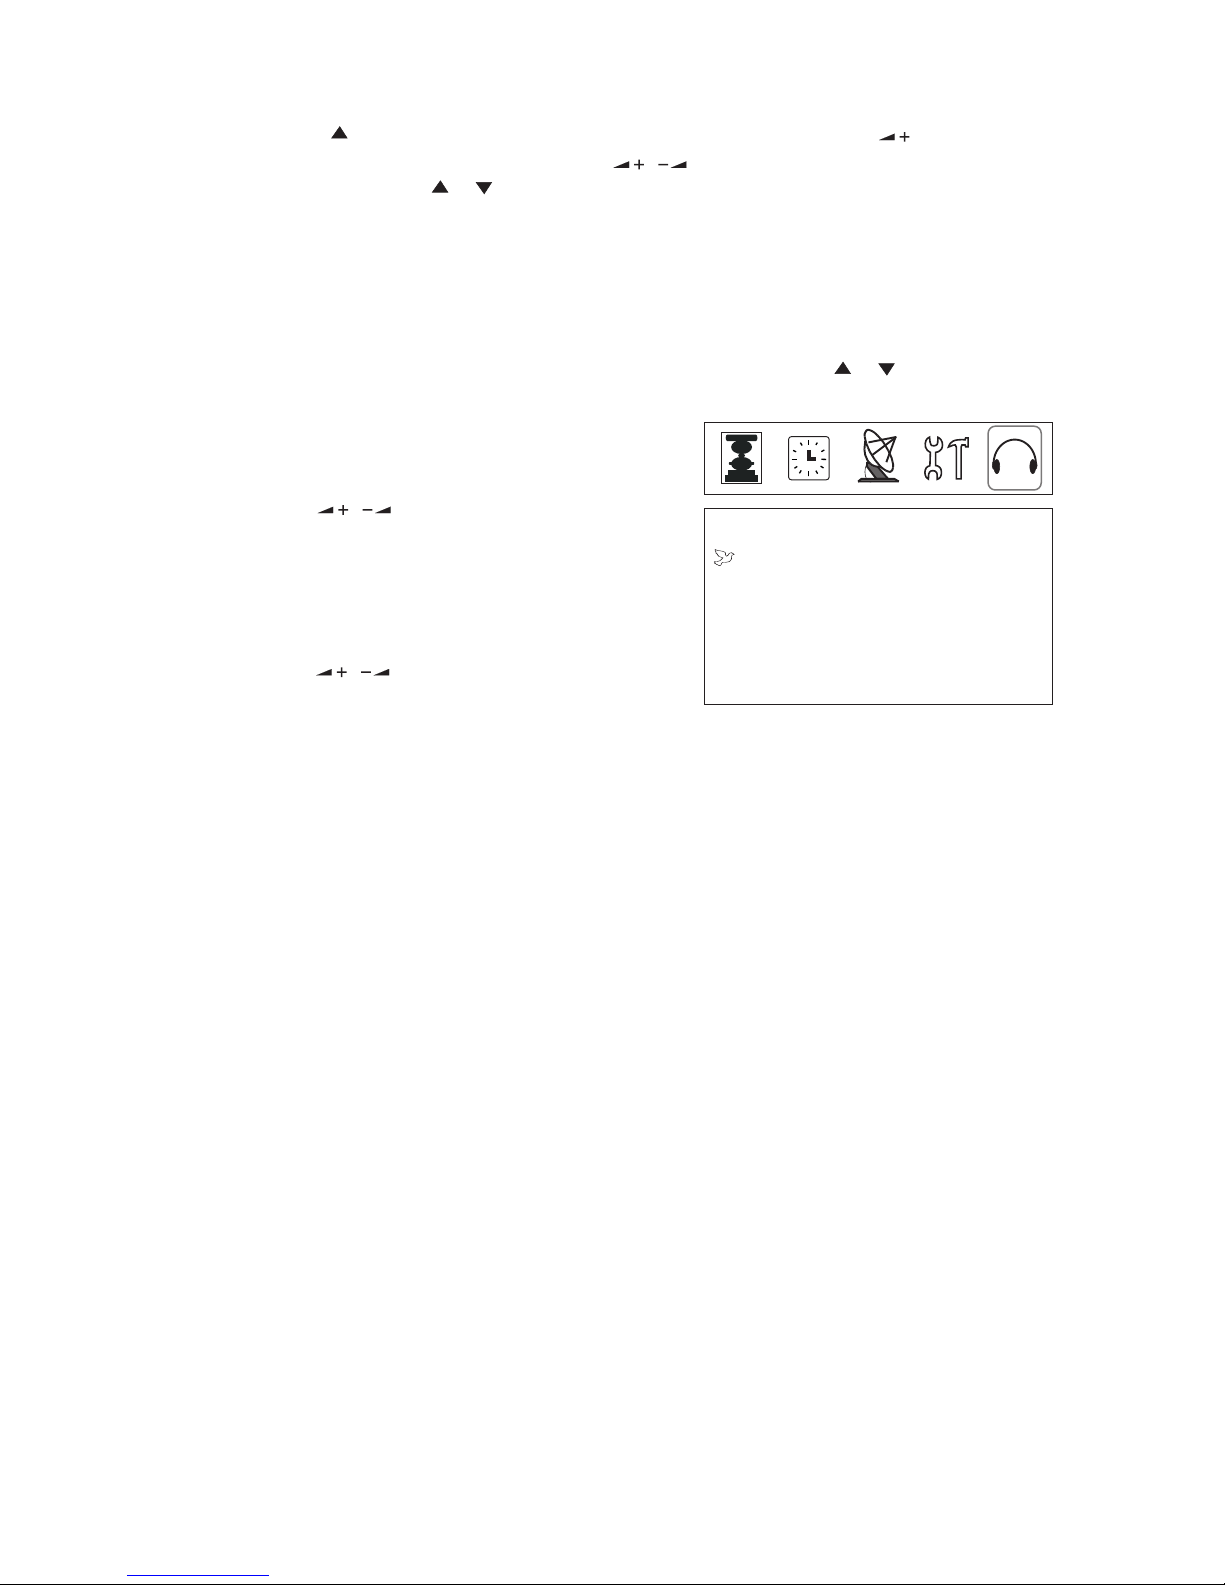
5. Channel Editing
Press "MENU" button to choose
the FUNCTION menu. Press " / "
button to choose the option to be
set. Press " / "button to adjust
the setting.
6.1 Language
The only available language is ENGLISH.
6.2 Color Temperature
Press " / "button to choose the
option of color temperature.
Press " / "button to choose various effects of color temperature.
There are 3 options as follows:
6.3 Automatic (Volume) Level Control.
Press " / "button to adjust the setting.
6. Function Menu
POS EDIT
CURRENT POS 000
TARGET POS 000
CONFIRM
SKIP OFF
SOUND
SEARCH
BG
P
P
P
P
P
P
P
P
P
P
P
P
-11-
SOUND
VOLUME 57
BALANCE 00
6.4 Calendar
Press " "buttonto choose theitem of calendar. Press " "button to
open the itemof calendar.Press " / "button to chooseyear, month
and day. Press " / "button to choose year calendar, monthcalendar
and day calendar.
7. Menu of Sound Setting
1) Volume
Press " / "button to adjustthe
volume. The parameter may be
adjusted in the range between 0
and 100.
4) Balance
Press " / button to adjustthe
balanced sound. The parameter may
be adjusted in the range between-50
and +50.
"
Press "MENU" buttonto enter sound menu. Press " / " button to
choose the item to be adjusted.
P
P
P
P
P

-12-
Remote Controller
POWER STANDBY
CHANNEL-CHOOSING BUTTON
CHANNEL BUTTON
SCREEN DISPLAY BUTTON
MUTE BUTTON
TV/AV SWITCH BUTTON
RECALL BUTTON
VOLUME BUTTON
MAIN MENU BUTTON
TWO OR THREE DIGIT BUTTON
FAVORITE CHANNEL SETUP BUTTON
GAME MENU BUTTON
AUDIO BUTTON
FAVORITE CHANNEL BUTTON
PICTURE FORM BUTTON
SLEEP TIMER BUTTON
SYSTEM CHOOSING BUTTON
P
P
MENU
AV
SYS
SLEEP
P.P
SCAN
GAME
SELECT
AUDIO
3
15
6
2
13
7
12
16 11
17
9
8
14
10
5
4
1
Don't mix different battery types. Take out of the batteries from the remote
for long time of no use.
CHILD LOCK FUNCTION
Pressing and holding ( ) key for more than 5 seconds, all the keys except ( ) key
and ( ) key are locked, then pressing and holding ( ) key for more than 5 seconds,
all the keys are unlocked.
-13-
1.POWER STANDBY
Press Standby button, TV switches on. When pressed the button again, TV will
enter the stand by mode.
2.MUTE BUTTON
Press MUTE button to switch off the sound and press it again to recover the sound.
3.TV/AV SWITCH BUTTON
Press AV button to swap between TV and AV systems.
4.CHANNEL BUTTON
Press "0" to "9" digit buttons to choose one digit channel (0-9).
5.RECALL BUTTON
Press RECALL button, the last and present channels can change each other.
6.TWO OR THREE DIGIT BUTTON
When pressing the two or three digit button, the screen displays -- choose the
number or digits you want for the channel.
7.
Press this key to fast browse your favorite program.
8.SLEEP TIMER BUTTON
Press SLEEP button, the sleep time can be set as follows (by minute)When sleep
time is set, the switch-off time will disappear automatically from the screen.
The sleep time setting will be cancelled automatically once the unit has turned itself off.
9.SELECT BUTTON
Press SELECT button to set the current program as the favorite program. And then
the colour of the "program no." will be change to yellow. You can set 8 favorite
programs.
10.SCREEN DISPLAY BUTTON
Press this button, the screen displays the present channel number, color form,
sound form, time and leaving time (Leaving time must be set in advance).
FAVORITE CHANNEL BUTTON
OFF 120 110 100......30 20 10
Operation of Remote Controller

-14-
11.PICTURE FORM BUTTON
You can select any one of the following form by pressing P.P button repeatedly.
12.SYSTEM CHOOSING BUTTON
Press <SYS> button to display current sound system on the screen.
13.MAIN MENU BUTTON
When press the main menu button, TV displays as follows in turn:
14.CHANNEL BUTTON
The function of this button is the same as that of and buttons on the panel.
15.VOLUME BUTTON
The function of this button is the same as that of and buttons on the panel.
16.AUDIO BUTTON
Press AUDIO BUTTON to enter audio function mode. the picture will cut off in this
mode. only sound will continue. Press the button again to exit audio function mode
and return to the normal watching mode.
17.GAME MENU BUTTON
Press GAME button to enter game operation interface.
[MENU] Key start/exit.
[ / ] Key select class.
SOUND BG
STANDARD MILD VIVID DYNAMIC PERSONAL
P
P

BATTERY INSTALLATION(REMOTE CONTROL UNIT)
THE CAUSES OF INTERFERENCE
1.Remove the battery cover
2.Insert the 2 AAA 1.5V batteries making sure the polarity(+or -)of the batteries matches the polarity
marks inside the unit.
3.Replace the battery cover.
Replace with new batteries when the TV set begins to show the following symptoms:operation is unsteady
or erratic.Sometimes the TV set does not function with Remote control unit.
Remark:
1) Alkaline batteries recommended
2) Remove batteries when they are exhausted or if the remote control is not to be used for a long time.
Incorporated in your TV receiver are the most
up-to-date devices to eliminate interference.
Local radiation however, can create
disturbances which visibly affect your picture.
Proper installation, a good aerial are your
best safe-guards against these disturbances.
INTERFERENCE
Moving ripples across the screen are caused by
nearby transmitting or receiving-short-wave
radio equipment..
DIATHERMY
Herringbone pattern and partial picture loss can result
from the operation of diathermy equipment From a
nearby doctors surgery or hospital.
SNOW
Weak TV signals from long distant stations give
the effect of falling snow. An antenna adjustment
or antenna amplifier may be needed.
GHOST
Multiple image caused by TV signals reflected
back from surrounding buildings, hills, aircraft, etc.
are minimized by correct aerial positioning.
CAR IGNITION
Nearby cars and electrical motors can cause small
streaks across the picture or make the picture roll.
-15-

SERVICE TIPS
Symptoms
Solution
BEFORE CALLING FOR SERVICE, HAVE YOU
ON SYMPTOMS AND SOLUTIONS?
Try different channel, if OK, probably station trouble
Check aerial connections on back of set
No picture, no sound
Poor sound, picture OK
Poor picture,sound OK
Weak picture
Blurred picture
Double image
Lines in picture
Distorted picture
Weak receptionon some channels
Horizontal bars
Picture rolls vertically
Poor colour
No colour
Misoperation of Remotecontrol
No Remote control
On screen DisplayControl outside thescreen
Check aerial for broken wires
Re-orient aerial(if indoor type)
Probably local interference, such as an appliance
Adjust fine tuning control
Adjust brightness control
Adjust contrast control
Check if station is broadcasting colour
Adjust colour control
Check if system switch is correct
Check if on/off switch is on
Check Batteries in Remote control
CHECKED( )THE FOLLOWING CHART

Guarantee Card
WARRANTY FOR APPLIANCES USED COMMERCIALLY LIMITED TO 90 DAYS
Type of Appliance: _________________________________________________
Model Number: ________________Purchase date:
Product Purchased From:
Your Name:
Address:
Phone Number:
IMPORTANT!
Please retain this warranty card with your purchase receipt.
Please do not post to the retailer or importer. If service is required, both of these
documents are to be returned with the appliance to your retailer, otherwise a fee may
be charged.
This Product is guaranteed against faulty materials and
workmanship for a period of 12 months from date of purchase.
The obligation to the purchaser under this warranty is limited to
servicing the unit and replacing defective parts when the product
is returned freight prepaid to the retailer. This warranty becomes
void if the product has been tampered with, damaged, damaged
by accident, damaged in any other way by improper use or has
been purchased second hand.
Warning! Refer specific instructions. All production orders have
quality inspections. IN the unlikely event of a deficiency, please
contact the retailer from whom this product was purchased.

Table of contents
Other Transonic TV manuals


