Transonic TC-BS2972 User manual

29 inchColourTelevision
Instruction Manual
ModelTC-BS2972
Pleasereadtheseinstructionscarefullyand retainforfuturereference.

1
Helpline
Forassistanceduring normalworking hours(9am-5pm,Mon-Fri,NewZealand localtime)call
Oriental PacificInternationalLtd.
NZ call: 0800 89 85 80
Australiacall: 1800 858011
Email: service@orientalpacific.com
SYMBOLS
Thegraphicsymbolsusedinthismanual orontheback coverofthesetmeanthe
following:
Read thismanualinfullbeforeuse.
Class II Doubleinsulated Appliance
The lightning flashsymbolisintended toalertthe usertotheenclosuresthat
containhazardousvoltages.
The exclamation symbolisintended toalert theusertothe presenceof
important operating and maintenance(servicing)instructionsinthe literature
accompanying the appliance.

2
IMPORTANTSAFEGUARDS
Whenusinganyelectricalapparatusalwaysobservesafetyregulationsanduse
basicsafetyprecautionstoreduce therisk offire,electricshock and personal
injury, includingthefollowing
Read, Keepand Followtheseinstructions, heeding all Warnings.
WARNING! Donot removeanycover.
WARNING! Noobjectsfilled withliquid, suchasvases, shall beplacedon thisequipment orinany
position whereliquidmayfall intothisequipmentoranyotherelectricalapparatus.
WARNING! Donotinsertanyobjectsintoanyopeningsofthisequipmentoranyotherelectrical
apparatus.
WARNING! Donot usethisapparatusnearwater.Toavoidtherisk offireorelectricshock, do not
exposethisapparatustorainormoisture.Theapparatusshall notbeexposedtodripping or
splashesandisstrictlyforindooruseonly.
WARNING! Donotimmerseinanyliquidwhilstinuseorcleaning.Clean onlywithadampcloth,
drywithadrytowel. Donotuseharshabrasivesasthesemaydamagethe plasticparts.
WARNING! DONOTblockanyventilationopenings.Keep awayfromcurtains,newspapersand
restrictedareas.Install inaccordancewithanyspecificmanufacturersinstructions.Always allowa
sufficientgaparoundthe apparatustoavoidoverheating.
WARNING! Donotinstall nearanyheatsourcessuchasradiators,gasheaters,stovesorother
apparatus(includingamplifiers)thatproduceheat.Donotleaveindirect sunlight.
WARNING! Donotplaceanynakedflamesource,suchaslightedcandleson anyelectrical
apparatus.
WARNING! Connect toasuitable230-240V~ 50 Hzpowersupplyonly.
WARNING! Keepoutofreachofyoung children.Thisapparatusisnotsuitableforusebyyoung
childrenorinfirm personswithoutsupervision.Young childrenmustbe supervised toensurethat
theydo not playwiththeapparatus.Ensureyoungchildrenhaveenoughknowledge tooperatethe
equipment safelyiftheydohaveaccesstothisequipment.
WARNING! Donotabuseordamageapowercord.Ifanypowercordisdamaged,the
manufacturer,itsserviceagentorasimilarlyqualifiedpersoninordertoavoidahazard,must
replaceit. Areplaceablecordmust be replacedwithanauthorisedreplacementfroman authorised
serviceagentonly.
WARNING! Onlyuseattachments/accessoriesspecified bythemanufacturer.
WARNING! Unplug completelyfromthepowersourcethisapparatusduringlighteningstormsor
whenunusedforlongperiodsoftime.
WARNING! Attentionisdrawntotheenvironmentalaspectsofdisposingof anybattery.
WARNING! Referall servicingtoqualifiedpersonnel.Servicingisrequiredwhentheapparatus
hasbeendamagedinanyway,suchaswhen thepowersupplycordorplugisdamaged,liquid
hasbeen spilledorobjectshavefallen intotheapparatus,theapparatushasbeenexposedtorain
ormoisture,doesnot operatenormally,orhasbeen dropped.
WARNING! Forhouseholduseonly,thisapparatusisnotintendedforcommercialuse.
WARNING! Ifthisapparatusistobeusedbyathirdparty,pleasesupplytheseinstructionswithit.
WARNING! Noliabilitywillbeacceptedforanypersonalinjuryordamagecausedbyfailure
tofollowtheseinstructions.

3
CONTENTS
SafetyPrecautions …………………………………………………………………2
Descriptionof ControlKeysand Connectors…………………….………………4
RemoteController……………………………………………………………..……5
Installation&BasicConnection…………………………………………………...7
PresettingTVchannels…………………………………………………………….8
Operating theTV………………….…..…….………….…………………………...9
Cleaning…………………………………………………………………………….15
Troubleshooting. ……………………………………….………………………….16
Specifications…………..……………………………………..……………………17

4
DESCRIPTIONOFCONTROLKEYSAND CONNECTORS
1.PACKAGE
Carefullyunpackthebox,making surethatallaccessoriesarefound.Disposeof
anyunwanted packagingsuchasplasticbagsthatmaybe dangeroustoyoung
children.
Packing list
Description Quantity
29”ColourTelevisionset 1
Instruction Manual1
RemoteController 1
“AA”Battery 2
2.FRONTPANEL&CONTROLKEYS
1.MainpowerON/OFFButton
2.Remotecontrolsensor
3.PowerONindicator
4.TV/AV selectorbutton
5.Menu button
6.Volumedown(V-) and up (V-) buttons
7.Programdown(P-) and up (P+)buttons
3.SIDECONNECTORS
• AV2Input: Audio&Video input terminal

5
4.REARPANELCONNECTORS
1. RFInput: terminalforantenna orCATVcoaxialcable.
2. VideoComponentInput: video terminalforComponent Video (Y,Cr,Cb)signal.
3. S-VIDEO Input: video terminalforS-Videosignalinput.
4. AV1Input: Audio&Video input terminal.
5. AVOutput: Audio&Video outputterminal.
Note:S-Videoinput,VideoComponent input &AV1inputsharetheAV1audioinput.
REMOTE CONTROLLER
1.MAINTENANCEOFTHEREMOTECONTROLLER
• Whenthe remotecontrollernolonger
operatesproperlyatnormalviewing
distances, the batteriesmust be replaced.
• If the remotecontrollerisnottobeused
foralongperiod of time, werecommend
removing the batteriestoavoid
electrolyteleaking.
• Donot mixnewbatterieswitholdones,
differentbrands, ordifferent type.
• Whenthe batteryisexhausted,
electrolyteleakage mayoccurand
damage maybe caused totheremotecontroller.
2.BATTERYINSTALLATION
• Removethe batterycover.
• Insert thetwo “AA”1.5Vbatterieswith
the polaritymatching withthemark
inside the batterycompartment.
• Closethe batterycover.
Use ofremotecontrol
Point the remotecontroltowardtheinfraredremotesensoronthemainunit.If there
isan obstaclebetween the mainunitand remotecontrol,the remotecontrolmay
not operateeffectively.

6
3.DESCRIPTIONOFREMOTECONTROLKEYS
1.POWERON/STANDBYBUTTON
Firstly,thepowersupplyofthe unitmustbe
switched on.When the unitisinstandbymode,
the indicatorwillbe lit.Press the standby
button and afterafewseconds,the unitwill
turnon.Press the button onceagaintoturn
the unittostandbymode.
2.SOUND MUTEBUTTON
Press thisbutton tomutethe sound completely.
Press the button onceagaintorestorethe
previoussoundlevel.
3.CHANNEL BUTTON
Whenthe channelnumberhasone figure,
pressthe number(0~9)directly.
When the channelnumberhastwofigures,
pressing the digitselectbutton (4.)-/--twice,
and then pressthe channelnumber(10 ~99).
When the channelnumberhasthree figures,
pressthe digitselectbutton -/--three times,
and then press the channelnumber(100 ~
249).
4.DIGITSELECTBUTTON
Toselectchannelnumbersthat aretwoor
three figures.
5.TV/AVBUTTON
Press the button toselectTV, AV1, AV2and
DVDsignalinput.
6.PICBUTTON
Set the desired picturequalitytothe PERSONALposition. GAME:MIX(Yellow).
7.CALL BUTTON
Press the button todisplaythe currentinformation of TV,i.e.Channel,time,etc.GAME: Exit (Blue).
8.MENU BUTTON
Press the button toselectPICTURE,TIMER,TUNING, SETUPorGAMEmenu.If submenu is
selected, press the button toexitthe submenu.
9.PROGRAMDOWN&UPBUTTONS
Press the button toselectthe nextlowerornext high programnumber.
10.VOLUME DOWN&UPBUTTONS
Press the button todecreaseorincreasethe sound volumelevel.
11.SLEEPBUTTON
Press the button and preset the unittoturnitselfoff withdefinitetime(0~120minutes)inintonations
of 10 minutes. Afterthatthe unitwillautomaticallyswitchitself tostandbymode.
12.SYSTEMBUTTON
Press thisbutton togainentry tothe colourand sound systemmenu tochange the settings.
13.PICTUREMODEBUTTON
Press the button tocyclicallyselect DYNAMIC, MOVIE,NATURE, STANDARD and PERSONAL
picturemode.

7
14.CALENDARBUTTON
Press the button, the calendarshowson the screen. PressV+orV- tochange MONTH.Press P+or
P- tochange YEAR.
Press the CALENDARbutton onceagaintocancel the calendar.
15.SOUND MODEBUTTON
Press the button tocyclicallyselectMUSIC,THEATRE,EXTEND1, EXTEND2,NEWSand
SURROUND OFFsound mode.
16.NAVIGATIONBUTTON
Usethesebuttonstohelpselectanymenu items, adjust amenu itemorconfirmthe selection.
INSTALLATION&BASICCONNECTION
1.AUTOMATICDEGAUSSING
Allcolourtelevisionreceiversaresensitivetomagneticinfluences,usuallycaused
byeithermoving the receiverfromone placetoanotherorusing certainelectrical
appliancesnearthe receiver.Thisresidualmagnetismasitiscalled,sometimes
causesdistortionwhichgivesriseto “blotchy”areasofcolourinthepicture.To
avoidtheseeffectsthereceiverincorporatesan automaticdegaussing circuit, which
operatesforashortperiodwhileeachtimethe receiverisswitchedonusingthe
mainswitch.Thiscircuitremovesanyresidualmagnetisminthe metalpartsofthe
picturetubeand thereforeensuresthateachtimethe receiverisswitched “ON”
usingthemainswitch,the purityofthe coloursdisplayedon the screenremaintrue
and lifelike.If thetelevision ismoved orfacedindifferentdirection,the mainswitch
mustbe switched offforatleastonehourinorderthatthe automaticdegaussing
circuitoperatesproperly.
2.ANTENNACONNECTION
Connect the75 OHMcoaxialcablefromthe antenna tothe RFsocketon the rear
panel, asshownabove.
• Forbetterreception,especiallyinoutlyingareasorwhereghostingor
interferenceoccurs, anexternalroof-mounted antennaisrecommended.
• ForUHFchannelreception, usethe specified UHFantenna.
• When using 300Ωflatcable,a300Ω–75Ωadaptershouldbe used fora
properconnection toRFsocket.The 300Ω–75Ωadapterisnot supplied.
3.POWERCONNECTION
• Plug thepowercordintoan ACoutlet (AC230 –240V~50Hz)

8
• Press POWERbuttontoturnonthe television, press POWERbutton again
toturnoff thetelevision.
PRESETTINGTV CHANNELS
Note: If you areusing the television forthe first time, pleasefirst followthe automatic
searchproceduretostorethe programsasfollowed.
1. SYSTEMSELECTION
Press the SYS button tocallup thesystemmenu on the TVscreen.
• ColourSystem
Press the navigation / buttonstomovethe cursor ”“toCOLOUR.Each
timethe / button ispressed,the setting changesinsequenceasshown
below.
AUTO PALNTSC3NTSC4
Note: select “PAL”coloursystemforNewZealandand
Australia.
• Sound System
Press the navigation / buttonstomovethe cursor ”“toSOUND. Each
timethe / button ispressed, the settingschange insequenceasshown
below.
DKI BG
Note: select “BG”soundsystemforNewZealand and Australia.
2.AUTO SEARCH
• Press MENU button,then press the / button
toselect TUNING menu.
• Press buttontocallupthe TUNING menu.
• Press button repeattoselectAUTOMEMORY,
and press button tostart autosearch.
• During autosearching,allTVchannelsfoundwill be
automaticallystoredstartingfromthe currentProgramNumber.
• If thenumberofTVchannelsfound exceedsthe maximumnumberofthememory
locationsthe autosearchwillstopautomatically.
• At the end ofthe autosearch, the firstTVchannelfoundwillbedisplayed.
9
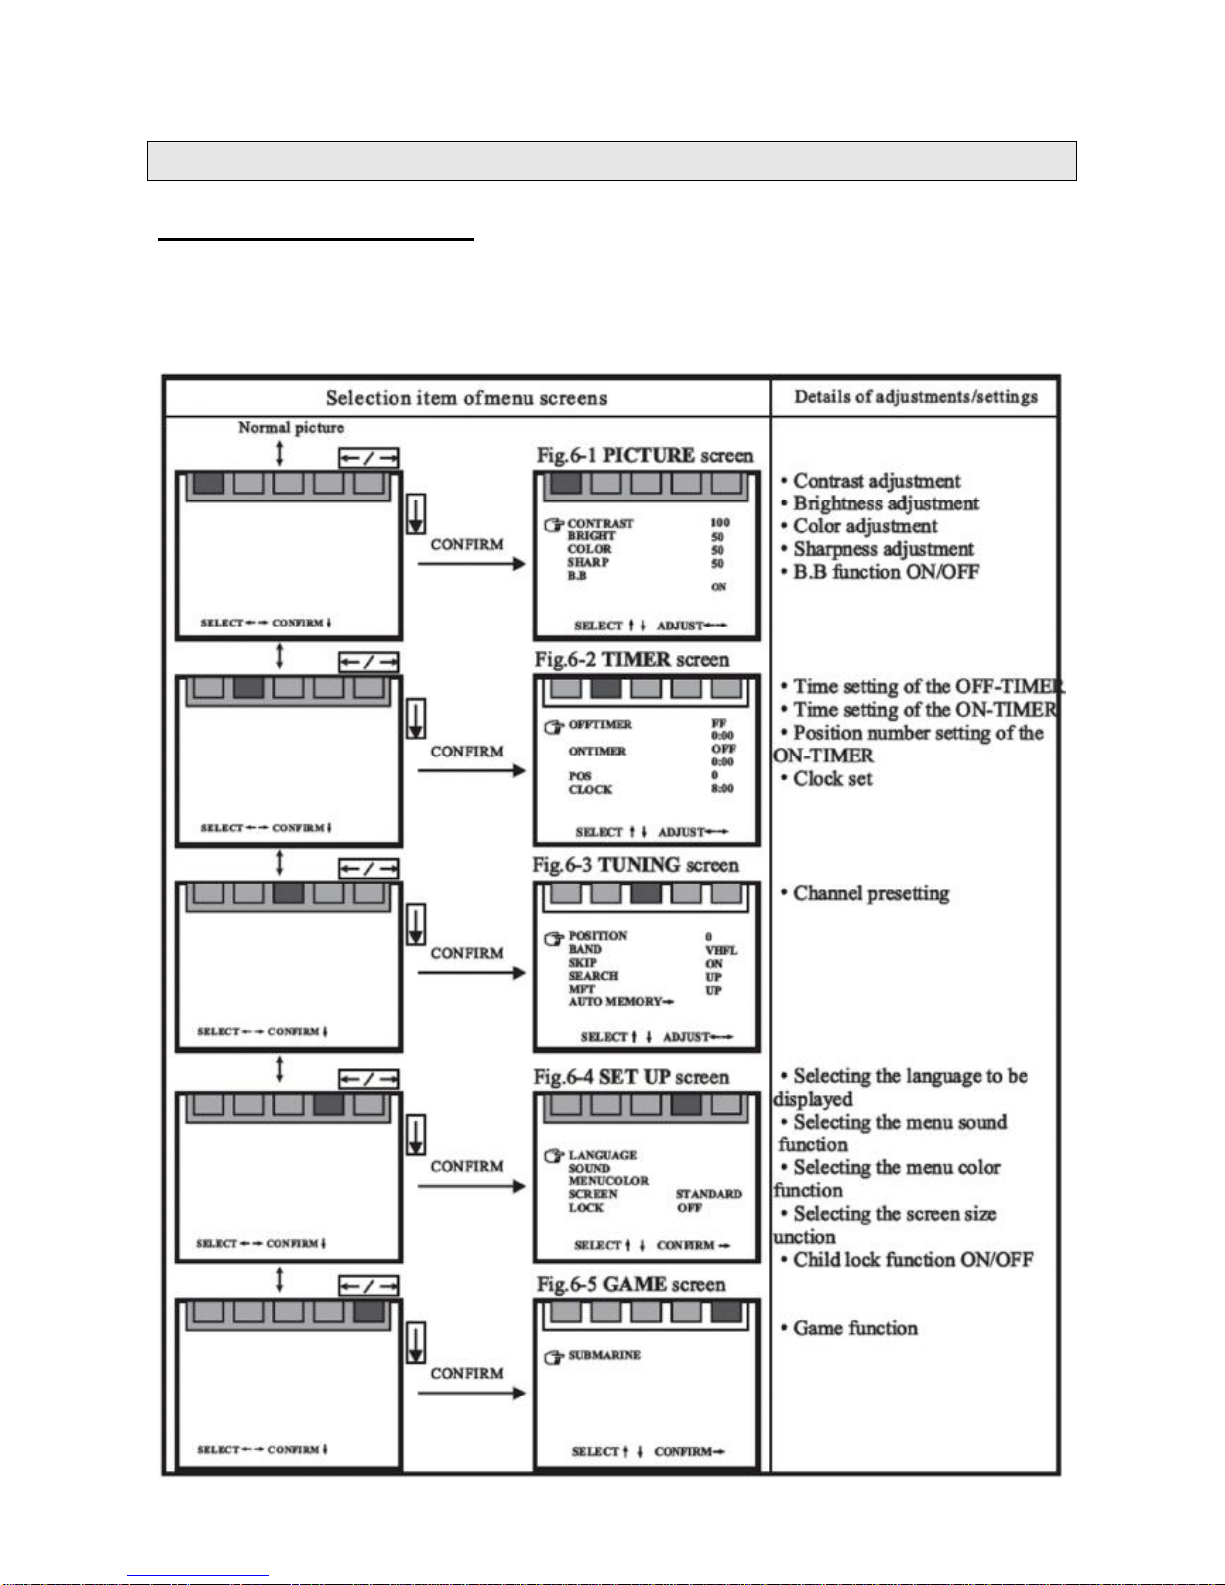
TV OPERATIONAND FUNCTIONMENU
MAINMENU OPERATION
Press theMENU buttononfrontpanelofthe televisionorontheremotecontroltoenter
the OSDmenu,then selecttheitembypressingthe Navigation buttonstoenterthe
PICTUREmenu,TIMERmenu,TUNINGmenu,SETUPmenu orGAMEmenu on the
screen.

10
1.PICTUREmenu
Onthe PICTUREmenu, you can adjust the contrast,
bright, colour, sharpand bluebackground (B.B.).
• Press PICbutton orMENU button toenterthe
PICTUREmenu.
• Select theitemthat you want toadjust using the /
buttons.
• Adjust the itemvalue usingthe / buttons.
• Press PICbutton orpress MENU repeatedlytoexit thismenu.
Note: Theadjusted levelisstored asthe PERSONALpicturemode.
The blueback isdisabled during searchmode.
If the blueback issetasOFF,thescreenwillshowsmoothdarkgreypatternunder
AV statusand showblack and whitedotsunderTVstatuswhen thereisno signal.
2. TIMERmenu
Using theTIMERmenu operation,you can startautomaticallythe TVtowatcha
certainprogramataparticulartime.Alsoyoucan placethe TVset instandbymode
at apreset time.
(1)CLOCKsetting
• SelectCLOCKontheTIMERmenu screenusing
the / buttons.
• Using the / buttonstoset clock.
(2)OFF TIMER
Withthe OFF TIMER,the TVwillautomaticallyswitchtostandbymode ata
preset time.
• SelectOFFTIMERon the TIMERmenu screen
usingthe / buttons.
• Using the / buttonstoselectONCE(a
day)orEVERY(everyday).SelectOFFtocancel
the OFFTIMER.
• Press the buttontoselectthetimesettingof
the off-timer.
• Press the / buttonstosetTVoff-time.
(3)ONTIMER
WiththeONTIMER,the TVwillautomaticallyturn
on toapreset channelat apreset time.
• SelectONTIMEon the TIMERmenu screen using
the / buttons.
• Using the / buttonstoselectONCE(a
11
day)orEVERY(everyday). SelectOFFtocancelthe ONTIMER.
• Press the button toselect thetimesetting of the on-timer.
• Press the / buttonstosetTVon-time.
• Press the button toselect POS.
• Press the / buttonstoset channelnumber.
• Press the standbybutton toswitchtheTVtostandbymode.Atthe preset
time, the TVwillturnonautomatically.
(4)Tocancelthe OFF TIMERand ONTIMER
Press the POWERbuttonon the frontpaneloftheTVtocancelalltimers
setting.
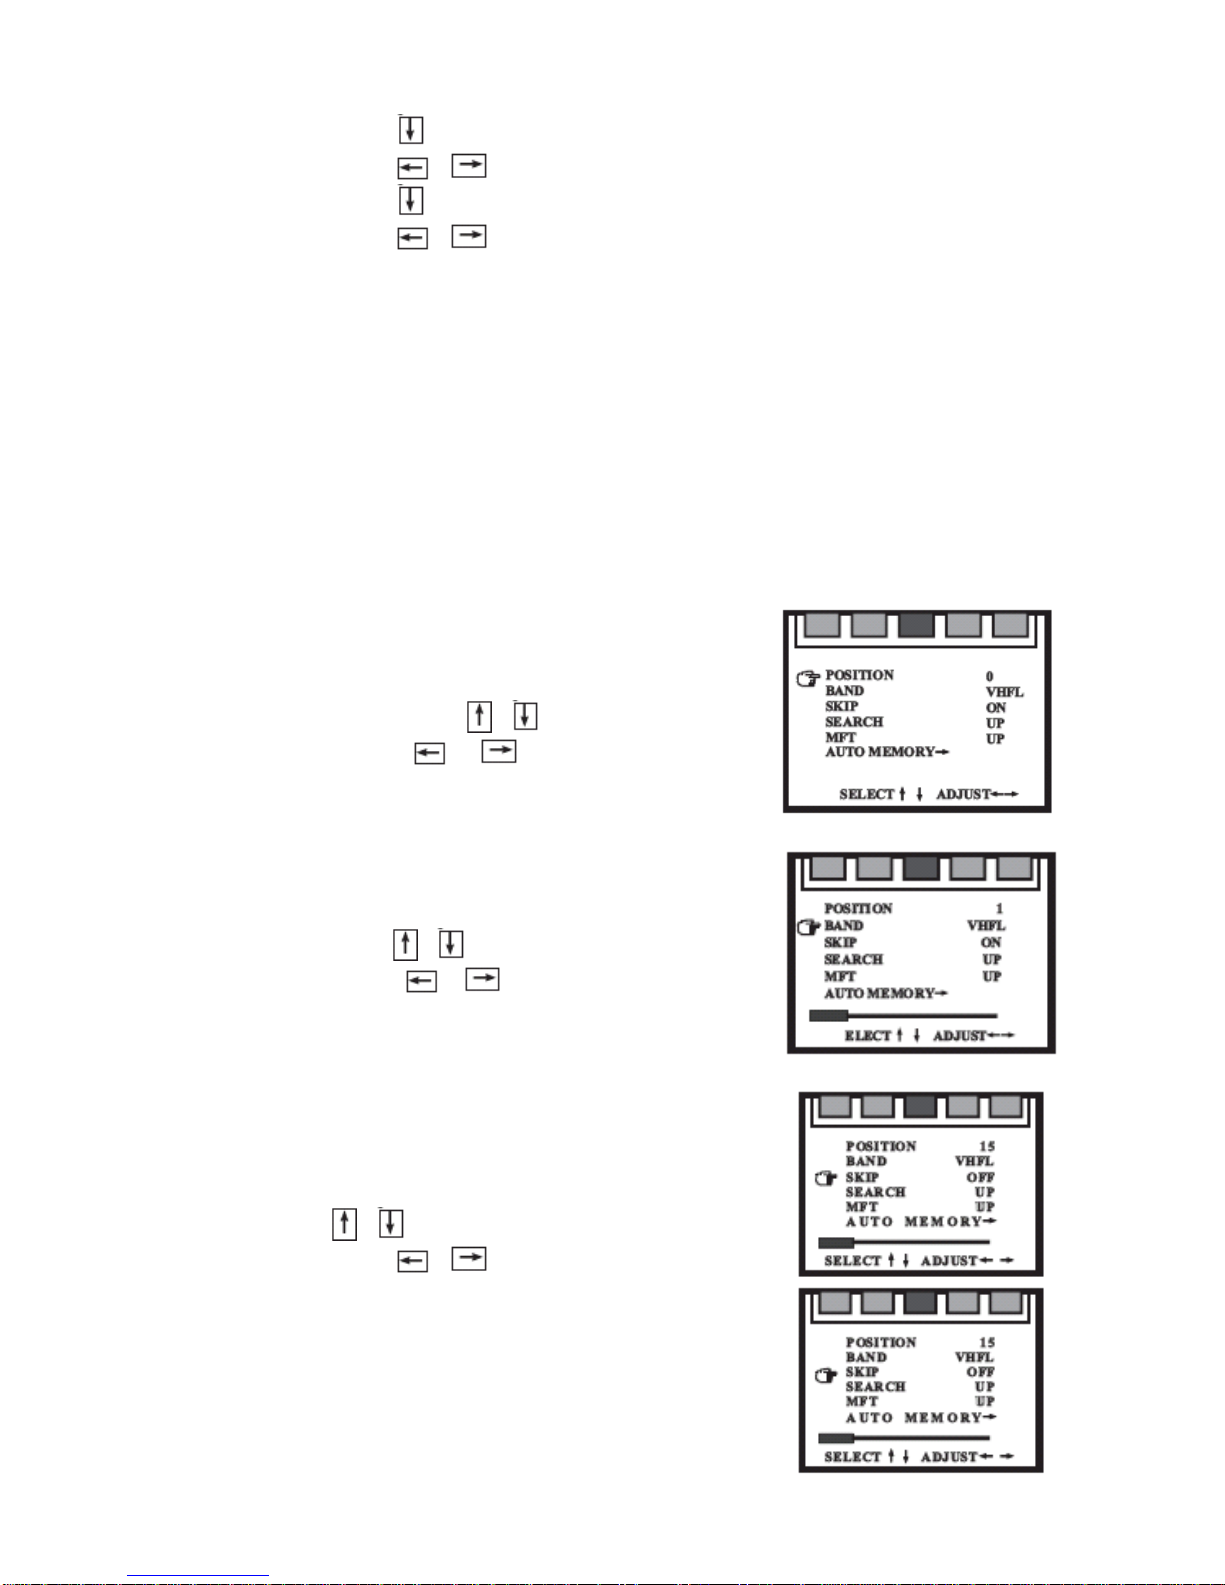
3.TUNING menu
WiththeTUNINGmenu operation,you canautosearchormanualsearchthe TV
broadcasting channel.Skipanyunnecessaryprogramnumberssothatonlythe
channelsthat you want towatchareselected.
(1)POSITION
Forselect the programnumberformanualsearchor
Skip.
• SelectPOSITIONontheTUNINGmenu
screen usingthe / buttons.
• Using the / buttonstoselectthe
programnumber.
(2)BAND
Select theBAND withthe TUNING menu screen for
manualsearch.
• SelectBAND on the TUNINGmenu screen
usingthe / buttons.
• Using the / buttonstoselectVHFL,
VHFHorUHF.
(3)SKIP
Usethisfunctiontoskiptheunnecessaryprogram
numbers.
• Select SKIPon the TUNING menu screen using
the / buttons.
• Using the / buttonstoselectON.
• Press MENU button toconfirmthe selection.
Thisposition numberwill be skippedwhen you
selectthe programnumberwiththeP-/P+
buttons.
Torestoreaskipped position number
• Selectthe skipped position numberwiththe
CHANNELbutton on the remotecontrol.
• Press the MENU button tocallup the TUNING

12
menu screen.
• Select SKIPon the TUNING menu screen using the / buttons.
• Using the / buttonstoselectOFF.
(4)SEARCH (ManualSearch)
• SelectSEARCH on theTUNINGmenu screen
usingthe / buttons.
• Usingthe / (down/up)buttonstostart
searching.Repeatthisprocess untilgetthe
desired channel.
If you want tostoreanotherchannelat anotherposition,
movethe cursortoPOSITIONandselectadesired
positionnumber.Then movethe cursortoSEARCH
and repeat thestep asabove.
When you completethepresetting process,press the
MENU button toexit the menu.
(5)MFT (ManualFineTuning)
Thisadjustingprocess isnotnecessaryundernormal
conditions.However,inan areaofinferiorbroadcast
conditions,the adjustmentMFT isnecessaryforgetting
abetterpicturequality.
• SelectMTF on theTUNINGmenu screen using
the / buttons.
• Usingthe / (down/up)buttonstostart
finesearching untilthe bestpictureand soundareobtained.
• Press the NENU buttontoconfirmand exit the menu.
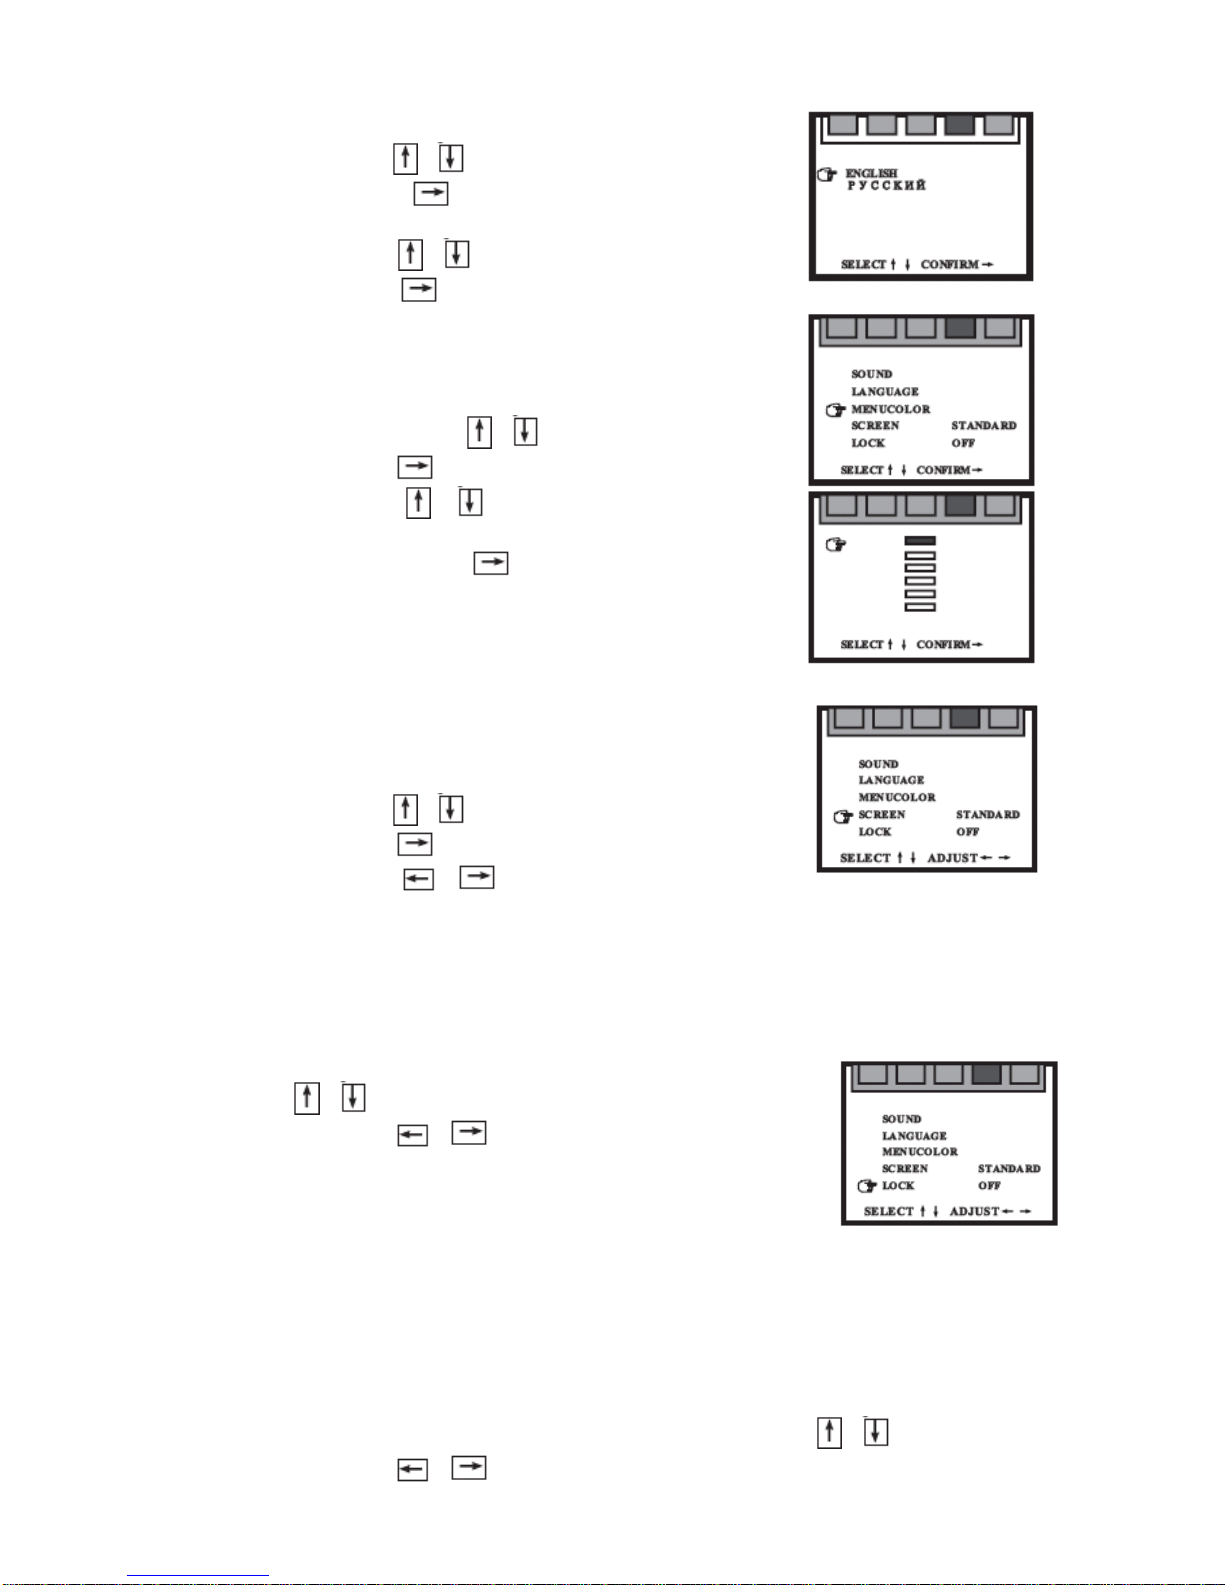
4.SETUPmenu
Toselect the displaylanguage, soundmode, screen sizeand childlock function.
(1)SOUND
Toadjust the BASS, TREBLE&BALANCEofsound.
• SelectSOUND on the SETUPmenu screen
usingthe / buttons.
• Using the button toenterthe sound
selection.
• SelectBASS orTREBLEorBALANCEmenu
screen usingthe / buttons.
• Using the button toenterthe adjustment.
• Using the / buttonstoadjust.
• Press MENU button toconfirmand returntomainmenu.
13
(2)LANGUAGE
• SelectLANGUAGEon the SETUPmenu screen
usingthe / buttons.
• Using the button toenterthe language
selection.
• Press the / buttonstoselectthe language
and press button toconfirm.
• Press the MENU button toreturntomainmenu.
(3)MENU COLOR
• SelectMENU COLORontheSETUPmenu
screen usingthe / buttons.
• Using the button toenterthe selection.
• Press the / buttonstoselectthe menu
colour(Black,Blue,Yellow,Cyanine,Greenor
White)and press button toconfirm.
• Press the MENU button toreturntomainmenu.
(3)SCREEN
Toadjust the screen displayformat asSTANDARD,
WIDEorZOOM. If the pictureisnormalon thescreen,
the adjustment isnot necessary.
• SelectSCREENon the SETUPmenu screen
usingthe / buttons.
• Using the button toenterthe selection.
• Using the / buttonstoselectthe screen
format (Standard,Wide orZoom).
• Press the MENU button toconfirmand returntomainmenu.
(4)LOCK(Childlock function)
Thistelevisionisequiped withachildlockfunctionthatlimitschildren towatchTV
programwithout remotecontrol.
• SelectLOCKontheSETUPmenu screenusing the
/ buttons.
• Using the / buttonstoselectON.
• Turnoff the POWERON/OFFswitchof the set.
• Whenyou turnon the POWERON/OFFswitchof
the set, the “LOCK”appearson the screen.
• Press the STANDBY button onthe remotecontrollertoturnthe picture.
Note:when the childlock isset, buttonsonthe TVfrontpanel(exceptthe
POWERON/OFFswitch)and thedigitnumberbutton on the remotecontroller
arenotvalid.You mustpress the STANDBY button onthe remotecontrollerto
turnon the picture.
Turnoff thechildlock.
• Select LOCKonthe SETUPmenu screen using the / buttons.
• Using the / buttonstoselectOFF.

14
5.GAMEmenu
• SelectSUBMARINEon the GAMEmenu
screen usingthe / buttons.
• Using the button toconfirm.
• The gamepictureisdisplayed on the screen.
The playersubmarinecolourisYellow.The computer
isGreen orPurple.
OTHEROPERATION
1.Selectthepicturemode
Press “IPI”buttontoselectthepicturemode fromfivepresetmodesand oneuser-
set mode.
2.Selectthesoundmode
Press “ISI”button toselect thesoundmode fromsixpresetmodes.
MUSIC, THEATRE,EXTEND1,EXTEND2, NEWS and SURROUND OFF

15
3.Sleeptimerfunction
The sleep timerautomaticallyturnsTVtostandbymode afterthe settimethatyou
havechosenhaselapsed.
• Press the SLEEP button toset the timerasbelow:
• You can press the SLEEP button oncewhilethe sleep timerisoperating to
displaythe remainingtime. It can changesin10-minutesstep.
• If you turnoff thepowerwhilethe sleeptimerisoperating,the sleeptimeris
cancelled.
4.CALL (Display)
Press the CALL button todisplaytheprogramnumberand time.
• Press CALL button,the programnumberappearson the screen.
• Press CALL button twice,theprogramnumberand timeappearonthe
screen.
• Press CALL button again,turnoff theprogramnumberand timedisplay.
5.CALE(Calendar)
• Press CALEbutton, thecalendarappearson the screen.
• Press the / buttonstoselect YEAR(1900-2099).
• Press the / buttonstoselect MONTH.
• Press CALEbutton again, turnsoff the calendar.
CLEANING
WARNING! Beforeyouattempttocleanthetelevisionscreenorcabinet,always disconnectthe
appliancefromthemainspowerandremovetheplug fromthe mainpoweroutlet.
Cleanthe television withasoftdryclothonly.Neveruseanyharshchemicalcleaning
agent orwaterasthismaydamage the television.
WARNING! Neverallowwatersplashestoenterthe appliance. Donotimmerseinwater.
WARNING!Neverremovetherearcover. Donotattempttoservice thisequipment.

16
TROUBLESHOOTING
Shouldyourtelevision develop aproblem, pleaserefertothe belowbeforerequesting service.
Symptom Check &Action
No Power
Check if powercordisconnected properlytothe poweroutlet.
Check ifmainpowerbutton on the unitisswitched on.
Remotenotworking
Makesurethe mainpowerbutton on the unitisswitched on.
Removeobstaclesfrombetween the remoteand the appliance.
Ensureyou arepointing the remoteatthe remotesensoron the appliance.
Check the batterieshavebeen inserted properly.
Replacedead batteries.
NoTVsignal atall
Check TV/AV selecting button issetforTVmode.
Check the antenna locationorconnection.
No Picture atAV
mode
Check tosee if the TVisturned on &correct channel selected.
Check TV/AV selecting button issetforcorrect AVmode.
Check video systemconnectionsarecorrect &secure.
Check if the connection cablesaredamaged.
Picture normalbut
nosoundorsound
isnonormal
Check the sound volumeisatminimum.
Check mutefunction,
Check the sound system,change toBG sound system.
No colour
Check withthe coloursystem, asPALcoloursystemforNewZealand.
Re-adjust channelusing FINETUNEfunction.
Small dots,lines or
stripsonthepicture
Theseareusuallycaused byinterferancefromcars, neon lights, electrical
appliansesorothereletricaldevices. Adjustthe antenna tominimisethe
interference.
Ghosting
Usuallycaused byreflection fromhillsorhighbuildingsnearby. Adjustthe antenna
orrelocatethe antenna.Anexteriorantenna withgood directvityisstrongly
recommended.
Some channels
have poorreception
and colourfading
Anexteriorantenna withgood directvityisstronglyrecommended.
Re-adjust channelusing FINETUNEfunction.
Afterglow when
turned
It isnormal tohaveanafterglowon the screen for1-3secondsafterthe poweris
switched off,thisdoesnot effectthe screen.
ColourBlotching
Ifcolourblotching appearsafterchanging the angleof the TVset,switchthe main
poweroff and waitforat least one hourbeforeturnson again.

17
SPECIFICATIONS
Description
29”ColourTelevision
Powerinput
AC230-240V50Hz
Powerconsumption
140W
Coloursystem
PAL(NTSCplayback)
Sound system
BG, DG, I
Channelmemory
250
ColourPictureTube
29”(74cm) SuperFlat
Viewablesize
68cm(diagonally)
Sound output
8Wx2
Netweight
48kg
Dimensions
890 x560 x645mm
Note: Designandspecificationsaresubjecttochangewithout priornoticeforthepurposeof performanceimprovement.

18
GuaranteeCard
ThisProductisguaranteed again
stfaultymaterialsand workmanshipforaperiodof
twelvemonthsfromdateofpurchase.Theobligation tothepurchaserunderthis
warrantyislimited toservicing the unitand replacing defectivepartswhen the product
isreturned freightprepaidtothe
retailer.Thiswarrantybecomesvoidifthe product has
been tampered with,damaged,damaged byaccident,damaged inanyotherwayby
improperuseorhasbeen purchased second hand.
Warning!Referspecificinstructions.All productionordershavequality
inspections.IN
the unlikelyeventofadeficiency,pleasecontactthe retailerfromwhomthisproduct
waspurchased.
WARRANTYFORAPPLIANCES USEDCOMMERCIALLYLIMITEDTO 90 DAYS
Type of Appliance: _________________________________________________
ModelNumber: ________________Purchasedate:
Product Purchased From:
YourName:
Address:
Phone Number:
IMPORTANT!
Pleaseretainthiswarrantycardwithyour purchase receipt.
Please do notposttotheretailer orimporter. If serviceisrequired,bothof these
documentsaretobe returned withthe appliancetoyourretailer, otherwiseafee may
be charged.
Table of contents
Other Transonic TV manuals


