Transonic TC2380LCD User manual

Model:TC2380LCD


-1-
Contents
1 Introduction...................................................................................... 2-5
2 Installation...................................................................................... 6-10
3 Operation....................................................................................... 11-14
4 Trouble Shooting............................................................................ .....15
5 Remote Controller.......................................................................... 16-17
6 DVD MENU....................................................................................18-36
7Warranty Card.........................................................................................37

INTRODUCTION
-2-
Thank you very much for purchasing this TV. To enjoy your product from the very
beginning, read this manual carefully and keep it handy for easy reference.
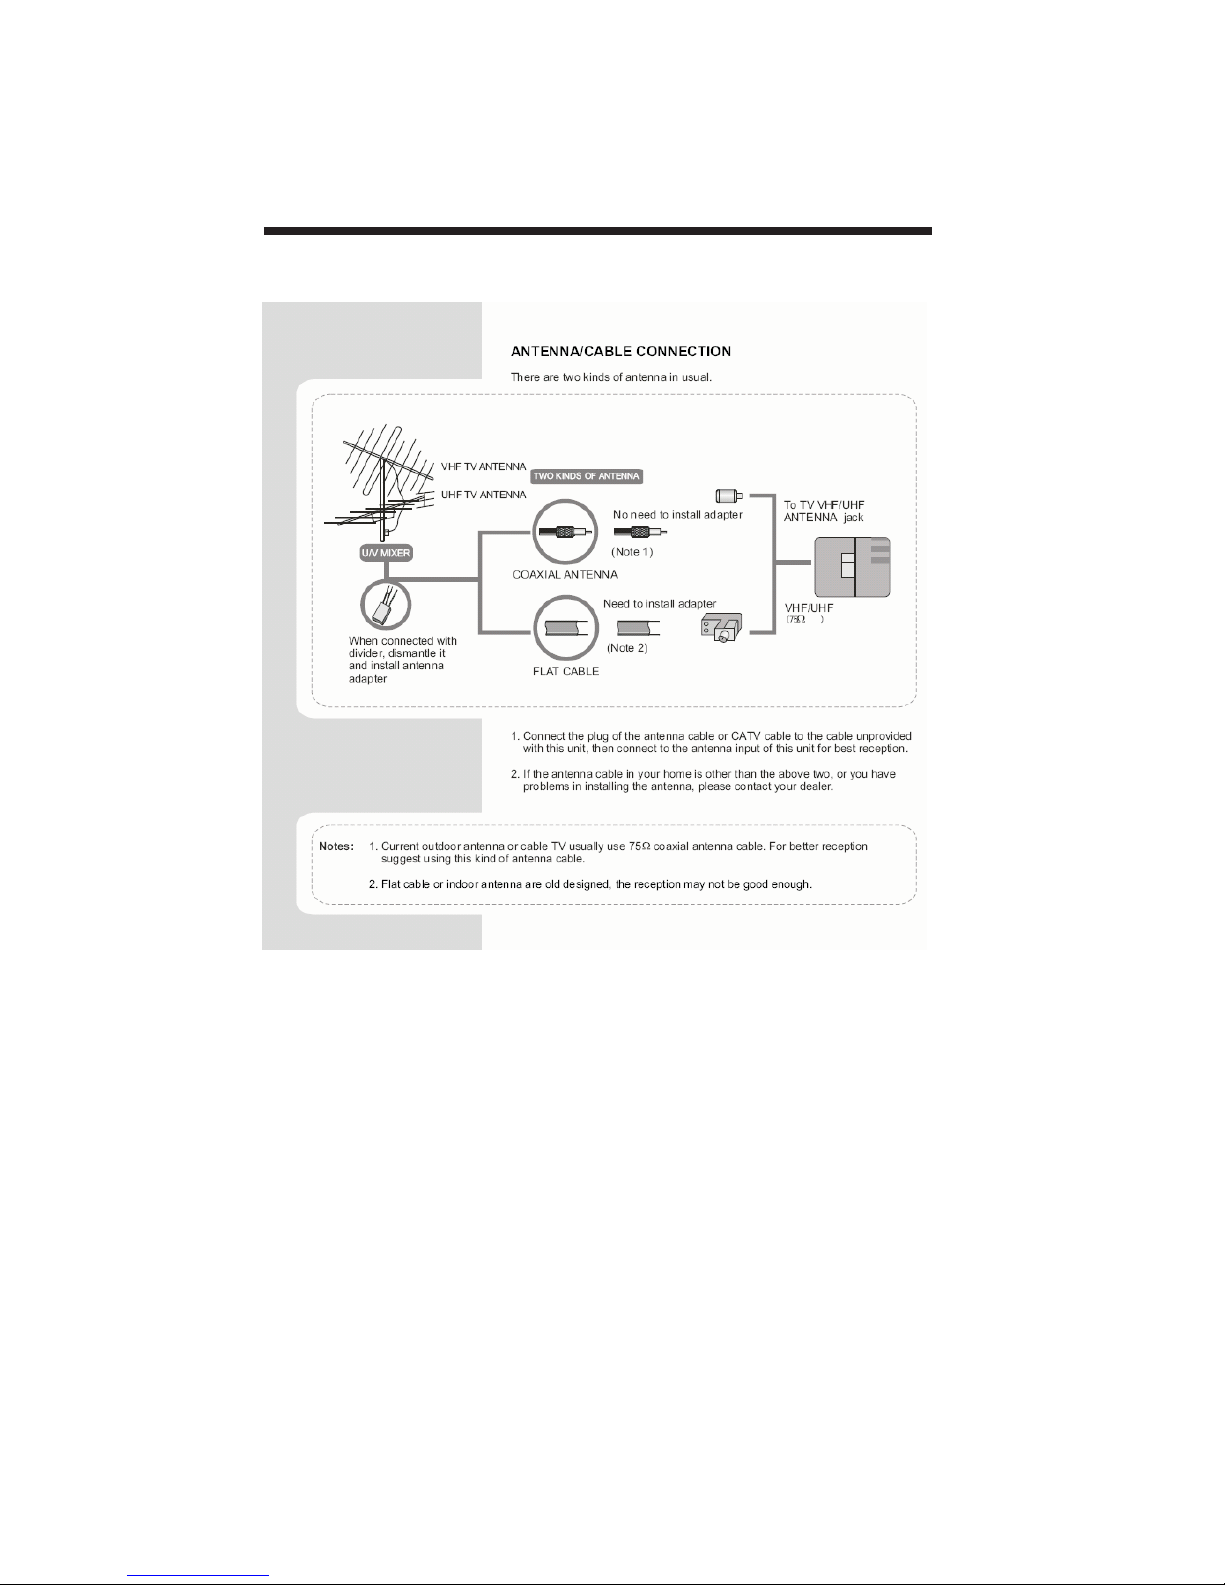
INSTALLATION
CAUTION
Locate the TV in the room where light does not strike the screen .
Total darkness or a reflection on the picture screen can cause eyestrain. Soft and indirect
lighting is recommended for comfortable viewing.
Allow enough space between the TV and the wall to permit ventilation.
Avoid excessively warm locations to prevent possible damage to the cabinet or premature
component failure.
This TV can be connected to AC 230-240 Volts. 50 Hz. Never connect to a DC supply
or any other power supply.
Do not cover the ventilation openings when using theTV.
directly
Never tamper with any components inside the TV, or any other adjustment controls not
mentioned in this manual. All LCD-TVs are high voltage instruments. When you clean
up dust or water drops on the LCD PANEL or CABINET, the power cord should be
pulled out from the receptacle, then wipe the TV with a dry soft cloth. During thunder
and lighting, unplug the power cord and antenna cord to prevent damage to your TV.
All repairs to this TV should only be performed by qualified TV service personnel.
INTRODUCTION
Viewing Pic ture Size(diagonal)
Resolution 1366x768
Aspect Ratio 16:9
TV Syst e m PAL-B/G I D/K
SECA M- B/G D/K L LL
Video Signal Sys tem PAL/NTSC/SE CAM
Receiving Range 44.75MHz-867.25MHz
Inpu t Powe r Voltage AC 230 V-240 V 50 Hz
Power consumption
Audio Output Power THD 7% 2x 8W
Signal Input Analog RGB(PC)x1
High-Definition Multimedia Interface(HDMI)x1
Video Inputx1
Super Videox1
Audio Inputx3
YCb (Pb ) Cr (P r)x1
SCA RTx 2
Horizontal definition TV line Composite Video in pu t >=350
Super Video Input >=400
Y Cb(Pb ) Cr(Pr ) >=400
170 W
32
Full SCARTx1(Scart CVBS+RGB)
Half SCARTx1(SCART CVBS)
32
-3-
Specification
DVD specification
Size 800(W)x560(H)x1070(D)
Net weight 19.3kg
Note:The LCD panel is very high technology product, giving you finely detailed picture .
Occasionally a few non-active pixels may appear on the screen an fixed point of colour
this does not affect the performance of you product.
Compatible discs DVD/MPEG-4/SVCD/VCD/CD/MP3/KODAK/JPEG
Resolution ratio 500 lines
Video S/N ratio 65dB
Frequency response(20HZ-20KHZ) 2dB
Video D/A Conversion Rate 10Mbit
Audio D/A Conversion Rate 24bit/192kHz
Nonactive Pixel <3
Note:Designandspecificationsaresubjecttochangewithoutpriornoticeforthepunposeof
performanceimprovement
-4-
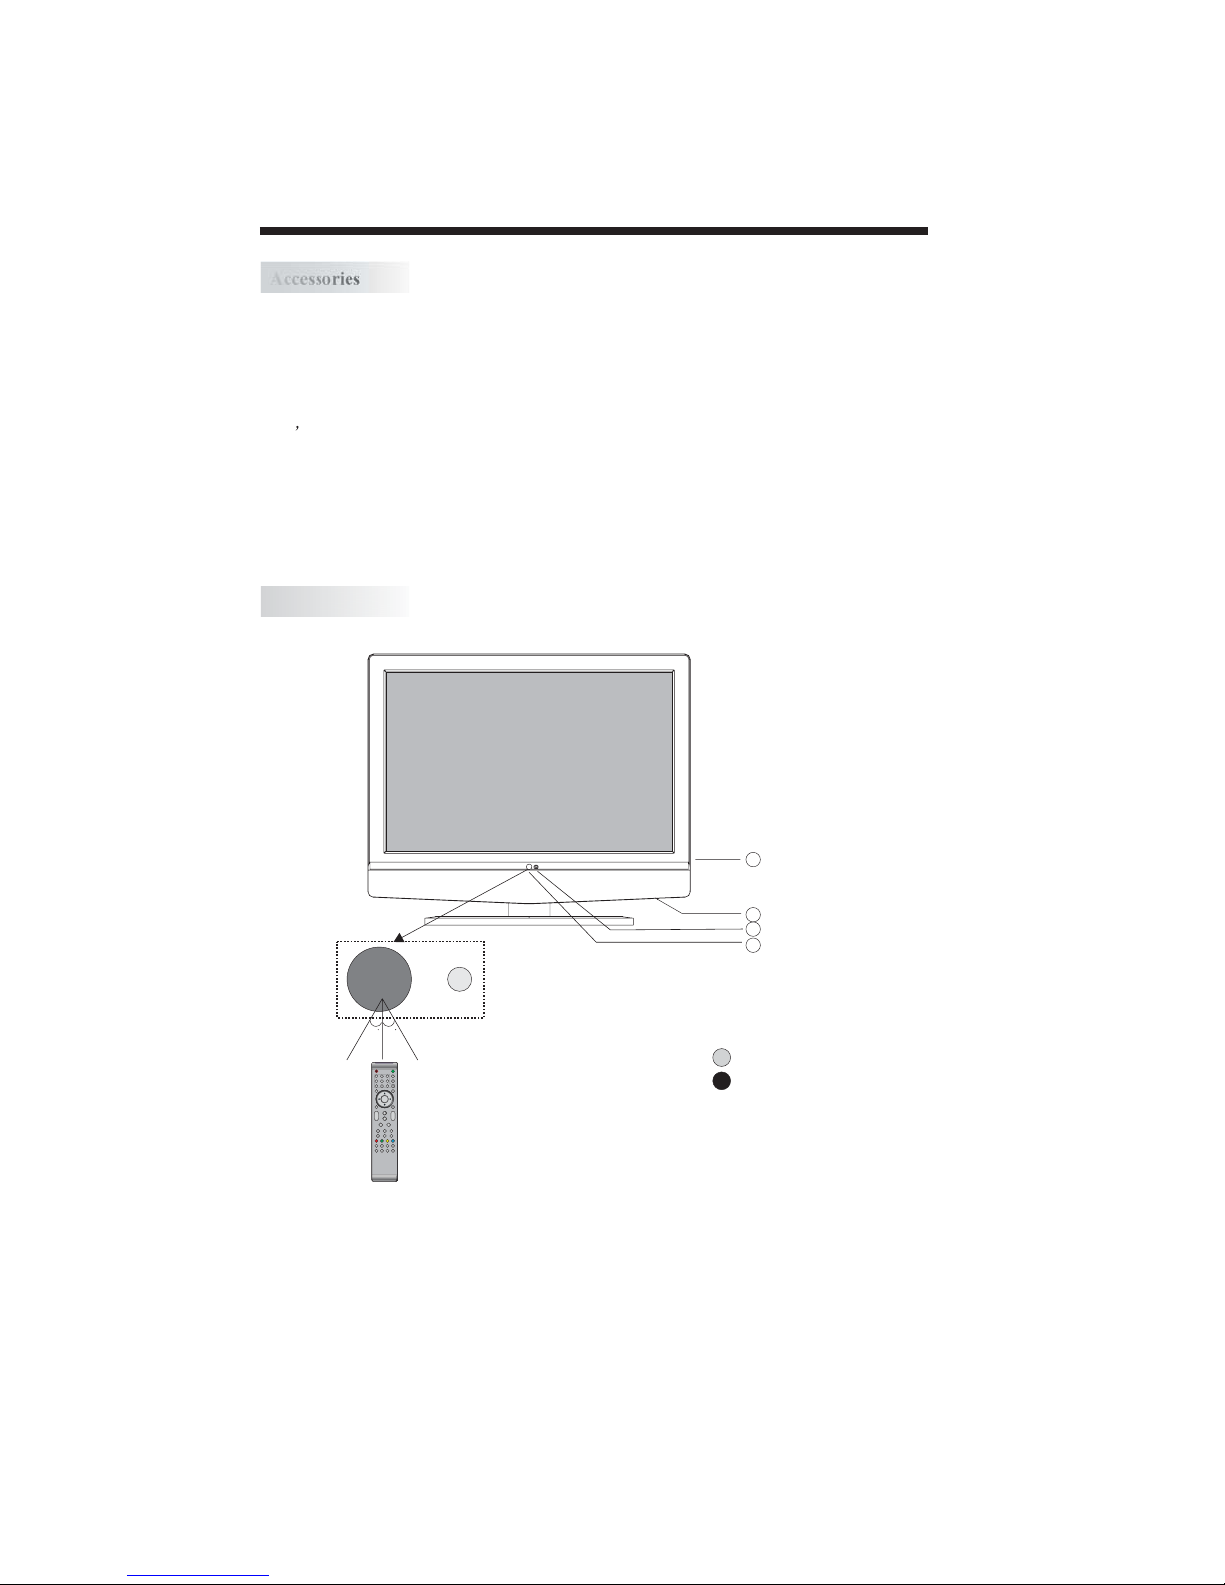
Accessories
Front panel
AC Power Cord......................... 1
Remote Control......................... 1
User s Manual ........................ 1
Battery(AAA).......................... 2
Accessories
INTRODUCTION
1: Remote control sensor.
2: Indicator LED: GREEN POWER ON.
RED STAND BY.
3: Key board(see next page).
4: AC power switch.
30 30
2
1
3
4
ENTER
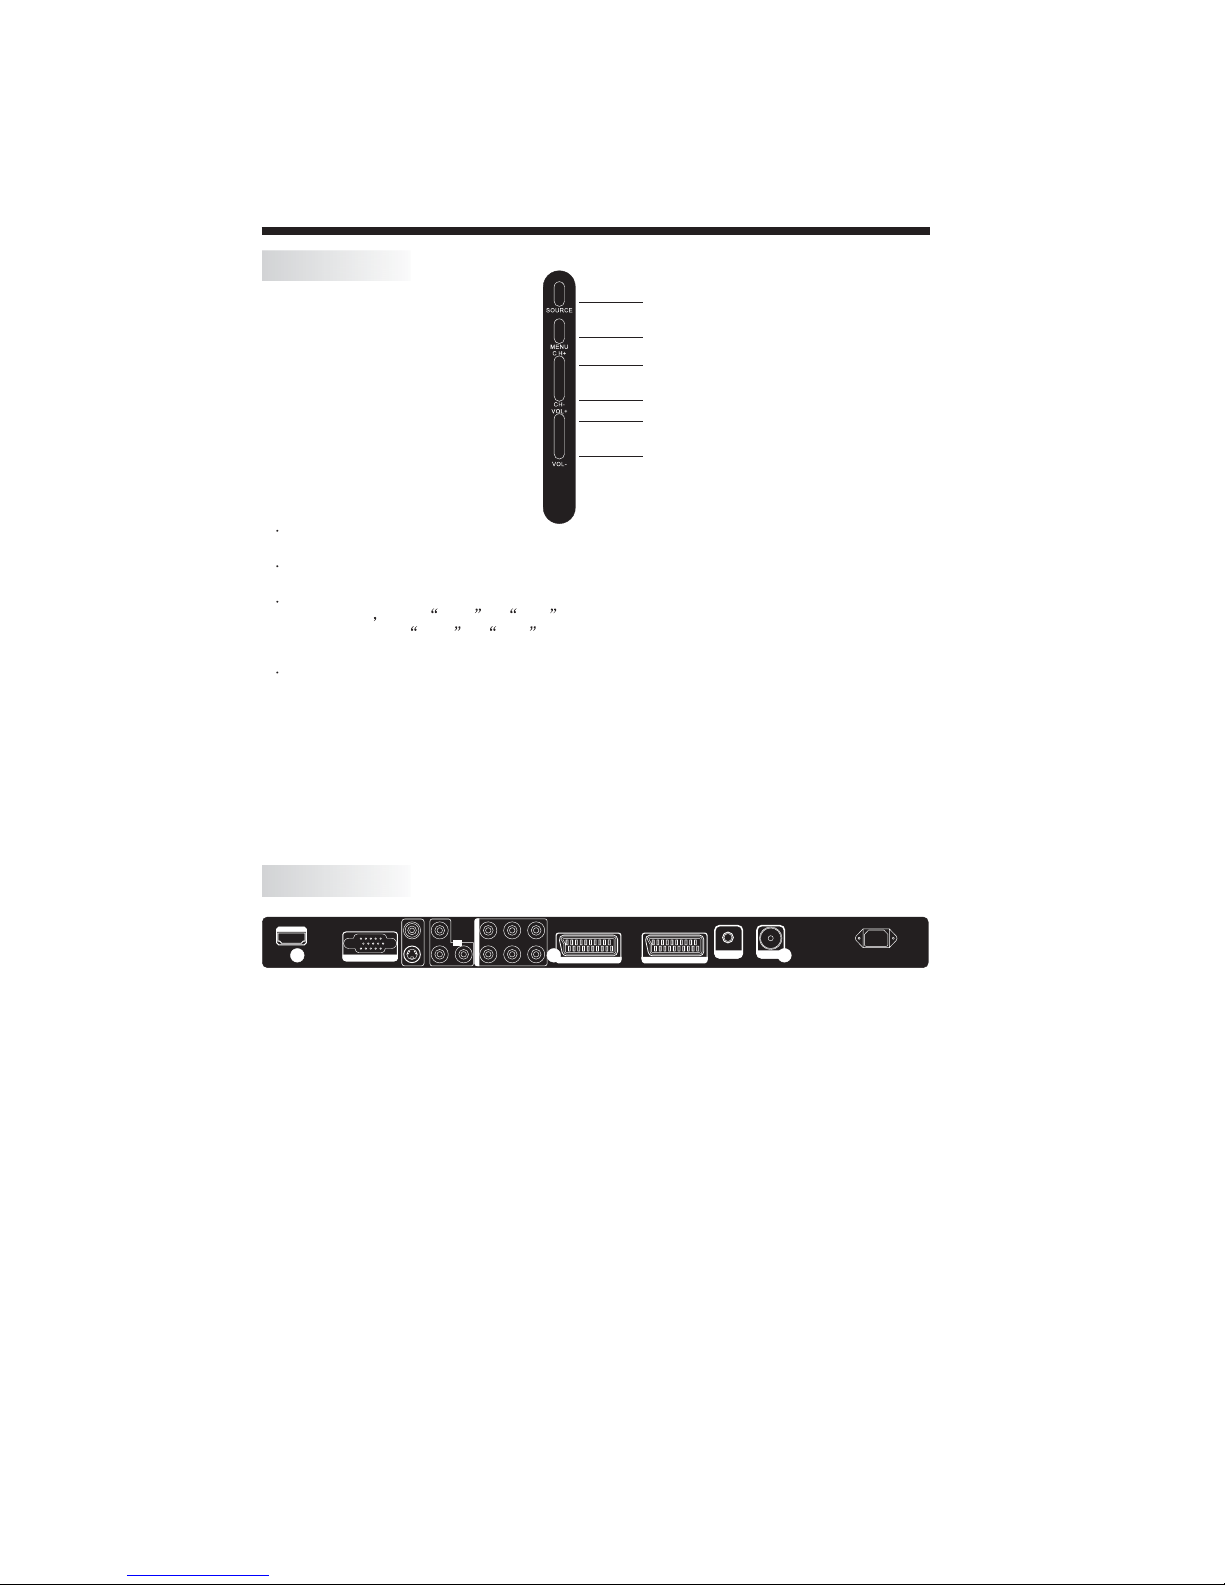
All the terminals are(from left to right):
HDMI, VGA , ,YPbPr,PC AUDIO,
SCART1, HALF SCART2 , HEADPHONE, ANTENNA,
Note: CVBS and S-VIDEO share one audio channel.
CVBS/S-VIDEO YPbPr AUDIO,AV AUDIO
FULL AC POWER.
SCART1(Full) is a scart with CVBS and RGB input.
SCART2(Half) is a scart with CVBS input only
.
INSTALLATION
KEYBOARD
REAR TERMINALS
-5-
SOURCE
MENU
CH+
CH-
VOL+
VOL-
1 SOURCE
2MENU
3 CH+/CH-
4 VOL+/VOL-
Display the input source menu.
To display main MENU.
In TV mode press CH+ or CH- to change the channel up and down.
In MENU,press CH+ or CH- to select items in MENU.
In standby mode, it can turn on the TV.
Adjust sound level.
In MENU,adjust the item that you selected.
S-VIDEO
AV-VI DEO YLLL
Y.P b . P r
INPUT
Pb Pr RRR
PC Y.Pb.Pr AV
AUDIO INPUT
AC-INPUT
100-240V~ 50/60Hz
ANT
SCART 1 (FULL) SCART 2 (HALF)
VGA INPUT
HDMI INPUT
EAR PHONE
S-VIDEO
AV-VI DEO YLLL
Y.P b . P r
INPUT
Pb Pr RRR
PC Y.Pb.Pr AV
AUDIO INPUT
AC-INPUT
100-240V~ 50/60Hz
ANT
SCART 1 (FULL) SCART 2 (HALF)
VGA INPUT
HDMI INPUT
EAR PHONE
INSTALLATION
-6-

PC
Be sure both the TV and computer are set to Power off.
1.Connect VGA and audio cable.
2.Connect the power cord.
3.Power on the TV, switch to PC mode.
4.Power on the PC.
This sequence is very important.
8
S-VIDEO
AV-VIDEO YLLL
Y.Pb. P r
INPUT
Pb Pr RRR
PC Y.Pb.Pr AV
AUDIO INPUT
AC-INPUT
100-240V~ 50/60Hz
ANT
SCART1 (FULL) SCART2 (HALF)
VGA INPUT
HDMI INPUT
S-VIDEO
AV-VIDEO YLLL
Y.Pb. P r
INPUT
Pb Pr RRR
PC Y.Pb.Pr AV
AUDIO INPUT
AC-INPUT
100-240V~ 50/60Hz
ANT
SCART1 (FULL) SCART2 (HALF)
VGA INPUT
HDMI INPUT
-7-
INSTALLATION

PRESET MODE(recommended resolution is 1366*768@60Hz)
1
2
3
4
5
6
7
8
9
10
11
12
13
720*400
640*480
640*480
640*480
800*600
800*600
800*600
800*600
1024*768
1024*768
1024*768
1280*1024
1280*1024
70
60
72
75
56
60
75
72
60
70
75
60
75
31.47
31.47
37.86
37.50
35.156
37.88
46.88
48.08
48.36
56.48
60.02
63.98
80.00
RESOLUTION V.Freq.(Hz) H.Freq.(KHz)
INSTALLATION
PC
-8-

INSTALLATION
It can be connected to the following appliances: VCR, multi-disc player, DVD, camcorder, video game
or stereo system, etc.....
YPbPr and HDMI can support these video fomats:480i,576i,480p,576p,720p,1080i.
SCART
To audio
outputs
with
terminal
VIDEO EQUIPMENT
VIDEO EQUIPMENT with YPbPr
To audio outputs
with S-v ideo
term inal
VIDEO EQUIPMENT
To S-VIDEO
output
Yellow (video)
White(audol L,mono input)
Red(audio R)
Y
W
R
Y W R
R
W
Y
W R
output
To video
GBR
GBR
Rr
Y
Pb
R
G
B
HDMI
SCART
AV EQUIPMENT
This TV provides one group of AV ,S-Video,one HDMI, one group of (YPbPr) and two SCART(half
scart and full scart) sockets for convenient connection to VCR,DVD or other video equipment. Please
refer to the owner s manual for the equipment to be connected as well.
You can use the input terminals on rear of the TV as follows.
-9-
NOTE:
Headphone
When headphone is connected, the speakers of the TV set will be disconnected.The
VOLUME -/+ keys are used to adjust the volume level. The headphone impedance
must be between 32 to 600 Ohm.Ohm
W R
S-VIDEO
AV-VID EO YLLL
Y.Pb . P r
INPUT
Pb Pr RRR
PC Y.Pb.Pr AV
AUDIO INPUT
AC-INPUT
100-240V~ 50/60Hz
ANT
SCART1 (FULL) SCART 2 (HALF)
VGA INPUT
HDMI INPUT
EAR PHONE
S-VIDEO
AV-VID EO YLLL
Y.Pb . P r
INPUT
Pb Pr RRR
PC Y.Pb.Pr AV
AUDIO INPUT
AC-INPUT
100-240V~ 50/60Hz
ANT
SCART1 (FULL) SCART 2 (HALF)
VGA INPUTVGA INPUT
HDMI INPUT
EAR PHONE

Remark:
BATTERY INSTALLATION
Insert Batteries Into the Remote Control
1. Remove the battery cover.
2. Inserting the 2 AAA 1.5V batteries making sure the polarity (+ or -) of the batteries matches the polarity
marks inside the unit.
3. Mount the battery cover.
Replace with new batteries when the TV set begins to show the following symptoms:
Operation is unsteady or erratic. Sometimes the TV set does not function with Remote Control Unit.
1) Alkaline Battery Recommended.
2) Remove batteries when they are exhausted or if the remote control is not to be used for long time.
-10-
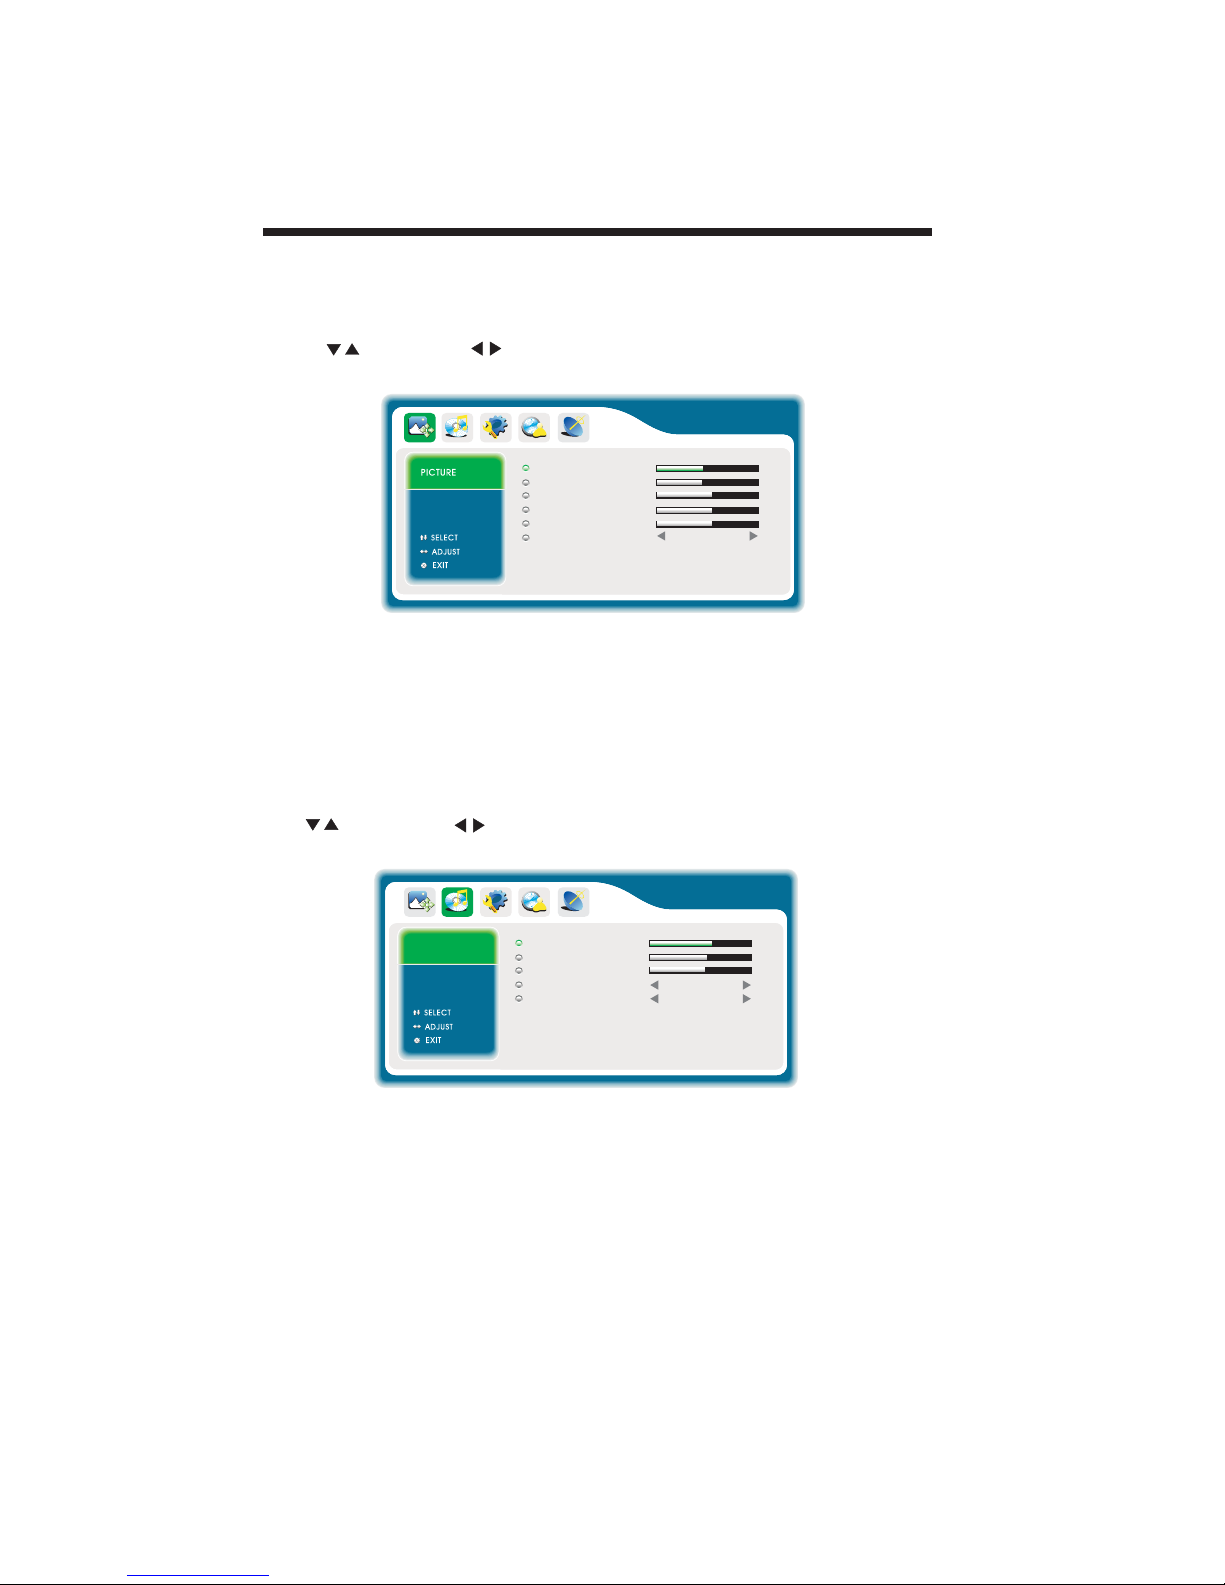
1. PICTURE MENU
The first item of the MENU is picture menu.
You can adjust picture effect here, such as contrast, brightness, etc.
Press to move, press to adjust.
Note:
1).TINT is only available when receiving NTSC signal.
2). There are three colour temperature modes which can : NORMAL, WARM, COOL.be selected
2.SOUND MENU
The second item of the MENU is the SOUND MENU.
You can adjust the sound here.
Press to move, press to adjust.
Note:
1).SURROUND mode can be available only for stereo audio input.
OPERATION
-11-
60
CONTRAST
BR IGHTNESS
TINT
COLOUR
SHARPNESS
COLOUR TEMP .
47
50
50
26
NORMAL
SOUND
BASS
TREBLE
BALANCE
AUTO VOLUME
SURROUND
57
53
50
OFF
OFF

3.FUNCTION MENU
The third item of the MENU is the function menu.
You can adjust the settings below:
1).IMAGE EFFECT :you can see the image effect difference between the 3D mode or 2D
mode.
2).3D NR: adjust this item , you can see the noise reduction effect in the picture only for TV
and AV source.
3).COLOUR SYSTEM: adjust the colour -system mode.
Note:when in TV mode, you can adjust the colour system in CHANNEL MENU.
4).TEXT LANGUAGE: adjust teletext language.
5).FACTORY DEFAULT: Reset all the settings to default value.
OPERATION
-12-
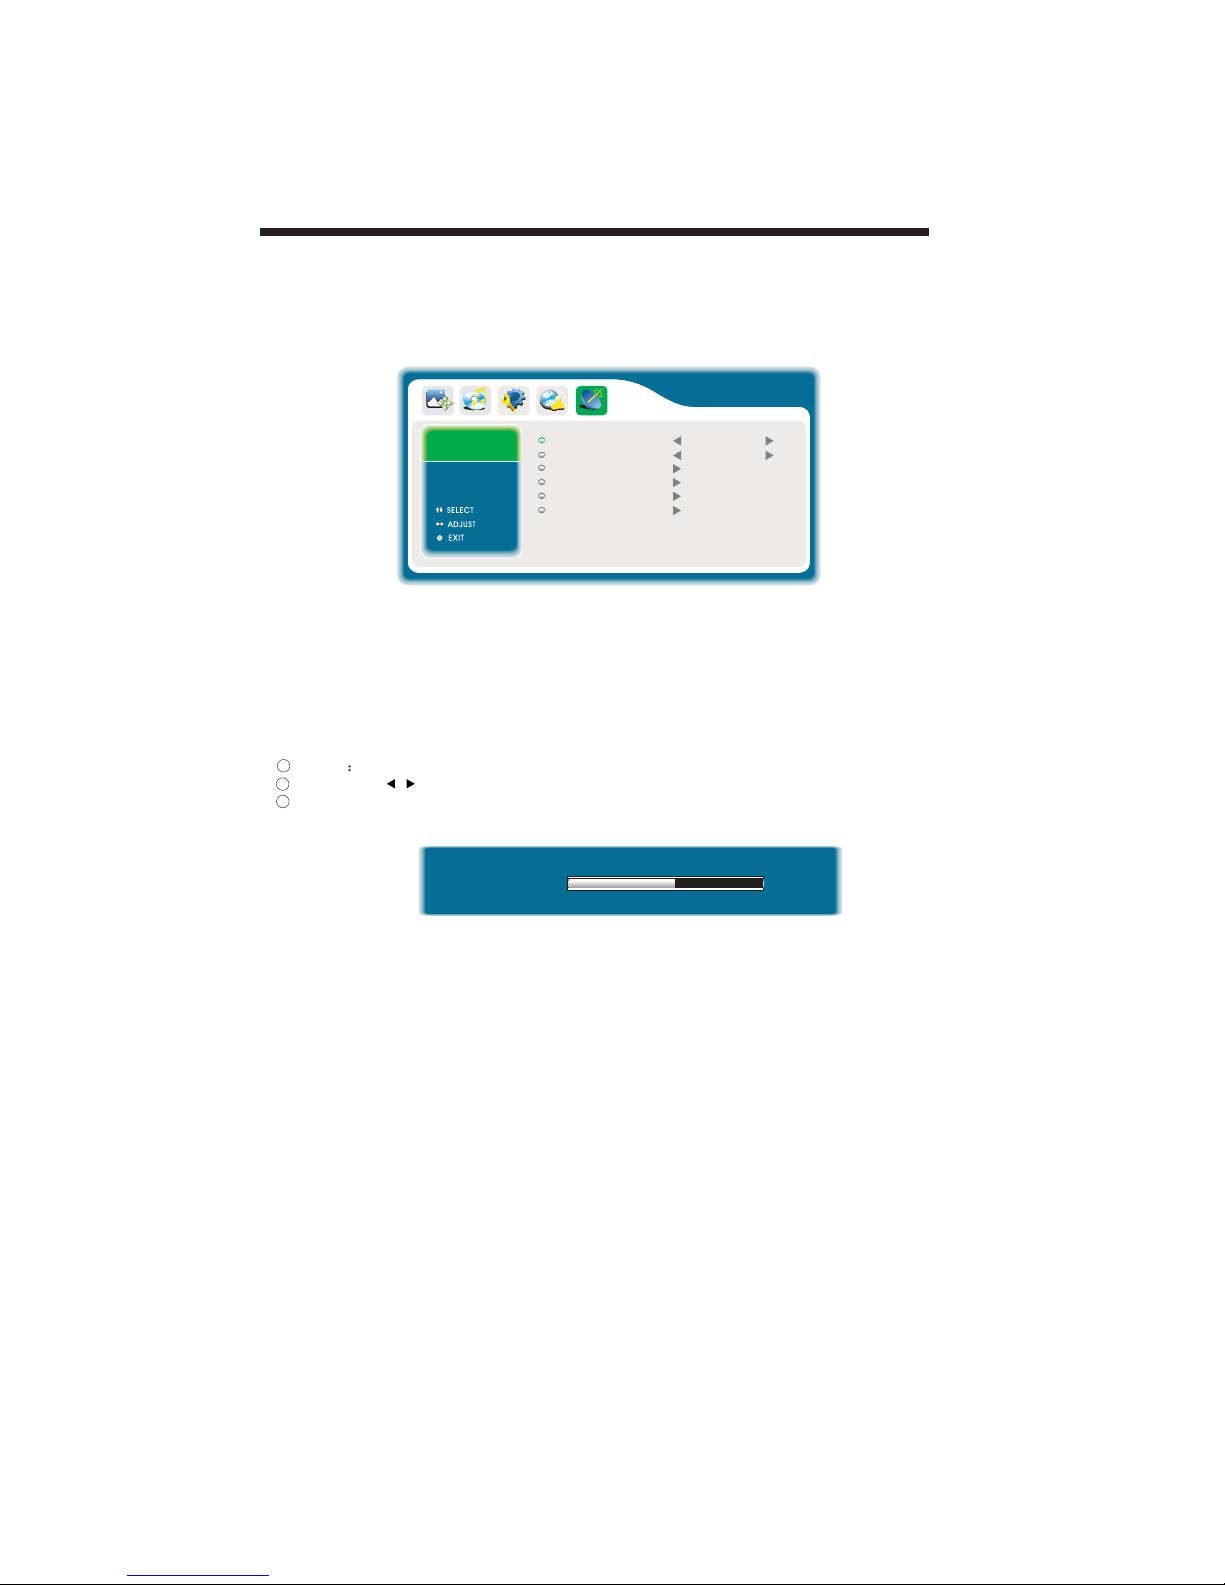
4.OSD MENU
The fourth item of the MENU is the OSD menu.
FUNCTION
IMAGE EFFECT
3D NR
COLOUR SYSTEM
TEXT LANGUAGE
3D
LOW
AUTO
WEST
FACTORY DEFAULT
OSD
OSD H-POSITION
OSD V-POSITION
OSD TIMEOUT
OSD TRANSPARENCY
50
50
26
0
OSD LANGUAGE
ENGLISH
OPERATION
-13-
5.CHANNEL MENU
The fifth item of the MENU is channel menu(only use in TV source).
You can complete channel search and setting here.
CHANNEL
SEARCH
STORE OK
4
287.54Hz
1
2
3
.channel Select the start channel of the manual search .
.search: Press begain to search.
.store:Store the program.
1).COLOR SYS: AUTO, PAL, SECAM,BG. AUTO is recommended.
2).SOUND SYS: DK, BG, I,L, LL. BG is recommend.
You should set this system according to the local TV broadcast.
3). AUTO SCAN
Search all the channels automaticly.
4). MANUAL SCAN
Search the channels manually.
5). CHANNEL PROGRAM
Display TV channel table.
6). FINE TUNE
Fine tune the current program.
CHANNEL
COLOR SYSTEM
SOUND SYSTEM
AUTO SCAN
MANUAL SCAN
CHANNEL PROGRAM
FINE TUNE
AUTO
BG

-14-
OPERATION
1. PC MENU
You can adjust picture here, such as contrast, brightness.
Press to move, press to adjust.
1.colour mode:only four modes could be selected: normal,warm,cool,user.
2.Press to move,press to adjust RGB value according to your personal taste under
user mode.
2. FUNCTION MENU
In PC Mode,with a computer connected there are two items are different with other sources.
1).H-POSITION:adjust the horizontal position of the screen.
2).V-POSITION:adjust the vertical position of the screen.
3).CLOCK: fine tune the screen width.
4).PHASE: fine tune the phase of the screen. Usually don`t adjust this item.
5).AUTO: auto adjust to fit the screen.
60
CONTRAST
BR IGHTNESS
COLOUR MODE
ASPECT
47
NORMAL
PC
COLOR TEMP.
50
PC
USER
USER-R
USER-G
USER-B
50
50
FUNCTION
H-POSITION
V-POSITION
CLOCK
PHASE
AUTO
60
47
47
47

Picture Audio
Snow Noise antenna position, direction
or connection
Inspection Check
Interference Noise electronic equipment,car/
motorcycle,fluorescent light
Normal Picture Mute
Volume(check if mute is
activated or if the audio system
connections are not correct)
No picture Mute
Power cord is not inserted
Power switch is not opened
Contrast and brightness/volume
setup
Press standby key on the remote
control for inspecting
No colour Normal audio Colour control
Picture
breaking up
Normal audio
or weak
retune channel
No colour Noise TVsystem
Normal audio
antenna position, direction
or connection
Trouble shooting
Trouble phenomenon Symptom
Ghost
-15-

-16-
REMOTE CONTROLLER
1
ENTER
2 3
4 5 6
7 8 9 0
+
CH
_
+
_
VOL
POWER MUTE
NICAM
RECALL/GOTO
TV MENU SOURCE
DVD MENU SOUND EXIT
PIC
SLEEP ASPECT
TEXTREPEATDVD SETUP
REVEAL HOLD LIST INDEX
SUBPAGE DISPLAY AUDIO SUBTITLE
ANGLE
PBCDVD/USB TITLE
TV DISPLAYPLAY/PAUSE STOP
1: :
To set the TV standby or power on.
2: :
3: :
To display TV menu.
4: :
To move within the menu.
5: :
To enter DVD menu in DVD mode.
6: :
To adjust sound level.
7: :
To switch picture mode.
8: :
S
19: :
To disable or enable the sound.
20: :
To switch nicam mode.only be available in TV
program with nicam mode transmission.
21: :
In analog TV mode, it is used to access the
previously viewed programme.
22: :
To display TV input source menu.
23. :
Used to return to the previous menu or exit menu.
25: :
To switch sound mode.
26: :
To access the next or previous TV programmes.
27: :
To change picture aspect ratio: 16:9,zoom,14:9,
4:3,panorama,Panorama mode is not available
in HDMI and YPbPr source.
28: :
To enter or exit TELETEXT.
29: :
Displays/removes the programme information.
POWER
NUMBER KEY
TV MENU
CURSOR
DVD MENU
VOL+/-
PIC
SLEEP
MUTE
NICAM
RECALL/GOTO
SOURCE
EXIT
SOUND
CH+/CH-
ASPECT
TEXT
TV DISPLAY
For direct access to programmes. For a 2 (3)
digit programme number,The second (third)
digit must be entered before the dash
disappears. The number, the name ( in analog
TVmode) are displayed for a few seconds.
et time to turn off the TV.
36: :Confirms selection.
TELETEXT KEYS:(see 29 page )
REVEAL,HOLD,LIST,INDEX,SUBPAGE
ENTER
1
2
3
4
5
6
7
8
9
11
10
12
13
14
15
16
17
18
19
20
21
22
23
26
25
27
28
29
30
31
33
32
35
34
36
9 -18,20,21,30-35 these keys are for DVD detail
information, please refer to DVD user manual
REMOTE CONTROLLER

E
TEXT
SELECTING A PAGE
DIRECT ACCESS
TO THE ITEMS
INDEX
SUB PAGE
HOLD
REVEAL
Press : You will obtain:
LIST
REMOTE CONTROLLER
TELETEXT
Enter the number of the page required using the 0 to 9 up/down. Example:
page 120, enter 120. The number is displayed top left, the counter turns and
then the page is displayed. Repeat this operation to view another page. If
the counter continues to search, this means that the page is not transmitted.
Select another number.
Coloured are as are displayed at the bottom of the screen. The 4 coloured
keys are used to access the items or corresponding pages. The coloured
areas flash when the item or the page is not yet available.
This returns to the contents page (usually page 100).
Certain pages contain sub-pages which are automatically displayed
successively. This key is used to stop or resume sub-page acquisition.
The indication appears top left.
To freeze the page.
To display or hide the concealed information (games solutions).
The user can set four favorite pages to be directly linked to the four color
keys. While list mode is activated, it is not possibility to use TOP or FLOF
navigation with the colorkeys. The favorite page numbers should be stored
and restored to/from nonvolatile memory for each channel by the system
software.
This is used to call or exit teletext modes. The summary appears with a
list of items that can be accessed. Each item has a corresponding 3 digit
page number. If the channel selected does not broadcast teletext, the
indication 100 will be displayed and the screen will remain blank (in this
case, exit teletext and select another channel).
Teletext is an information system broadcast by certain channels which can be consulted
like a newspaper. It also offers access to subtitles for viewers with hearing problems or
who are not familiar with the transmission language(cable networks, satellite channels, etc.)
-17-
Table of contents
Other Transonic TV manuals


