Transonic TC-2961 User manual

2

3
IMPORTANT SAFEGUARDS

SYMBOLS
ANTENNA CONNECTION
OTHER EQUIPMENT
OPERATION OF REMOTE CONTROL
BASIC OPERATION
6
7
8-10
11-15
TROUBLE SHOOTING
16
SPECIFICATIONS
17
CONTENTS
2
IMPORTANT SAFEGUARDS
3
4
LOCATIONS OF CONTROLS
5

FRONT PANEL
LOCATIONS OF CONTROLS
BACK PANEL
TV/AV MENU V- V+ P- P+
12 13
14
1. Speaker
2. SideAV1 Input
3. TV/AV Button
4. MENU Button
5. Volume Down Button
6. Volume Up Button
7. Channel Down Button
8. Channel Up Button
11
2
5
9. Standby Indicator
10. Remote Sensor
11. Power Button
12. 75 ohm Antenna
13. Rear AV2 Input
14. Rear AV Output
15. Rear S-VIDEO Input
345
6
78910 11
15
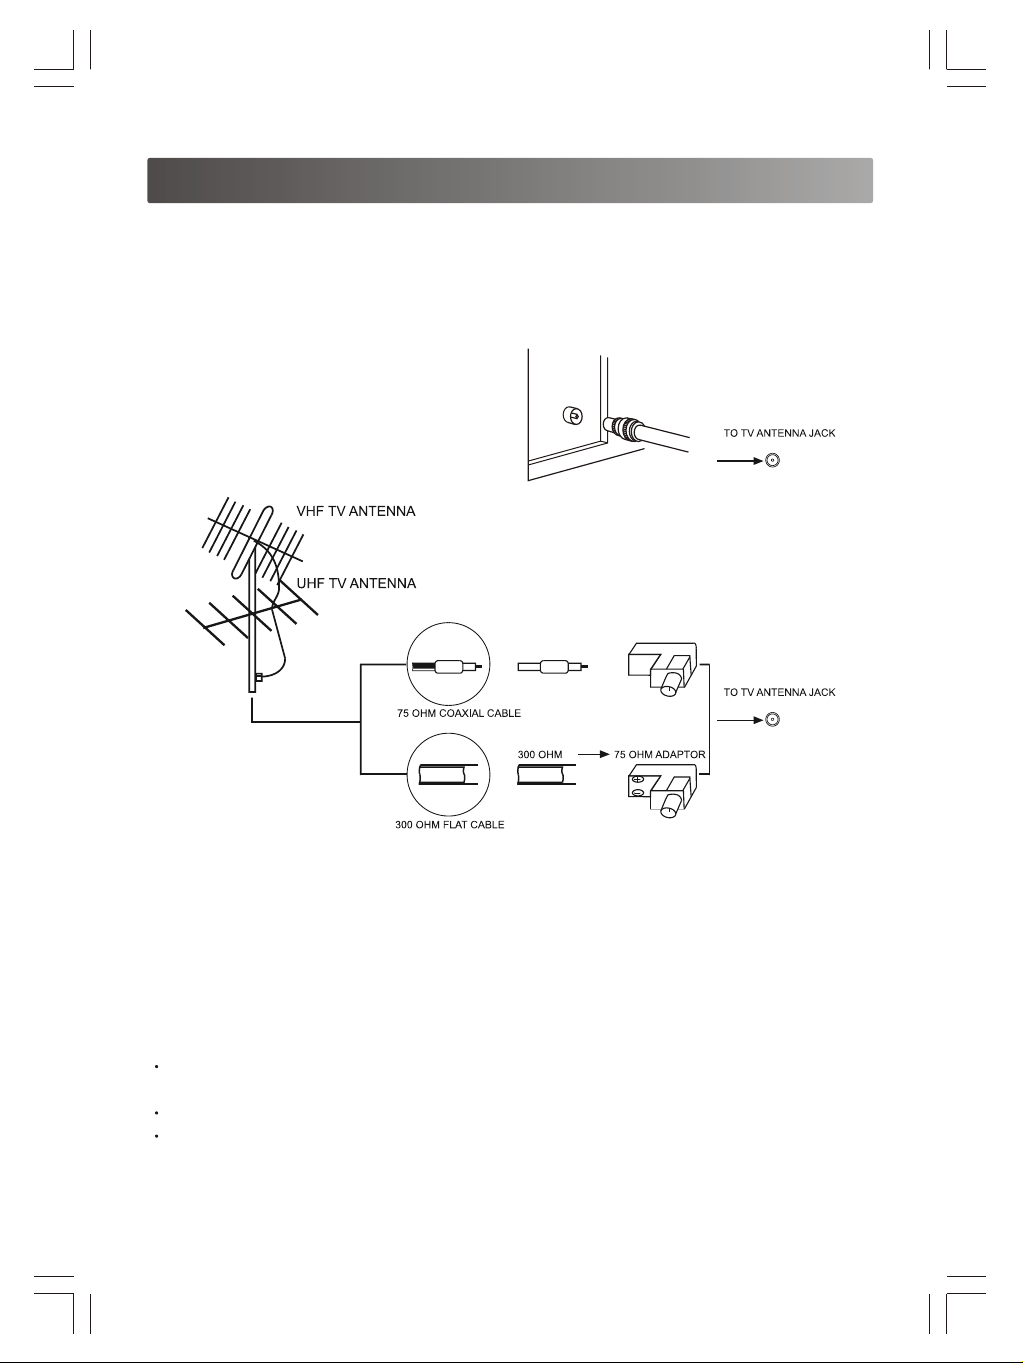
ANTENNA CONNECTION
INSTALLATION OF ANTENNA
Connect the 75 OHM coaxial cable from the antenna to the antenna jack on the rear panel,
as shown above.
Note:
For better reception, especially in outlying area or where ghost or interference happens,
an external roof-mounted antenna is recommended.
For UHF TV reception, use the specified UHF antenna.
When using 300 OHM flat cable, a 300 OHM - 75 OHM adapter should be adopted for a
proper connection to the antenna jack.
Aerial cable
6

CONNECTION TO OTHER EQUIPMENT
This TV set can be connected to a video cassette recorder, video disc player, video camera,
game player.(Not available for audio only)
OTHER EQUIPMENT
RED
WHITE
YELLOW
SIDE A/V CONNECTIONS
R-AUDIO-L VIDEO
REAR A/V CONNECTIONS
7
VIDEO CASSETTE RECORDER
DVD PLAYER
VIDEO
AUDIO
S-VIDEO
(Optional)

..
123
456
78
0-/--
9
VOL- VOL+
CH+
CH-
P.P
TEXT/TV REVEAL
.
OPERATION OF REMOTE CONTROL
DESCRIPTION OF REMOTE CONTROL KEYS
1
8
5
6
1. STAND-BY BUTTON
Firstly, the power supply of the unitmust be
switched on. When it is in standby status, the
indicator will be lit, press standby button, the
indicator will then go out, after a few seconds, the
unit is on. Press the button once again to turn the
unit off (standby status).
Also the unit can be switch on by pressing
P+ or P- button on the TV set when it is in
standby status.
The unit has the function of no signal muting and
no signal auto switching off. If there is no signal
for several minutes, it can be turned to standby
status automatically.
2. DISPLAYBUTTON
Press the button to display the current information
of the TV.i.e. Channel, Colour System, Sound-
System, etc.
3. CHANNEL BUTTON
1) When the channel number has one figure,
press the number directly.
2) When the channel number has two figures,
it can be accessed by pressing button -/-- first,
say if you want to access program 23, press
button -/-- to see -- on the screen, then press 2
and within 5 seconds of pressing 2, press button
3. If button 3 is not pressed within 5 second the
program accessed is program number 2.
4. RECALL BUTTON
Press the button, the program can be
interchanged between present program and
former program.
5. PROGRAM BUTTONS
Press these button to select the next higher or
lower program number.
6.VOLUME BUTTONS
Press these button to increase or decrease the
sound volume level, volume bar will be displayed.
7.TV/AV SELECTION BUTTON
Press the button to select TV, AV1, AV2 or S-VHS
input signal.
8.SOUND MUTE BUTTON
Press the button to mute the sound completely.
Press the button once again to restore the
previous sound level, and cancel the mute.
15
13
17
18
3
2
4
10
11
12
14
7
8
9
16

OPERATION OF REMOTE CONTROL
DESCRIPTION OF REMOTE CONTROL KEYS
9. SLEEP TIMER BUTTON
Press the button, it can preset the unit with
definite time(0~120minutes). After that the unit
can be automatically switched to standby.The
sleep timer can be set in steps of 10 minutes
with a maximum of 120 minutes.
10.ENTER BUTTON
Enter key. Press to enter menu selections.
11.MENU BUTTON
Press the button to select Picture menu, Audio
menu, Install menu or Setup menu. If submenu
is selected, press the button to exit submenu.
12.TEXT/TV BUTTON
Press the button to select TELETEXT or TV
input signal.
13. OK BUTTON
Enter key. Press to enter menu selections.
14.PICTURE MODE BUTTON
Press the button to cyclically select Soft,
Dynamic, Favourite or Standard mode.
15.ANALOG BUTTON
Press the button to cyclically select the Picture
and Sound setting as following:
Volume Brightness Contrast Colour
Sharpness Tint (NTSC only) Treble
Bass Balance
16.SOUND MODE BUTTON
Press the button to cyclically select News,
Music, Favourite or Standard mode.
17.PICTURE MODE BUTTON
Press the button to cyclically select Soft,
Dynamic, Favourite or Standard mode.
18.REVEAL BUTTON
These button can be only used in
TELETEXT mode.
TELETEXT MODE
1) TEXT/TV Key
Press the TEXT/TV key to change the viewing
condition from TV to Teletext if TV stations in
your local have teletext broadcasting.
2) REVEAL Key
This is a toggle function key to display hidden
characters.
3) OK / P.NODE /A.A / S.MODE Keys
These 4 Colour keys in teletext mode can
quickly enter the pre-captured teletext pages.
4) P+/P- Keys
These keys can be used as a page up/down key
in teletext mode.
5) 0, 1, ..., 9 Key
Using the 0, 1, ..., 9 keys, the required Teletext
pages are selected.
9

OPERATION OF REMOTE CONTROL
1.Open the battery compartment cover.
2.Insert two AAA (pencil size) 1.5V
batteries. Make sure the polarity (+ or -)
of the batteries matches the polarity marks
inside the unit.
3.Close the battery compartment cover.
NOTE:
The life time of the batteries may last up
to one year, depending on how often the
remote control is used. For the best
performance, the batteries should be
replaced on a yearly basis, or when
remote operation becomes erratic.
Be sure to place the batteries in the
correct direction, as shown left.
Do not mix old and new batteries, or
different types.
Old batteries may leak chemical and
damage the remote control. Always
remove batteries as soon as they
become weak.
BATTERY INSTALLATION OF REMOTE CONTROL UNIT
10
555

BASIC OPERATION
11
Connect your TV aerial to the aerial input socket located onthe back of the TV.
Push the Main Power Switch, if the unit is in standby status, the indicator will be lit, press
the standby button on remote control to turn on the TV, the indicator will then go out, after a
few seconds the TV screen will light up.
MAIN MENU OPERATION
Press the button Menu on the TV or on the remote control to select Picture menu,Audio
menu, Install menu and Setup menu according to the menu shownon the screen.
INSTALL MENU OPERATION
Press the button Menu on remote control to select Install
menu. Shown as right:
Auto Search Operation
1. Press the P+ or P-button to select AutoTune item.
2. Press the Enter button to begin searching. After searching
all wave band, auto search stop. In the course of the auto
searching, press the Menu or Standby button to stop
searching. After auto search finished, the unit returns to
the normal reception status, program number is Pr01 .
Note: The unit will automatically search all VHL, VHF and UHF band andsupplementary
channel. After searching finished, all fine tuned programs will be stored automatically.
When it is auto search, the amount of stored programs can be 99 (program number 01-99).
32
Picture
Brightness
Contrast
Colour
Sharpness
Tint
32
Audio
Treble
Bass
Balance
Volume
Install
Auto Tune
Manual Tune
Fine Tune
Store
Setup
Timer
Organize
Function
Language
** The install menu will not be displayed whenyou press menu button if theTV is in the AV mode.**
Install
Auto Tune
Manual Tune
Fine Tune
Store

BASIC OPERATION
12
Manual Tuning Operation
1. Press the P+ or P- button to select Manual Tune item.
2. Press the V+ or V- button right or left to search theTV program you want. When find out
program, searching stop. Then press the P+ or P- button to select Store item, press the
Enter button to enter Store submenu, and press the P+ or P- button to select Program or
Store item. If Program is selected, press the V+ or V- button or press 0-9 button to select
program number. If Store is selected, press the Enter button to save the present program,
and screen display: OK . In the course of the manual searching, press the Menu or
Standby button to stop searching.
Fine Tuning operation (only in caseof poor reception)
1. Press the P+ or P- button to select Fine Tune item.
2. Press the V+ or V- button right or left to adjust the picture andsound. After fine tune
finished, press the Enter button to enter Store submenu, and press the P+ or P- button to
select Program or Store item. If Program is selected, press the V+ or V- button or press
0-9 button to select program number. If Store is selected, press the Enter button to save
the present program, then screen display: OK . Press the Menu button to exit
submenu.
Store Operation
1. Press the P+ or P- button to select Store item.
2. Press the Enter button to enter Store submenu, and press the P+ or P- button to select
Program or Store item. If Program is selected, press the V+ or V- button or press 0-9
button to select program number. If Store is selected, press the Enter button to save the
present program, then screen display: OK . Press the Menu button to exit submenu.
PICTURE MENU OPERATION
Press the button Menu on remote control to select
Picture menu. Shown as right:
Brightness Adjustment
1. Press the P+ or P- button to select Brightness item.
2. Press the V+ or V- button in order to increase or
decrease brightness (00~63).
Contrast Adjustment
1. Press the P+ or P- button to select Contrast item.
2. Press the V+ or V- button in order to increase or decrease
contrast (00~63).
Colour Adjustment
1. Press the P+ or P- button to select Colour item.
2. Press the V+ or V- button in order to increase or decrease colour (00~63).
Sharpness Adjustment
1. Press the P+ or P- button to select Sharpness item.
2. Press the V+ or V- button in order to increase or decrease sharpness (00~15).
Tint Adjustment
1. Press the P+ or P- button to select TINT item.
2. Press the V+ or V- button in order to increase or decrease tint(-31~00~+32).
Note: Tint will only appear in NTSC mode.
32
Picture
Brightness
Contrast
Colour
Sharpness
Tint

BASIC OPERATION
13
AUDIO MENU OPERATION
Press the button Menu on remote control to select
Audio menu. Shown as right:
Treble Adjustment
1. Press the P+ or P- button to select Trebleitem.
2. Press the V+ or V- button in order toincrease or decrease
treble (00~63).
Bass Adjustment
1. Press the P+ or P- button to select Bass item.
2. Press the V+ or V- button in order toincrease or decrease bass (00~63).
Balance Adjustment
1. Press the P+ or P- button to select Balance item.
2. Press the V+ or V- button in order toadjust right and left track (-31~00~+32).
Volume Adjustment
1. Press the P+ or P- button to select Volumeitem.
2. Press the V+ or V- button in order toincrease or decrease volume (00~63).
SETUP MENU OPERATION
Press the button Menu on remote control to select
Setup menu. Shown as right:
TIMER SUBMENU OPERATION
When setup menu is selected, then press the P+ or P- button
to select Timer item. Press theEnter button to enter Timer
submenu. Press the Menu button to exit Timer submenu.
Shown as right:
24 Hour Clock Setting (The clock must be set before you
select the other items)
1. Press the P+ or P- button to select Timeitem.
2. Press the V- button to set the hour (0~23).Press the V+
button to set the minute (0~59).
On Timer Setting
1. Press the P+ or P- button to select On Timer item.
2. Press the V- button to set the hour (0~23).Press the V+
button to set the minute (0~59).
Note: When On Timer item is set,then press the standby
button on remote control. Make sure the TV set is
under standby mode.
Off Timer Setting
1. Press the P+ or P- button to select Off Timer item.
2. Press the V- button to set the hour (0~23).Press the V+ button to set the minute (0~59).
Note: When Off Timer item is set, the SLEEP function is cancelled automatically.
32
Audio
Treble
Bass
Balance
Volume
Setup
Timer
Organize
Function
Language
Setup
Timer
Organize
Function
Language
06:00
07:00
23:00
Pr01
Time
On Timer
Off Timer
On Timer

BASIC OPERATION
On Program Setting
1. Press the P+ or P- button to select On Timer item.
2. Press the V+ or V- button to select the channelyou want.
Note: On Program means the program number when the TV turned on at on timer.
ORGANIZE SUBMENU OPERATION
When setup menu is selected, then press the P+ or P- button
to select Organize item. Press the Enter button to enter
Organize submenu. Press the Menu button to exit Organize
submenu. Shown as right:
Program Selection
1. Press the P+ or P- button to select Pr item.
2. Press the V+ or V- button to select thechannel up or down.
Label Selection
1. Press the P+ or P- button to select Label item.
2. Press the V+ or V- button are used tojump from one column to other.Red background
shows the row selected and the selected column is blue and flash.
3. Press the P+ or P- button to select Ato Z, +, -, ., SPACE and 0 to 9. The label hence gets
tagged to the particular program.
Colour System Selection
1. Press the P+ or P- button to select Colour item.
2. Press the V+ or V- button to select PAL.
Sound System Selection
1. Press the P+ or P- button to select R F. Std item.
2. Press the V+ or V- button to select BG.
Skip Selection
1. Press the P+ or P- button to select Skip item.
2. Press the V+ or V- button to selectYes (channelskipped) or No (channel not skipped).
Note: When Skip item is set to Yes, this position will be skipped while you use the P+ or
P- button to scan the stored channels. You can still use the direct number buttons to
enter into the skipped channels.
FUNCTION SUBMENU OPERATION
When setup menu is selected, then press the P+ or P- button
to select Function item. Press the Enter button to enter
Function submenu. Press the Menu button to exit Function
submenu. Shown as right:
Blue Back Setting
1. Press the P+ or P- button to select Blue Back item.
2. Press the V+ or V- button to selectYes orNo .
Setup
Timer
Organize
Function
Language
01
----
PAL
BG
No
Pr
Label
Colour
RF. Std
Skip
14
Setup
Timer
Organize
Function
Language
Yes
No
Blue Back
Lock

Lock Setting
1. Press the P+ or P- button to select Lock item.
2. Press the V+ or V- button to selectYes orNo .
Note:
If the Lock is changed from No to Yes ,the lock menu will appear. In this mode,
three digit can be key in and saved as the locking number. When the next time the TV is
power on, the user must key in the locked numbers for enter the TV. And it's convenience
for user to use the P.P key three times when the user forget the lock number.
LANGUAGE SUBMENU OPERATION
When setup menu is selected, then press the P+ or P-
button to select Language item. Press the Enter button to
enter Language submenu. Press the Menu button to exit
Language submenu. Shown as right:
Language Setting
1. Press the P+ or P- button to select LANGUAGE item.
2. Press the Enter button to enter Language submenu.
3. Press the V+ or V- button to select different languages.
BASIC OPERATION
Setup
Timer
Organize
Function
Language English
FranHais
Greek
Turkish
Polski
Russian
15

TROUBLE SHOOTING
16

SPECIFICATIONS
17

Table of contents
Other Transonic TV manuals


Popular TV manuals by other brands


Panasonic
Panasonic CT-24SX11 operating instructions

Samsung
Samsung PS50B530S2W Quick setup guide

Hitachi
Hitachi UT47X902 - 47" LCD Flat Panel Display Service manual

Blusens
Blusens h305 user manual

EAS Electric
EAS Electric E43AN80 operating instructions

Grundig
Grundig XEPHIA 42 PXW 110-6616 REF user manual


