TRAUMSCHWINGER BABYSCHWINGER User manual

- 1-
your manual

- 2-
Table of contents
1 Introduction .................................................................................................. 4
2 Requirements .............................................................................................. 5
3 Parts ............................................................................................................. 7
4 Assembling the height-adjustment mechanism........................................ 9
4.1 Preparing the threaded rods ................................................................. 9
4.2 Inserting the threaded rods (1) ............................................................. 9
4.2 Inserting the threaded rods (2) ........................................................... 10
4.3 Attaching the rst stainless-steel plate................................................ 10
4.4 Attaching the stainless-steel bushes....................................................11
4.5 Inserting the steel pin into the wooden wedge.....................................11
4.6 Placing the wooden wedge on the stainless-steel plate ..................... 12
4.7 Attaching the second stainless-steel plate.......................................... 12
4.8 Attaching the second wooden cheek .................................................. 13
4.9 Fastening the round nuts .................................................................... 13
4.10 Inserting the carabiner ...................................................................... 14
4.11 Finished height-adjustment mechanism ........................................... 14
5 Connecting the net to the height-adjustment mechanism ..................... 15
5.1 Spreading out the net ......................................................................... 15
5.2 Inserting and locking the rope ends.................................................... 16
6 Suspending the net .................................................................................... 18
6.1 Suspending the net with the height-adjustment mechanism .............. 18
6.2 Inserting the crossbar ......................................................................... 18
6.3 Inserting the lateral bars ..................................................................... 19
6.4 Attaching the rope bag........................................................................ 20

- 3-
7 Assembling the foot rest (optional).......................................................... 20
7.1 Inserting the crossbar ......................................................................... 21
7.2 Inserting the lateral bars ..................................................................... 21
7.3 Adjusting the foot rest ......................................................................... 22
7.4 Assembling the foot rest ..................................................................... 23
8 Models for children - Baby chair and Children Swinger (Model M)....... 23
2.1 Babyschwinger, Baby chair................................................................. 23
2.2 Kinderschwinger, Model M.................................................................. 24
9 Using the Traumschwinger ....................................................................... 25
9.1 Care .................................................................................................... 25
9.2 Cleaning.............................................................................................. 26
9.3 Washing instructions........................................................................... 26
9.4 Adjusting the sitting height .................................................................. 27
9.5 Adjusting the sitting position ............................................................... 28
9.6 Sitting down, enjoying and getting up................................................. 28
10 Stainless-steel mount ................................................................................ 29
11 Relatet Links ............................................................................................31
IMPORTANT! READ CAREFULLY!
KEEP FOR FUTURE REFERENCE!
- 4-
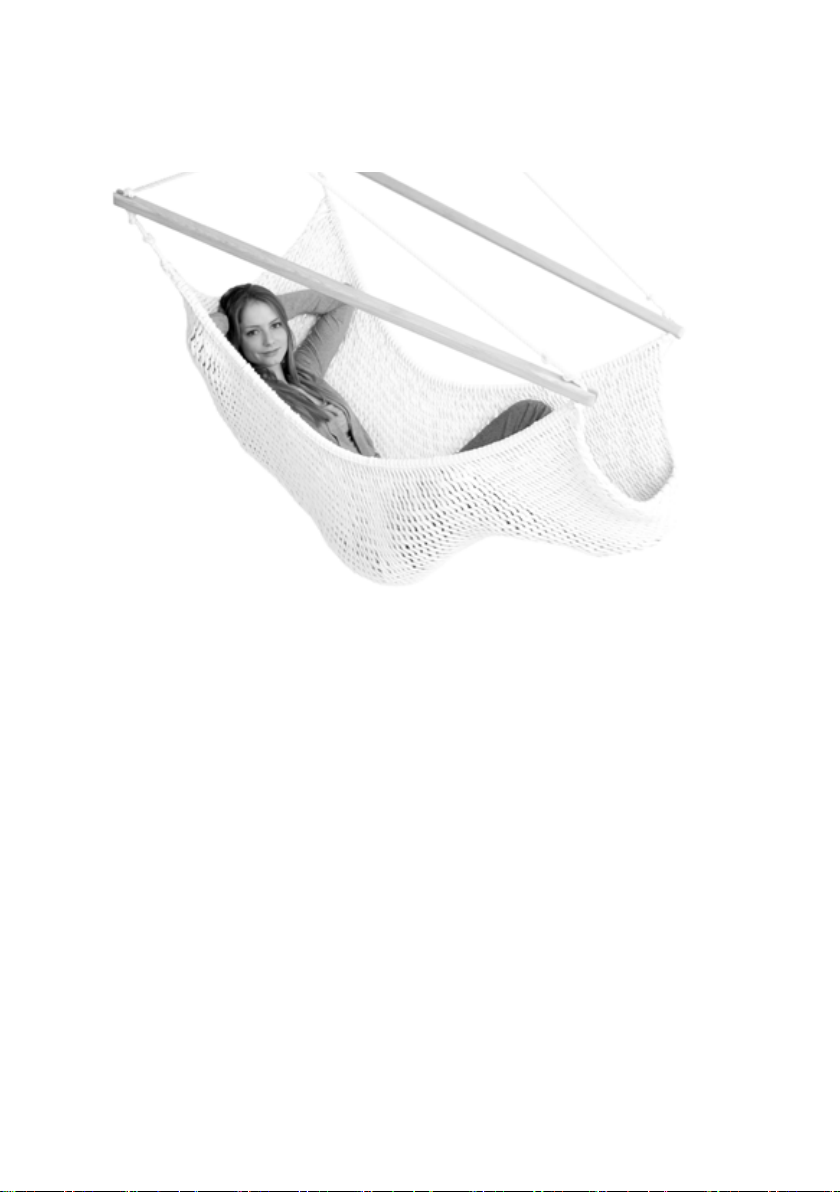
1 Introduction
Create with your TRAUMSCHWINGER (dream swing) a favorite place, a perso-
nal Oasis in your home, in the garden, on the balcony or at your workplace. You
will notice that ceilings, ceiling beams, loft beds, roof- and balcony projections,
conservatories, pergolas, stable branches as well as wide doorframes diverse op-
portunities to place the chair. Also during your vacation, while camping or on trips
you will soon welcome the hammock chair as a companion. Even the transport is
not a problem, since with each chair, you will receive a bag made of cotton fabric,
where you can store the chair ready and space-saving.
This manual will explain to you the instruction, of how to use your TRAUM-
SCHWINGER (dream swing). The different sizes of the models are construction
equal, the individual steps therefore will be shown as illustrated on Model L. All
information also apply to the other models. The peculiarities of the models for
children (Baby chair and children‘s chair) are explained in chapter 8.

- 5-
SAFETY NOTICE
Our TRAUMSCHWINGER - hanging chairs are resting as well as relaxing
furniture. They are not to be used as trainers and/or play area. If you notice
damage of the material (e.g. cracks), the product should not be used any-
more. When an infant or toddler is placed in the nettling, a cloth should be
placed underneath him. Children should not be allowed unsupervised the
use of the furniture. Carefully observe further notice and safety instructions
in this manual, and keep them for possible questions.
Follow exactly the instructions in order to avoid causing dangers due to
incorrect installation. The mounting should be carried out by an adult.
Suspension and height adjustment are to be checked regularely for tight-
ness.
In all one-dot-suspension a swivel or similar needs to be used in order to
avoid shear stresses on the suspension. Our stainless steel hangers with
integrated plain or ball bearing make the use of an additional rotating vortex
unnecessary.
For your TRAUMSCHWINGER you need your building conditions and use wishes
adequately secured. You can receive the standard xing for our products directly
through MIRA - ART we would be pleased to advise you.
Basically, you have the choice between a ceiling mounting, attachment to a beam
or the use of a stator. Pay attention of the respective weight if you are purchase
the attachment for the TRAUMSCHWINGER. Make sure when you chose ceiling
mounting, that your requirement for your ceiling (e.g. concrete) is met. Inquire at
a local hardware store, what kind of attachment you are suppose to use for your
structural circumstances.
2 Prerequisites

- 6-
Following table is shown the model-dependent values for the suspension:
Before you start the assembling of TRAUMSCHWINGER, you have to complete
the installation of your chosen mounting. Pay attention to this proper execution of
the installation according to the instructions for the respective xing.
SAFETY NOTICE
Check the attachment regularly for tightness and damages! For damages
caused due to improper or loosened xing, no liability will be assumed by
us. To avoid damage, please pay attention that your suspension of your
hammock chair does not scrubs along on ceilings or walls
Net/ Model Suspension height
(min./ max.) Load max. Wall distance
min.
Babyschwinger
1,8 m / 3,0 m
(als Kindermöbel
1,2 m / 3m)
75 kg 65 cm
Modell M 1,5 m / 2,5 m 75 kg 65 cm
Modell L 1,8 m / 3,0 m 150 kg 70 cm
Modell XL 2,0 m / 3,0 m 150 kg 80 cm
Modell XXL 2,2 m / 3,0 m 150 kg 85 cm
Modell XXL extra
large 2,4 m / 3,0 m 150 kg 99 cm

- 7-
3 Parts
The following images and lists provide an overview of the product scope of the
TRAUMSCHWINGER:
1) Cotton net
2) Universal rope bag2
3) Wooden crossbar
4) Wooden lateral bar (2 x)
2"Set" and "Setplus" editions only
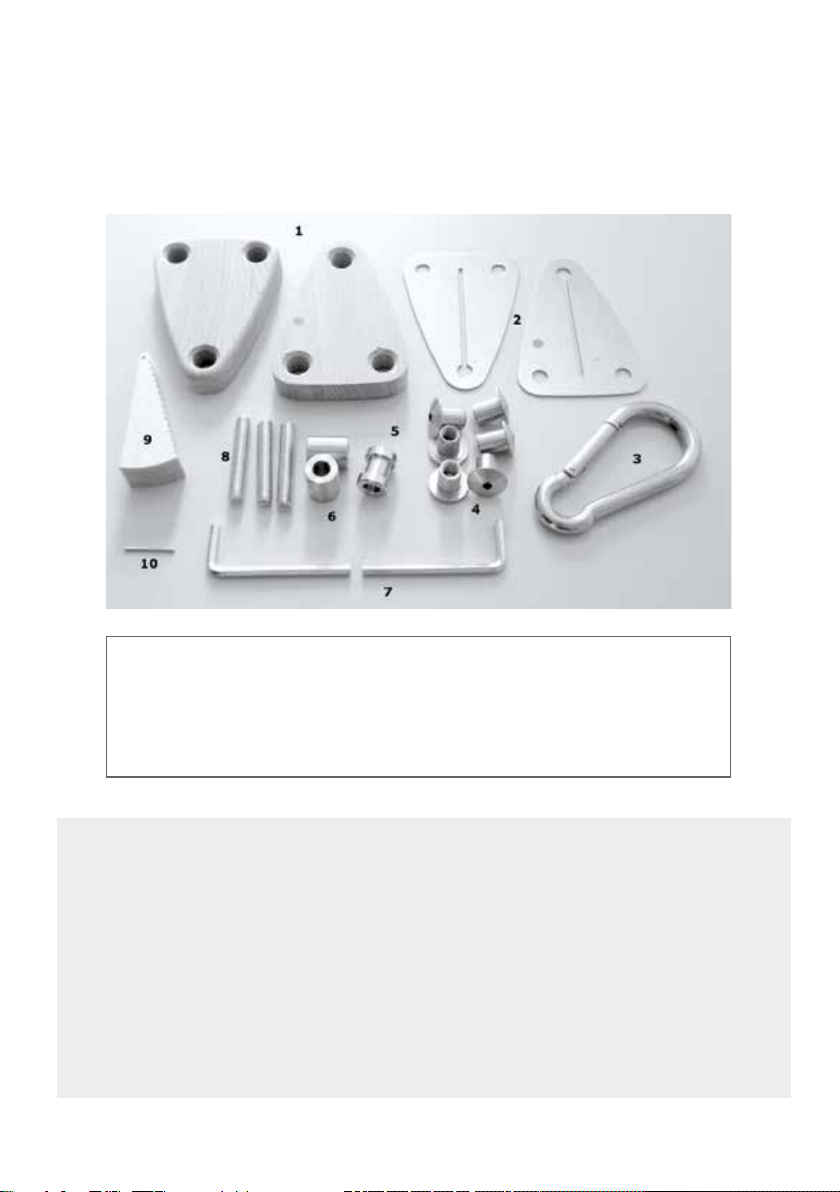
- 8-
All items shown on this page are only included when you buy a TRAUM-
SCHWINGER in the version „Set“ or „Set plus“. For the others versions this
can be purchased as an accessory item.
NOTE
All parts are cleaned upon completion of the manufacturing process.
However, we recommend cleaning some parts manually in order to prevent
soiling of the cotton ropes. Clean the recesses in the wooden bars in order
to remove any sanding residue. Use a damp cloth and some detergent
to clean the following rope-guiding metal parts of the height-adjustment
mechanism, i.e. the three stainless-steel bushes and the sides of the two
stainless-steel plates that do not have a colour sticker.
1) Wooden cheek (2 x)
2) Stainless-steel plate (2 x)
3) Carabiner
4) Round nut (6 x)
5) Stainless-steel bush with
collar
6) Stainless-steel bush (2 x)
7) Allen™ key
8) Threaded rod (3 x)
9) Wooden wedge, 9 mm
10) Steel pin

- 9-
4 Assembling the height-adjustment mechanism
The assembly of the included height-adjustment mechanism is the rst stage of
the assembly of your TRAUMSCHWINGER. For this, you need the parts from the
height-adjustment mechanism box and the carabiner. The required tool (Allen™
key) is included. The easiest way to assemble the height-adjustment mechanism
is to do so while sitting at a table.
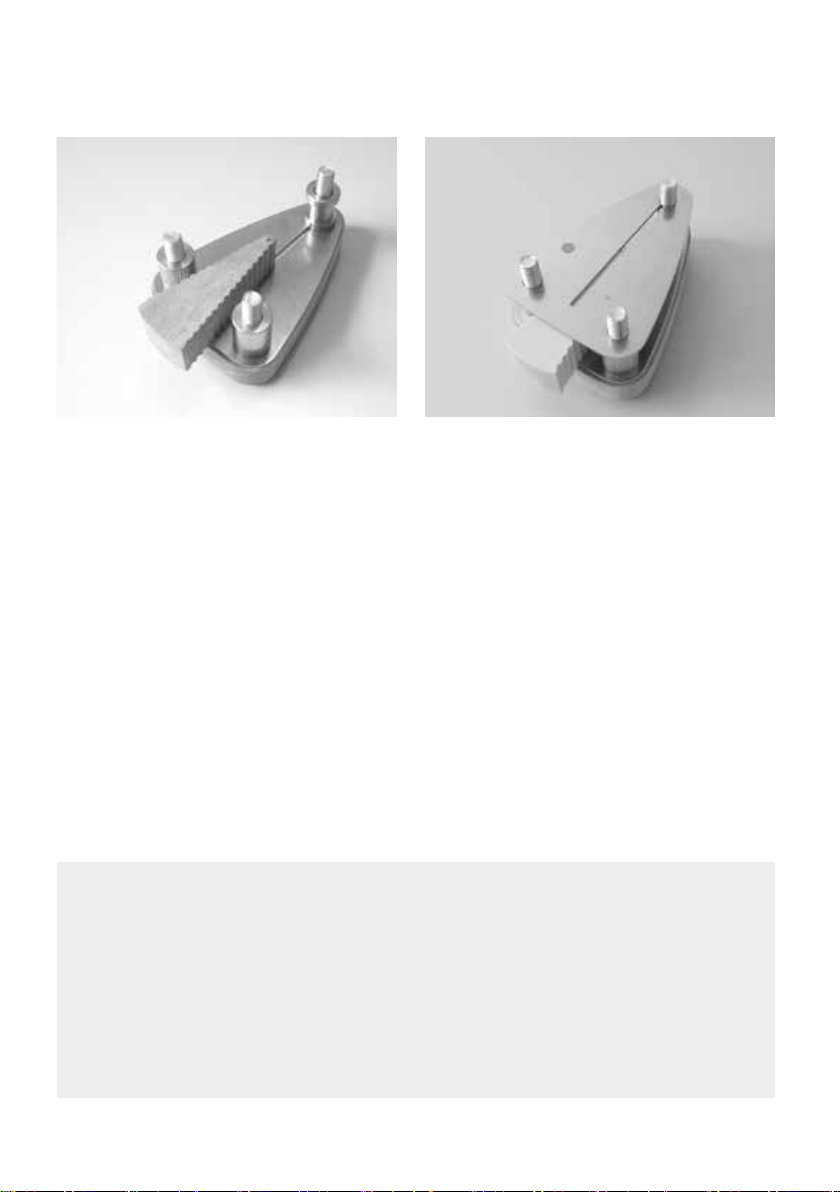
4.1 Preparing the threaded rods
Some metal parts have been pre-as-
sembled (for the purposes of checking
the thread). For the assembly, you
rst need to disassemble these parts.
Take the three pre-assembled thread-
ed rods, remove one of the round
nuts on each of the rods, and remove
the stainless-steel bushes from the
threaded rod. Slightly tighten the
round nut remaining on the threaded
rod. You now have three threaded
rods with one attached round nut
each.
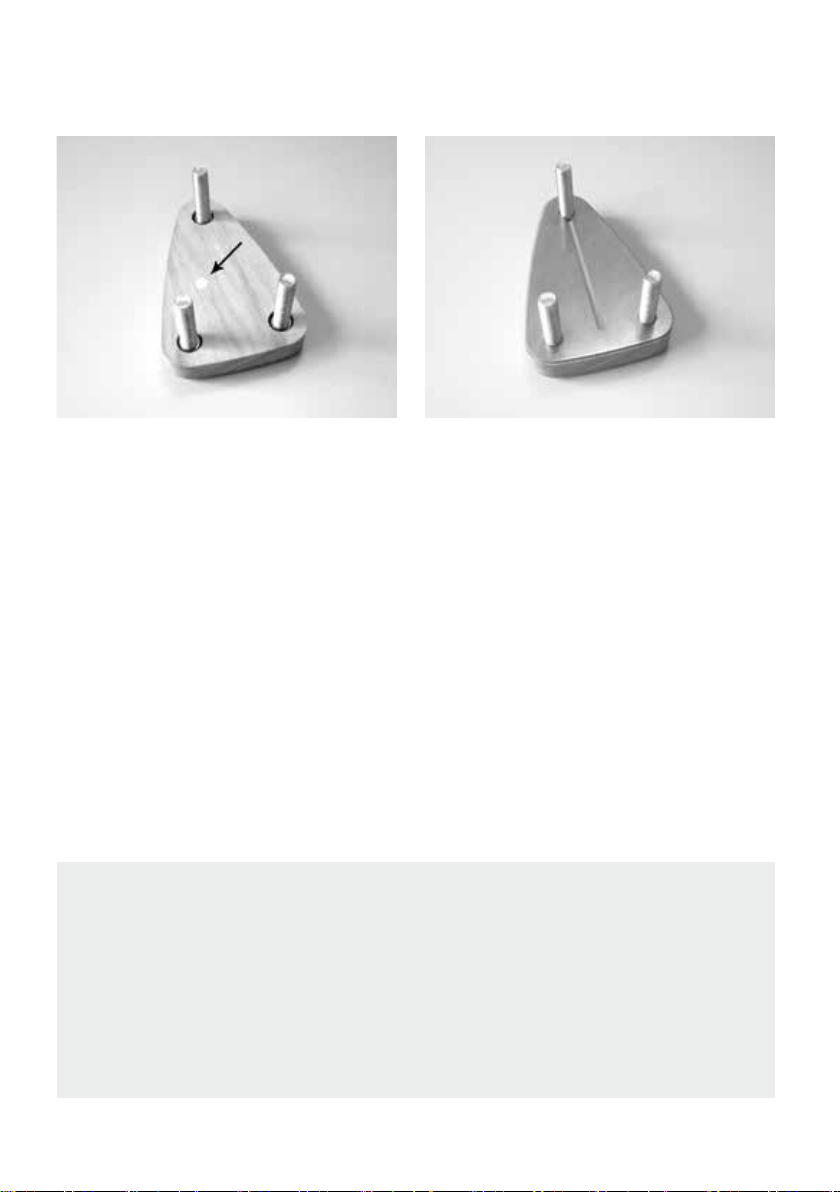
4.2 Inserting the threaded rods (1)
Now take one of the triangular wooden
cheeks. One side of the wooden cheek
is marked with a colour sticker; this is
the inner side of the respective wooden
cheek.
Hold the wooden cheek in such a way
that the side marked with the sticker
points down. With the other hand,
insert a threaded rod with a round nut
through each of the holes.
- 10 -
4.2 Inserting the threaded rods (2)
Place your free hand over the three
round nuts in order to prevent them
from falling out and reverse the wood-
en cheek. The side with the colour
sticker now points towards you. Lay
the wooden cheek down before you
in this way. The wooden cheek now
rests on the round nuts. The threaded
rods point upwards.
Take one of the stainless-steel plates. A
colour sticker indicates the side of the
stainless-steel plate that should face
the inner side of the wooden cheek.
Hold the stainless-steel plate in such
a way that the side marked with the
sticker points down. Place the stain-
less-steel plate onto the wooden
cheek, passing the threaded rods
through it. The side of the stain-
less-steel plate that is marked with the
colour sticker now lies on the side of
the wooden cheek that is marked with
a colour sticker.
4.3 Attaching the rst stainless-steel
plate
SAFETY INFORMATION
The sides of the wooden cheek and of the stainless-steel plate that are
marked with colour stickers must face each other.
This ensures that the ropes will only touch the rounded edge of the stain-
less-steel plate. Non-compliance with these assembly instructions can result
in increased wear and tear of the ropes.
- 11 -
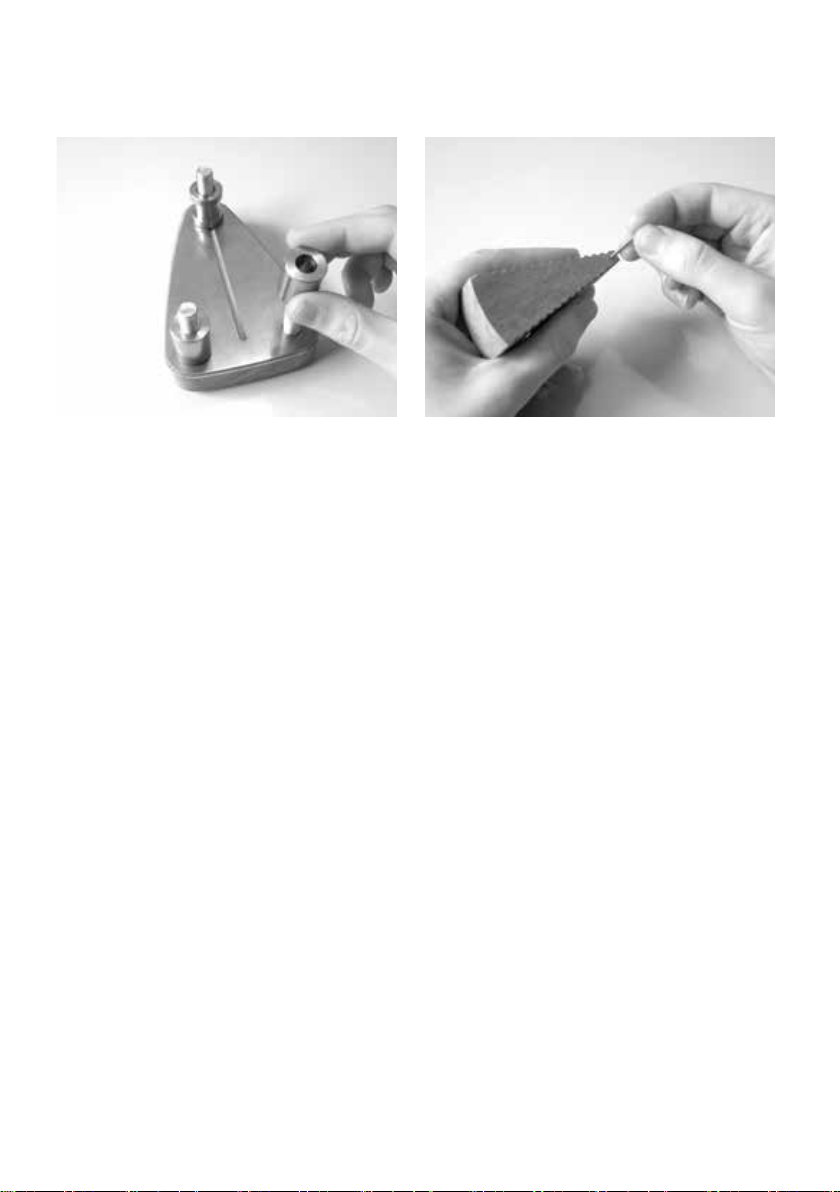
4.4 Attaching the stainless-steel
bushes
4.5 Inserting the steel pin into the
wooden wedge
Attach the stainless-steel bush with
collar to the threaded rod at the tip of
the triangular wooden cheek. Attach
the two stainless-steel bushes (with-
out collar) to the two threaded rods at
the short side of the triangular wooden
cheek.
Now take the wooden wedge and the
steel pin. Pass the steel pin through
the hole at the tip of the wooden wedge
until it evenly protrudes about 2 mm on
each side.
- 12 -
4.6 Placing the wooden wedge on
the stainless-steel plate
4.7 Attaching the second stain-
less-steel plate
Put the wooden wedge with the
inserted steel pin on the previously
assembled stainless-steel plate with
one of its two smooth sides. Position
the wooden wedge in such a way
that the protruding steel pin is in the
groove of the stainless-steel plate.
Take the second stainless-steel
plate. Hold the stainless-steel plate
in such a way that the side marked
with the sticker points up. Place
the stainless-steel plate onto the
stainless-steel bushes, passing the
threaded rods through it. Make sure
that the steel pin in the wooden
wedge is also inserted in the groove
of this second stainless-steel plate.
SAFETY INFORMATION
The sides of the wooden cheek and of the stainless-steel plate that are
marked with colour stickers must face each other.
This ensures that the ropes will only touch the rounded edge of the stain-
less-steel plate. Non-compliance with these assembly instructions can result
in increased wear and tear of the ropes.

- 13 -
4.8 Attaching the second wooden
cheek
4.9 Fastening the round nuts
Take the second wooden cheek.
The side of this wooden cheek that
is marked with a colour sticker must
lie on the side of the second stain-
less-steel plate that is marked with a
colour sticker.
Hold the second wooden cheek in
such a way that the side marked
with the sticker points down.
Place the wooden cheek onto the
stainless-steel plate, passing the
threaded rods through it. The side
of the second wooden cheek that is
marked with the colour sticker now
lies on the side of the second stain-
less-steel plate that is marked with a
colour sticker.
Attach the three remaining round nuts
to the three threaded rods in the holes
of the second wooden cheek. To do so,
you can use the enclosed Allen™ key.
Finally, tighten all six round nuts. Done.
The height-adjustment mechanism for
your TRAUMSCHWINGER, is ready.
SAFETY INFORMATION
The round nuts can gradually loosen over time. Regularly make sure that the
round nuts are tightly fastened, and tighten them with the enclosed Allen™
key whenever necessary. If the round nuts loosen, this could result in abra-
sion of the metal parts and soiling of the ropes.
- 14 -
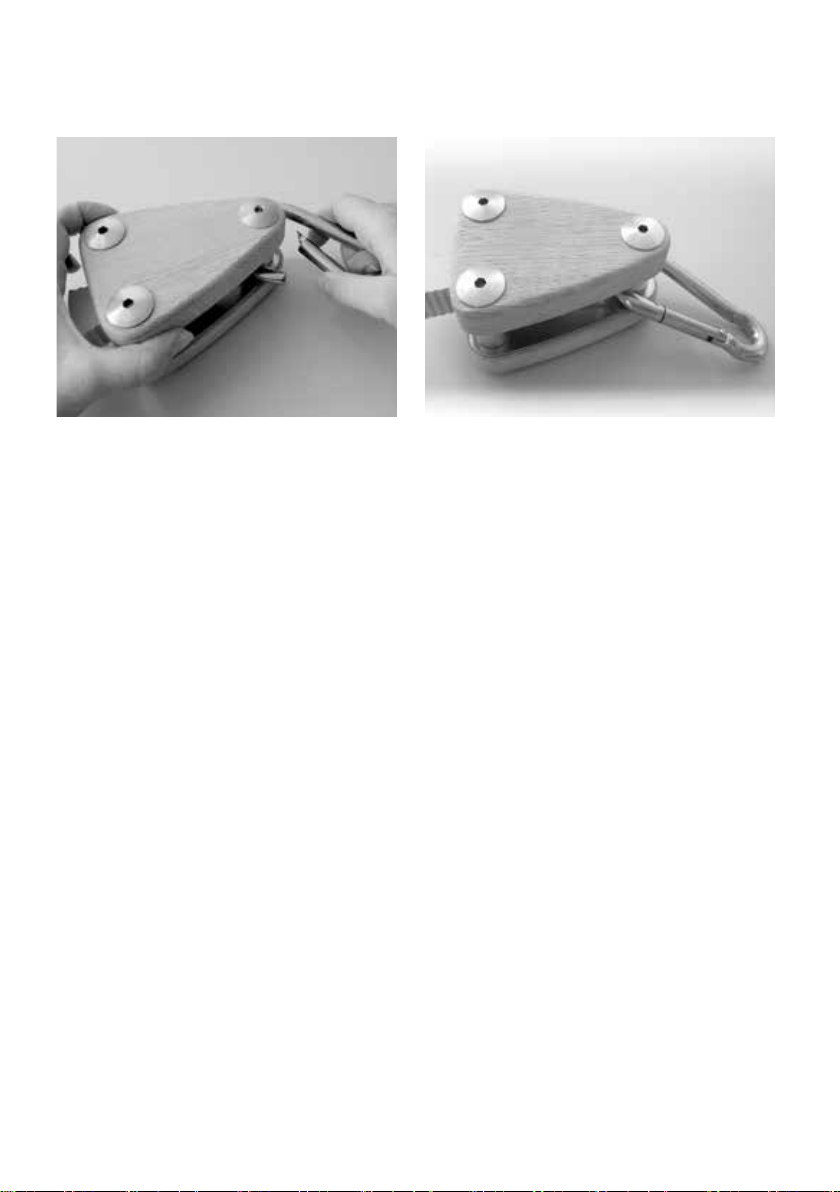
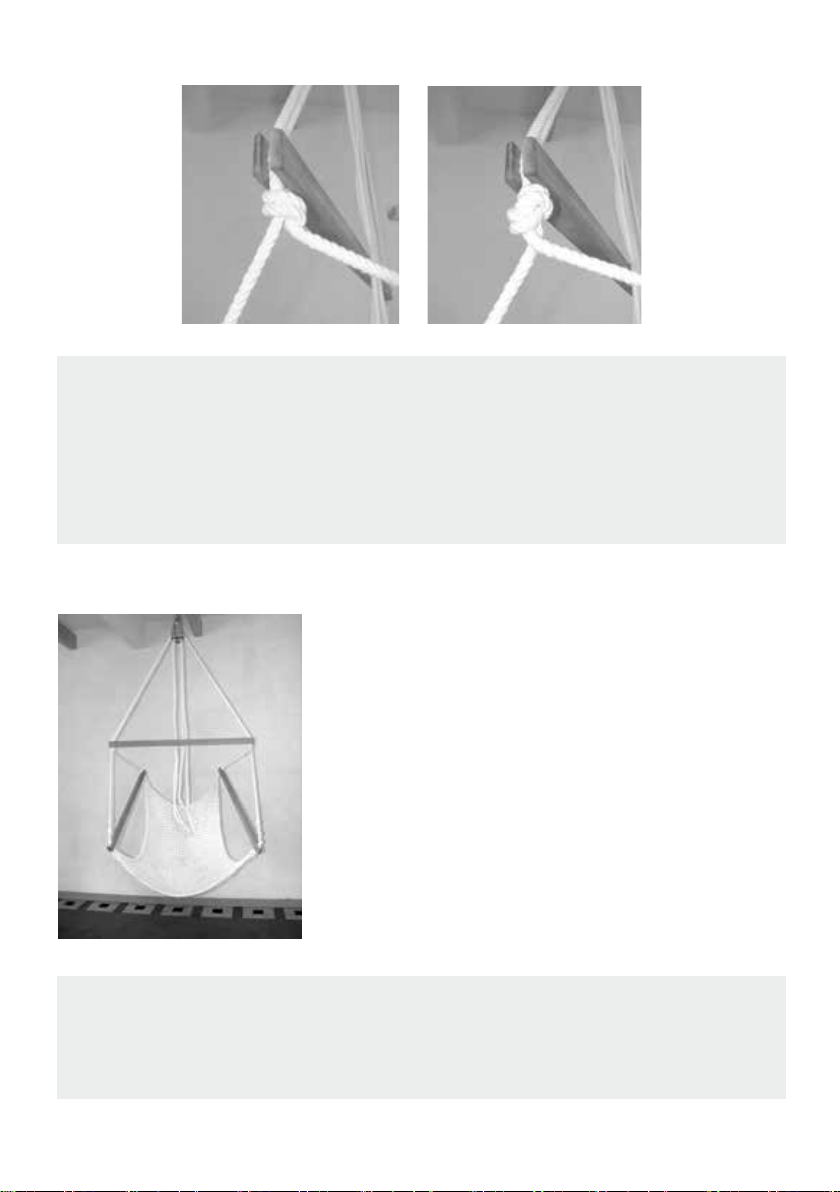
4.10 Inserting the carabiner 4.11 Finished height-adjustment
mechanism
Take the included carabiner and
attach it to the stainless-steel bush
with collar (at the top side of the
height-adjustment mechanism).
Use the two enclosed Allen™ keys
to make sure that all metal parts are
securely fastened. Please also check
the metal parts from time to time when
using the TRAUMSCHWINGER.

- 15 -
5 Connecting the net to the height-adjustment mechanism
Next, connect the net of your TRAUMSCHWINGER, to the height-adjustment
mechanism. As you need to spread out the net to do so, we recommend putting a
blanket on the oor. Place the height-adjustment mechanism next to the blanket.
This will make the next steps easier.
5.1 Spreading out the net
Take the rolled-up net and unfold it. Remove the cloth bag containing the cross-
bar and the two lateral bars, which is tied with a knot, from the net. You can put
the cloth bag aside for the time being, as you will only need the bars in the next
section.
The net can easily be spread by lifting it entirely with both hands. For this, hold
one of the two connection knots in each hand and lift the net entirely. The net will
turn to the right position by itself. You merely need to place it on the oor in this
position.
For the next steps, make sure that the net lies on the oor in the correct position.
You can see this from the position of the label on the net. If the label is on top on
the right-hand side of the net that lies before you, the net is positioned correctly. If
the label is not yet in this position, duly turn or reverse the net.
Left
connection knot
Right
connection knot
Label

- 16 -
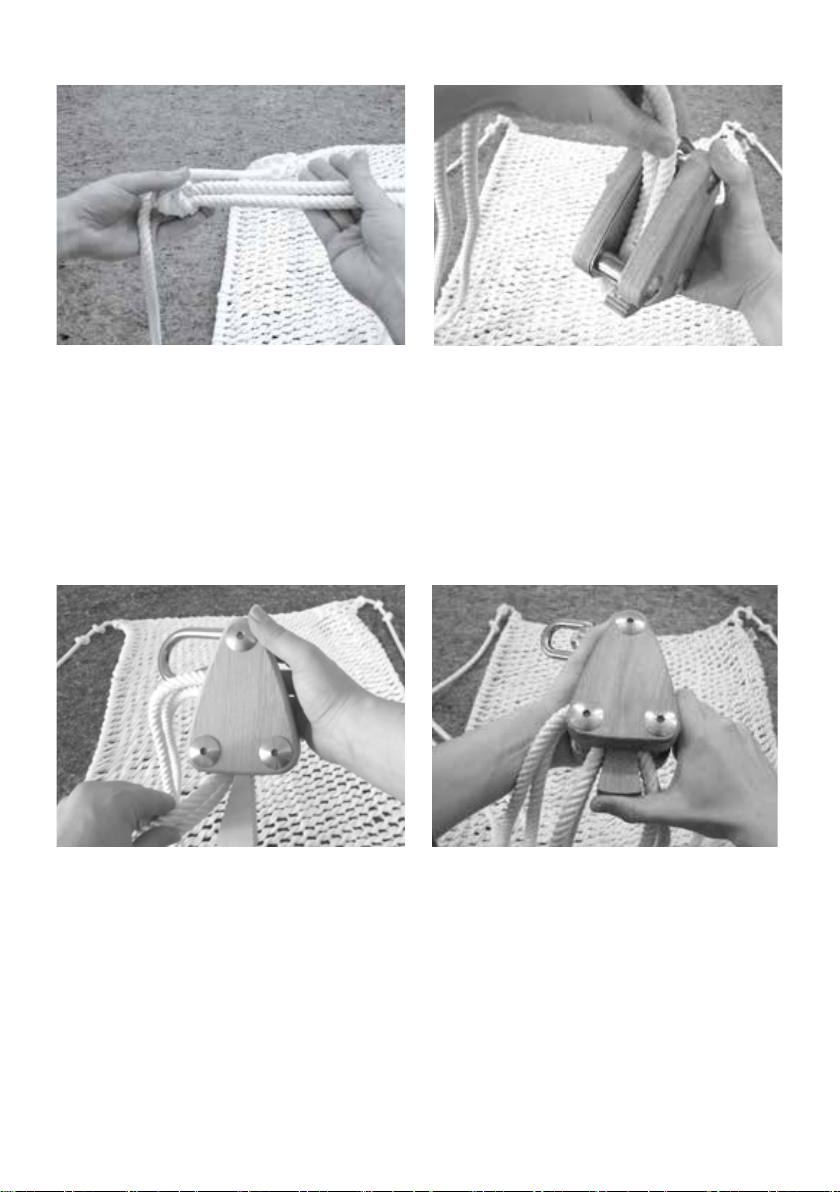
5.2 Inserting and locking the rope ends
For material and manufacturing-related reasons, the ropes might be twisted or
entangled upon delivery. Before inserting the rope ends in the height-adjustment
mechanism, make sure that the ropes are not twisted or entangled.
Safety information
If the ropes are attached to the height-adjustment mechanism in a twisted or
entangled state, this could result in increased wear and tear of the ropes due
to damage of the rope surface.
Start aligning the ropes without twisting on the left-hand side. Hold the left con-
nection knot with your left hand and lift it until the two ropes at the corners of the
net are slightly stretched. Turn the connection knot in your hand so that the two
ropes that come out of the connection knot are not on top of each other (see the
following two gures).
When the connection knot is in this position, hold the rope pair that comes from
the top of the knot between the thumb and index nger of your right hand (see
next gure).
RIGHT WRONG
- 17 -
Use your left hand to pull the rope pair
through your right hand without twisting
the ropes. When you reach the end of
the rope, switch sides. Hold the end
of the rope pair so that it will not get
twisted anew.
Hold the height-adjustment mecha-
nism with your right hand in such a
way that the wooden wedge is in the
height-adjustment mechanism about
halfway. Attach the end of the rope pair
to the left stainless-steel bush of the
height-adjustment mechanism, so that
both ropes lie next to each other on the
stainless-steel bush.
Lead the end of the rope pair out of the
height-adjustment mechanism in the
space between the bush and the wood-
en wedge. Pull this rope pair until about
40 cm hang out from the height-adjust-
ment mechanism. For the time being,
put the height-adjustment mechanism
with the inserted left rope pair on the
net.
Now take the right connection knot
with your right hand and proceed in
the same way as on the left-hand side.
Once you have attached the right rope
pair to the height-adjustment mecha-
nism as well, press the wooden wedge
into the height-adjustment mecha-
nism. This will lock the ropes in the
height-adjustment mechanism.
- 18 -
6 Suspending the net
This section describes the last steps to assemble your TRAUMSCHWINGER. For
this, you need the net that is connected to the height-adjustment mechanism, the
crossbar and the two lateral bars, the rope bag and a stepladder.
6.1 Suspending the net with the height-adjustment mechanism
6.2 Inserting the crossbar
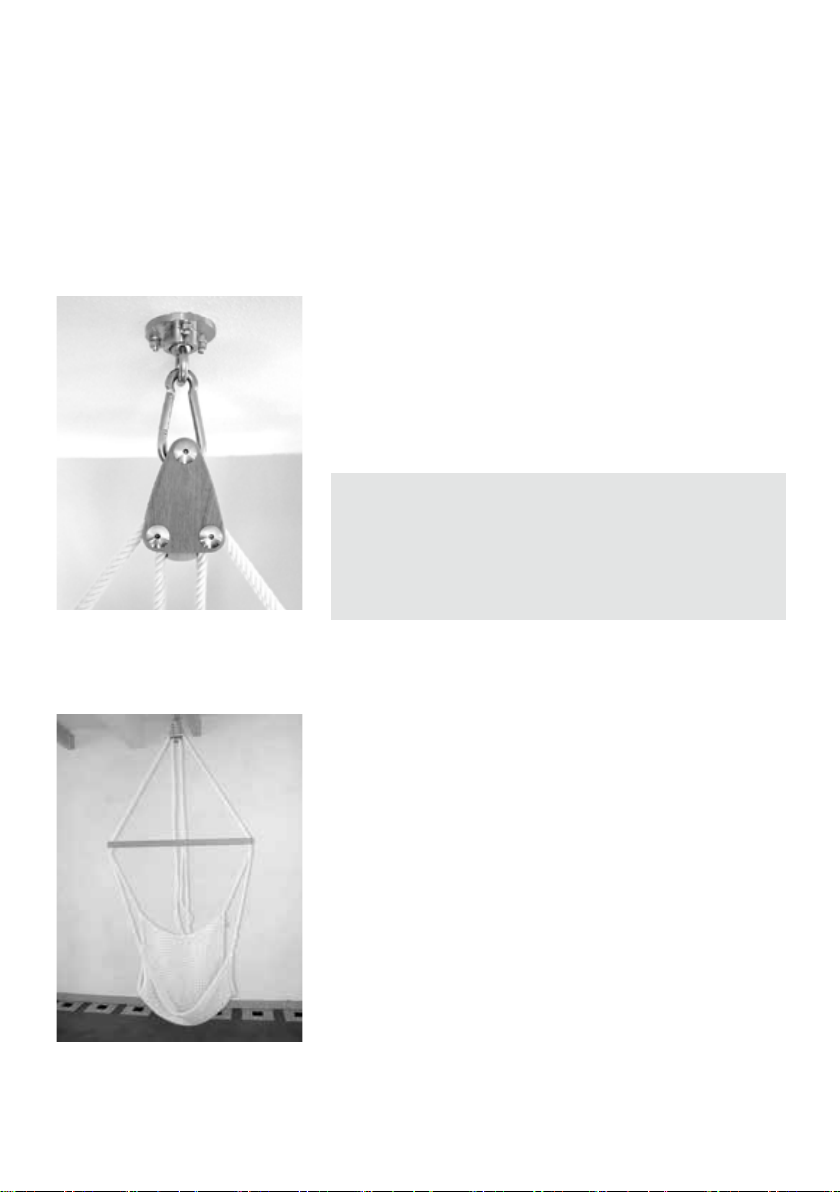
Attach the carabiner that is connected to the
height-adjustment mechanism to the prepared (or
existing) suitable mount; see chapter 2, Require-
ments.
(In the image to the left, the foot rest sling is
already attached)
Safety information
Regardless of the type of mount, it must reg-
ular be checked for wear and tear and secure
fastening!
One of the included wooden bars is longer than the
other two. This is the crossbar.
Take the crossbar and insert the respective rope pair
in the recesses of the crossbar just above the con-
nection knots. Make sure that the ropes that come out
of the connection knot are not on top of each other
or twisted! If necessary, turn the connection knot in
your hand so that the two ropes run freely to the front
and back (see the two gures on the following page).
Press the rope pair into the recess of the crossbar as
far as they will go.
- 19 -
Safety information
If the ropes are on top of each other or twisted, this could result in in-
creased wear and tear of the ropes due to damage of the rope surface.
Do not use any pointed items to press the rope pair into the recess.
This could damage the rope surface and impair the strength of the
ropes.
RIGHT WRONG
6.3 Inserting the lateral bars
To make it easier to attach the lateral bars, sit in the
net for about 2 minutes in order to stretch the cotton
(also applies to TRAUMSCHWINGER). This will also
help to make the net comfortable after unpacking it.
After getting up, take the two lateral bars and attach
them to the two sides alongside the seat between the
existing knots above the net. Press the ropes into the
recesses of the lateral bars as far as they will go.
For information on adjusting the sitting height, refer
to the chapter "Using your TRAUMSCHWINGER".
Safety information
Do not use any pointed items to press the ropes into the recesses of the lateral
bars. This could damage the rope surface and impair the strength of the ropes.

- 20 -
6.4 Attaching the rope bag
Finally, attach the rope bag between the two
rope pairs above the crossbar. Attach the
universal bag with the help of the adjustable
straps.
For the motif bags (sun and sheep), tie a knot
with the strings to fasten them. Then stow the
ropes handing down from the height-adjust-
ment mechanism and, if necessary, the rope
end of the foot rest in the rope bag.
Safety information
For your safety, be sure to stow the ropes. By stowing the ropes in the bag,
you can avoid triggering the height-adjustment mechanism inadvertently.
7 Assembling the foot rest (optional)
In this section, we will show you how to assemble and suspend the foot rest of
your TRAUMSCHWINGER. As you need to spread out the net to do so, we rec-
ommend putting a blanket on the oor.
Put the foot rest bundle on the blanket in front of you and remove the string
around it. Then remove the cotton bag containing the bars from the net.
Note
All parts are cleaned upon completion of the manufacturing process.
However, we recommend cleaning some parts manually in order to prevent
discolouring of the cotton ropes. Clean the recesses in the wooden bars, e.g.
using the cotton bag of the bars, in order to remove any sanding residue.
Other manuals for BABYSCHWINGER
1
This manual suits for next models
5
Table of contents
Popular Hammock manuals by other brands


Courtyard Creations
Courtyard Creations KUS2015 Assembly instructions

IKEA
IKEA DYNING Assembly instructions

Crivit
Crivit 282517 Instructions for use

Insportline
Insportline Simisus LG3400 user manual

Coopers of Stortford
Coopers of Stortford 10568 Instructions for use

Algoma Net
Algoma Net Soft Comfort Assembly instructions and parts list
