Travelander Evron DC 4 User manual

1
www.travelander.com.au
Travelander owner’s manual

2
www.travelander.com.au
Contents
Operation of Camper .............................................................................................................3
Opening of camper ................................................................................................................3
Closing of camper ....................................................................................................................6
Operation of Internal Accessories ........................................................................................8
12 volt system .........................................................................................................................8
Mechanical lifting arm (remote control) ...............................................................................10
Battery 120 amp hours ..........................................................................................................10
Fridge/Freezer .........................................................................................................................11
Shower unit .............................................................................................................................11
Turning on Heater ...................................................................................................................12
Kitchen ......................................................................................................................................12
Operation of External Accessories ........................................................................................12
Air bag suspension – GEO Trailer .........................................................................................12
Free standing the camper on its legs. .................................................................................13
Water tank ...............................................................................................................................13
Water tank ller .......................................................................................................................14
Annex Roof and Annex Walls ................................................................................................14
Fitting standard - quick awning..............................................................................................14
Attaching annex roof ..............................................................................................................14
Erection of annex roof ............................................................................................................15
Attaching annex walls .............................................................................................................15
Removing annex roof and annex walls ................................................................................15
Product Care and Cleaning ....................................................................................................16
Cleaning Canvas ......................................................................................................................16
Cleaning Kitchen .....................................................................................................................16
Service of Camper ...................................................................................................................16
1,000 km service .....................................................................................................................16
5,000 km service .....................................................................................................................16
Check and service during operation .....................................................................................16
Lubricants to be used .............................................................................................................17
Pre-Delivery Inspection Form ................................................................................................17
Travelander Warranty ............................................................................................................17
Limitations .............................................................................................................................18
Owner’s Responsibility ...........................................................................................................19
Transfer of Warranty ..............................................................................................................19
Travelander Warranty Form ..................................................................................................21
3
www.travelander.com.au
Operation of Camper
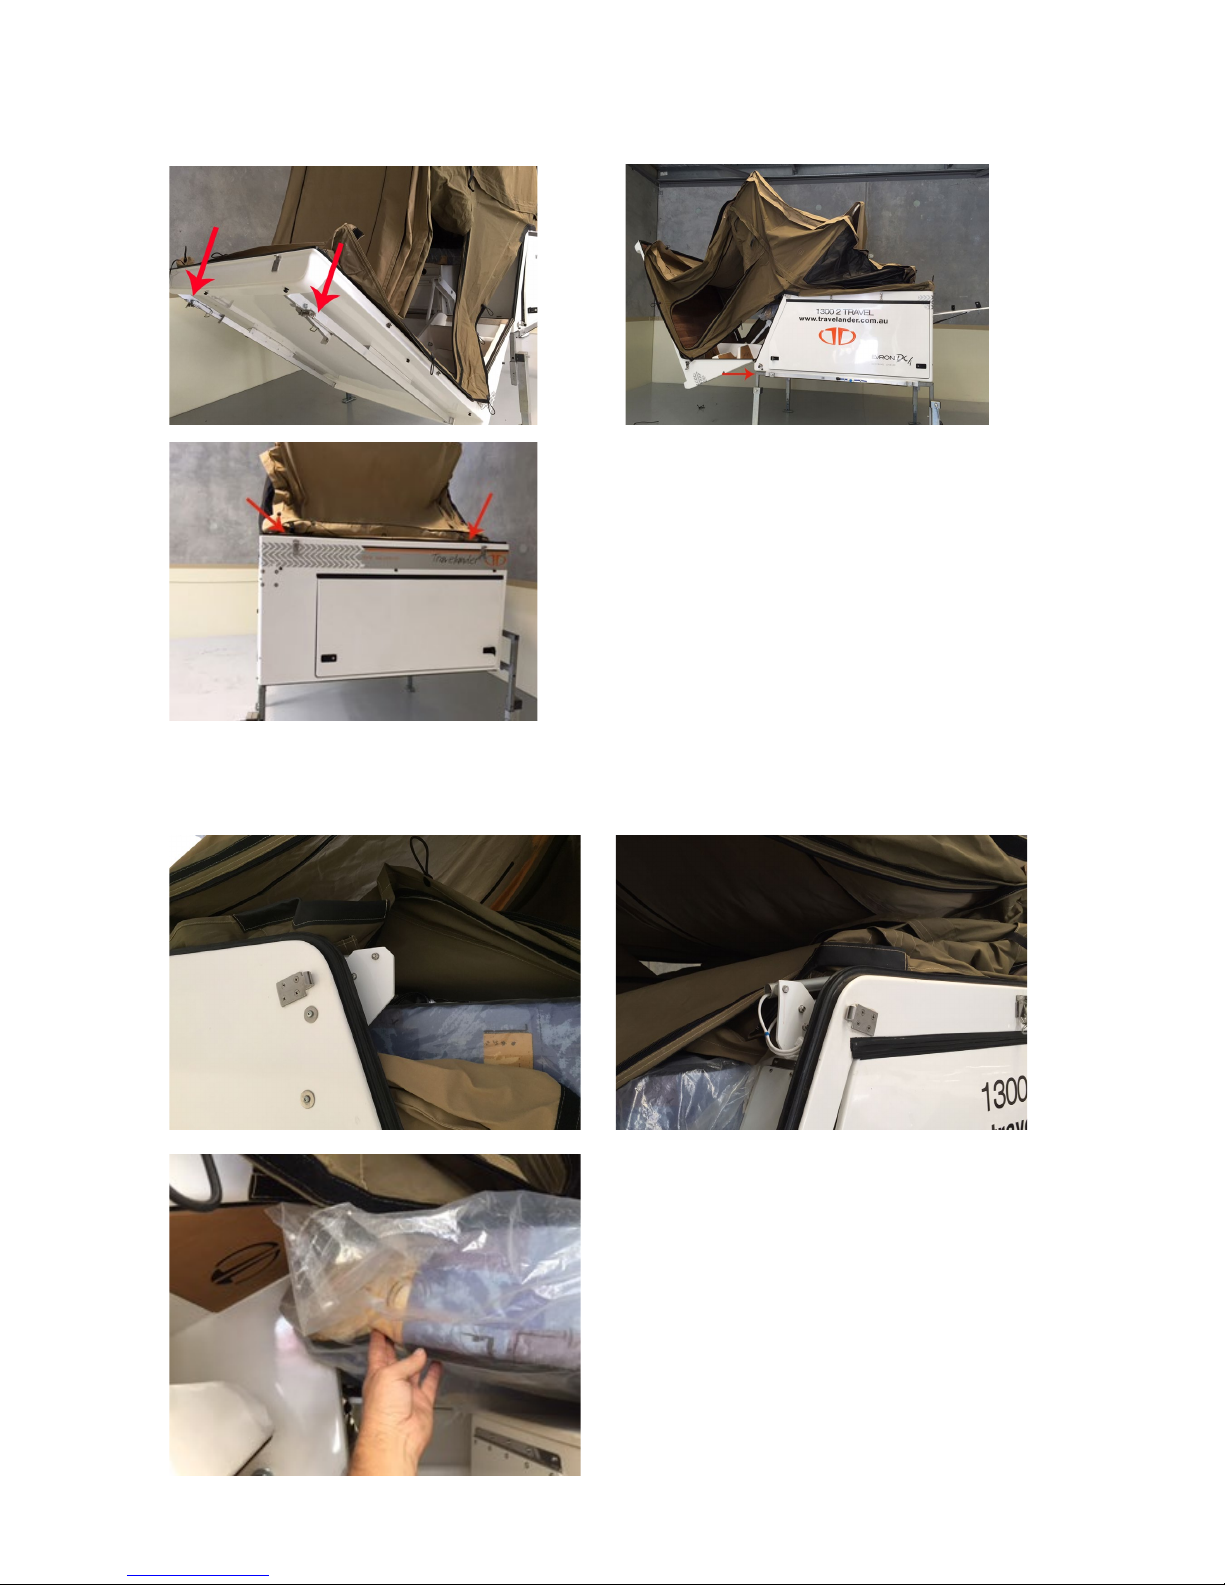
Opening of camper
• Before opening and folding the camper lid over,
you must remove any items that you are
carrying on the (aluminum roof bars) of the camper
lid or have placed on the camper lid; due to weight
restrictions on the tted ram. Extra weight will
overload the ram and cause damage to the ram.
(Any overloading of the lid will void the warranty to
the lid and to the ram).
• * Image of DC model is for display purposes only (SC
model has 1 extra catch as noted)
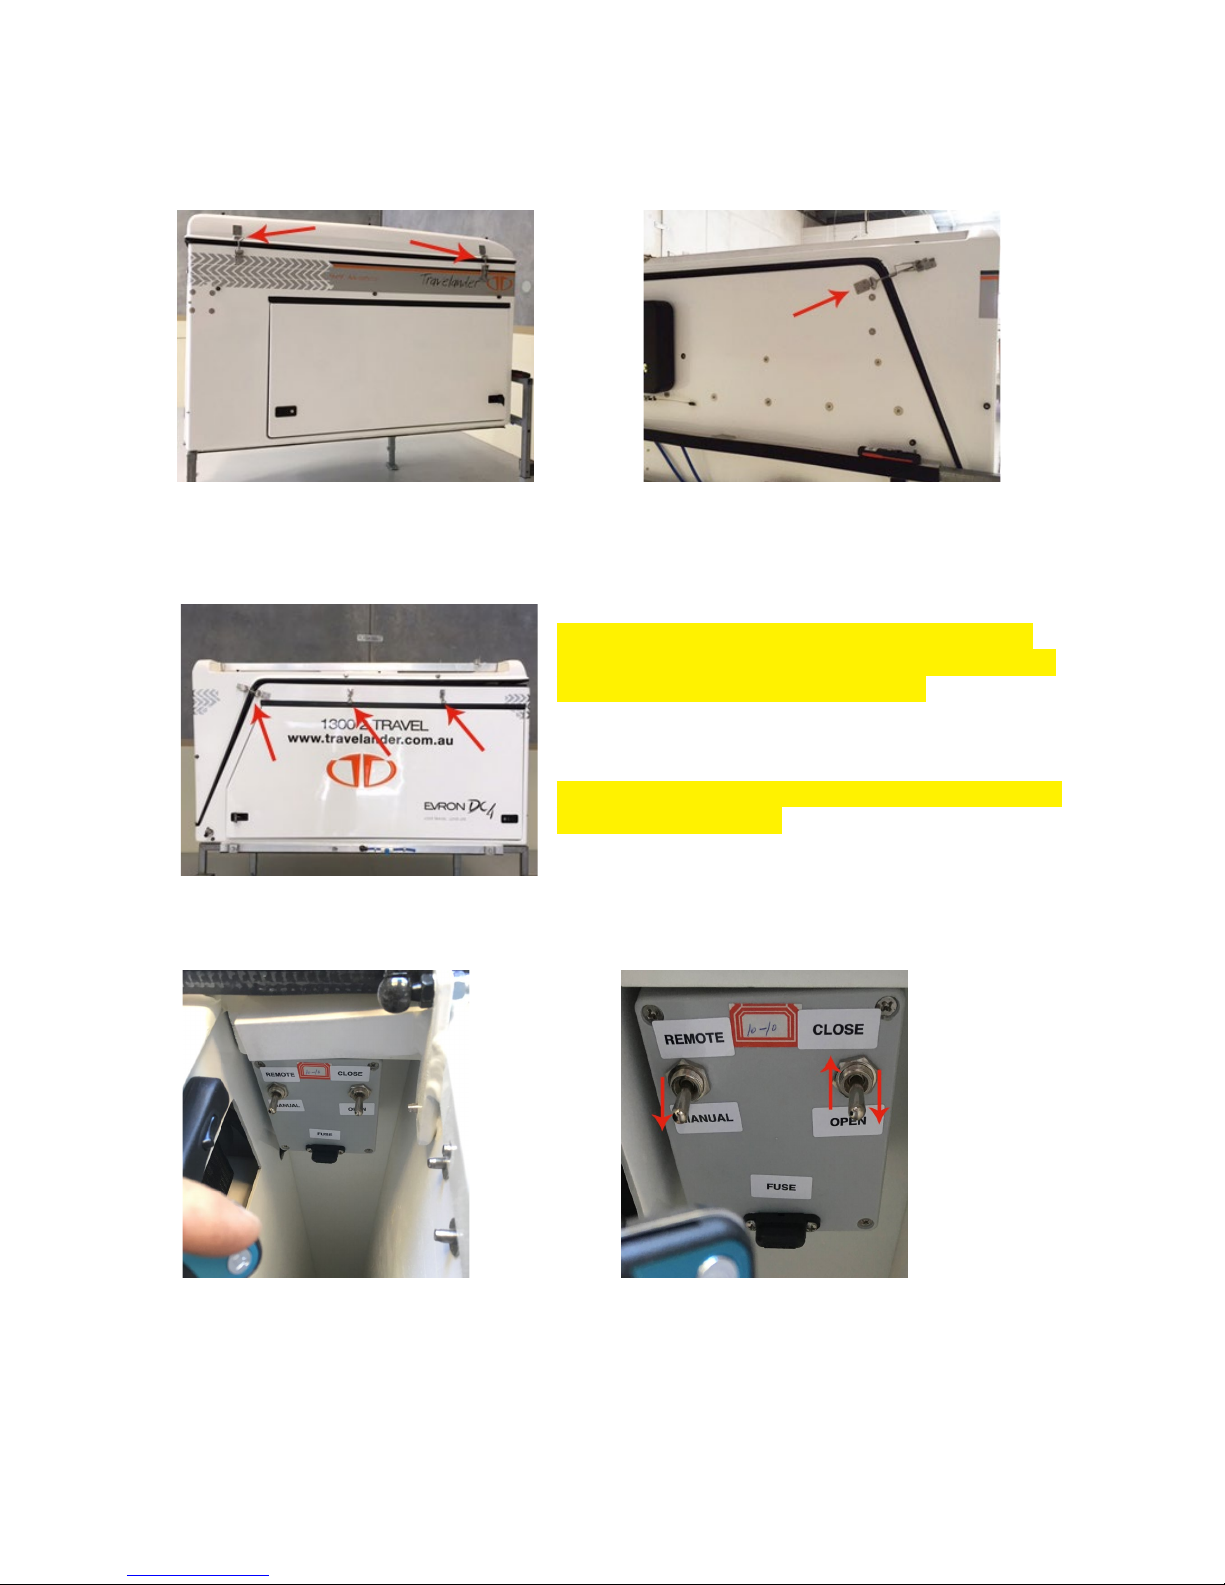
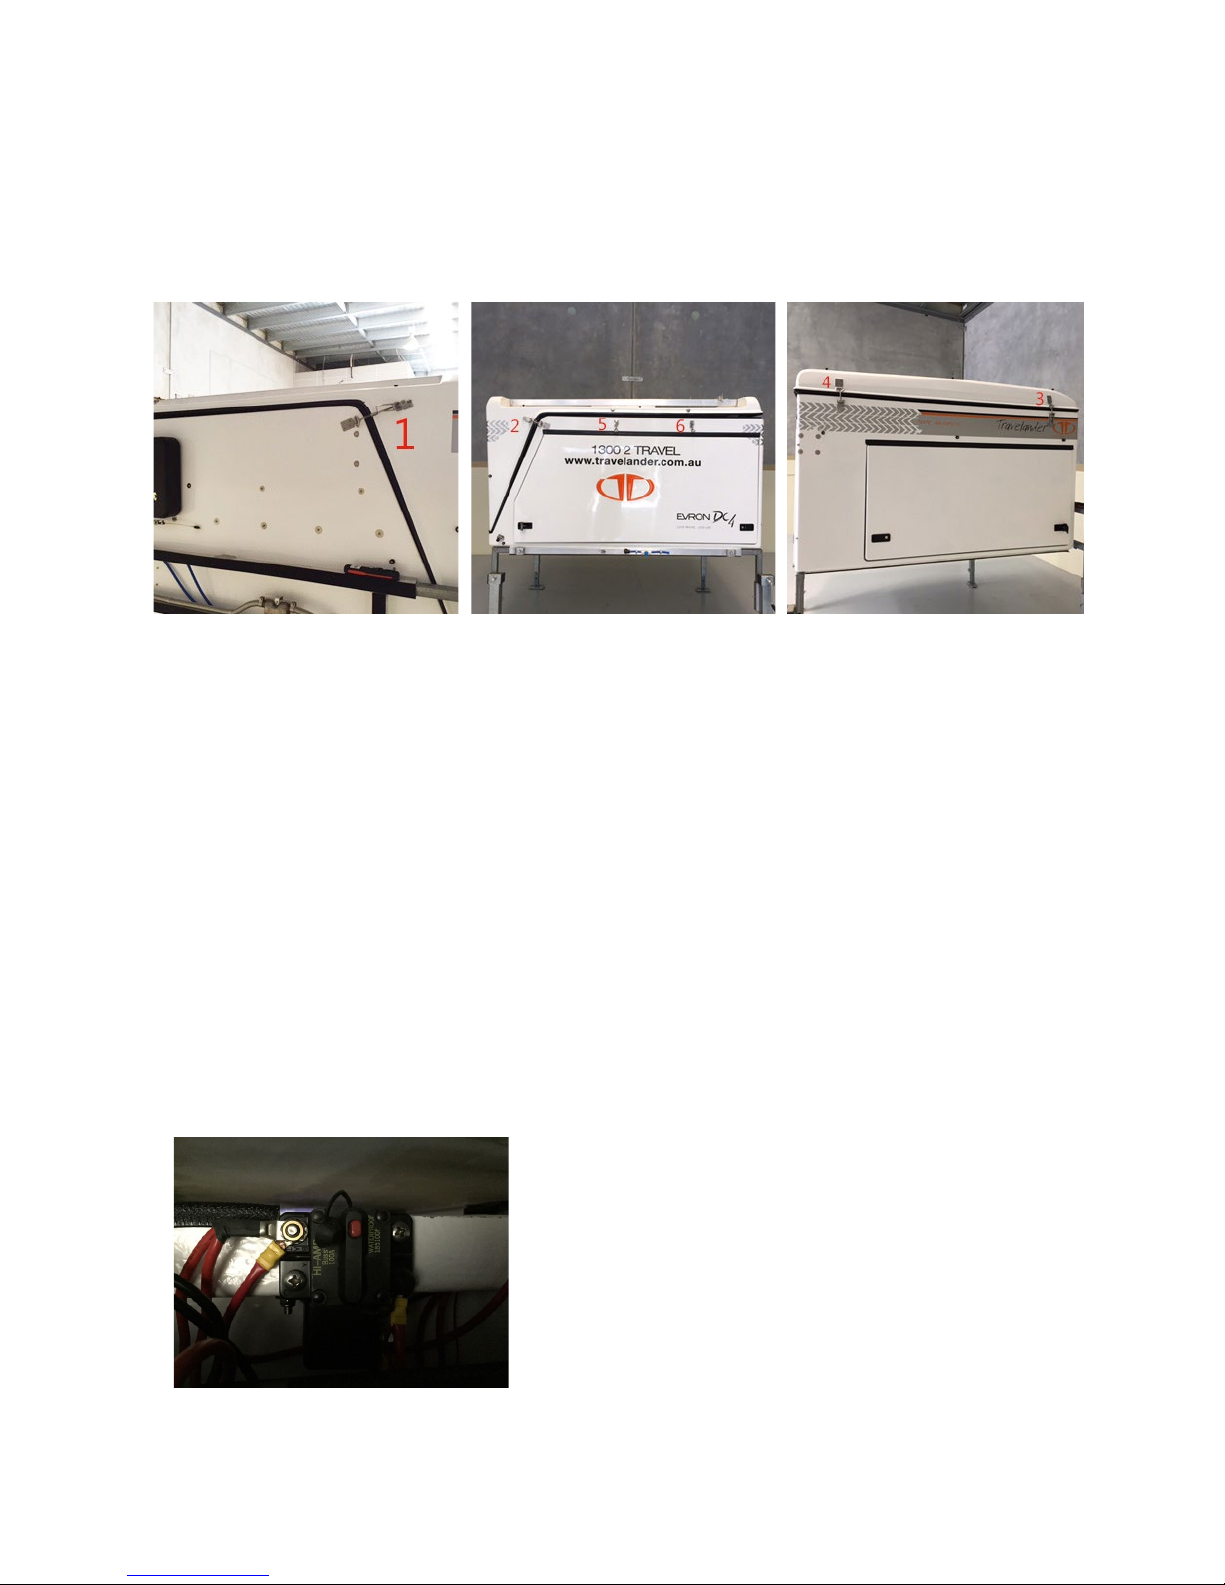
Unfasten 3 catches on RH top side of
camper (SC Models only) Unfasten
2 catches on RH top side of camper
(DC Models only)
Unfasten 1 catch at front of
camper (SC and DC Models)
Unfasten 3 catches at rear of camper
(SC and DC Models)
Once you have released all catches from
the lid, go to the RH side lockable door of
the camper to turn on the remote control
switch. You will view 2 x switches and fuses.
Turn the one on that says – remote control.
If you cannot locate your remote control
receiver/s or the batteries are at, you can
over-ride the remote control system by
placing the left switch on manual and then
use the right toggle switch to go up or down
as required.
Up = close lid, Down = open lid.
4
www.travelander.com.au
Opening of camper (cont.)
• Swivel the jack stands into position by pulling the handle out to drop legs into upright
position. GEO trailer model only).
• Make sure there is nothing protruding outside the LH side of your vehicle/camper.
When the camper lid opens and folds out to the LH side of the vehicle it will hit the
protrusion/obstacle when folding out.
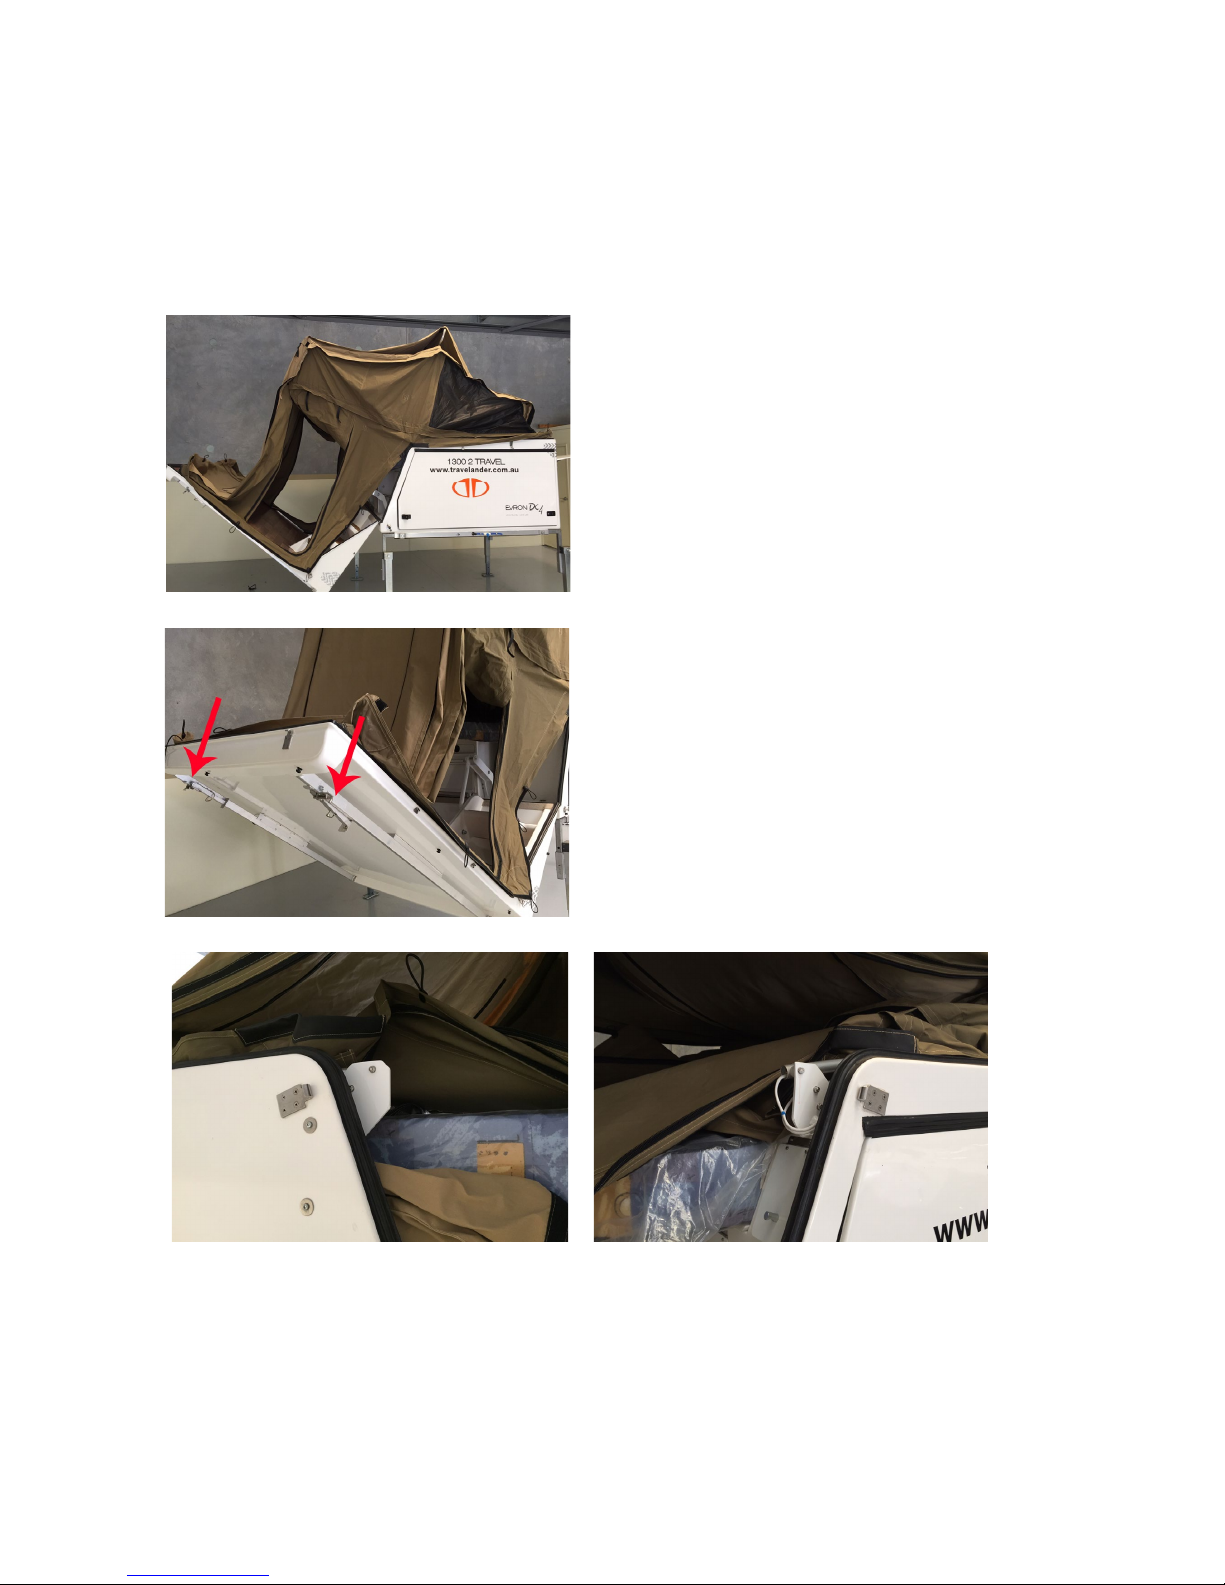
• Press the (unlock) button on the remote
control receiver to open the camper. Stop
opening the camper lid about ¾ of the way from
being completely open, (or when the lid is in a
45 degree position from ground level). To stop
the opening of the camper remove your nger
o the remote control receiver.
• At this point drop the lid legs by pulling the
spring bolt and then fold the leg into a 90 degree
position. It is recommended to pull the canvas
over the edge of the camper lid at this point,
because it is at an easy height for reaching and it
is easier to pull over the edge at this level.
•
Continue to pull the rest of the canvas over the front edges of the camper body and the
rear edges. (This front & rear location point is just near the bow pivot point, above the rear
kitchen on LH side of door and on the front edge).
5
www.travelander.com.au
Opening of camper (cont.)
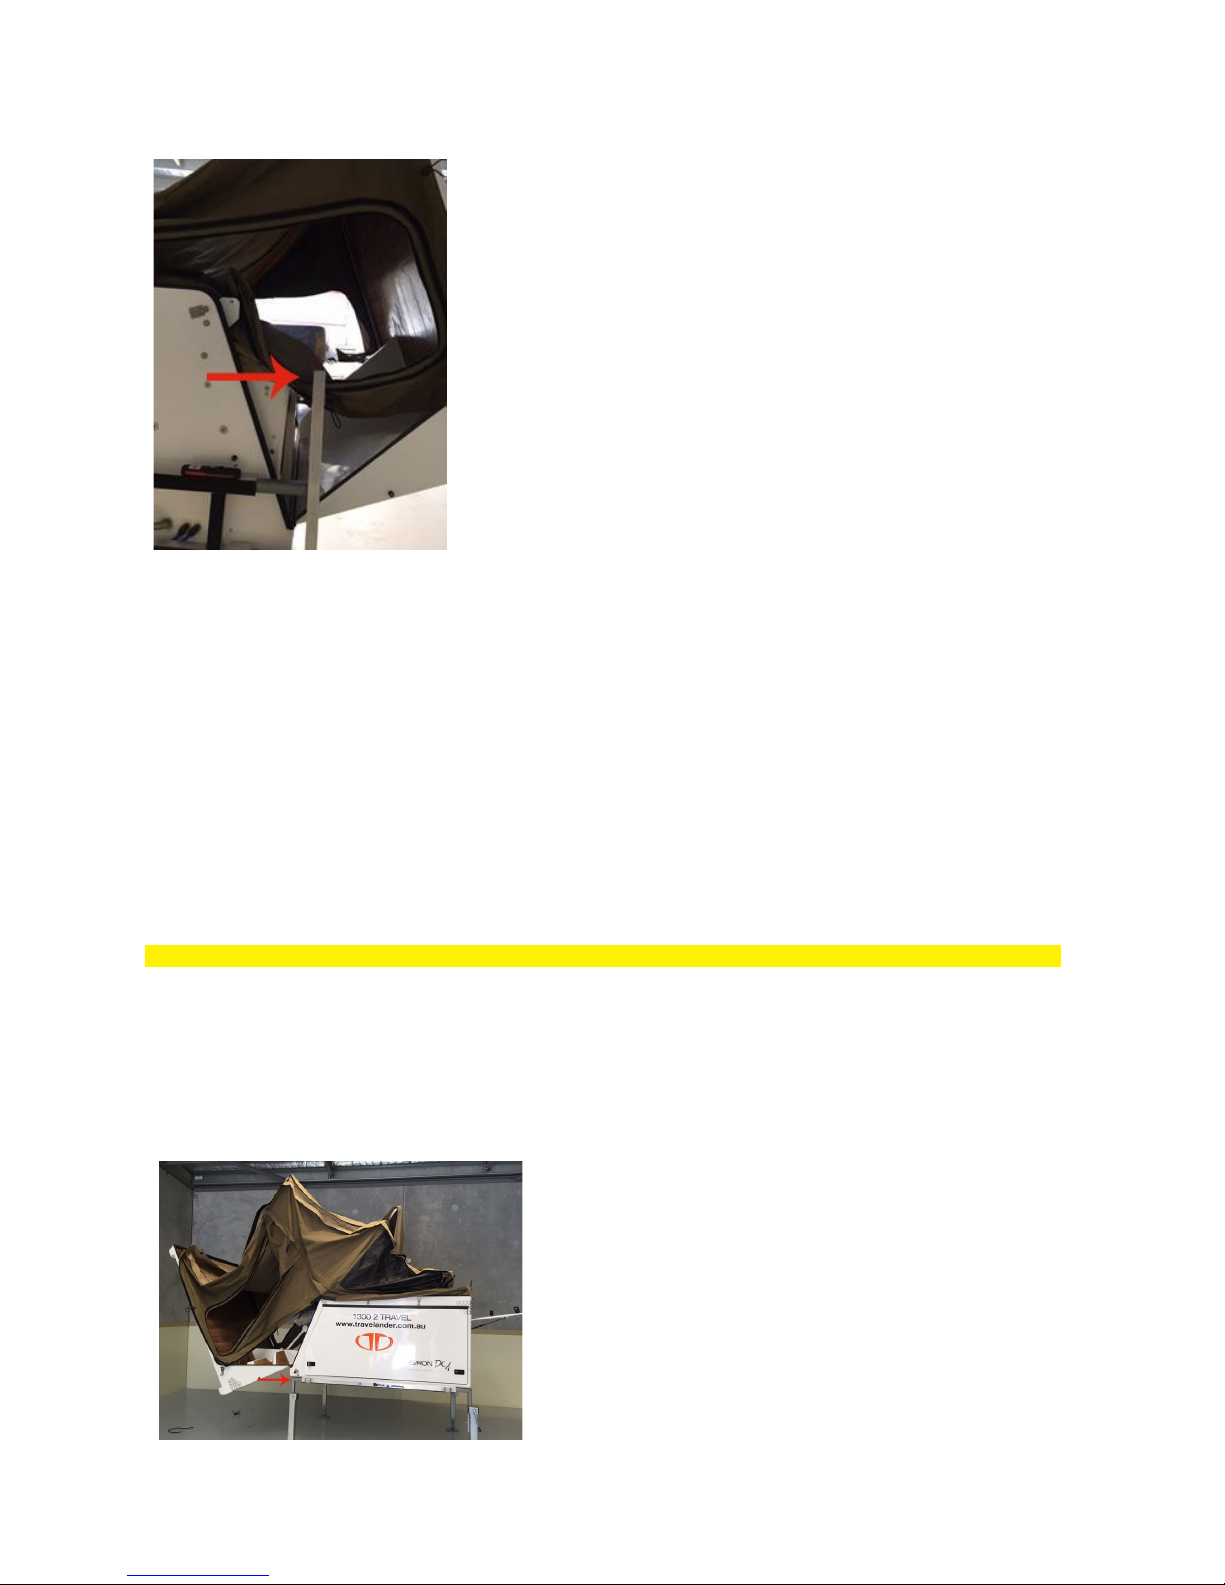
• Please ensure the canvas is not over the LH front F
bracket). If you do not follow these instructions you will pull
the canvas sail track out of oor or tear the canvas.
• Ensure that when the camper lid is opening, that the top of the lid does not jam on the
ground. If the lid is not going to clear the ground then you will need to – Raise the LH air
bag upwards a fraction or lower the RH side airbag if it is sitting to high. (This information
applies to GEO trailer or vehicles with tted airbags). If you have a coil suspension trailer
or vehicle you will have to use the rear jack stands to alter the levels required.
Continue to press (arrow down) button on remote control receiver to nalise opening of
camper to horizontal positioning.
• Release airbag pressure so camper is sitting on stands.( Air bag trailer only)
• Pull canvas around edge of lid (ground level) and body to prevent water leakage.
• Release the internal cords that pull the canvas in from side to side.
• MAKE SURE YOU TURN YOUR REMOTE OFF AT SWITCH BOARD.
Please ensure that the main tent doors REMAIN OPEN AT ALL TIMES when opening and
closing the camper lid. Once the camper is open you can enter inside and release the step
platform downwards into position and go to bed. You can open up the camper whilst it is
standing on its legs, only if you are on stable ground. You will need to put a larger platform
down at the foot of the leg to create a larger surface area if the ground is not stable. If the
camper is still sitting on the back of the vehicle tray, you do not have to place the legs into
the slide-on camper to open.
• If you are opening the camper as seen in the
photo you will have to make sure that the LH
rear leg is all the way in. If it is sitting beyond the
edge of the camper the leg will hit the side of the
camper and cause damage when opening the lid.
6
www.travelander.com.au
Closing of camper
• GEO trailer model - Lift LH & RH air bag pressure up to 90psi (air-bag trailer only)
• Go around the outside and release ALL the bungie loops that hold the canvas over the
side of the camper. If you do not do this, then you will tear the bungie loops out of the
canvas and lift the canvas o the camper edge. (Failure to follow these instructions will
void warranty).
• Close all windows. Leave the velcro on front and
rear doors open and unzipped over bungee cords
inside camper that pull the canvas in. DOORS
MUST BE LEFT OPEN. If you close the main tent
doors you will tear the canvas, because it places
too much pressure on the internal bows. (Failure
to follow these instructions will void warranty).
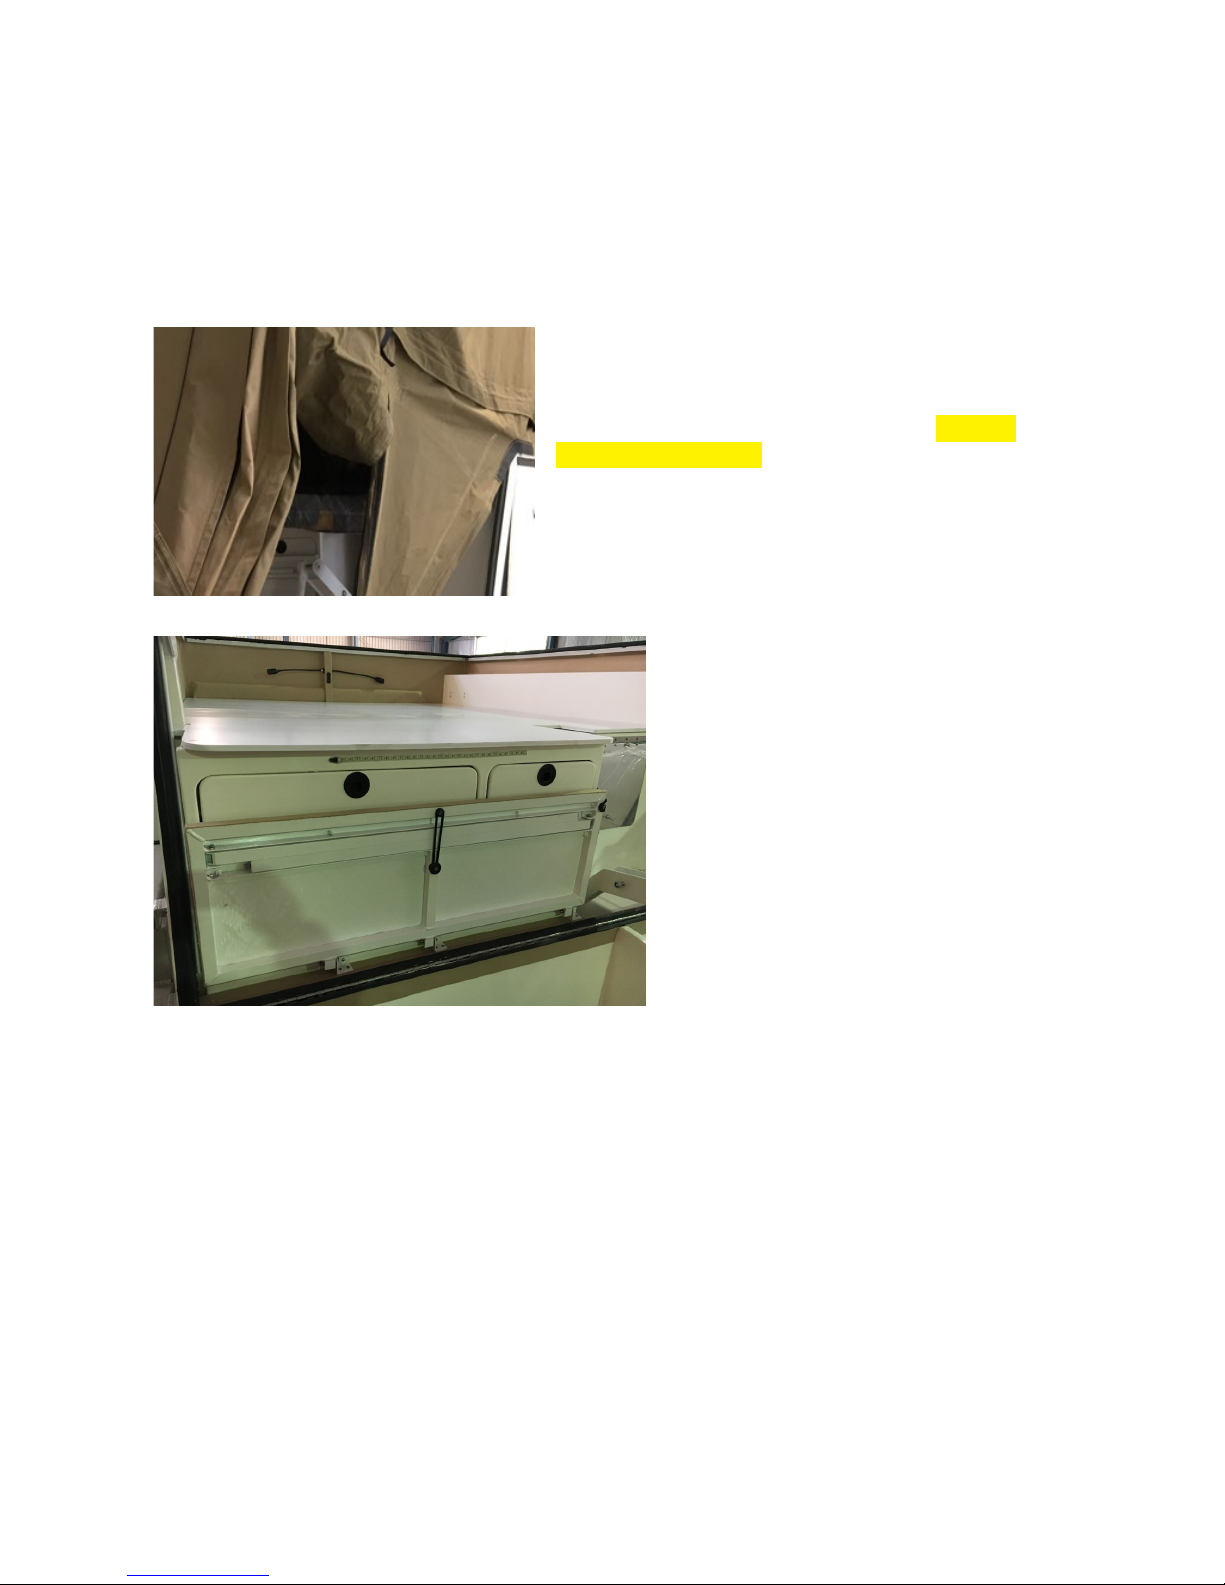
• Fold up the internal step platform that
is in front of the drawers and fold legs
of step platform away. If the step is left
down you will cause major damage to
the lid of the camper when it is closing
up.
• Pull your pillows away from the back edge/head at least 300mm from the back edge of
the camper, as the internal bows lay down in this position with the canvas.
• Turn o the internal lights and make sure there is nothing sitting higher than the black
ruber seals. As the lid comes down and sits at this level.
• Turn Remote control on at the switch panel.
• Press lock button on remote control receiver to commence closure. Lifting the lid with
one hand will help preserve battery power and will close the camper at a faster rate.
7
www.travelander.com.au
Closing of camper (cont.)
•
Once the camper is it at the 45 degree position,
stop pressing the remote and drop the lid legs down
at.
• At this stage you should also go around the
camper and tuck in the canvas before the rst
internal bow comes down. This will aid in holding
the rst layer of canvas down when you continue
to close the camper.
• GEO trailer models - it is best to use a tent pole or a broom to tuck the canvas in between
the nose cone and camper. GEO trailer models - have steps on the front nose cone that
you can walk up to tuck the canvas in.
• STOP about ¾ of the way before the lid is
completely closed because you need to make
sure the canvas is not protruding over the
corner of the bed base on the front LH side of
the camper and that the canvas is cleared from
the bow brackets at the front and rear. Also at
this point in the DC models, the mattress needs
to be lifted up at least 200mm, this should line
up with bottom step of the stairs (if this is not
done, the mattress will be crushed and torn)
8
www.travelander.com.au
Closing of camper (cont.)
• Continue closing the camper and tucking in the rest of the canvas.
• If the canvas gets caught or rubs on anything hard, it may obtain a hole.
• Lock the two LH side catches rst then got to the RH front and proceed to lock the three
catches on the top RH of the lif and the two ctaches at the rear are last.
• TURN OFF REMOTE AT SWITCH PANEL.
• DO NOT OVER TIGHTEN THE CATCHES FOR YOU CAN PULL THEM OUT OF THE LID.
• GEO trailer model - you will then have to fold your rear legs up.
Operation of Internal Accessories
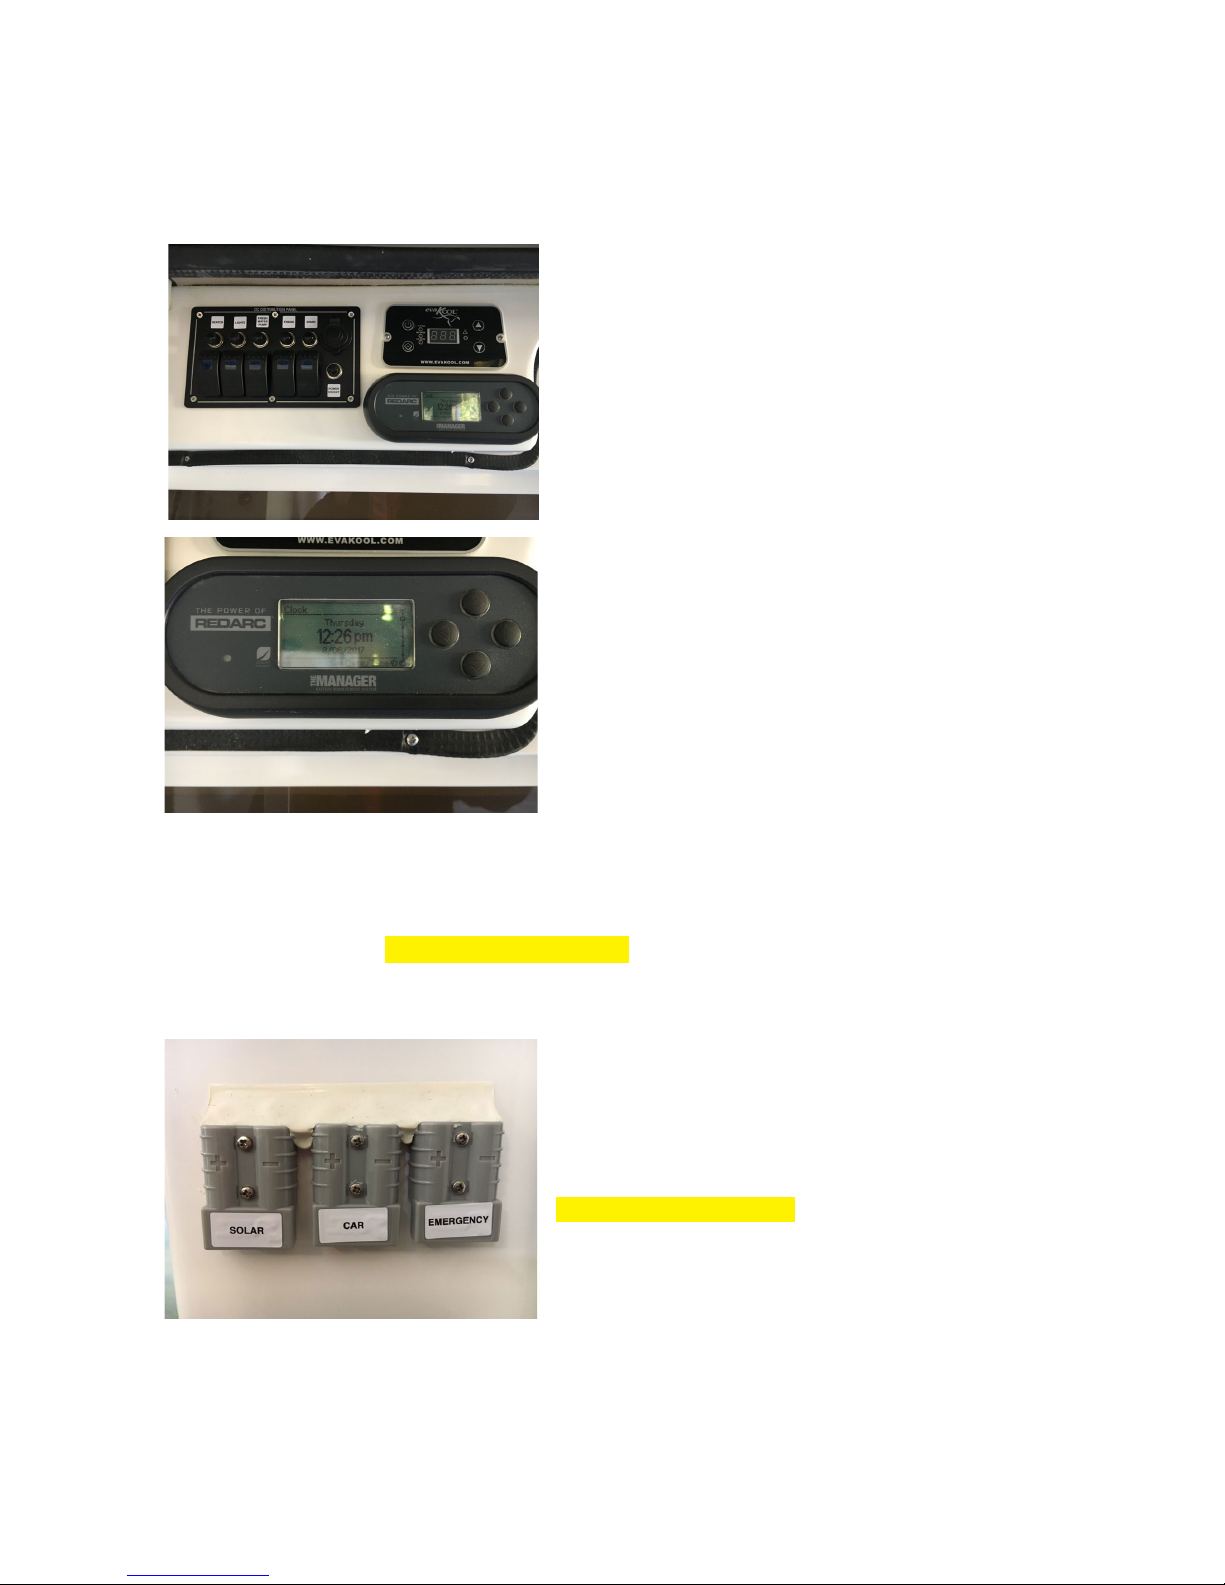
12 volt system
• The 12 volt system is a simple and eective source of power. The two batteries are joined
in parallel and work as one power source. A switch panel is located inside the kitchen at
the rear of the camper. Every accessory is protected by a resettable fuse which is located
above each switch.
• It is important to turn the switches OFF on the switch panel when travelling, other than
the fridge switch, which will need to be left on to keep your groceries fresh. Turning the
other switches o will prevent unnecessary usage of power and ensure that there is no
power to the lights around the bed and will stop them from accidentally coming on and
becoming hot in the enclosed area.
• There is also a large circuit breaker which protects
the whole camper. The circuit breaker can be used to
shut all the power o to the camper by pressing the
red bottom.
9
www.travelander.com.au
Operation of Internal Accessories (cont.)
• If you ever disconnect your camper batteries you will have to follow the redarc owner’s
manual as to how to connect back up. If you do not follow this then your charger will
revert back to factory settings which could also damage the batteries.
• The Redarc display is your battery monitor and
this will give you a full read out. You can press any
button and the screen will light up and then use
the arrow up and down to go between screens.
(Please read the Redarc manual before you start
to press any more buttons, if you do go into the
menu and change any settings you could damage
your batteries which will not be covered under
warranty).
• IF THE BATTERIES ARE LEFT FOR A LENGTH OF TIME WITHOUT CHARGE ON THEM, You
will destroy your batteries. (Leave the charger on them and the charger will maintain
them for you). As you have a redarc in your camper you are best to plug into 240v or
plug in a solar panel (without solar regulator) into the solar socket and place solar panel
in sunny area,this will maintin your batteries to full capacity. Charging the battery can be
done in four dierent ways.
1. Charging from the vehicle through the 50 amp grey
anderson plug on the front of the camper.
2. Charging through the 240v battery charger.
3. Charging through a solar panel from the solar
panel plug on the driver’s side charger socket
(without solar regulator).
4. Charging with a generator through the battery
charger 240v.

10
www.travelander.com.au
Operation of Internal Accessories (cont.)
Mechanical lifting arm (remote control)
• If mechanism fails, check fuses and replace if necessary with the spare fuses of the same
amperage (colour coded). If there is no power coming from the circuit board, manually fold
the camper up using the manual overdrive.
WHEN YOU ARE USING THE MANUAL WINDER, MAKE SURE THAT YOU DO NOT FORCE
THE WINDER. IF IT FEELS HARD TO WIND, STOP IMMEDIATELY OR YOU WILL BREAK THE
OPENING ACTUATOR.
Battery 120 amp hours
• It is best to charge the 120 amp hr batteries every 2-3 days whilst in use; or when fridge/
freezer shuts o (indicated by error light on fridge/freezer panel). You will require a 12vlt
power supply from the vehicle to charge the 120 amp hr batteries on the GEO camper
trailer. You can also charge the batteries by using a Honda generator (1kva), Honda
alternator, or solar panel of your choice.
• IF THE BATTERIES ARE LEFT FOR A LENGTH OF TIME WITHOUT A CHARGE ON THEM,
you will destroy your batteries quickly. (Leave the charger on them and the charger will
maintain them for you).
• ALWAYS CHECK THAT YOUR CHARGE HAS NOT BEEN TURNED OFF.
• LEAVE CHARGER ON AT ALL TIMES
11
www.travelander.com.au
Operation of Internal Accessories (cont.)
Fridge/Freezer
• Turn fridge on. This is done at the switch panel and this should be the only thing running
when you are mobile.
• Unit works best on about -13°c. I set my Evakool at about -13°c and this will give you about
2-4°c in the fridge compartment.
Shower unit
Location - for DC4 and SC4 models the shower cubical is located on the LH front side of the
camper.
• To prepare shower unit for use - remove shower head by pulling outwards. Pass the
shower head through the outside of the camper and into shower cubical.
• To use shower unit - turn pressure pump switch into ON position.
• To get hot water, the heater switch will need to be turned on, you then need to wait about
15-20min for hot water.
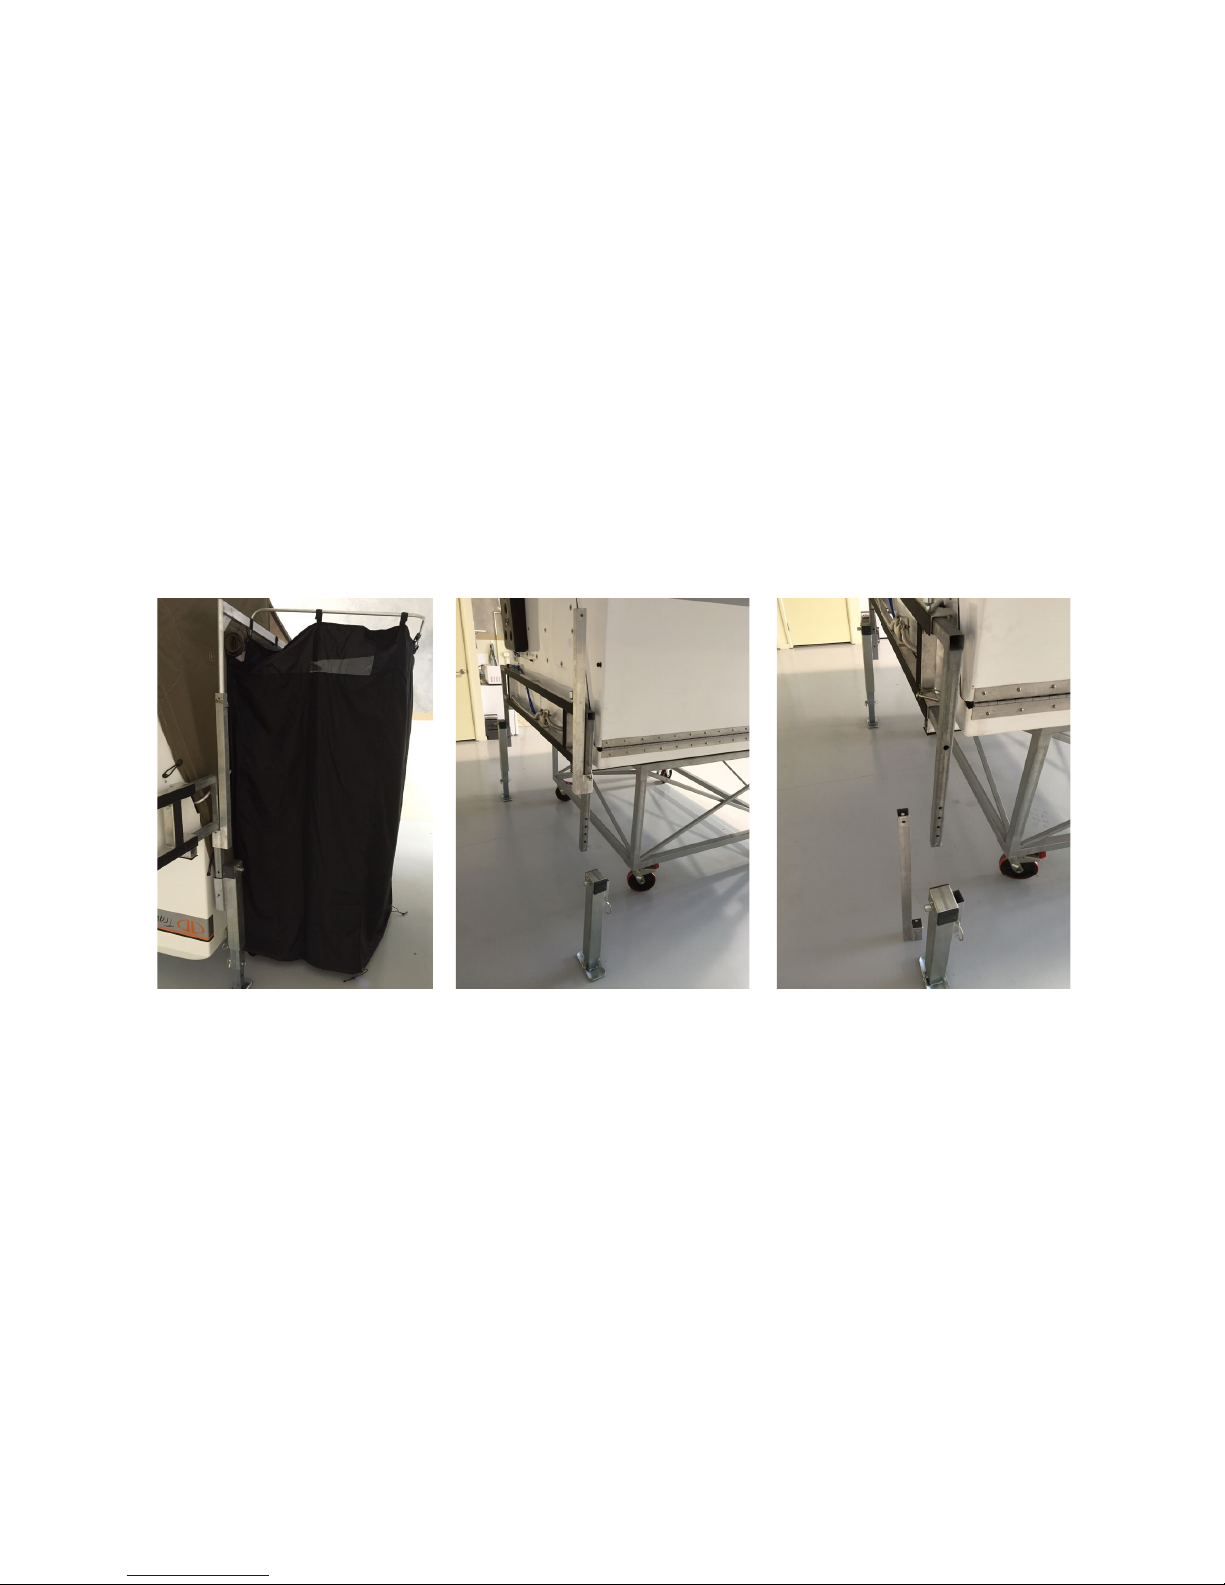
• To prepare shower cubical for use - attach aluminum frame to side of camper. Attach black
fabric cubical walls to aluminum frame. Always start in one corner and work your way around
whilst pressing velcro together at top around frame. Peg each corner out. DO NOT peg
through the eyelets for you can tear them out of the black fabric. Use the black bungee cords
that are supplied and feed them through the eyelets and tie them o in a knot, to the length
that is needed.
• If setting up on legs you will have to add the 40x40 attachment as indicated in photo
• You will have to set the shower temperature at the LH front door of camper. Once this is
completed please leave at that temperature setting until you have nished taking a shower.
When you are storing the camper or in transit you MUST turn the water mixer OFF. If you
store the shower head but leave or push the trigger ON, then you
will cause water to leak in
the camper. (ALWAYS TRAVEL WITH THE MIXER TURNED OFF)

12
www.travelander.com.au
Turning on Heater
• Remove RH front strap that holds camper down to tray. Go to the Kitchen & turn heater
switch on. It will take about 15-20 min to heat up. Once hot, you will then get your cabin
heating as well as hot water for your sink & shower.
Cabin Heating
• The heater will have to be running for about 15-20 min. There is a 2 speed fan switch to the
right of the shower. Press this switch to speed 1 or 2 & this will allow hot air to ow into cabin.
Kitchen
•A metho cooker has been provided. Please make sure that you do not allow a breeze
to sweep up the sides or rear of the cooker, as this will prevent the ame from working
correctly. You must shield any wind from the cooker (sides & rear) or you may burn yourself
and/or you may not be able to shut the cooker o.
• Whilst in storage/or not in use, the metho can evaporate from the cooker. Dometic supply
round stoppers that you can place on top of the canister to prevent wasteful evaporation.
• You can remove the metho cooker from the camper if preferred - Push yellow lever down
on one slide & on the other slide lift up the black lever and then slide cooker out.
• Read cooker manual before rst use, we suggest it is necessary to read sections 7.1 & 8.2-3
Operation of External Accessories
Air bag suspension – GEO Trailer
• Turn air pump on at switch board.
• Location of airbag control panel is in the nose cone on RH side.
• The air bag control has 2 needles, one for LH side and one for the RH side. It also has two
switches on both sides of gauge to raise or lower airbags. To raise LH and RH airbags lift
switch UP and to lower LH and RH airbags press switch DOWN.
• Airbag pressure can be placed on 65-70psi for highway travel.
• Airbags pressure can be placed on 40-45psi for o-road travel. Please note: Airbag
pressure noted above is only a guide. If you feel that the pressure is not correct, please
alter for road conditions you are travelling on.

13
www.travelander.com.au
Operation of External Accessories (cont.)
Free standing the camper on its legs.
• Firstly choose the most level ground area, making sure the ground is not too soft. If
it is soft then you will need to position a larger foot platform at the base of the leg to
make the surface area larger.
• Remove all straps
• Pull the 2 front F brackets out and turn them 180 degrees, fit the front legs to the F
brackets so the handle part is facing the front of your vehicle. The F brackets can be
placed some distance from the vehicle tray which allows greater clearance from the
vehicle when driving out and leaving the camper on its legs.
• Remove the rear L brackets and turn them 90 degree and then fit the rear legs. The
LH rear leg has to be pushed all the way in otherwise it will hit the camper lid when
opening/closing the camper whilst on its legs. The RH leg can be placed further out
than the side of the vehicle/camper.
• Once you have all legs placed in position, you can commence winding the feet to
ground level. At this point wind the handle only about 10 turns individually on each
leg and keep going around the vehicle until the camper clears the vehicle tray and
then drive vehicle out from under the camper. Once the vehicle is out from under the
camper you can then lower the camper to your preferred height.
• You can view this procedure on footage via youtube at the following link:-
https://www.youtube.com/watch?v=hkwaJS2086Q
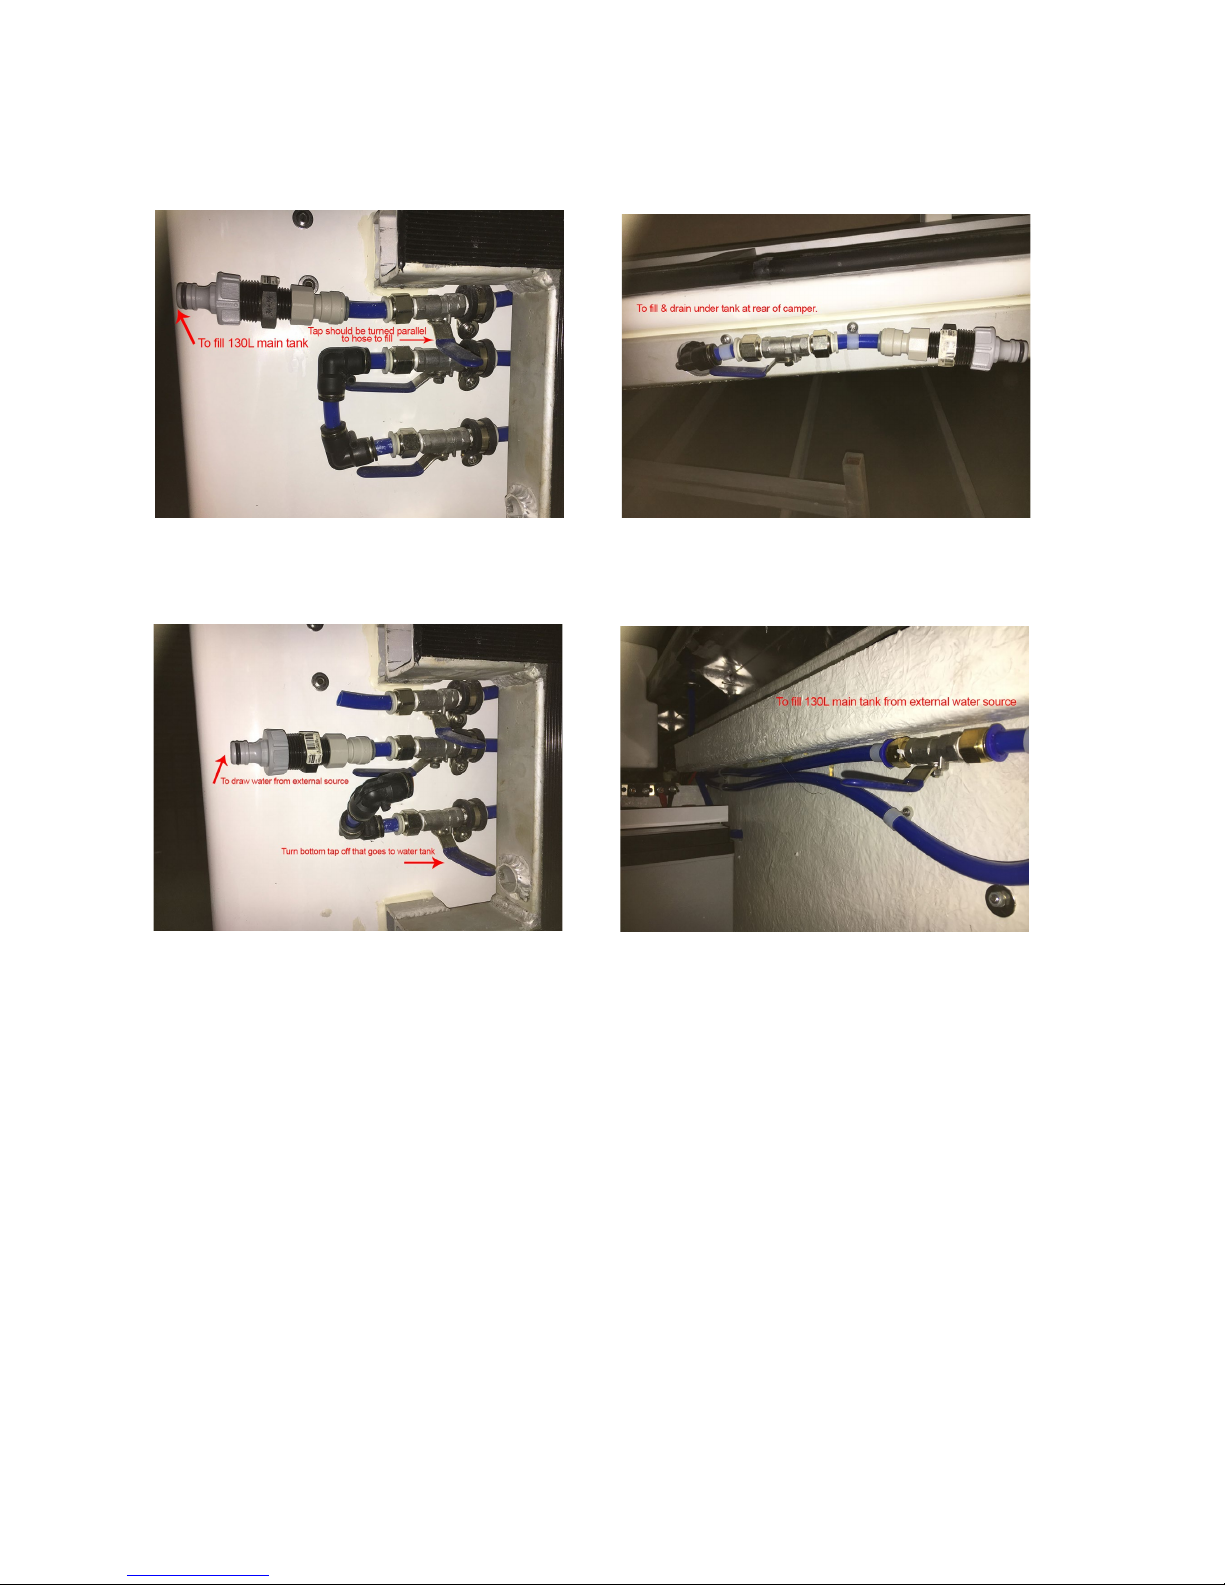
Water tank
• 1 x 130 L water tank is in the first ¼ of the camper on the base.
You will have an extra 50L under the DC model and an extra 70L under the SC
model. Filling and draining of the extra under-body water tank is from the rear of the
camper. The front of the camper must be the high point.
• The water tank sight guage is located on the RH front side of the camper and
between door and redarc charger. THERE IS NO LEVEL INDICATOR FOR THE BOTTOM
TANK AS IT IS TOO LOW PROFILE FOR THIS.
• You must stay at camper when filling both the 130L front tank & the under body
tank. (Do not walk away from camper when filling tanks. When the 130L tank guage
gets to just under the front drawer, you must shut off water or you will split the
tank. Failure to do this will void warranty. With the under body tank, fill slowly and
once water comes out the front 50x50 box, shut off water or again you will crack
tank and void warranty.
14
www.travelander.com.au
Water tank ller
• The water tank ller is located on the RH side of camper. When lling, do not ll it quickly
or the tank will expand and crack.
Drawing water from creek or external water source to ll main tank
Annex Roof and Annex Walls
Fitting standard - quick awning
• Firstly erect the roof extension with three – poles, ropes and pegs on the RH side and
then roll out the annex and zip on. This is an easy height to zip the annex roof on
without help. This awning can be erected with minimal of four poles, ropes and pegs.
But if you are wanting to erect it in full then you will need 6 poles, ropes and pegs.
Attaching annex roof
• 1st roll out smaller annex roof on RH side of camper. Fit three poles, guy ropes and pegs
to secure.
• At this stage you can place all the poles in the correct places and you can set some poles
at the correct height also. The centre pole you can set to the highest point and the LH
poles can be set to the height of the zipper in corner where it just turns the corner. You
can then take 3 good paces out from the centre bow on main camper and put a peg
in the ground and attach the rope and have this ready for when you have zipped the
awning on, you will have a rope and peg ready to attach and you should always start with
the centre pole and then the corners.

15
www.travelander.com.au
• To attach main annex roof when camper is open - stand at the LH door entrance, then
put an extended tent pole through the eyelet of zipper above doorway. As one person
holds the annex roof out straight, the other person pushers the zipper by moving the
pole along the roof edge. When the person gets to the centre or apex then the person
that is holding the roof up must lower so the 2 zippers are running together. This will
make the zipper run easier as you move it along.
• The zip to attach the annex roof begins near the door of the camper, zip across the top of
the roof towards the right side. If you wish to zip this on when camper is being opened,
lift roof to the open position, lift top oor until you can see the zip runner. Lock roof zip
to camper zip, and then as you open the camper, zip the roof to the tent.
Erection of annex roof
• Zip the annex roof to the camper as explained above.
• Extend one tent pole next to the camper to match the height of the centre tent bow.
• Continue this for the tent bow over the door and the tent bow over to the right.
• 1st erect the centre, highest pole. Fit pole through inner sleeve and through the eyelet,
t a single rope to this pole and peg to the ground.
• 2nd erect the pole opposite the camper door. Fit pole through the eyelet, t a double
rope to this pole and peg to ground.
• 3rd erect the pole opposite the LH corner. Fit pole through the eyelet, t a double rope
to this pole and peg to the ground.
• Measure the three front poles of the annex against the top of the annex wall. This will
ensure the front height is correct.
• Set up the three front poles, double ropes on the corners and a single rope in the middle.
• Adjust poles so the bottom of the annex roof is horizontal.
Attaching annex walls
• Fit annex walls in the following order
• Wall 1, Wall 2, Wall 3, proceed with Draft Skirt, then Wall 4. Ensure velcro is tted
correctly with no gaps or bunching. Peg walls to the ground using the black loops
supplied with camper in long draw. Feed these throw the eyelets and tie a half hitch or
not in them and put the peg through this and not the eyelets on the annex walls.
• Please note: - Wall 1, starts at entry door.
Removing annex roof and annex walls
• Remove all walls from the annex roof and prepare camper for closing.
• Remove all annex poles and ropes from annex roof. Leaving 3 on RH camper roof extension.
• Remove all annex pegs from ground and place ropes, pegs and poles in storage.
• Unzip annex roof starting from RH side.
• Fold up and place in storage.

16
www.travelander.com.au
Product Care and Cleaning
Canvas
• Your camper is tted with the highest quality canvas. This canvas tent is waterproof and
mildew treated. When a new tent is made, it could leak around the seams. A new tent
must be seasoned, wet down and dry out completely over three sunny days before use.
If a seam persists in leaking, it can be treated with a sealant. You can close the camper
when the canvas is wet. Place a poly tarp or plastic sheet over the bedding before you
close the camper. Never leave the camper closed for more than 12 hours with a wet tent.
If it is raining you must open the camper. It is better to leave the camper open in the
rain than leave it closed wet. It is advisable to open the camper every month or two, if
possible. If your canvas is dirty, do not use any soap or detergent to clean it. Just hose the
canvas and use a brush on the hard to clean spots. Some spots are better left. If any type
of cleaner is used you must reproof the tent. There are products available from most
camping stores to reproof canvas. It is best to spray silicon spray on the zippers and
rubber seal as this will allow the zippers to run free and also the rubbers will stay soft.
• When removing camper from tray-back or camper trailer chassis, please store in
undercover area. If the unit is left outside in weather on un-level ground or if the camper
is not square to lid, there is a possibility that water can run in through the seals and wet
the canvas. If stored outside a weather proof cover should be placed over camper.
Service of Camper (Trailer models only)
Your camper has been built to specications as set by the standards association. We adjust
such items as brakes, bearings and suspension moving parts before delivery. Some parts
must “wear in” and we give you the following information to help you with your rst 1,000
km service.
1,000 km service
This is the most important service for the camper. Brakes and bearings must be checked
(service if required). By this time they would have seated into position. Check the wheel
bearings and adjust the brakes. Check all suspension bolts and tow coupling bolts.
5,000 km service
A full service of your camper is required. Check and replace where required, bearing,
brakes, all suspension and tow coupling bolts, adjust locks if needed. If you have used your
camper in water, sand or mud then the service interval will need to be 2,000 km or less
depending on the conditions. Daily checks are required when in o-road conditions.
Check and service during operation (All models)
During operation you are responsible for maintaining your camper to satisfactory and safe
condition. Depending on the conditions these items will need to be maintained.
• Clean rubber seals and spray with silicon spray, every 3 months.
• Clean and service kitchen and under-bed draw slides.
• Check adjustment of braking system.
• Check wheel bearings.
• Check gas struts.

17
www.travelander.com.au
Product Care and Cleaning (cont.)
Lubricants to be used
• Wheel bearings and coupling – High temperature wheel bearing grease. THIS SHOULD BE
DONE BEFORE ANY LONG TRIP.
• Suspension bushes – Rubber grease. THIS SHOULD BE DONE BEFORE ANY LONG TRIP.
• Rubber seals – Silicone spray.
• THIS SHOULD BE DONE BEFORE ANY LONG TRIP.
Pre-Delivery Inspection Form
To ensure that your new camper is delivered to you in top condition and that you are
familiar with the operation of all features, the following factory approved pre-delivery
inspection service has been performed.
• Exterior
• Interior
• Under body / Chassis
• 12 Volt system
• Lights
• Equipment supplied to standard camper
• Canvas tent
• Kitchen
• Appliances
• Complete “Warranty” with customer and send copy to Travelander head oce
• Review owners’ manual
• Explain service requirements
• Demonstrate correct and safe use of all features
Yours sincerely
………………………………………..
Agent / General Manager
………………………………………..
Sales Manager
Travelander Warranty
A great travel home is just the beginning.
After you’ve bought your new camper, we support you with on-going customer service
that aims to make you one of the most satised owners in Australia. The service we aim
to provide demonstrates our commitment to the valued customer oering total peace of
mind whilst traveling on or o-road, anytime and anywhere. This includes assistance at
remote locations for parts and accessories.
10 year structural warranty
For 10 years, your camper is covered against any defects in factory materials or
workmanship for the breglass and trailer chassis structures. This 10 year structural
warranty period shall commence once the camper is sold to the customer at a retail outlet.
This does not include warranty for general parts failure or accessories supplied and tted
to our camper/trailers. Please refer to the individual warranty manuals provided with your
camper/trailer.

18
www.travelander.com.au
10 year warranty against perforation
It’s reassuring to know that the original body of your travel home is guaranteed against
perforation for the rst 10 years of its life. If perforation occurs, we’ll x it for free,
providing the damage was due to standard defects in factory materials and was not caused
by misuse of the product.
Damage or replacement costs
All costs associated with the full replacement or damage repairs to any part of the product
purchased, whilst in the care of the client/owner, shall be borne by the client/owner; unless
otherwise proven to be covered under our warranty plan. Our warranty does not include
transportation or accommodation costs.
Limitations
This warranty shall exclude any of the following repair or replacement costs, not resulting
from defects in factory materials or workmanship:-
• Misuse of the product whilst in the care of the owner.
• Road accidents.
• Accidental damage.
• Abuse / lack of knowledge.
• Overloading.
• Lack of proper maintenance.
• Repairs, modication or remodeling performed by owner / operator or replacement parts
improperly installed by any person other than the manufacturer.
• A replacement part or accessory not conforming to the manufacturers’ specications.
• Deterioration due to everyday use and exposure, or damage and corrosion from
environmental conditions such as airborne fallout, salt, sand, stone, hail, windstorm,
lightning, ood / water damage etc.
• Use of the camper for any other purpose other than that for which it is designed.
• Any scheduled maintenance including cleaning, polishing and lubrication etc.
• Expenses incurred in transportation to and from the manufacturer.
• Freight costs incurred from delivery of parts and/or accessories to an authorised dealer
other than standard road freight costs.
• Incidental loss or damage.
• Any claims relating to the camper which result from failure to execute maintenance and
repair as required.
• Water damage to the canvas from storing the camper outside in wet conditions. Camper
should always be stored in an undercover area or have a weather proof cover over
camper, if stored outside.
This warranty includes all obligations of the manufacturer. No authorised dealer, agent
or its employee/s are authorised to extend or make any changes to this warranty. It
excludes all statutory warranties except rights given to or created in favor of consumers
by legislation which cannot be lawfully excluded or limited. This warranty is to be read and
construed as additional to and not restrictive of any such statutory rights or warranties.
Limitation of liability and remedy
The Manufacturer is not liable for any consequential indirect or incidental loss or damage
or for any service not expressly provided herein and the liability of the Manufacturer under
this warranty is limited to the repair or replacement of defective material or workmanship
by the Manufacturer at its place of business utilising genuine Travelander approved parts
and the skill of trained technicians.

19
www.travelander.com.au
Tyres and batteries
Tyres and batteries installed as original equipment on a camper are warranted by the
Manufacturer but are not included in this Warranty.
Owners’ responsibility
Slide-on Camper - When tting your slide-on camper to your vehicle, it is the owner’s
responsibility to make sure that the tted slide-on camper abides by all road regulations
and laws governed in Australia and by the Road Transport Association. It is also your
responsibility to make sure that the tted slide-on camper, is not over loading the vehicles
carrying capacity and axle load limits.
Travelander will take no responsibility for any vehicle the slide-on camper is tted to,
or the additional weight the customer may place onto the slide-on, at any time.
Camper Trailer - Travelander will take no responsibility for any additional weight the
customer may place onto the camper trailer, at any time.
General
Regular maintenance and services are the owner’s responsibility.
You must retain evidence that proper maintenance has been performed on your
camper. Claims made during the warranty term will not qualify under this warranty
if lack of proper maintenance acts as cause rather than defective material or
workmanship.
You must maintain your camper in accordance with the instructions in your owner’s
manual. You must repair at your expense any body rust, corrosion or damage due to
any neglect (maintenance is the owner’s responsibility) or external damage found by
inspection which are not subject to the warranty within 30 days of identication. You
must promptly inform your authorised Travelander dealer if you nd any rust and / or
corrosion to the body part(s) of your camper.
You must deliver your camper to the Manufacturer or an authorised Travelander
dealer to obtain warranty service. All parts & service must be approved by the
Travelander service manager prior to work commencing, Warranty will not be able to
be claimed if this procedure is not followed.
Transfer of warranty
If you sell your camper within the 10 year warranty period the warranty can be trans-
ferred to the new owner. The new owner must complete a handover demonstration of
the camper with an authorised Travelander dealer. A form will be provided for you, the
new owner and the dealer to complete, the form then must be supplied to Travelander
head oce.

20
www.travelander.com.au
Table of contents


