Traveler CBB 1 User manual

After Sales Support TEL: 1800 623 432 · WEB: www.traveler-service.com/au
2
1. Contents of box
Carefully remove camcorder from packaging and check that all of the below parts are
contained in the box:
1. Traveler® CBB 1
2. SD memory card 2 GB
3. USB car adapter
4. USB cable
5. Suction cup mounting
6. Instruction Manual
7. Warranty documents
Dear customer,
Congratulations on purchasing a high-quality Traveler(R) product. You have acquired a modern
digital HD camcorder with excellent technical features and respective accessories,
which is particularly easy to operate. Please study this information in detail observing,
in particular, the safety instructions.
The device comes with a 3-year warranty. You will need the enclosed warranty card and your
sales receipt in the event of the camcorder developing a fault. Keep these in a safe place
together with the Instruction Manual. Please include the Instruction Manual when
passing on the camcorder to a third party.
Note:
t 3FNPWFQSPUFDUJWFGPJMGSPNEJTQMBZBOEXIFSFBQQMJDBCMFGSPNMFOTPGDBNDPSEFS
by pulling the protruding tab.
t $BVUJPO,FFQQMBTUJDCBHTPVUPGSFBDIPGCBCJFTBOETNBMMDIJMESFOBTEBOHFSPG
suocation.

After Sales Support TEL: 1800 623 432 · WEB: www.traveler-service.com/au
3
2. Contents
2 Introduction
2 1. Contentsof box
3 2. Contents
5 3. Safety and Warning notices
8 4. Your camcorder
8 4.1. Description of parts
9 4.2. Overview of device
10 4.3. Installing the camcorder
11 4.4. Charging the battery
12 4.5. Inserting and removing the memory card
13 5. Menu settings
13 5.1 Video menu
14 5.2. Photo menu
15 5.3. Playback menu
16 5.4. System settings
19 6. Using the camcorder
19 6.1 Video recording
20 6.2. Taking photos
20 6.3. Recording audio
20 6.4. Playback recordings

After Sales Support TEL: 1800 623 432 · WEB: www.traveler-service.com/au
4
21 7. Connecting to a computer and TV
21 7.1 System requirements
22 7.2. Transferring les
22 7.3. Webcam operation
22 7.4. Connecting to a TV
23 8. Technical Specication
24 9. Recording times and number of images
24 10. Warranty and Service
25 11. Conformity
26 12. Cleaning
26 13. Disposal
26 13.1 Packaging
26 13.2. Device
27 14. Index

After Sales Support TEL: 1800 623 432 · WEB: www.traveler-service.com/au
5
3. Safety and Warning notices
Incorrect use of the camcorder and accessories can be dangerous for you and others
and can damage or destroy the camcorder. We therefore ask you to read and strictly
observe the following hazard, safety and warning notices.
Intended use
This camcorder is intended for taking video clips and digital photos. It has been
designed for private use and is not suitable to be used for commercial purposes.
Hazards for children and persons with limited
ability to operate electronic equipment
The camcorder, accessories and packaging are not toys for children to
play with and should be kept away from children.There could be a risk of electro-
cution, poisoning and suffocation.
The camcorder and accessories may not be used by children or persons with
a limited ability of operating equipment. The camcorder and the car power
supply may only be used by persons that are physically and mentally able to safely
operate these devices.
Hazard of electrocution in case of wet and humid
conditions
The camcorder and accessories may not be exposed to dripping or spray
water. Containers filled with liquid, such as vases or glasses may also not be
placed on or close to the camcorder. There is a danger of fire and electrocution.
Do not charge camcorder close to water. Danger of fire and electrocution. In
particular take care in case of rain, snow, on the beach or near water and protect
your camcorder from moisture and humidity.

After Sales Support TEL: 1800 623 432 · WEB: www.traveler-service.com/au
6
Also do not use camcorder in areas exposed to high humidity or considerable
amounts of steam, smoke or dust. There is a danger of re and electrocution.
Electrical hazard
Switch off camcorder if a foreign body or liquid has entered the camcor-
der. Wait until completely dry, danger of fire and electrocution.
Switch off camcorder if camcorder has been dropped or housing is damaged,
there is a danger of fire and electrocution.
The camcorder may not be dismantled, modified or repaired, there is a danger
of fire and electrocution.
Use the supplied car power supply and only with the rated mains voltage
specified on the rating plate, as otherwise danger of fire and electrocution.
Disconnect camcorder from power by pulling the car power supply out of the
cigarette lighter socket. As long as the car power supply is inserted it can continue
to consume power and represent a hazard source.
Damage from heat – fire hazard
Do not leave camcorder in places that are susceptible to considerable
increases in temperature. The housing and internal parts may be damaged,
which in turn could cause a fire.
Do not wrap up camcorder or place on textiles. This could produce a build-up
of heat in the camcorder that could cause deformation of the housing and may
represent a fire hazard.
Hazards of using the rechargeable battery
Danger of explosion in case of incorrect removal of the battery or use of incorrect
type of battery.

After Sales Support TEL: 1800 623 432 · WEB: www.traveler-service.com/au
7
Injuries and material damage
Only place camcorder on sturdy surfaces.The camcorder could otherwise fall
or topple over, causing damage or injury.
Only use the car power supply specied for the camcorder. No liability shall
be accepted for damage caused by an incorrect car power supply.
Ensure that the LCD display is not subjected to impacts or concentrated
pressure. This could damage the glass of the display or cause the display liquid to
leak out. In case of the liquid coming into contact with eyes or skin, rinse immedi-
ately with clean water. In case of contact with eyes, consult doctor immediately.
Damage to the electronics, display or lens caused by external influences, such
as impacts, falls or others are not covered by the warranty and shall thus be
charged for.
Do not switch on camcorder light when close to other people’s eyes. This
could damage their eyes
Do not drop or bump camcorder and handle with due care as the camcorder
could otherwise be damaged.

After Sales Support TEL: 1800 623 432 · WEB: www.traveler-service.com/au
8
4. Your camcorder
4.1. Description of parts
1. TRAVELER® CBB 1
2. SD memory card 2 GB
3. USB car adapter
4. USB cable
5. Suction cup mounting
1
2
3
4
5
After Sales Support TEL: 1800 623 432 · WEB: www.traveler-service.com/au
9
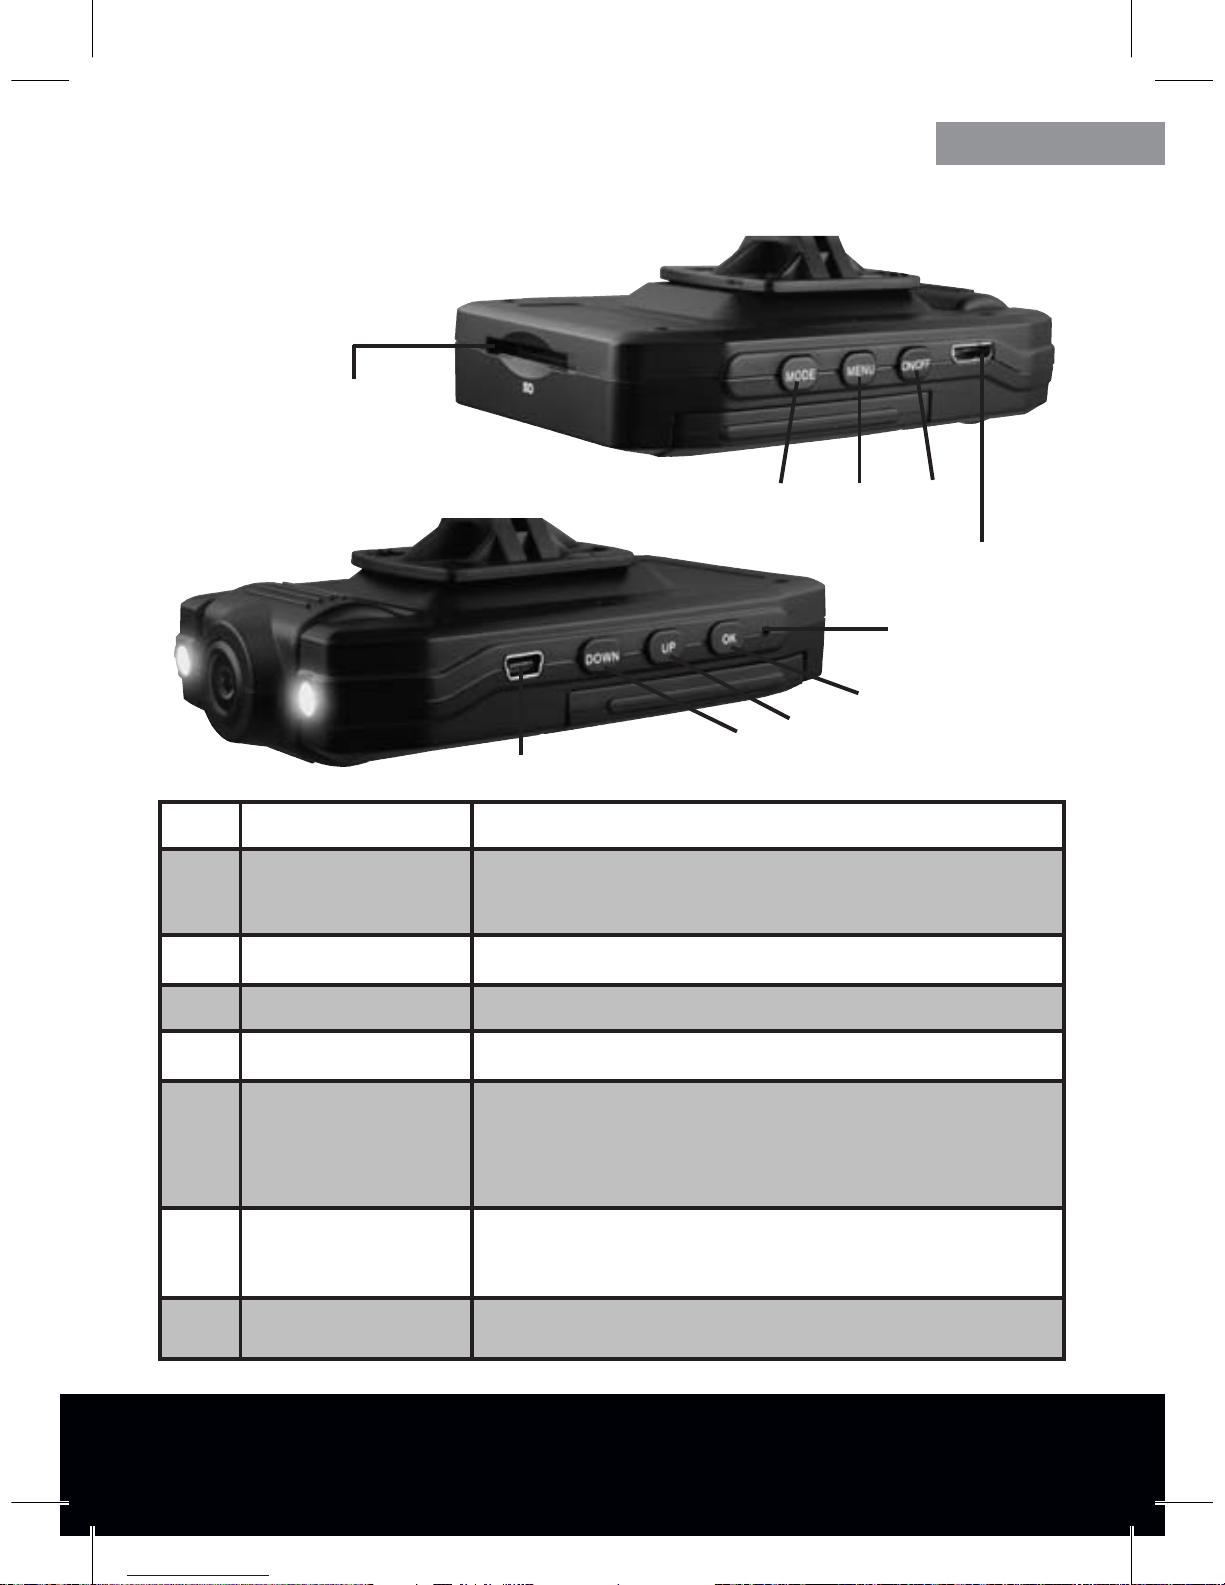
4.2. Overview of device
Button Function
1 ON/OFF On and o switch. Keep button depressed for approx. 3 seconds
to switch device on or o.
2 OK Conrms a selection
3 UP Move up in menu / zoom in 1x-4x
4 DOWN Move down in menu / zoom out 4x-1x
5 MODE
Mode selection: video recording, photos, audio recording,
playback.
In menu: set values
6 MENU Show and hide menu.The USB menu is activated if the camcor-
der is connected to the computer.
7 RESET Reset to factory default settings.
1
2
3
4
56
SD card slot
HDMI connection
7
USB connection
After Sales Support TEL: 1800 623 432 · WEB: www.traveler-service.com/au
10
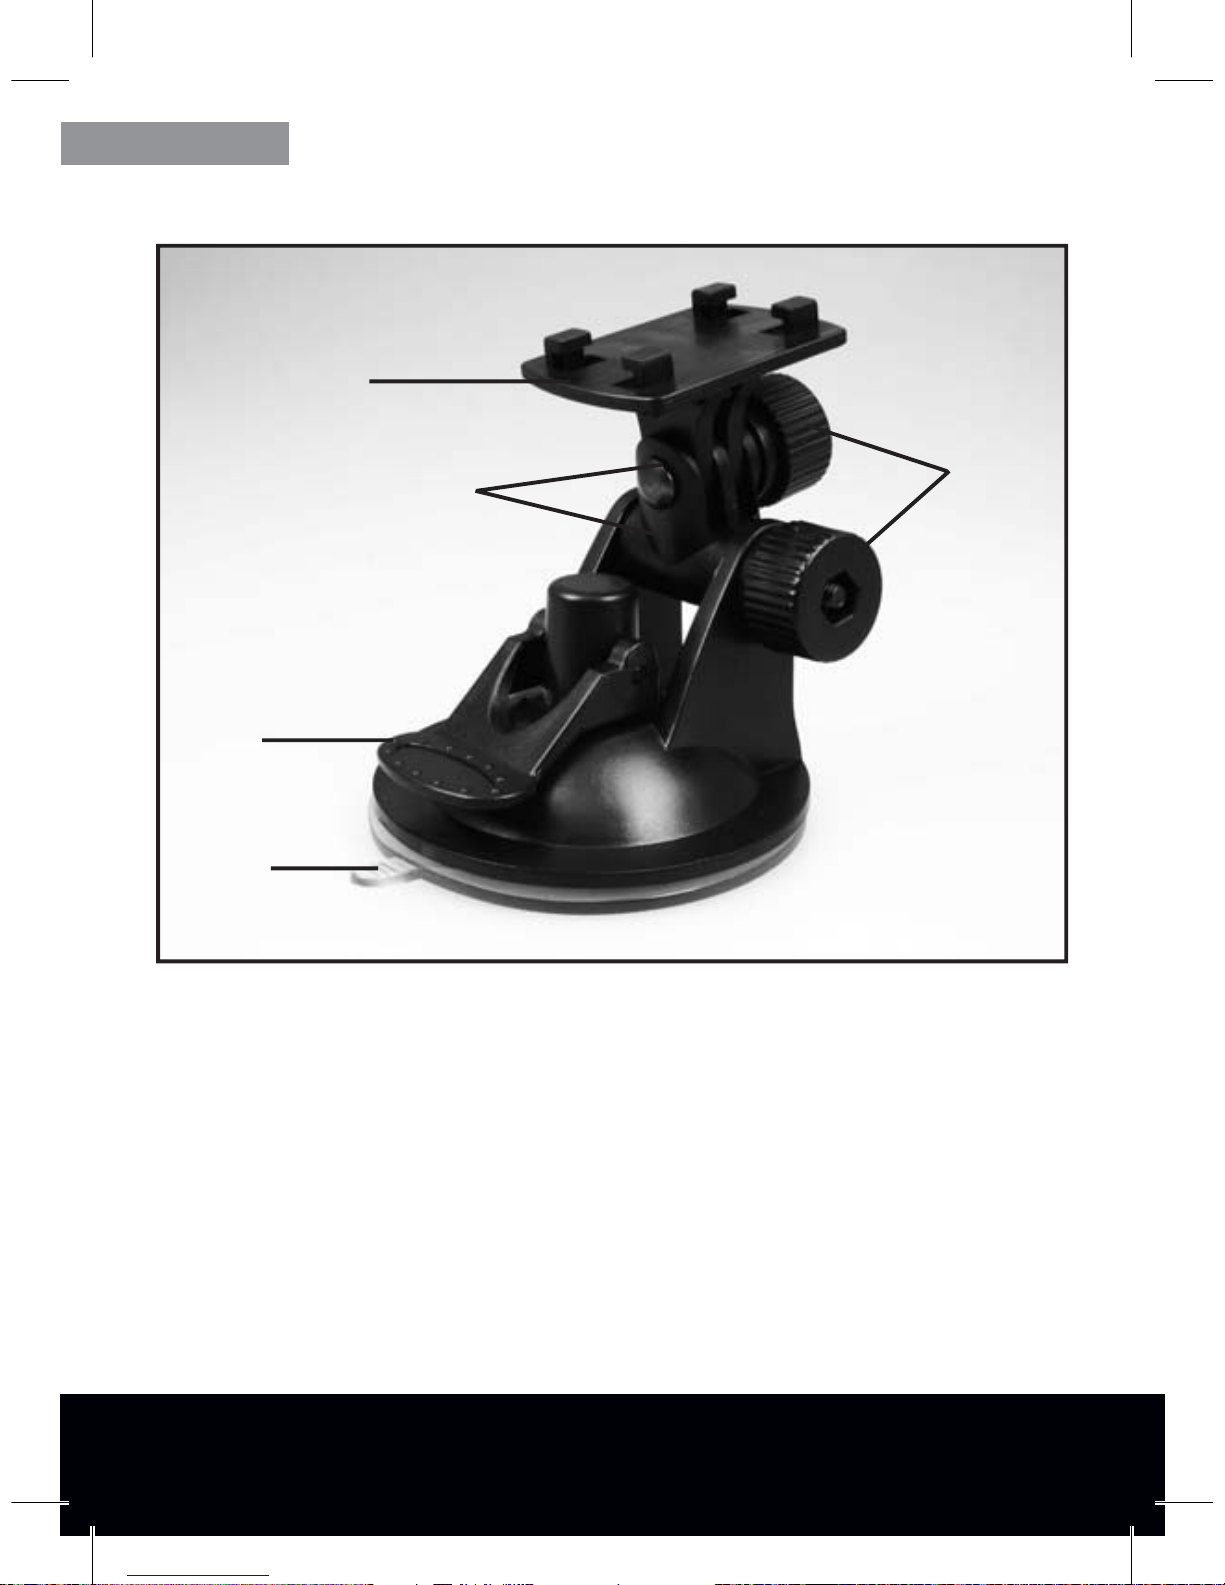
4.3. Installing the camcorder
1. Mounting plate
2. Lever
3. Suction cup
4. Pivot joints
5. Securing bolts
Place bottom of camcorder on mounting plate (1) of suction cup mounting and secure
by sliding to the rear of the mounting plate until it clicks into place.
1
2
3
45

After Sales Support TEL: 1800 623 432 · WEB: www.traveler-service.com/au
11
Open lever (2) for the suction cup and press suction cup rmly against windscreen.
Once in position, push down lever (2) completely. The suction cup should now be
securely fastened to the windscreen. To release the suction cup from the windscreen
pull again at tab (3) of the suction cup.
To adjust camcorder, slightly release bolts (5) for both pivot joins (4) of the holder and
adjust position of camcorder as required.Tighten bolts again.
The lens of the camcorder can also be rotated by 180°.
4.4. Charging the battery
To charge the battery either connect camcorder to the computer using the USB cable
or plug the USB car adapter to the cigarette lighter socket.
During charging the red control LED of the camcorder is lit. From full discharge the
battery is charged within approx. 2-3 hours.
Note:
t $BVUJPO"MXBZTFOTVSFUIBUUIFDBNDPSEFSJTBUUBDIFEUPUIFXJOETDSFFOJOTVDIB
XBZUIBUUIFWJFXPGUIFESJWFSJTOPUJNQBJSFE
t 5IFXJOETDSFFONVTUCFDMFBOBOEGSFFGSPNHSFBTFUPQSPWJEFBTFDVSFIPME
Note:
t 7JEFPTBOEQJDUVSFTDBOCFUBLFOEVSJOHDIBSHJOH

After Sales Support TEL: 1800 623 432 · WEB: www.traveler-service.com/au
12
4.5. Inserting and removing the memory card
Prior to any recording, a memory card must rst be inserted into the camcorder. Insert
memory card into camcorder as shown until it clicks into place.
To remove memory card, press against card until it protrudes slightly from device,
ready for removal.
For HD quality recording (1280 x 780 pixels) use SDHC memory cards of class 6 or
higher.

After Sales Support TEL: 1800 623 432 · WEB: www.traveler-service.com/au
13
5. Menu settings
5.1. Video menu
For video recording settings rst press MODE button to select the Video mode. Then
press MENU button to open the Video menu. The following setting options are
available in the Video menu:
Movie Size:
HD: 1280x720 Video recording at 1280 x 720 pixels with 30 frames per seconds.
D1: 848x480 Video recording at 848 x 480 pixels with 30 frames per seconds.
640: 640x480 Video recording at 640x 480 pixels with 30 frames per seconds.
Date stamp:
OFF: O No date or time information on video.
D&T: Date&Time Date and time are shown on video.
Motion detect:
OFF: O Motion detect o.
ON: On Motion detect on.
Loop Rec:
OFF: O Loop recording o.Video recording ends as soon as memory card
is full.
ON: On Loop recording on. As soon as the memory card is full, the oldest
video recording is deleted to store a new recording.
Note:
t 'PS)%RVBMJUZSFDPSEJOHYQJYFMTVTF4%)$NFNPSZDBSETPGDMBTTPS
higher.

After Sales Support TEL: 1800 623 432 · WEB: www.traveler-service.com/au
14
Loop time:
2min A new video recording le is opened every 2 minutes.
5min A new video recording le is opened every 5 minutes.
10min A new video recording le is opened every 10 minutes.
Continue:
O On external power o, video recording stops.
10min On external power o, video recording continues for 10 minutes.
20min On external power o, video recording continues for 20 minutes.
Video Sound:
ON: On For video recording with sound.
OFF: O For video recording without sound.
5.2. Photo menu
For photo settings rst press MODE button to select the Photo mode.Then press
MENU button to open the Photo menu. The following setting options are available in
the Photo menu:
Resolution:
5M: 2592x1944 Photos with 2592x1944 pixels.
3M: 2048x1536 Photos with 2048x1536 pixels.
2M: 1600x1200 Photos with 1600x1200 pixels.
1M: 1280x1024 Photos with 1280x1024 pixels.
Quality:
Super Fine Low compression in JPEG format producing an excellent quality.
Fine Medium compression in JPEG format producing a good quality.
Normal High compression in JPEG format producing a standard quality.

After Sales Support TEL: 1800 623 432 · WEB: www.traveler-service.com/au
15
Exposure:
The brightness of photos can be adjusted within a range of -2.0EV (dark) to +2.0EV
(bright). Select the desired EV value by pressing the UP or DOWN button.
Driver Mode:
O No operating mode selected.
Self-timer 2S Photo is taken automatically with a 2 second delay.
Self-timer 10S Photo is taken automatically with a 10 second delay.
Burst Continuous photo shooting.
Date stamp:
OFF: O No date or time on photo.
D&T: Date&Time Date and time are shown on the photo.
5.3. Playback menu
For playback settings rst press MODE button to select the Playback mode. Then
press MENU button to open the Playback menu. The following setting options are
available in the Playback menu:
Lock:
Lock/Unlock one Protect single photo against accidental deletion.
Lock All Protect all photos against accidental deletion.
Unlock all Unlock deletion protection from all photos.
Delete:
One Delete a single photo.
All Delete all photos.

After Sales Support TEL: 1800 623 432 · WEB: www.traveler-service.com/au
16
Slide Show:
Start Start photo slideshow.
Interval Time interval between two photos during slide show. Select from
1 to 10 seconds using the MODE button.
Repeat Repeat slideshow (Yes) or terminate upon completion (No).
Voice Memo:
Add Add commentary to photo. The commentary is recorded as soon
as the OK button is pressed. Recording is stopped by pressing the
OK button again.
Delete Delete existing commentary of photo.
Start-up Image:
Set Set selected photo as start image.
Cancel End menu.
5.4. System settings
To adjust the system settings of your camcorder, open the menu by pressing the
MENU button from any operating mode. Use MODE button to change to the System
menu. The following setting options are available in the System menu:
Sounds:
Shutter Select whether an audible signal should be emitted when
pressing the camera shutter.
Start-up Set the sounds played when switching on the camcorder.
Beep Select if a sound shall be played when pressing a button.
Volume Select the volume of sounds.

After Sales Support TEL: 1800 623 432 · WEB: www.traveler-service.com/au
17
Power frequency:
Set the mains frequency to the mains frequency of your local power supply grid either
to 50 or 60 Hz.This prevents ickering when using the camcorder under articial light
conditions.
Power Save:
1min The camcorder switches o if no button has been pressed for 1 minute.
3min The camcorder switches o if no button has been pressed for 3 minutes.
5min The camcorder switches o if no button has been pressed for 5 minutes.
OFF Automatic switch-o is deactivated.
Panel Protect:
30s The display switches o if no button has been pressed for 30 seconds.
1min The display switches o if no button has been pressed for 1 minute.
2min The display switches o if no button has been pressed for 2 minutes.
OFF The display remains permanently switched on.
Date & Time:
Set the date and time by selecting the value to be changed with the MODE button
and change value using the UP and DOWN buttons. Conrm settings by pressing the
OK button.
Language:
Select the desired menu language by pressing the UP and DOWN button and conrm
your selection by pressing the OK button.
TV Out:
NTSC For playing back recordings on a NTSC standard TV.
PAL For playing back recordings on a PAL standard TV.

After Sales Support TEL: 1800 623 432 · WEB: www.traveler-service.com/au
18
Start-up Image:
O No start image appears when the camcorder is switched on
System A standard start images is displayed when the camcorder is switched on.
My image A start image selected from the Photo menu appears when the
camcorder is switched on.
Format:
The memory card can be directly formatted in the camcorder. Please note that all data
DPOUBJOFEPOUIFNFNPSZDBSEJTFSBTFEEVSJOHGPSNBUUJOH
LED:
OFF The auxiliary light is deactivated.
ON The camcorder automatically switches on the auxiliary light next to
the lens in low-light conditions.
Reset All:
This option is used to return all settings to the default settings. Conrm the resetting
by selecting“Yes”or terminate the selection by pressing the MENU button.
Version:
By selecting this option, the rmware version is displayed on the camcorder.
Table of contents


