Traxon Technologies e:cue LIGHTDRIVE+ WiFi User manual
AM477420038
e:cue LIGHTDRIVE+ WiFi
Conguration Guide
Edition:
06.02.23 [EN_LIGHTDRIVEplusWiFi_Setup_v2p1]
Published by:
Traxon Technologies Europe GmbH
Karl-Schurz-Strasse 38
33100 Paderborn, Germany
©2023 Traxon Technologies Europe GmbH
All rights reserved
Read the Conguration Guide and the Safety Instructions
carefully. Subject to modication without prior notice.
Typographical and other errors do not justify any claim for
damages. Modication of the product is prohibited.
This document is designed for system administrators and
accomplished users of the product.
All product names and trademarks mentioned in this manual are
trademarks of their respective owners.
Except for internal use, relinquishment of the instructions to a
third party, duplication in any type or form - also extracts - as
well as exploitation and / or communication of the contents is not
permitted.
Traxon Technologies Europe GmbH
Sales Operations
Karl-Schurz-Str. 38
33100 Paderborn, Germany
+49 5251 54648-0
Downloads and more information at:
www.ecue.com

WWW.TRAXON-ECUE.COM ©2023 traxon technologies. All rights reserved. Conguration Guide 02/23 Sheet: 02 / 29
LIGHTDRIVE+ WiFi — Conguration Guide | Table of Contents
Table of Contents
1 Safety instructions 03
1.1 Symbols 03
1.2 General instructions 03
2 General remarks 03
2.1 Transport 03
2.2 Unpacking 03
2.3 Warranty regulations 03
2.4 Maintenance and Repair 03
2.5 Disposal 04
2.6 Support 04
2.7 Further information 04
3 General device description 04
3.1 Delivery content 05
3.2 Optional accessories 05
3.3 Product specications 05
4 Connectors and interfaces 07
4.1 User & USB interfaces 07
4.2 Connections 08
4.3 Installation 08
5 DIP switches 08
5.1 Control all Zones via Zone A 09
6 Standard use 09
6.1 Jog wheel 09
6.2 Zones 09
6.3 Scenes 10
6.4 Turning o/on Zones 10
6.5 Adjusting running Scene content 10
6.6 Saving Scenes 10
6.7 Locking / Unlocking the LIGHTDRIVE+ WiFi 11
6.8 Synchronizing devices 11
7 Conguration via App 11
7.1 Onboarding 12
7.2 Sequence of conguration 12
7.3 LIGHTDRIVE+ app: Operation and functions 13
8 Firmware Update 23
9 Restart and Reset 24
9.1 Default values 25
10 Certications 26
11 Dimensions 26
12 All links 27
13 Trouble shooting 27
14 FAQ 27
14.1 Power supply 28
14.2 Network 28
14.3 Update 28

WWW.TRAXON-ECUE.COM ©2023 traxon technologies. All rights reserved. Conguration Guide 02/23 Sheet: 03 / 29
1 Safety instructions
Read the safety instructions, provided in a separate manual, carefully. Make sure that the environmental,
mounting, and installation prerequisites are met. This manual should be kept at a safe place and in reach of
the device.
1.1 Symbols
!
The exclamation mark warns about possible
damage of the device itself, to connected devices,
and to the user.
i
The information symbol gives general hints and
informs about handling and procedures for use of
the device.
1.2 General instructions
2 General remarks
2.1 Transport
Only transport the device in its original packaging. This protects the device from damage.
2.2 Unpacking
Only unpack the e:cue LIGHTDRIVE+ WiFi at its installation location. To protect the device against
condensation water, unpack it and wait until all moisture remaining in the device has evaporated.
Condensation can occur when the device is moved from a cold to a warm location. Keep the packaging for
use in case of further transport. Inspect all parts for completeness regarding chapter „3.1 Delivery content“
on page 05. If there is apparent damage to the device or parts are missing from the delivery scope, please
contact the Traxon e:cue Support service.
2.3 Warranty regulations
Depending on the product, warranty regulations are of dierent duration. The warranty time is usually noted
in the quote and in the order conrmation. See www.traxon-ecue.com/terms-and-conditions for details. Legal
warranty regulations apply in any case.
2.4 Maintenance and Repair
This device requires no maintenance.
!
— The Ethernet port of the LIGHTDRIVE+ WiFi is not
designed for inter-building connections. Use the
LIGHTDRIVE+ WiFi only with intra-building networks.
i
— If safety instructions are missing, please contact Traxon
e:cue to receive a new copy.
!
— Before dismounting, appropriate measures must be taken
to protect the respective components against damage
caused by electrostatic discharge (ESD protection).
— Do not try to repair the device. Return it to your Traxon
e:cue distributor for replacement or repair.
LIGHTDRIVE+ WiFi — Conguration Guide | Safety instructions
content

WWW.TRAXON-ECUE.COM ©2023 traxon technologies. All rights reserved. Conguration Guide 02/23 Sheet: 04 / 29
2.5 Disposal
The proper disposal of packing materials and of the device is the responsibility of the respective user and for
his account; in all other matters, the retrieval obligation for packing materials and the device is subject to the
statutory regulations.
2.6 Support
In case of technical problems or questions regarding installation and repair please contact:
Traxon Technologies Europe GmbH
Customer Service
Karl-Schurz-Str. 38
33100 Paderborn, Germany
+49 (5251) 54648-0
2.7 Further information
For further product information, such as the Onboarding Guide, check www.ecue.com.
3 General device description
The LIGHTDRIVE+ WiFi fuses dynamic lighting control with a sophisticated design. The wall-mounted user
terminal is able to output various scenes and eects in dierent zones which are set-up via the
LIGHTDRIVE+ app. No matter what kind of location you have in mind: bars and restaurants, shops and malls,
museums, reception areas ... For any purpose of any scale, be it small or mid-size, LIGHTDRIVE+ WiFi is the
easy and straightforward solution for lighting control. The user terminal serves as a standalone DMX512
controller. The focal point of user interaction is the so called Jog Wheel. With this control knob, scenes,
zones and eects, such as speed and brightness, can be adjusted in a blink of an eye. The user terminal itself
shows a clear and minimalistic design with a high quality glass front panel. The LIGHTDRIVE+ WiFi is
compatible with all monochrome, dynamic white, RGB and RGBW LED xtures.
Main features:
yState-of-the-art user interface with elegant appearance
ySet-up via LIGHTDRIVE+ app
yFor monochrome, dynamic white, RGB and RGBW LED xtures
yTwo DMX outputs, divided in 3 zones
y8 scenes in each of the 3 predened zones
yPre-dened FX eects
yIntegrated scheduler for time trigger
yIntegrated proximity sensor
y2 low-side switches and 2 dry inputs for integration into 3rd party systems.
Batteries and technical appliances must not be disposed of
with domestic waste, but should be handed in at the
appropriate collection and disposal points.
LIGHTDRIVE+ WiFi — Conguration Guide | General device description
content

WWW.TRAXON-ECUE.COM ©2023 traxon technologies. All rights reserved. Conguration Guide 02/23 Sheet: 05 / 29
3.1 Delivery content
Delivery content for the e:cue LIGHTDRIVE+ WiFi (AM477420038):
1. e:cue LIGHTDRIVE+ WiFi
2. Device plugs
3. Safety instructions
4. Welcome card
3.2 Optional accessories
yPower Supply 15W 12V DIN rail (AM3137600HA)
3.3 Product specications
Product speci cations
Dimensions
(W x H x D)
80 x 160 x 30 mm /
3.15 x 6.30 x 1.18 inch
Weight 188 g / 0.41 lb
Power supply PoE IEEE 802.3af, polarity-
independent
or 12 V DC SELV
Power consumption typ. 4.5 W,
max. 6 W (all LEDs 100 % white),
on device plug
Operating temperature 0 ... 35 °C / 32 ... 95 °F
Storage temperature 0 ... 50 °C / 32 ... 122 °F
Op. / storage humidity 0 … 80% RH, non-condensing
Protection class IP20
Installation Indoor installation only,
Intra building connections only
Electrical safety class SELV
Housing PC/ABS, glass
Mounting Wall mount housing, suitable for most
international in-wall mounted boxes
Certi cates CE, ETL, FCC, UKCA
Real time clock with capacitor backup, holds time for
~1 h
Interface speci cations
User interfaces (UI) 12 x capacitive touch key
1 x jog wheel with switch
System interfaces 3 x DIP switch
1 x Ethernet 10/100 Mbit/s, on device
plug, max. cable length: 65 m,
for synchronization of multiple devices
only
1 x USB 2.0 micro USB-B,
for update only
DMX outputs 2 x DMX512, on device plug
Fixture types Monochrome (1 channel)
Dynamic White (2 channels)
RGB (3 channels)
RGBW (4 channels)
Low-side switches 2 x 24 V DC, max. 3 A, ON resistance 50
mΩ, normally open, galvanically isolated,
overload protected, on device plug
Digital dry contacts 2 x inputs, 5 V DC contact supply, on
device plug,
Input high threshold voltage:
VIHmin = 2.5 V
Input low threshold voltage:
VILmax = 1.2 V
Typ. input threshold voltage:
VSW(typ) = 1.5 V
Input voltage max.: VINmax = 15 V
Digital inputs supply For dry contacts
Use 5 V DC from device (pin 7)
VSUP = 5 V DC
max. 15 mA
Typ. current when sourcing all 2 ports:
Ityp = 12 mA
Device plugs Push-in spring connection plug,
Stripping length: 6 mm
Major diameter of isolated cable max.
2 mm
Cable cross-section:
solid: 0.14 ... 0.5 mm²
exible: 0.2 ... 0.5 mm²
WiFi RF frequencies: 2.4 ... 2.473 GHz,
IEEE 802.11 b/g/n
Sensors Proximity sensors for UI activation
LIGHTDRIVE+ WiFi — Conguration Guide | General device description
content

WWW.TRAXON-ECUE.COM ©2023 traxon technologies. All rights reserved. Conguration Guide 02/23 Sheet: 06 / 29
Product speci cations
Dimensions
(W x H x D)
80 x 160 x 30 mm /
3.15 x 6.30 x 1.18 inch
Weight 188 g / 0.41 lb
Power supply PoE IEEE 802.3af, polarity-
independent
or 12 V DC SELV
Power consumption typ. 4.5 W,
max. 6 W (all LEDs 100 % white),
on device plug
Operating temperature 0 ... 35 °C / 32 ... 95 °F
Storage temperature 0 ... 50 °C / 32 ... 122 °F
Op. / storage humidity 0 … 80% RH, non-condensing
Protection class IP20
Installation Indoor installation only,
Intra building connections only
Electrical safety class SELV
Housing PC/ABS, glass
Mounting Wall mount housing, suitable for most
international in-wall mounted boxes
Certi cates CE, ETL, FCC, UKCA
Real time clock with capacitor backup, holds time for
~1 h
Interface speci cations
User interfaces (UI) 12 x capacitive touch key
1 x jog wheel with switch
System interfaces 3 x DIP switch
1 x Ethernet 10/100 Mbit/s, on device
plug, max. cable length: 65 m,
for synchronization of multiple devices
only
1 x USB 2.0 micro USB-B,
for update only
DMX outputs 2 x DMX512, on device plug
Fixture types Monochrome (1 channel)
Dynamic White (2 channels)
RGB (3 channels)
RGBW (4 channels)
Low-side switches 2 x 24 V DC, max. 3 A, ON resistance 50
mΩ, normally open, galvanically isolated,
overload protected, on device plug
Digital dry contacts 2 x inputs, 5 V DC contact supply, on
device plug,
Input high threshold voltage:
VIHmin = 2.5 V
Input low threshold voltage:
VILmax = 1.2 V
Typ. input threshold voltage:
VSW(typ) = 1.5 V
Input voltage max.: VINmax = 15 V
Digital inputs supply For dry contacts
Use 5 V DC from device (pin 7)
VSUP = 5 V DC
max. 15 mA
Typ. current when sourcing all 2 ports:
Ityp = 12 mA
Device plugs Push-in spring connection plug,
Stripping length: 6 mm
Major diameter of isolated cable max.
2 mm
Cable cross-section:
solid: 0.14 ... 0.5 mm²
exible: 0.2 ... 0.5 mm²
WiFi RF frequencies: 2.4 ... 2.473 GHz,
IEEE 802.11 b/g/n
Sensors Proximity sensors for UI activation
LIGHTDRIVE+ WiFi — Conguration Guide | General device description
content
WWW.TRAXON-ECUE.COM ©2023 traxon technologies. All rights reserved. Conguration Guide 02/23 Sheet: 07 / 29
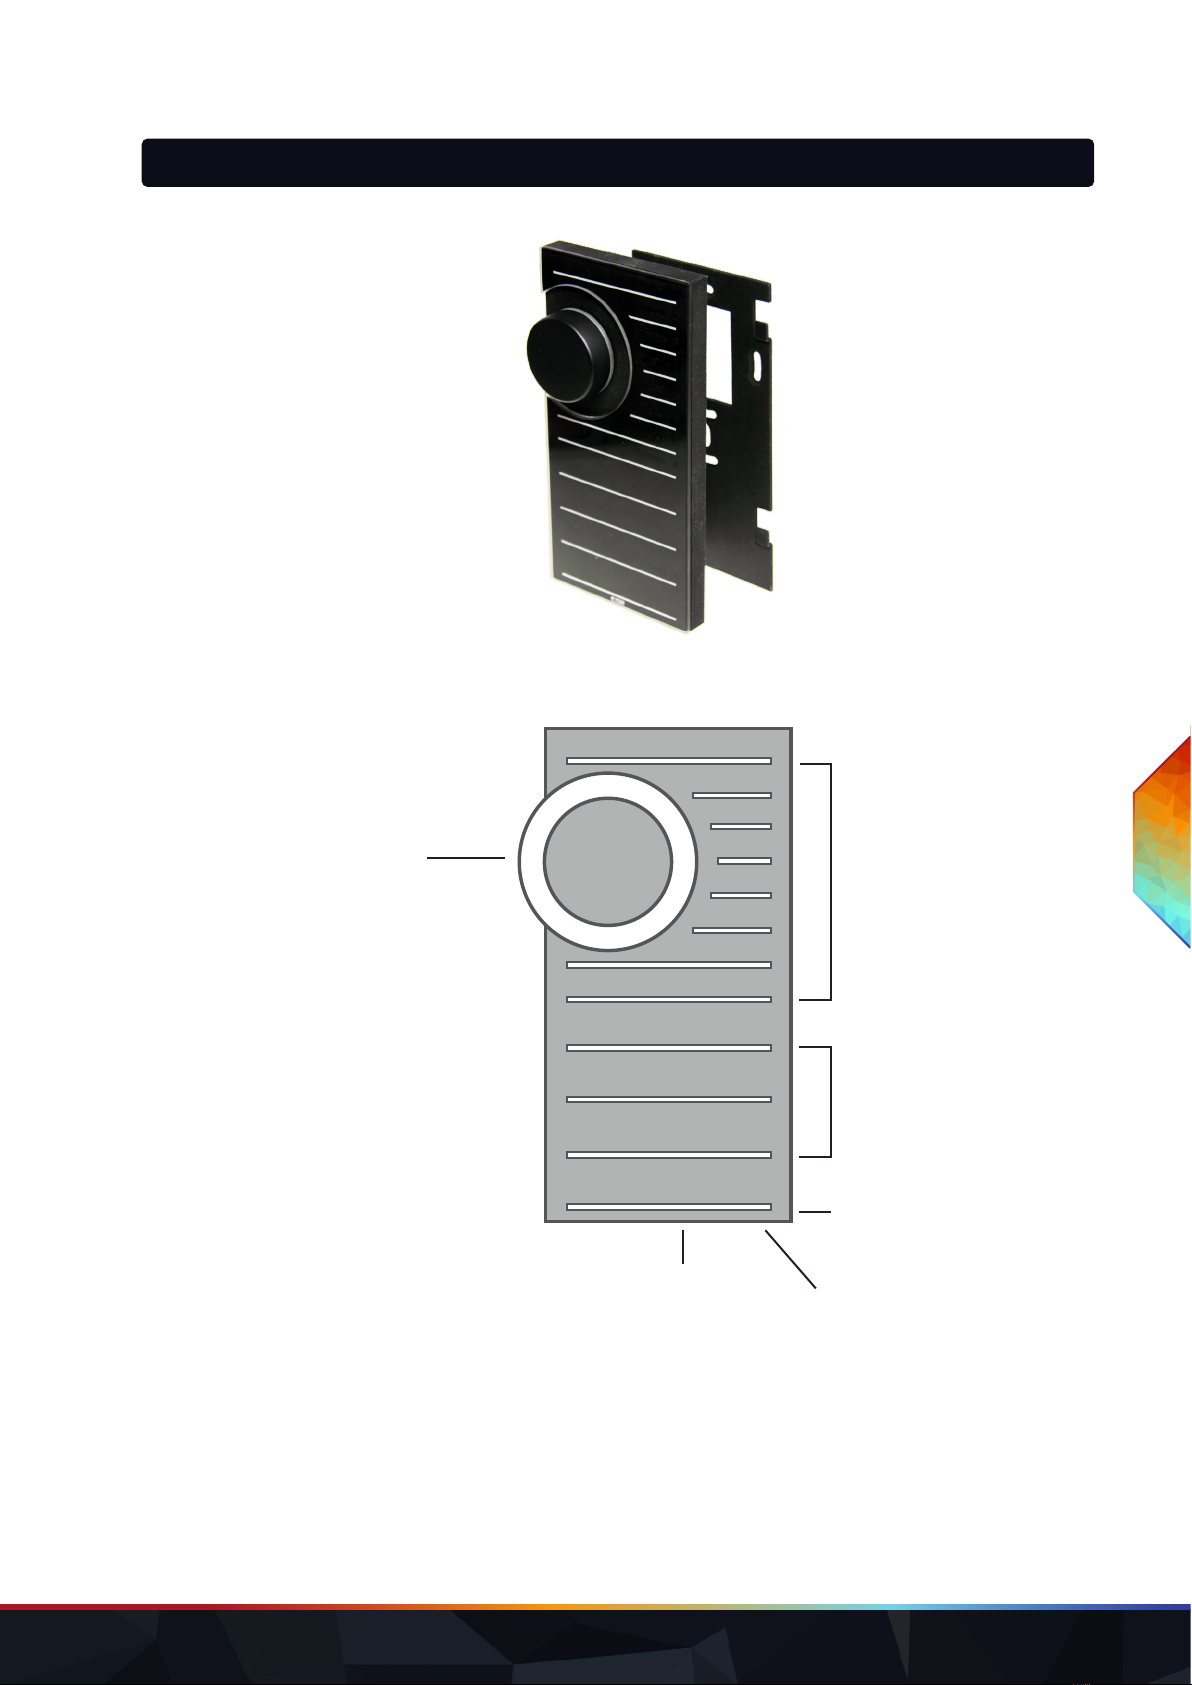
4 Connectors and interfaces
4.1 User & USB interfaces
Front view:
Jog wheel halo:
ydisplays the color and brightness of the running Scene.
ydisplays the current brightness or color adjustment (see „6.5 Adjusting running Scene content“ on
page 10).
Scene light stripes:
— display color and brightness of the Scenes’ content.
Zone light stripes:
— display color and brightness of each running Scene.
Dismounting slot
LIGHTDRIVE+ WiFi controller
Base plate
8 Scene buttons + light stripes
3 Zone buttons + light stripes
Tone button + light stripe
USB interface
Jog wheel with
button + halo
LIGHTDRIVE+ WiFi — Conguration Guide | Connectors and interfaces
content

WWW.TRAXON-ECUE.COM ©2023 traxon technologies. All rights reserved. Conguration Guide 02/23 Sheet: 08 / 29
— displays the current color adjustment (see „6.5 Adjusting running Scene content“ on page 10).
Tone stripe:
— displays on restart the WLAN connection status until any button is pressed:
Green: connected to another WLAN.
Red: open access point, no connection to another WLAN.
— displays the current color or speed adjustment (see „6.5 Adjusting running Scene content“ on page
10).
4.2 Connections
Rear view:
APower supply
BDMX outputs
CPoE & Ethernet
DLow-side switches & Digital dry contacts
EDIP switches (see “5 DIP switches” (page 08))
4.3 Installation
For installing and mounting the LIGHTDRIVE+ WiFi see its Installation Guide. Scan the QR
code, open the Link to PDF or download at www.ecue.com.
5 DIP switches
The DIP switches dene the conguration. The DIP switches are only read when the LIGHTDRIVE+ WiFi is
powered up. After changing the switch settings, the LIGHTDRIVE+ WiFi must be restarted: Press 10 x Tone
button and then 1 x Scene 1 button. Alternatively power down and up again the device.
(0 = OFF position, 1 = ON position)
EDIP switches
1 ... 7 no function
1
1 2
2
3
4
5
6
A
B
C
D
1
2
3
4
5
6
7
123456
E
1
2
3
4
5
6
7
ON
8
9
10
LIGHTDRIVE+ WiFi — Conguration Guide | DIP switches
content
WWW.TRAXON-ECUE.COM ©2023 traxon technologies. All rights reserved. Conguration Guide 02/23 Sheet: 09 / 29
EDIP switches
8Enable/ Disable Tone button (see „6.5 Adjusting running Scene content“
on page 10)
0 = Tone button disabled
1 = Tone button enabled
9Control all Zones via Zone A (see „5.1 Control all Zones via Zone A“ on
page 09)
0 = disabled
1 = enabled
10 Overwrite Scenes (see „6.6 Saving Scenes“ on page 11)
0 = Scenes can not be overwritten using the user interface
1 = Scenes can be overwritten using the user interface (“Saving scenes”)
5.1 Control all Zones via Zone A
Is DIP switch 9 enabled, you can control the Scene selection (including brightness levels) of all Zones at once
via Zone A with the following characteristics:
— Is Zone A selected, Scene control in this Zone is also valid for B and C. Example: Select for Zone A the
Scene 2 Zone B and Zone C will also each play their Scenes 2. Low-side switch settings are only used
as dened for Zone A, low-side switch settings for Zones B and C are ignored.
— Are Zone B or C selected, all control works as dened, including low-side switch settings. You have
separate control for the current Zone.
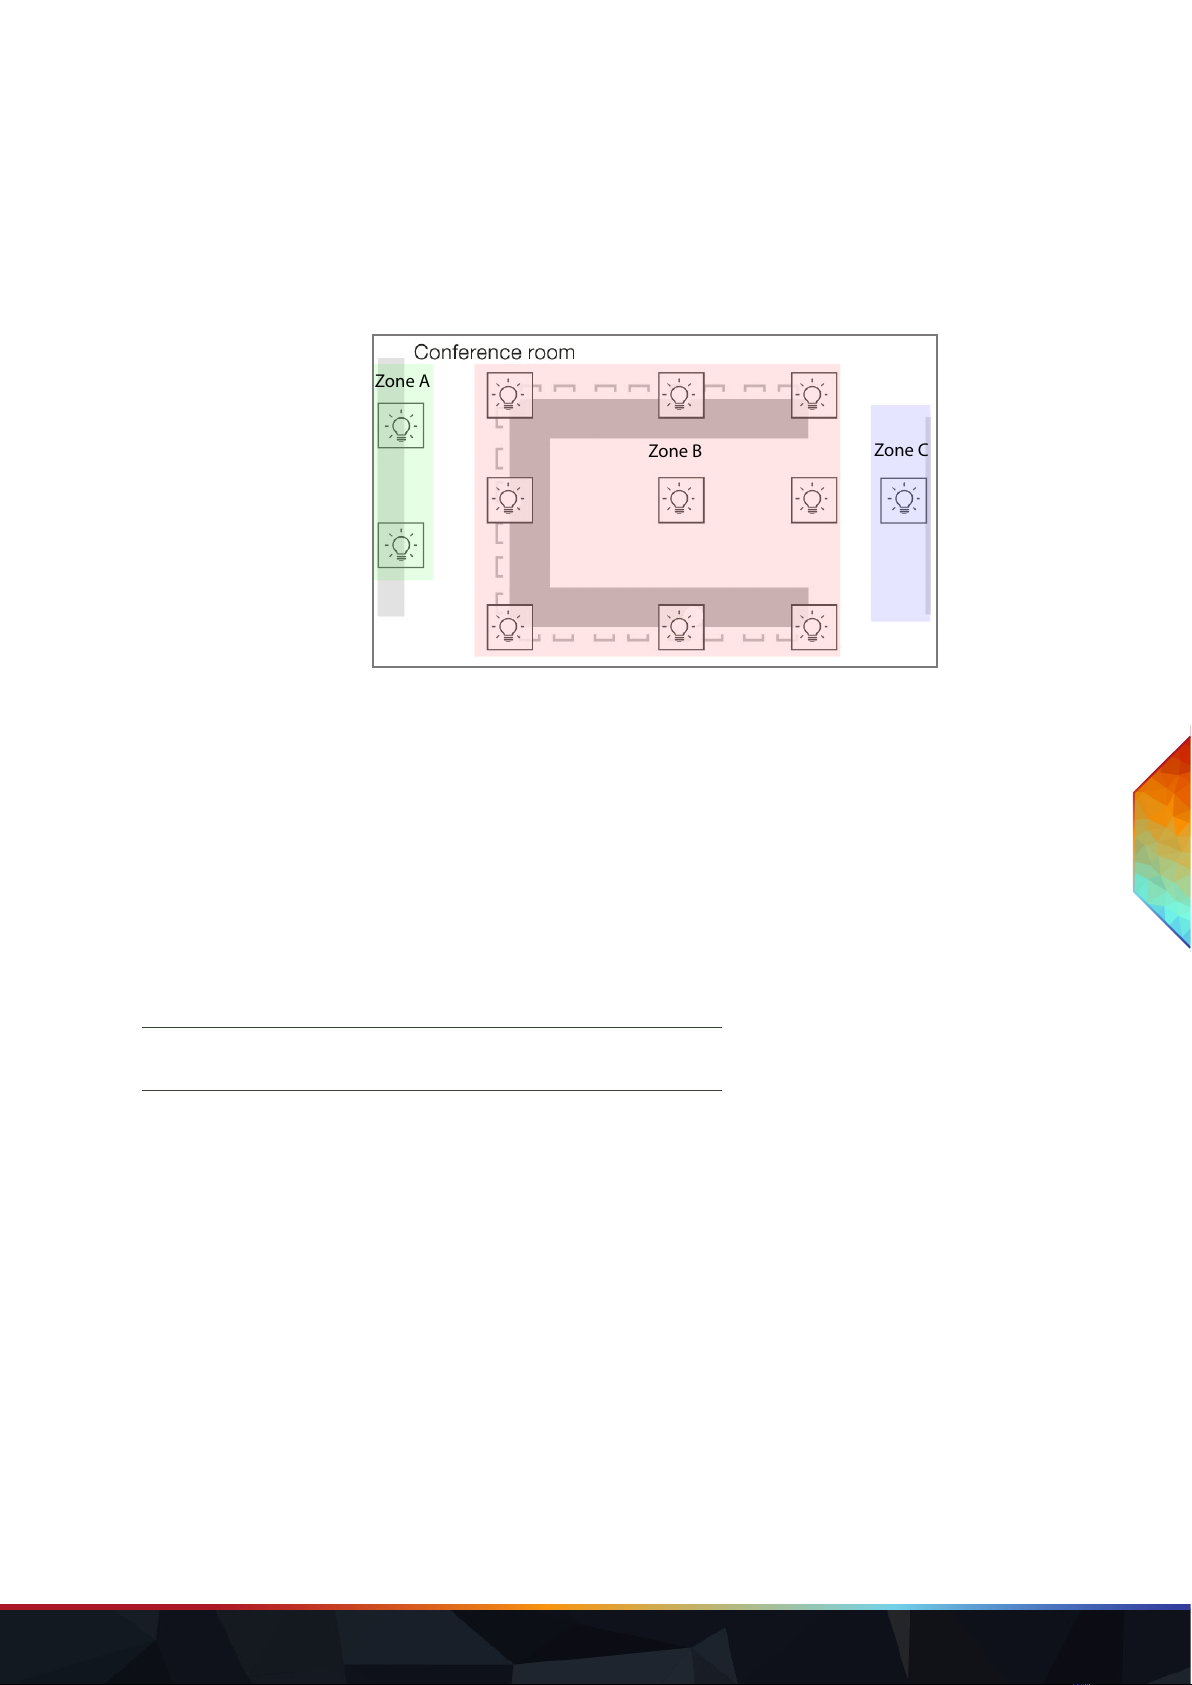
6 Standard use
The LIGHTDRIVE+ WiFi controls up to two DMX universes. This address range is split into three Zones. To
any Zone a Scene can be assigned, a Scene can be a constant color or an eect and a brightness level. To
select Zones and assign Scenes, touch-sensitive button are used. To change the brightness turn the jog
wheel. To switch the LIGHTDRIVE+ WiFi on and o, press the jog wheel. The color in the current selected
Zone is also used to illuminate the jog wheel while it is not in Idle or O mode.
When the LIGHTDRIVE+ WiFi is not used, its light stripes are dimmed down after 30 seconds (default value
of Idle mode; time can be changed via LIGHTDRIVE+ app). It returns to the active state when the jog wheel is
turned or any button is touched. The integrated proximity sensor also reactivates the device back of Idle
mode, when the user approaches the LIGHTDRIVE+ WiFi. Reactivation does not change the selected Zone
or Scene. After switching o the device and switching it on again, the LIGHTDRIVE+ WiFi restores the same
state as selected before.
6.1 Jog wheel
Use the jog wheel to switch the LIGHTDRIVE+ WiFi on and o. Switching is done by
pressing the jog wheel. In standard mode, the jog wheel controls the brightness ( higher,
lower). The jog wheel also shows the current color of the xtures.
If the LIGHTDRIVE+ WiFi is in OFF Mode, you can change the appearance of the jog wheel
illumination (pulsative or static) by turning the jog wheel or via LIGHTDRIVE+ app settings.
6.2 Zones
i
Any Scene content related use requires that content has
been congured via the LIGHTDRIVE+ app.
LIGHTDRIVE+ WiFi — Conguration Guide | Standard use
content
WWW.TRAXON-ECUE.COM ©2023 traxon technologies. All rights reserved. Conguration Guide 02/23 Sheet: 10 / 29
Select a Zone with of the three Zone buttons. The Zone number at the right lights up and, when enabled, a
signal sound indicates the Zone selection. The LIGHTDRIVE+ WiFi controls three Zones:
— Zone A: DMX 1, addresses 1 ... 512
— Zone B: DMX 2, addresses 1 ... 256 (default)
— Zone C: DMX 2, addresses 257 (default) ... 512
Example:
Zone A
Zone B Zone C
The LIGHTDRIVE+ app can change the DMX address ranges of Zone B/C (see „Start Address Zone C:“ on
page 17).
6.3 Scenes
Select a Scene for the current Zone by touching one of the eight Scene buttons. The Scene number on the
right lights up and, when enabled, a signal sound indicates the selection of a Scene.
6.4 Turning o/on Zones
Turn o a Zone by pressing the Zone button for 5 seconds (long press). To turn on again the Zone, press any
Scene button with the Zone selected.
6.5 Adjusting running Scene content
Adjust brightness:
Turn the jog wheel to change the brightness of the running scene. To save the adjustment save the Scene
(see “6.6 Saving Scenes” (page 11)). To exit without saving changes, press any other Scene or the same
Scene.
Adjust color:
Touch the Tone button (short press) to be able to change the current Scene color. The Tone LED blinks and,
when enabled, a short signal sound is played. Select a color with the jog wheel. The jog wheel, the current
Zone LED and the Tone stripe reect the selected color. To save the adjustment save the Scene (see “6.6
Saving Scenes” (page 11)). Short press the Tone button again to switch to brightness adjustment. To exit
the Color mode without saving changes, touch the Tone button again.
Adjust speed:
Press the Tone button for ve seconds (long press) to be able to change the speed of the current Scene’s
eect. The Tone LED and Tone light stripe are blinking and when enabled, a short signal sound is played.
Select the speed of the current eect with the jog wheel. The Tone stripe blinks with the selected speed of
the eect. If the speed is zero, the Tone stripe is constantly alight. To save the adjustment save the Scene
i
Use of the Tone button requires that the DIP switch 8 on the
back is set to the “ON” position.
LIGHTDRIVE+ WiFi — Conguration Guide | Standard use
content

WWW.TRAXON-ECUE.COM ©2023 traxon technologies. All rights reserved. Conguration Guide 02/23 Sheet: 11 / 29
(see “6.6 Saving Scenes” (page 11)). Short press the Tone button to alternate to brightness and color
adjustment. To exit the Speed mode without saving changes, touch the Tone button again.
If there is no action within the Activation Time (see „Idle Mode“ on page 22), the LIGHTDRIVE+ WiFi
switches to Idle mode without saving changes.
6.6 Saving Scenes
To save an adjusted Scene, long press any Scene button of ve seconds. When enabled, a signal sound
arms the saving of the Scene. The new settings are also visible in the app after uploading the data from the
device (= reselection of page).
6.7 Locking / Unlocking the LIGHTDRIVE+ WiFi
The LIGHTDRIVE+ WiFi can be locked via the front buttons.
3
1
2
1. Touch the Tone (1) button and keep it touched.
2. Now touch the Scene 8 button (2), keep both touched together for at least ve
seconds.
3. The jog wheel blinks in white for ve seconds. During this time, press the jog wheel
(3) to lock the LIGHTDRIVE+ WiFi.
4. If you do not press the jog wheel, the LIGHTDRIVE+ WiFi will return to normal
operation.
The LIGHTDRIVE+ WiFi is now locked. Signals over the digital inputs like Scene selection are still accepted.
To unlock the LIGHTDRIVE+ WiFi,
— repeat the steps above,
— or turn the device o and on again.
— The locking will also be disabled when the state of the digital inputs changes.
6.8 Synchronizing devices
The LIGHTDRIVE+ WiFi supports three Parent and Child modes to synchronize several LIGHTDRIVE+ WiFi
devices. To use synchronization the devices must be connected via Ethernet (utilizing the Ethernet
connections at port C, see “4.2 Connections” (page 08)).
— Set a LIGHTDRIVE+ WiFi to the Grandparent mode if the device is supposed to control other Parent
devices including their Child devices.
— Set a LIGHTDRIVE+ WiFi to the Parent mode if the device is supposed to control several Child
devices.
— Set a LIGHTDRIVE+ WiFi to the Child mode if you would like the device to react on button presses of a
Parent with the same Class ID.
The setup of synchronization modes is done via the LIGHTDRIVE+ app, see „7.3.3 “Network”“ on page 14.
i
Saving Scenes requires that the DIP switch 10 on the back is
set to the “ON” position.
i
Use of the Tone button requires that the DIP switch 8 on the
back is set to the “ON” position.
LIGHTDRIVE+ WiFi — Conguration Guide | Standard use
content
WWW.TRAXON-ECUE.COM ©2023 traxon technologies. All rights reserved. Conguration Guide 02/23 Sheet: 12 / 29
7 Conguration via App
To congure the LIGHTDRIVE+ WiFi and to use its digital inputs and solid-state low-side switches you need to
use the LIGHTDRIVE+ app. The LIGHTDRIVE+ WiFi provides an access point so you can congure the
device, e.g. connect it to another WLAN, using the LIGHTDRIVE+ app.
The settings allow:
— Free denition of start and end values for DMX channels in the Zones B and C (see „7.3.4 “DMX
Fixtures”“ on page 16).
— Assignment of digital inputs and low-side switch outputs (see „7.3.8 “I/O (Relays and Inputs)”“ on page
20).
— Dimming unused light stripes: only the light stripe for the current active Scene is at full intensity, all
unused stripes are dimmed (see „7.3.9 “LightDrive+ Light Stripes”“ on page 21).
For the conguration of the LIGHTDRIVE+ WiFi, the installation of the power supply must be completed. You
also need a tablet with the installed LIGHTDRIVE+ app.
Prerequisite: Android ≥ 6 or iPadOS ≥ 11.0
7.1 Onboarding
For the conguration via app the device provides an integrated, DHCP server including access point. The
access point is kept open for 20 min after powering up. When adding the device into a network, the access
point gets closed after the successful transfer.
On how to access the LIGHTDRIVE+ WiFi via the app and on how connect the
LIGHTDRIVE+ WiFi to a WLAN, see the LIGHTDRIVE+ WiFi Onboarding Guide. Scan the
QR code, open the Link to PDF or download at www.ecue.com.
Default password of the access point: ecue0123
Connected to another WLAN: green Tone light stripe.
No connection to another WLAN: red Tone light stripe.
Initial WLAN conguration:
Enter manually the network name (SSID) at WLAN name and the password (Key) of the router. Tap the OK
button to apply the settings.
After the LIGHTDRIVE+ WiFi is connected to another WLAN, the app operating tablet will lose the
connection to the LIGHTDRIVE+ WiFi. The LIGHTDRIVE+ WiFi closes its access point. To reconnect to the
LIGHTDRIVE+ WiFi, connect the tablet on which the app is running to the new WLAN.
Reconnection to congured WLAN:
After powering up the LIGHTDRIVE+ WiFi starts a 10sec search for the previously congured network. If not
found it 5 x beeps and the access point opens: the network of the LIGHTDRIVE+ WiFi (“Lightdrive-AP XXX”) is
available.
If the previously congured network becomes available afterwards, the LIGHTDRIVE+ WiFi does not
reconnect automatically. To reconnect to the belated available network, you need to restart the device (see
Lightdrive+
LIGHTDRIVE+ WiFi — Conguration Guide | Conguration via App
content

WWW.TRAXON-ECUE.COM ©2023 traxon technologies. All rights reserved. Conguration Guide 02/23 Sheet: 13 / 29
“Restart” at „9 Restart and Reset“ on page 24).
7.2 Sequence of conguration
For the initial conguration and set-up of the LIGHTDRIVE+ WiFi, the following sequence is recommended:
1. Connect - connect the tablet to the LIGHTDRIVE+ WiFi device.
2. Network - optional; congure the network settings.
3. DMX Fixtures - congure the DMX addressing.
4. Scenes - congure the content.
5. LightDrive+ Settings - congure name and system time.
6. Scheduler - congure time triggers for the content.
7. I/O (Relays and Inputs) - congure actions for relay (low-side switch) and digital input changes.
8. LightDrive+ Light Stripes - congure the behavior of the device.
7.3 LIGHTDRIVE+ app: Operation and functions
The description of the functions follows the recommended sequence of confguratoin.
and icon: add an entry
icon: delete entry
icon: edit entry
7.3.1 Menu
To navigate through the app and open the menu, tap the
icon in the upper left corner. The menu expands on the left side
of the display.
At the top, under Connected to you can see the LIGHTDRIVE+
device to which the app is currently to (= selected device in
Connect page.).
i
Where a Save or OK button is present and not used, any
changes will be discarded when exiting the page. When saving,
the values are transferred to device.
LIGHTDRIVE+ WiFi — Conguration Guide | Conguration via App
content
WWW.TRAXON-ECUE.COM ©2023 traxon technologies. All rights reserved. Conguration Guide 02/23 Sheet: 14 / 29
7.3.2 “Connect”
Select a LIGHTDRIVE+ WiFi device within the network to
connect the app to. Alternatively, select Demo to use the app
on its own and without conguring a device. Note that it is not
possible to upload the Demo conguration onto a device.
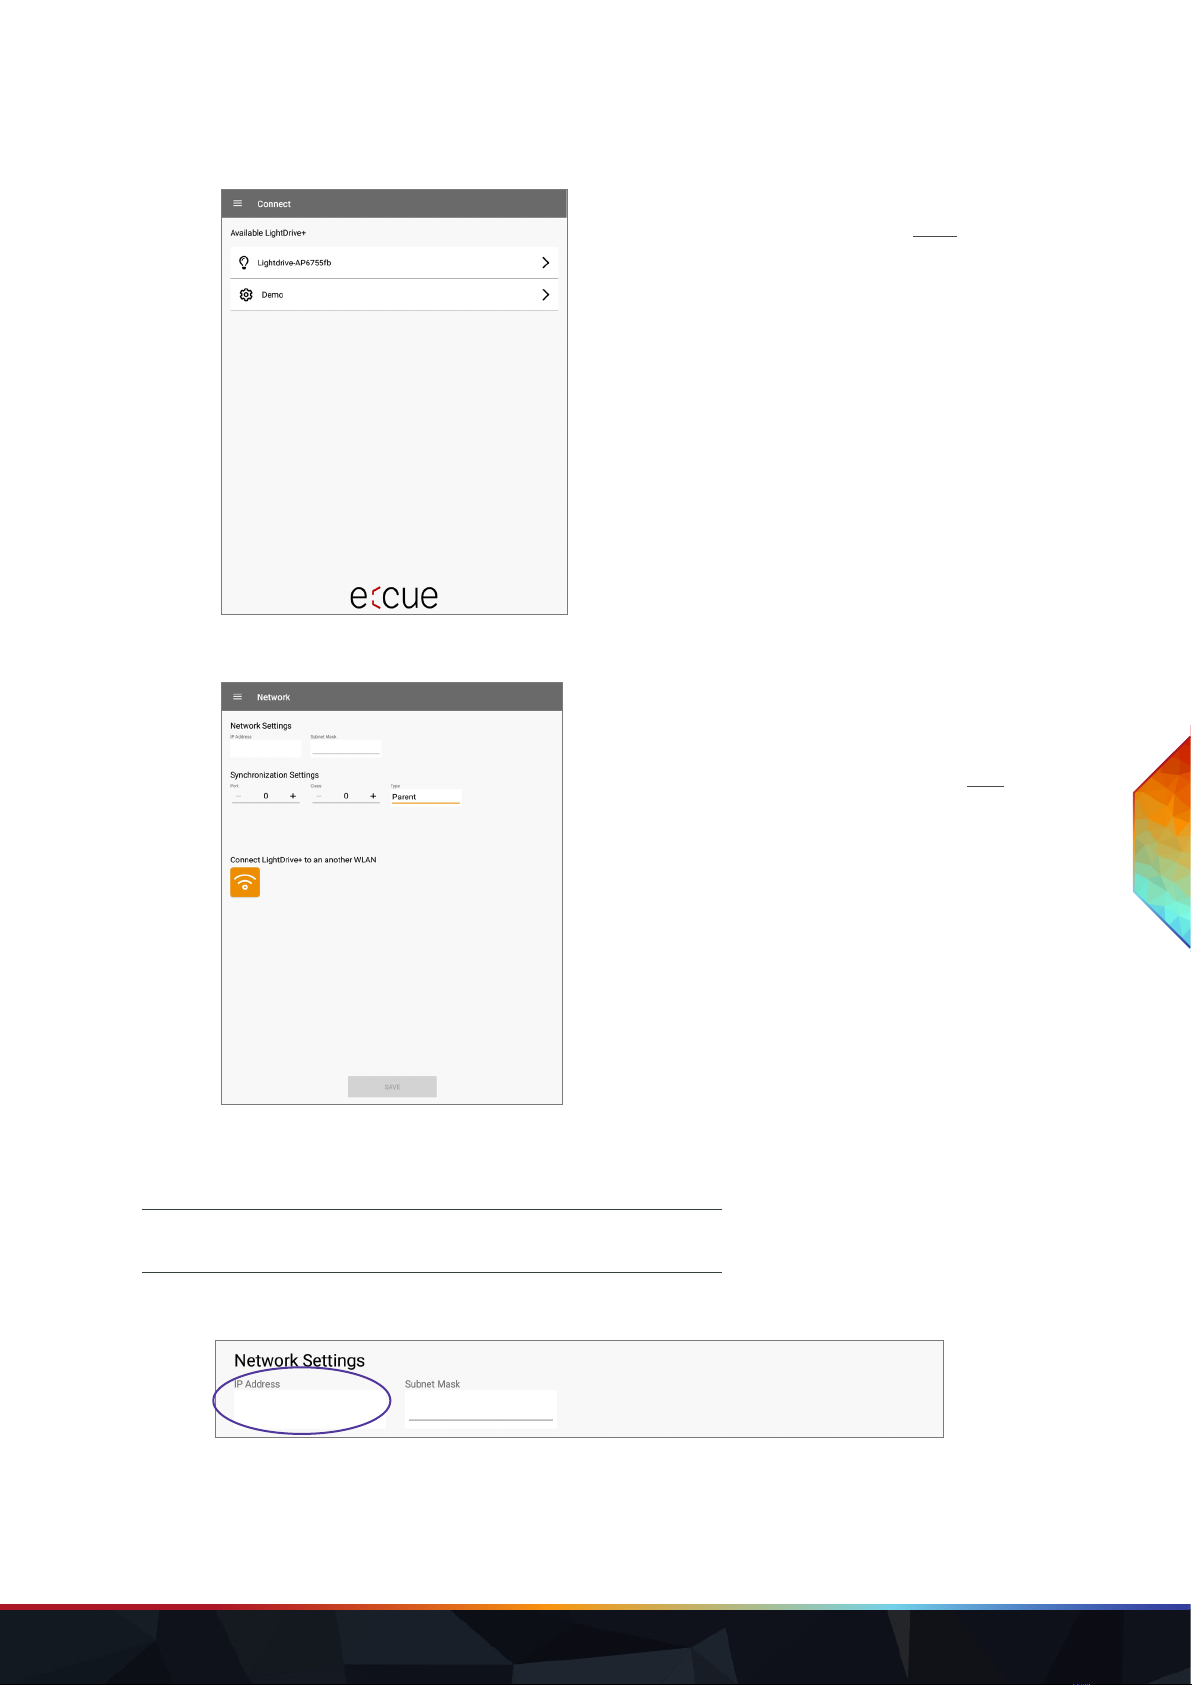
7.3.3 “Network”
You can set up an interacting, Ethernet based static network
of LIGHTDRIVE+ devices with synchronizing functions (see
„6.8 Synchronizing devices“ on page 11): use Network
Settings and Synchronization Settings. Tap the Save button to
apply the settings.
You can integrate the LIGHTDRIVE+ WiFi into a WLAN: use
Connect LightDrive+ to another WLAN. Tap the WLAN button
to congure the WLAN settings.
Network Settings
When using the LIGHTDRIVE+ WiFi in a static Ethernet network for synchronizing multiple
LIGHTDRIVE+ WiFi devices, congure the network settings of the LIGHTDRIVE+ WiFi.
IP Address:
Unique IP address; must be coordinated with the rest of the Ethernet network settings.
i
Ethernet connection with 2 x Tx and 2 x Rx at port C (see “4.2
Connections” (page 08)) necessary.
LIGHTDRIVE+ WiFi — Conguration Guide | Conguration via App
content

WWW.TRAXON-ECUE.COM ©2023 traxon technologies. All rights reserved. Conguration Guide 02/23 Sheet: 15 / 29
Subnet Mask:
Must be coordinated with the rest of the Ethernet network settings.
Synchronization Settings
For multiple LIGHTDRIVE+ WiFi devices, dene groups and therein the hierarchy of the devices among each
other for synchronizing the controlling commands.
Port:
The port to which the device listens. Must be identical between interacting devices. Minimum value = 1.
Disabled = 0.
Class:
The synchronizing group to which the device belongs. Must be identical between interacting devices. Minimum
value = 1. Disabled = 0.
Type:
The role of the device in the hierarchy.
Standalone: The device does not interact with other LIGHTDRIVE+ WiFi devices.
Child: All actions of the device are dened by and identical to its (Grand-)Parent (of the same Port
number and Class ID).
Parent: The device controls the Child devices (of the same Port number and Class ID) and is controlled
by its Grandparent (of the same Port number and Class ID).
Grandparent: The device controls all Parent and Child devices (of the same Port number and Class ID).
Connect LightDrive+ to another WLAN
To integrate the LIGHTDRIVE+ WiFi into another WLAN, this network must provide a DHCP server. Because
the LIGHTDRIVE+ WiFi remembers the WLAN conguration, the following two scenarios are to be
considered: Initial WLAN conguration and Reconnection to congured WLAN. See „7.1 Onboarding“ on page
12.
i
Only devices with the same Port number AND Class ID are
linked to each other.
LIGHTDRIVE+ WiFi — Conguration Guide | Conguration via App
content
WWW.TRAXON-ECUE.COM ©2023 traxon technologies. All rights reserved. Conguration Guide 02/23 Sheet: 16 / 29
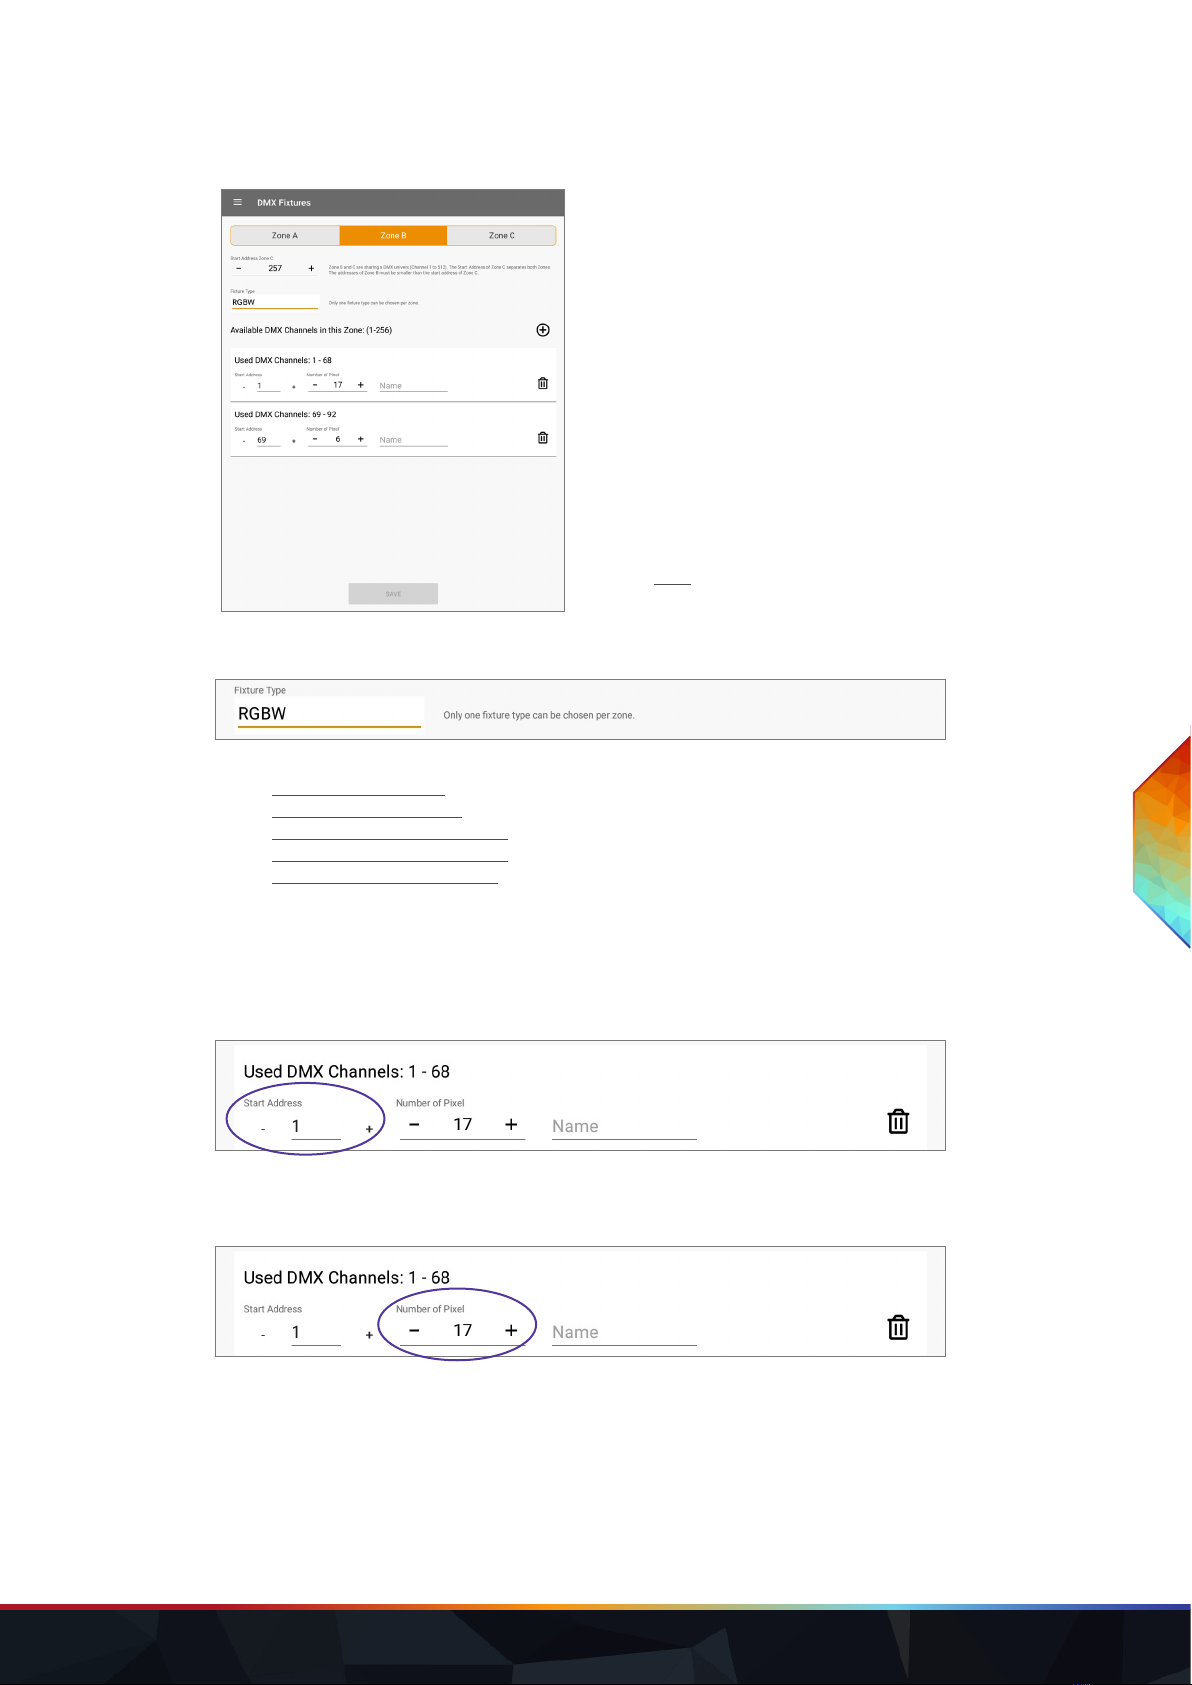
7.3.4 “DMX Fixtures”
The LIGHTDRIVE+ WiFi can control two DMX512 universes,
divided into three xtures groups, the so called Zones. Each
Zone is assigned to one xture type; it is not possible to mix
xture type within a Zone.
Zone A controls the rst DMX universe (DMX1). Zone B and C
share the second DMX universe (DMX2). The Start Address
of Zone C separates both Zones. Zone C is located behind
Zone B: the addresses of Zone B must be smaller than the
Start Address of Zone C. Zone B consists of the channels 1 ...
“Start Address Zone C”, while Zone C consists of the
channels “Start Address Zone C” ... 512.
Congure the xture type and DMX channels for each of the
three Zones.
Tap the Save button to apply the settings.
Fixture type:
Select one type:
RGB (3 DMX channels)
RGBW (4 DMX channels)
Tunable White 2 DMX channels
Tunable White 3 DMX channels
Monochrome (1 DMX channel)
Add xture entries to a Zone. Using multiple entries you can integrate scattered xtures that are not lined up
together into the Zone. The xtures use as many channels as dened by the selected Fixture type, e.g. one
RGB pixel automatically takes 3 channels. Congure for each entry the following properties:
Start Address:
Set the start address of the rst DMX pixel.
Number of Pixel:
Set the number of DMX pixels (xtures) you want to address in a row. The app automatically sums up the used
amount of channels (Used DMX Channels).
LIGHTDRIVE+ WiFi — Conguration Guide | Conguration via App
content
WWW.TRAXON-ECUE.COM ©2023 traxon technologies. All rights reserved. Conguration Guide 02/23 Sheet: 17 / 29
Name:
You can dene a name for the entry to distinguish the addressed xtures.
For Zone B and C:
Start Address Zone C:
Set the start address of the rst DMX pixel for Zone C. This address is the separator of the second DMX
universe into Zone B and Zone C. Set the start address either in the tab for Zone B or for Zone C; the other
tab mirrors the start address.
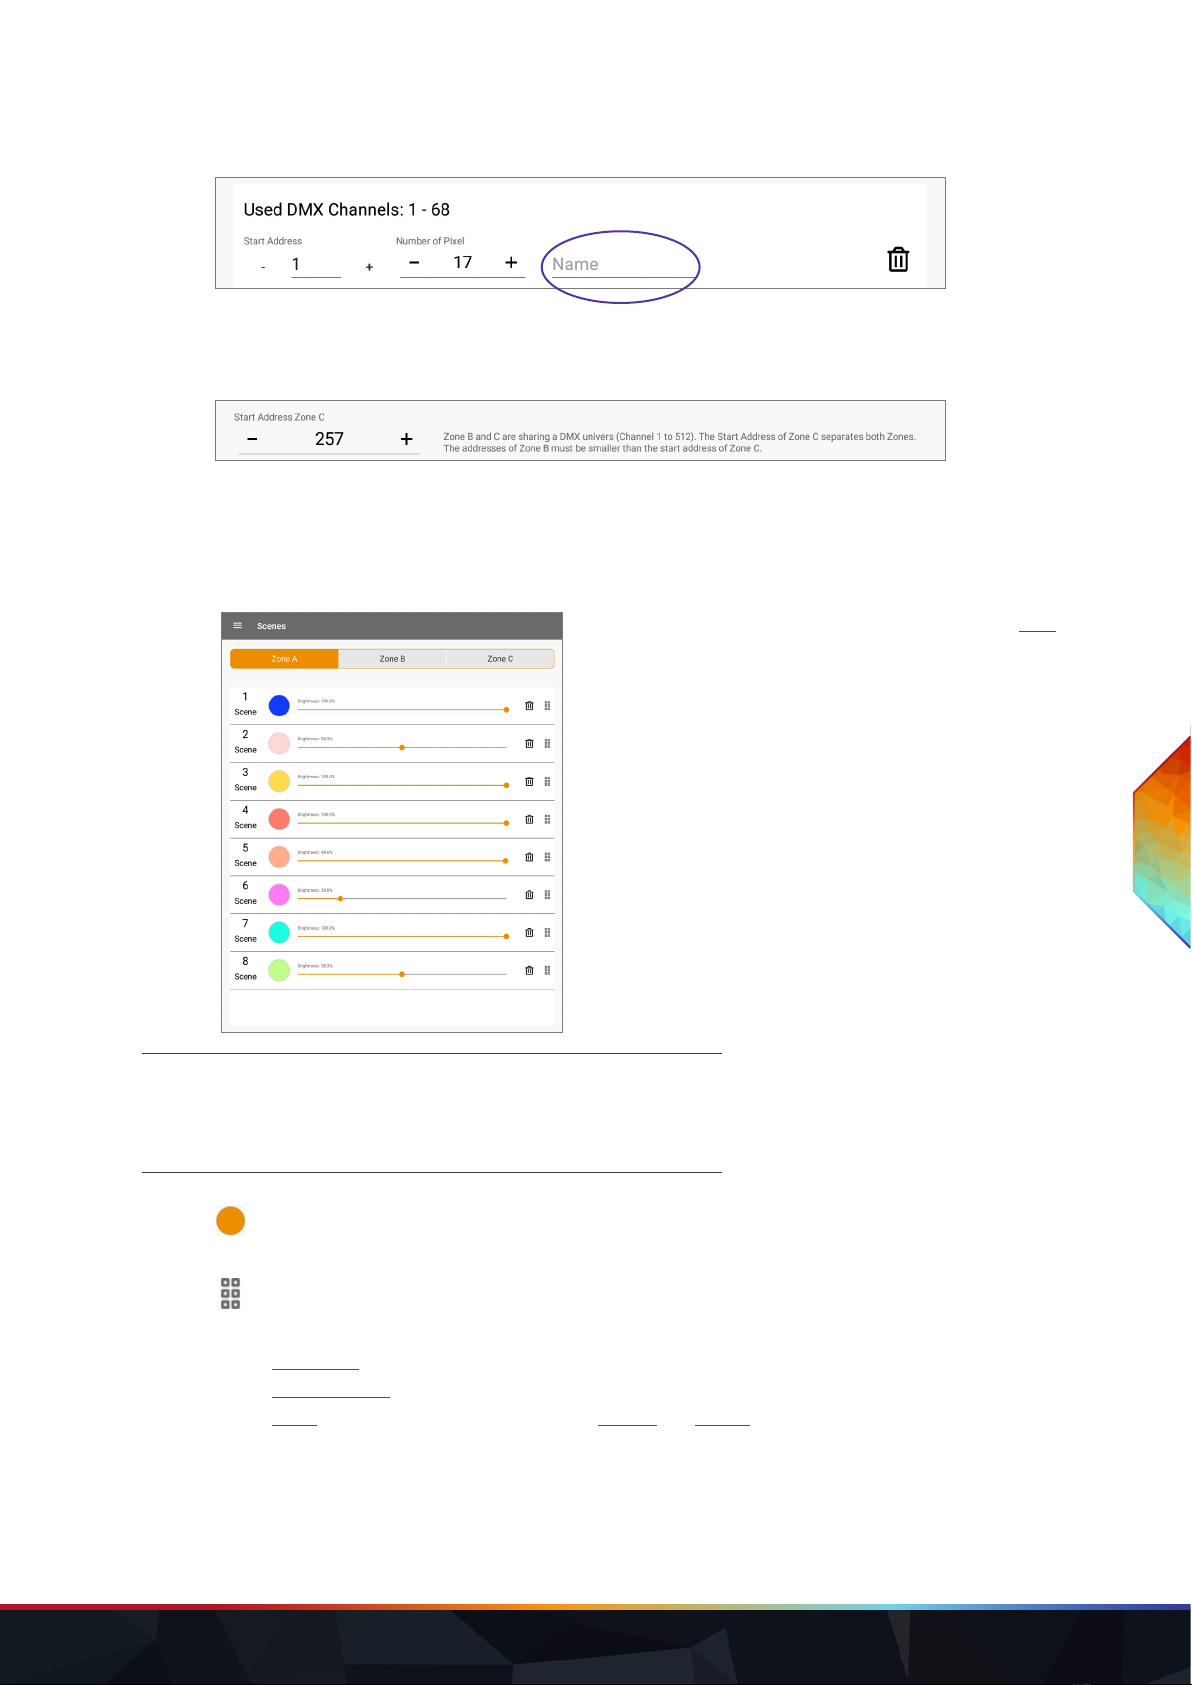
7.3.5 “Scenes”
Congure Scenes of the LIGHTDRIVE+ WiFi. Tap the Save
button to apply the settings. Static color Scenes are saved on
selection.
icon: tap on it to open the color picker. At the bottom it includes a slider for the brightness and for RGBW
xtures a slider for the white channel.
icon: move the entry to another position = change of scene number.
Add content to a Scene by editing its entry. Select a type of Scene:
Static color: Edit the color and the brightness by tapping on the color preview circle or the slider.
Color sequence: Add color entries as needed and edit each entry’s settings.
Eect: Choose between the Eect types Sparkle and Chaser. Edit its color and its settings.
To change the type of an existing Scene, you have to delete the content and add new content.
i
Congure the DMX Fixtures types before setting Scenes.
When the type of DMX Fixtures gets changed, any existing
Scene loses its selected color and gets reset to the default
color value.
LIGHTDRIVE+ WiFi — Conguration Guide | Conguration via App
content

WWW.TRAXON-ECUE.COM ©2023 traxon technologies. All rights reserved. Conguration Guide 02/23 Sheet: 18 / 29
7.3.6 “LightDrive+ Settings”
Congure the general settings of the LIGHTDRIVE+ WiFi.
Name:
Change the name of the LIGHTDRIVE+ WiFi device. The name is display at the available devices under
Connect, as the Connected to device and when its access point is open as an available network.
Date and Time:
Relevant when using the Scheduler. Set the date and time of the LIGHTDRIVE+ WiFi device. Or select Use
current Date/ Time to apply the tablet’s settings.
Daylight savings time:
Enable to consider the change of summer time / winter time according to a specic time zone.
i
When using the brightness fader in the Scenes overview, wait
a short moment and, if enabled, for the arming accoustic
signal before your next action. Otherwise the brightness
value might not be saved.
LIGHTDRIVE+ WiFi — Conguration Guide | Conguration via App
content
WWW.TRAXON-ECUE.COM ©2023 traxon technologies. All rights reserved. Conguration Guide 02/23 Sheet: 19 / 29
You can select an entry from the drop-down list or use the tablet’s time zone with My Time Zone. Tap the Save
Time Zone button to apply the setting.
Reset:
All settings except the network settings are reset to factory default. The device restarts and the tablet keeps
its connection to the LIGHTDRIVE+ WiFi device.
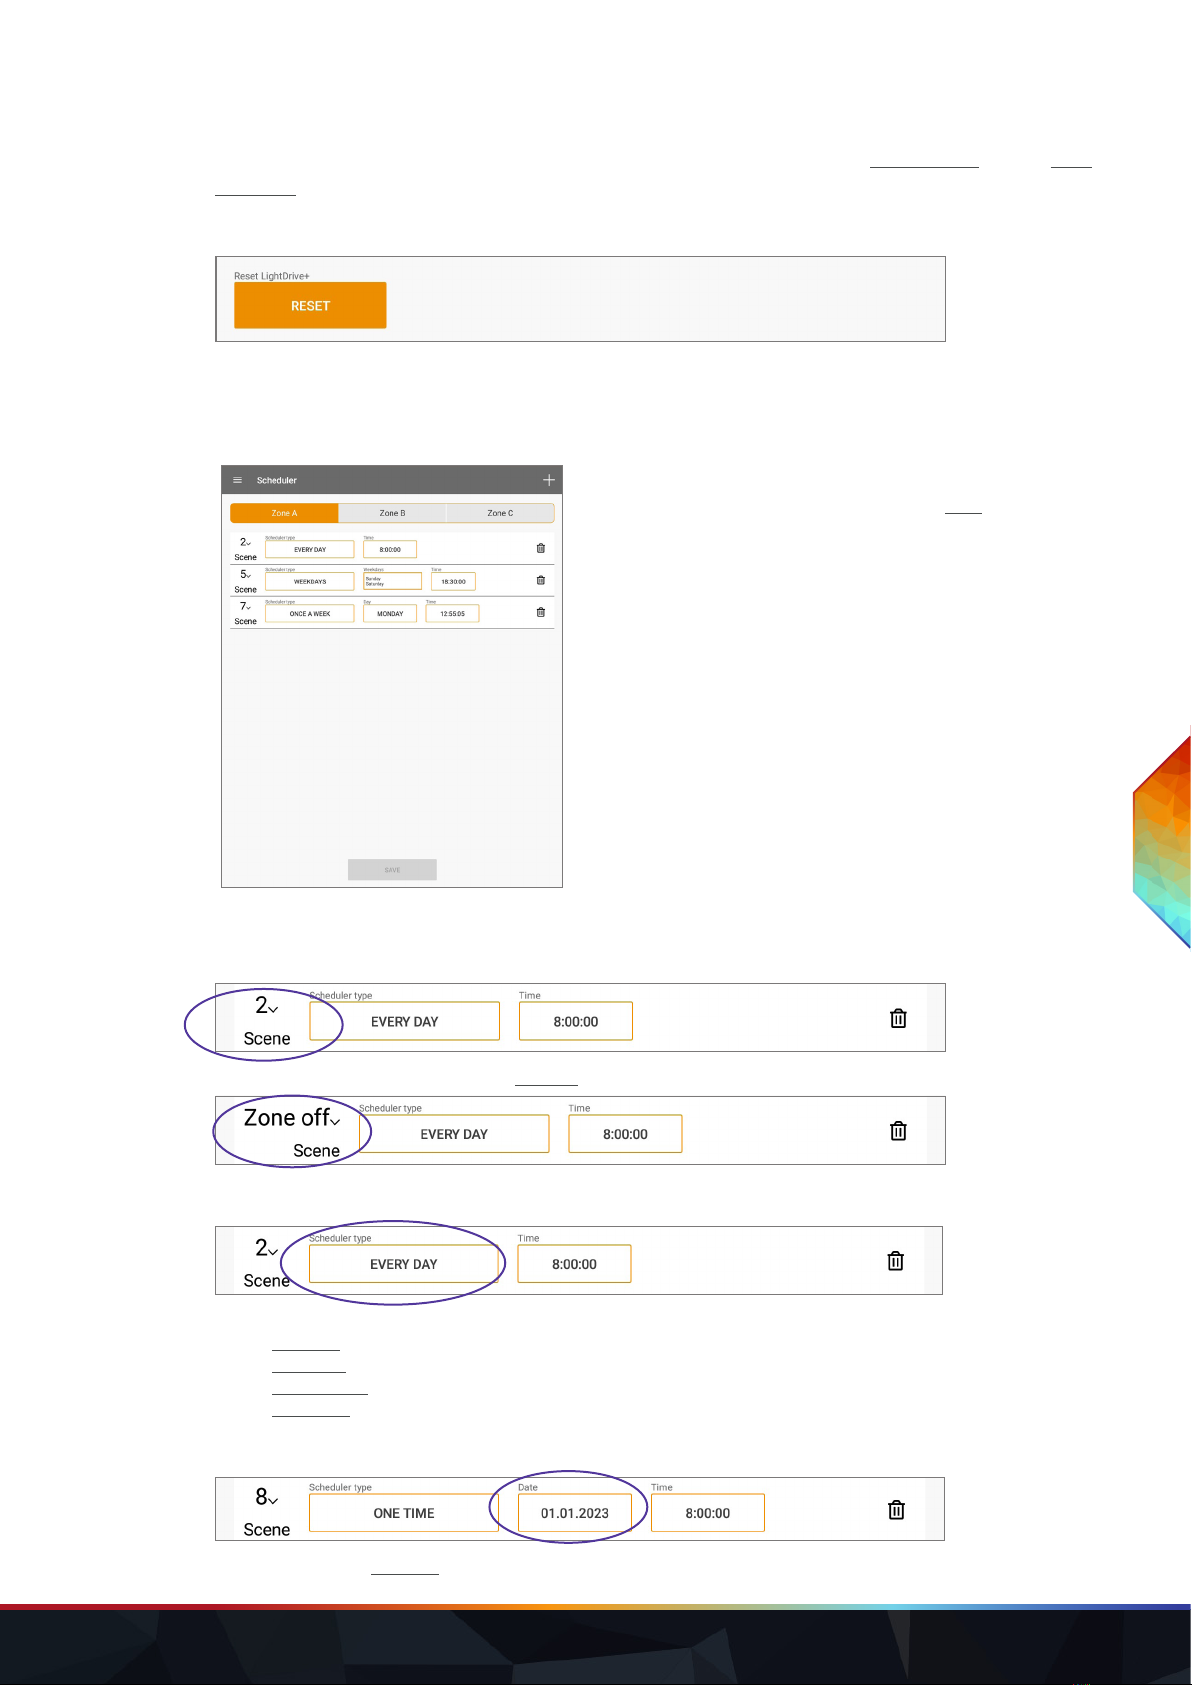
7.3.7 “Scheduler”
To trigger Scenes at dened times, use the Scheduler page.
Or turn o a Zone at a dened time. Tap the Save button to
apply the settings.
Add a trigger entry to a Zone. For each entry congure the following properties:
Scene:
Select the aected Scene. Or select Zone o to turn the Zone o when triggered:
Scheduler type:
Select the occurrence of the trigger:
One time
Every day
Once a week
Weekdays
Date:
Set the date of the One time trigger.
LIGHTDRIVE+ WiFi — Conguration Guide | Conguration via App
content
WWW.TRAXON-ECUE.COM ©2023 traxon technologies. All rights reserved. Conguration Guide 02/23 Sheet: 20 / 29
Time:
Set the time of the trigger.
Day:
Select the day of the week for the Once a week trigger.
Weekdays:
Select multiple days a week for the Weekdays trigger.
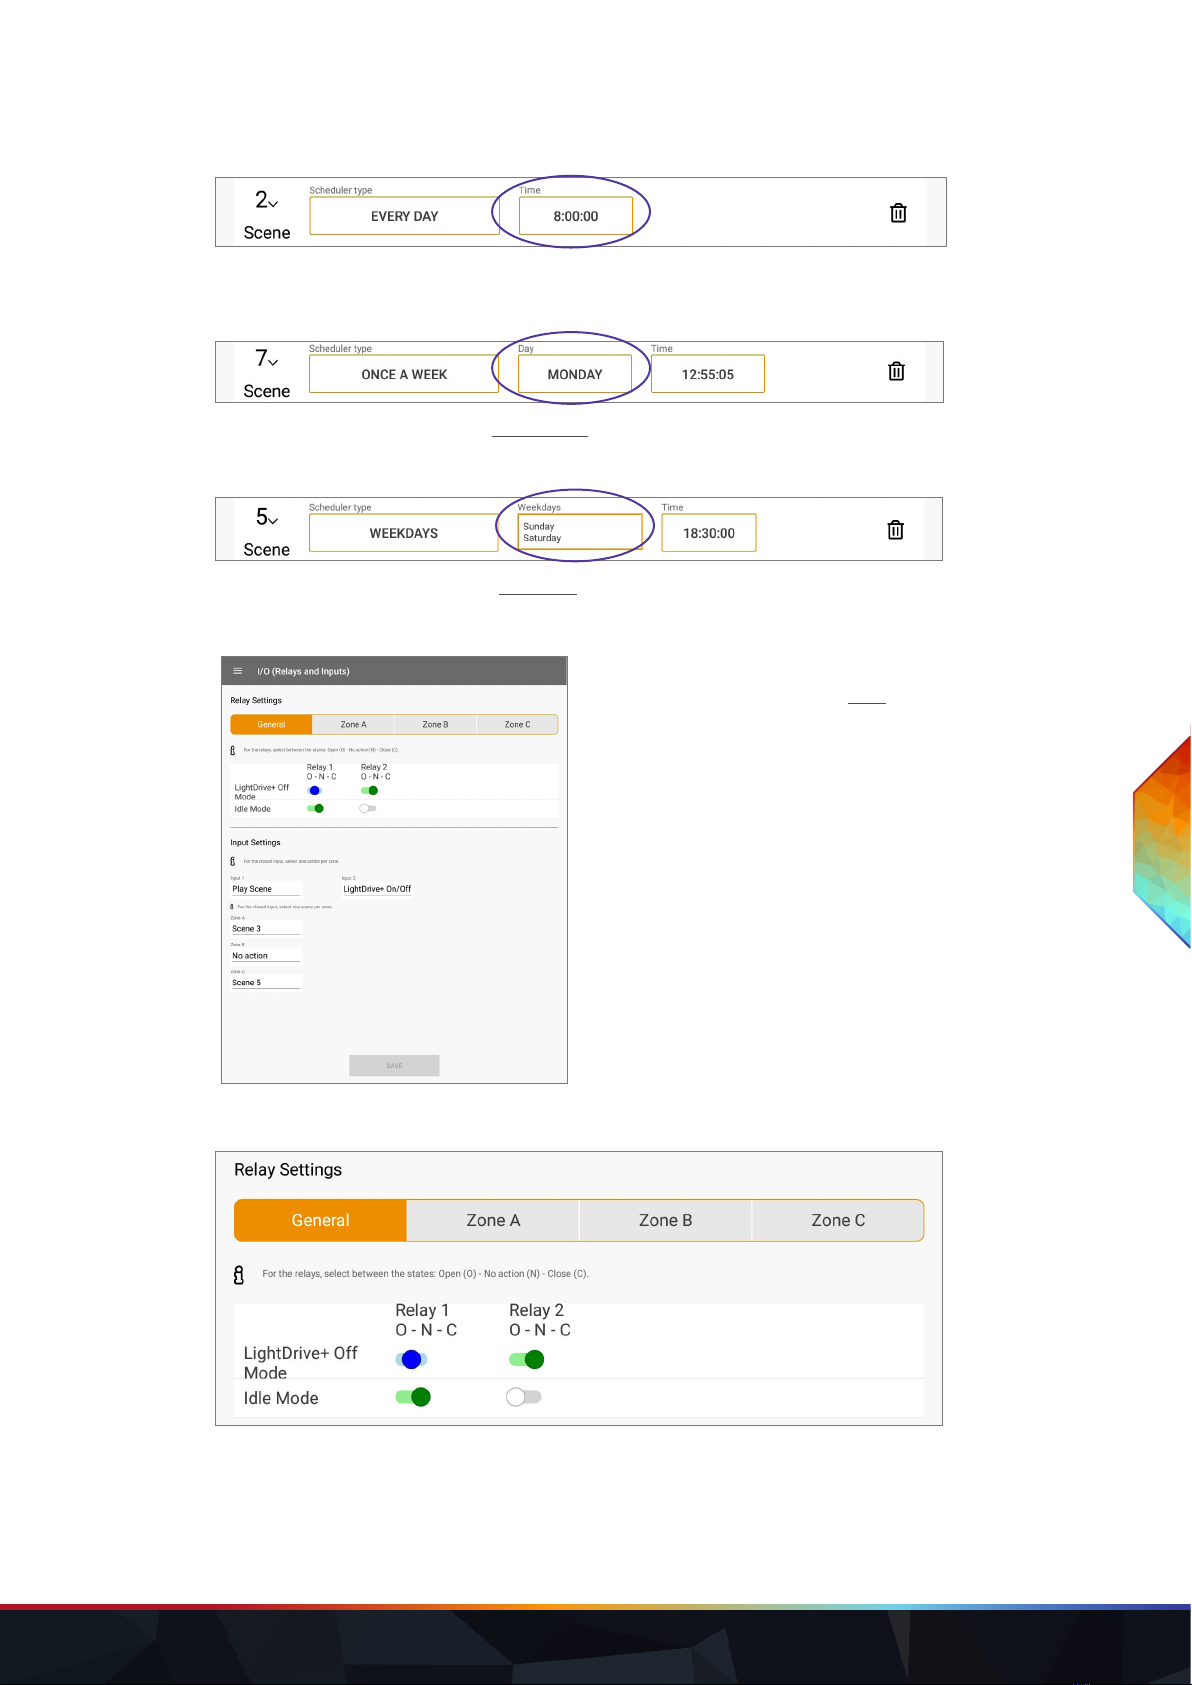
7.3.8 “I/O (Relays and Inputs)”
Congure the actions for the relays (low-side switches) and
on digital input changes. Tap the Save button to apply the
settings.
Relay Settings
For both relays (low-side switches), you can dene relay actions depending on the general device status and
on each Zone specic Scene selection.
General: you can set the relays depending on the O-mode and Idle-mode.
Zone A, B and C: you can set the relays depending on Scene selection.
LIGHTDRIVE+ WiFi — Conguration Guide | Conguration via App
content
This manual suits for next models
1
Table of contents
Other Traxon Technologies Lighting Equipment manuals

Popular Lighting Equipment manuals by other brands


Nowatt Lighting
Nowatt Lighting MIKA user guide

Sealey
Sealey ES601 instructions

Robe
Robe Robin 100 LEDBeam Wireless DMX CRMX user manual

Leader Light
Leader Light LL ARC SPOT 19 user manual

Hugo Lahme
Hugo Lahme FitStar Double-Jet installation instructions

BARRON
BARRON EXITRONIX ILX Series installation instructions