TreadwayHouse Designs Nixie V51R3 User manual

1
April 14, 2018
April 2018 | TreadwayHouse Designs | 480-323-9009
Nixie Clock
Users Manual
WIFI
Thank you for your purchase
Your new Nixie clock has been constructed using new- old
nixie tube stock manufactured in the late 70s from Russia.
It is a beautiful mix of old and new, resulting in a high
accuracy, low power clock which will be a talking point in
your home.
If you would like to reach us- You can contact us by email:
thdesigns.store.
Contents
Description 2
WIFI setup 3
Configuring your clock 4
General operations 14
Display modes 15
Settings 15
Quick Settings Table 20
Display Blanking 21
Tube Healing 21
Factory Reset 22
Nixie Clock Users Manual
V51R3-WIFI+RTC

2
April 14, 2018
Description
The clock has the following features:
•Latest technology, highly reliable and accurate.
•Tried and tested design, with many hundreds of clocks sold.
•Low power consumption.
•Long tube life: Anti Cathode Poisoning (ACP) and configurable blanking
makes sure that the tubes will stay healthy for many years with no
intervention from you.
•The multiplexed display and automatic dimming used in this design
extends the life of the tubes indefinitely. Some other designs run the tubes
too “hard”, and this causes a rapid degradation in the useful life of the tube.
•Automatic roll mode –periodically rolls through all digits on all locations to
check that the display is healthy. This is normal and part of the ACP
strategy.
•RGB back lighting allows you to set the color of the back lighting to
practically any color you desire.
•All settings are stored in non-volatile memory. Once they are set, they are
remembered forever, or until you change them again.
•Silent operation. Some Nixie clock designs emit an irritating “buzz” or
“hiss” which is especially annoying if you keep the clock in a bedroom.
•Ambient light sensing, with automatic tube dimming, which sets the tube
and LED brightness according to the light conditions. This also increases
tube life.
•Automatic week day or weekend blanking strategies available to extend
the life of your tubes
•Automatic time of day blanking (see basic settings “05”), can blank
between a start hour and an end hour, on week days, weekends or every
day
This clock is equipped with an WIFI time provider. It makes sure that your clock is
always right, (even when daylight savings change), and never drifts because the time
is synchronized with the internet’s atomic clocks. The option has the following
features:
•Configure and forget. It just runs. No intervention necessary ever.
•The time never drifts –it is always right within 1 second, year after year, even
after daylight savings time changes.
•Really simple configuration: You just enter your WIFI SSID and password,
and the time zone, and the rest happens automatically.
•Logs into your WIFI network. You configure the module with the credentials,
and it remembers the settings forever, or until they change.
•Low power consumption.
•All settings are stored in non-volatile memory. Once they are set, they are
remembered forever, or until you change them again.
•Configure the clock setting from the web interface. Makes setting up the
clock easy and quick.

3
April 14, 2018
When you power your clock for the first time, the time will be off since it does not know how
to connect to your WIFI network just yet. Turn the clock on, and log into it using a wifi
enabled computer, phone or tablet. Go to your connection settings on that device and under
available networks and select the access point called “NixieTimeModule”.
NOTE: The “ NixieTimeModule” access point will only be activated on powerup AFTER an
unsuccessful attempt to connect to a WLAN. It’s a security feature. Since we tested the
interface at our factory before shipping, the module will need to complete an unsuccessful
attempt on your network. So for the first time, you must turn power on- wait 30 seconds, cycle
power.
Step 1: Select the NixieTimeModule access point
Search in the list of WIFI networks for the one called “NixieTimeModule” and connect to it.
There is no password
Powering Your Clock the 1st Time- WIFI SETUP

4
April 14, 2018
Step 2: Accept the message saying that Internet is not available
When you have connected to it, you might get a message that Internet is not available.
This is fine, just say “OK” to the message.
You might not get this message, depending on the device you have. It's only
important that that you manage to connect to the “NixieTimeModule” network.

5
April 14, 2018
Step 3: Configure the WLAN
Now you can log into the Module with a browser and configure it. Open a browser on the
wifi device and enter the URL. http://192.168.4.1/wlan_config
Don't worry if the browser looks a bit ugly at the moment, it is because we are not able to
access the style sheets from the Internet (because the module doesn't have Internet
access until you configure the WLAN).
Select the network you want the clock to use from the list and enter the password for that
network. For this example, I have chosen the network “LUCANIA”. Press “Set” once you
are ready. The clock is now on your network. The access point will disengage, and you
will have to log into the clocks assigned IP address on your network to complete the
installation.

6
April 14, 2018
Step 4: Find the IP address of the module on the network
There are many different ways to do this, but the easiest is to look at the summary tab
or log into your router administrator. Enter your routers admin and password. You
should find an entry in the “connected devices” list which starts with “ESP_XXXX”with
some numbers and letters after it. This is your clock, and the IP address assigned will
be shown there. In my case its 192.168.1.116
Remember the IP address, or write it down. You will need it in a couple of minutes.
For me, my summary page looks like this:

7
April 14, 2018
Step 5: Login to the module using the WLAN assigned by your router
Now that the module is configured on your WLAN, you should change back to your
normal WLAN and log into the address of the clock noted in the previous step. Now things
should look a bit nicer:

8
April 14, 2018
Step 6: Select the time server and time zone
Now you can set the time server and time zone.
Our free to use time server is at:
http://time-zone-server.scapp.io/getTime/
You have to know the time zone you are in. The easiest way is to select the town nearest
to you from the list on this page:
https://en.wikipedia.org/wiki/List_of_tz_database_time_zones
I live in Phoenix, so I select “America/Phoenix”. The full URL is:
http://time-zone-server.scapp.io/getTime/America/Phoenix
Enter this in the page “Configure Time Server”, and press “Set”
In most cases we have done this for you at the factory.

9
April 14, 2018
Step 7: Check that you are getting the right time
If you have set up the time zone correctly, you should now be able to see the current time
in the summary page:
My time shows as 2016,5,1,13,8,1, which is in the format year, month, day, hours
minutes, seconds so 132:08:01 on the 1st May 2016.
That's it! From now on, the NixieTimeModule will check the time every minute and
make sure that the Nixie Clock never drifts from the right time.
You should see the time on your Nixie clock change to the correct time within one minute!
Step 8: IMPORTANT: Cycle power to secure the WIFI module
You must restart the module, in order to close the “NixieTimeModule” access point. This
will prevent someone from accessing your network thru the clock.
To restart, simply Turn the power off and back on. the open access point is now closed
and available only on your network via the ip address assigned by the server that you
wrote down earlier
Please see the section on “Security” for more information.
Configuring the Nixie Clock

10
April 14, 2018
As an additional function, you can configure the Nixie clock from the WIFI module as
well. This makes configuring the clock very easy and quick.
Just go to the “Configure clock settings” section of the module, and you will see the
current settings. All of the possibilities of the clock are laid out here.
You can still set all the configuration settings using the traditional way directly on the
clock, if you want to.
The main configuration page looks like this:
Configuring your clock

11
April 14, 2018
Description
12H / 24H hour time. The hours are displayed in 12 or 24-hour mode.
Default: 24H mode.
Blank leading “0”. Blank out the leading “0” from single digit hours.
Default: Don't blank.
Scroll back. Use the scroll back (rapid count down) effect when changing
from “9” to “0”. Default: enabled
Suppress ACP when dimmed. The Anti Cathode Poisoning which runs during the
night lights the digits up at full brightness, and some people might find this disturbing.
Using this setting, you can stop ACP happening when the display is fully dimmed (e.g.
at night).
Default: Enabled.
Display blanking. To preserve the tubes, you can set the display to be blanked. Note
that blanking can be overridden from the clock, see the section below.
Options:
•“Never blank”: the display runs all the time
•“Blank all day on weekends”: the display is blanked at weekends.
•“Blank all day on week days”: the display is blanked on week days.
•“Blank always”: The display is always blanked unless you tell it to come on.
•“Blank during selected hours every day”: Blank between the start and end hour
every day, week days and weekends.
•“Blank during selected hours on week days and all day at weekends”: The
display is blanked during the hours you define during week days and all day at
weekends.
•“Blank during selected hours on weekends and all day on week days”: This
blanks the clock during the selected hours on weekends and all day on week
days.
•“Blank during selected hours on weekends only”: This blanks between the start and
end hour on weekends.
•“Blank during selected hours on week days only”: This blanks between the start
and end hour on
week days.
Default: “Never Blank”
Blanking From. Hour blanking will start at this hour, on the days set by the Display
Blanking Mode. If the display blanking mode does not use hours, this setting is not
enabled.
Blanking To. Hour blanking will end at this hour, on the days set by the Display
Blanking Mode. If the display blanking mode does not use hours, this setting is not
enabled.

12
April 14, 2018
Blanking Hour Start. Hour blanking will start at this hour, on the days set by the
Display Blanking Mode.
If the display blanking mode does not use hours, this setting is not shown.
Blanking Hour End. Hour blanking will end at this hour, on the days set by the Display
Blanking Mode. If the display blanking mode does not use hours, this setting is not
shown.
Fade Steps. This sets how quickly one-digit fades into the next one. You can
also turn off the fade feature completely. It can be set from 20 (fast) to 200 (very
slow). Default: 50.
Scroll Steps. This sets how quickly each scroll back digit is displayed when we
scroll back from 9 to 0. You can also turn off the scroll feature completely. It can be
set from 1 (very fast) to 40 (very slow). Default: 4.
Back Light. This sets the mode of the back light. Default: "Fixed RGB
backlight, no dimming"
•"Fixed RGB backlight, no dimming". There is a constant color on the back
light, which stays bright all the time, even at night when the display is
dimmed. The Red, Green and Blue intensities are set using the channel
intensities below.
•"Pulsing RGB backlight, no dimming". This pulses the back light but does
not dim with the display. The Red, Green and Blue intensities are set using
the channel intensities below.
•"Cycling RGB backlight, no dimming". The back-light cycles through random
mixes of colors but does not dim with the display. The intensities of the
channels are managed by the software.
•"Fixed RGB backlight, dims with ambient light". There is a constant color on
the back light, which dims as the display is dimmed. The Red, Green and
Blue intensities are set using the channel intensities below
•"Pulsing RGB backlight, dims with ambient light". This pulses the back light,
which dims as the display is dimmed. The Red, Green and Blue intensities
are set using the channel intensities below.
•"Cycling RGB backlight, dims with ambient light". The back-light cycles
through random mixes of colors, which dims as the display is dimmed. The
intensities of the channels are managed by the software.
Red Channel Intensity. Sets the maximum intensity of the red channel back light. This
will be dimmed according to the display dimming. If you are in cycle mode, this setting
does not do anything. The value can be set from 0 (off) to 15 (bright). Default: 0
Green Channel Intensity. Sets the maximum intensity of the green channel back
light. This will be dimmed according to the display dimming. If you are in cycle mode,
this setting does not do anything. The value can be set from 0 (off) to 15 (bright).
Default: 0

13
April 14, 2018
Blue Channel Intensity. Sets the maximum intensity of the blue channel back light.
This will be dimmed according to the display dimming. If you are in cycle mode, this
setting does not do anything. The value can be set from 0 (off) to 15 (bright).
Default: 15
Backlight Cycle Speed. If you are in cycle mode, this controls the speed at which the
colors cycle. The higher the number, the slower the colors will change. The value can
be set from 2 (very fast) to 64 (very slow). Default: 10
The module is by design already quite secure. There is no known way of connecting to
the open “NixieTimeModule” network and doing anything other than changing the clock
settings. There is no known way of accessing through the open network to your WLAN
network. However, we designed the software in the module to provide the highest
security possible.
The module tries to connect to the configured Wireless LAN on start up. If it manages
to connect, it will shut down the “NixieTimeModule” access point. You can still get
into the module configuration through your WLAN, using the IP address assigned by
the router.
If for any reason the module is not able to connect to your WLAN (say, you changed the
password, or the network name), it will switch over to the real time clock chip and try to
reconnect every 5 minutes.
In order to activate the access point again, assuming the clock has already
unsuccessfully attempted to access the network, you will need to cycle power and
redo the installation procedure starting from step one. The “NixieTimeModule”
access point is only available after a power cycle following an unsuccessful
attempt to log into your network. This is a security feature to make sure you are in
control of when the access point is opened.
Security

14
April 14, 2018
General Operations
The clock has different modes of operation, which you select using the pushbutton. When
you start the clock up the very first time it will start in “Time Display Mode”. After it
connects to the internet and talks with the time cloud server, you will never have to set the
time or date.
If you press the button for differing lengths, different things will happen.
•“Short Press” (less than 1 second): A temporary display will be shown for 5 seconds.
This is useful if you want to know the date, for example. The options here are given
in the section “Display Mode”
•“Medium Press” (more than 1 second): The clock will go into “Setting Mode” to
allow you to change settings.
•“Long Press” (more than 8 seconds): The clock will go into “Tube healing mode”.
Read the section on “Tube healing Mode” before using this mode. This mode can
damage your tubes if you don’t use it correctly!
Every 10 minutes (at “xx:x9:15”, the clock will do “Anti-Cathode Poisoning”, which will cycle
all the digits for about 15 seconds. If enabled, the slots mode will temporary display the
date once per minute for approximately 5 seconds. The bulbs will scroll like a slot machine
before and after displaying the date.
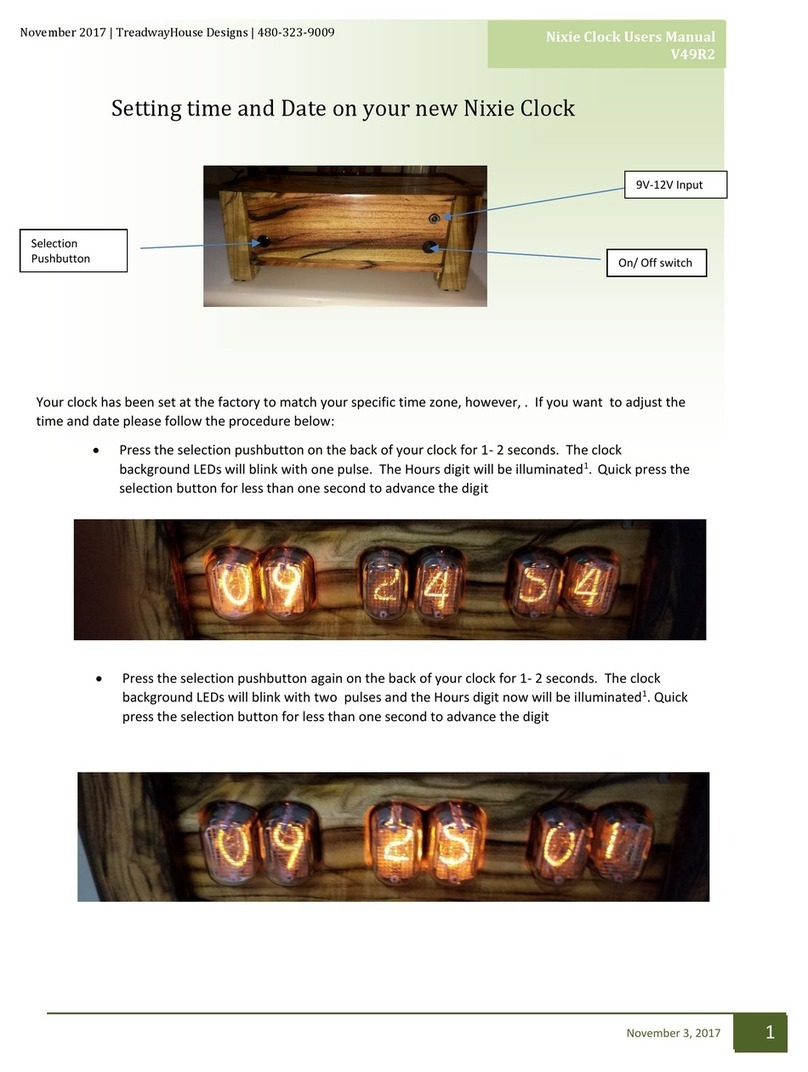
9V-12V Input
On/ Off switch
Selection
Pushbutton

15
April 14, 2018
Display Mode
With the WIFI option installed we recommend logging into your clock and using the GUI to
set your preferences. However, it can be done manually using the select button on the
back of your clock.
To enter setting mode, press the button for more than 1 second (“medium press”). The
“RGB back light” LEDs will start to flash white. The number of consecutive flashes indicates
the mode you are in.
Each medium press of more than 1 second will move the setting mode onto the next item.
To change a setting, press the button for less than one second, and then release it (“short
press”). Once the clock has established an internet connection, the time and date is set
automatically for you. When entering the setup mode, the last two digits on the clock
indicate the mode and the 1st 4 digits are used for the setting. See Table Below
To exit the setting mode before going through all the options, press the button for more
than 2 seconds. The “RGB back light” LEDs will return to their normal operation. Another
way of exiting is to cycle through all the setting options, after which you will return to time
mode.
Normally, the clock will show the time. To show additional information press the button
with a “short” press. Each press cycles through the following information. After 5 seconds,
the display will revert to the normal time display.
Mode
Description
Values
Date
The current Date is shown
Temp
The current internal temperature inside the
clock case will be shown in degrees Celsius.
The temperature in the case should never
exceed 40 degrees C.
<40 ° C
Light
This shows the current ambient light reading
from the LDR (light dependent resistor). It is a
normalized value and goes between 100 (dark)
to 999 (bright). This controls the dimming of
the tubes.
100: Darkest
999: brightest
Version
Display the version number. The format will
be:”VV vv 07”, where major version is “VV”,
minor version is “vv” and the “07” is the id for
the version display
00:51:07
Settings Mode

16
April 14, 2018
Basic Settings
“00”
Flashing
12 or 24-hour time. The hours are displayed in 12 or
24-hour mode
“1” = 12 hour
“0” = 24 hour
default: 1
“01”
flashing
Blank leading “0”. Blank out the leading “0” from single
digit hours
“1” = blank
“0” = don't blank
default: 1
“02”
flashing
Scroll back. Use the scroll back (rapid count down)
effect when changing from “9” to “0”.
“1” = enable
“0” = disable
default: 0
“03”
flashing
Fade. Use cross digit fading
“1” = enable
“0” = disable
default: 1
“04”
flashing
Date format. Set the format that the date is displayed
in
“0” = YY.MM.DD
“1” = MM.DD.YY
“2” = DD.MM.YY
default: 1
“05”
flashing
Display blanking. To preserve the tubes, you can set
the display to be blanked. Options:
“4” = “hours”: Blanks between the start and end hour
every day.
“5” = “H or weekends”: This blanks all day during the
weekends and between the start and end hour every
other day.
“6” = “H or week days”: This blanks all day during the
week days and between the start and end hour every
other day.
“7” = “H on weekends”: This blanks between the
start and end hour on weekends.
“8” = “H on week days”: This blanks between the
start and end hour on week days.
“0” = Don't blank
“1” = Weekends
“2” = Week days
“3” = Always
“4” = Hours
“5” = H or
weekends “6” = H
or week days “7” =
H on weekends
“8” = H
on week days’
default: 0
“06”
flashing
Blanking Hour Start. Hour blanking will start at this
hour, on the days set by the Display Blanking Mode. If
the display blanking mode does not use hours, this
setting is not shown.
Default: 00

17
April 14, 2018
“07”
flashing
Blanking Hour End. Hour blanking will end at this hour,
on the days set by the Display Blanking Mode. If the
display blanking mode does not use hours, this setting
is not shown.
Default: 07
“08”
flashing
Anti-Cathode Poisoning night suppression. (If clock is
equipped with LDR option) The ACP which runs during
the night lights the digits up at full brightness, and
some people might find this disturbing. Using this
setting, you can stop ACP happening when the display
is fully dimmed (e.g. at night)
“1” = don't do ACP
when dimmed
“0” = do ACP
always default: 1
Special Effects Settings
“09”
flashing
USE LDR. If you disable the LDR, the tubes will always
work at maximum brightness.
“1” = enable
“0” = disable
default: 1
“10”
flashing
Blank Mode. You can set the tubes, the LEDs or both
the tubes and the LEDs to be blanked when in blanking
mode.
“0” = tubes only
“1” = LEDs only
“2” = tubes and
LEDs
default: 2
“11”
flashing
Fade Speed Slower. Each short press will make the
fade speed between digits slower
Max: 200
Min: 20
Default: 50
“12”
flashing
Fade Speed Faster. Each short press will make the fade
speed between digits faster.
Max: 200
Min: 20
Default: 50
“13”
flashing
Scroll-back Speed Slower. Each short press will make
the “scroll back” speed slower.
Max: 40
Min: 1
Default: 4
“14”
flashing
Scroll-back Speed Faster. Each short press will make
the “scroll back” speed faster
Max: 40
Min: 1
Default: 4
“15”
flashing
Slots Mode. You can have the date shown
automatically once per minute for about 5 seconds.
“1” = enable
“0” = disable
default: 1

18
April 14, 2018
Back Light Settings
“16”
flashing
Back Light Mode. This sets the mode of the back light.
“Fixed” mode will show the back-light color per the
Red, Green and Blue channel intensities.
“Pulse” will make the intensity of the back light
“pulse”, brightening for a second and then darkening
for a second, but always respecting the relative
intensities set by the Red, Green and Blue channel
intensities.
“Cycle” fades the back lighting randomly, and does
not use the Red, Green and Blue channel intensities.
These settings will be skipped if cycle mode is
selected.
Options “0”, “1” and “2”, do not dim with the bulbs.
Options “3”, “4” and “5” do if the LDR option is
installed.
“0” = Fixed
“1” = Pulse
“2” = Cycle
“3” = Fixed/Dim
“4” = Pulse/Dim
“5” = Cycle/Dim
default: 0
Initial: 3
“17”
flashing
Red Channel Intensity. Sets the maximum intensity of
the red channel back light. This will be dimmed per the
display dimming. If you are in cycle mode, this setting
will be skipped.
Max: 15
Min: 0
Default: 0
“18”
flashing
Green Channel Intensity. Sets the maximum intensity
of the red channel back light. This will be dimmed per
the display dimming. If you are in cycle mode, this
setting will be skipped.
Max: 15
Min: 0
Default: 0
“19”
flashing
Blue Channel Intensity. Sets the maximum intensity of
the red channel back light. This will be dimmed per the
display dimming. If you are in cycle mode, this setting
will be skipped.
Max: 15
Min: 0
Default: 15
“20”
flashing
Cycle Speed. If you are in cycle mode, this controls the
speed at which the colors cycle. The higher the
number, the slower the colors will change.
Max: 15
Min: 0
Default: 10
HV Generation Settings
“21”
flashing
HV Target Voltage Higher. Each press sets the HV
target voltage higher by 5V
Max: 200
Min: 150
Default: 180
“22”
flashing
HV Target Voltage Lower. Each press sets the HV
target voltage lower by 5V.
Max: 200
Min: 150
Default: 180

19
April 14, 2018
“23”
flashing
PWM On Time Longer. This setting controls how long
the PWM on pulse is. The CPU sets this value. Contact
factory before adjusting
Max: 50
Min: 500
Default:(set by
cpu)
“24”
flashing
PWM On Time Shorter. This setting controls how short
the PWM on pulse is. The CPU sets this value. Contact
factory before adjusting
Max: 50
Min: 500
Default:(set by
cpu)
Misc Settings
“25”
flashing
Increase Minimum dim. This setting allows you to
increase the minimum brightness you want to have
when
the clock is fully dimmed.
Max: 500
Min: 100
Default:200
“26”
flashing
Decrease Minimum dim. This setting allows you to
decrease the minimum brightness you want to have
when
the clock is fully dimmed.
Max: 500
Min: 100
Default: 100
“27”
flashing
Increase Anti-ghosting. This setting reduces “ghosting”
(the number on the right shows faintly on the digit on
the
left). This is due to transients when switching
Max: 50
Min: 0
Default: 0
“28”
flashing
Decrease Anti-ghosting. This setting reduces “ghosting”
(the number on the right shows faintly on the digit on
the
left). This is due to transients when switching.
Max: 50
Min: 0
Default: 0
Information
“29”
flashing
Current case temperature. Show the current
temperature inside the case (used as part of the
temperature compensation for the clock crystal)
“30”
flashing
Clock version. Show the clock software version.
Digit Test. Will roll through all digits on all locations to
check that the display is healthy

20
April 14, 2018
Mode
Factory default setting
Your Settings
notes
00
1
01
1
02
0
03
1
04
1
05
0
06
00
07
07
08
1
09
1
10
2
11
50
12
50
13
4
14
4
15
1
16
3
17
0
18
0
19
15
20
10
21
180
please don’t adjust
22
180
please don’t adjust
23
150
please don’t adjust
24
150
please don’t adjust
25
150
26
150
27
0
28
0
Settings Summary
Table of contents
Other TreadwayHouse Designs Clock manuals
