Tredy TD-2600 User manual

Instruction manual
Read this manual carefully before use.
TD-2600
Top Filled
Ultrasonic Humidifier

Contents
Instruction
Safety information
Product introduction
Troubleshooting
Warranty
01
01
02
06
07
Customer Service:[email protected]

Thank you for purchasing the top filling humidifier. It is specially designed to help relieve dry air
discomforts, easy to fill, use and clean. Its unique removable top fill design offers 2 easy ways to
fill the water tank– at the humidifier with a pitcher or remove the tank and fill it at the sink. With
ultra-quiet operation, this product delivers soothing, cool visible moisture to effectively humidify
medium to large size rooms making it ideal for bedroom use. It also features a wide tank opening
and carry handle to make filling, emptying and cleaning convenient and easy.
1. The humidifier should always be placed on a firm, flat, waterproof surface at least 4.5 feet
(1.5m) away from bedside, 12 inches (30 cm) from the wall and out of reach of patients, children
and pets. Be sure the humidifier is in a stable position and the power cord is away from heated
surfaces and out of the way to prevent the humidifier from being tipped over.
2. The humidifier should not be left unattended in a closed room since air could become saturated
and leave condensation in front of unit, on walls and furniture. Leave room door partly open. Do
not aim Mist Outlet directly at children, walls or furniture.
3. Before using the humidifier, extend the cord and inspect for any signs of damage. Do not use
the unit if the cord has been damaged.Do not operate with power cord coiled or with twist tie in
place.
4. The humidifier has a polarized plug (one blade is wider than the other) as a safety feature. This
plug will fit into a polarized outlet only one way. If the plug does not fit fully into the outlet, reverse
the plug. If it still does not fit, contact a qualified electrician. Do not attempt to defeat this safety
feature.
5. To avoid fire or shock hazard, plug the humidifier directly into a120V AC electrical outlet.
6. To avoid risk of fire, shock or personal injury do not use an extension cord or power strip.
7. The humidifier should always be unplugged and emptied when not in operation or while being
cleaned. Shut off and unplug humidifier before moving. Do not move or tilt humidifier while it is in
operation. Plug and unplug unit with dry hands. Never pull by cord.
8. Do not operate the humidifier without water. Turn off and unplug unit when tank is empty.
Humidifier requires regular cleaning. Refer to and follow cleaning instructions..
9. Do not operate outdoors; this humidifier is intended for indoor residential use only.
10. Do not cover or insert objects into any openings on the unit.
11. Do not block intake or output vents.
12. Do not attempt to repair or adjust any electrical or mechanical functions on this humidifier.
Doing so will void your warranty.
13. Do not place in direct sunlight, high temperature areas or near computers or sensitive
electronic equipment.
14. Do not touch the nebulizer while the unit is plugged in, as burns could result.
15. Do not add any medications (e.g. liquid inhalant, or oils) into fogging cylinder, water tank or
housing.
Caution
1. Instruction
2. Safety Information
1
READ AND SAVE THESE INSTRUCTIONS!

Water is released into the water tank when the Float Paddle engages the Plunger at the bottom
of the housing. A Nebulizer vibrates at ultrasonic frequency, breaking the water into a fine mist.
The mist is quietly propelled by a fan up a vertical Fogging cylinder to the Mist Outlet where the
cool, visible mist enters the room. This humidifier will automatically shut off when the water level
is low.
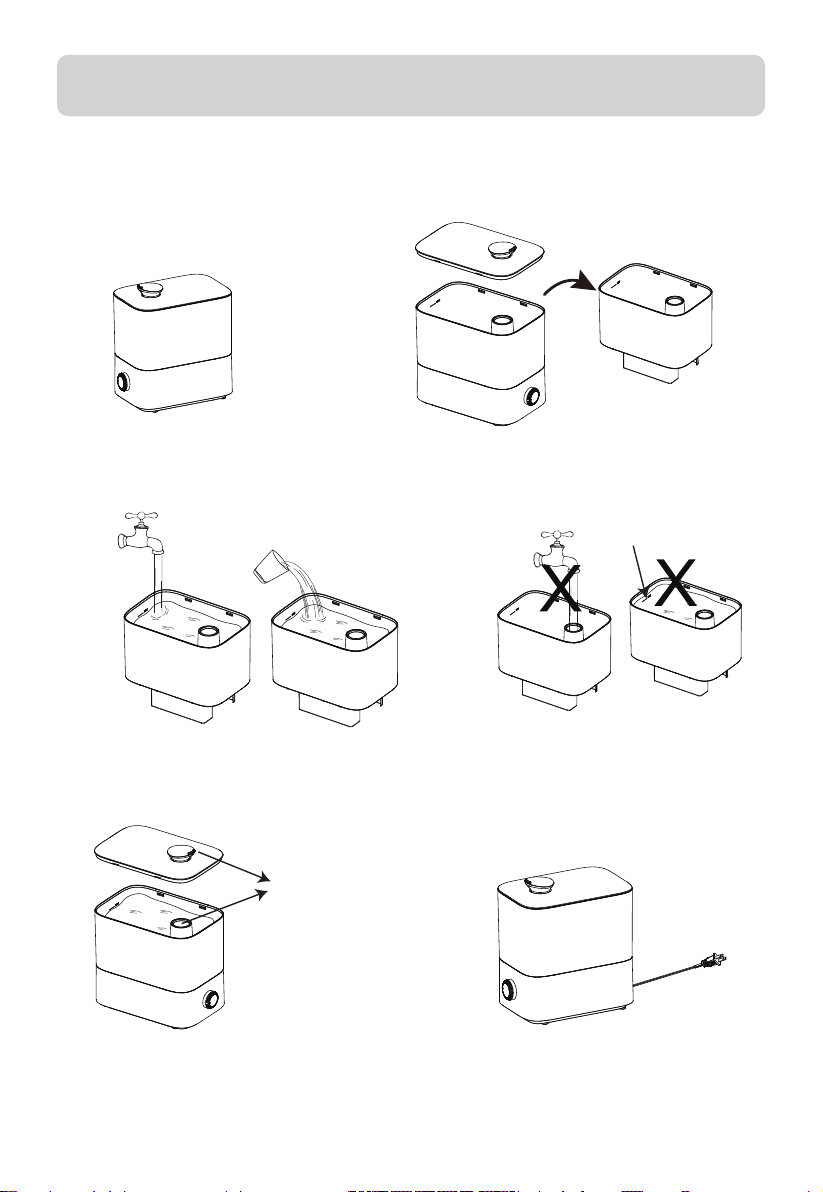
1. SET UP YOUR HUMIDIFIER
①Remove packaging materials. Put the water tank on the housing.
②Remove twist tie and extend power cord. Place on a firm, level, water resistant surface a
minimum of 12 inches (30 cm) from walls.
2. SFILLING OR RERILLING WATER TANK
This humidifier holds a maximum of 1.31 gallons (5 liters) of water.
①Take the tank cover out of the water tank.
②Pour pure water or clean from a pitcher or jug directly into water tank. Or take the water tank
out from humidifier then pour water from tap, and place correctly on housing.
③Fill to the MAX line marked on the inside of the tank.
④Place tank cover correctly on the tank, the nozzle fits with the mist chamber.
NOTE: Water temperature shall not surpass 40 Celsius degree.Should not pour water into the
mist chamber when pour water into water tank in order to avoid water flowing out from the air
outlet.The water tank should be carried using two hands when pour from tap; one hand on the
one side of the tank and other hand supporting the bottom of the tank. Carry water tank back
to humidifier.Replace the full Tank on the housing.
3. Product introduction
Product component structure
Product installation and use
2
MAX
Mist Outlet
Tank Cover
Water Tank
Housing cover
(Max. Water-Level
in housing)
Power Cord
Power Knob
Max Water Line
Fogging cylinder
Float Paddle
Housing
Air Outlet
Instruction Ligh
MAX
3. Product usage
CAUTION: Use care when handling Water Tank to avoid unnecessary impact. Banging or
dropping the Water Tank could result in damage to the Tank that may cause leaking.
3
3.Take out the water tank and put it under the faucet,
or pour water into the water tank with a water cup.
4.After filling, put the water tank into the body
and close the water tank cover.
5.Adjust the direction of the mist,plug in
AC 120V/60Hz socket.
2.Take off tank cover and bring out the water tank.
1.Put humidifier at the horizontal level place.
Max
Note:
Fit the mist outlet
and the fogging cylinder
Note: Do not add water to the mist outlet; the
water volume must not exceed the maximum
water level line (water temperature does not
exceed 40 °C).
4.Product cleaning and maintenance
4
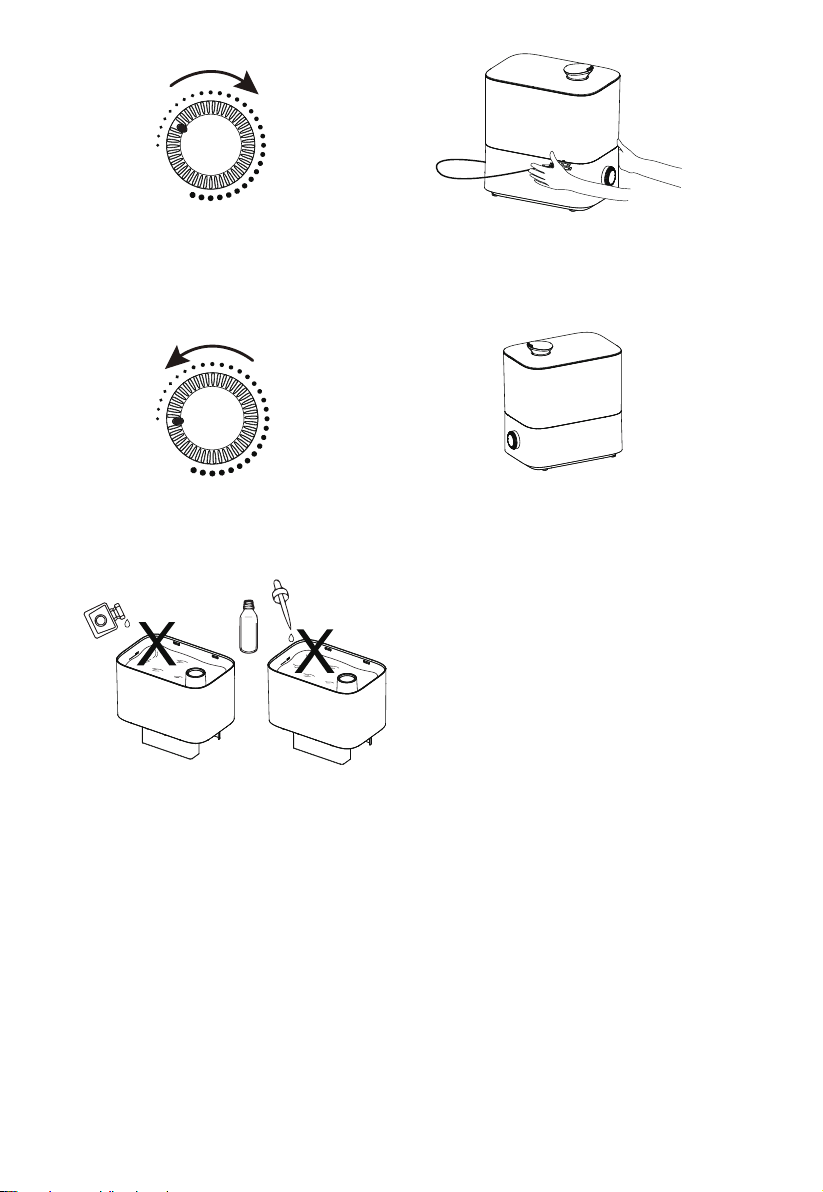
6.Turn the knob and the indicator will turn
blue and humidifier will start working then
the amount of mist can be adjusted
according to individual needs.
8.When the humidifier is working to the
water shortage state, the indicator light will
turn red. At this point, you need to turn off
the power and add water to the water tank.
7.Before moving the humidifier, please stop using
it, turn off the power switch, and unplug the
power plug,then move all machine together. Be
careful not to move the humidifier while working.
9.When the water tank is filled full with water, it
can work continuously for more than 16 hours.
NOTE:
1. Before cleaning, be sure to turn off the power and unplug the plug.
2. When cleaning the body, wipe the surface with the soft cloth after rinsing with warm water
below 40 degrees Celsius. Do not use a wire ball or a nylon rag to wipe the body to avoid
surface scratch damage.
3. When cleaning the water tank, first wipe off the scale inside the box with a soft cloth, then
rinse with water.
4. Do not use diluent, toluene, acid detergent, lamp oil, alcohol or chemical rag to avoid
discoloration and deterioration.
5. When not in use for a long time, clean it, dry it, put it into the packing box according to the
original packaging, and put it in a dry place for safekeeping.
6. It is recommended to clean the humidifier once a week or so.
OFF
Max
OFF
Max
Note: It is forbidden to add perfume or
essential oil to the humidifier.

3. Pour the right amount of water and detergent,
and shake it evenly to allow the detergent to
dissolve.
5.Pour the white vinegar into the atomizer and
soak for 5-10 minutes to dissolve the scale.
6.Pour the white vinegar, wipe it with a cotton
swab or a brush, and finally rinse it with water.
4.After soaking in water and detergent for 5-10
minutes, pour it off, wipe with a cotton swab or
brush, and finally rinse with water.
Clean the housing
Cleaning atomizer
1.Open the housing cover. 2.Pour off the remaining water into
the sink.
Detergent
White Vinegar
5

Please find solutions from the following table list in case of any problem during operation.
If faults still occur after all measures have been exhausted, contact your supplier or distributor.
Technical Parameters
6
4. Troubleshooting
Model
Name of product
TD-2600
Top Filling Humidifier
Power Supply 120V~ 60Hz
Rated Power 25 W
5LVolume
Max Mist Output 260ml/h
Max Working Time 16H
Applicable Area 21-30㎡
Spec L280*W180*H310mm
Net Weight 1.8KG
Faults Symptom/Possible Causes Solutions
Housing has no water
Mist has odor
Leakage from base drain holes
The blue light is on, but little or
no fog is released
Mist emerges from the area
between tank cover and tank,
and the area between tank
and housing
Damp on the window and wall
around the humidifier.
Float Paddle is stuck by
extraneous matter and cannot
turn down
Dirt in the housing or water is not
clean in the tank
Knob position at the minimum
position
Frequently lifting up the water
tank could cause a higher water
level of the housing, and the
vaporizer will possibly not nebulize
If the water level is over than the
Max. Level.
The water level in the housing is
higher than the air outlet
Water tank outlet spring failure
leaking
Over higher humidity position
Too close to window or door
Tank cover and tank doesn’t
put right or tank and housing
doesn’t put right Put them right
Lower down the humidity position
Move humidifier farer away from window
or wall
Clean up the extraneous matter at the
pivot of the float paddle.
Clean housing and tank
Move Knob to higher position
Pour out some of the water from the
housing until the water level is under max.
Lower the water level in the housing
Replace the tank spring

ONE YEAR LIMITED WARRANTY
You should first read all instructions before attempting to use this product.
①This 1 year limited warranty applies to repair or replacement of product found to be defective
in material or workmanship.
This warranty does not apply to damage resulting from commercial, abusive, unreasonable use
or supplemental damage. Defects that are the result of normal wear and tear will not be
considered manufacturing defects under this warranty.
Manufacturer is not liable for incidental or consequential damages of any nature, any implied
warranty of merchantability or fitness for a particular purpose on this product is limited in duration
to the duration of this warranty.
Some jurisdictions do not allow the exclusion or limitation of incidental or consequential
damages or limitations on how long an implied warranty lasts, so the above limitations or
exclusions may not apply to you.
This warranty gives you specific legal rights, and you also may have other rights which vary
from jurisdiction to jurisdiction.
This warranty applies only to the original purchaser of this product from the original date of
purchase.
②At its option, manufacturer will repair or replace this product if it is found to be defective in
material or workmanship.
③This warranty does not cover damage resulting from any unauthorized attempts to repair or
from any use not in accordance with the instruction manual.
④Please be sure to specify a model number located on the box and the back and bottom of your
unit.
⑤All air and transportation charges are not covered by the warranty and are the responsibility of
the customer.
NOTE: If you experience a problem, please contact consumer relations first or see your
warranty. Do not return the product to the original place of purchase. Do not attempt to open
the motor housing yourself, doing so may void your warranty and cause damage to the product,
or personal injury.
5. Warranty
7

tredyhome.com
Table of contents


