manuals.online logo
Brands
  1. Home
  2. •
  3. Brands
  4. •
  5. treesse
  6. •
  7. Hot Tub
  8. •
  9. treesse GHOST PLUS Shadow User manual

treesse GHOST PLUS Shadow User manual

centrostanza
standalone
centrostanza ad incasso
built-in standalone
AB
cm201x162 h.82
Amperaggio
Amperage
1000 l.
14
3,3 m2
220 kg
1220 kg
220/380 volt
22 A (220V)
3x16 A (380V)
50 Hz
2.5 Hp
0.38 Kw
3 Kw
1x2 speed
1 speed
1.8 Kw
2 speed
mini jets
12
jets
Motore Idromassaggio 2 velocità
Pannello di controllo
Whirlpool Motor 2 speed
Control panel
Valvola di scarico Draining valve
2020 rev.01
Shadow
162
82
77 154
201
20
177
4
44
27
5
62
54
S
M
M
M
S
S
Electrical connection with maximum cable section 3x6 mmq,
approximate lenght 2 ml.
NOTE
L’impianto elettrico al quale si intende collegare la minipiscina deve essere conforme alle norme CEE.
La minipiscina dovrà essere collegata ad un Sezionatore di rete (interuttore magnetotermico) con contatti distanziati
min. 3mm. e ad un RCD (interruttore differenziale) di max 30mA.
E’ necessario che l’impianto dell’edificio sia presente un dispositivo di disconnessione bipolare.
Deve esistere un efficiente impianto di terra.
La minipiscina deve essere collegata all’impianto di terra dell’edificio in maniera permanente.
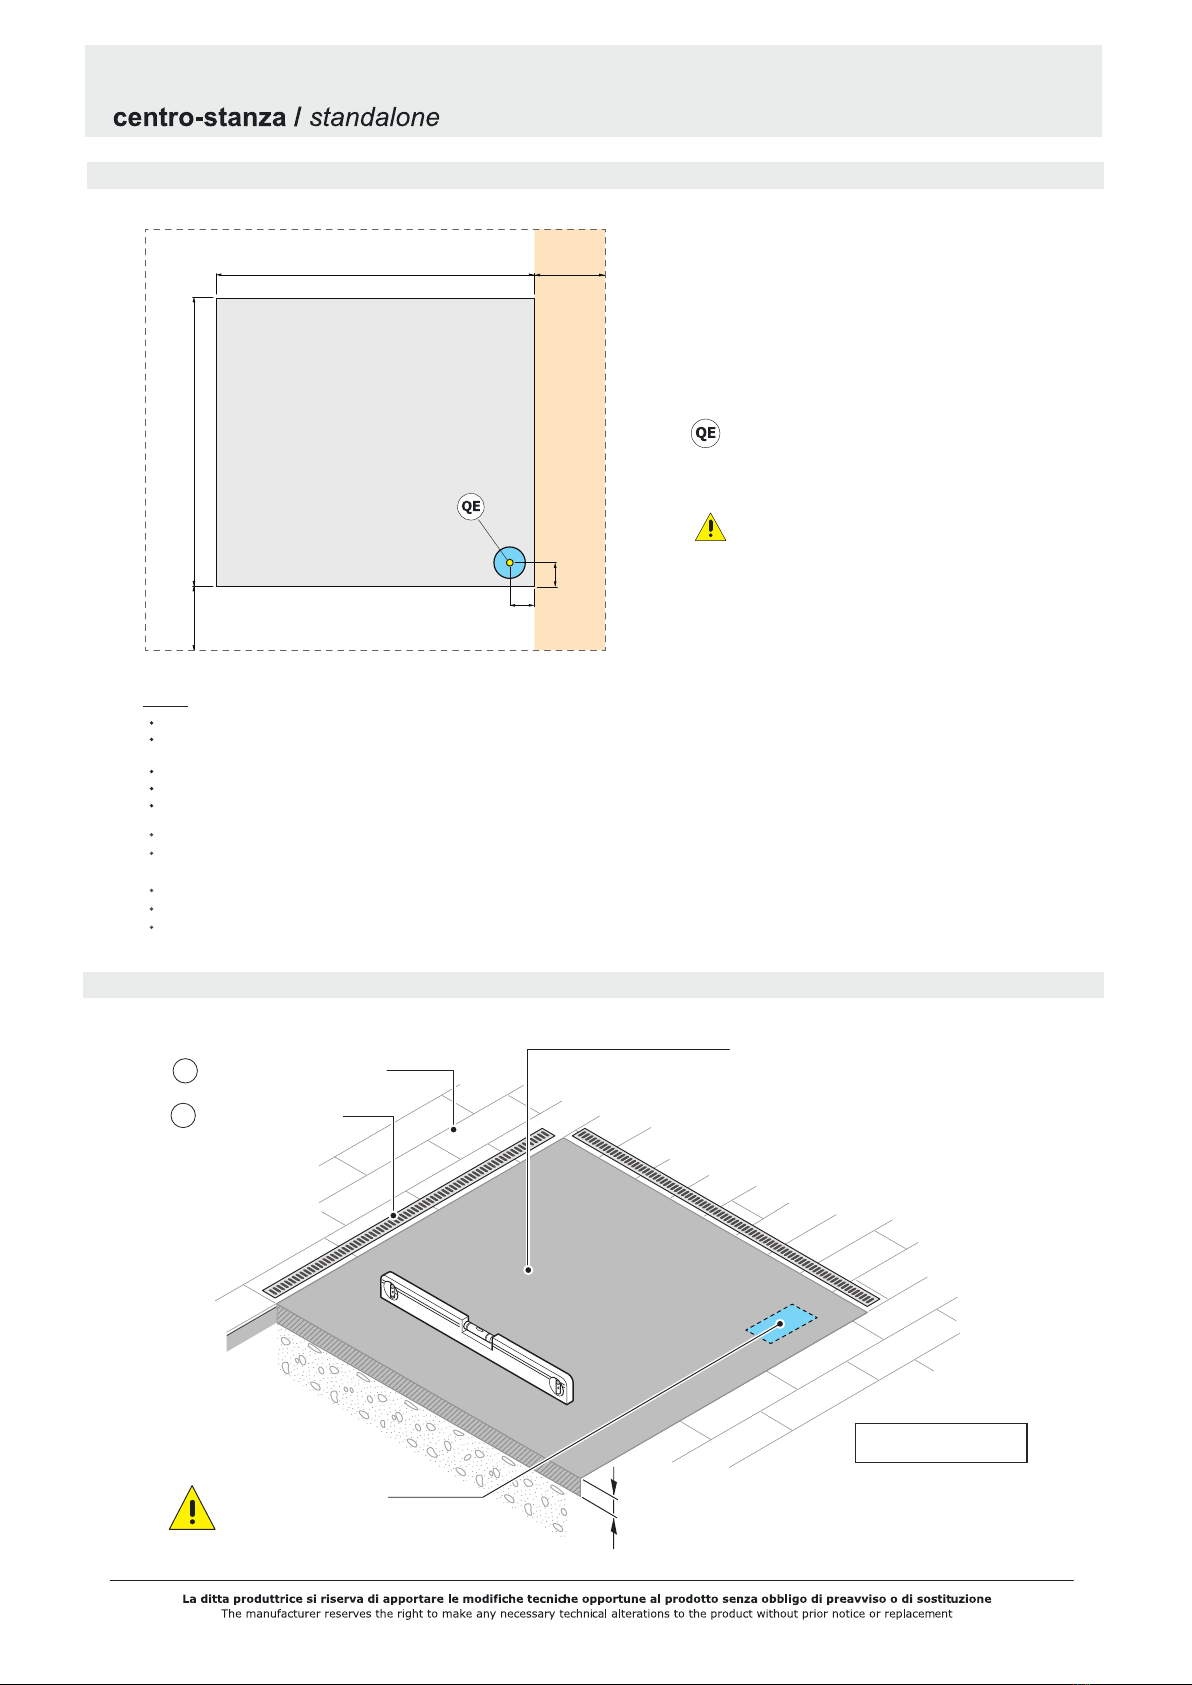
Allaccio alimentazione elettrica
(sezione max del cavo 3x6 mmq / lunghezza 2 ml circa)
A> spazio tecnico obbligatorio sul lato dove sono dislocati gli
impianti (motore,centralina...)
B> spazio tecnico consigliato per ispezione perimetrale.
Il collegamento elettrico deve essere predisposto all’interno
dell’area indicata dal rettangolo azzurro.
The electrical connection must be set up within the area
indicated by the blue rectangle.
A monte dell’impianto idraulico si consiglia di installare
dei rubinetti filtro. L’azienda declina problemi derivanti
dalla mancata installazione dei suddetti.
It is recommended to install filter faucets upstream
of the hydraulic system. The company declines problems
arising from failure to install them
50
The electrical system to which the mini-pool will be connected must comply with CEE standards
The minipool should be connected to a mains isolator (magnetothermic switch) with min. 3mm spaced contacts
and an RCD (differential switch) of max 30mA
It is necessary that the building electrical system is equipped with a bipolar disconnecting device
The electrical system must be equipped with an efficient ground system
The minipool must be connected to the building's ground system permanently
50
lato comando/impianti
control/systems side
162
15
15
201
Predisposizione della sede / Preparation of the installation site
Predisposizioni di installazione / Preparation of installation
cm201x162 h.82
Shadow
Drainage grates
Non-slip flooring
lato impianti/comandi
controls/installations side
AGriglie di drenaggio
BPavimentazione antiscivolo
ospitabili
Predisposizione
collegamento elettrico
Preparation for electrical connection
SOLETTA IN CALCESTRUZZO
CONCRETE SLAB h. 10 cm minimum
h. 10 cm min.
Soletta in calcestruzzo h. 10 cm minimo,
perfettamente in bolla e adatta a sostenere il
peso della minipiscina + il peso delle persone
Concrete slab h. 10 cm minimum, perfectly
level and able to support the weight of the
minipool + the weight of the people within
A
B
2020 rev.01
Draining valve
lato comando/impianti
control/systems side
Operazioni di scarico / Drainage system
A> spazio tecnico obbligatorio di 50cm (lato impianti) / mandatory technical space of 50cm (system side)
B> spazio tecnico consigliato di 50cm per ispezione perimetrale / recommended technical space of 50cm for perimeter inspection.
cm201x162 h.82
Shadow
VALVOLA DI SCARICO
Lo svuotamento avviene effettuando le operazioni
indicate nella figura a lato:
1 - Estrarre la manopola;
2 - Svitare il tappo;
3 - Allentare la valvola di ritenuta;
4 - L’acqua fuoriesce.
Operazioni di scarico minipiscina
Installazione freestanding / freestanding installation
Draining valve
Control panel
VALVOLA DI SCARICO
A
B
PANNELLO COMANDI
4
3
1
2
2020 rev.01
INSPECTION COMPARTMENT DETAILS
profondità
77cm
259
298
198
159 50
50
50
50
Installazione ad incasso / Built in installation
B
A
A
A
Griglie di drenaggio interne
Vano per ispezione
perimetrale di 50cm
con pavimento removibile
Perimetric inspection
compartment of 50cm
with removable floor
ECoibentazione: evita danni
da gelo e condensa
D2 griglie Ø15 cm per garan--
tire una corretta aerazione
del vano tecnico
CPavimentazione antiscivolo
Internal drainage grates
Non-slip flooring
n°2 Ø15 cm vents to ensure
proper ventilation of the
technical compartment
Insulation: prevents damage
from freezing and condensation
B
C
DE
15 mm
Per ottenere un buon accoppiamento
tra la minipiscina e il rivestimento, si
consiglia la posa dell’ultima fila di
piastrelle (in prossimità del bordo) ad
installazione avvenuta.
NB: si raccomanda che il peso della
minipiscina deve scaricare sulla base
e non sui bordi.
NB: we recommend to let the spa
discharge its weight on the base and
not on the edges.
We advice to fix the last line
of tiles near the edge once the
installation is finished, the result will
be a good match between
the spa and the covering.
DETTAGLI VANO INCASSO
lato impianti/comandi
controls/installations side
50 50198
77
cm201x162 h.82
Shadow
2020 rev.01

This manual suits for next models

1

Other treesse Hot Tub manuals

treesse minipool Quarz Operating instructions

treesse

treesse minipool Quarz Operating instructions

treesse Fusion SKI Series User manual

treesse

treesse Fusion SKI Series User manual

treesse ATC System User manual

treesse

treesse ATC System User manual

treesse Fusion Spa Series User manual

treesse

treesse Fusion Spa Series User manual

treesse Minipool REST User manual

treesse

treesse Minipool REST User manual

treesse Rest User manual

treesse

treesse Rest User manual

treesse Muse Operating instructions

treesse

treesse Muse Operating instructions

treesse Fusion Spa 200 User manual

treesse

treesse Fusion Spa 200 User manual

treesse Shadow User manual

treesse

treesse Shadow User manual

treesse Quarz 212 User manual

treesse

treesse Quarz 212 User manual

Popular Hot Tub manuals by other brands

Invacare 3600 Owner's operator and maintenance manual

Invacare

Invacare 3600 Owner's operator and maintenance manual

glass 1989 Infinity 220 Preinstallation manual

glass 1989

glass 1989 Infinity 220 Preinstallation manual

Aqua Pulse Spas AIRLIE LUXURY SPA instructions

Aqua Pulse Spas

Aqua Pulse Spas AIRLIE LUXURY SPA instructions

CLEOPATRA WellPool Square 401 Installation instructions and instructions for use

CLEOPATRA

CLEOPATRA WellPool Square 401 Installation instructions and instructions for use

Jacuzzi LUXURA 5.5 Specification sheet

Jacuzzi

Jacuzzi LUXURA 5.5 Specification sheet

COVANA OASIS installation manual

COVANA

COVANA OASIS installation manual

Pooli OS030979B product manual

Pooli

Pooli OS030979B product manual

Westerbergs Arum Installation instructions and user manual

Westerbergs

Westerbergs Arum Installation instructions and user manual

PDC spas Vitality SL12s owner's manual

PDC spas

PDC spas Vitality SL12s owner's manual

Sundance Spas ALTAMAR owner's manual

Sundance Spas

Sundance Spas ALTAMAR owner's manual

Dynasty Spas 2007 Operator's guide

Dynasty Spas

Dynasty Spas 2007 Operator's guide

Whirlpool 11-0086-11 owner's manual

Whirlpool

Whirlpool 11-0086-11 owner's manual

glass 1989 INFINITY Use and maintenance guide

glass 1989

glass 1989 INFINITY Use and maintenance guide

SOFINA DELUXE PORTABLE SPA owner's manual

SOFINA

SOFINA DELUXE PORTABLE SPA owner's manual

Jacuzzi Andros installation manual

Jacuzzi

Jacuzzi Andros installation manual

Arctic Spas Arctic Ocean owner's manual

Arctic Spas

Arctic Spas Arctic Ocean owner's manual

Invacare Tub Bar Assemby, installation and operating instructions

Invacare

Invacare Tub Bar Assemby, installation and operating instructions

Aquatic AI31LUX6636ISL Specifications

Aquatic

Aquatic AI31LUX6636ISL Specifications

manuals.online logo
manuals.online logoBrands
  • About & Mission
  • Contact us
  • Privacy Policy
  • Terms and Conditions

Copyright 2025 Manuals.Online. All Rights Reserved.