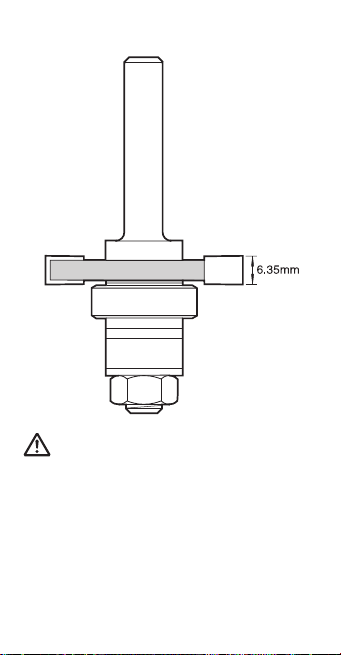
Groove Set Up
Tongue & groove joint showing minimum and
maximum possible timber thickness.
OPERATION
Carefully remove the protective wax from the cutter
and dispose.
Insert the cutter shank into the collet at least all
the way to the marked line indicated on the shank.
This ensures at least 3/4 of the shank length is
held in the collet.
Cutting the Groove
Undo nut with a 13mm A/F spanner, remove all
parts and reassemble as per the groove set up
diagram. Set the cutter to the desired height
against the timber (this will be dependant on
the thickness of the timber).
The bearing will automatically give the correct
depth of cut. If a side fence is not used, a lead
on piece will be required.
Cutting the Tongue
Undo the nut with a 13mm A/F spanner,
remove all parts and reassemble as per the
tongue set up diagram. Groovers C should
be at 90° to each other to reduce the cutting
impact. The height of the cutter will need to be
adjusted to match the groove.
The joint produced will be slightly loose to allow
for ease of assembly of the finished joint. For a
tight joint extra shims E should be added either
side of the bearing in the tongue set up.
MAINTENANCE
Continual satisfactory operation depends upon
proper tool care and regular cleaning.
Cleaning
■Remove resin build-up regularly.
■Apply a rust protector to shanks. Do not
use rust protector on ball bearing guides.
Lubrication
■Use a PTFE dry lubricant spray on tool.
■Apply a rust protector to shanks. Do not
use rust protector on ball bearing guides.
Storage
Always return cutter to its packaging after
use.
Before using cutter, please ensure it is
correctly assembled and locking nut is fully
tightened to correct torque setting.
Recommended speed is 18,000 rpm.
SPARE PARTS
Please use only Trend original spare parts
and accessories.
Item Qty. Desc. Ref. (1 off)
A 1 Arbor 1/4” shank 33/30X1/4”
Arbor 8mm shank 33/30X8MM
B 1 Replacement arbor nut ANUT/33/30
C 2 Groover 6.3mm Kerf SP-C149C
D 2 Bearing 22mm dia. SP-C149C
F 1 Spacer set SPACER/8
G 1 Instructions INST/C158
Our policy of continuous improvements mean that
specifications may change without notice. Trend
Machinery & Cutting Tools Ltd. cannot be held liable
for any material rendered unusable, or for any form of
consequential loss.
Safety Points
1. Disconnect power tool and attachment from power supply when not in
use, before servicing, when making adjustments and when changing
accessories such as cutters. Ensure switch is in “off” position and cutter
has stopped rotating.
2. Read and understand instructions supplied with power tool, attachment
and cutter.
3. Current Personal Protective Equipment (PPE) for eye, ear and
respiratory protection must be worn. Keep hands, hair and clothes
clear of the cutter.
4. Before each use check cutter is sharp and free from damage. Do not
use if cutter is dull, broken or cracked or if any damage is noticeable or
suspected.
5. The maximum speed (nmax) marked on tool or in instructions or on
packaging shall not be exceeded. Where stated, the speed range
should be adhered to.
6. Insert the shank into the router collet at least all the way to the marked
line indicated on the shank. This ensures at least 3/4 of shank length is
held in collet. Ensure clamping surfaces are clean.
7. Check all fixing and fastening nuts, bolts and screws on power tool,
attachment and cutting tools are correctly assembled, tight and to
correct torque setting before use.
8. Ensure all visors, guards and dust extraction is fitted.
9. The direction of routing must always be opposite to the cutter’s
direction of rotation.
10. Do not switch power tool on with the cutter touching the workpiece.
11. Trial cuts should be made in waste material before starting any project.
12. Repair of tools is only allowed according to tool manufacturers
instructions.
13. Do not take deep cuts in one pass, take shallow passes to reduce the
side load applied to the cutter.
Please see www.trend-uk.com/safety for more safety advice.