Trenton Systems ION MPC1000 User manual
ION MINI PC
Prepared by
Trenton Systems
1725 MacLeod Dr
Lawrenceville, GA 30043
Date: August 20, 2020
Model Number: MPC1000
Revision:2
Manual

Section 0 / Table of Contents
1
Last Updated: August 20, 2020 | Manual (Rev 2)
Table of Contents
Preface........................................................................................................................................................ 2
About Trenton Systems............................................................................................................................. 3
Warranty & Policies ................................................................................................................................... 4
Handling Precautions................................................................................................................................ 6
Regulatory Compliance ............................................................................................................................. 7
What’s in the Box....................................................................................................................................... 8
System Overview ....................................................................................................................................... 9
Diagrams & Layouts ................................................................................................................................ 11
Technical Specifications .......................................................................................................................... 13
Installation Instructions .......................................................................................................................... 20

Section 1 / Background
2
Last Updated: August 20, 2020 | Manual (Rev 2)
Preface
The information in this user’s manual has been carefully reviewed and is believed to be accurate.
Trenton Systems assumes no responsibility for any inaccuracies that may be contained in this
document and makes no commitment to update or to keep current the information in this
manual, or to notify any person or organization of the updates.
Please Note: For the most up-to-date version of this manual, please visit our website at:
www.trentonsystems.com.
Trenton Systems, Inc. reserves the right to make changes to the product described in this manual
at any time and without notice. This product, including software and documentation, is the
property of Trenton Systems and/or its licensors, and is supplied only under a license. Any use or
reproduction of this product is not allowed, except as expressly permitted by the terms of said
license.
IN NO EVENT WILL TRENTON SYSTEMS, INC. BE LIABLE FOR DIRECT, INDIRECT, SPECIAL,
INCIDENTAL, SPECULATIVE OR CONSEQUENTIAL DAMAGES ARISING FROM THE USE OR INABILITY
TO USE THIS PRODUCT OR DOCUMENTATION, EVEN IF ADVISED OF THE POSSIBILITY OF SUCH
DAMAGES. IN PARTICULAR, TRENTON SYSTEMS, INC. SHALL NOT HAVE LIABILITY FOR ANY
HARDWARE, SOFTWARE, OR DATA STORED OR USED WITH THE PRODUCT, INCLUDING THE COSTS
OF REPAIRING, REPLACING, INTEGRATING, INSTALLING OR RECOVERING SUCH HARDWARE,
SOFTWARE, OR DATA.
Contact Information
Trenton Systems, Inc.
1725 MacLeod Drive
Lawrenceville, GA 30043
(770) 287-3100
info@trentonsystems.com
sales@trentonsystems.com
support@trentonsystems.com
www.trentonsystems.com

Section 1 / Background
3
Last Updated: August 20, 2020 | Manual (Rev 2)
About Trenton Systems
“Unbelievably light. Unquestionably
rugged. Undeniably powerful.”
BACKGROUND
Since its establishment in 1989, Trenton Systems has been the leading, high-performance
computer hardware and systems manufacturer dedicated to crafting application-specific solutions
for the military, industrial and commercial markets. Our rugged computing solutions are designed
and manufactured in-house at our state-of-the-art facility in Lawrenceville, Georgia, which we
relocated to in 2016 after outgrowing our original facility in Gainesville. Versatile, adaptable and
built-to-last, our multi-faceted computing solutions sport completely customizable, ultra-rugged
designs, both inside and outside the chassis.
EXPERIENCE
Trenton Systems is trusted by the world’s leading technology companies. Some of our happy
customers include Boeing, IBM, L3Harris, Northrop Grumman, Lockheed Martin and Raytheon. We
also partner with Intel via the Embedded and Communications Alliance, which provides us with
access to Intel’s roadmap, as well as with technical support directly from the company.
Throughout the years, we’ve been at the forefront of the industry in numerous capacities. As a
founding member of the PCI Industrial Manufacturers Group (PICMG), we redefined the industry
in 1994 with our PICMG 1.0 form factor, and redefined it again in 2005, when we wrote the PICMG
1.3 specification. In 2008, we streamlined our design and manufacturing capabilities, allowing us
to craft our systems fully in-house and provide customers with a one-stop shop for all things
Trenton rugged.
PHILOSOPHY
Trenton Systems believes in stress-testing and certifying its USA-made products to and beyond the
highest military and industrial standards. We believe in crafting solutions that last decades, rather
than just a few years. We believe in providing rapid and effective follow-up support so that our
customers don’t have to spend hours, days or weeks trying to resolve a simple issue. At Trenton,
we believe in setting our customers up for success, both on and off the front lines.

Section 2 / Warranty & Policies
4
Last Updated: August 20, 2020 | Manual (Rev 2)
Warranty & Policies
WARRANTY
The following is an abbreviated version of Trenton Systems’ warranty policy for Mini PC products.
For a complete warranty statement, contact Trenton Systems or visit our website at
www.trentonsystems.com.
Board-level products manufactured by Trenton Systems are warranted against material and
manufacturing defects for five years from date of delivery to the original purchaser. Buyer agrees
that if this product proves defective Trenton Systems, Inc. is only obligated to repair, replace or
refund the purchase price of this product at Trenton Systems’ discretion. The warranty is void if
the product has been subjected to alteration, neglect, misuse or abuse; if any repairs have been
attempted by anyone other than Trenton Systems, Inc.; or if failure is caused by accident, acts of
God, or other causes beyond the control of Trenton Systems, Inc. Trenton Systems, Inc. reserves
the right to make changes or improvements in any product without incurring any obligation to
similarly alter products previously purchased.
In no event shall Trenton Systems, Inc. be liable for any defect in hardware or software or loss or
inadequacy of data of any kind, or for any direct, indirect, incidental or consequential damages
arising out of or in connection with the performance or use of the product or information
provided. Trenton Systems, Inc.’s liability shall in no event exceed the purchase price of the
product
RETURN POLICY
A Return Material Authorization (RMA) number, obtained from Trenton Systems prior to return,
must accompany products returned for repair. The customer must prepay freight on all returned
items, and the customer is responsible for any loss or damage caused by common carrier in
transit. Items will be returned from Trenton Systems via Ground, unless prior arrangements are
made by the customer for an alternative shipping method.

Section 2 / Warranty & Policies
5
Last Updated: August 20, 2020 | Manual (Rev 2)
To obtain an RMA number, call us at (800) 875-6031 or (770) 287-3100. We will need the following
information:
Return company address and contact
Model name and model # from the label on the back of the product
Serial number from the label on the back of the product
Description of the failure
An RMA number will be issued. Mark the RMA number clearly on the outside of each box, include
a failure report for each board and return the product(s) to our Lawrenceville, GA facility:
Trenton Systems, Inc.
1725 MacLeod Drive
Lawrenceville, GA 30043
Attn: Repair Department
TRADEMARKS
Intel, Xeon, Intel Quick Path Interconnect, Intel Hyper-Threading Technology, Intel
Virtualization Technology and Intel Active Management Technology are trademarks or
registered trademarks of Intel Corporation.
Microsoft are registered trademarks of Microsoft Corp.
PCI Express is a trademark of the PCI-SIG
All other brand and product names may be trademarks or registered trademarks of their
respective companies.
LIABILITY DISCLAIMER
This manual is as complete and factual as possible at the time of printing; however, the
information in this manual may have been updated since that time. Trenton Systems, Inc. reserves
the right to change the functions, features or specifications of their products at any time, without
notice.
Copyright © 2019 by Trenton Systems, Inc. All rights reserved.
E-mail: support@trentonsystems.com
Web: www.trentonsystems.com

Section 3 / Handling Precautions
6
Last Updated: August 20, 2020 | Manual (Rev 2)
Handling Precautions
WARNING: This product has components that may be damaged by electrostatic
discharge.
To protect your Mini PC from electrostatic damage, be sure to observe the following precautions
when handling or storing the system:
Keep the Mini PC in its static-shielded bag until you are ready to perform your installation.
Do not touch the I/O connector pins.
Use a grounded wrist strap at your workstation or ground yourself frequently by touching
the metal chassis of the system before handling any components. The system must be
plugged into an outlet that is connected to an earth ground.
Use antistatic padding on all work surfaces.
Avoid static-inducing carpeted areas.
WARNING: There is danger of explosion if the CMOS battery is replaced incorrectly.
Disposal of battery into fire or a hot oven, or mechanically crushing or cutting of a
battery can result in an explosion.
WARNING: Risk of explosion if the MPC1000 battery is replaced by an incorrect type.
Dispose of used batteries according to the instructions. The MPC1000 uses a
Panasonic CR2032 battery available from Trenton. The Trenton Systems part number
for a replacement battery is 29-005774-000.

Section 4 / Regulatory Compliance
7
Last Updated: August 20, 2020 | Manual (Rev 2)
Regulatory Compliance
DECLARATION OF CONFORMITY
FCC
This device complies with part 15 of the FCC rules as a Class A device. Operation is subject to the
following two conditions: (1) this device may not cause harmful interference and (2) this device
must accept any interference received, including interference that might cause undesired
operation.
CE
This equipment complies with all applicable European Union (CE) directives if it has a CE marking.
For this device to remain CE compliant, only CE compliant parts can be installed, and proper
cables and cabling techniques are required.
AGENCY APPROVALS
All standards should be at applicable revision levels at time of test.
Electromagnetic Emissions (EMI)
oDesigned to meet FCC 47 CFR Part 15 Subpart B ISED Canada ICES-003 Issue 6 Class A as a
minimum.
oDesigned to meet Electromagnetic Compatibility Directive 2014/30/EU
oImmunity Product Standard: EN55035:2017
oEmissions Product Standards: EN55032:2012, EN 61000-3-2:2014, EN61000-3-3:2013
Safety
This product will be UL approvable for safety concerns and designed for IEC 60950-1:2005 and
IEC 62368-1:2014
Environmental
This product will be approvable for MIL-STD-810G High and Low-Temp Operating and Storage
system testing to test methods 501.5 and 502.5, Procedures II and I
This product will be approvable for MIL-STD-810G Altitude Operational and Storage system
testing to test method 500.5, Procedures II and I.

Section 4 / What’s in the Box
8
Last Updated: August 20, 2020 | Manual (Rev 2)
What’s in the Box
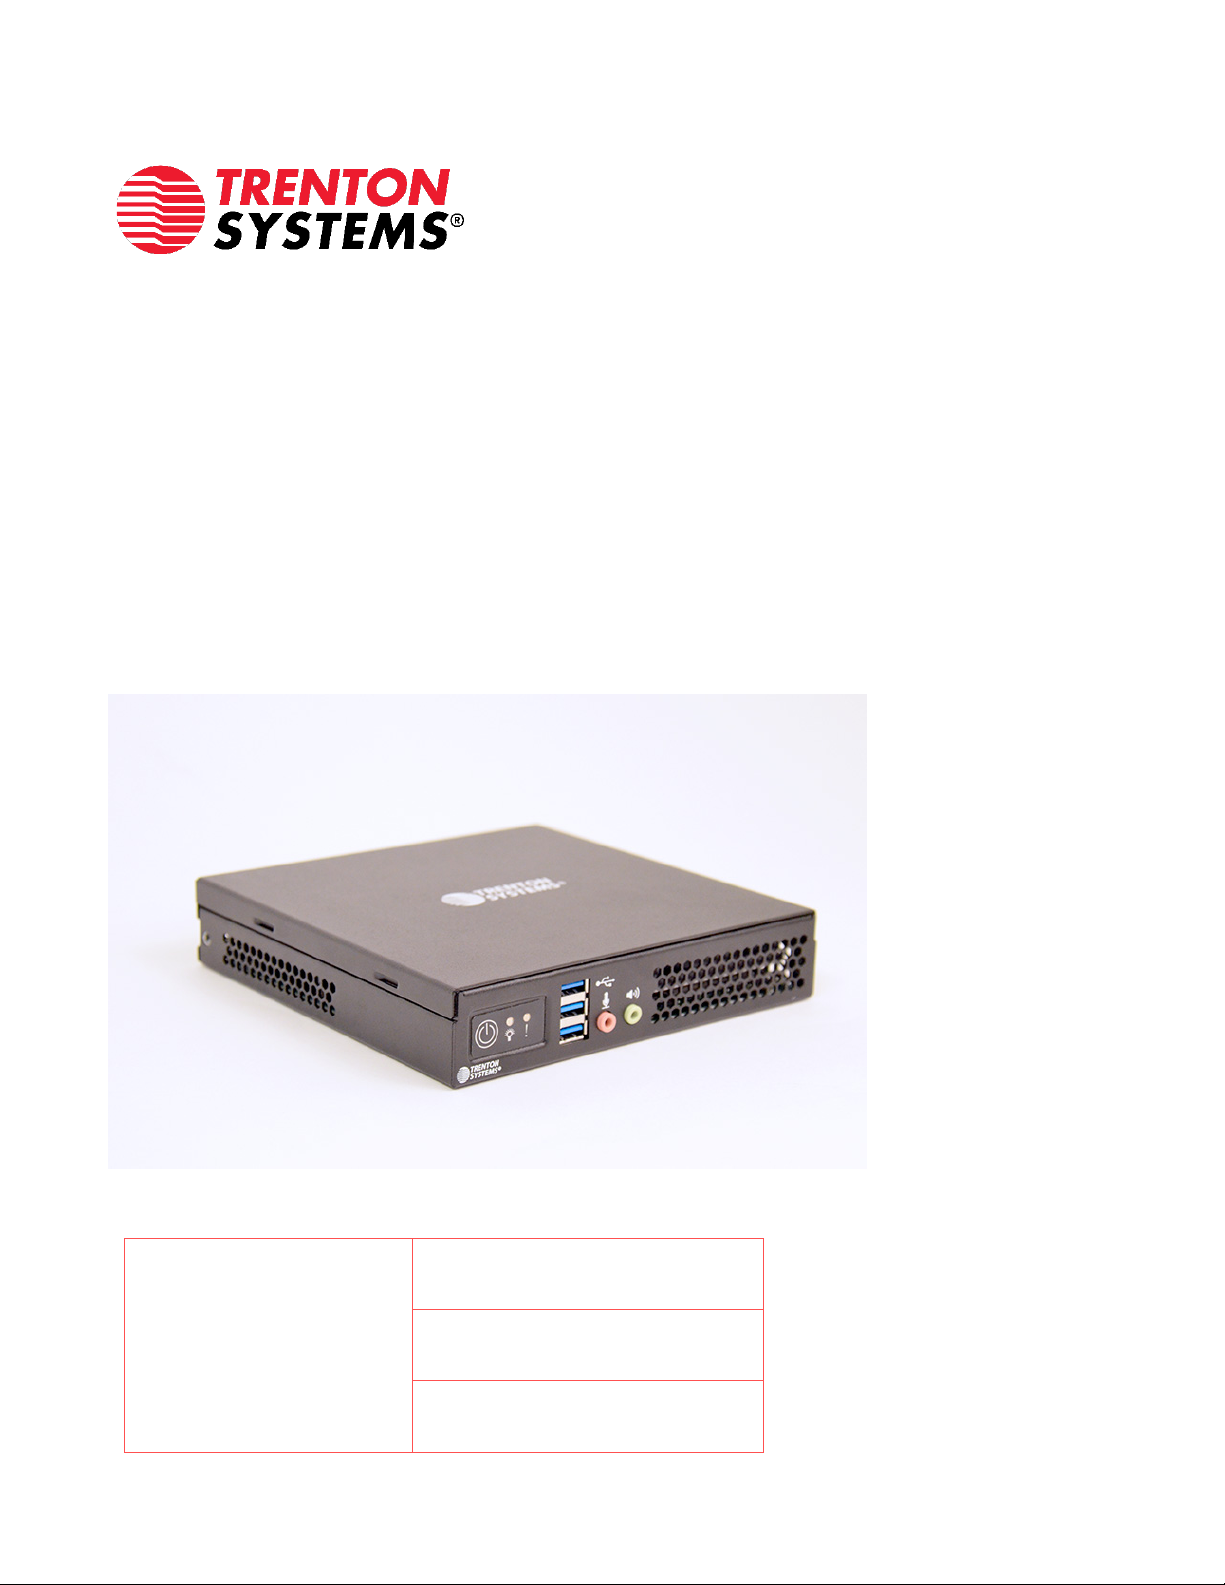
ION Mini PC: Dimensions of the system measure 7.01” x 7.17” x 1.34” (L x W x H)
Power Supply: CUI, Inc. SDI90-12-U
Screws:HDD Mounting Screws
Optional: Mounting Brackets
Section 5 / System Overview
9
Last Updated: August 20, 2020 | Manual (Rev 2)
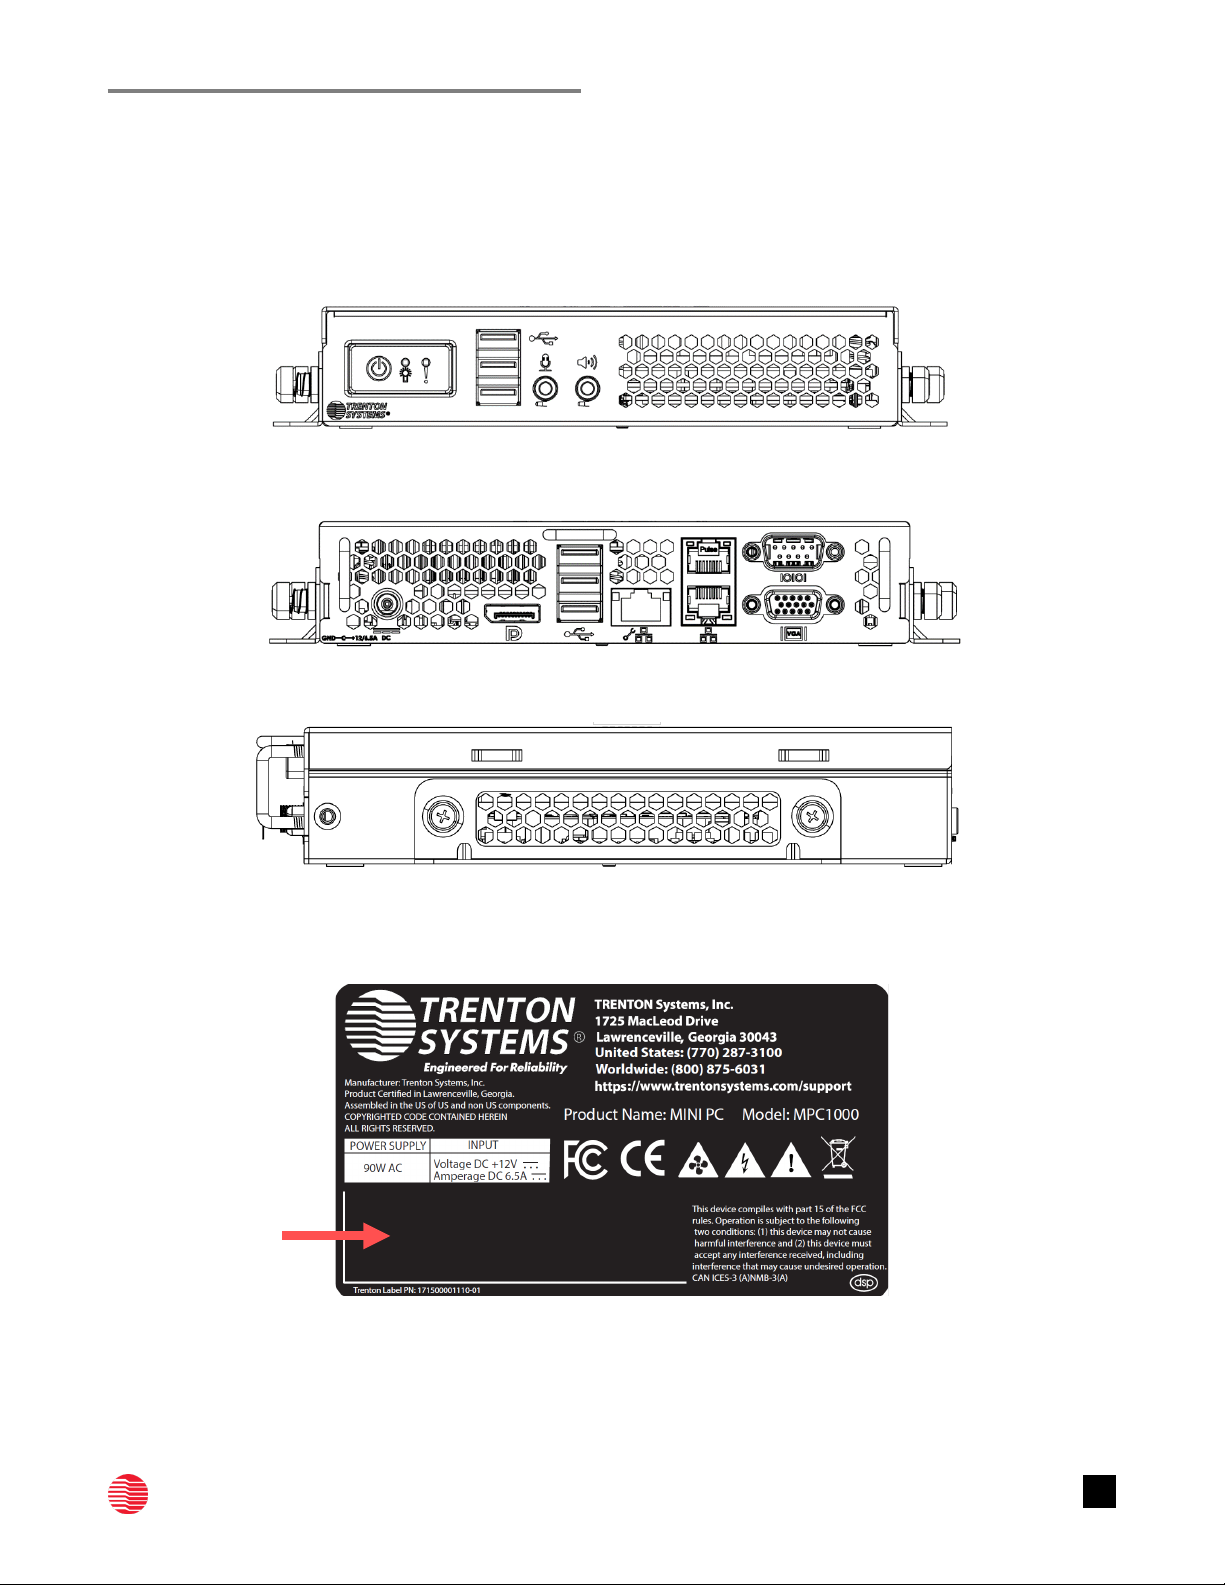
System Overview
Figure 1: MPC1000 with side brackets - Front
Figure 2: MPC1000 with side brackets - Rear
Figure 3: MPC1000 Sides with brackets
Figure 4: Serial Number Location
SERIAL NUMBER
STICKER LOCATION
Section 5 / System Overview
10
Last Updated: August 20, 2020 | Manual (Rev 2)
MODEL NUMBER
MPC1000 | Form Factor: Mini PC
PROCESSOR BOARD
MXT8288 |Type: Mini-ITX
PROCESSOR
Intel® Coffee Lake & Coffee Lake-R Processor
CPU TDP support up to 35W
Processor
Gen
ECC
Cores/Threads
Frequency
Watts
i7-9700TE
9th
Yes
8/8
1.80 GHz
35W
i3-9100TE
9th
No
4/4
2.20 GHz
35W
i3-8100T
8th
Yes
4/4
3.10 GHz
35W
i7-8700T
8th
No
6/12
2.40 GHz
35W
i5-8500T
8th
No
6/6
2.10 GHz
35W
MEMORY
Slots: 2x DDR4 SODIMM sockets
Capacity: Up to 32GB DDR4 ECC SODIMM
Type: 2400/2666 ECC DDR4 UDIMM
DIMM Sizes: 16GB, 8GB
Error Detection: Corrects single-bit errors and
detects double-bit errors using ECC memory
STORAGE
Type(s): 1x 2.5” SSD/HDD SATA3 (6 Gbps) drive up
to 15mm height; 1x M.2 NVMe x4 PCIe
Capacity: Up to 1TB (larger capacities available
upon request)
ON-BOARD DEVICES
Chipset: Intel® C246
IPMI: Support for Intelligent Platform Management
Interface v2
oIPMI 2.0 with virtual media over LAN and KVM-
over-LAN support
oASPEED AST2500 BMC
Network Controllers:
oIntel i350 Gigabit Ethernet
oSupports 1000BASE-T, RJ-45 output
Graphics: Intel Integrated Graphics & ASPEED
AST2500 BMC
TPM 2.0: Secure crypto-processor that helps you
with actions such as generating, storing, and
limiting the use of cryptographic keys
INPUT / OUTPUT
Power: 1x Power Connector
USB: 3x USB 3.0 Ports
Display:
o1x DisplayPort
o1x VGA Port
LAN:
o2x RJ-45 Gigabit Ethernet LAN ports
o1x RJ-45 Shared IPMI LAN port
Serial: 1x RS232 Serial Port
DIMENSIONS
Width: 7.0” | 17.78 cm
Height: 1.4” | 3.56 cm
Depth: 6.8” | 17.27 cm
Average System Weight*: 3.2 lbs. | 1.45 kg
*dependent on component selection
FRONT PANEL
3x USB Ports
Power Button
Audio In/Out
Fault LED
SYSTEM COOLING
1x PWM CPU Blower Fan; DC 12 V
POWER SUPPLY
84W Power Brick, 12 Vdc, 7A
SYSTEM BIOS
BIOS Type: 128 Mb SPI NOR Flash with Insyde BIOS
BIOS Features:
Plug and Play (PnP)
APM 1.2
PCI 2.2
ACPI 1.0 / 2.0
USB Keyboard Support
SMBIOS 2.3
UEFI
MANAGEMENT
AST2500 Baseband Management Controller: rKVM,
System Monitoring, Out of Band Management
ENVIRONMENTALS
Operating Temperature: 0°C - 45°C
Storage Temperature: -40°C - 70°C
Operating Humidity: 8% - 90% Non-Condensing
Non-operating Humidity: 5% - 95% Non-
Condensing
Preliminary numbers noted.
COMPLIANCE
Random Vibe B, 3 Axis
Shock 6g +/-
CE certified to health, safety, and environmental
protection standards for products sold within the
European Economic Area
Section 6 / Diagrams & Layouts
11
Last Updated: August 20, 2020 | Manual (Rev 2)
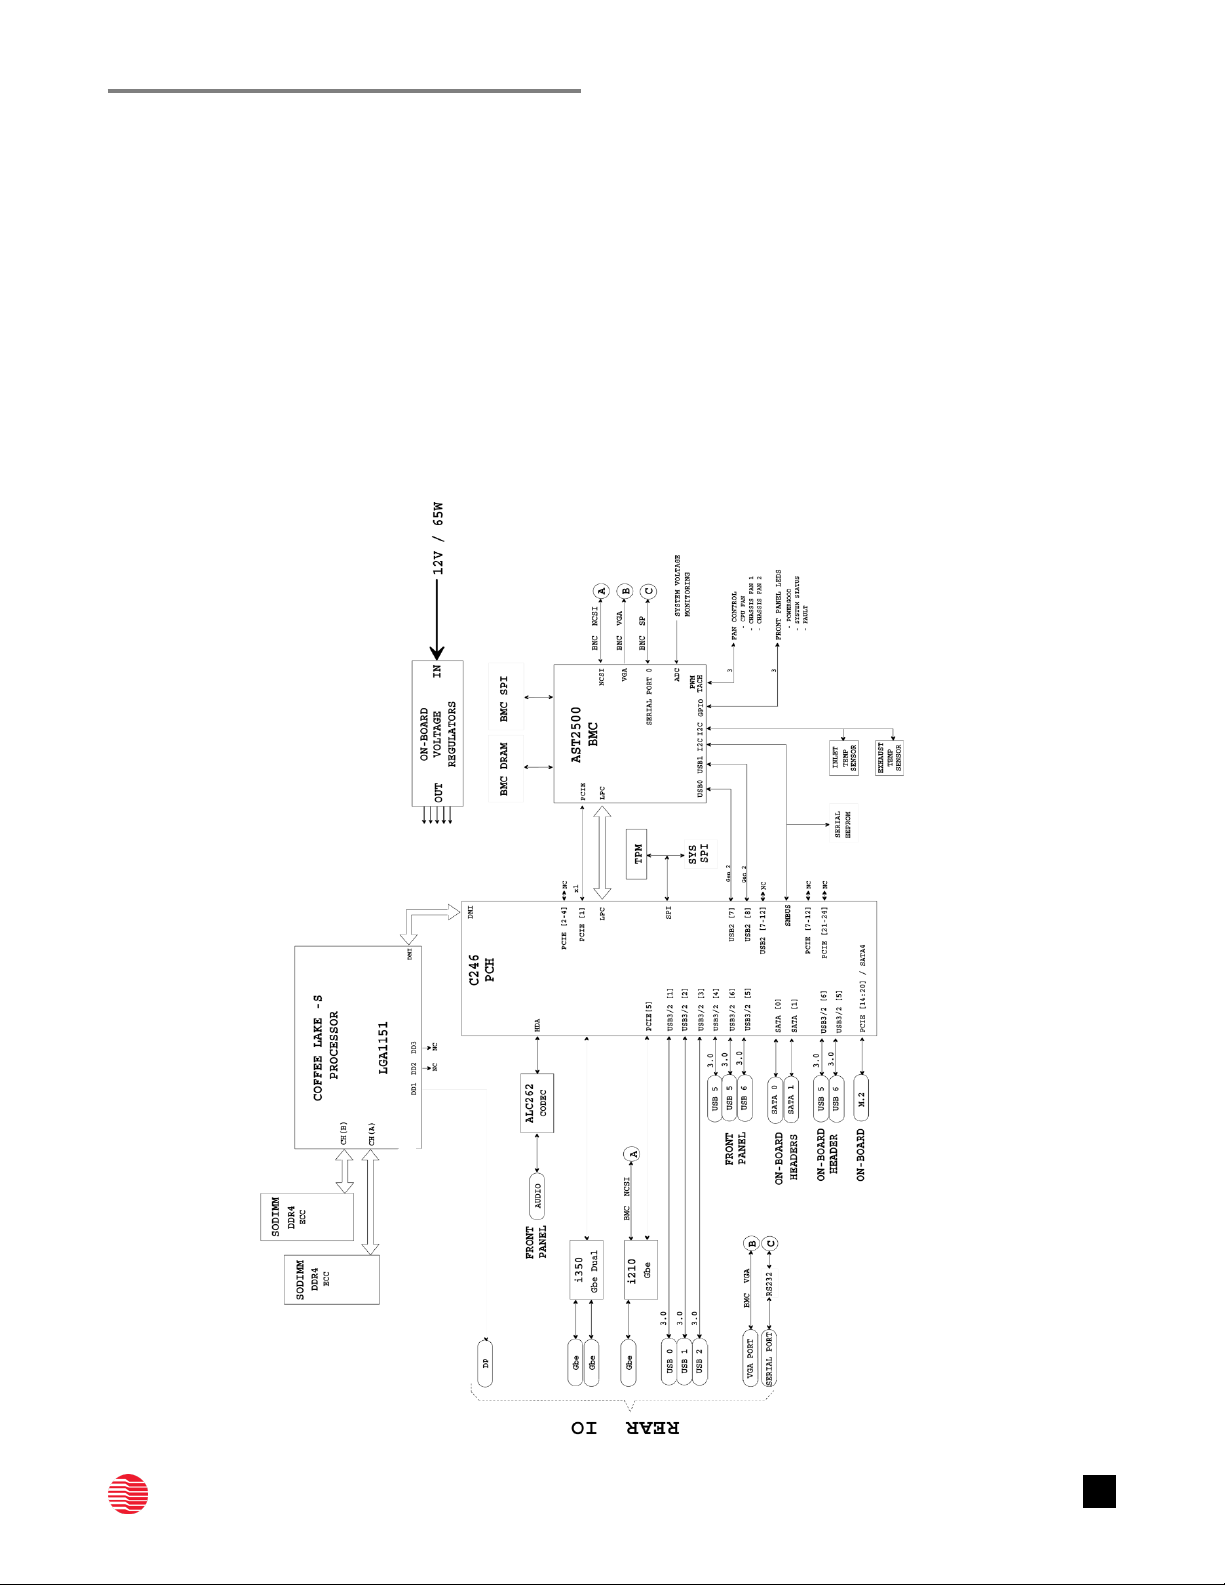
Diagrams & Layouts
BLOCK DIAGRAM

Section 6 / Diagrams & Layouts
12
Last Updated: August 20, 2020 | Manual (Rev 2)
LAYOUT DRAWING
ITEM
DESCRIPTION
A1 Power Connector
A2
DisplayPort
A3
3x USB 3.0 Ports
A4
1GbE LAN Port (Management Port)
A5
2x 1GbE LAN Ports
A6
VGA Port
A7
Serial Port
A8
2.5“ SATA SSD Drive
A9
M.2 NVMe x4 PCIe
A10
Heatsink over CPU
A11 3x USB 3.0 Ports
A12 Audio In/Out
A13
Fan over SODIMM slots
A14
LED Post Codes
A1
A2
A3
A4
A5
A6
A7
A9
A8
A10
A11
A12
A13
Front
Rear
A14

Section 4 / Technical Details
13
Last Updated: August 20, 2020 | Manual (Rev 2)
Technical Specifications
MEMORY & STORAGE
TYPE
PART NUMBER
SIZE
RAM
26-504615-001
8 GB
RAM
26-504615-002
16 GB
2.5” SSD
263500001521-00
240 GB
2.5” SSD
263500001522-00
480 GB
2.5” SSD
263500001523-00
960 GB
M.2 263500001543-00 250 GB
M.2
263500001534-00
512 GB
M.2
263500001533-00
1 TB
This device complies with part 15 of the FCC rules as a Class A device. Operation is subject to the
following two conditions: (1) this device may not cause harmful interference and (2) this device
must accept any interference received, including interference that might cause undesired
operation.
PROCESSOR GRAPHICS
Onboard Intel® UHD Graphics 630 processing circuitry is integrated into the processor.
Single Display supports maximum resolution up to 4096 x 2304 @ 60Hz.
Dual independant diplays achieved through the VGA Port.
Linux multi-monitor support is in
development
.
LAN PORTS

Section 4 / Technical Details
14
Last Updated: August 20, 2020 | Manual (Rev 2)
i210 LEDs
•Activity LED = Orange
•10MBs Full Duplex= No LED
•100MBs Full Duplex = Green LED
•1000MBs Full Duplex = Amber LED
i350 LEDs
•Activity LED = Green
•10MBs Full Duplex= No LED
•100MBs Full Duplex = Green LED
•1000MBs Full Duplex = Orange LED
SERIAL PORT
Standard DB-9 Serial Port
HEADERS & CONNECTORS
REF DES
PURPOSE
JU1 Clear CMOS, ME Recovery, Flash Security Override (dual row 16P hdr)
JU2
Front Panel (dual row 14P hdr)
JU3
BMC Enable (2P hdr)
JU4
Force PWR On (2P hdr)
P1
SATA0 (22P SATA RCPT)
P2
SATA1 (7P SATA) (8287 only)
P3
Rear I/O Panel Stacked Triple USB (USB3-P0, P1, P2) (USB2-P0, P1, P2)
P4
Front I/O Panel Stacked Triple USB (USB3-P3, P4, P5) USB2 (P3, P4, P5)
P5 Audio: Line Out (Green)
P6 DisplayPort
P7 I/O Panel Stacked i350 Dual Ethernet
P8 I/O Panel i210 Single Ethernet
P9
M.2
P10
I/O Panel Stacked DB9/DB15 Serial/VGA

Section 4 / Technical Details
15
Last Updated: August 20, 2020 | Manual (Rev 2)
P11
USB3 On-Board Header (USB3-6,7) (8287 only)
P12
12V Jack (8288 only)
P14
XDP CONN (60p) (p.53)
P15
Front Panel Membrane LED/Switch
P16
I2C hdr (3P hdr) (smbxxx_host)
P17
BMC Serial (4P hdr)
P18 ATX Power (24-pin) (8287 only)
P20 Chassis Fan 0 (4P hdr) (8287 only)
P21 Chassis Fan 1 (4P hdr) (8287 only)
P22 Speaker (2P hdr) (p.22)
P23
CPLD/VR Program Hdr (10P .050”)
P24
CPU Fan (4P hdr)
P26
Alternate 12V Pwr In (Mini Fit Jr) (4P hdr) (8288 only)
P27
Audio: Mic In (Pink)
PCIe1
PCIe slot (x8 electrical, x8 mechanical) (8287 only)
LEDS
REF DES
COLOR
SOURCE
PURPOSE
LED(0-7)
GRN
PCH
BIOS Post Codes
LED9 GRN BMC Heart Beat
LED(10-17) GRN BMC Programmable – BMC Post Codes
LED18
GRN
SSD_LED# for SATA0
LED19
RED
CPLD
On 2sec/off 2sec: Thermtrip
2 blinks/2 sec: CATERR
1 blink/2 sec: IMVP8 VR Fault
On solid: PS_PWROK & PLT_RESET# not asserted

Section 4 / Technical Details
16
Last Updated: August 20, 2020 | Manual (Rev 2)
LED POST CODES
MSB LSB
In Development
BMC LEDs
BIOS LEDs
10
2
3
4
5
6
7
10
2
3
4
5
6
7
*Please look at Layout Drawing A14 for LED Post Codes location on the board.
PCH-H I/O MAPPING-PCIE
PCH PORT (LANE REVERSAL ON
PCIE5-8)
DESTINATION
PCIe5,6
I350 (U6 to P7) (Gen2)
PCIe6
AST2500 (Gen2)
PCIe7,8
I210 (U7 to P8) (Gen1)
PCIe13-16
M.2 (Gen3 x4)
PCH-H I/O MAPPING-USB2 & USB3
PCH PORT
DESTINATION
USB2_1 USB2_P0: P3-Lower (Rear IO Panel)
USB2_2 USB2_P1: P3-Middle (Rear IO Panel)
USB2_3
USB2_P2: P3-Upper (Rear IO Panel)
USB2_4
USB2_P3: P4-Lower (Front IO Panel)
USB2_5
USB2_P4: P4-Middle (Front IO Panel)
USB2_6
USB2_P5: P4-Upper (Front IO Panel)
USB2_7 USB2_P11: (On-Board Header-P1)
USB2_8 USB2_P11: (On-Board Header-P2)
USB2_9 Not Connected
USB2_10
Not Connected

Section 4 / Technical Details
17
Last Updated: August 20, 2020 | Manual (Rev 2)
USB2_11
USB2_P10: to BMC USB2A
USB2_12
USB2_P11: to BMC USB2B
USB2_13
Not Connected
USB2_14
Not Connected
USB3_1 USB3_0: P3-Lower (Rear IO Panel)
USB3_2 USB3_1: P3-Middle (Rear IO Panel)
USB3_3 USB3_2: P3-Upper (Rear IO Panel)
USB3_4
USB3_3: P4-Lower (Front I/O Panel)
USB3_5
USB3_4: P4-Middle (Front I/O Panel)
USB3_6
USB3_5: P4-Upper (Front I/O Panel)
USB3_7
USB3_P11: (On-Board Header-P1)
USB3_8
USB3_P11: (On-Board Header-P2)
PCH-H I/O MAPPING-SATA3
PCH PORT
DESTINATION
SATA0_PCIE11
SATA0 (P1- 22P SATA connector)
SATA1_PCIE12
SATA1 (P2 – 7P SATA connector)
SUPPORTED DISPLAY RESOLUTIONS
UBUNTU 20.04 LTS (GNOME 3.36.3 & WAYLAND)
VGA
RESOLUTION
ASPECT RATION
1280 x 1024 5:4
1440 x 900 16:10
1280 x 800 16:10
1024 x 768
4:3
800 x 600
4:3
DISPLAYPORT
RESOLUTION
ASPECT RATION
1920 x 1080
16:9

Section 4 / Technical Details
18
Last Updated: August 20, 2020 | Manual (Rev 2)
1600 x 900
16:9
1280 x 1024
5:4
1152 x 864
4:3
1024 x 768
4:3
800 x 600
4:3
WINDOWS 10
VGA RESOLUTIONS
DISPLAYPORT RESOLUTIONS
1440 x 900 1920 x 1080
1360 x 768 1680 x 1050
1280 x 800 1600 x 900
1152 x 864 1400 x 1050
1024 x 768 1360 x 768
800 x 600
1280 x 1024
1280 x 960
1280 x 800
1280 x 768
1280 x 720
1280 x 600
1152 x 864
1024 x 768
Clearing the CMOS
Setting the jumper with the Clear CMOS jumper shunt allows you to clear the data in the CMOS.
NOTE: Do not clear the CMOS right after updating the BIOS. You must boot up the system first
and then shut it down before clearing the CMOS.
NOTE: The password, date, time user default profile will be cleared only if the CMOS battery is
removed.
To clear and reset system parameters to the default setup, follow these steps:
1. Turn off the computer and unplug the power cord from the power supply.

Section 4 / Technical Details
19
Last Updated: August 20, 2020 | Manual (Rev 2)
2. Wait 15 seconds.
1. Remove the jumper shunt from pins 6 and 4 and use it to short pins 2 and 4 on the header
for 5 seconds.
3. Remove the jumper shunt and return it to short pins 6 and 4.
ENVIRONMENTALS
Operating Temperature: 0ºC to 45ºC (min)
Storage Temperature: -20ºC to 70ºC
Operating Humidity: 5% to 90% non-condensing
Non-operating Humidity: 5% to 95% non-condensing
Table of contents
Other Trenton Systems Desktop manuals


Popular Desktop manuals by other brands


HP
HP 280 G4 Product End-of-Life Disassembly Instructions

Lenovo
Lenovo ThinkCentre A58 user guide

UMAX Technologies
UMAX Technologies SuperMac C600x user guide

Premier
Premier GAMMA TABLET V1.8 TAB-4950-8G instruction manual

Sony
Sony PCV-L640 - Vaio Slimtop Computer Specifications

Sony
Sony MSX 2 HB-F9P operating instructions