Treo Fitness FW410 BENCH User manual
BENCH OWNER’S MANUAL
FORMODEL:
FW410 BENCH

3
Introduction
Important Precautions
Before You Begin
Assembly Instructions
Conditioning Guidelines
3
4
5
10
16
CONGRATULATIONS and THANK YOU for your purchase of this Treo Weight Bench!
Whether your goal is to tone your muscles, increase your strength or simply enjoy a fuller, healthier
lifestyle, a Treo Weight Bench can help you attain it – adding club-quality performance to your
at-home workouts, with the ergonomics and innovative features you need to get stronger, healthier
and faster. We’re committed to designing fitness equipment from the inside out, so we use only the
highest quality components. It’s a commitment we back with one of the strongest warranty packages
in the industry.
You want exercise equipment that offers the most comfort, the best reliability and the highest quality
in its class. A Treo Weight Bench delivers!
INTRODUCTION
TABLE OF CONTENTS

During the assembly process there are several areas that special attention must be paid. It is very important to
follow the assembly instructions correctly and to make sure all parts are firmly tightened. If the assembly instructions
are not followed correctly, the weight bench could have frame parts that are not tightened and will seem loose and
may cause irritating noises. There should be no side-to-side play in the frame uprights. If there is any play in these
areas, the weight bench has not been properly assembled. To prevent damage to the weight bench, the assembly
instructions must be reviewed and corrective actions should be taken.
4 5
Read all instructions and follow it carefully before using your machine. This machine is intended for household
use only. It is not designed for commercial use. Inspect your exercise machine prior to exercising to ensure that
all nuts and bolts are fully tightened before each use.
•
Make sure machine is stabilized on the floor and uneven surfaces are leveled before use.
•
Exercise equipment has moving parts. In the interest of safety, keep others, especially children age under 12,
at a safe distance while exercising.
•
Make sure all adjustment devices are fully inserted and properly adjusted before use to avoid injury.
•
Remove all jewellery, including rings, chains and pins before commencing exercise.
•
It is essential that your weight bench is used only indoors, in a climate controlled room.
•
Always wear suitable clothing and footwear during exercise. Do not wear loose fitting clothing that could
become entangled with the moving parts of your exercise machine.
•
Warm up 5 to 10 minutes before each workout and cool down 5 to 10 minutes afterward. This allows your
heart rate to gradually increase and decrease and will help you prevent straining your muscles.
•
Never hold your breath while exercising. Breathing should remain at a normal rate in conjunction with the
level of exercise being performed.
•
Rest adequately between workouts. Muscles tone and develop during these rest periods. Beginners should
work out twice a week and increase gradually to 4 or 5 times per week.
•
Do not “over train”. Incorrect or excessive training may result in injury.
IMPORTANT PRECAUTIONS
FOR HOUSEHOLD USE ONLY
At NO time should pets or children under the age of 12 be closer to the weight bench than 10 feet.
At NO time should children under the age of 12 use the weight bench.
Children over the age of 12 should not use the weight bench without adult supervision.
Before commencing with any exercise program, please consult your family physician.
If at any time during exercise you feel faint, dizzy or experience pain, stop and consult
your family physician. In the event any of the above metioned warnings are breached
by the consumer, the manufacturer may use same as a defense to any claim for
injuries, damage or loss. The above warnings are in no way intended to limit or modify
the consumer’s remedies for breach of warranties pursuant to applicable federal and
state laws of regulations. They are being supplied strictly to ensure the safety of the
individuals using this product.
WARNING
WARNING
IMPORTANT: READ THESE SAFETY INSTRUCTIONS BEFORE USE!
UNPACKING
Place the weight bench carton on a level flat surface. It is recommended that you place a protective covering on your
floor. Take CAUTION when handling and transporting this unit. Never open box when it is on its side. Unpack the unit
where it will be used. FAILURE TO FOLLOW THESE INSTRUCTIONS COULD RESULT IN INJURY!
* Refer to the SERIAL NUMBER and MODEL NAME when calling for service.
BEFORE YOU BEGIN
Before proceeding, find your weight bench’s
serial number and model name located on the
left rear side of the base frame and enter it in
the space provided below.
ENTER YOUR SERIAL NUMBER AND
MODEL NAME IN THE BOXES BELOW:
SERIAL NUMBER :
MODEL NAME:
WEIGHT LIMITS:
USER WEIGHT LIMIT : 110 KG / 242 LBS
BARBELL POSITION : 120 KG / 264 LBS
LEG EXTENSION POSITION : 40 KG / 88 LBS
ARM CURL POSITION : 40 KG / 88 LBS
WARNING

#ITEM
1
2
3
4
5
6
7
8
9
10
11
12
13
14
15
16
17A
17B
18
19
20
21
22
23
24
25
26
27
28
29
30
31
32
33
34
35
36
37
38
39
40
41
42
43
44
45
46
47
48
49
50
51
52
53
54
55
1
1
1
2
1
2
1
1
1
1
1
1
1
1
1
1
1
1
3
2
2
1
1
1
1
2
3
6
2
4
3
2
2
6
4
4
1
7
1
2
2
4
4
2
1
10
2
2
23
12
6
1
1
1
3
1
LEFT UPRIGHT FRAME
RIGHT UPRIGHT FRAME
BACK UP BEAM
BARBELL ADJUSTABLE FRAME
CROSS FRAME
BACKREST SUPPORT FRAME
ADJUST FRAME
FRONT UPRIGHT STANCHION
LEG DEVELOPER
SEAT CUSHION
BACKREST CUSHION
ARM CURL PAD
CURL SUPPORT FRAME
FRONT HANDLE
SUPPORT PLATE
BEARING TUBE
LONG FOAM ROD
SHORT FOAM ROD
CONNECTOR PLATE
FOOT TUBE
COPPER BUSHING
PIN
LEFT BARBELL SAFETY LOCK
RIGHT BARBELL SAFETY LOCK
POP PIN
LOCK KNOB
1’’QUICK CLIP
FOAM ROLL
HANDLE GRIPE
PLASTIC BUSHING
PLASTIC SPACER
45 mm SQUARE END PLUG
30 mm SQUARE END PLUG
25 x 50 mm SQUARE END PLUG
25 mm SQUARE END PLUG
20 x 40 mm SQUARE END PLUG
1’’ROUND CAP
1’’ROUND END PLUG
1/2’’ x 3-1/2’’HEX BOLT
3/8’’ x 3’’HEX BOLT
3/8’’ x 2-3/4’’HEX BOLT
M8 x 38 mm HEX BOLT
M8 x 35 mm HEX BOLT
M8 x 16 mm HEX BOLT
1/2’’ LOCKNUT
3/8’’ LOCKNUT
5/16’’ LOCKNUT
1/2’’ WASHER
3/8’’ WASHER
M8 WASHER
3/8’’ x 2-7/8’’ HEX BOLT
PIN A
CABLE
CHAIN HOOK
3/8"X3/4" HEX BOLT
FRONT BASE TUBE
DESCRIPTION QTY
6
(43) M8 x 16 mm HEX BOLT 2PCS (20) COPPER BUSHING 2PCS
(44) 1/2’’ LOCKNUT 1PC
(42) M8 x 35 mm HEX BOLT 4PCS
(41) M8 x 38 mm HEX BOLT 4PCS
(49) M8 WASHER 12PCS(54) 3/8’’ x 3/4’’ HEX BOLT 3PCS
(50) 3/8’’ x 2-7/8’’ HEX BOLT 6PCS (48) 3/8’’ WASHER 23PCS
(40) 3/8’’ x 2-3/4’’HEX BOLT 2PCS
(39) 3/8’’ x 3’’HEX BOLT 3PCS
(38) 1/2’’ x 3-1/2’’HEX BOLT 1PC
(47) 1/2’’ WASHER 2PCS
(46) 5/16’’ LOCKNUT 2PCS
(45) 3/8’’ LOCKNUT 11PCS
7
ASSEMBLY PARTS LIST HARDWARE LIST

(1) LEFT UPRIGHT
FRAME
(5) CROSS FRAME
(9) LEG DEVELOPER
(13) CURL SUPPORT
FRAME
(2) RIGHT UPRIGHT
FRAME
(6) BACKREST
SUPPORT FRAME
(10) SEAT CUSHION
(14) FRONT
HANDLE
(3) BACK UP
BEAM
(7) ADJUST FRAME
(11) BACKREST CUSHION
(15) SUPPORT
PLATE
(16) BEARING
TUBE
(4) BARBELL
ADJUSTABLE FRAME
(17B) BEARING
TUBE
(8) FRONT UPRIGHT
STANCHION
(12) ARM CURL PAD
(17A) FOAM ROD
8
(18) CONNECTOR
PLATE
(19)FOOT TUBE (21) PIN
(25) LOCK KNOB (26) 1’’QUICK CLIP
(27) FOAM ROLL (28) HANDLE FOAM (29) PLASTIC
BUSHING
(24)POPPIN
PT-1C
(55) FRONT
BASE TUBE
(30) PLASTIC
SPACER
(31) 45 mm
SQUARE END
PLUG
(35) 20 x 40 mm
SQUARE END
PLUG
(36) 1’’ROUND
CAP
(37) 1’’ROUND
END PLUG
(51) PIN A (52) CABLE (53) CHAIN HOOK
(32) 30 mm
SQUARE END
PLUG
(22) LEFT BARBELL
SAFETY LOCK
(23) RIGHT BARBELL
SAFETY LOCK
(33) 25 x 50 mm
SQUARE END
PLUG
(34) 25 mm
SQUARE END
PLUG
9
PART DRAW
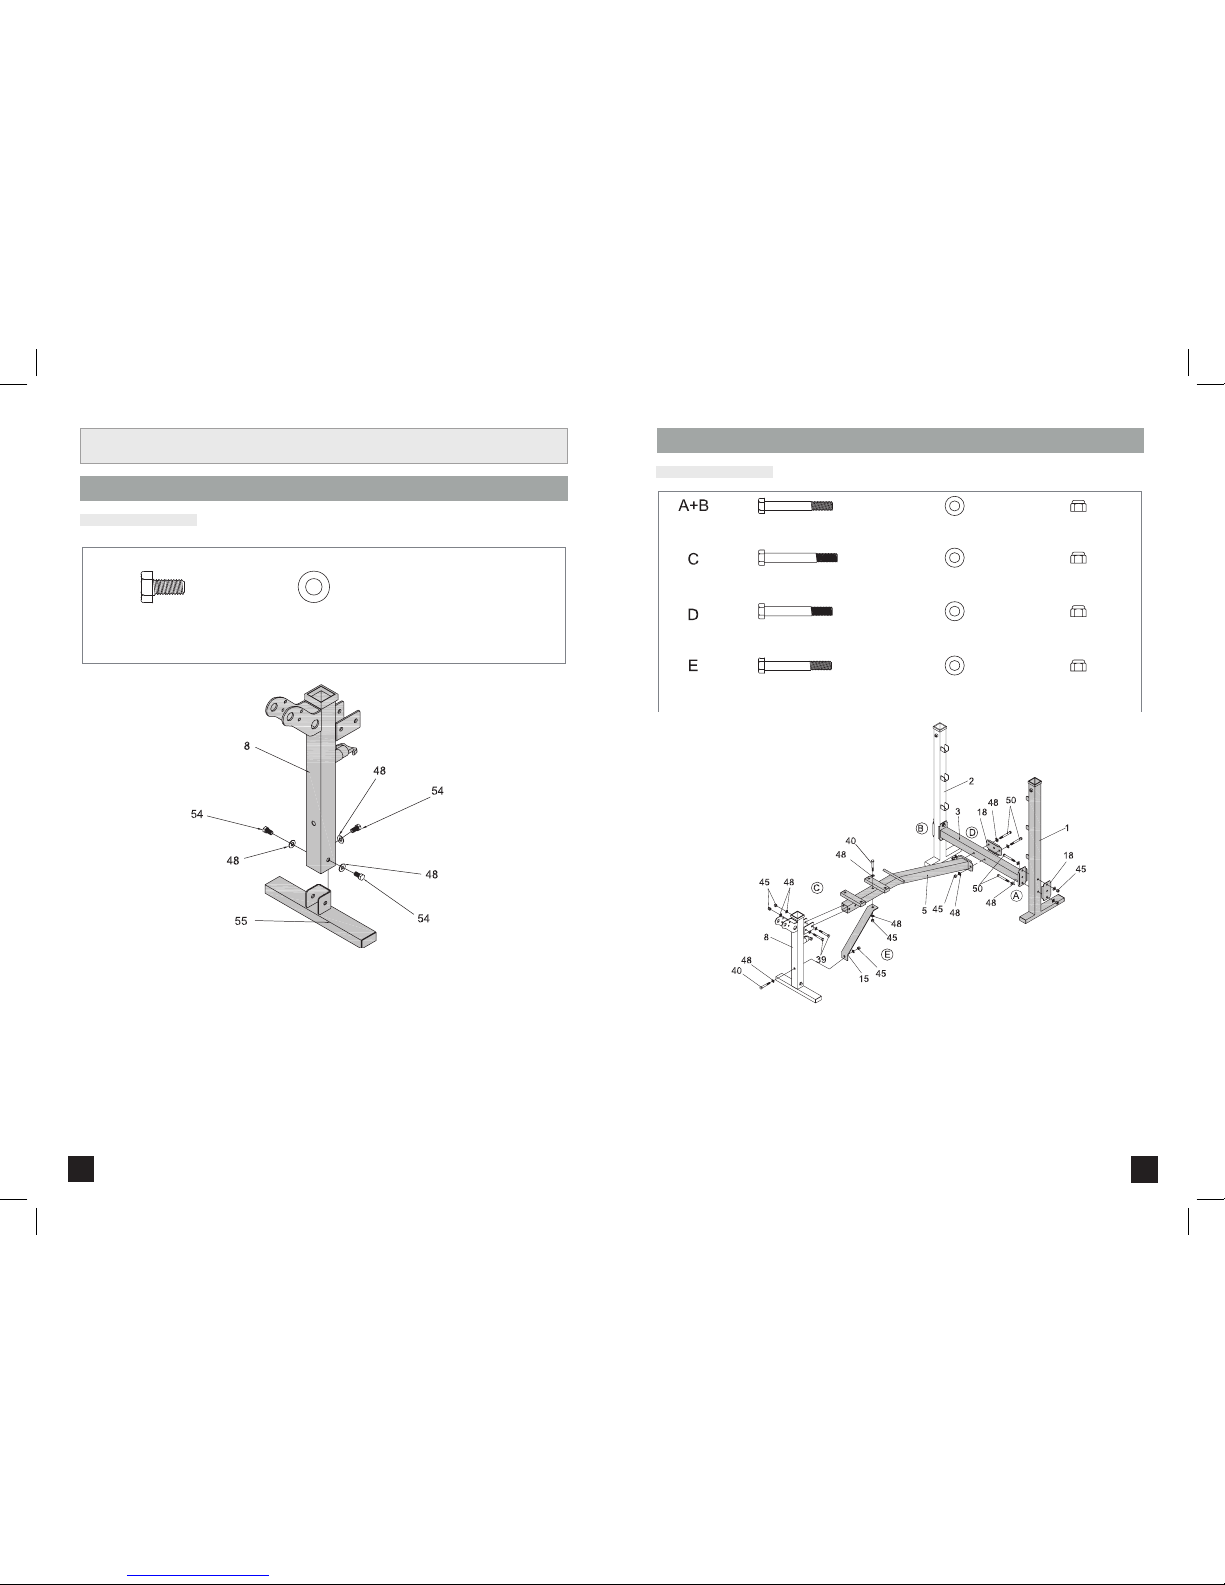
Attach FRONT UPRIGHT STANCHION (8) onto FRONT BASE TUBE (55) using three 3/8"X3/4" HEX
BOLT (54) and three 3/8" WASHER (48).
2-A & 2-B
Attach LEFT UPRIGHT FRAME (1) and RIGHT UPRIGHT FRAME (2) to BACK UP BEAM (3) using two
CONNECTOR PLATE (18), four 3/8” x 2-7/8” HEX BOLTS (50) , eight 3/8” WASHERS (48) and four
3/8” LOCKNUTS (45).
2-C
Attach another end of CROSS FRAME (5) to FRONT UPRIGHT STANCHION (8) using two 3/8” x 3”
HEX BOLTS (39), four 3/8” WASHERS (48) and two 3/8” LOCKNUTS (45).
2-D
Attach CROSS FRAME (5) and CONNECTOR PLATE (18) to BACK UP BEAM (3) using two 3/8” x 2-7/8”
HEX BOLTS (50), four 3/8” WASHERS (48) and two 3/8” LOCKNUTS (45).
2-E
Then attach SUPPORT PLATE (15) to CROSS FRAME (5) and FRONT UPRIGHT STANCHION (8) using
two 3/8” x 2-3/4” HEX BOLTS (40), four 3/8” WASHERS (48) and two 3/8” LOCKNUTS (45).
10 11
ASSEMBLY STEP 1
ASSEMBLY STEP 2
ASSEMBLY INSTRUCTIONS
HARDWARE BAG 1 CONTENTS:
HARDWARE BAG 2 CONTENTS:
(50) 3/8’’ x 2-7/8’’
HEX BOLT 6PCS
(50) 3/8’’ x 2-7/8’’
HEX BOLT 6PCS
(48) 3/8’’
WASHER 23PCS
(48) 3/8’’
WASHER 23PCS
(48) 3/8’’
WASHER 23PCS
(48) 3/8’’
WASHER 23PCS
(48) 3/8’’
WASHER 23PCS
(39) 3/8’’ x 3’’
HEX BOLT 3PCS
(45) 3/8’’
LOCKNUT 11PCS
(45) 3/8’’
LOCKNUT 11PCS
(45) 3/8’’
LOCKNUT 11PCS
(45) 3/8’’
LOCKNUT 11PCS
(40) 3/8’’ x 2-3/4’’
HEX BOLT 2PCS
(54) 3/8’’ x 3/4’’
HEX BOLT 3PCS

ASSEMBLY STEP 3 ASSEMBLY STEP 4
HARDWARE BAG 3 CONTENTS: HARDWARE BAG 4 CONTENTS:
3-A
Attach LEG DEVELOPER (9) TO FRONT UPRIGHT STANCHION (8) using one 1/2 x 3-1/2” HEX BOLTS
(38), two 1/2” WASHERS (47), one 1/2” LOCKNUT (44) and one 1’QUICK CLIP (26).
3-B
Insert one BARBELL ADJUSMENT FRAM (4) into LEFT UPRIGHT FRAM (1) at desired height then
secure with one LOCK KNOB (25).
Insert another BARBELL ADJUSMENT FRAM (4) into RIGHT UPRIGHT FRAM (1) at the same height
then secure with one LOCK KNOB (25).
Attach BACKREST SUPPORT FRAME (6) to CROSS FRAME (5).
Attach FRONT HANDLE (14) to LEG DEVELOPER (9) using one CHAIN HOOK (53), CABLE (52) and
one PIN A (51).
12 13
(44) 1/2’’ LOCKNUT
1PC
(38) 1/2’’ x 3-1/2’’
HEX BOLT 1PC
(47) 1/2’’ WASHER
2PCS
(46) 5/16’’ LOCKNUT
2PCS
(49) M8 WASHER
12PCS

ASSEMBLY STEP 5
HARDWARE BAG 5 CONTENTS:
5-A
Secure BACKREST CUSHION (11) on to BACKREST SUPPORT FRAME (6) with four M8X38 HEX BOLT
(41) and four M8 WASHER (49).
5-B
Attach SEAT CUSHION (10) to CROSS FRAME (5), using four M8X35 HEX BOLT (42) and four M8
WASHER (49).
5-C
Attach ARM CURL PAD (12) to CURL SUPPORT FRAME (13) using two M8X16 HET BOLT(43) and two
M8 WASHER (49).
Insert two FOAM RODS (17A & 17B) through the holes, then slide one FOAM ROLL (27) for each end.
Insert BEARING TUBE (16) Through the holes of LEG DELVEOPER (9) then slide one
FOAM ROLL (27), one FOOT TUBE (19) and one 1’QUICK CLIP (26) for each end as shown.
14 15
(49) M8 WASHER
12PCS (49) M8 WASHER
12PCS
(49) M8 WASHER
12PCS
(41) M8 x 38 mm
HEX BOLT 4PCS
(43) M8 x 16 mm
HEX BOLT 2PCS
(42) M8 x 35 mm
HEX BOLT 4PCS
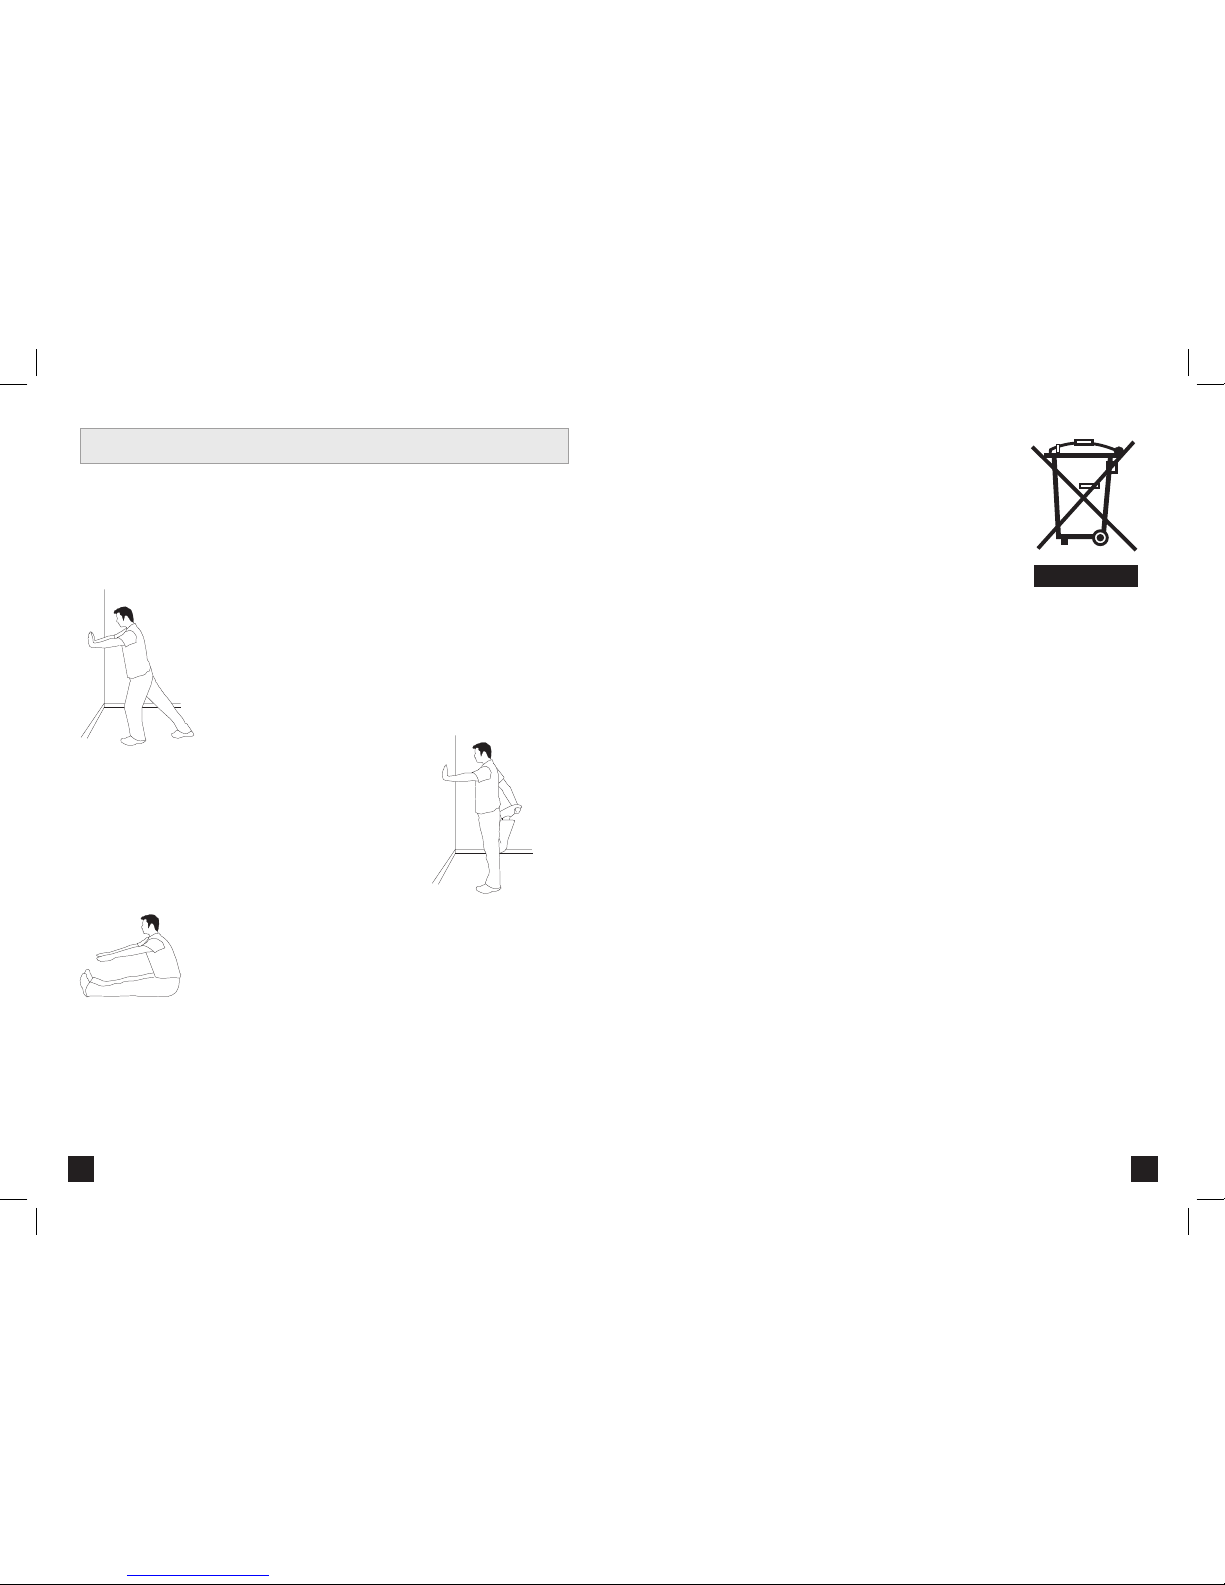
STRETCH FIRST
Before using your product, it is best to take a few minutes to do a few gentle stretching exercises. Stretching prior
to exercise will improve flexibility and reduce chances of exercise related injury. Ease into each of these stretches
with a slow gentle motion. Do not stretch to the point of pain. Make sure not to bounce while doing these stretches.
1. STANDING CALF MUSCLE STRETCH
Stand near a wall with the toes of your left foot about 18" from the wall, and the right
foot about 12" behind the other foot. Lean forward, pushing against the wall with your
palms. Keep your heels flat and hold this position for a count of 15 seconds. Make sure
that you do not bounce while stretching. Repeat on the other side.
2. STANDING QUADRICEP STRETCH
Using a wall to provide balance, grasp your left ankle with your
left hand and hold your foot against the back of your thigh for 15
seconds. Repeat with your right ankle and hand.
3. SITTING HAMSTRING & LOWER BACK MUSCLE STRETCH
Sit on the floor with your legs together and straight out in front of you. Do not lock
your knees. Extend your fingers towards your toes and hold for a count of 15 seconds.
Make sure that you do not bounce while stretching. Sit upright again. Repeat one
time.
CONDITIONING GUIDELINES
D:
Entsorgungshinweis
TREO Fitness - Produkte sind recyclebar. Führen Sie das Gerät am Ende der Nutzungsdauer einer sachgerechten
Entsorgung zu (örtliche Sammelstelle).
GB:
Waste Disposal
TREO Fitness products are recyclable. At the end if its useful life please dispose of this article correctly and safely (
local refuse sites).
F:
Remarque relative à la gestion des dèchets
Les produits TREO Fitness sont recyclables. A la fin sa durrèe d`utilisation, remettez I´appareil à un centre de gestion
de dèchets correct (collecte locale).
NL:
Verwijderingsinstructie:
TREO Fitness producten zijn recycleerbaar. Breng het apparaat aan het einde van de gebruiksduur voor recycling naar
een vakkundig verzamelpunt.
E:
Informaciones para la evacuaciòn
Los productos de TREO Fitness son riciclables. Cuando se termina la vida ùtil de un aparato o una màquina, entrèguelos
an una impresa local de eleiminaciòn de residuos para su reciclaje.
I:
Indicazione sullo smaltimento
I prodotti TREO Fitness sono reciclabill. Quando I` apparecchio non servirà più, portatelo in un apposito punto di raccolta
della Vostra città (Punti di raccolta comunall).
PL:
Wskazòwka dotyczàca usuwania odpadòw.
Producty firmy TREO Fitness podlegajà recyklingowi. Pod koniec okresu o`ywalnoÈcl pros`z oddac urzàdzenie do
wlaÈciwego punkto usuwania odpadòw (lokalny punkt zbiorczy).
16 17


FW410 062510 © 2010 Treo Fitness Product |Made in China
Table of contents
Other Treo Fitness Home Gym manuals


