Trident Dryspell Series Owner's manual

Dryspell Series Instruction Manual
Desiccant Compressed Air Dryer
Dryspell Series
INSTALLATION, OPERATION, MAINTENANCE
Regenerative Type Heatless Desiccant Dryer
R1 - 06/13

Dryspell Series Instruction Manual
GENERAL
Compressed air is a vital energy medium used in almost all areas of industrial production. The
atmospheric air taken in by the compressor contains contaminants, dirt particles and humidity,
i.e. water vapor which condenses in compressed air pipes. The condensation can lead to
considerable costs (corrosion, freezing, etc.). These costs can be avoided by the application
of a Dryspell Series dryer. This complete purification system includes an optional prefilter with
automatic condensate drain, heatless adsorption dryer and in built afterfilter. The Dryspell
series with optional Prefilter(Recommended) is specially made for small compressed air
flows, is compact, easy to maintain, and comes standard with
Electronic controller with manual purge economizer and compatible with dew point
sensor for automatic purge control
Electronic drain valve on the inlet filter
A inbuilt 3-micron particulate after-filter (within the diffuser screen or Compactor plate)
to protect downstream equipment from desiccant fines.
Design
The air enters the coalescing prefilter where solids and condensates (oil/water mixture) are
retained up to a residual oil content of 0.01mg/cu.m. The heatless regenerative dryer then
adsorbs moisture from the compressed air stream down to an atmospheric dew point (ADP)
of –40°F at standard inlet conditions (100°F, 100% saturated, 100psig). Finally the in built
after filter removes any desiccant fines before they can travel downstream.
Models
Dryspell Models
Nominal Inlet Flow
SCFM
10 10
20 20
30 30
45 45
60 A 60
100 100
125 125
200 200
250 250
300 300
375 375
R1 - 06/13

Dryspell Series Instruction Manual
Statement of conformity
97/23/CE : Pressurised Equipments
89/392/CEE : Machine Safety
89/336/CEE : Electromagnetic Compatibility
73/23/CEE : Low Voltage
Specification
Maximum Pressure : 225 PSIG (16 bar)
Minimum Pressure : 29 PSIG (2 bar)
Maximum Temperature : 158 F
Voltage : 115/1/60, 208-230/1/60, 220-240/1/50
Power Consumption : 12 Watt Max
Recommended
Pre-filter rating : 0.01 Micron (Coalescer)
After-filter Rating (Inbuilt) : 3.0 Micron (within the diffuser screen or Compactor plate)
Cycle Time : 4 min
Purge Loss : 12%
Air Outlet Conditions : Dry air down to -40degF ADP
Power Cord : 7 ft
Contents
The dryer consists of:
2 aluminum towers filled with desiccant
2 aluminum blocks including air seals and check valve
1 Pre filter
2 solenoid pilot valves
Built in after filters
1 electronic control
1 pressure gauge
2 Mufflers
Electronic auto drain
Adsorbent Material
The desiccant used in the dryspell series is a smooth sphere of activated alumina produced
by a unique manufacturing process. The benefits of using this high performance desiccant
include:
Uniform ball size
Reduces pressure drop and channeling
High crush strength
Allows rapid pneumatic loading of towers
R1 - 06/13

Dryspell Series Instruction Manual
Low abrasion
The low abrasion ensures less dusting during transport, loading, and service
life which reduces pressure drop and minimizes downstream valve and filter
plugging, common with dustier products.
High adsorptive capacity.
The desiccant’s high surface area and tailored pore distribution provide a
high dynamic H2O adsorption capacity. It also has excellent cyclical stability
which leads to a long desiccant life.
DESCRIPTION OF OPERATION
Operating Principles
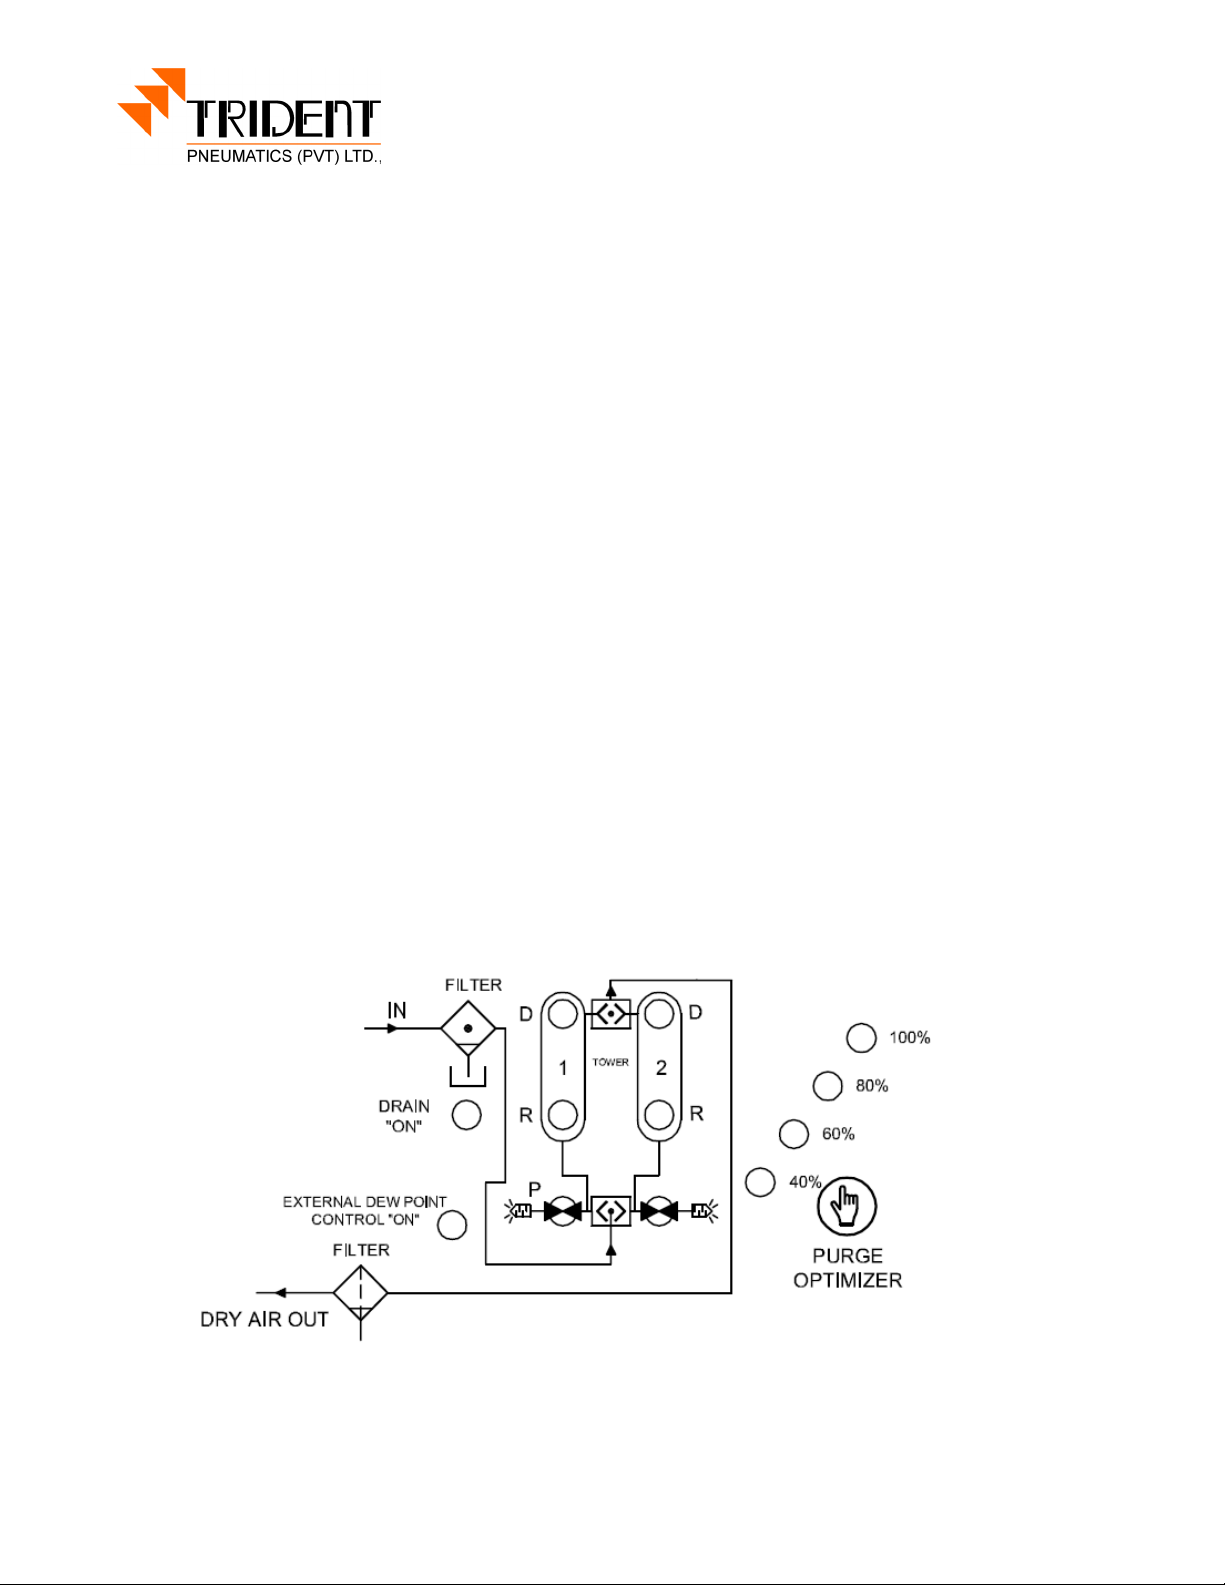
Wet air enters the inlet prefilter and flows from the top block to the lower block via the air
transfer tubes. Air then flows to the shuttle inlet valve and is diverted to tower 1. The
compressed air flowing through tower 1 is dried to a –40°F ADP and exits via the outlet filter.
A small portion (12%) of the compressed air is expanded to near atmospheric pressure by
passing through the purge orifice. Expansion of this already-dry gas to near-atmospheric
pressure increases the ability of the purge air to strip the previously adsorbed water vapor
from the partially saturated desiccant bed in tower 2. The air exhausts through the opened
two-way purge valve. This cycle continues for 1.5 minutes then the purge valve closes and
tank 2 begins re- pressurization. After 30 seconds purge valve 1 opens and the process
repeats for tower 2.
the online tower dries for 2 minutes
the offline tower regenerates for 1 minute and 30 seconds
the offline tower re-pressurizes for 30 seconds
Warning
Failure to follow these instructions can lead to serious injury or death.
This dryer should be only be used for drying filtered, compressed air.
Ensure inlet air to this air dryer is filtered.
Only experienced and licensed electricians that are properly trained in compressed air
systems should service or repair Trident products. Before start-up or performing any
maintenance on any Trident air dryer, filter, drain system, or other equipment, you must first
turn off and disconnect all electrical power and service to the equipment at the main
disconnect switch. Also, be sure to bypass and depressurize the dryer to 0 PSIG. Do not start
or operate the dryer if there is a leak. Make sure the dryer’s protection rating is applicable to
the installation conditions. Do not operate the dryer at pressures and/or temperatures above
the maximum allowable marked on the data label. Likewise, verify that incoming voltage
matches the voltage marked on the data label. Do not lift the dryer by its piping or control box
or drop the dryer. Doing so may damage the dryer.
R1 - 06/13

Dryspell Series Instruction Manual
INSTALLATION AND MAINTENANCE
Safety
Dryspell dryers are intended for the drying of compressed air. Under no circumstance
should they be used to dry other gases.
The desiccants used are not toxic. However, they may cause respiratory problems if they are
inhaled in dust form. The use of a dust mask is sufficient to protect personnel.
Installation Site and Connections
Install the dryer in a closed clean, dry room protected from freezing. Access to the
room should be restricted to personnel qualified in maintenance and operation. The
room must be adequately ventilated. The dryer must not be directly exposed to
sources of heat. The temperature of the room must not exceed 43°C/109°F.
Make sure that the dryer is not near any equipment which does not comply with the
electromagnetic compatibility directives and which may degrade dryer operation. There
must be a minimum distance of 3 feet between the dryer and any other equipment
which uses electricity.
Ensure that the dryer is installed in the vertical position.
Dryer should be secured by bolting it down.
R1 - 06/13

Dryspell Series Instruction Manual
Install a system of by-pass valves between the dryer inlet and outlet so the dryer can
be serviced without having to interrupt the compressed air supply from the circuit (see
diagram above). The upstream and downstream valves must be closed during
installation.
Connect a drain line to the Pre-filter auto drain outlet.
Check for leaks after all connections have been made.
Always pressurize dryer before power up.
Electrical Connections
Connect the electrical power cable to an 85-260 V, single phase, 60 Hz grounded power
supply.
Running The Installation and Turning On The Dryer
The valves upstream and downstream of the dryer must be closed and the by-pass
valve open before the compressor is started.
Make sure power to dryer is off.
Open bypass valve, close outlet valve.
Open inlet valve until dryer is pressurized.
Open outlet, close bypass valve.
Turn on power to the dryer.
Check if the LED on the tower is in the drying operation, and that the automatic drain
valve at the bottom of the prefilter drains every 4 minutes
Control Panel DS 31-90
R1 - 06/13

Dryspell Series Instruction Manual
Control Panel DS 31-200
The control panel presents all the instruments necessary to control and regulate the dryer:
a machine diagram
two LEDs indicating the tower in drying operation (Tower 1 and Tower 2).
a LED indicating the prefilter drain operation (Drain) (for models equipped with
electronic auto drain.).
Press 8 sec Purge Optimizer button continuously, then set the value ( 40% to 100%) if
needed to control the purge flow
Operating Cycles Time
Drying time : 2 min
Regeneration time : 1 min 30 seconds
Pressurization time : 30 seconds
First Cycle
Second Cycle
Tower 1 Tower 2 Tower 1 Tower 2
Drying Regeneration Regeneration Drying
Re-pressurization
Re-pressurization
When 1 is lighted, tower 1 is in drying operation and tower 2 is in regeneration mode. After
tower 2 regeneration is finished, tower 2 LED will blink to show that the tank is now in the
pressurization stage. After 30 seconds of pressurization, tower 1 will depressurize, the
operating cycle is reversed with tower 1 is in the regeneration stage and tower 2 in the drying
mode. (Caution: At the end of the pressurization the regeneration tower will
depressurize producing a loud noise.) The cycle occurs every 2 minutes. (For models
equipped with prefilter and electronic auto drain, the prefilter condensate drain discharge is
programmed every 4 minutes for 4 seconds.) All these cycle times are fixed and not
adjustable by user.
R1 - 06/13

Dryspell Series Instruction Manual
Shutting Down the Dryer
Follow the procedure below:
Open the by-pass valve.
Close the inlet valve.
Close the outlet valve.
Turn off power to the dryer.
Adsorption dryers are robust, reliable machines. To ensure uninterrupted, problem-free
operation, regularly perform the inspections below.
Monthly Inspections
During the monthly routine inspection, check that:
the drying and regeneration cycles function normally,
the silencers are not clogged.
Semi Annual Inspections
During the semi-annual routine inspection, check that:
that the drying and regeneration cycles function normally
the silencers are not clogged
replace filter elements
Annual Inspections
During the annual routine inspection, check that:
the drying and regeneration cycles function normally
the silencers are not clogged
replace filter elements.
the state of the desiccant: if the desiccant is brown (oil pollution) or if there is a lot of
dust (disintegration), then change the desiccant (see next section).
the state of block ‘O’ rings.
During the entire operation, the compressor and the dryer must be shut down. It is
recommended for all personnel who are in the presence of the desiccant to wear dust masks
Quantity of Desiccant in the Dryer
The replacement desiccant in your dryer must be absolutely identical to the initial desiccant.
Contact the factory for desiccant kit part number.
R1 - 06/13

Dryspell Series Instruction Manual
The total quantities required for each model are as follows (weight in kgs):
Dryspell Models
Quantity (
Kgs
)
10 2
20 6
30 8
45 10
60 A 14
100 8 Bag*
125 10 Bag
200 16 Bag
250 20 Bag
300 24 Bag
375 30 Bag
*Bag is a special custom made desiccant cartridge. It is accurately packed and sealed with a
required quantity and quality of desiccant.
Changing the Desiccant
1. Dryspell 10 to Dryspell 60A
Bypass dryer.
Disconnect dryer from airlines.
Loosen the Tie rod and remove it
Replace the old desiccant
Make sure O-rings or gaskets are in place
Install and screw the Tie rod
2. Dryspell 100 to Dryspell 375
Bypass the dryer.
Disconnect dryer from air lines.
Loosen the M8 Allen Bolt and remove the top block and top compactor plate.
Remove the saturated desiccant bag by pulling the bag handle in upward direction and
replace the new desiccant bag. If there is no desiccant bag, just tilt the dryer remove
the old desiccant and replace new desiccant bag.
Make sure O-rings or gaskets are in place
Install the top compactor plate continues by top block and screw the M8 Allen Bolt.
R1 - 06/13

Dryspell Series Instruction Manual
LEDS not Glowing
A – Check the power supply connection and tension
Tower Status LED not Changing
A – Change the controller
LEDS Status Change but Tower not Switching
A – Check coil connection at DIN and terminal connector in the controller
B – Check the solenoid valve
No Purging
A – Check the solenoid valve
B – Check the exhaust valve
C – Clean the silencer (muffler)
Continuous Purging at Tower 1
A – Shuttle not closing
B – Check pilot air for exhaust valve
C – Check exhaust valve piston stuck
High Purge Loss
A – Check outlet shuttle closing
B – Check for silencer choke
High Pressure Drop across Dryer
A – Prefilter may be clogged. Check and replace filter elements.
B – Check whether the dryer is being overflowed.
R1 - 06/13

R1-06/13

R1-06/13

R1-06/13

R1-06/13

R1-06/13

R1-06/13

R1-06/13

R1-06/13

R1-06/13

R1-06/13
Table of contents
Other Trident Dehumidifier manuals