Trigon Electronics TELEDIAL HS Owner's manual
INSTALLATION
and
OPERATION INSTRUCTIONS
Telephone-line powered
TELEDIAL HS
www.EmergencyTelephoneTowers.com | (800) 878-7829

Page 2
Teledial HS
TABLE OF CONTENTSTABLE OF CONTENTS
TABLE OF CONTENTSTABLE OF CONTENTS
TABLE OF CONTENTS
INTRODUCTION ..................................................................................... 3
PRODUCT OVERVIEW .......................................................................... 3
MOUNTING .............................................................................................. 4
WIRING ..................................................................................................... 4
WIRING DIAGRAM ................................................................................ 5
PROGRAMMING INFORMATION
Enter Programming information ............................................................. 6
PROGRAMMING
Entering Program Mode .......................................................................... 6
Setting Operational Modes...................................................................... 6
EnteringAutodialed Telephone Numbers ............................................... 6
VerifyingAutodialed Telephone Number................................................ 6
Setting the Site ID Number ..................................................................... 7
Changing Program Access Number ........................................................ 7
Setting Incoming Ring Count.................................................................. 7
Setting Dial Mode ................................................................................... 7
Setting Call Legnth ................................................................................. 7
DTMF Echo Test ...................................................................................... 7
OPERATION
STANDARD Mode................................................................................. 8
EMERGENCY Mode ............................................................................ 8
TROUBLE SHOOTING GUIDE
General .................................................................................................... 9

Page 3
Teledial HS
Thismanual contains the informationrequiredto install
and program the TRIGONTeledial HS. If you are using
this manual to install this unit, it is very important to
read all the sections in order.
You should read these instructions before you begin
installation. This will insure that everything is done
efficiently.
Hookup Specifications
If you are using this manual as a programming guide
after the initial installation, you may find the TABLE
OF CONTENTS useful in locating the particular
programming procedure you need.
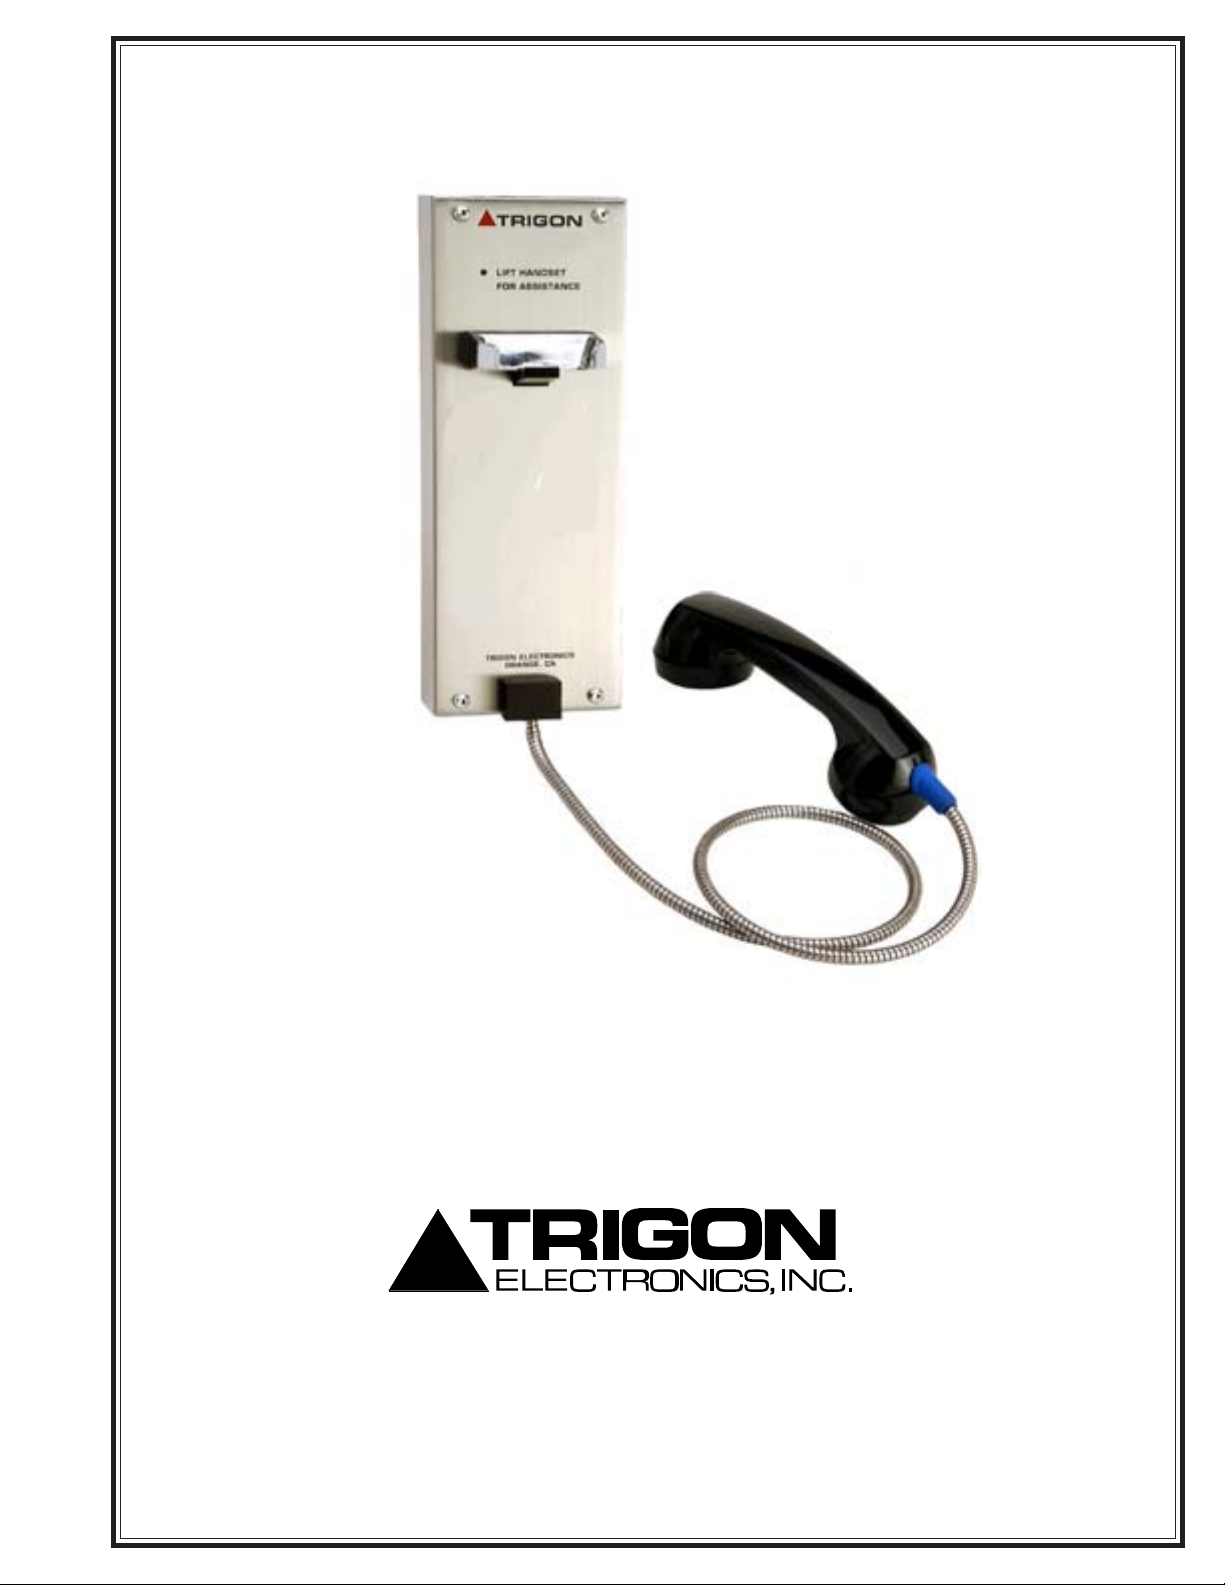
TheTrigonTeledialHS is a HandSetautodialtelephone.
It is a multi-number telephone line powered autodialing
industrial telephone.
The Teledial HS has a capacity of up to 10 telephone
numbers and is PBX compatible. It is constructed for
rugged outdoor use. Its long-lasting brushed-finish
stainlesssteel housing complements itsthindesignlines.
A matching flush-mount trim-ring or lighted hood may
beselected to add thefinishingtouchesto an installation.
PRODUCT OVERVIEWPRODUCT OVERVIEW
PRODUCT OVERVIEWPRODUCT OVERVIEW
PRODUCT OVERVIEW
INTRODUCTIONINTRODUCTION
INTRODUCTIONINTRODUCTION
INTRODUCTION
Figure 1
Page 4
Teledial HS
MOUNTINGMOUNTING
MOUNTINGMOUNTING
MOUNTING
Arrangements must be made for the installation of a
standard voice-grade telephone line (touch-tone or
rotary, telco or PBX Port), as close to the unit mounting
location as possible. The telephone company may
require the following information.
FCC Registration No..................1Z8898-62546-DI-T
Ringer Equivalence..............................................0.8B
Connector............................................Terminal Block
When selecting a mounting location, Trigon
recommends some shelter be provided from direct rain
and sunlight. An overhang is usually sufficient. If a
heater element is installed, be sure to use a bi-metal
thermal switch to prevent over-heating during the
summer months.
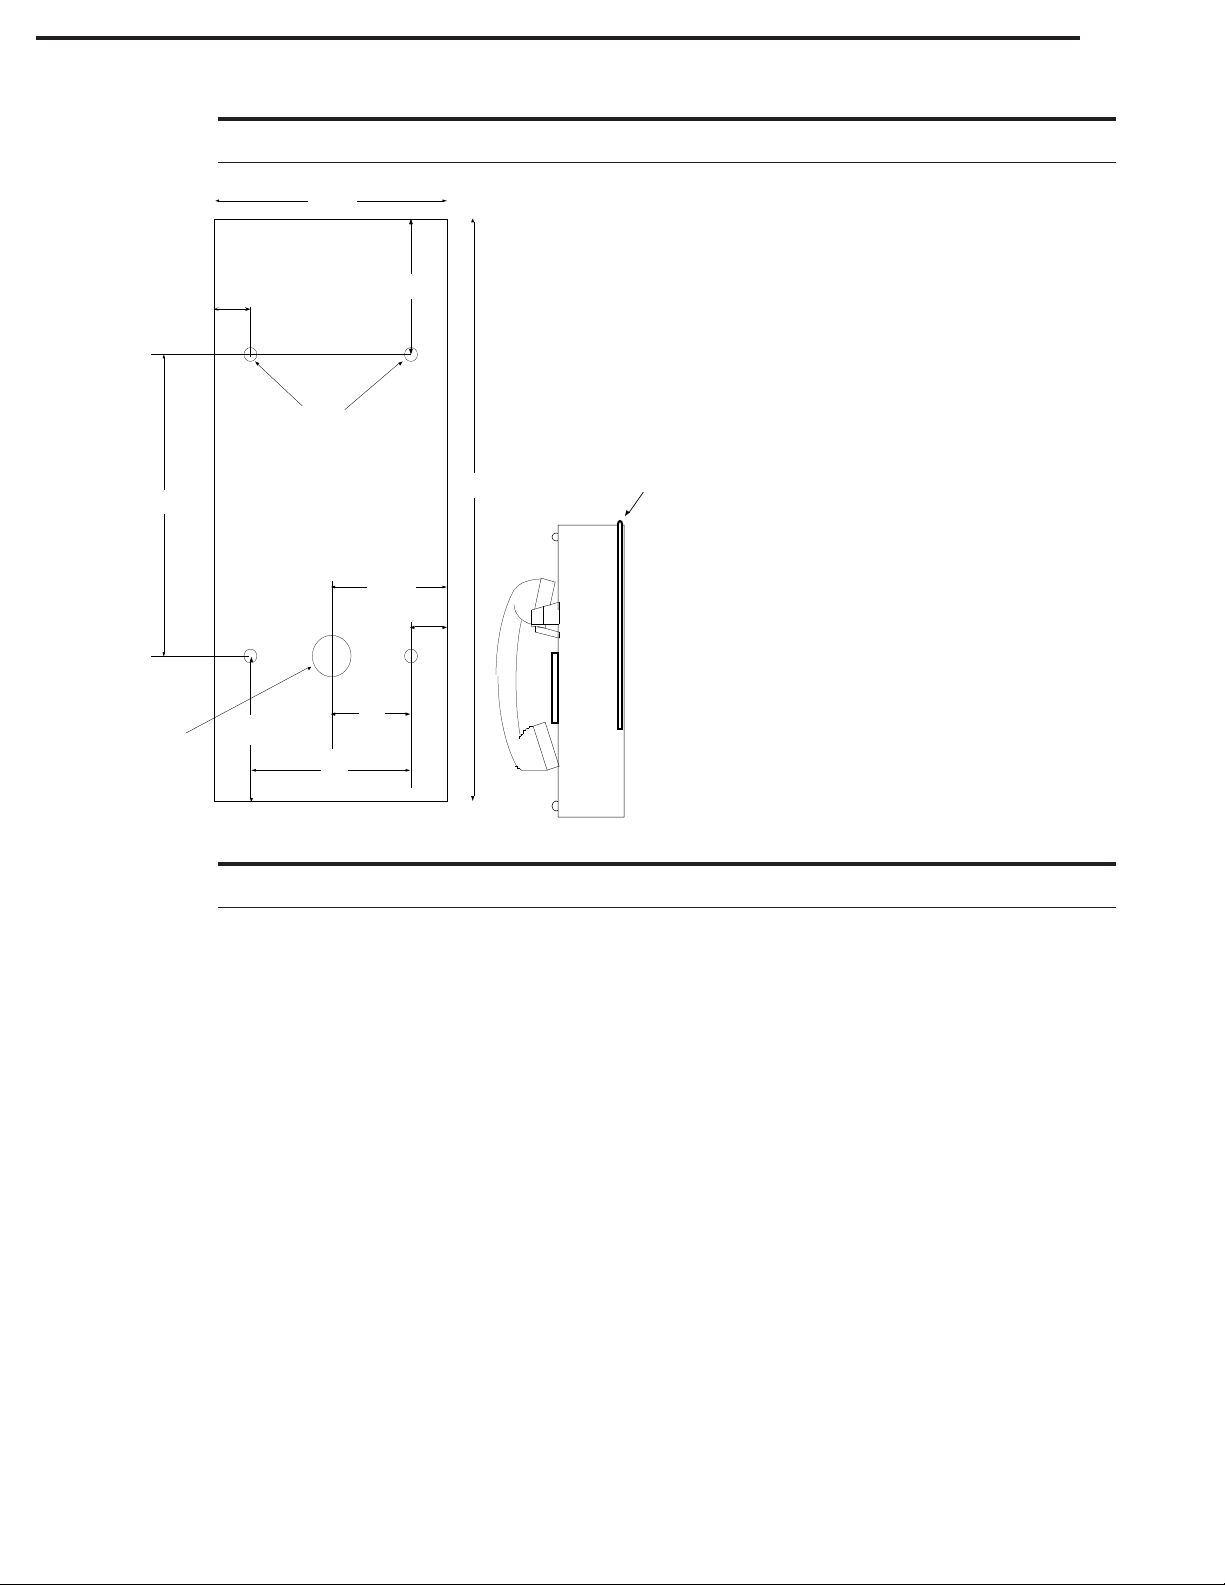
Pull the wiring through the access hole in the lower
portion of the back plate (Fig. 2). Bolt the plate to the
surfacethrough the four.312"mounting holes provided.
At this time, the wiring should NOT be energized.
Note: If used in extreme weather, a bead of silicon
sealant should be run around the outside top two thirds
of the unit, after the front case is secured. (Fig. 2b).
WIRINGWIRING
WIRINGWIRING
WIRING
1.Use the wiring diagram on pg. 5 for wire connection
information.
2. Isolate the phoneline from 120 VAC power wires.
This will prevent 60 Hz hum from occurring on the
phoneline. Use 22 AWG wire on Telco line run
distances of up to 2400 feet. Consult the factory for
distances greater than 2400 feet.
3. If all wiring and grounding is completed, mount the
faceplate onto the backbox.
Figure 2b
Seal top 2/3 of case
to mounting surface.
Side View
.52" 3.62"
+
+
4.04"
11.80"
5.38"
2.80"
++
3.0"
.52"
1.5"
2.02"
1 Hole
.88" Dia.
4 Holes
.312" Dia.
Note: Mount backplate with .88" Dia.
wire entry hole toward the bottom.
Figure 2
Figure 2b

Page 5
Teledial HS
WIRING DIAGRAMWIRING DIAGRAM
WIRING DIAGRAMWIRING DIAGRAM
WIRING DIAGRAM
Figure 3
EARTH GROUND
TELEPHONE LINE
MICROPROCESSOR
AUDIO
SPEAKER
VOLUME EARPHONE
MOUTH
SPEAKER (HF-2)
MICROPHONE (HF-2)
MEMORY
Telephone line cabling
Voice Grade 24 to 48V
22AWG; Shielded or
Twisted up to 2400'
Microphone
Sensitivity
Adjustment
PG
TELEDIAL HS

Page 6
Teledial HS
General Programming Information
The "Initial Setup" for the HS-2 has been programmed
at the factory. These factory default settings may be
changed to better suit your particular application. If you
decide to alter these settings, follow the instructions
below. It is important that each programming step be
taken in order. When reprogramming a specific feature,
you must always enter the programming mode first. You
may then go to the appropriate procedural steps for the
changes desired.
Record below the autodialed numbers to be programmed
into the HS-2.
PROGRAMMING INFORMATIONPROGRAMMING INFORMATION
PROGRAMMING INFORMATIONPROGRAMMING INFORMATION
PROGRAMMING INFORMATION
Autodialed Numbers
Primary Auto dial Number (16 digit max)
__ __ __ __ __ __ __ __ __ __ __ __
Second Auto dial Number (16 digit max)
__ __ __ __ __ __ __ __ __ __ __ __
Third Auto dial Number (16 digit max)
__ __ __ __ __ __ __ __ __ __ __ __
Fourth Auto dial Number (16 digit max)
__ __ __ __ __ __ __ __ __ __ __ __
Fifth Auto dial Number (16 digit max)
__ __ __ __ __ __ __ __ __ __ __ __
Sixth Auto dial Number (16 digit max)
__ __ __ __ __ __ __ __ __ __ __ __
Seventh Auto dial Number (16 digit max)
__ __ __ __ __ __ __ __ __ __ __ __
Eighth Auto dial Number (16 digit max)
__ __ __ __ __ __ __ __ __ __ __ __
Ninth Auto dial Number (16 digit max)
__ __ __ __ __ __ __ __ __ __ __ __
Tenth Auto dial Number (16 digit max)
__ __ __ __ __ __ __ __ __ __ __ __
Site ID Number-if required Number (4 digits)
__ __ __ __
PROGRAMMINGPROGRAMMING
PROGRAMMINGPROGRAMMING
PROGRAMMING
(A) To Enter Program Mode:
1. Call the telephone number of the unit.
2. Listen for the two second tone.
3. Enter '#' then the unit's Program Code.
4. If desired, exit Program Mode by pressing '#'
(wait for two second tone).
5. To terminate call, press '7'.
If the unit is new, use the preset factory code. (Factory
code is 9753).
1. Unit must be in Program Mode.
2. Press '2' then '1' (wait for tone) and enter the
first phone number. Press '#' when complete.
Press '2' then '2' (wait for tone) and enter the
second phone number. Press '#' when complete.
If more numbers are needed press '2' then '3'
(wait for tone) and so on for up to 10 phone
numbers. Press '#' when complete.
3.If desired, exit Program Mode by pressing '#'
(wait for two second tone).
4.To terminate call, press '7 '.
(C) Verifying Telephone Numbers:
1. Unit must be in Program Mode.
2. Press ' ' then press '1' to verify the first phone
number entered.
3. Press ' ' then press '2' to verify the second
phone number entered etc.
4. If desired, exit Program Mode by pressing '#'
(wait for two second tone).
5. To terminate call, press '7'.
(B) Setting the Primary and Backup Telephone
Numbers:

Page 7
Teledial HS
PROGRAMMINGPROGRAMMING
PROGRAMMINGPROGRAMMING
PROGRAMMING
This number identifies the unit upon request from a
central office.
1. Unit must be in Program Mode.
2. Press '1' .
3. Enter a four digit number.
You willheartwo 'beeps' indicatingcommandaccepted.
4. If desired, exit Program Mode by pressing '#'
(wait for two second tone).
5. To terminate call, press '7'.
(E) Changing ProgramAccess Number:
Thiswill changethefactorypresetnumberof'9753'.
1. Unit must be in Program Mode.
2. Press '3'.
3. Enter a new four digit number.
You willheartwo 'beeps' indicatingcommandaccepted.
4. If desired, exit Program Mode by pressing '#'
(wait for two second tone).
5. To terminate call, press '7'.
(F) Setting Incoming Ring Count:
Entering a digit value of 1 to 9 will set the number of
rings the unit will count before answering an incoming
call.
1. Unit must be in Program Mode.
2.Press '5'.
3. Enter the number of rings desired ( 1 to 9).
or
4. Enter '0' if an audible ring is desired from the
HS--2 whenever it is called.
You will hear two 'beeps' indicating command accepted
5. If desired, exit Program Mode by pressing '#'
(wait for two second tone).
6. To terminate call, press '7'.
Note: If '0' was programmed for an audible ring, the call
may be answered by pressing the first 'Call' button on
the face of the unit.
(I) Setting the Dial Mode.
This will select Rotary or Touch-Tone dialing.
1. The unit must be in Program Mode.
2. Press '6'.
3. Press '1' for Rotary.
or
4. Press '0' for Touch-Tone.
You will hear two 'beeps' indicating command accepted
5. If desired, exit Program Mode by pressing '#'
(wait for two second tone).
6. To terminate call, press '7'.
Thisis the periodof timeallowedfor conversation before
time-out. The time desired is measured in seconds, and
entered using a 3 digit number. (060= 1 minute, 180= 3
minutes, etc).
1. Unit must be in Program Mode.
2. Press '8'.
3. Enter call length in seconds (001 to 999).
You will hear two 'beeps' indicating command accepted.
4. If desired, exit Program Mode by pressing '#'
(wait for two second tone).
5. To terminate call, press '7'.
(K) DTMF Echo Test:
1. Press '9'.
The unit will send a tone sequence 1 thru 0 ,*, #, and
then echo any tones received from the caller.
2. To stop test. press '#' (wait for two second tone).
3. To terminate call, press '7'.
(D) Setting the Site ID Number:
Remote Operation Time-out:
If you call the unit to operate it remotely, you have 30
seconds until auto-termination. Any tone instruction
will restart this 30 second timer. If you find that you
need more than 30 seconds:
1. Enter "8” on your telephone’s keypad to extend
your call time to three minutes.
Remote Function Tests:
The TRIGONTeledial HS has the ability to run a series
of self-tests to verify its functionality.
Call the unit. When it answers choose from the
following.
1. Enter "0” for touch tone echo test.
Unit will “echo” any touch tone you send with your
phone.
2. Press " # " to escape from this test.
3. Enter "1" for memory test. (One tone = good;
two tones = bad).
4. Enter "2" for touch tone sequence. (Unit
answers by transmitting touch tones 1 through 9,
✽
, and #).

Page 8
Teledial HS
STANDARD MODE
When the handset is lifted, the Teledial HS dials a pre-
programmed phone number and monitors the line for
the following signals:
Busy Signal: The HS will hang up and redial the
number after approximately three busy tones.
Ring Signal: The HS will hang up and redial the
number after approximately six unanswered rings
(36 seconds).
Voice or Touch-tones: This indicates an answer.
The unit then enters the Talk Mode.
Answering the Call From the Teledial HS
AnswertheTeledial HSincomingcallwith a shortphrase
at least 3 seconds long. The unit may fail to recognize
a short greeting such as “Hello” and may not turn on the
microphone.
To Terminate the Call, press '7'.
To Reset the Teledial HS's Call Length Timer,
press '8'.
Note: The unit will beep twice to warn of auto-call
termination in 10 seconds.
To Retrieve the HS-2s Site ID number, press '#'.
Note: If the wrong Program code is entered, the unit
will immediately hang up. If the program code or other
informationisnot entered completely, the HS-2 willtime-
out and hang up.
OPERATIONOPERATION
OPERATIONOPERATION
OPERATION
EMERGENCY MODE
When the handset is lifted, the Teledial HS dials a pre-
programmed phone number, and monitors the line for
the following signals:
Busy Signal: The HS will hang up and redial the
number after approximately three (3) busy tones.
Ring Signal: The HS will hang up and redial the
number after approximately six unanswered rings
(36 seconds).
Voice or Touch-tones: This indicates an answer.
The unit then enters the Talk Mode.
Answering the Call From the HS-2
Answer the Teledial HS incoming call with a short
phrase at least 3 seconds long. The unit may fail to
recognize a short greeting such as “Hello” and may not
turn on the microphone.
Once voice communication has been established you
may then press keys on your touch-tone telephone to
do any of the following:
1. To Terminate the Call, press '7'.
2. To Reset the HS-2's Call Length Timer,
press '8'.
Note: The unit will beep twice to warn of auto-call
termination in 10 seconds.
3. To Retrieve the HS-2's Site ID number,
press '
✽
'.
4. To Enter the Program Mode, press '#',
followed by the four digit Program Code.
When the Teledial HS is in the Emergency Mode, the
call can only be terminated by the party that answers
the call when they press '7' on their telephone keypad.

Page 9
Teledial HS
TROUBLE SHOOTING GUIDETROUBLE SHOOTING GUIDE
TROUBLE SHOOTING GUIDETROUBLE SHOOTING GUIDE
TROUBLE SHOOTING GUIDE
NO DIAL TONE
1. Check for phone line. Voltages across terminals
should be 48-52 VDC (on hook), 6-12 VDC(off
hook).
2. Check VOLUME adjustments on PC board.
3. Check handset connections to PCB.
4. Verify that contacts and wires are clean and tight.
CANNOT PROGRAM
1. Incorrect/lost program code.
2. Not entering “*” before program code.
3. Try ‘NODIALTONE’troubleshootingprocedures.
4. Keypad damaged. Check for vandalism.
5. Check that the Program Prom/Microprocessor is
fully seated.

Page 10
Teledial HS
Table of contents


