Connection Electronics X200E User guide

System Manual
Version 1.0
Revised
on
16-Apr-2010
CONNECTION ELECTRONICS LTD.

Vpot-30 i BX - System Manual
NOTICE
The information contained in this document is believed to accurate in all respects but is not warranted
by Connection Electronics td. The information is subject to change without notice and should not be
construed in any way as a commitment by Connection Electronics td. or its affiliates and subsidiaries
assume no responsibility for any errors or omissions in this document. Revisions of this document or
new editions of it may be issued to incorporate such changes.
Unit 6A, 28/F, Cable TV Tower, 9 Hoi Shing Road, Tsuen Wan, Hong Kong
Tel: +852 2412 1386 Fax: +852 2411 3984 Email: contactus@cel.hk
www.cel.hk
Copyright 2010 Connection Electronics td.
ii

Vpot-30 i BX - System Manual
TABLE OF CONTENTS
1.HARDWARE OVERVIEW........................................................................................................................ 1
1.1 X200E Enterprise iPBX Server......................................................................................................... 1
1.2 E800H RFID IP Phone .....................................................................................................................1
1.3 GXW-4108 FXO Gateway................................................................................................................2
2.HARDWARE INSTALLATION................................................................................................................. 3
2.1 Network Configuration Example....................................................................................................... 3
2.2 Turn X200E Server On / Off.............................................................................................................4
2.2.1 Turn on X200E Server................................................................................................................ 4
2.2.2 Turn off X200E Server...............................................................................................................4
2.2.3 Restart X200E Server................................................................................................................ 4
2.3 Firewall Setting................................................................................................................................. 4
3.SYSTEM ADMINISTRATION USING UTTY.........................................................................................5
3.1 Install PUTTY.................................................................................................................................... 5
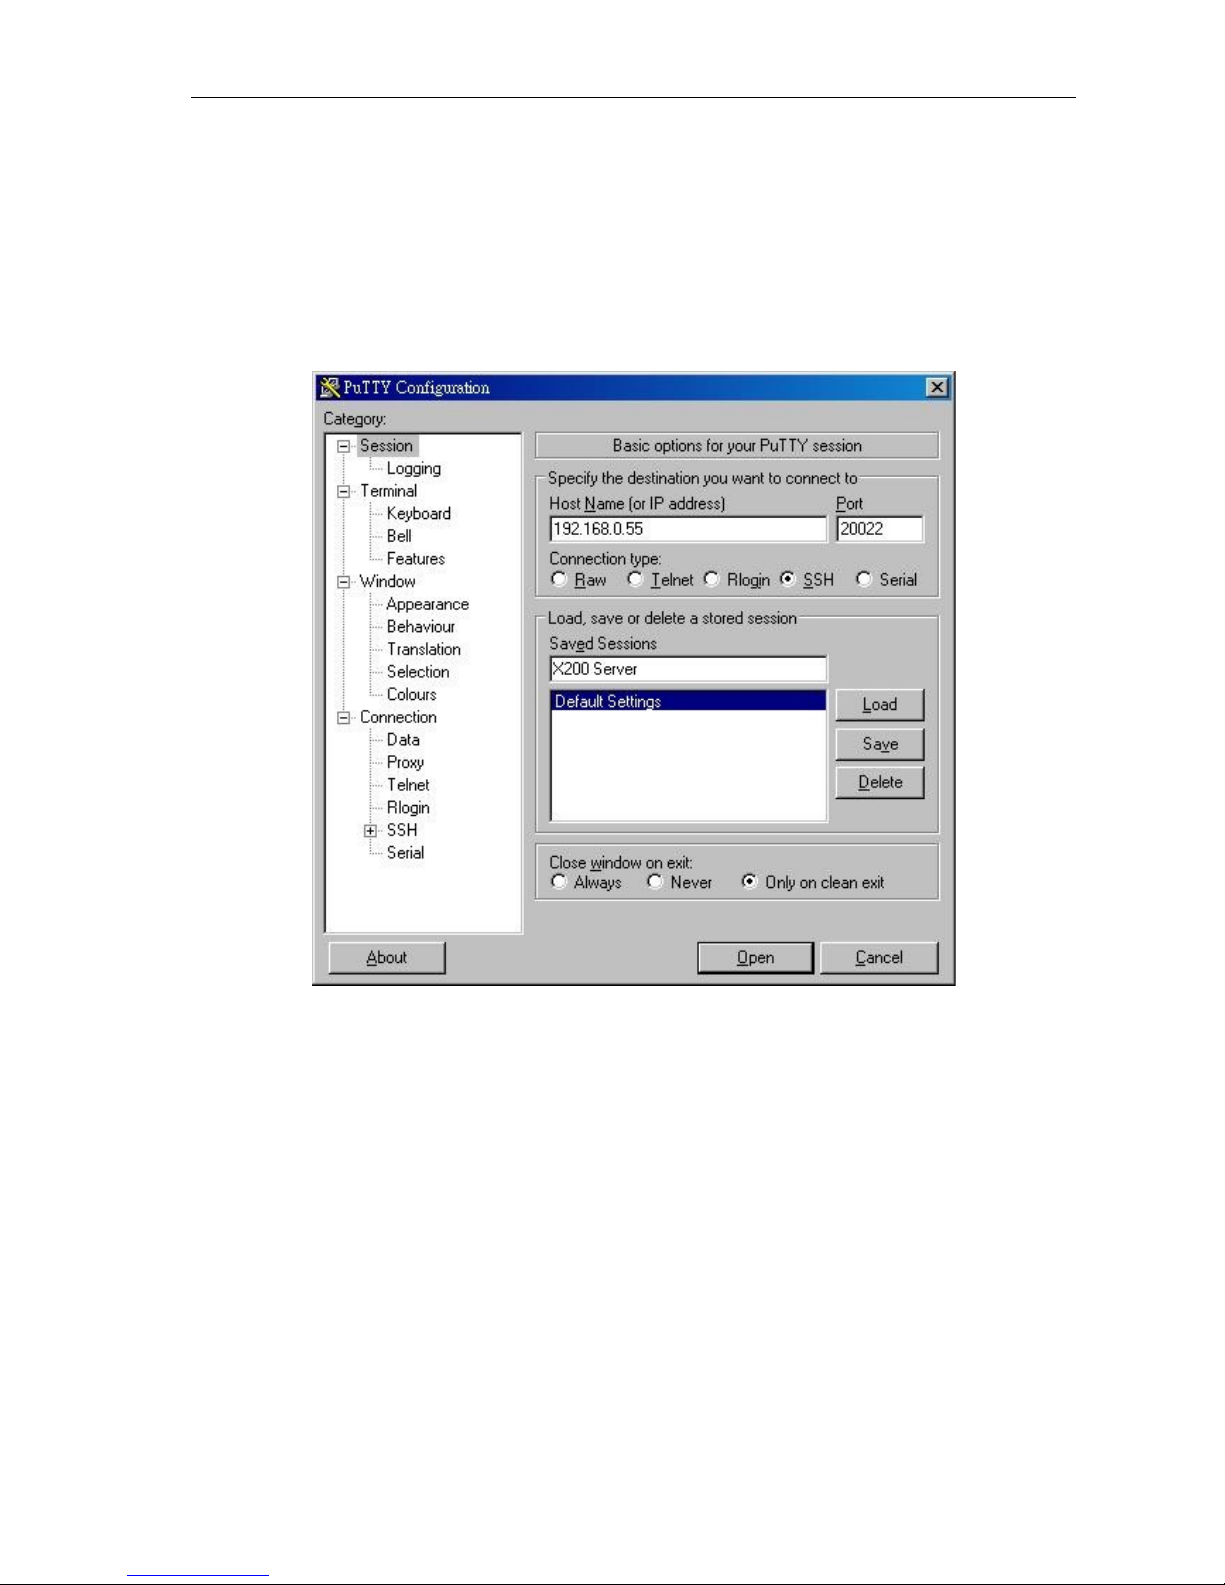
3.2 Setup putty for X200E Server...........................................................................................................5
3.3 General Operation of Menu User Interface.....................................................................................10
4.SYSTEM ADMINISTRATION................................................................................................................ 11
4.1 System Operation........................................................................................................................... 11
4.1.1 System Backup........................................................................................................................ 11
4.1.2 System Update......................................................................................................................... 12
4.1.3 System Restart......................................................................................................................... 12
4.1.4 RAID Management................................................................................................................... 12
4.1.5 System Monitor........................................................................................................................13
4.2 Network Setup................................................................................................................................ 13
4.3 Email Setup.................................................................................................................................... 14
4.4 NAT Setup...................................................................................................................................... 14
4.5 Change Password..........................................................................................................................15
4.6 HKBN 2b Phone.............................................................................................................................15
4.7 FXO Gateway................................................................................................................................. 16
4.8 PRI Trunk....................................................................................................................................... 16
4.8.1 PRI Trunk 1..............................................................................................................................16
4.8.2 PRI Trunk 2..............................................................................................................................17
4.8.3 PRI Monitor.............................................................................................................................. 17
4.9 icense Management..................................................................................................................... 17
4.10 About Vpot-30 iPBX"..................................................................................................................... 18
5.USER MANAGEMENT.......................................................................................................................... 19
5.1 Extension........................................................................................................................................ 19
5.1.1 ist Extension...........................................................................................................................19
5.1.2 Edit Extension.......................................................................................................................... 20
5.1.2.1 Phone Type .....................................................................................................................20
5.1.2.2 Phone Password ............................................................................................................. 20
5.1.2.3 Web Page Password ...................................................................................................... 20
5.1.2.4 Voicemail Password ........................................................................................................20
5.1.2.5 Voicemail Greeting .........................................................................................................21
5.1.2.6 Email ............................................................................................................................... 21
5.1.2.7 Pickup Group ..................................................................................................................21
5.1.2.8 Intercom Group ............................................................................................................... 21
5.1.2.9 Dialing Whitelist ..............................................................................................................21
5.1.2.10 Dialing Blacklist ............................................................................................................... 21
5.1.2.11 Call Waiting ..................................................................................................................... 21
5.1.2.12 Outgoing Insertion ...........................................................................................................22
5.1.2.13 Phonebook 1/2/3 ............................................................................................................. 22
5.1.2.14 Phonebook 1/2/3 Edit ......................................................................................................22
5.1.2.15 Conference Recording .................................................................................................... 22
5.1.2.16 Busy Forward .................................................................................................................. 23
5.1.2.17 No Answer Forward ........................................................................................................ 23
5.1.2.18 No Answer Timeout ........................................................................................................23
iii

Vpot-30 i BX - System Manual
5.1.2.19 Mobile Phone Number .................................................................................................... 23
5.1.2.20 Ring Mobile Simultaneously ............................................................................................23
5.1.2.21 Outgoing Route ............................................................................................................... 23
5.1.2.22 Secondary Route ............................................................................................................23
5.1.2.23 One Touch F1 / F2 / F3 ................................................................................................... 24
5.1.2.24 Call Recording ................................................................................................................ 24
5.1.2.25 Turbo Dial ......................................................................................................................24
5.1.2.26 Blind to Other Phone .......................................................................................................24
5.1.3 Add Extension.......................................................................................................................... 24
5.1.4 Delete Extension...................................................................................................................... 24
5.2 Ring Group..................................................................................................................................... 25
5.2.1 ist Ring Group........................................................................................................................ 25
5.2.2 Edit Ring Group........................................................................................................................ 25
5.2.3 Add Ring Group........................................................................................................................ 26
5.2.4 Delete Ring Group....................................................................................................................26
5.3 Access Codes.................................................................................................................................27
5.4 Call Answering................................................................................................................................ 27
5.5 Auto Attendant................................................................................................................................ 28
5.6 Working Time and Holiday..............................................................................................................28
5.6.1 Working Time........................................................................................................................... 29
5.6.2 Holiday..................................................................................................................................... 29
5.7 DID and DISA................................................................................................................................. 29
5.7.1 DID by Caller ID....................................................................................................................... 30
5.7.2 DID by Called Number.............................................................................................................. 30
5.7.3 DISA Authentication................................................................................................................. 31
5.8 Export SMDR.................................................................................................................................. 31
5.9 RFID Card...................................................................................................................................... 32
5.9.1 ist RFID Card......................................................................................................................... 32
5.9.2 Edit RFID Card......................................................................................................................... 32
5.9.3 Add RFID Card......................................................................................................................... 32
5.9.4 Delete RFID Card..................................................................................................................... 32
5.10 Conference Room......................................................................................................................... 33
5.10.1 ist Conference Room............................................................................................................ 33
5.10.2 Edit Conference Room........................................................................................................... 33
5.10.3 Add Conference Room........................................................................................................... 33
5.10.4 Delete Conference Room.......................................................................................................33
iv

Vpot-30 i BX - System Manual
1. HARDWARE OVERVIEW
1.1 X200E Enterprise i BX Server
X200E Enterprise iPBX Server is the primary component of the IP telephony system. It
connects the Internet and register to Internet Telephone Service Provider (ITSP) to oin
the PSTN. The server also connects the user IP phones and performs call switching /
processing between PSTN.
1.2 E800H RFID I hone
E800H RFID IP PHONE is the dedicated IP phone for the X200E Enterprise iPBX
Server. It has a RFID feature which greatly enhance it's function with ease of operation.
It also has a 2.5mm headset ack to connect Nokia compatible headsets or other headsets
with cable adapter.
Figure 1: X200E Enterprise i BX Server
Figure 2: E800H I hone
1

Vpot-30 i BX - System Manual
1.3 GXW-4108 FXO Gateway
The GXW-4108 is a 8 ports FXO gateway. It provides an alternate way for X200E
Enterprise iPBX Server connects to the PSTN. Which enable up to 8 traditional analog
telephone lines connect to the X200E server, so IP phones of X200E server can oin the
PSTN via the analog telephone lines.
Figure 3: GXW-4108 FXO Gateway
2

Vpot-30 i BX - System Manual
2. HARDWARE INSTALLATION
Connect the X200E Enterprise iPBX Server, E800H RFID IP PHONE to system LAN.
If GXW-4108 FXO gateway is used, connect it's WAN port to system LAN with the
same subnet of the server.
X200E server and GXW-4108 FXO gateway require static IP address while E800H
phone accepts both static or dynamic IP address. Please refer to E800 User Manual and
GXW-4108 User Manual for their IP address assignments.
2.1 Network Configuration Example
Example of connecting X200E server and E800H in a network.X200 server connects to
ITSP (HKBN) via internet.
Example of connecting X200E server, E800H and GXW-4108 FXO gateway in a
network. X200 server connect to PSTN using GXW-4108 FXO gateway's analog trunk
lines.
Figure 4: X200E Server and E800H General Installation Diagram
Figure 5: X200E Server, E800H and GXW-4108 General Installation Diagram
3
PSTN
X200E Enterprise iPBX Server
E800H RFID IP Phone
E800H RFID IP Phone
Soft Phone
LAN
Analo Trunk Lines
GXW-4108
FXO Gateway
Internet
PSTN
Router / Firewall
X200E Enterprise iPBX Server
E800H RFID IP Phone
E800H RFID IP Phone
Soft Phone
(e. . HKBN 2b)
LAN ITSP

Vpot-30 i BX - System Manual
2.2 Turn X200E Server On / Off
2.2.1 Turn on X200E Server
The X200E server can be turned on by pressing the power button once. After the power
indicator, blue colour LED lite, the system will be ready about 1 minutes later.
2.2.2 Turn off X200E Server
The X200E server can be turned off by pressing the power button once. After pressing
the power button, the system will start to shut down and will turn off about 1 minutes
later. The power indicator, blue colour LED turns off indicates the X200E server is
actually turn off.
WARNING: Don't remove power while the server is operating. It requires proper shut
down by press the power button once as stated above.
2.2.3 Restart X200E Server
In order to restart X200E server, following the above procedure to turn off it, wait for 10
seconds and then turn on it again.
2.3 Firewall Setting
Since most of the network has a firewall between internet and system LAN. As in the
above network configuration examples, X200E server are accessing the internet behind
a firewall. In order to make X200E server successfully communicates with other parties
in the internet, the firewall should be configured to pass specific information to X200E
server. The followings are X200E server required port forwarding setting for different
services it provide.
Service Protocol Port Forwarding to X200E Server
ITSP (HKBN 2b) Signaling UDP 5060
ITSP (HKBN 2b) Voice UDP 10000 ~ 20000
Remote E800H IP Phone UDP 4569
Remote administration TCP 20022
Remote system phonebook TCP 443
Table 1: Firewall ort Forwarding for X200 Server
4

Vpot-30 i BX - System Manual
3. SYSTEM ADMINISTRATION USING UTTY
PuTTY is a free implementation of Telnet and SSH for Windows and Unix platforms.
We use PuTTY in Windows PC as a SSH client to do the system administration of
X200E server. Using PuTTY can perform system administration within system LAN or
remote administration via Internet.
3.1 Install UTTY
PuTTY is ust one "exe", no install, no extra dlls are required. You can download it and
execute the downloaded putty.exe directly. The download link is
“http://the.earth.li/~sgtatham/putty/latest/x86/putty.exe”.
For better file organization, it is recommended to store the putty.exe in
“c:\Program Files\PuTTY” directory and create a shortcut at Start Menu as shown in
following steps.
1. Use Windows Explorer to locate “c:\Program Files” and create new directory
“PuTTY”
2. Move the downloaded putty.exe into the newly created
“c:\Program Files\PuTTY” directory.
3. Locate the file “c:\Program Files\PuTTY\putty.exe” and drag it to “Start” button
then drop it.
4. A shortcut to putty.exe will be created in the start menu.
3.2 Setup putty for X200E Server
Executing PuTTY will show the configuration windows as shown below.
Figure 6: uTTY Configuration Window
5

Vpot-30 i BX - System Manual
The following steps entering the session information for X200E server:
1. Enter the X200E Server IP address, e.g. “192.168.0.55” in the “Host Name (or
IP address)” box.
For remote administration, enter the WAN IP address from ISP as Host Name.
Also, the firewall should also configure to forward port 20022 to X200 server..
2. Enter “20022” in the “Port” box.
3. Enter a name for this session, e.g. “X200 Server” in the “Saved Sessions” box.
Figure 7: uTTY Configuration - Session Information
6

Vpot-30 i BX - System Manual
Two options require for X200E server:
1. In the left column, select “Terminal” → “Feature” and then check the “Disable
application keypad mode”
Figure 8: uTTY - Terminal Features
7

Vpot-30 i BX - System Manual
2. In the left column, select “Window” → “Translation” and then select “ISO-
8859-1:1998 (Latin-1, West Europe)” in the “Received data assumed to be in
which character set:” box:
After all the above change, select “Session” at the left column and click the “Save”
button to save the setting.
The PuTTY “X200 Server” session is ready to connect to X200E server. Double click
the “X200 Server” in the “Saved Sessions” or load the session and then click the
“Open” button to connect X200E server.
Figure 9: uTTY - Window Translation
8

Vpot-30 i BX - System Manual
After connected to X200E server, the terminal screen will show and prompt for login
username and then password.
Enter “admin” and corresponding password for System Administration. Enter “user”
and corresponding password for User Management.
Figure 10: uTTY - Login
9

Vpot-30 i BX - System Manual
3.3 General Operation of Menu User Interface
The following figure show the System Administration Menu. The System
Administration and User Management having the same user interface.
In the middle of menu are items for selection and the bottom of menu have the action
buttons. Use <Up> and <Down> arrow key to select items and use <Left> and <Right>
arrow key to change the active action button. Press <Enter> will execute the action of
highlighted action button. Beside using the arrow and <Enter> keys, using mouse to
click on the menu item will select it and click on the action button will execute it.
In sub-menu for changing configuration, there has <Save> action button. After changing
the system configuration, execute the <Save> is required. Otherwise, changes under that
sub-menu will be lost.
Figure 11: Menu User Interface
10

Vpot-30 i BX - System Manual
4. SYSTEM ADMINISTRATION
System Administration is for setting up X200E server in system network, VoIP account
to ITSP, license management, X200E server maintenance, etc..
Use PuTTY to connect X200E server. Login with “admin” and corresponding password
will bring the system administration menu.
4.1 System Operation
System operation contain the maintenance operations – System Backup, System Update,
System Restart, RAID Management and System Monitor.
4.1.1 System Backup
In System Backup menu, it has System Backup, View Backup and System Restore
options.
System Backup - Backup the X200E server configurations to a file. It is recommended
to perform system backup after the configuration has changed.
Figure 13: System Operation Menu
Figure 12: System Administration
11

Vpot-30 i BX - System Manual
View Backup – Display the backup files in system in chronological order. Each backup
has assigned a number. The number is used to perform System Restore.
System Restore – Restore the X200E server configuration from a backup file.
4.1.2 System Update
In System Update menu, it has View Update, System Update and Linux Update options.
View Update – Display any X200E server system update file.
System Update – Update the X200E server from the system update file.
Linux Update – Update the Linux components from internet.
WARNING: Performing Linux Update may cause unpredictable result. It should be
performed when directed to do so.
4.1.3 System Restart
In System Restart menu, it has System Restart, System Reboot and Power Off options.
System Restart – Restart X200E server VoIP processing service.
System Reboot – Reboot the whole X200E server.
Power Off – Turn off X200E server.
4.1.4 RAID Management
In RAID Management menu, it has View RAID Status and Add Hard Disk options.
View RAID Status – View the hard disk in RAID, their current status and also the RAID
recovery progress if any.
For the md1 line, active means 'started'. It is a raid1 array and the
component devices are: sda2[0] and sdb2[1].
The final 2 entries on this line [2/2] [UU]. [n/m] means that ideally
the array would have m devices however, currently, n devices are
in use. [2/2] means it is in good condition.
Figure 14: RAID Status
12

Vpot-30 i BX - System Manual
The “UU” at last of line means two hard disks are in normal status,
while “_” instead of “U” means the hard disk is failure.
Add Hard Disk – Add available hard disk to RAID.
4.1.5 System Monitor
In System Monitor menu, it currently has only 1 option, Temperature.
Temperature – Show the system temperature and CPU temperature.
4.2 Network Setup
Network Setup is for setting the X200E server's name and it's Ethernet interface
parameters.
System Name – Let you assign a name to X200E server.
IP Address – A static IP address in system LAN.
Subnet Mask – System LAN subnet mask. e.g. 255.255.255.0.
Gateway – IP address of gateway in system LAN. e.g. router in system LAN.
DNS 1 - IP address of first DNS server. (Refer to ISP information)
DNS 2 - IP address of second DNS server. (Refer to ISP information)
Figure 15: Network Setup
13

Vpot-30 i BX - System Manual
4.3 Email Setup
Email Setup is for setting the X200E server's email sending account and corresponding
recipient for system alert. System alert including daily system log, hard disk failure, etc..
SMTP Server – Address of SMTP server used by X200E server to send email.
SMTP Account – Account name for SMTP server if applicable.
SMTP Password – Account password for SMTP server if applicable.
Server Email – X200E server's own email address, sender address.
Admin Email – Destination email address for system alert.
Send Test Email – Send a test email to Admin Email to test the above setup is valid.
4.4 NAT Setup
NAT Setup is for setting the X200E server's VoIP service to pass through the NAT
function.
External IP Address – The WAN IP address of system LAN. That is the IP address
obtained from ISP.
Local IP Addresses – The system LAN IP address range. It should be entered in the
ip_address/mask syntax. e.g. 192.168.0.0/24
Figure 16: Email Setup
14
Figure 17: NAT Setup

Vpot-30 i BX - System Manual
4.5 Change assword
Change Password is for changing system-wise passwords.
System Administration Password – The password for “admin” login.
User Management Password – The password for “user” login.
Card Administration Password – The password for RFID card administration. The
password should be numeric only.
Upgrade Firmware Password – The password for E800H IP phone firmware upgrade
The password should be numeric only.
Greeting Recording Password – The password for recording system (auto attendant)
voice greeting messages. The password should be
numeric only.
4.6 HKBN 2b hone
HKBN 2b Phone is for entering the HKBN 2b phone account information.
Phone Number – The phone number of HKBN 2b account.
Password – The password of HKBN 2b account.
Domain Name – The domain name of HKBN 2b account.
Figure 19: HKBN 2b hone
15
Figure 18: Change assword

Vpot-30 i BX - System Manual
4.7 FXO Gateway
FXO Gateway is for entering the IP address of connected GXW-4108 FXO gateway.
IP Address (fxo1) – The IP address of first connected GXW-4108 FXO gateway.
IP Address (fxo2) – The IP address of second connected GXW-4108 FXO gateway.
4.8 RI Trunk
PRI Trunk is for setting up PRI trunk card in X200E server. If PRI trunk card has
installed in X200E server, the PRI trunk type E1 / T1 hardware setting will be detected
and displayed automatically.
4.8.1 RI Trunk 1
Setting for PRI Trunk 1.
Figure 20: FXO Gateway
Figure 21: RI Trunk
16
Figure 22: RI Trunk Setting
This manual suits for next models
2
Table of contents
Other Connection Electronics Telephone manuals
Popular Telephone manuals by other brands

Sears
Sears 329.34431; 329.34432; 329.34433; 329.34434 owner's manual

NEC
NEC IPK II user guide

Grandstream Networks
Grandstream Networks GHP6 Series Administration guide

Polycom
Polycom VVX 300 Quick user guide

Xblue Networks
Xblue Networks X16 Quick reference card

Siemens
Siemens OPTIPOINT 500 Service manual

TransTel Communications
TransTel Communications Superkey Series user guide

SpectraLink
SpectraLink NetLink e340 install guide

Teledex
Teledex Pearl S - Pan Euro user guide

AT&T
AT&T Generic 1 user guide

Viking Electronics
Viking Electronics E-32-IP quick start guide

Mitel
Mitel SmarT-1 EuroRoute Installation & programming guide