TrikExplor F426E User manual

TRIKE & QUAD USER MANUAL

Content
This manual contains important safety, operation and maintenance information.
Safety Notes and Cautions ………………………….. 3/4
Rear Shock A5-RE User Manual ………………………12/13
AOY-36RC Air Shock User Manual ………………….. 15/19
Display User Manual…………………………………… 20/33
Li-ion Battery User Manual (Rear Rack Type III)………. 38/41
Li-ion Battery User Manual (Hailong Type)…………… 34/37
Li-ion Battery Charger User Manual…………………… 42/43
Lighting System User Manual…………………………… 44/46
Adjusting Your TrikExplor ……………………………. 5/6
How to Ride …………………………………………... 6/7
Maintenance ………………………………………….. 7/8
Inspection ……………………………………………... 7/8
2
Read it before you take the first ride on your new TrikExplor, and keep it for reference.
Warranty Policy ……………………………………….. 9/10
Legal Requirements …………………………………… 11

Congratulations on being a new TrikExplor owner. We hope it brings you many years
of enjoyment.
This manual has been written to help you set up and use your TrikExplor. Recumbent
trike and quad may be a little different from the cycles you are familiar with, so please
take a moment to read through this document.
Throughout the manual, we have included some Tips, which have been learned from
over 10 years of experience buldlng trikes and quads. They are well worth taking
special note of.
We hope you enjoy owning and riding your TrikExplor.
It is good practice to wear a cycling helmet that complies with the latest safety
standards. Choose a helmet that is comfortable and fits well.
Safety Notes and Cautions
Pinch Points, Moving Parts and Hot Spots
Some parts of your TrikExplor can injure you if mishandled. For example, the chainring
teeth are sharp and brakes get hot during use. Moving parts, including brake levers
and the fold mechanism can pinch, cut or crush. When you sit on the TrikExplor your
hands will be close to the wheels. Touching the wheels when they are moving can
cause friction burns. Before you ride your TrikExplor, ensure that the wheels cannot
touch the handlebars or your hands when the steering is in full lock.
Check List for Every Ride
Before you ride your TrikExplor make sure it is in a safe operating condition. If any part
of your TrikExplor does not function correctly, do not ride it until it is fixed.
• Visual inspection: check the TrikExplor and accessories for damage
• Brakes: ensure the front brakes and parking brake (if fitted) work correctly
• Gears: ensure the gear system works correctly
• Wheels and tires: ensure the tyres are correctly inflated and wheels are fitted correctly
• Seat: ensure the seat is secure and cannot move
• Mounting bolts: ensure the bolts on main hinge, seat, steering, and wheels are tight
• Reflectors: ensure reflectors are clean, in position, and unobstructed
Wear a Helmet
Cycling Laws and Regulations
This section describes ways to keep safe while cycling. Always think “safety” and cycle
according to your ability and experience.
Most countries have special laws and regulations for bicycles and cyclists, and these
may apply to you as a trike rider. Know the local cycling laws and obey them.
3

Suitable Clothing
Wear clothing that is suitable for conditions you will ride in. Wear glasses to protect
your eyes from dust, dirt, and bugs. Wear appropriate shoes that will stay on your feet
and can grip the pedals. Use pedal straps or “clipless” pedals to prevent your shoes
slipping off the pedals while cycling.
Cycling with Care
You can help prevent accidents by using common sense, cycling with care, and thinking
about your safety. You need to think about what other cyclists, vehicles, and pedestrians
may do, and react accordingly. Anticipate potential hazards, such as car doors opening
or children running in front of you. Cycle at an appropriate speed, stay back from other
cyclists and vehicles, and avoid cycling on the inside of traffic queues. A rear view
mirror is helpful to see what is happening behind you. Help other road users
understand what you are going to do next by staying visible, maintaining a clear
position on the road and using clear hand signals. Using a horn or bell will help other
people know that you are near.
Cycling in Bad Weather
Make sure other road users and pedestrians can see you. Ensure your reflectors and
lights are clean, correctly positioned and not obstructed by clothing or accessories.
Check that your lights are working correctly before you ride, even if you don’t anticipate
using them. Wear bright colored clothing with reflective areas. Attach a flag to your
TrikExplor.
Visibility
Take extra care when the weather is wet, foggy, windy, or icy. Ride with extra care and
brake early, as your TrikExplor will take longer to stop. Sudden braking could lead to
skidding and loss of control.
Cycling in Poor Visibility
Take extra care when the weather is wet, foggy, windy, or icy. Ride with extra care and
brake early, as your trike will take longer to stop. Sudden braking could lead to
skidding and loss of control.
4

5
1. Change gear to the smallest front chainring and rear sprocket.
2. Loosen the two clamp bolts under the front boom with a 5mm Allen wrench.
3. Adjust the boom by twisting and pulling or pushing. Take care not to damage the
frame shim located inside.
4. Ensure that boom is not extended past the MIN INSERT 10cm.
5. Ensure that the boom is vertical.
6. Tighten the two front boom clamp bolts to 8-10Nm.
Adjusting Your TrikExplor
Tire Pressure
Tire pressure is important for comfort and safety. Ensure your tires are correctly inflated
before every ride. The recommended pressure range is given on the side wall of the
tire.
Adjusting the seat tension
The mesh seat tension can be adjusted using the straps behind the seat back and base.
It is easier to adjust the tension when the seat is off the trike.
Adjusting the front boom
If you decide to adjust the boom, the chain will also need to be lengthened or
shortened two inches for every inch the boom is moved. For this reason we recommend
taking it to your local dealer or bike shop to make sure it’s done correctly.
It is important that your leg is not fully straightened when the crank is in the foremost
position. If the distance is too long it is difficult to overcome this dead point, pedalling
becomes uncomfortable and there is too much strain on the sinews of your feet and
legs. If the distance is too short you may suffer from knee pain.
Adjusting the handlebars
While riding you should allow your arms to rest in a relaxed position on the
handlebars. By changing the angle of the handlebar you can adjust the position of the
grip to the length of your upper body and your arms.
In order to change the angle of the handlebar, loosen the four screws of the handlebar
clamping. Move the handlebars until they are in your favourite position and there is no
interference. Tighten the clamping screws to 8–10Nm with a 5mm Allen wrench .
Check the correct clamping of the handlebars by sitting down on your tricycle and
pulling the handlebars.
If the handlebar grips are adjusted pointing too far forward or too wide, your hands or
the brake levers can touch the front wheels or mudguards when cornering sharp,
leading to injury. Make sure you have at least 5 cm (2") clearance between brake levers
and front wheels/mudguards at all steering angles.

6
Braking
We use disc brakes on our TrikExplors and they are very efficient. To stop, squeeze both
brake levers smoothly and with equal pressure. Each brake lever activates a
corresponding brake on the front wheels. You will experience “brake steer” (pulling) if
you brake only one side or if you use unequal pressure on the brake levers. It is
possible to tip the trike forward by trying to stop too fast.
After having adjusted the handlebar position you have to readjust the length of the
brake cables and shifter cables. The cables have to run smoothly without any sharp
turns and they should not be bent sharply or stretched when the handlebar is at
maximum angle. Also avoid large bows that could be caught up by the front wheels or
other parts or touch objects under your tricycle.
Adjusting the headrest
The mest seat can be equipped with a headrest. Its height and inclination is adjustable
at the mounting clamp.
Adjusting the shock
Please refer shock user manual.
Adjusting the display
Please display user manual.
How to Ride
Entering and Exiting the TrikExplor
Before sitting down on the TrikExplor, make sure that it cannot roll away from you by
using the parking brake.
Straddle the boom and begin lowering yourself into the seat while supporting yourself
using the tires or the sides of the seat frame. Do not to put weight on the handlebars as
they are not load bearing members of the trike and can be damaged by doing so.
When exiting the TrikExplor, lock the parking brake and use the tires, boom stub tube,
or seat frame to provide assistance when standing up from the seated position.
Turning
Lean your body into the center of your turns or you risk lifting the inside tire and
possibly rolling your TrikExplor. The faster you are riding, the more critical this
becomes. This leaning counteracts the lifting force (caused by fun things like your center
of gravity, instantaneous velocity and centrifugal force) and encourages the inside tire
to stay on the ground. Since TrikExplors cannot lean like regular bikes, you have to
counter these forces with your body movement.

7
F426E, 424E and T320E have unique brake levers. The right handlebar is mounted two
levers. The outsider lever is to control the brake on front right wheel. The insider lever is
to control the brakes on two rear wheels. You need to using two levers by one hand.
On flat road, you can only use front brakes. On off-road, especially uphill and
downhill, you have to use front and rear brakes at the same time. Before first ride you
have to practice to operate these brake levers.
When you shift using derailleur gears the chain must be moving clockwise under gentle
tension; you can only change gear when you are pedalling and moving forward.
Shifting allows you to maintain a comfortable pedaling cadence while riding over
varied terrain.
Parking
When your TrikExplor has stopped you can use a parking brake to keep it stationary.
Use the parking brake lever down on the handlebar.
Shifting
Your TrikExplor is equipped with trigger shifters. There are two triggers on each shifter.
The big trigger is operated by your thumb. The smaller trigger is operated by your
index finger.
The right shifter changes the front gears, and the left shifter changes the rear gears.
This is different with regular bicycles.
Maintenance
Wear and Tear Items
Items such as steering bushings, brake pads, tires, hinges, drivetrain, etc. are all parts
on your TerraTrike that will slowly wear out over time. It is important to keep an eye on
these parts from a safety and functionality standpoint. If an issue creeps up over time it
may be a sign that one of these items is ready to be adjusted or replaced. Some
drivetrain noise is normal; loud, grinding noises are not and can indicate the need for
service, adjustment, or part replacement. Contact your local dealer or bike shop for
proper service.
Lubrication
Your chain and cables need regular lubrication with a good quality bike lube to reduce
wear and maintain proper operation. Keep these parts clean and lubricated.

8
• Clean your bicycle and protect it from corrosion as described in the chapter on
"Cleaning".
• Store your bicycle in a dry and warm place.
• Avoid direct sunlight and storage close to the heating since it affects the rubber of
your tires.
• Choose the smallest sprocket and the smallest chain ring. That way the cables are in
the most relaxed position.
• The tubes of your tires lose air when standing over a longer period of time. If the
bicycle then rests on flat tires, the tires may be damaged. Therefore, hang up your
bicycle or check the air pressure regularly.
The winter months are a convenient period of time for the annual service since then you
won't have to wait long for an appointment.
Before storing your bicycle over a longer period of time, e.g. during winter, please take
care of the following steps:
The best way to transport your TrikExplor is inside the car. Take care that it does not lie
on the derailleur.
Transport in the Car
Brake cables and shift cables will stretch during the initial break-in period of your
TerraTrike. To compensate for this, you can make minor adjustments by turning the
barrel adjusters near the ends of the cable housing. Make small adjustments,
rechecking the functionality with each rotation so you do not overcompensate for the
cable stretch. We strongly recommend taking your trike to your local dealer or bike
shop to make sure these adjustments are done correctly.
Brake and Shifter Cables
How to Clean Your TrikExplor
Wash your TrikExplor with soap and water occasionally, but especially after riding in
inclement weather. It’s important to dry and lubricate it right after cleaning. Wash the
seat mesh separately (by hand or on a gentle cycle in your washing machine) and let it
air dry if needed. Do NOT put the mesh in your dryer. Road salt is very hard on all trike
components, including the frame. Clean it off immediately! Likewise, salty air can
corrode your TrikExplor over time. It’s a good idea to wax the frame (only glossy
finished areas) occasionally with a good quality car wax.
How to Store Your TrikExplor
If you want to transport it outside the car we recommend a roof-rack or a rear carrier.
Take care to fasten your tricycle at the frame only.
Please remove any parts that could come loose during transport (seat cushion, water
bottles, luggage bags, pumps, pennants, etc.).

9
Inspection
The following service schedule is a guide based on cycling up to 30 miles (50km) per
week in ngood weather conditions. If you ride your trike more often, or in poor
weather, you will need to do maintenance more frequently.
Monthly Check:
Every month check that all accessories are all still fitted correctly and are not damaged.
After a long ride and at least every three months of regular use:
• The ‘Before Every Ride’ checks.
• Clean, degrease and lubricate your TrikExplor.
• Inspect the TrikExplor and accessories for damage.
• Ensure bolts are tightened to the correct torque.
• Ensure the hubs turn smoothly.
• Ensure there are no loose or broken spokes.
• Ensure tires are not badly worn or damaged.
• Ensure the chain moves smoothly through the chain tube and pulley.
• Ensure the seat is still securely attached.
Every 6 months:
• Visual inspection: check the trike and accessories for damage
• Brakes: ensure the front brakes and parking brake (if fitted) work correctly
• Gears: ensure the gear system works correctly
• Wheels and tires: ensure the tyres are correctly inflated and wheels are fitted correctly
• Seat: ensure the seat is secure and cannot move
• Mounting bolts: ensure the bolts on main hinge, seat, steering, and wheels are tight
• Reflectors: ensure reflectors are clean, in position, and unobstructed
Before every ride:
• Check the steering assembly.
• Inspect drivetrain for damage.
Every 12 months:
In addition to the regular maintenance, we recommend that your TrikExplor is given a
full service every year. Unless you are experienced in trike mechanics, we recommend
that you ask your dealer to do this for you:
• Ensure wheels are true.
• Change brake and gear cables if necessary.
• Inspect chainring and sprockets for wear and replace if necessary.
• Check chain for wear and stiff links, clean and lubricate or replace the chain if
necessary.
• Ensure the headsets move smoothly.

10
Warranty Policy
TrikExplor warrants all its new recumbent cycles against defects in materials and
workmanship for limited period.
Item Warranty Time
Frame and Fork 10 years
Motor, controller and display 2 years
Battery 1 year
Components 1 year
This warranty does NOT cover the following:
• Damage caused by wear and tear, corrosion or damage at the surface coating.
• Damage caused by inappropriate use, inadequate care and maintenance, falls,
crashes, overloading through excess weight, incorrect assembly or modifications.
• Using the bicycle for commercial purpose, such as rental or leasing.
• Check bearings in front suspension unit for wear.
• Check rear suspension back end for lateral movement and loose vertical movement.
• Ensure the pedals are still tight.
If in doubt, ask your dealer for help.
In the event of any warranty, the warranty pass together will a copy of the proof of
purchase has to be sent to TrikExplor through your dealer
This warranty does not have any influence on the rights of the purchaser according to
this statutory rights.
This warranty applies only to the original purchaser.
The warranty starts with the date of purchase (receipt of the dealer) of a new bicycle.
The warranty is processed via the dealer who ordered the bicycle from us.
Warranty is only valid for original parts from TrikExplor. In case of warranty we will
replace or repair the damaged part with a part of our choice or a new part equal to the
old one (warranty obligation). We do not cover any transport, labour or any secondary
In case of damage the dealer has to send the damaged frame to us so that we can
check it, if asked to do so by us.
In the event of any action that falls under warranty the original warranty period will not
be prolonged and no new warranty will be given. If TrikExplor refuses to count a repair
as warranty case we will only carry out a repair with costs after having talked to the
customer or his representative, the respective dealer.

11
Legal Requirements
Legal requirements vary from country to country and you should always comply with
them.
The important areas you need to consider are lighting, and helmet use. Consult your
local bike dealer for information about what is required in your area. Please also
remember that even if not required by law, some equipment (such as helmets and
lights) can increase your personal safety and should be carefully considered.
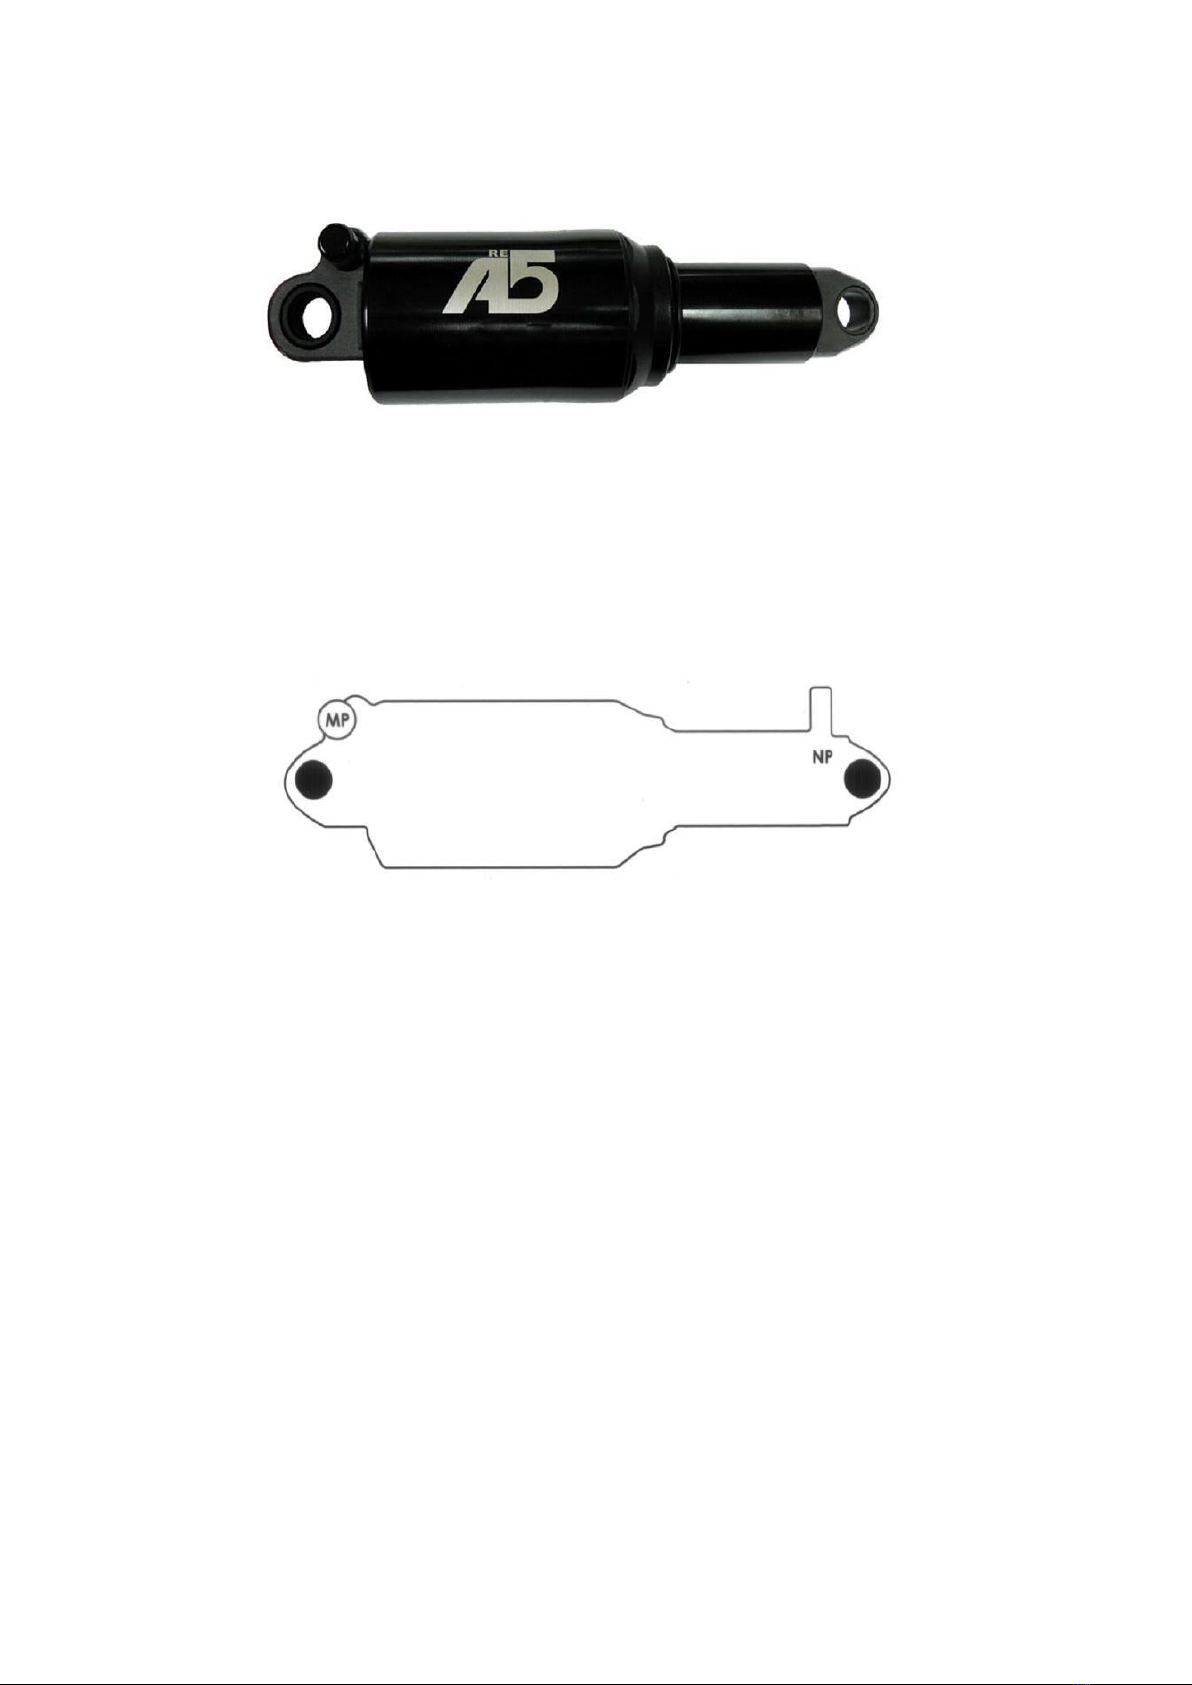
Recommended air pressure for the main cylinder is 100-150PSI.
The negative pressure must not exceed the main pressure.
DO NOT EXCEED 180PSI.
12
Rear Shock A5-RE User Manual
To set the pressure in the main cylinder (valve marked “MP”), use a compatible shock
pump. Remove the valve cap and attach the shock pump according to the pump
manufacturers’ specifications. Kind Shock recommends using the KS AIR-8 pump
model for best results.
Maintenance
Your ExaForm rear shock requires periodic service to maintain consist function. This
service should be done at the same interval as a drivetrain cleaning. Please see your
local dealer to have this service performed.
Lubrication: It is recommended that the main shaft be lubricated every 25-30 hours of
use or after a long period of non-use.
Cleaning: Use only warm water and a lint-free soft cloth to wipe down. The use of
solvents, degreasers, waxes and other chemicals may damage the shock and void the
warranty.
Setup

13
Attention
This is a high performance product. It will give you reliable service if it is installed
properly and regularly maintained by an authorized ExaForm service center. Please
read through these instructions fully and follow them carefully before you install your
new rear shock.
Warning
ExaForm rear shocks must be regularly maintained by an authorized ExaForm service
center. Service center locations can be found at www.exa-form.com. Do not
disassemble your rear shock. Disassembly could cause damage and severe personally
injury as some of the contents are under pressure. Failure to follow these warnings and
instructions will immediately void your warranty.

AOY-36RC Air Shock User Manual
Product Description
Diagram Consumer Safety / : Warning : Attention
14

Rebound adjustment knob
+ direction rotation, increase damper (slow)
- direction rotation, decrease damper (fast)
Compression adjuster
+ direction rotation, lock-out
- direction rotation, open up
Main air chamber
Supply air pressure according to
pressure meter
Negative air chamber
Supply air pressure according to
pressure meter
15
Specification
A. Total Length
165± 2
190± 2
200± 2
B. Route
35± 2
50± 2
55± 2
DNM Air Shocks
INSTALLATION OF A NEW SHOCK
16
Congratulations! You have purchased the best suspension shock absorber in the
Mountain Bike Technology. DNM shocks are made of lightweight, high strength
materials and they are designed to balance high performance, easy to use and easy to
maintain.
This manual contains information about safe installation, operation and maintenance of
your purchased item. We urge you to read it carefully to be more familiarized with its
contents and follow our recommendations and references to help you make your
mountain bike experience enjoyable and trouble-free.
Diagram Consumer Safety / : Warning : Attention
The first and most important factor when upgrading your rear shock is to make sure that
you have the correct unit for the application.
To put it simply you need to determine the main type of riding that you will be doing, for
example, Downhill, Cross Country, Free Riding or Road.
Upgrading your shock can change many aspects of your bikes handling, including the
steering and also the way the bike behaves in tough terrain.
Choosing the right shock is crucial. Be sure to consider the type of riding you will be
doing. It would be pointless to put a light weight air shock on a downhill bike, just as it
would be unsuitable to put a long travel shock on a light weight dual suspension bike.
1. Establish the length of the shock you need by measuring from mounting eyelet to
eyelet, this requires accuracy so use a set of calipers or a metal ruler. The distance from
the center of the bolt at the head of the shock to the center of the other bolt at the base
of the shock is the distance you need to find out.
2. You also need to know the distance for the width of the aluminum sleeves at either
end of the shock which passes through the bushings and connect the shock to the frame
and swing arm. This requires the use of the caliper, you measure from the inside of the
mount on both sides. The gap where the shock mounts should be the same as the
aluminum sleeve. If your bike has a different set up you may need to consult with a
good bike shop.
3. Remember if you are seeking to extend the travel of your bike, make sure that you
have sufficient clearance to accommodate the full travel of the rear swing arm. If you
are going to use a shock which has an external reservoir (Piggy back chamber), Please
make sure that it will be suitable for your frame, move smoothly. It won't cause any
damage or interruption of your frame or seat posts as well.

SHOCK INFORMATION
1. Compressing Damping
The resistance felt when compress the shock.
2. Rebound Damping
The force needed to compress the spring.
3. Preload
The amount of static force placed on the spring
4. Spring Rate
The force needed to compress the spring.
5. Shock Sag
4. Once you know the correct shock length and you are confident that the bushing gaps
are also correct, the fitting of the new shock is a relatively simple exercise. Remove your
old shock absorber and clean the inside surfaces of the frame and swing arm, remove
any dirt and make sure that the surfaces are clean.
5. Establish which way you are going to position the shock take into consideration
access to the adjusters. Position the shock in the mounting area using the appropriate
tools usually a 5mm Allen key and a 10mm open ended spanner, depending on the
type of fastener in use on your existing mount the sizes may vary.
6. The tightening process requires only a medium amount of pressure, as the aluminum
spacers are a tolerance fit. It is good to use Nylock nuts and some Loc-tite fastening
solution. Once the shock is fastened gently sit on the bike and progressively apply more
pressure easing the bike through its travel. Providing there are no strange noises
coming from the shock area, you can be fairly confident the installation process has
been a success.
7. The final stage of the installation involves fine tuning, ride height can be adjusted by
using the collar on the main shock body to compress the spring. The rebound adjuster
to control how fast the shock kicks back and the compression damper to fine tune the
stroke. You will find that as these adjustments are variable just like where you ride they
will be something you change periodically.
8. So there you have it! If you have successfully got to this point the last thing you need
to do is to put on your helmet and go for a ride!
The amount the shock compresses when the rider is sitting on the bike in normal riding
position. This takes about 15%~25% of the shock travel for cross-country and about
25% for Downhill applications.
17

6. Lock-Out
7. Remote Lock-Out
Allows you to operate your Lock-Out system from your bike handlebars via thump shifter.
SAFETY INFORMATION
* Do not use locked-out system during jump riding, it is considered very dangerous.
SAG SET-UP INSTRUCTIONS
AIR SHOCKS
A unique DNM device allows the rider to choose different riding styles. Lock the
movement of the shock, reduce the suspension travel of your bike, and make it easy to
climb hills, fast acceleration, suitable for Downhill applications depending on the track
conditions. Available for both remote lock-out and manual lock out operating systems.
Before riding your bike, make sure to wear a safety helmet, protective clothing and eye
protection and do not ride beyond your limits. Always maintain your bike & suspension.
Never modify your shock or your bike frame. Any modifications can result to a broken
or malfunctioning shock, may lead to serious injury or the premature termination of life.
NEVER disassemble or service your shock if it is compressed or has not returned to its
original length without any load on the shock.
If your shock ever makes unusual noises or ever loses oil, DO NOT attempt to
disassemble any part of the shock. Please return your shock to a DNM authorized
dealer for service. Use ONLY genuine DNM parts for shock.
To maximum performance of DNM shock in any different situation, it is necessary to
adjust the SAG. The main reason of sag difference is all about the weight(bike or own
weight). When you set up the sag, please sit on the saddle properly. Make sure all your
weight is on the bike. And then observe the ring position which is on the shock travel
body after getting off bike. We suggest that displacement percentage range is 15~25%
of full travel. The sag displacement will be decreased by adding air pressure. On the
contray, displacement will be increased. Adjust air pressure to match your sag satisfied.
Air shocks are high quality air hydraulic shocks consisted of hard-anodized shaft and
black shock body. Adjustment: Compression, Rebound, Negative Air Spring and Lock-
Out. The Compression air valve is located near the rebound adjuster and the blue lock-
out knob. Air pressure is filled with 150psi during production.
Increasing the airpressure will make the shock harder while decreasing the air pressure
will make the shock softer. Negative air pressure is filled with 50psi during production
and should be adjusted between 50psi~80psi. Rebound adjuster is the red circular
knob between the main air valve adjuster and the blue lock-out knob.
18

It is necessary to adjust the SAG to get the best performance from your DNM shock.
Please refer to Shock Specification Table and Set-Up Instructions.
SERVICE MAINTENANCE
Air pressure in negative air room is 50psi, maximum is 80psi.
To get more information, please browse DNM website: www. dnmshock.com.
19
Turning the red circular rebound knob you can control the speed of your shock slower
or faster. Lock-out adjustment is the blue knob which locks the movement of the shock
and reduces the rear suspension travel of your bike by manually pulling the lock-out
knob. Press the knob into turn the lock-out feature on.
1. Do not disassemble the shock yourself, please contact your nearest DNM authorized
service center for shock malfunctions or improper operation.
Attention: Air shocks internal air is adopted nitrogen. Please do not disassemble by
yourself. We will not be responsible if the client who disassemble the shock by self.
2. The DNM shock has been filled with high-pressure air (150psi) during production.
Maximum air pressure must be limited within 250psi.
160
180
200
3. After about 5000km of riding, take out the mount bearing sleeves from both sides to
clean, grease and replace if necessary.
4. After a muddy riding, please clean the main shaft, dust scal and bumper rubber to
protect the shock and maintain its life span. Wash your shock only with soap and water.
Never use high-pressure washers.
5. Check and adjust to your desire level of the main air spring pressure and/IC negative
air spring pressure before riding.
6. Please note if you need to adjust your shock harder or softer, always adjust the main
air chamber first and then the negative air chamber.
Weight (lbs)
Main air chamber (psi)
Negative air chamber
75
* The above numbers are for reference only. Air pressure depends on rider's weight and
frame specification.
50
50
55
65
70
220
90
105
120
135
150
165
120
140

20
DPC14 Display User Manual
This manual suits for next models
12
Table of contents


