Cowboy C4 User manual

1
A guide
for riders
User Manual

2 3
Welcome to Cowboy.
Your new bike has arrived with
a new way to move in the city.
As you map your own path we’ll
be there to power you forward,
open to the road ahead.

Find your language
This guide is available online
in Danish, Dutch, English, French,
German, Italian, Spanish and Swedish
cowboy.com/pages/downloads
Cowboy S.A.
67 Rue de la Régence
1000 Brussels, Belgium
cowboy.com

6 7
This guide will get your new
bike set up and ready to ride
The product you have might differ
from what is reflected in the images
in this manual
8
9–23
24–29
34–35
36–37
38–39
40–41
42–43
30–33
What’s in the box
The set-up
Know your bike
The app
Accessories
Before you ride
Battery care
Bike maintenance
Built for any season
Get Ready
Connect
Ride
Contents

9
00 What's in the box
The set-up
All the Cowboy essentials are in
your hands. Follow the instructions,
Classic
01
09
1112
05
10
04
02
03
07
08
06
Battery chargerBattery keys x2 Belt spanner x1
or
Pedals x2
L R
Allen key 5Allen key 3 Allen key 6
and in just a few steps you'll
have your bike put together.
Butterfly Allen key 4
8

10 11
Cruiser ST
08
01 09
11
12
05
10
04
02
03
07
06
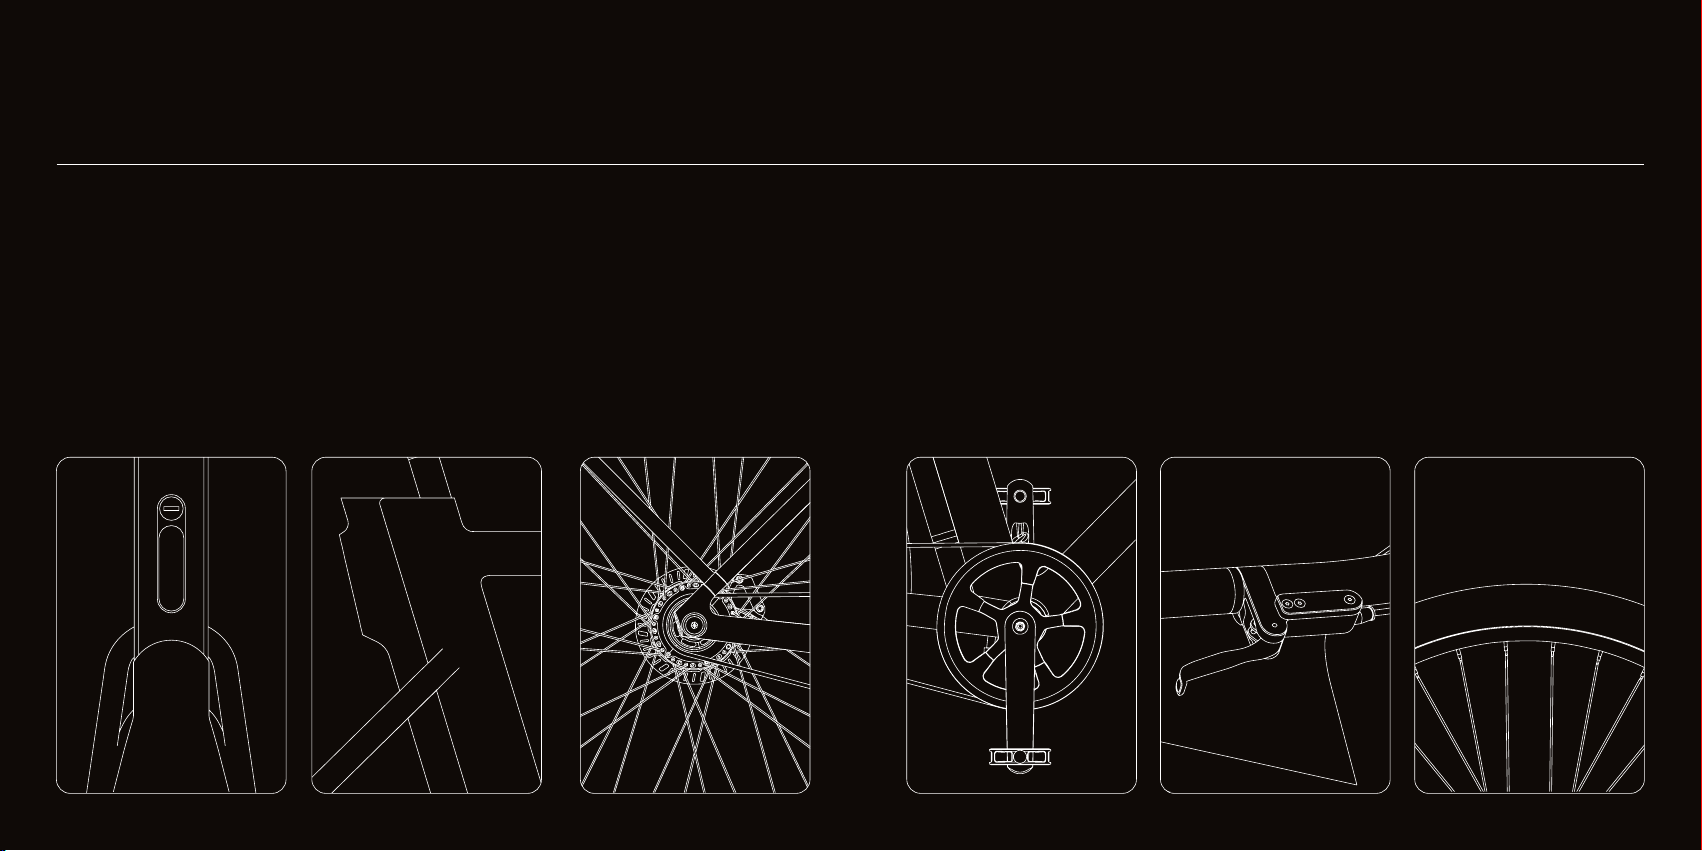
The essentials
01 Rear light
02 Removable battery
03 Mudguards
04 Rear hub motor
05 Puncture-resistant tyres
06 Carbon belt drive
07 Pedals
08 Hydraulic disc brakes
Cruiser
08
01 09
11
12
05
10
04
02
03
07
06
09 Front light
10 Wireless charging cockpit
11 Frame
12 Adjustable saddle

1312
01 Handlebar
90°
Allen key 3
01 Check
Your bike comes with the handlebar
parallel to the wheels and frame.
03 Secure
Use Allen key 3 to tighten the two
screws securely as shown.
This will keep your handlebar in
place. Be sure to use the short
end of the Allen key for the most
tightening force, then test it to
make sure it’s fully secure by
blocking the front wheel between
your legs and trying to move the
handlebar from left to right.
02 Rotate
Turn the handlebar 90° clockwise
until it’s at a right angle to the rest
of the bike. It’s important that the
front brake disc marked in the
diagram ends up on the left side
of the wheel.
If you see the disc brake is sitting
incorrectly on the right-hand side,
turn the fork in the anticlockwise
direction to rectify.
Front
brake disc
12

02 Brakes
14 15
Allen key 5
45°
Allen key 5
02 Turn up
Turn the brake handles and grips up
until the brake handles are at a 45°
angle. Hold them in place. Just as
you can set your brake handle posi-
tion, you can also rotate the grip
position to be more comfortable.
01 Loosen
When you ride, the brake levers
should be fixed on the handlebar
at a 45° angle from the ground.
Check the position of your brake
levers. If they are already at a 45°
angle, they do not need adjusting.
If the brake levers are pointed
down towards the ground as in the
illustration below, then first loosen
the screw under each brake using
Allen key 5 as shown.
03 Tighten
Tighten the screw as shown using
Allen key 5. Make sure it’s nice and
tight so that the brake levers don’t
rotate, taking care to not overtighten.
For brake maintenance see page 40.

1716
03 Pedals
16
L R
01 Know right from left
The right and left pedals are
different. You can tell them apart
by their position in the box and
the three small grooves on the left
pedal axle only. You will also find
the stamped ‘R’ and ‘L’ on the end
of the axle.
03 Tighten up
Insert the shorter end of Allen key
6 into the screw head on the side
of the pedal closest to the frame.
Tighten firmly.
02 Screw in
Take the right pedal and screw it
in clockwise as far as you can by
hand. It should screw in easily. If
it doesn’t, stop right away as you
may be crossthreading the screw.
Make sure the pedal is properly
aligned before trying again.
Repeat these steps for the left pedal,
screwing anticlockwise this time.
Allen key 63 grooves indicate left pedal
16

19
04 Saddle
Butterfly Allen key 4
02 Take out the battery
To change the saddle height,
you’ll first need to take out the
battery using one of the battery
keys provided.
03 Adjust the height
Loosen the saddle by turning
the Butterfly Allen key 4 in the
two holes as shown. Then raise
or lower the saddle to where you
want it, being careful not to raise
it higher than the depth warning
mark indicated on the saddle post.
Use the Butterfly Allen key again
to secure it in place.
01 Find the right position
Let’s work out your perfect saddle
height. Sit on the bike and move the
pedal around with your foot until it’s
closest to the ground in the 6°clock
position. You’ll know the saddle is
the right height when your leg is just
slightly bent as shown.
18

2120
05 Wireless charging
20
45°
01 Dock your phone
Put a Quad Lock case on your
phone. You can buy one suitable
for your phone separately in the
Cowboy webshop. Position your
phone at 45° and slot the phone
over the mount, making sure the
two are aligned. Rotate the phone
so it’s upright at 0° as shown.
It should click right into place.
Always check that your phone has
clicked securely before you ride.
03 Undock your phone
To undock your phone, simply turn
it back to 45° and you can take it off
the mount. Be careful not to leave
your phone unattended on the bike
as anyone can detach and take it.
02 Charge up
If your phone is compatible with
wireless charging, it will charge
automatically when docked with
the bike turned on.
Important note: Don’t keep anything
metal such as coins and credit cards
between the phone and the charger.
Don’t attempt to mount anything heav-
ier than a smartphone. If you have an
electrical device such as a pacemaker,
consult a physician before using
wireless charging.
Incorrect position
Correct position
45°
20

22 23
2524
06 Know your bike
Safety lights
The integrated rear light flashes
when you brake to let those behind
you know you’re slowing down.
Motor and belt drive
250W of power to assist you up
to 25km/h. No oily chain to mess
with and no gears to bother with,
just one smooth ride.
A handy battery
Roam far and wide with 40-80km
range depending on your riding
conditions. Your battery removes
easily and can be 100% recharged
in 3.5 hours.
Communication module
With sensors embedded in the
bike, there’s constant dialogue with
the app and you for an informed,
safe and worry-free ride.
Tyres
47mm custom tyres with a flexible
grip and a puncture protection layer.
Brakes
Hydraulic disc brakes offer total
stopping power the second you
make contact.
24 25
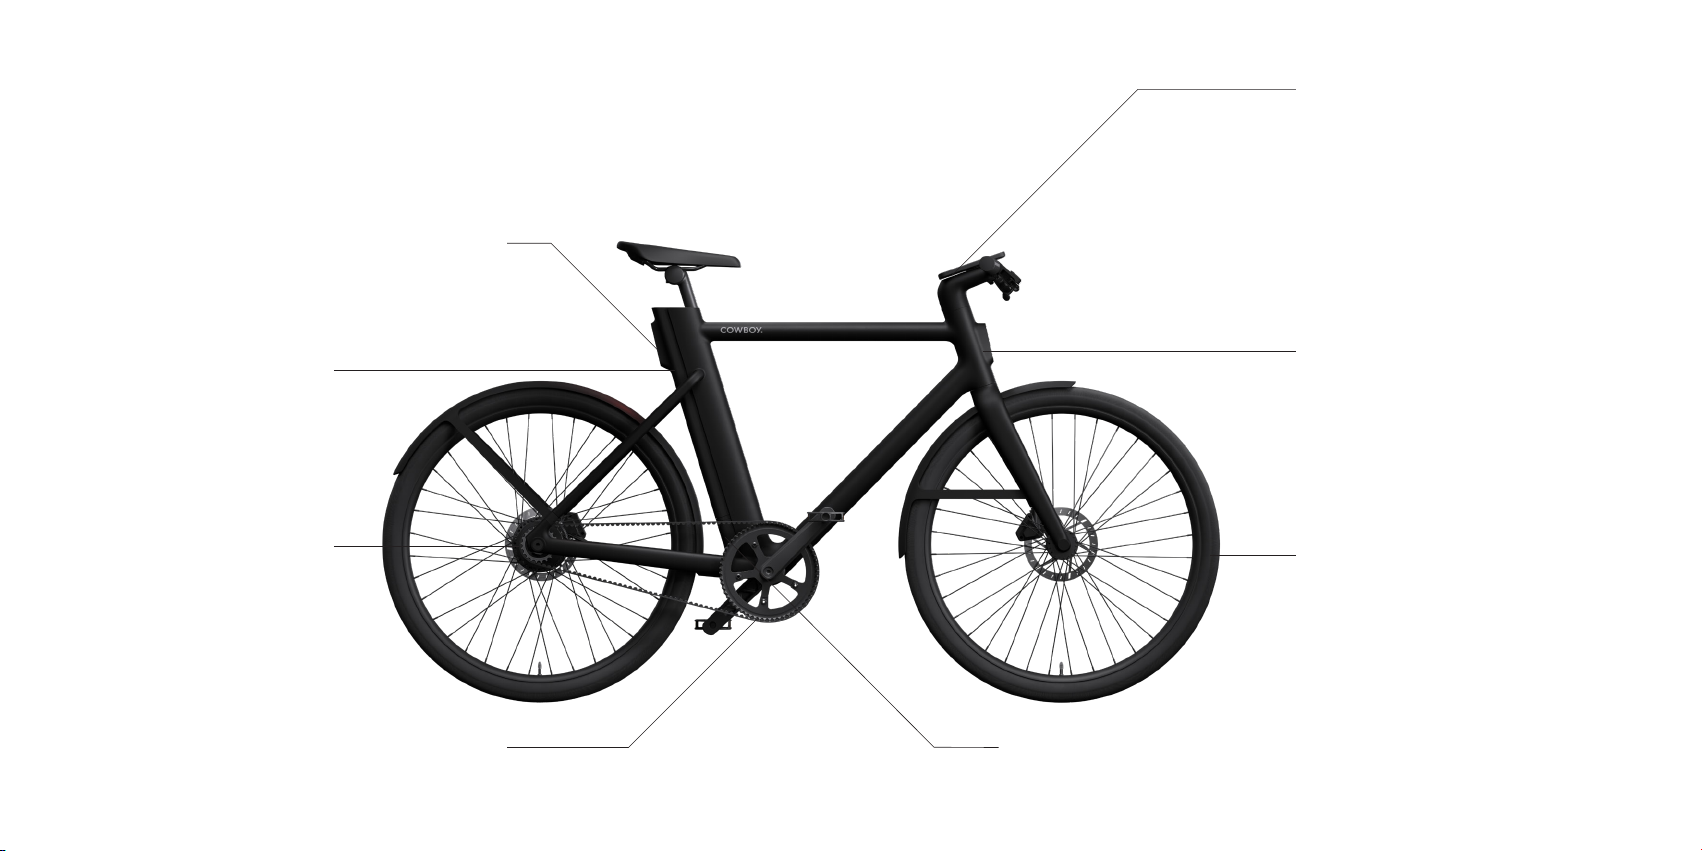
27
01 Rear light
Integrated rear light that flashes
when you hit the brakes
04 Gates carbon belt
Hassle-free maintenance and
no oily chain to mess with
03 Rear hub motor
Power to assist you up to 25km/h.
Ride like you always do, but faster
02 Removable battery
The battery has 40-80km battery
autonomy and weighs just 2.4 kg
Know your bike
Now that your bike’s assembled, let’s take a look
at some of the quintessential Cowboy features.
From stem to sprocket, every detail is crafted
to offer an unparalleled riding experience.
08 LED display
Eight LEDs in the cockpit display
your bike's battery level
05 Sensors
Sensors in the bike frame detect a fall and
alert your emergency contacts via the app
07 Front light
Iconic Cowboy lights mean you’re
always visible to others on the road
06 Tyres
All-rounder tyres with a flexible grip
and a puncture-resistant layer
26

28 29
The connected ride
From mapping the best routes to keeping you informed
of the essentials powering your bike, the app is your key
to a smarter, more mindful ride.

07 The app
Road companion
The Cowboy app is your daily
companion on the road. It’s always
looking ahead, keeping an eye on
things like weather conditions while
having a little fun along the way.
Ride dashboard
Monitor your speed, power and
battery level at a glance while
seeing your progress as you ride.
Route planning
Beat the traffic by mapping the
quick route or find the clear way
there with real-time air quality
mapping. Know your battery range
for your journey there and back.
Ride stats
Check your recent ride stats and
track all your activities, such as
riding streaks, average speed, and
calories burned. Even earn badges
as you unlock new milestones.
Find my bike
With GPS tracking, see the
location of your bike anytime and
track its live position in the app.
A network of support
Connect with our support
team directly through the app,
whenever you need a fix or have
any questions along your ride.
Pair the app
01 Download the iPhone or
Android Cowboy app
02 Create your Cowboy account
then pair your bike in the app
03 Turn on your bike and ride
30 31

32 33

34
08 Accessories
35
Rear rack
Do not use the rear rack as a
passenger seat or child carrier.
Mount a child seat instead.
Be mindful that a loaded rack
affects the bike’s weight distri-
bution and stability. Stay visible
and don't mount accessories that
block the rear light. The rack is not
designed to tow a trailer and
should not be attempted.
Kickstand
Simply use your foot to extend
the kickstand when you want your
bike to stand upright. Be careful
of slippage when standing the
bike on a wet surface.
The product you have might differ
from what is reflected in the images
in this manual.
If you ordered any of the custom Cowboy
accessories, please follow these tips.
34

37
09 Before you ride
Before every ride
1. Make sure that the battery
is fully clicked into the frame.
2. Tyres deflate during shipping
and storage. Inflate them to a
pressure of 2.5 bars for heavier
payload and less for a lighter
payload. We don’t recommend
a tyre pressure below 1.5 bars
or at the max pressure of 4 bars
as this will make your ride less
comfortable.
3. Squeeze the brakes to check
they are working perfectly.
4. Check the belt tension by
pressing firmly down in the
middle of the belt with your
index finger. The deflection
of the belt should be between
0.5cm and 1cm. Note that
lubrication is not necessary.
Refer to Gates™ carbon
drive manual for more info:
gatescarbondrive.com/
resources/manuals-and-tech
5. Wear the correct protective
gear. Always wear a helmet
and be visible on the roads.
6. Remember that you will need
to brake sooner and more
smoothly in wet conditions as
stopping distances increase.
7. Adjust your total payload to stay
within the 140kg limits of your
bike (including accessories,
rider and the cargo).
Before your first ride
Charge up
Fully charge your bike battery
before your first ride. When
docking your phone in the cockpit,
always use the Quad Lock mount
provided and check the phone
is securely clicked in place.
Note that wireless charging
will not work if you have a metal
phone case. Your bike can
interrupt wireless charging if it
senses your phone is overheating.
Take it slow
Get used to your new bike in a safe
area with minimal traffic.
When mounting your bike, make
sure to not step on the pedals
before you sit on the saddle and
get a firm grip on the handlebar
and brake levers. It is recom-
mended to start with one pedal
in the lowest position.
To maximise braking power and
avoid squeaking noises you will
need to bed in the brakes.
You can do so by coming to a full
stop 30-40 times on your new bike.
Follow local regulations
If you want to use your bike on
public roads, make sure that you
comply with local driving regula-
tions, for example those governing
lights and reflectors. These vary
from country to country.
The regulations on bikes with
pedal assistance can change
in your country. Make sure you
always stay up to date by reading
the daily press and government
publications.
Ride safely
The bike is equipped with hydraulic
disc brakes. Note that the left-hand
lever actuates the front brake while
the right-hand lever actuates the
rear brake. In the UK, it is on the
opposite side (rear brake on left-
hand side and front brake on the
right-hand side).
The brakes on your bike are
responsive and you should avoid
braking too suddenly. Remember
to apply the brakes carefully until
you reach a full stop in a safe area.
After heavy use, the brake discs
may be hot. Please beware.
Stopping distances for your bike
may be longer than they are for
conventional bikes you may have
had experience with. Under wet
conditions, stopping distances
may increase further as braking
effect is reduced. Extra caution
is required.
Watchouts
The weight distribution on this bike
differs from conventional bikes
you may have had experience with.
Bear this in mind when loading,
parking or lifting the bike.
Do not hang bags or heavy objects
on the handlebar as this can have
an adverse effect on your ability
to accurately and safely steer the
bicycle. Note that your bike has
been designed for a maximum
load of 140kg (bike, accessories,
rider and cargo included).
Avoid wearing loose clothes such
as skirts and wide-legged trousers
and make sure you secure any
loose straps. These can get
caught in the wheels and cause
accidents. You may wish to use
trouser grips.
Any questions? Speak to us.
If you wish to attach a bicycle
trailer, check the Cowboy webshop
to get a specific adapter.
If you wish to use third party
accessories with your bike (such
as a child seat or a luggage
carrier), first check compatibility
with the accessory’s manufacturer.
36

38
10 Battery care
38 3938
Range
Your battery will give you an
estimated range of 40-80km.
However, note that this is an
indicative range and the exact
range always depends on the
riding conditions. A range of 80km
or more is typically achievable with
a new battery, minimal wind,
a consistent speed on a good
asphalt road, a load of 75kg and
an outside temperature of 20°C.
The following factors can impact
autonomy:
Your environment
Temperature – Colder
surroundings make your battery
drain faster. During the winter it’s
best to store your battery inside
to maximise its performance.
Terrain – Your range will be lower
if you take steep hills than if you
stay on flat roads. Poor quality
roads, gravel and uneven forest
paths also drain the battery faster
than good tarmac.
Wind – The stronger the wind,
the shorter the range.
Your bike set-up
Ride mode – If you own a Cowboy
Classic (ST) or Cruiser you can
change your motor assistance level
in your ride settings. You'll consume
around 25% less battery when
switching from Adaptive to Eco.
Weight – The more load your bike
has to carry the faster your battery
will drain.
Age – Batteries slowly lose
capacity over time, so your range
is expected to slowly decrease
as the bike ages.
Tyres – An under-inflated tyre will
have a higher contact surface with
the ground, leading to more drag
and less range.
Storage – Avoid leaving your
battery on zero charge for
prolonged periods. This will
negatively and permanently affect
the battery capacity.
You the rider
Riding style – Cruising at a
constant speed consumes less
power than frequently accelerating
and decelerating.
Protect your source
of power
Your battery self-learns in order
to improve the accuracy of its
estimations any time you
discharge the battery when the
last LED is blinking (7% power
remaining) and you charge it fully
afterward. It’s normal for the
battery percentage displayed to be
inaccurate for your first few rides.
Charge the battery indoors
between 10°C and 25°C on a
non-flammable surface using the
charger from the accessories box.
Do not expose the battery or
charger to full sun, moisture, or
water during charging. Keep the
battery away from fire and heat.
We recommend charging the
battery during the day and in dry
rooms fitted with smoke detectors.
Do not ride in the rain without the
battery inserted to keep the
battery connectors clean and dry.
Make sure that the battery is in
sound condition with no corrosion,
cracking or other damage before
using it or charging it. Do not open,
disassemble or crush the battery.
Do not use a battery or charger
that is defective.
Keep the battery and charger out
of reach of children.
Long live your battery
Battery life in general is described
as the number of cycles it takes
to arrive at 60% of the original
battery capacity in ideal
conditions. For Cowboy this would
be 500 cycles. Note that lithium
ion batteries such as yours have
no memory effect. Therefore you
can charge your battery after
every ride.
To maximise the lifetime of your
battery:
• Avoid leaving it fully discharged
for prolonged periods.
• If you plan to not use your bike
for longer periods of time,
remove the battery from the
bike, store it in a dry environment
at room temperature (between
10°C and 25°C) and charge your
battery every 6-8 weeks. This is
to prevent the battery from going
into 'deep discharge' mode,
which is a necessary battery
safety precaution. Once this
mode is activated, the battery
will need to be replaced, which is
not covered under warranty and
will incur additional costs.
• The battery pack should be
stored at room temperature.
Avoid exposing the battery
pack to direct sunlight on
warm summer days.
• Make sure that the battery gets a
full discharge-to-charge cycle at
least once every two months.
Caution: Inserting anything other
than a genuine Cowboy battery
presents a serious safety hazard.
New batteries can be ordered with
us directly. Dispose of used
batteries at your local recycling
centre. The battery pack must not
be stored below -20°C or above
+60°C and we recommend it be
stored at room temperature.
Never place the battery pack near
sources of direct heat such as
heaters or ovens. Be careful not to
drop the battery pack and do not
attempt to open it. If you have any
doubts, contact customer service
for more information.
38 39
Other manuals for C4
2
Table of contents
Other Cowboy Bicycle manuals


