Trivum RP341v2 User manual
Quick Installation Guide
RP341 v2
AN: 301021
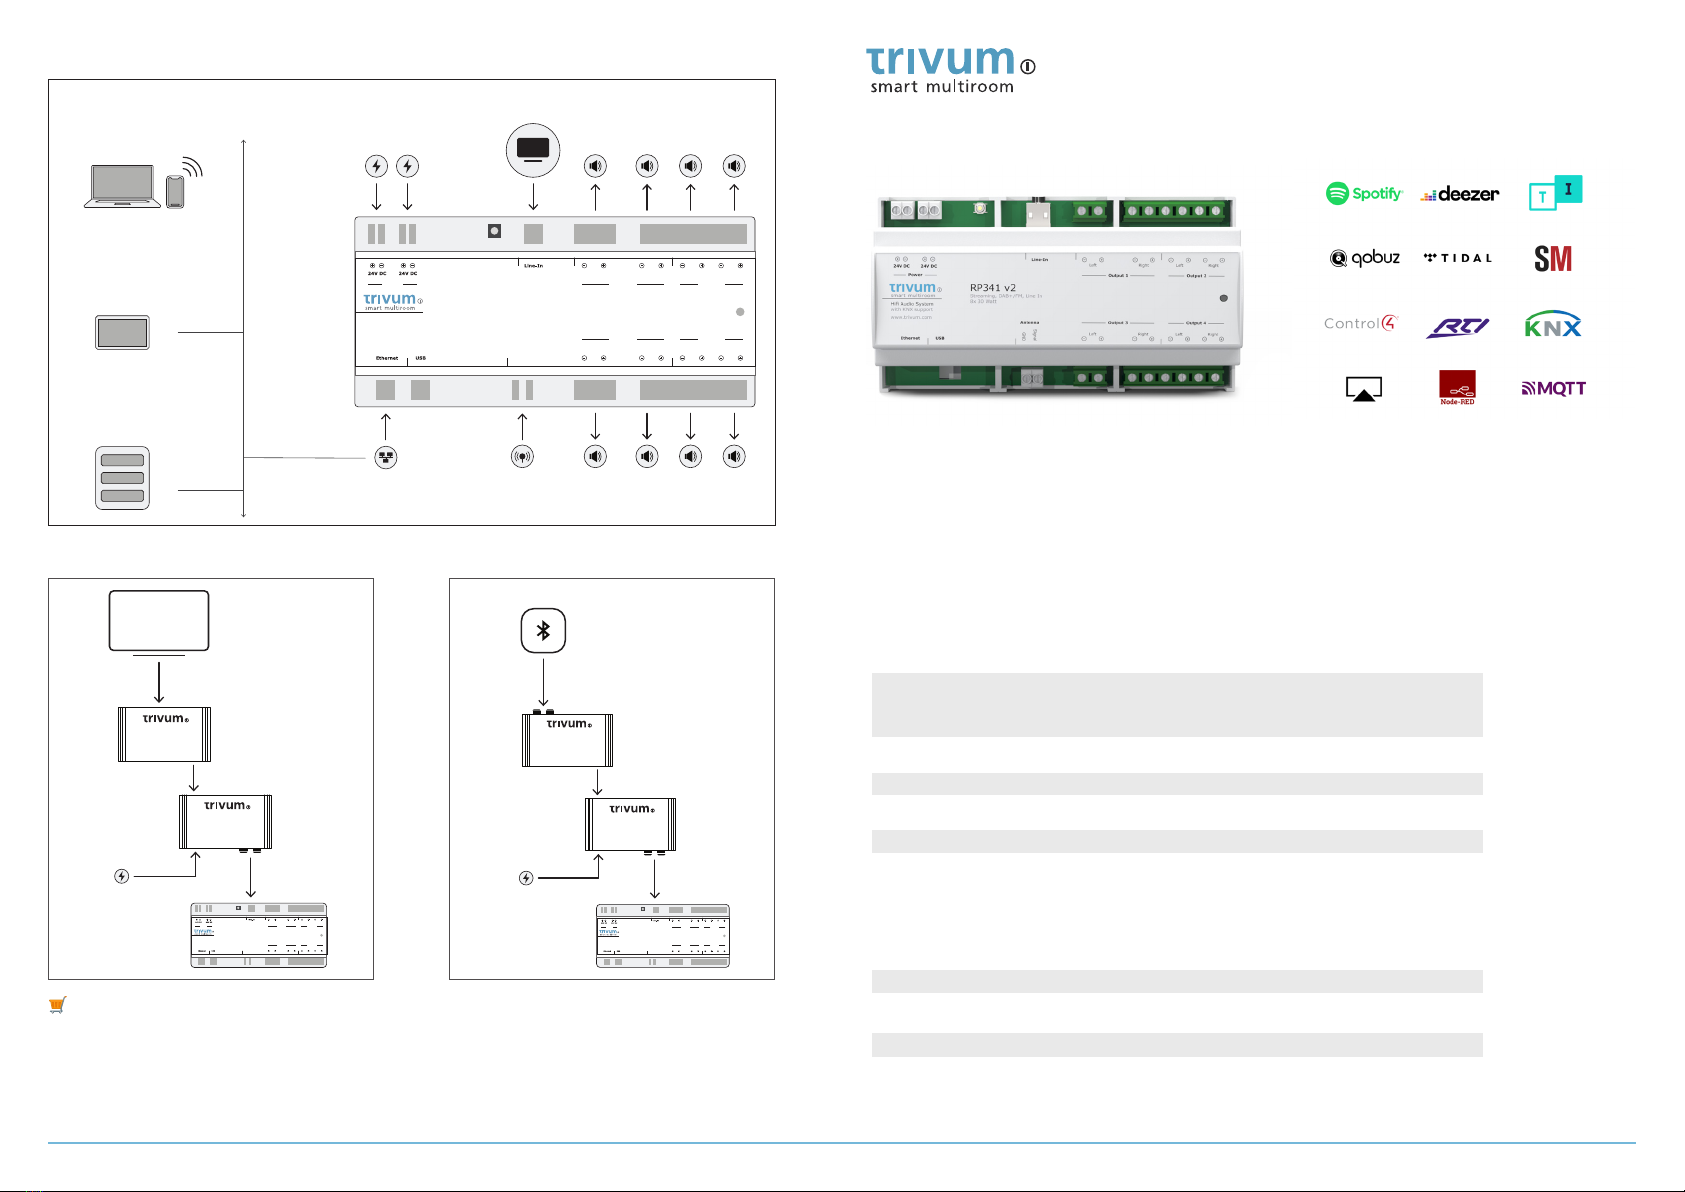
Connection example:
Connection examples with trivum Audio Extenders:
🛒
All trivum products are available in our online shop www.trivum.com
Article Numbers:
Technical Data
Required components for installation:
• 2x 24 V DC power supply, at least 4A each (e.g. PS24/100 4.2A by trivum AN: 500023)
• ethernet cable
• network with DHCP capable router
• Browser (PC / Mac) or trivum App
• speakers with 4 or 8 Ohms impedance
1. RP341v2: 301021
2. XT:DIGITAL: 500047
3. XT:LINE: 500041
4. XR:LINE: 500042
5. REG PS 24/100 (4.2A): 500023
6. Audio Extender PS 15V: 500049
7. TouchPad 7": 600013
We reserve the right to make misprints, mistakes and changes in the case of product progress, even without prior
notice. 09/2021
Zones 4 Zones
Expandable to up to 64 zones
Source 4x Streaming
1x DAB+/FM Tuner
1 x analog Line Input
Streaming 4x up to 192kHz 24Bit
Radio DAB+/FM
External Sources 1x Line In analog via 3.5 Jack
Music Formats MP3, AAC, FLAC, M4A, WMA, ALAC
Connections 1x Network (RJ45 Socket)
4x Speaker Stereo (4-Pin connector)
1x Analog Line Input
1x Antenna (2-pin connector)
2x Power (2-pin connector)
Amplier Class D, 8x 30W @ 4 Ohm
Power Supply 24V, 8A (192 W) 2x 2-pin connector
Casing REG 9 units (159mm)
Weight 0.313 kg
Speakers
Analog Line In
TV, CD Player, etc
PS24/100
Power Supply 2x 24V / 4A
Network DAB+/FM
Antenne
Speakers
RP341 v2
Streaming, DAB+ / FM, Line In
8x 30 Watt
Left Right
Left Right
HifiAudio System
with KNX support
www.trivum.com
GND
Signal
Left Right
Output 2
Power
Left Right
Output 1
Antenna Output 4Output 3
LAN
DHCP
NAS
(optional)
trivum TouchPad
(optional)
DHCP
Browser or App
wireless
CAT 5/6/7 up to 300 m
Analog Out
RCA
XT:LINE
RP341 v2
Streaming, DAB+/ FM, Line In
8x 30 Watt
Left Right
Left Right
HifiAudio System
with KNX support
www.trivum.com
GND
Signal
Left Right
Output 2
Power
Left Right
Output 1
Antenna Output 4Output 3
Bluetooth receiver
XR:LINE
Analog Line In
Audio Extender
Power Supply 15V
TV
RP341 v2
Streaming, DAB+/ FM, Line In
8x 30 Watt
Left Right
Left Right
HifiAudio System
with KNX support
www.trivum.com
GND
Signal
Left Right
Output 2
Power
Left Right
Output 1
Antenna Output 4Output 3
XR:LINE
XT:DIGITAL
Analog Line In
CAT 5/6/7 up to 300 m
Digital Out
TOSLink or HDMI (ARC)
Audio Extender
Power Supply 15V
1. Mounting and connection
1.1 Mount the RP341 v2 on a 35 mm DIN-rail.
1.2 Connect cables to audio speakers (check polarity), Ethernet network and power supply.
⚠
Warning: Wrong polarity may damage the device! Double check power cable polarity before connecting!
2. Conguration
The trivum RP341 v2 has to be congured via web browser. We recommend you to use the trivum Apps or trivum ServerAdmin
Tool. The trivum Apps and ServerAdmin Tool will scan and list all trivum devices and their IP addresses in your network.
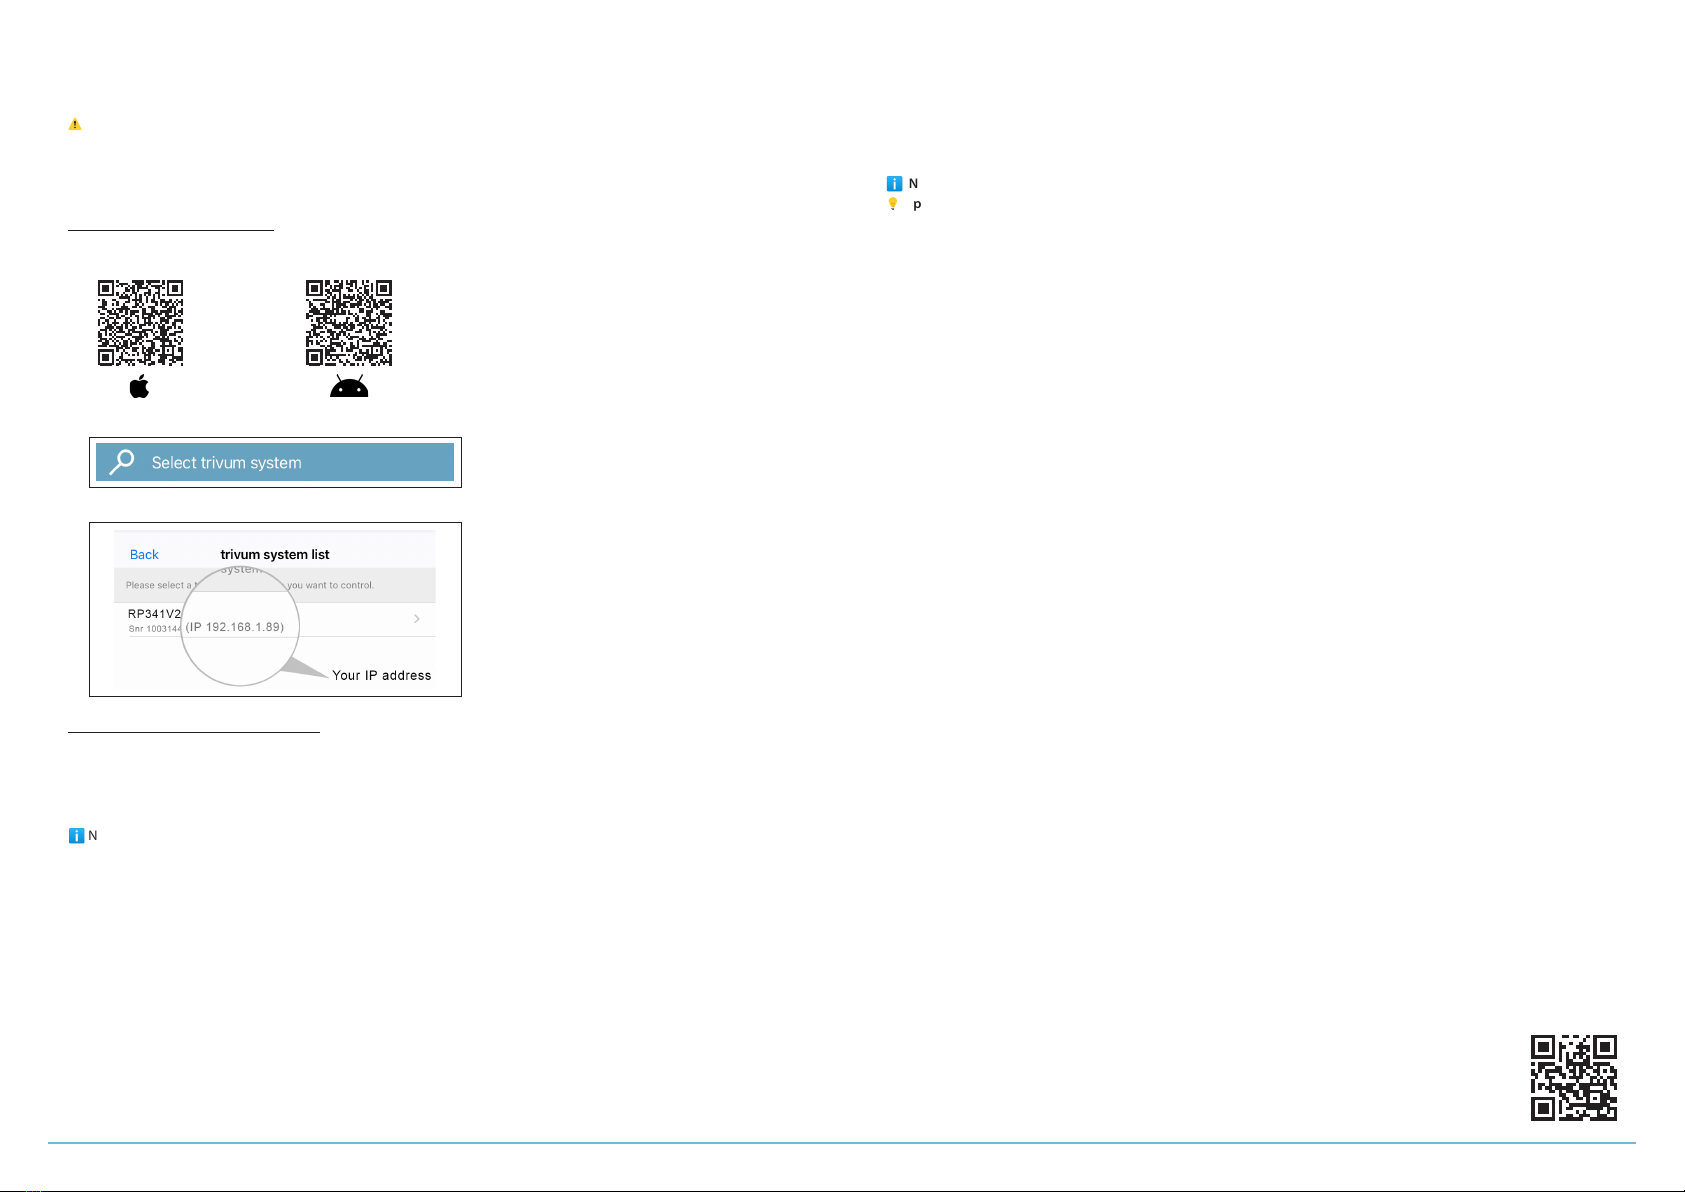
Using trivum App (iOS or Android)
2.1 Please scan QR Code to download the trivum iOS App or Android App. You can also visit -> https://trivum.de/apps
2.2 Start the App and tap on the button "Select trivum system" .
Then all trivum devices in your network, their IP addresses and serial numbers will be listed..
Using trivum ServerAdminTool (Windows)
2.3 Please download and install the ServerAdmin Tool. -> https://trivum.de/admin-tool
2.4 Start the ServerAdmin Tool.
2.5 Double-click on the device (RP341 v2) to open the Music Center WebCong (main cong site).
ℹ
Note: If you are not sure about the assignment of the listed devices, you can compare the serial number in the list with the
serial number on your device.
2.6 If you need static IP instead of DHCP: click "Network".
2.7 Select "Use static IP address".
2.8 Enter your IP settings and Restart to apply changes.
3. Adding a network share
The trivum RP341 v2 can play audio les which are stored on network shares. If you want to use a shared directory, make sure
that it supports the media sharing service Samba service (smb). To add a network share (e.g. NAS):
3.1 Open the Music Center WebCong.
3.2 Click: "Music on NAS -> Setup music library -> Add network share".
3.3 Set the network path and user/password if required.
3.4 Click "Save as new share".
3.5 Click "Refresh" your music index now.
4. Adding your Online streaming service account
4.1 Open the Music Center WebCong.
4.2 Click "Streaming".
4.3 Click "Add Service".
4.4 Select your favorite service and enter your user account.
4.5 Click Create the streaming service given account.
ℹ
Note: trivum supports only paid accounts.
💡
Tip: The RP341 v2 is AirPlay ready, so it’s easy to stream every kind of music to the specic zone (with Apple devices).
Backup your conguration
Once you have completed the setup, we recommend you to make a backup of your conguration:
• Open the Music Center WebCong.
• Click "Backup/Restore -> Export/import conguration".
• Follow the instructions.
For easy operation of your RP341 v2, we recommend our trivum TouchPad.
How to use a trivum TouchPad?
• Make sure your TouchPad is running software v2.35 or later.
• Wait a few seconds until the TouchPad has booted.
• On the starting screen press "Pair TouchPad with Audio System".
• Press "Select..." and select your preferred trivum MusicCenter from the pop-up menu.
How to use KNX?
The KNX programming of RP341 v2 is done via the web browser. No need for extra KNX software.
• Open the Music Center WebCong.
• Click "KNX->Setup KNX communication" and enable "use KNX / IP".
• Follow the instructions.
You nd further informations for KNX on:
https://trivum.de/knx-setup
Further documentation and troubleshooting
To nd helpful log les in support cases:
• Open the Music Center WebCong.
• Click "Logs & Warnings".
Please visit also our website for the latest documentation, videos and information:
https://www.trivum.com
https://service.trivum.com
If support is needed
Please contact your local trivum dealer or write to:
Download links:
trivum ServerAdmin Tool (Windows):
https://trivum.de/admin-tool
trivum Apps (iOS, Android, Web):
https://trivum.de/apps
trivum technologies GmbH
Eierstraße 48
70199 Stuttgart
www.trivum.com
This manual suits for next models
1
Other Trivum Stereo System manuals


 Service manual")


