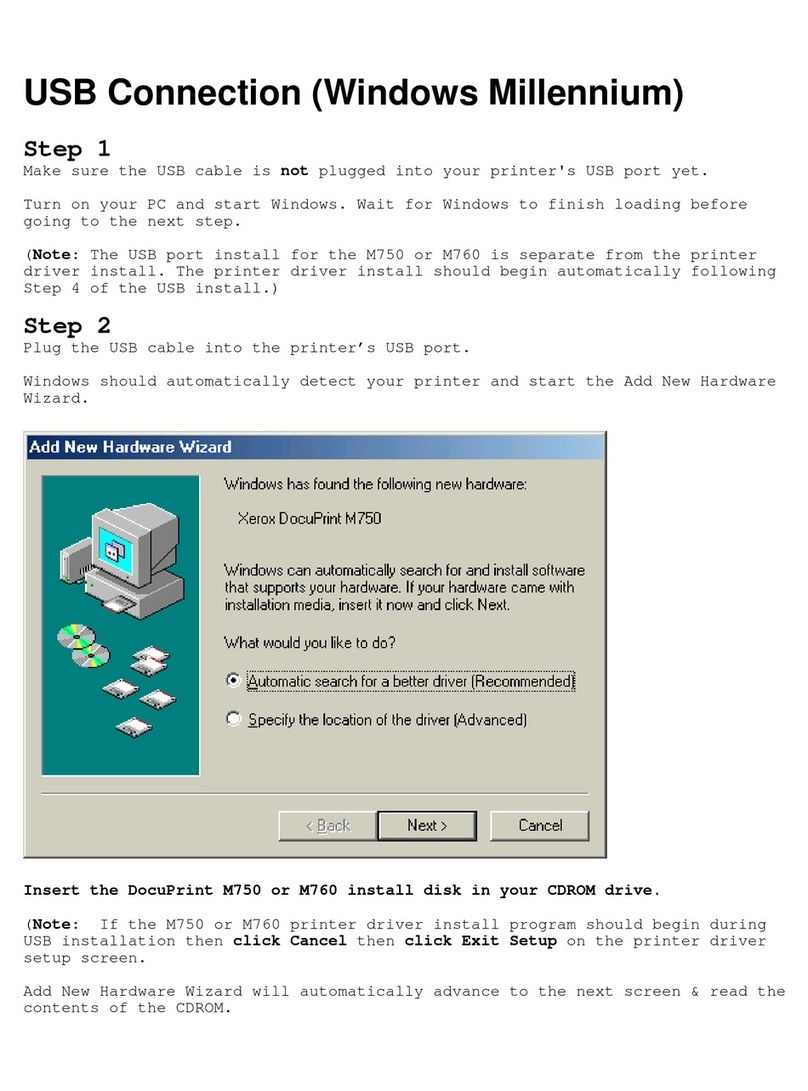
TrojanLabel Trojan 3 User manual

User Guide
Revision 3.8
22834693-EN-E

TrojanThree User Guide
Page | 1
Copyright statement
© 2016 Trojanlabel, This document, attachments and information contained herein are the
confidential and proprietary property of Trojanlabel and their suppliers. As such, this document,
attached files and information contained herein are subject to all nondisclosure and proprietary
information agreements currently in effect with your organization. Copies of this document, any
portion of this document or attachments may not be transmitted or disclosed to any third party
without the prior written permission of Trojanlabel.
© 2016 Trojanlabel, All the content is the confidential property of, or licensed to, Trojanlabel
(“Trojanlabel,” “we,” or “us”) and is protected under Danish and Foreign copyright, trademark
and other intellectual property laws.
Trojanlabel.com
Marielundvej 46A 2 sal
2730 Herlev
Denmark
Email: contact@trojanlabel.com
Phone +45 2964 0005

TrojanThree User Guide
Page | 2
Contents
1 Specification and General Information ..................................................................................................... 5
1.1 Certificate and Compliance ............................................................................................................... 5
1.2 Introduction....................................................................................................................................... 6
1.3 General Information .......................................................................................................................... 6
1.4 Specification and Application ............................................................................................................ 7
2 Setting up the TrojanThree for printing .................................................................................................. 10
2.1 Unpacking and Physical setup ......................................................................................................... 10
2.1.1 Setting the adjustable feet: ..................................................................................................... 10
2.1.2 Mounting the touchscreen and connecting the cables for the screen: .................................. 11
2.1.3 Mounting Print Engine............................................................................................................. 12
2.2 Cabling (network and power supply) .............................................................................................. 14
3 Power On ................................................................................................................................................. 15
3.1 Safety Check .................................................................................................................................... 15
3.2 Power On Process............................................................................................................................ 15
3.3 Installing Ink Tanks and Printhead................................................................................................... 15
3.3.1 Installing ink tanks ................................................................................................................... 15
3.3.2 Installing the printhead ........................................................................................................... 16
4 Integrating the TrojanThree OEM Print Module ..................................................................................... 21
4.1 Over printer (OP) version ................................................................................................................ 21
4.2 Label printer (LP) version................................................................................................................. 22
5 Sending, Starting, Selecting and Queuing Print Jobs............................................................................... 23
6 Pause, Resume or Stop a Print Job.......................................................................................................... 25
7 Shutting Down the TrojanThree .............................................................................................................. 27
8 Printing Modes ........................................................................................................................................ 28
8.1 Continuous Printing Mode (only available at LP version) ............................................................... 28
8.2 Diecut Mode (available for both LP and OP versions)..................................................................... 29
8.3 Blackmark Mode (only available at LP version with sensor) ........................................................... 30
9 Label Gap Size Requirements and Print Speeds ...................................................................................... 31
10 Driver Installation and Features .......................................................................................................... 32
10.1 Driver Installation ............................................................................................................................ 32
10.2 Driver Features and Functions......................................................................................................... 35
10.3 Using Color Profiles ......................................................................................................................... 37
11 Software Features ............................................................................................................................... 39
11.1 Status Bar......................................................................................................................................... 39

TrojanThree User Guide
Page | 3
11.2 General Settings (HOME menu) ...................................................................................................... 40
11.2.1 Overview.................................................................................................................................. 40
11.2.2 Settings .................................................................................................................................... 41
11.2.3 Statistics................................................................................................................................... 46
11.2.4 View Statistics in Browser and Exporting Statistics to CSV file format ................................... 48
11.2.5 Shutdown................................................................................................................................. 49
11.3 TrojanThree Handling (TrojanThree tab)......................................................................................... 50
11.3.1 Overview.................................................................................................................................. 50
11.3.2 Maintenance............................................................................................................................ 51
11.3.3 Job Library................................................................................................................................ 53
11.3.4 Print Queue.............................................................................................................................. 55
11.3.5 Diagnostics............................................................................................................................... 56
11.3.6 Media Settings......................................................................................................................... 57
12 Updating Software and Firmware on TrojanThree ............................................................................. 61
12.1 Online Update.................................................................................................................................. 61
12.2 Offline Update ................................................................................................................................. 62
13 Maintenance........................................................................................................................................ 64
13.1 Emptying the Waste Ink Bottle:....................................................................................................... 64
13.2 Replacing Micro Fiber Roller (MFR)................................................................................................. 65
13.3 Manual Printhead Wiping................................................................................................................ 70
14 Troubleshooting .................................................................................................................................. 74
14.1 Error States List................................................................................................................................ 74
14.2 Error Messages on Screen ............................................................................................................... 76
14.3 Firmware Update Failure................................................................................................................. 78
15 Trojan3 OP guidelines for printing bags .............................................................................................. 79
16 Typical issues ....................................................................................................................................... 80
16.1 Uneven surfaces (Distance between substrate and print head)..................................................... 80
16.2 Print head too far ............................................................................................................................ 80
16.3 Print head too close......................................................................................................................... 80
16.4 Residual ink smearing on substrate................................................................................................. 80
17 Feeding paper bags.............................................................................................................................. 81
17.1 Challenging areas............................................................................................................................. 81
17.1.1 Were the handles are attached to the bag ............................................................................. 81
17.1.2 Were the bottom of the bag bends around creating a bump on the printing surface ........... 81
17.2 Optimal print zone........................................................................................................................... 81

TrojanThree User Guide
Page | 4
17.3 Direction of feeding......................................................................................................................... 83
17.3.1 Correct direction of feeding .................................................................................................... 83
17.3.2 Incorrect direction of feeding.................................................................................................. 83
17.4 Print on the “back side” of a paper bag .......................................................................................... 83
17.4.1 Printing in the optimal print zone (back side) ......................................................................... 84
17.4.2 Printing across the bottom fold............................................................................................... 84
18 Preparations before starting a print job.............................................................................................. 85
18.1 Cause for residual ink on PH and how to limit the occurrence ....................................................... 85
18.1.1 The wiper roller ....................................................................................................................... 85
18.1.2 The maintenance cap .............................................................................................................. 85
18.2 Wipe print head before start of job ................................................................................................ 86
19 Recommendations and expectations .................................................................................................. 87
19.1 Print speed....................................................................................................................................... 87
19.2 Web/substrate cleaning .................................................................................................................. 87
19.3 Mid job cleaning frequency ............................................................................................................. 87
19.4 Printing on wood ............................................................................................................................. 87
19.5 Avoid Vacuum active under print head ........................................................................................... 87
19.6 Expectations .................................................................................................................................... 87
20 Examples.............................................................................................................................................. 88
20.1 Printing in print zone ....................................................................................................................... 88
20.2 Printing on bags without bottom fold ............................................................................................. 89
20.3 Printing in print zone, smear from dirty Print head ........................................................................ 89
20.4 Print on the bottom bend touching Print head............................................................................... 90
20.5 Print over bottom bump, good scenario ......................................................................................... 90

TrojanThree User Guide
Page | 5
1Specification and General Information
1.1 Certificate and Compliance

TrojanThree User Guide
Page | 6
1.2 Introduction
Original instructions
These instructions are original instructions made by Trojanlabel for the Trojanlabel digital
over-printer (henceforth called the machine or TrojanThree).
Purpose
The purpose of these instructions is to ensure correct installation, use, handling and
maintenance of the machine.
Accessibility
The instructions are to be kept in a location known to the staff and must be easily
accessible for the operators and maintenance personnel.
Knowledge
It is the duty of the employer (the owner of the machine) to ensure that anyone who is to
operate, service, maintain, or repair the machine have read the instructions. As a
minimum, they should have read the part(s) relevant for their work. In addition, anyone
who is to operate, service, maintain, or repair the machine is under obligation to look for
information in the instructions themselves.
1.3 General Information
Manufacturer
The machine has been manufactured by:
Company name: Trojanlabel
Address: Marielundvej 46A 2 sal
2730 Herlev
Denmark
The machine’s designation
The machine’s complete designation is Digital Over-Printer type Trojan③.
Machine plate
The machine plate is situated on the back side of the machine at the lower right corner:

TrojanThree User Guide
Page | 7
1.4 Specification and Application
General description
The machine consists of a metal cabinet, ink delivery system, service door, print engine,
embedded PC, touchscreen, media sensor (optional), printhead and 4 ink tanks.
If any changes or alterations are made to the machine, these changes or alterations must
be reflected in these instructions as necessary.
The machine’s purpose and intended use
Application: The machine is only to be used to print labels (label printer /LP/ version) or to
print on packaging materials (over printer /OP/ version) which meet the material
specification requirements. The machine must not be used for any other purpose than the
purpose mentioned above.
Warning about foreseeable misuse
The TrojanThree may not be used with inks not endorsed by Trojanlabel. All inks purchased
from Trojanlabel or from official Trojanlabel distributors worldwide are endorsed by
Trojanlabel.
Physical specifications in millimeters

TrojanThree User Guide
Page | 8
Weight approximately 85kgs including inks
Electrical:
•Nominal supply voltage: 110-240V
•Nominal supply frequency: 50-60hz
•Estimated peak consumption: 150W
•Machine power supply:
150 W (48 VDC, 3.2 A), please see “Meanwell SP-150-spec.pdf” for details:
http://www.trojanextranet.com/media/58025/sp-150-spec.pdf
Technical Specifications:
•Simple cleaning station ensures high print quality over long runs
•Ink drop size is 1-2 Pico liter
•Spring loaded blade for controlling media just before printhead
•Print head height adjustable:
Electronically: 3 mm, both directions
Mechanically: unlimited, depending on design
•Remote access for control and service
Performance
•Print speed 9 m/minute or 18 m/minute (+/- 5%)
•Print resolution – 1600 x 800 dpi or 1600 x 1600 dpi
•Printer Data connectivity – Ethernet 10/100/1000
•Dye ink in 4 individual 2000 ml CMYK color ink tanks

TrojanThree User Guide
Page | 9
Operating positions, location and arrangement
The machine is intended to be used in a light industrial/office environment. The operator
operates the machine in a standing or sitting position.
Temperature
Recommend operational temperatures
•Operation: 15° to 30° Celsius at RH 22-80% (non-condensing)
•Storage: -5° to 50° Celsius at RH up to 85%, non-condensing at 65°
If transferring the machine from different temperature conditions, ensure that the
machine has time to acclimatize.
Operating Environment
It is important that the machine is placed in a clean environment as possible, with sufficient
air conditioning/cleaning. Avoid placing it in an environment with dust and paper debris, as
the print head nozzles are sensitive to this.
Label Materials
The machine requires ink jet coated materials for optimal print quality; some non-coated
materials like cardboard or other packaging materials will also work. Please contact
Trojanlabel or your distributor for recommendations of suited materials.
It is imperative to have a local source of material, to ensure a stable production.
Media Handling
•Maximum printable width – 222,8 mm
•Maximum printable length – 1500 mm without stitching,
•Unlimited length width stitching
•Media width – depends on installation
•Media thickness – User controlled, adjusted through user interface
Usability & Serviceability
•User friendly interface called TrojanControl software
•15.6” color HD capacitive touchscreen (Optional)
•Ethernet 10/100/1000.
•120GB storage
•Remote access for control and service
•Easy setup, troubleshooting and servicing
•Stainless steel and aluminum with industrial-grade ruggedness
•Printer driver compatibility – 32/64-bit Windows XP, Vista, 7, 8, 10,
•Supported Network protocol – Automatic (DHCP) or Manual TCP/IP settings
•Automatically upgradable firmware and software
•Easy replaceable print engine for quick swap out.

TrojanThree User Guide
Page | 10
2Setting up the TrojanThree for printing
2.1 Unpacking and Physical setup
The TrojanThree is packed in a wooden crate (dimensions: 74x59x158cm) and shipped strapped on top of a
wooden pallet (total weight of the package including the crate is around 125kgs). After opening the
wooden crate the machine must be lifted out from the crate. The approximate weight of the machine is
70kgs, therefore it is advised to lift the machine out of the box by multiple persons to avoid injury.
Content of package:
•TrojanThree Digital Over-Printer in a metal cabinet
•Touchscreen with cables and screws (4 screw to mount)
•Power Supply Cable (matching with the regional standard)
•Print Engine module
•Packing list
2.1.1 Setting the adjustable feet:
The machine is standing on 4 adjustable feet. The height of the feet can be set from 43mm to 121mm.
The feet height can be adjusted by turning the foot clockwise (lifting the machine) or turning the foot
counter-clockwise (lowering the machine). The contra nut on each foot ensures that the feet’s height
position will not change accidentally. Make sure all 4 feet are set to the same height and machine is
leveled, check leveling using a spirit leveler. See picture below:
Adjustable feet for TrojanThree
Contra Nut
Lifting the machine
Lowering the machine

TrojanThree User Guide
Page | 11
2.1.2 Mounting the touchscreen and connecting the cables for the screen:
Lead the cables of the touchscreen through the hole on the top of the machine cabinet. Then fix the
touchscreen stand with 4 screws to the top of the machine cabinet.
Mounting touchscreen stand...
Connecting touchscreen cables:
(A.) Ground cable, (B.) LVDS cable, (C.) USB Touch Control and (D.) Screen Backlight cable)
Embedded PC Motherboard inside the machine cabinet
USB Touch Control cable
(Make sure red wire is on the left)
LVDS cable
Screen Backlight cable
Ground cable
A.
A.
B.
C.
C.
D.
B.

TrojanThree User Guide
Page | 12
2.1.3 Mounting Print Engine
There are 2 mounting brackets to attach the print engine module to the machine cabinet. Each mounting
bracket has to be fixed with 2 screws.
After fixing the mounting brackets, the print engine module can be fixed by the mounting brackets with 1
screw on each side.
Left side mounting bracket Right side mounting bracket
2x Mounting bracket

TrojanThree User Guide
Page | 13
Connect all the tubes and cables between print engine module and machine cabinet.
Before connecting tubes and cables
NOTE: The luers are matching for the ink tubes at incoming and return ink lines so the tubes cannot be
connected wrong. Make sure the colors of the tubes are matching when connecting the tubes. The 2
Ethernet cables are labeled with the proper port number (J4, J5). All other connectors are unique.

TrojanThree User Guide
Page | 14
2.2 Cabling (network and power supply)
The machine has 4 cable inlets:
1. Power Supply
2. Ethernet
3. OEM Port for encoder signals
4. I/O port
Only the power supply cable is necessary for powering up the machine. The network cable is necessary for
sending new print jobs to the TrojanThree and for remote support/software updates.
NOTE: Ethernet cable is not included in the TrojanThree package
Power ON/OFF switch
Power supply
Ethernet port
OEM Port
I/O Port

TrojanThree User Guide
Page | 15
3Power On
3.1 Safety Check
Before powering on the TrojanThree, visibly ensure that no foreign objects are interfering with the print
engine module.
3.2 Power On Process
1. Press the physical power switch on the side of the TrojanThree, switching it from 0 to 1.
Turning the main power switch on starts up TrojanControl touch screen and print engine.
2. The machine is fully functional, when the TrojanThree tab is visible on the TrojanControl software
and at right side status bar the ‘system state’ field is online and ‘media path state’ is ready.
3.3 Installing Ink Tanks and Printhead
3.3.1 Installing ink tanks
The TrojanThree printer uses CMYK ink tanks, each contain 2 liters of ink when opened. Every TrojanThree
ink tank is QA chip protected ensuring that only genuine Trojanlabel ink tanks can be used.
1.
2.
2.
2.
2.
3.
3.
3.
3.

TrojanThree User Guide
Page | 16
1. Open door on back side of the cabinet to gain access to ink tanks (orange arrow on picture above).
2. Connect QA chip reader cable (green arrow on picture above). The connector clicks onto the slot
when properly connected.
3. Connect tube with connector (red arrow on picture above). The connector clicks onto the slot when
properly connected.
When ink tank is connected the proper ink level and percentage is displayed at status bar on the
touch screen:
NOTE: TrojanThree ink tanks are not refillable and shall be treated as hazardous waste when
empty.
3.3.2 Installing the printhead
•Unpacking printhead:
1. Open the end of the printhead package outer box and slide out the foil bag.
Inspect the integrity of the foil vacuum sealing. The foil bag should be formed tightly to the
contours of the printhead cartridge as shown above. If the foil is loose to any degree then the seal
has been compromised.
NOTE: If a poor seal is suspected, DO NOT USE the printhead. Report the issue to your supplier.
2. Carefully rip the foil packaging open at the notch. Use scissors if your foil bag does not have a
notch or you are finding it difficult to tear the bag.
Ink tank levels
Reservoir ink tank levels

TrojanThree User Guide
Page | 17
3. Remove the printhead from the foil bag.
4. Remove the orange protective plastic cover from the printhead cartridge. Holding the printhead
cartridge by the handle
a. Release the flaps covering the ink ports
b. Release the clip retaining the cover near the center of the printhead cartridge
c. Carefully remove the protective cover
5. Remove the protective strip from the electrical contacts. While holding the printhead cartridge by
the handle with one hand, grasp the pull tab with the other hand and, slowly and carefully, peel
back the plastic strip covering the electrical contacts.
NOTE: Dispose of the removed strip immediately and do not allow the removed strip to contact
the electrical contacts.
6. Remove the protective strip from the printhead nozzles. While holding the printhead cartridge by
the handle with one hand, grasp the pull tab with the other hand and slowly and carefully peel
back the plastic strip covering the printhead nozzles. Maintain an angle of no less than 45° with
the printhead surface when pulling on the strip.

TrojanThree User Guide
Page | 18
NOTE: Dispose of the removed strip immediately and do not allow the removed strip to contact
the electrical contacts or the printhead nozzles.
IMPORTANT: Do not throw away the printhead packaging. The white box has the serial number,
part number and manufacturing date of the printhead. Also it is recommended to store
printheads which are currently not installed in the original packaging.
•Installing printhead:
1. Open cover lid on TrojanThree to gain access to the print engine.
CAUTION!
•DO NOT touch the printhead cartridge’s ink couplings, nozzle surface or the
electrical contacts when installing the printhead cartridge. Hold the printhead
cartridge ONLY by the handles.
•DO NOT unpack the printhead cartridge until the machine is ready for
installation. Once unwrapped, delay in installing the printhead can
compromise print quality due to dehydration.
•DO NOT place an unwrapped printhead on any surface before installing.
Protect the printhead at all times from dust, fibers, dirt and other
contaminants.

TrojanThree User Guide
Page | 19
2. Press Release Printhead button in TrojanThree -> Maintenance menu to open printhead latch:
NOTE: The above warning label can be found on the printhead latch. Trying to open the blue
plastic latch manually by the handle will most likely break the latch. Breaking the latch is
considered as improper usage and therefore replacement is out of warranty. Breaking the latch
also causes the machine to be non-operational until the broken part is replaced.
3. Insert printhead by the handle into the cradle.
a. Open printhead latch all the way up.
b. Insert printhead into the cradle by the handles.
c. Pull the printhead backwards until it snaps into the proper place standing upright.
a.
b.
c.
c.
b.
Table of contents
