Tronic KH 3002 User manual

KOMPERNASS GMBH · BURGSTRASSE 21 · D-44867 BOCHUM
www.kompernass.com
ID-Nr.: KH3002-06/09-V2
6MOBILE POWER SUPPLY
KH 3002
MOBILE POWER SUPPLY
Operating instructions
KH 3002
q
Awer
t
y
u
io
a
s
B
d
fgh jk
C
F
D
E

CONTENT PAGE
Intended Use 2
Preparation 2
Technical Data 2
Description of the appliance 2
Safety instructions 3
Start-up 4
Charging with the mains power plug.............................................................................................4
Charging with the vehicle adapter.................................................................................................4
Power supply over the low voltage socket (max. 1 A) 5
Carrying out connections ................................................................................................................5
Providing electrical power...............................................................................................................6
Ending the supply of electricity .......................................................................................................6
Possible faults in the event of non-functionality..............................................................................6
Power supply over the 10 amp socket (Vehicle power plug) 6
Carrying out connections ................................................................................................................7
Switching the power supply on.......................................................................................................7
Ending the supply of electricity .......................................................................................................7
Possible faults in the event of non-functionality..............................................................................8
Power supply over the screw connections 8
Carrying out connections using the banana plugs.......................................................................8
Carrying out connections with the bare ends of fixed appliance cables...................................8
Carrying out connections over a loose cable ..............................................................................8
Fuses 9
Changing a round fuse....................................................................................................................9
Changing a flat fuse.........................................................................................................................9
Changing a cable fuse ...................................................................................................................9
Cleaning and care 9
Storage 10
Disposal 10
Warranty & Service 11
Importer 11
- 1 -
Read these operating instructions carefully before using the appliance for the first time and preserve this
booklet for later reference. Pass this booklet on to whoever might acquire the appliance at a future date.
- 2 -
MOBILE POWER SUPPLY
KH 3002
Intended Use
This Energy Station is intended for mobile power
supply to low-voltage appliances of up to 10 A
power consumption. This appliance is intended only
for domestic use, it is not intended for use in commer-
cial or industrial applications.
Do NOT use this appliance for applications where
a power failure could result in damage, e.g. medical
equipment, aviation or space programme etc.
Preparation
Unpacking
1. Remove the Energy Station and its accessories
from the packaging.
2. Remove all adhesive tapes, foils and transport
restraints.
Attention!
Do not permit small children to play with the plastic
packaging. There is a risk of suffocation!
Check the items supplied
Before taking the appliance into use, check that all
items are present and free of visible damage.
1 Energy Station KH 3002
1 Carrying strap
1 Power supply unit
1 Vehicle adapter
1 Adapter cable
5 Adapter plugs
Technical Data
Energie Station
Rechargeable gel battery: 12 V / 7 Ah
Low voltage sockets: 3 V / 4,5 V
6V/9V/
12 V
unstabilised / 1 A
Vehicle socket: 12 V / 10 A
Screw connections: 12 V / 10 A
for max. 2 mins.
Connector power pack
Power supply : 240 V ~/ 50 Hz
Output voltage: 12 V / 500 mA
Protection class: II /
Model: ZJF-DC120V050
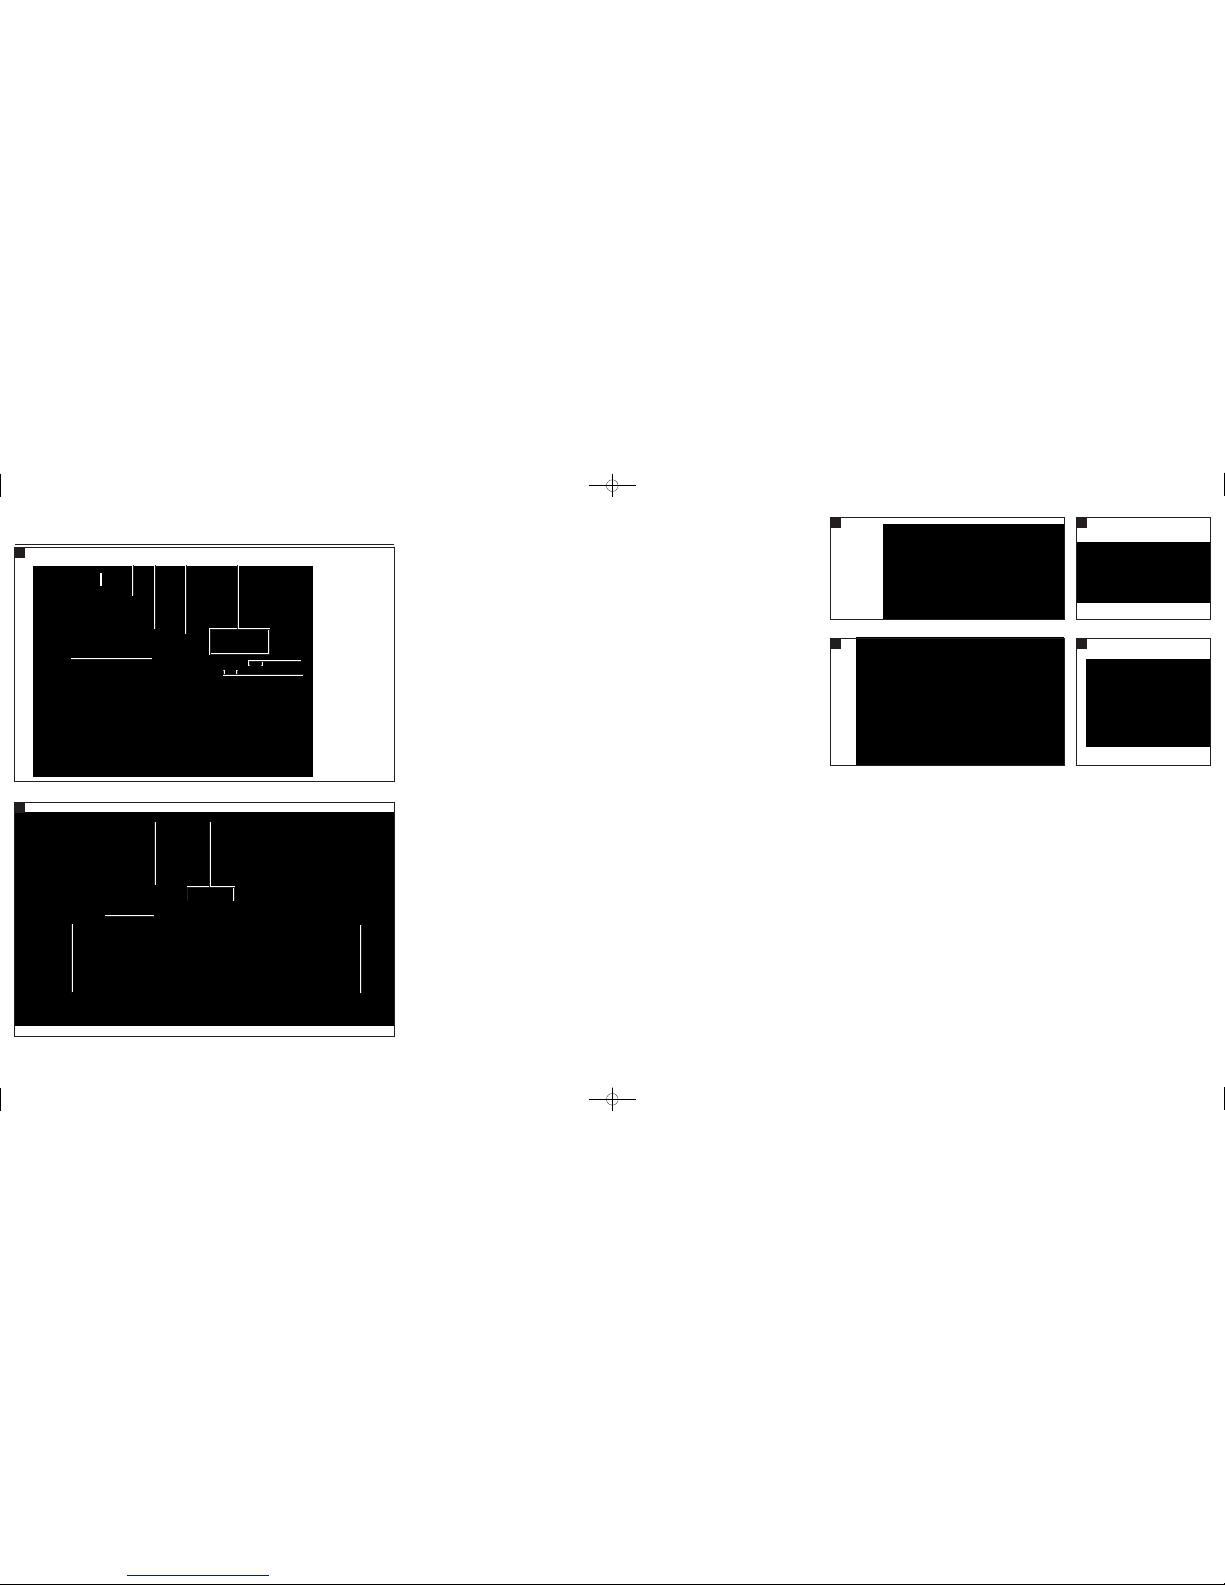
Description of the appliance
Front
1Carrying strap
2Mains switch (CHA/OFF/ON)
312 V/10 A Output
4Low voltage sockets (3 V/4,5 V/6 V/9 V/12 V)
5Indicator lamps for OUTPUT
(Red LED "Empty"/Green LED "Full")
6Indicator lamps for CHARGE
(Red LED "On"/Green LED "Full")
7Round fuse 2 A (T2A 250 V)
Rear
8Flat fuse 10 A (C10)
9Screw connections 12 V / 10 A
0Storage compartment for adapter cables
qStorage compartment for adapter plugs
wCharging socket DC-INPUT
- 3 -
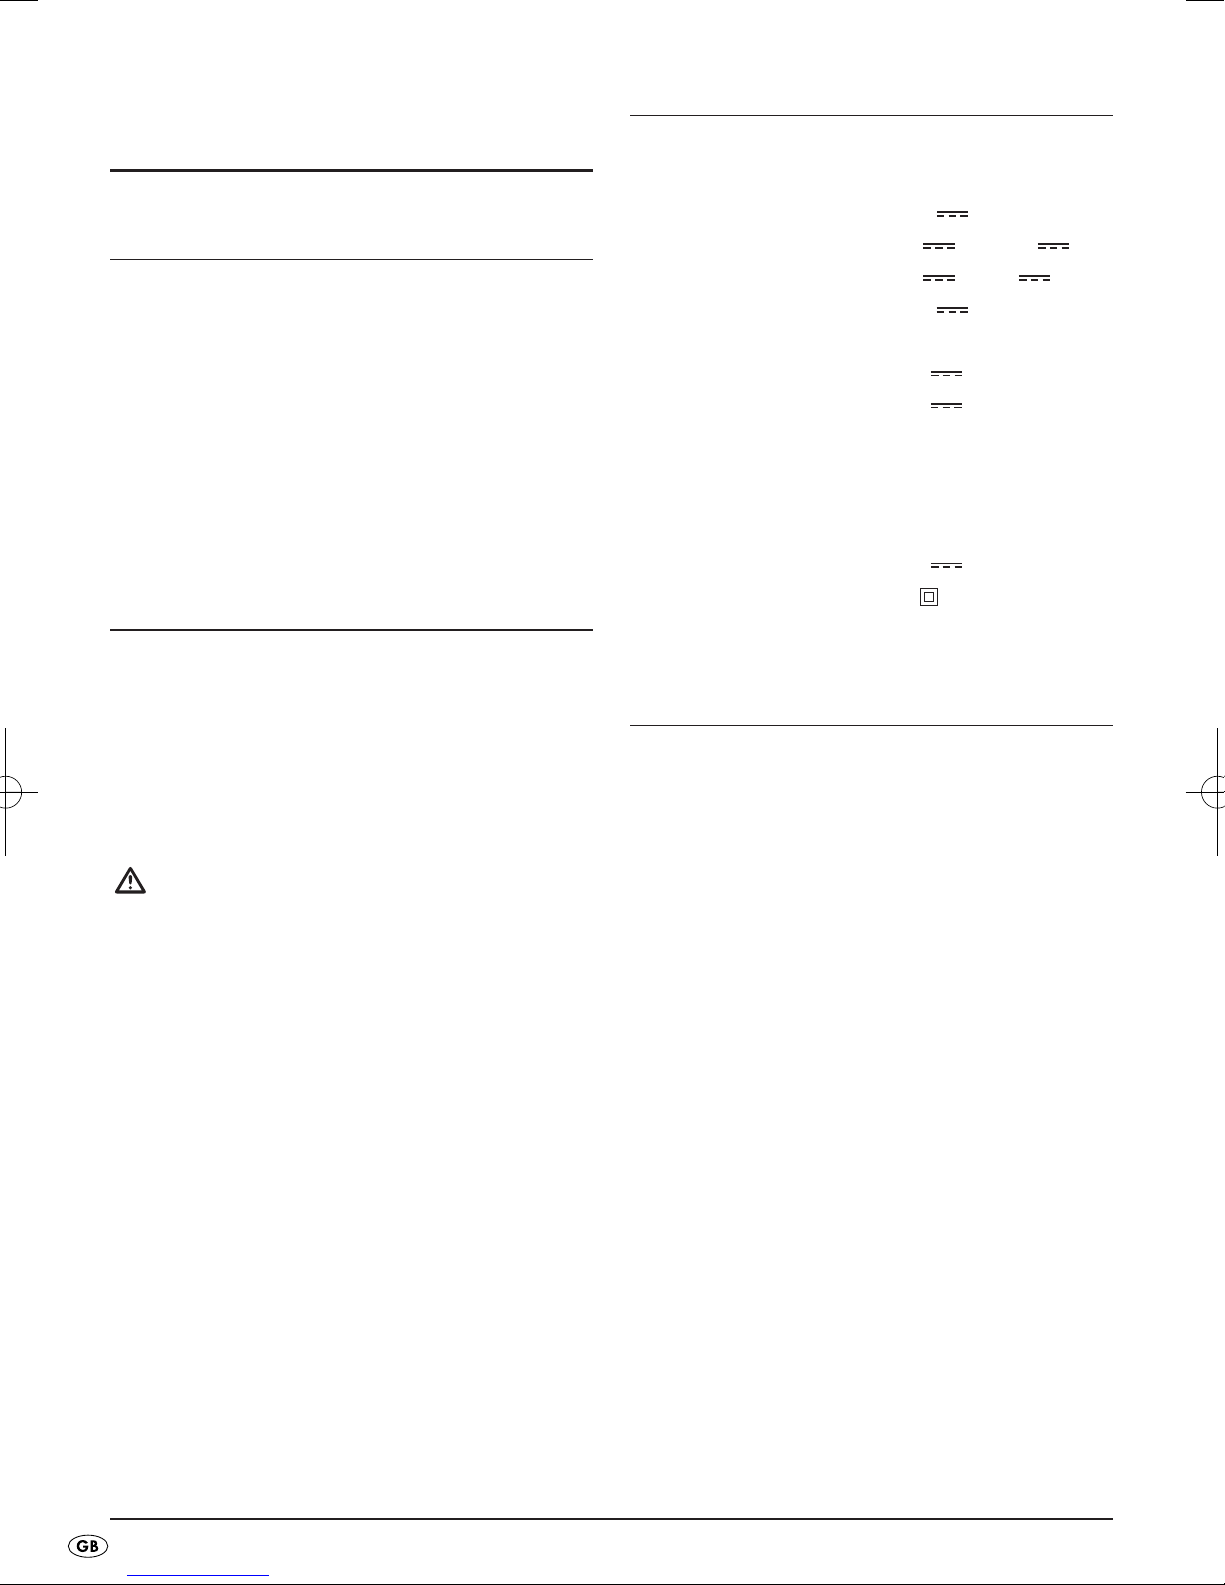
Vehicle adapter
Adapter plugs
e3.5 mm Barrel connector
r5 mm Barrel connector
t5.5 mm Barrel connector
z2.5 mm Jack plug
u3.5 mm Jack plug
Adapter cable
Power supply unit
Safety instructions
This appliance is suitable for use ONLY
indoors.
• This appliance is not intended for use by individuals
(including children) with restricted physical, physio-
logical or intellectual abilities or deficiences in
experience and/or knowledge unless they are
supervised by a person responsible for their safety
or receive from this person instruction in how the
appliance is to be used.
• Children should be supervised to ensure that
they do not play with the appliance.
• Check the appliance and all parts for visible
damages. The safety concept can work only if
the appliance is in a faultless condition.
• The plug must always be easily accessible,
so that the appliance can be quickly separated
from the mains power supply in the event of an
emergency.
To avoid potentially fatal electric
shocks:
• Connect the power supply unit only to correctly
installed and earthed mains sockets. The mains
voltage must conform with the specifications on
the ratings plate of the power supply unit.
• Only use the supplied power supply unit.
If you replace the power supply unit, only replace
it with one of the same model.
• To avoid risks, arrange for defective power plugs
and/ or cables to be replaced at once by
qualified technicians or our Customer Service
Department.
• Never submerge the appliance or the power
supply unit in water. Wipe it only with a slightly
damp cloth.
• Do not expose the appliance to rain and never
use it in a humid or wet environment.
• Ensure that the power cable never becomes wet
during operation.
• Do not open the casing or attempt to repair the
appliance yourself. Should you do so, appliance
safety can no longer be assured and the warranty
will become void.
• Protect the appliance against drip and spray
water. Do not place any water-filled vessels
(e.g. flower vases) on the appliance.
• Should water permeate into the Energy Station
or the power supply unit, or if they fall into water,
irreparable damage can occur and there also
exists the risk of receiving an electric shock!
To avoid the risk of fire caused by
short circuits:
• Ensure that the screw connectors can never be
short-circuited, for example, by a loose cable.
For operational reasons these connections are not
protected – this means that very high currents
can flow (over 15 A).
• Do not use the appliance in the vicinity of hot
surfaces.
• Do not retain the appliance in places exposed to
direct sunlight, Otherwise, it may overheat and
become irreparably damaged.
• Do not leave the appliance unattended when
in use.
- 4 -
• Do not operate the Energy Station in the im-
mediate vicinity of sources of heat, such as an oven,
hot air blowers (in a vehicle: close to heating
vents) and similar appliances! Heat effects could
lead to the equipment overheating and to the
melting of plastic parts, whereby the Energy
Station could be irreparably damaged!
If it is overheated, the Energy Station could
be irreparably damaged and the risk of
a fire exists!
• This appliance must not be placed in the im-
mediate vicinity of flammable materials,
for example curtains, inflammable liquids etc.
• Do not place any open sources of fire,
like candles, on the appliance.
Injury hazard!
• Keep children away from the connecting cable
and the appliance. Children frequently under-
estimate the dangers of electrical appliances.
• Ensure that the appliance stands with a safe and
secure positioning.
• Do not operate the appliance if it has sustained
a fall or is damaged. Arrange for the appliance
to be checked and, if necessary, repaired by
qualified technicians.
Start-up
The Energy Station is supplied with a low-level pre-
charged battery. Prior to initial usage it must therefore
be charged.
Attention!
The battery can lose considerable capacity should
you use the Energy Station without fully charging it
beforehand!
• Before taking the appliance into use, check to
ensure that the Energy Station, the connection
cables and the power supply unit are in
a defect-free condition.
Danger!
NEVER use a damaged connection cable. Risk of
short circuit!
Charging with the mains power plug
Attention: Explosive Gas
Avoid flames and sparks. During charging, ensure
that there is sufficient ventilation.
1. Insert the appliance plug of the power supply
unit in the charging socket DC-INPUT wat
the back of the appliance.
2. Connect the power supply unit to a mains
power socket. The mains voltage must conform
with the specifications on the ratings plate of the
power supply unit.
3. Place the main switch 2at the front of the appli-
ance to the “CHA” position. The Energy Station is
now being charged.
4. While the Energy Station is charging, the red LED
“On” 6in the field CHARGE will be illuminated.
5. When the battery is nearly fully charged, the
green LED “Full” 6will start to be faintly illumi-
nated. As soon as it is fully illuminated you can
remove the power supply unit . The red LED
"On" 6continues to glow until you place the
main switch 2in the position "OFF".
Charging with the vehicle adapter
You can also charge the Energy Station by con-
necting the supplied vehicle adapter to the
12V on-board voltage system of a motor vehicle or
sports boat:
1. First insert the appliance plug of the 12V vehicle
adapter in the charging socket wat the rear
of the appliance.

- 5 -
2. Then insert the 12 V plug of the vehicle adapter
in the 12-V plug resp. in the cigar lighter of
the vehicle.
Danger!
The above sequence is important, as it avoids a short
circuit due to inadvertent contact of the appliance
plug with the vehicle chassis.
3. Place the main switch 2at the front of the appli-
ance to the “CHA” position. The Energy Station is
now being charged.
4. While the Energy Station is charging, the red LED
“On” 6in the field CHARGE will be illuminated.
5. When the battery is nearly fully charged, the
green LED “Full” 6will start to be faintly illumi-
nated. As soon as it is fully illuminated you can
remove the vehicle adapter . The red LED "On"
6continues to glow until you place the main
switch 2in the position "OFF".
Notice!
A charging process is only established if the charging
voltage is higher than that of the battery. With a sta-
tionary vehicle this is frequently not the case. Gene-
rally speaking, charging is therefore only possible
with the engine running.
Power supply over the low
voltage socket (max. 1 A)
Caution!
Before performing any connections, always check
to ensure that both the appliance to be supplied
and the Energy Station are switched off. Place the
main switch 2in the “OFF” position (centre position).
In this way you can avoid damage through connec-
tion faults.
Carrying out connections
A total of 5 low voltage connection sockets 4,
from 3 - 12 V, are available for the supply of power
to appliances with a maximum power consumption
of 1 A:
1. Insert the adapter cable in the low voltage
connection socket 4corresponding to the voltage
required for the appliance to be supplied.
2. Select the suitable adapter connector for the
input to the appliance being supplied.
Caution!
Ensure that “Positive” and “Negative” have not
been switched. Otherwise your appliance could
be damaged!
3. Connect the selected adapter plug and the
adapter cable together so that positive and
negative correspond to the markings on the
sockets of your appliance.
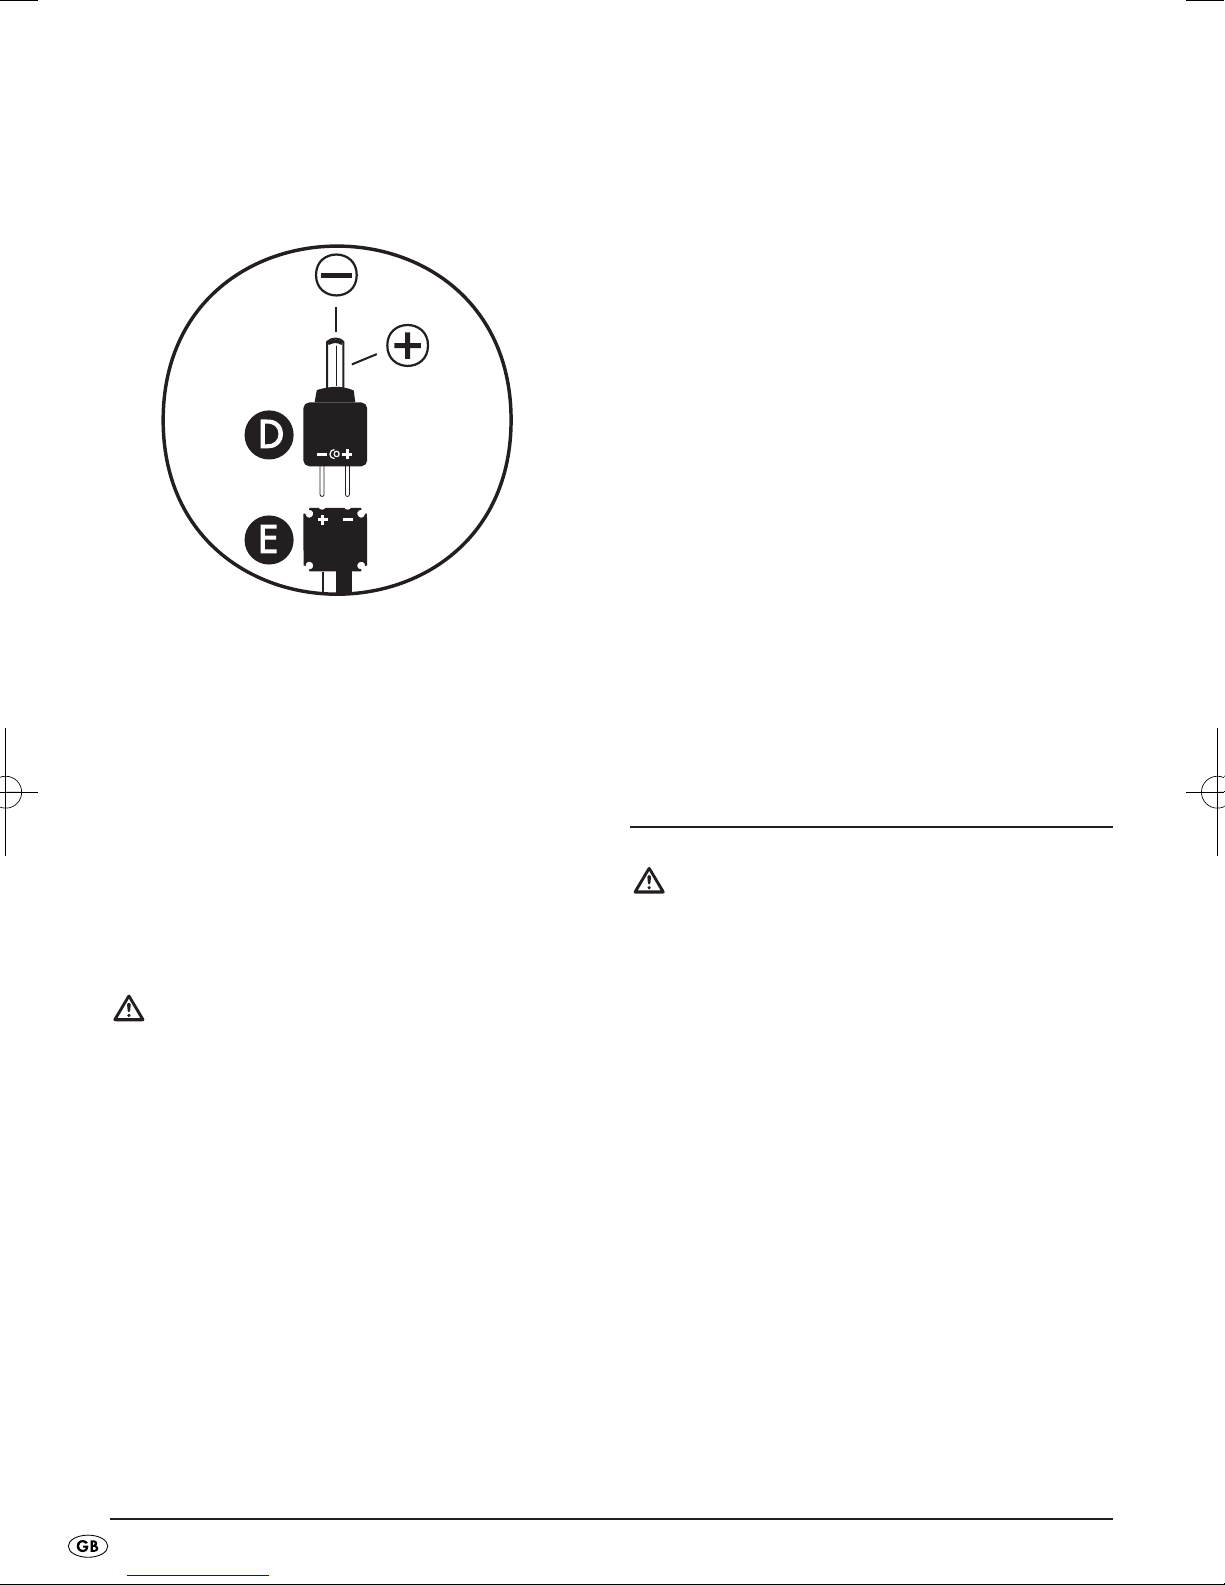
Polarity of the adapter plug:
• Should the adapter plugs be connected with
positive to positive and negative to negative on
the adapter cable , then on the adapter plugs
positive is above resp. inside and negative is
below resp. outside.
- 6 -
• Should the adapter plugs be connected with
opposite markings (+ and -) on the adapter cable
, then on the adapter plugs positive is outside
and negative is inside.
Providing electrical power
1. Place the main switch 2to "ON" – the appliance
connected via the adapter cable is supplied
with electricity.
2. For as long as sufficient energy is available for
the appliance being supplied, the green LED
“Full” 5is illuminated in the OUTPUT field.
3. When there no longer sufficient energy available
for the appliance being supplied, the red LED
"Empty" 5is illuminated in the OUTPUT field.
Caution!
You must first recharge the battery when the red LED
“Empty” 5is illuminated. Otherwise the battery will
be depleted, usually resulting in a considerable loss
of charging capacity.
Ending the supply of electricity
1. Switch the appliance off that is being supplied
with power.
2. Place the main switch 2of the Energy Station at
"OFF" (centre position).
In this way you prevent current flowing while the
connector is being withdrawn. Sensitive appliances
sometimes malfunction as a consequence.
3. Now you can withdraw the adapter cable plugs
from both the appliance and the Energy
Station.
Possible faults in the event of
non-functionality
• If neither of the two LEDs, 5and 6, light up
after switching on, then the 10 amp fuse 8on
the Energy Station might have blown. Changing
fuses is described in more detail in the section
"Fuses".
• Should an LED light up on the Energy Station
after switching on, but the appliance fails to work,
immediately switch the Energy Station off. Check
to ensure that the cable is correctly connected –
and “Positive” and “Negative“ have not been swit-
ched. If required, also check the fuse in your
appliance, as described in its operating
instructions.
Power supply over the 10 amp
socket (Vehicle power plug)
Caution!
Before performing any connections, always check
to ensure that both the appliance to be supplied
and the Energy Station are switched off. Place the
main switch 2in the “OFF” position (centre position).
In this way you can avoid damage through connec-
tion faults.
The 12 V/10 A socket 3is available for the supply
of electricity to appliances consuming up to a max.
of 10 A. Here you can connect the so-called “ciga-
rette lighter connectors” for various appliances.
These could be for example...
- cooler boxes,
- car vacuum cleaners,
- small portable TV sets etc. ...

- 7 -
Note:
Please bear in mind that with a 10 A load the battery
will be exhausted after not more than 45 minutes –
subject to the battery charge condition, even earlier.
Cooler boxes have a typical power consumption of
3 - 4 A per hour. With a battery capacity of 7 Ah,
this corresponds to just under 2 hours of operating
time. You can roughly estimate the operating time
for your appliance using this calculation example.
In this way you can avoid damage caused by
connection errors.
Carrying out connections
Caution!
Ensure that “Positive” and “Negative” are not switched
before connecting your appliance to the Energy
Station. Otherwise your appliance could be
damaged.
You could use the supplied vehicle adapter for
supplying power, should its plug fit in the socket of
the appliance.
With the supplied vehicle adapter cable the
appliance plug is connected so that Positive is on
the inside and Negative on the outside, as shown.
• You can use the vehicle adapter cable if the
socket on the appliance being powered is marked
thus:
• Do not use the vehicle adapter cable if the
socket on the appliance being powered is marked
thus:
On appliances with a permanently connected cable
and 12 V plug, “Positive” and “Negative“ have
the correct polarity.
1. Insert the appliance connector of the supplied
vehicle adapter cable in the socket on your
appliance.
2. Insert the 12-V plug of the vehicle adapter ,
resp. the appliance being powered, in the
12 V/10 A socket 3on the Energy Station.
Switching the power supply on
1. Place the main switch 2at "ON" – your appli-
ance will now be supplied with power.
2. For as long as sufficient energy is available for
the appliance being supplied, the green LED
“Full” 5is illuminated in the OUTPUT field.
3. When there no longer sufficient energy available
for the appliance being supplied, the red LED
"Empty" 5is illuminated in the OUTPUT field.
Caution!
You must first recharge the battery when the red LED
“Empty” 5is illuminated. Otherwise the battery will
be depleted, usually resulting in a considerable loss
of charging capacity.
Ending the supply of electricity
1. Switch the appliance off that is being supplied
with power.
2. Place the main switch 2of the Energy Station at
"OFF" (centre position).
In this way you prevent current flowing while the
connector is being withdrawn. Sensitive appliances
sometimes malfunction as a consequence.
3. Withdraw the 12-V plug from the 12 V/10 A
socket 3on the Energy Station and, if need be,
the appliance plug of the vehicle adapter
from the appliance that was being powered.
- 8 -
Possible faults in the event of
non-functionality
• If neither of the two LEDs, 5and 6, light up after
switching on, then the 10 amp fuse 7on the
Energy Station might have blown. Changing fuses
is described in more detail in the section "Fuses".
• Should an LED light up on the Energy Station after
switching on, but the appliance fails to work, im-
mediately switch the Energy Station off. Check to
ensure that the cable is correctly connected –
and that “Positive” and “Negative“ have not
been switched. If required, also check the fuse in
your appliance, as described in its operating
instructions.
Power supply over the screw
connections
Caution!
Before performing any connections, always check
to ensure that both the appliance to be supplied
and the Energy Station are switched off. Place the
main switch 2in the “OFF” position (centre position).
In this way you can avoid damage through connec-
tion faults.
Use the screw connections 9at the rear of the ap-
pliance for 12V appliances requiring a high starting
current for switching on, but which do not otherwise
consume more than 10 A per hour.
Appliances with a high starting current could be for
instance ...
- 12 V vacuum cleaners
- 12 V drilling machines
- 12 V television sets etc.
Although these may not require more than 10 A
in operation, the fuse will immediately blow when
they are switched on. In this case such appliances
cannot be operated on the 12 V/10 A socket 3.
Operate these appliance only by way of the screw
connections 9, as described here.
Carrying out connections using the
banana plugs
1. The screw connections 9are hollow, to accom-
modate so-called “banana plugs”. If such are
provided on your appliance cable, you can insert
these in the screw connections 9from the top,
instead of screw-connecting.
Danger!
Extremely high current flows are possible here, ones
that are even capable of heating thick cables to red
hot! Before connecting, check to ensure that the
connecting cable for the appliance to be powered
is suitable for such a connection, so as to avoid
electric shock and the risk of fire.
These high currents are required for the starting of
some appliances. The screw connections 9are
therefore neither routed by way of a fuse and nor
by way of the main switch 2, i.e. voltage is
continuously present!
For this reason it is imperative to ensure that a short-
circuit cannot be created at the screw terminals,
not under any circumstances!
Carrying out connections with the
bare ends of fixed appliance cables
1. If the cable is permanently connected with the
appliance to be powered, you can simply con-
nect the bare “Positive“ wire (usually red) to the
red screw connector 9.
2. Connect the bare "Negative" wire (usually black
or blue) to the black screw terminal 9.
To do so, unscrew the plastic caps on the screw
terminals 9. Clamp the bare wires underneath
when retightening.
Carrying out connections over a loose
cable
1. If the cable is not permanently connected to the
appliance being powered, but has a bare ap-pli-
ance plug available, first insert the appliance
plug in the socket on the appliance.
- 9 -
2. Then connect the wires to the screw connectors 9.
With this sequence you avoid short-circuit risks,
should the bare connector inadvertently come into
contact with metallically conductive objects during
the connection work.
Fuses
If neither of the two LEDs, 5and 6, light up after
switching on, then the 10 amp fuse 7on the Energy
Station might have blown.
If an LED is illuminated after switching on, but no
current is flowing via the vehicle adapter , the
cable fuse in the 12 V plug of the vehicle adapter
may have burnt out.
Danger!
First, place the main switch 2to “OFF”. Disconnect
ALL cables from the Energy Station before changing
ANY fuses.
In this way you will avoid having the new fuse melting
in your fingers on insertion if the defect persists –
risk of injury!
Danger!
Fuses are important protective measures to help
prevent damage. Never render them ineffective.
Always replace fuses with fuses of the same rating,
never with “higher” ratings. Never bypass fuses.
Risk of fire!
Changing a round fuse
• Unscrew the cap at the front of the round fuse 7.
Fit a new fuse with a rating of “2 A“ (T2A 250 V).
Changing a flat fuse
• Pull out the flat fuse 8at the rear of your ap-
pliance (e.g. with long-nose pliers). Insert a new
“10 A (C10)” fuse.
Changing a cable fuse
• Unscrew the cable fuse cap on the 12 V plug
of the vehicle adapter . Insert a new “1 A
(T1A 250 V)” fuse.
If the fuse blows again immediately after the app-
liance is connected, the appliance is burdening the
Energy Station with excessive power consumption –
or it is defective.
Cleaning and care
Danger!
Never open the housing of this appliance. There
are no user-serviceable elements inside. An open
housing can pose a fire hazard through short-circuit
currents.
• Place the main switch 2to the position “OFF”.
• Disconnect all cable connections between the
Energy Station and any appliances that might be
connected to it.
• If you wish to clean the power supply unit ,
disconnect it from both the mains power socket
and the charging socket w.
Danger!
Never submerse any parts of the appliance in water
or other liquids! This can severely damage the Energy
Station – and there is also the risk of a potentially
fatal electric shock from the power supply unit.
• All surfaces and cables are best cleaned with
a slightly moistened washing-up cloth. Dry the
appliance well before re-using it.
Danger!
Do not use detergents or solvents. These could cause
damage to the appliance, especially to the lettering.

- 10 -
Storage
Because of the natural self-discharge of batteries,
the Energy Station should be fully charged once
more before putting it into storage for several days
or weeks.
If you wish to store the appliance for an extended
period of time without usage, to prevent a full deple-
tion of the battery it should be recharged before
the expiry of 6 months.
• Place the main switch 2to the position “OFF”.
• Disconnect all cable connections between the
Energy Station and any appliances that might be
connected to it.
• Pack all cables and connectors away in the
storage compartments 0and qon the
appliance.
• And finally, close all lids.
• Store the appliance in a dry place.
Disposal
Do not dispose of the appliance in your
normal domestic waste.
This product is subject to the provisions
of European Directive 2002/96/EC.
Dispose of this appliance through an approved waste
disposal centre or at your community waste facility.
Observe the currently applicable regulations.
In case of doubt, please contact your waste disposal
centre.
Disposal of batteries/cells
Used batteries/cells may not be disposed of in house-
hold waste. All consumers are statutorily required to
dispose of batteries or cells at a collection point in
their community or at a retail company.
The purpose of this obligation is to ensure that batte-
ries are disposed of in a non-polluting manner. Only
dispose of batteries when they are fully dis-charged.
Dispose of all packaging materials in an
environmentally friendly manner.
- 11 -
Warranty & Service
The warranty for this appliance is for 3 years from
the date of purchase. The appliance has been
manu-factured with care and meticulously examined
before delivery. Please retain your receipt as proof
of purchase. In the case of a warranty claim, please
make contact by telephone with our service depart-
ment. Only in this way can a post-free despatch for
your goods be assured.
The warranty covers only claims for material and
maufacturing defects, not for wearing parts or for
damage to fragile components. This product is for pri-
vate use only and is not intended for commercial use.
The warranty is void in the case of abusive and
improper handling, use of force and internal tampe-
ring not carried out by our authorized service
branch. Your statutory rights are not restricted in
any way by this warranty.
DES Ltd
Tel.: 0870/787-6177
Fax: 0870/787-6168
e-mail: support.uk@kompernass.com
Kompernass Service Ireland
Tel: 1850 930 412 (0,082 EUR/Min.)
Standard call rates apply. Mobile operators may vary.
e-mail: support.ie@kompernass.com
Importer
KOMPERNASS GMBH
BURGSTRASSE 21
44867 BOCHUM, GERMANY
www.kompernass.com

Table of contents


