Truck Hero extang XCEED Assembly instructions

3 1 8 5 1 0 1 0 - 3 0
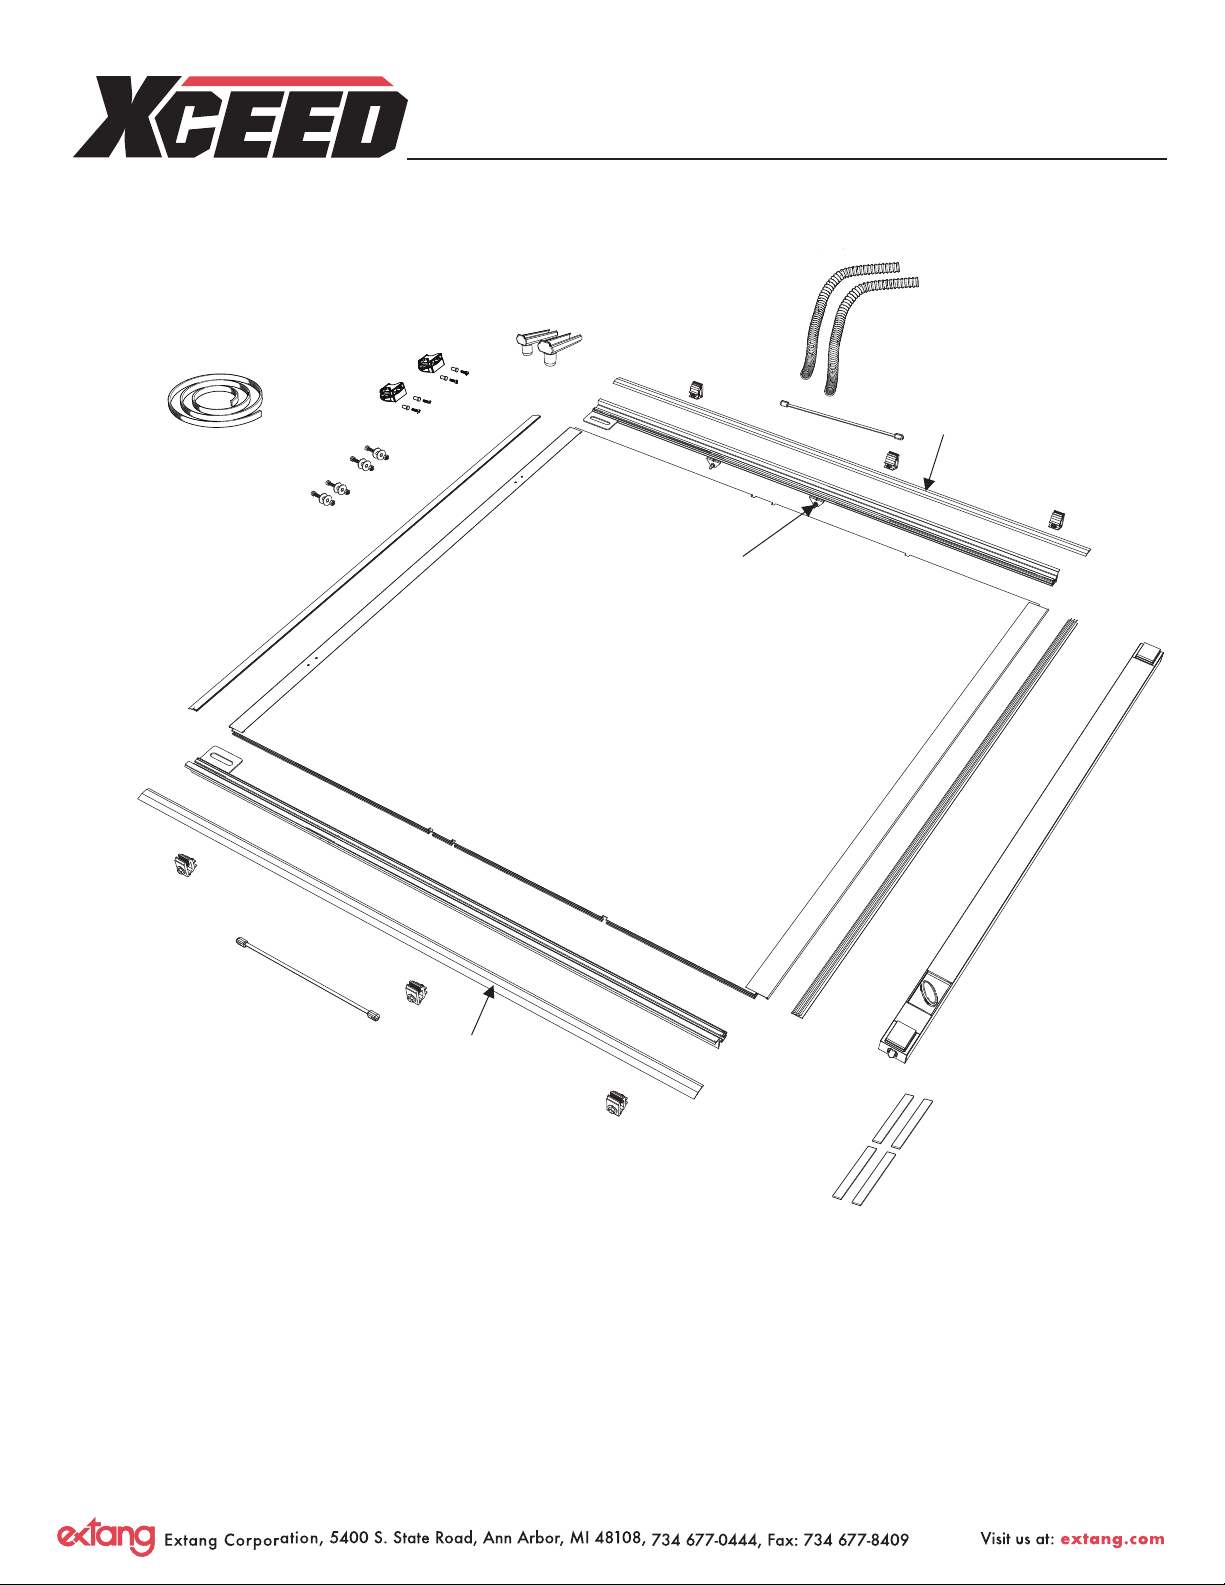
The XCEED truck bed cover requires the
installation of rails and some small parts.
Note any damaged or missing
components before installing.
It is important that
all areas where the
bed cover mounts
are clean and free
of debris prior to
installing.
Item No. 31851010-30 4.16.19 DD
Extang, Corp., 2019. Printed in USA
If the truck
does not have
a bed liner, install the
cab/bulkhead seal.
Wipe the painted
surfaces with
isopropyl alcohol
before applying.
With the tailgate closed, place the Xceed
rails on the truck bed rail with the slotted
bracket forward toward the
cab/front and facing inside.
Front/Cab
Make sure the rail is clamped square with the truck bed rail
and bulkhead. Start at the front/cab and place the rst clamp
6 to 9 inches (152 to 229mm) from the front.
NOTE: Some drop in
liners may require
trimming in the corners
to t the rail tightly into
the corner of the bed.
Make sure the
clamp is inserted
all the way up
into the rail and
clamp teeth are
aligned to the rail
slots to ensure grip.
Tools required:
9/16” and 1/2” sockets and ratchet wrench,
Phillips screwdriver
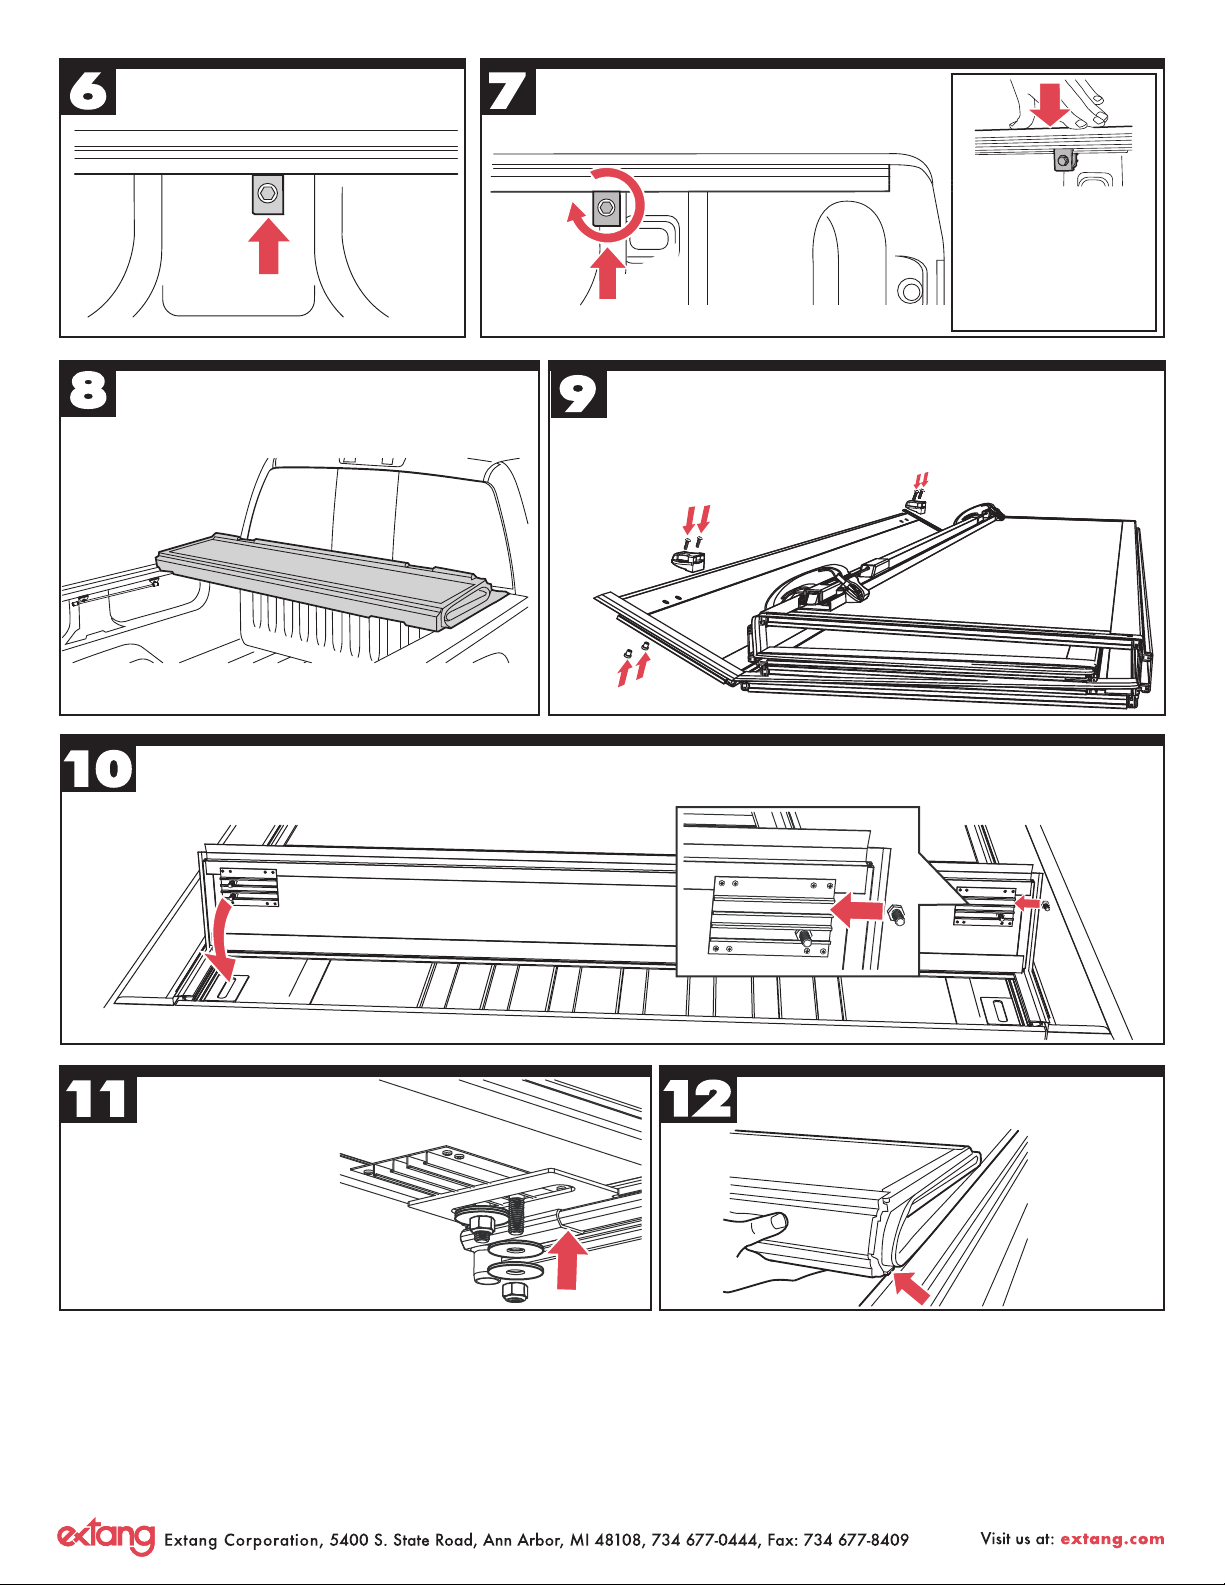
Place the 2nd clamp near
the center of the rail.
Place the rear clamp approximately 6 inches
152 mm from the tailgate.
Tighten all the clamps to 10 ft-lb, 13,6 N-m.
10 ft-lb
13,6 N-m
NOTE: Always apply
downward pressure
to the rail when
tightening the clamps
to ensure that the
rail sets ush and
seals properly.
Set the cover in the folded position, with the cab
panel at the front onto the rails at the front/
cab of the truck.
Before mounting the cover on the truck, using a screw driver install
the two buckle ends into the pre-drilled holes on the front header
panel. Insert the posts from the bottom, thread the screws down
though the buckle end. Do not over tighten, hand tighten,
Do Not use a screw gun.
At the front cab, fold the header panel back and insert 2 mounting bolts through the keyed slots. When closed, the two
screws will align with the slotted bracket of the cover rails. Repeat on the opposite side.
Install mounting hardware loosely
underneath the slotted bracket
on the rail. Start with the rubber
washer, then the large at washer,
then the nylon lock nut.
Install two on either side.
Leave the nuts loose for later
adjustments.
Unfold the cover toward the tailgate. Make sure
the cover ts squarely between the rails.
The cover’s aluminum frame at the tailgate should
just t inside of the tailgate when the cover is
correctly positioned from front to back.
The clearance is approximately 1/4”, 6.35mm.
The rear edge of the cover and tailgate seal should rest on top
of the tailgate. The cover must also be parallel with the tailgate
and truck bed.
Once the cover is properly aligned, carefully open the cover
ensuring that it remains in position. Tighten the four mounting
nuts. Do Not over tighten the fasteners, Do NOT use power tools.
Check that the cover operates correctly and the latches engage,
if not loosen the fasteners and realign.
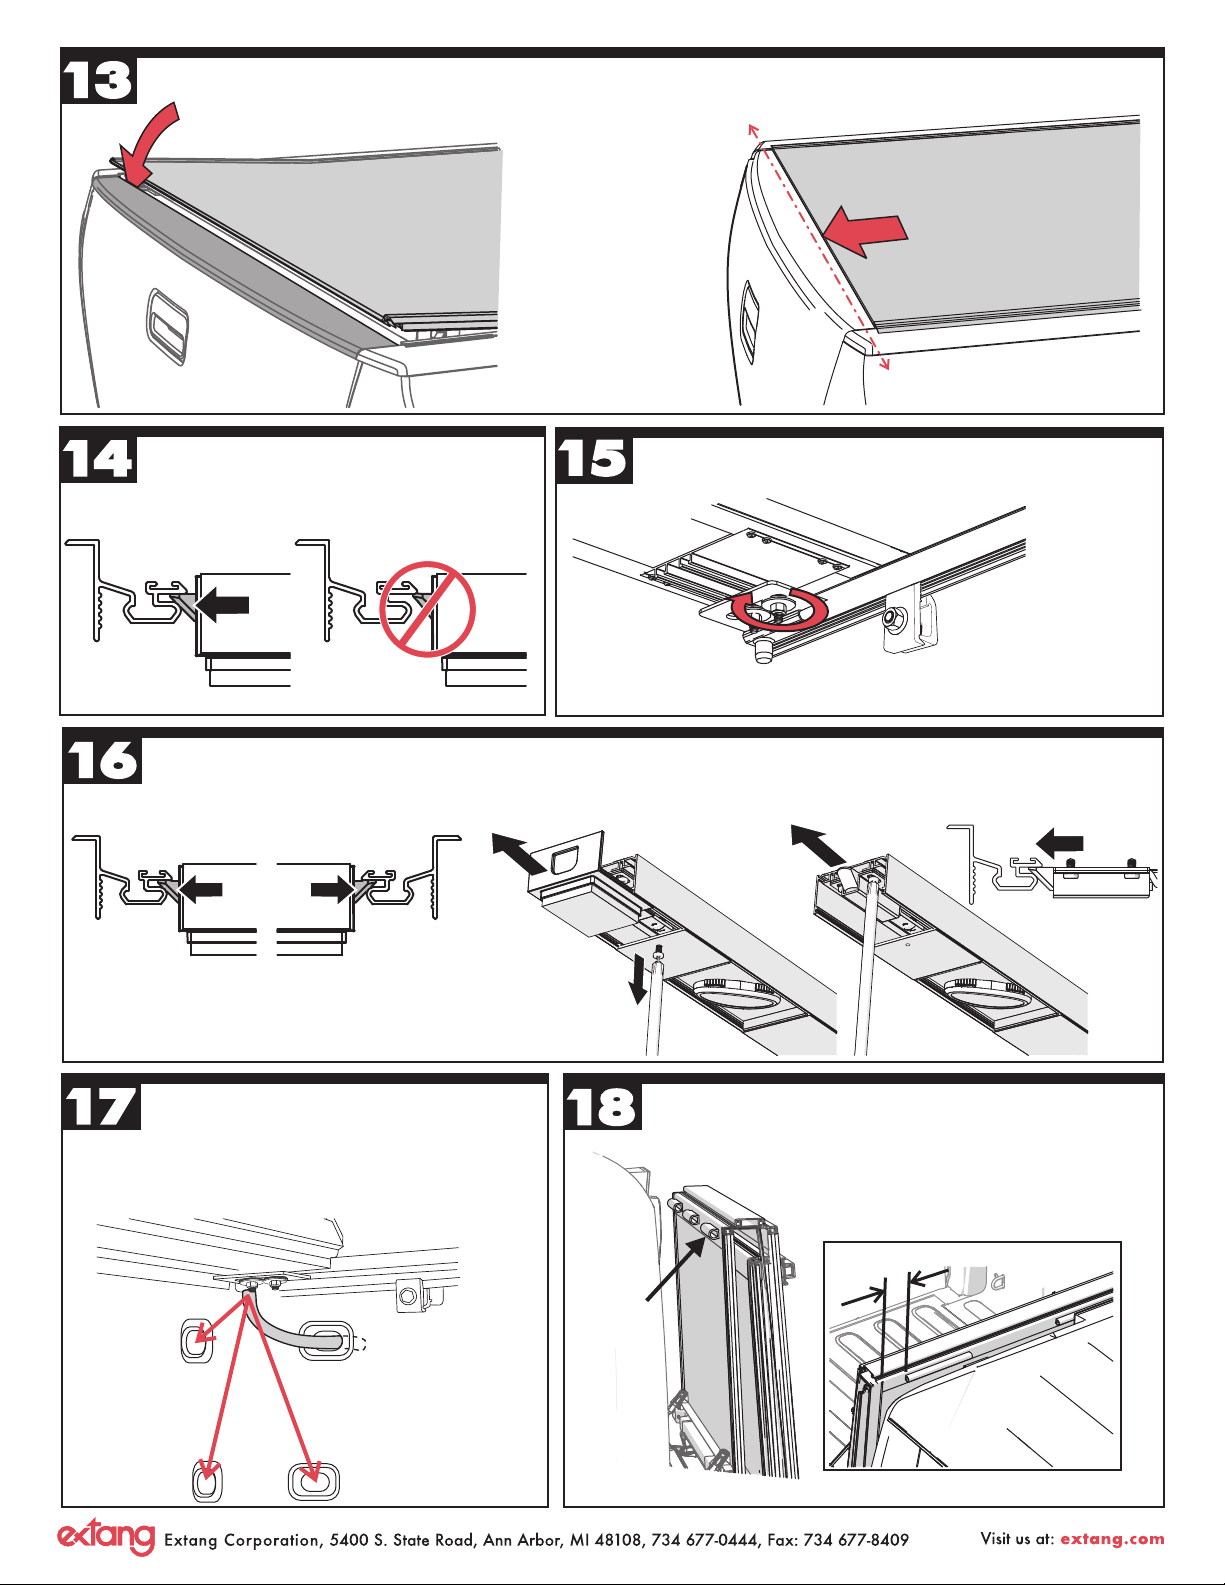
Attach the drain hoses to the front drains and
route the hose through the manufacturer bed
plugs. Remove the plug or drill a 7/8”, 22.3mm
hole in the bed plug. Install hoses on both sides.
The hoses may have to run behind a drop-in
bed liner.
Check that the cover panel latches on both sides
make proper contact with the side rails.
Adjust the cover left to right so that both latches
have equal engagement into the side rails.
Check for tail panel latch engagement. Check to see that both tail panel latches make proper contact with the side rails.
If the tail panel latches do not contact properly, remove the small panel screw and slide the end cover off of the latch assembly.
Loosen the two screws (remove and re-tighten screws by hand only) and slide the latch pall assembly to contact the rail.
Check and adjust on both sides. Tighten the screws and replace the cover and cover screw.
Proper engagement
both sides
1.0”, (25.4mm)
Install three cab bumpers along the edge of the cover where
it meets the truck cab in the propped up position.
Position the outer bumpers no closer
than the one inch, or 25.4mm, from
the outside edge of the panel as shown.
IMPORTANT
IMPORTANT NOTICE
Bed cover safe operation and use
While driving, the cover must be completely at and secure with all latches
in the closed position OR completely folded up (all panels) and secured at
the cab. DO NOT DRIVE with cover partially opened.
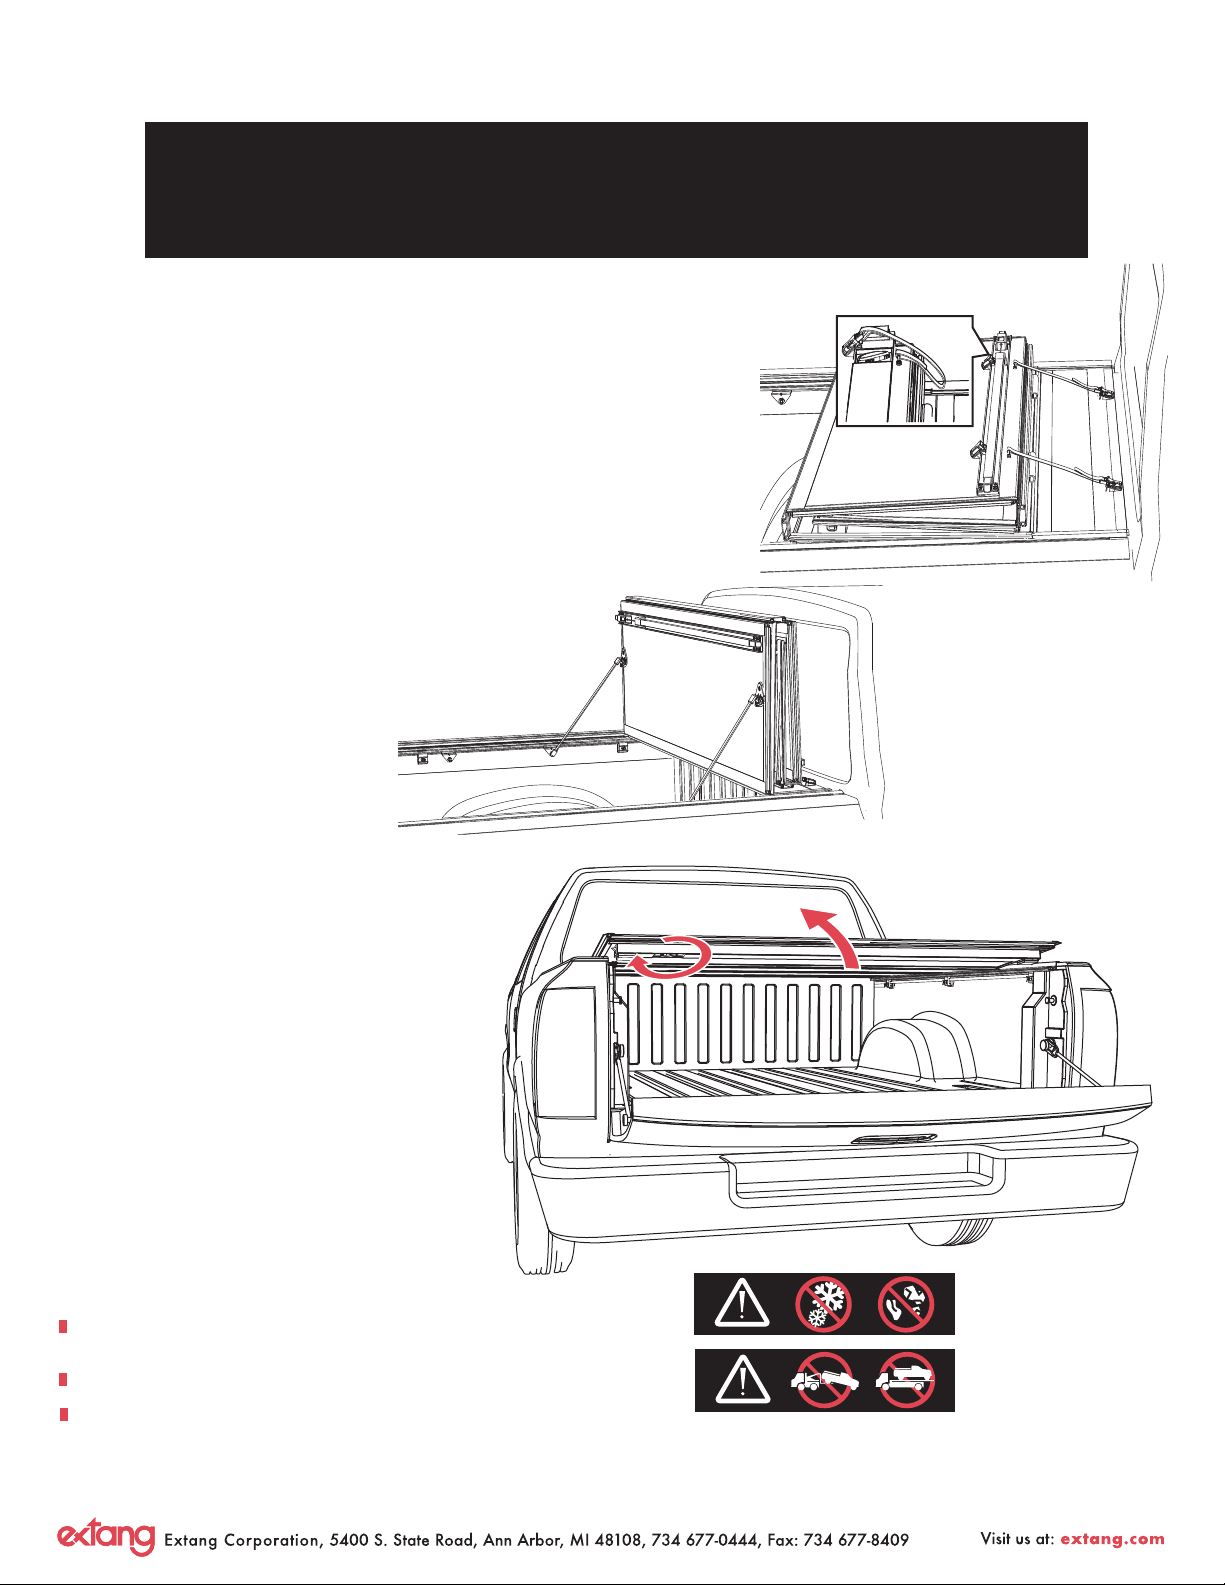
Tonneau Cover Positions While Operating Vehicle
Tail Panel Operation
Prior to vehicle operation, the bed cover MUST be properly secured.
CLOSED POSITION
To close the tailgate panel
To open the tailgate panel
All panels must be at, closed and FULLY LATCHED to the bed cover side rail.
FOLDED & SECURED FLAT AT FRONT OF BED
FOLDED POSITION
FOLDED & PROPPED UP TO CAB
FOLDED & PROPPED UP POSITION
Fold the cover open and lift it until it is vertical, or 90 degrees.
Release the prop rods from the rail clips and engage the
end of the prop rod with the ball tting of the cover bracket.
Always engage both sides.
Your cover should be rmly in
position with little to no movement
once the prop rods are locked.
Strap Storage
Position
The tailgate can be closed with the cover either
up or down.
Open the tailgate and reach under the driver’s
side of the tail panel for the rotary handle.
Rotate the handle to release both latches, lift
the panel to open.
To drive with your bed cover in the folded position, use the tie
down straps and buckles provided with your cover. Ensure that
BOTH buckle clips are fully inserted into the buckle ends located
on the front header panel of the cover, and adjust the straps to
ensure the cover is secure during vehicle operation. The clips should
be secured in the storage position, as shown in Figure1,
when the straps are not in use.
Figure 1
DO NOT DRIVE WITH THE TONNEAU
IN A PARTIALLY OPEN POSITION!
Additional Important Operating Tips
The bed cover MUST be free of foreign material including snow
and ice before opening the panels.
Do Not tow your vehicle from the rear with the bed cover in place.
Do Not operate the vehicle with objects on top of the cover.
FAILURE TO FOLLOW THESE CAUTIONS MAY RESULT IN SEVERE DAMAGE TO THE COVER
AND WILL VOID YOUR WARRANTY!
Remove any snow or
foreign matter before
folding the cover.
Do Not tow your vehicle
from the rear with the
cover on the truck.
Replacement Parts
NOTE: To order replacement parts, it is best to contact our Customer Service Department
for assistance, to ensure getting the correct part for your vehicle application.
When ordering, xxx represents the 3-digit sufx, as referenced on the sales receipt or vehicle
application list. Customer Service Department: 800-877-2588.
Bulkhead
Seal
321A0008
Cover
Mounting
Kit
254A0001
Drain Tubes
31620024
Drain Caps
351A0004
Top Side Buckle Kit
356A0002
Tail Latch Assembly
85XXX-30
Rails only - 85XXX-20
Cover only - 85XXX-25
Prop Rod
31855025
Prop Rod Clip
31855025
Clamp
15-1900
Shims
166A0001
166A0003
Side Seal LH 72”
32850102
Side Seal LH 84”
32850104
Side Seal RH 72”
32850103
Side Seal RH 84”
32850105

Extang offers three years of coverage from the date of purchase. Warranty is limited to original
purchaser of truck bed cover and is nontransferable.
This warranty is against defective materials and workmanship. The warranty is void if the product has
been damaged by accident, unreasonable use, neglect, improper service/installation/removal,
modifications, normal wear and tear or other causes not arising out of defective materials or
workmanship. Consequential and incidental damages are not covered under this warranty.
Warranty is void if defect in materials and workmanship is not reported in writing within 30 days of
discovering a defect.
Warranty does not cover the cost of shipping, including the cost of returning the product for warranty
service or inspection.
Warranty does not cover scratches and dents to bed cover. Warranty further excludes damage to bed
cover as a result of placing, storing, or hauling objects on top of bed cover.
Warranty will be void if shipping damage is not reported in writing within 3 business days of purchase.
OVERLOADING OF CARGO – Cargo should not touch the tonneau at any point. Cargo may shift while
traveling and cause it to push against the panel and damage it.
DRIVING WITH PANELS OPEN OR IMPROPERLY SECURED – Prior to vehicle operation, clamps must be
tightly secured so that clamp lips tightly grip the inner bedside metal surfaces. OPEN POSITION:
tonneau must be completely folded and secured with BOTH buckles. CLOSED POSITION: Tonneau must
be completely flat and secured at all 6 latch points (2 per panel).
Top of tonneau MUST be free of foreign material including snow and ice before opening panels or severe
damage may result.
Do NOT tow your vehicle from the rear with any Extang tonneau cover on your truck.
Provided all warranty conditions are met Extang will either repair or replace (at Extang's option) the
product or component. Extang may require the original item to be returned postage prepaid for final
determination. Extang reserves the right to substitute and offer the respective warranty discount on an
entire replacement system or provide other remedies than those listed in this warranty for discontinued
product or other reasons. A return authorization number must be obtained from our customer service
department prior to returning any product. Shipping charges will apply for any repair or replacement.
This warranty gives you specific legal rights and you may also have other legal rights which vary from
state to state. To request warranty coverage, please contact Extang Customer Service at
800-877-2588 or email us at [email protected] to have a specialist assist you.
Every truck bed cover is specifically designed to fit your truck. Please contact Extang Customer Service at
800-877-2588 or email us at [email protected] to have a specialist assist you with the correct part for
your Extang bed cover.
This manual suits for next models
1
Table of contents
Other Truck Hero Automobile Accessories manuals


