Truper MAX-20SC User manual
Manual
Cordless
Circular Saw
MAX-20SC
ModelCode
MAX-20SC
Applies for:
102480
Disc
6-1/2”
CAUTION Read this manual thoroughly
before using the tool.
ENGLISH
ESPAÑOL

2
Technical Data
Power requirements
General power tools safety warnings
Safety rules for the use of circular saws
Parts
Preparation
Start up
Maintenance
Notes
Authorized Service Centers
Warranty Policy
3
3
4
5
7
8
9
11
12
13
14
MAX-20SC
CAUTION
Contents
Keep this manual for future references.
The illustrations in this manual are for reference
only. They might be different from the real tool.
To gain the best performance of
the tool, prolong the duty life,
make the Warranty valid if
necessary, and to avoid hazards
of fatal injuries please read and
understand this Manual before
using the tool.
3
MAX-20SC
102480
6-1/2”
Cordless circular saw
Code
Description
Disc
Voltage
4 200 RPM
Speed
IP20
IP Grade
The power cable has cable clamps type: Y
The construction class of the tool is: Class III
Construction class of the charger is: Reinforced insulation
Battery
Input: Voltage: 127 V
Frequency: 60 Hz
Current: 1.1 A
Output: 21.5 V 3.5 A
Charger
Ion-lithium 20 V 4 Ah | Charging time: 80 min approximately
20 V
Maximum
cutting depth a 90º: 2 1/8” | a 45º: 1 1/2”
ENGLISH
Technical Data
Power Requirements
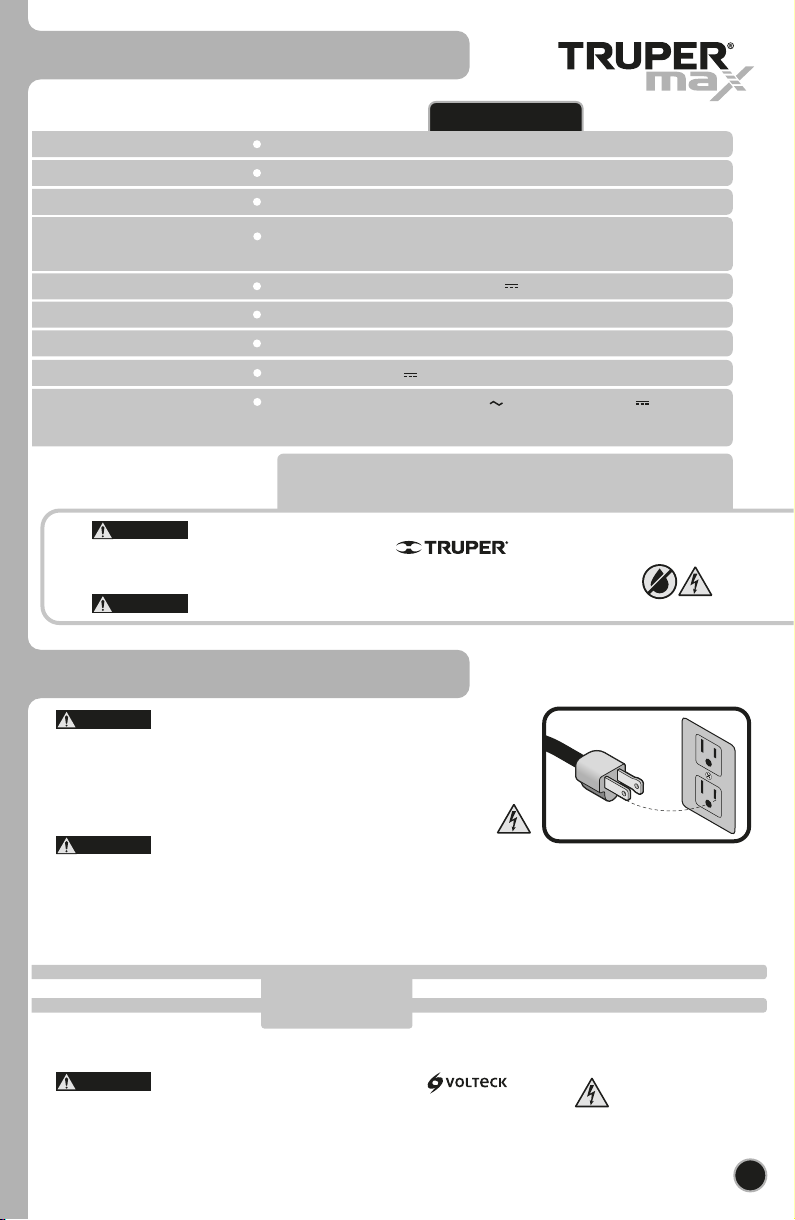
Tools with double insulation are equipped with a polarized plug
(one prong is wider than the other). This plug will only fit in the right way into a
polarized outlet. If the plug cannot be introduced into the outlet, reverse the plug. If
it still doesn’t fit, call a qualified electrician to install for you a polarized outlet. Do
not alter the plug in any way. Double insulation eliminates the need of both a
grounded third power cord with three prongs or a grounded power connection.
When using an extension cable, verify the gauge is enough for
the power that your product needs. A lower gauge cable will cause voltage drop in the line, resulting in power loss and
overheating. The following table shows the right size to use depending on cable’s length and the ampere capability shown in
the tool’s nameplate. When in doubt use the next higher gauge.
WARNING
WARNING
WARNING
from 0 A and up to 10 A
from 10 A and up to 13 A
from 13 A and up to 15 A
from 15 A and up to 20 A
18 AWG(*)
16 AWG
14 AWG
8 AWG
16 AWG
14 AWG
12 AWG
6 AWG
3 (one grounded)
from 6 ft to 49 ft | higher than 49 ft
Ampere
Capacity Number of
Conductors Extension gauge
*It is safe to use only if the extensions have a built-in artifact for over current protection.
AWG = American Wire Gauge. Reference: NMX-J-195-ANCE
When operating power tools outdoors, use a grounded
extension cable labeled “For Outdoors Use”. These extensions are especially designed
for operating outdoors and reduce the risk of electric shock.
WARNING
WARNING Avoid the risk of electric shock or severe injury. When the power cable gets damaged
it should only be replaced by the manufacturer or at a Authorized Service Center.
The build quality of the electric insulation is altered if spills or liquid gets into the tool while in use.
Do not expose to rain, liquids and/or dampness.
Before gaining access to the terminals all power sources should be disconnected.

4
General power tools
safety warnings
ENGLISH This tool is in compliance with the Official Mexican Standard (NOM - Norma Oficial Mexicana).
Work area
Keep your work area clean, and well lit.
Cluttered and dark areas may cause accidents.
Never use the tool in explosive atmospheres, such as in the
presence of flammable liquids, gases or dust.
Sparks generated by power tools may ignite the flammable material.
Keep children and bystanders at a safe distance while operating
the tool.
Distractions may cause loosing control.
Electrical Safety
The tool plug must match the power outlet. Never modify
the plug in any way. Do not use any adapter plugs with
grounded power tools.
Modified plugs and different power outlets increase the risk of electric shock.
Avoid body contact with grounded surfaces, such as pipes,
radiators, electric ranges and refrigerators.
The risk of electric shock increases if your body is grounded.
Do not expose the tool to rain or wet conditions.
Water entering into the tool increases the risk of electric shock.
Do not force the cord. Never use the cord to carry, lift or unplug
the tool. Keep the cord away from heat, oil, sharp edges or
moving parts.
Damaged or entangled cords increase the risk of electric shock.
When operating a tool outdoors, use an extension cord suitable
for outdoor use.
Using an adequate outdoor extension cord reduces the risk of electric shock.
If operating the tool in a damp location cannot be avoided, use
a ground fault circuit interrupter (GFCI) protected supply.
Using a GFCI reduces the risk of electric shock.
Personal safety
Stay alert, watch what you are doing and use common sense
when operating a tool. Do not use a power tool while you are
tired or under the influence of drugs, alcohol or medication.
A moment of distraction while operating the tool may result in personal injury.
Use personal protective equipment. Always wear eye
protection.
Protective equipment such as safety glasses, anti-dust mask, non-skid shoes,
hard hats and hearing protection used in the right conditions significantly
reduce personal injury.
Prevent unintentional starting up. Ensure the switch is in the
“OFF” position before connecting into the power source and /
or battery as well as when carrying the tool.
Transporting power tools with the finger on the switch or connecting power
tools with the switch in the “ON” position may cause accidents.
Remove any wrench or vice before turning the power tool on.
Wrenches or vices left attached to rotating parts of the tool may result in
personal injury.
Do not overreach. Keep proper footing and balance at all times.
This enables a better control on the tool during unexpected situations.
Dress properly. Do not wear loose clothing or jewelry. Keep
hair, clothes and gloves away from the moving parts.
Loose clothes or long hair may get caught in moving parts.
If you have dust extraction and recollection devices connected
onto the tool, inspect their connections and use them correctly.
Using these devices reduce dust-related risks.
Power Tools Use and Care
Do not force the tool. Use the adequate tool for your
application.
The correct tool delivers a better and safer job at the rate for which it was designed.
Do not use the tool if the switch is not working properly.
Any power tool that cannot be turned ON or OFF is dangerous and should be
repaired before operating.
Disconnect the tool from the power source and / or battery
before making any adjustments, changing accessories or
storing.
These measures reduce the risk of accidentally starting the tool.
Store tools out of the reach of children. Do not allow persons
that are not familiar with the tool or its instructions to
operate the tool.
Power tools are dangerous in the hands of untrained users.
Service the tool. Check the mobile parts are not misaligned or
stuck. There should not be broken parts or other conditions that
may affect its operation. Repair any damage before using the
tool.
Most accidents are caused due to poor maintenance to the tools.
Keep the cutting accessories sharp and clean.
Cutting accessories in good working conditions are less likely to bind and are
easier to control.
Use the tool, components and accessories in accordance with
these instructions and the projected way to use it for the type of
tool when in adequate working conditions.
Using the tool for applications different from those it was designed for, could
result in a hazardous situation.
Use and care of the battery-operated tool
Recharge only with the charger specified by .
A charger that is suitable for one type of battery pack may create a risk of fire when
used with another battery pack.
Use power tools only with specifically designated battery packs.
Use of any other battery packs may create a risk of injury and fire.
When battery pack is not in use, keep it away from other metal
objects, like paper clips, coins, keys, nails, screws, or other
small metal objects, that can make a connection from one
terminal to another.
Shorting the battery terminals together may cause burns or a fire.
Under abusive conditions, liquid may be ejected from the
battery; avoid contact. If contact accidentally occurs, flush with
water. If liquid contacts eyes, additionally seek medical help.
Liquid ejected from the battery may cause irritation or burns.
Service
Repair the tool in a Authorized Service Center
using only identical spare parts.
This will ensure that the safety of the power tool is maintained.
WARNING! Read carefully all safety warnings and instruction listed below. Failure to comply with any of
these warnings may result in electric shock, fire and / or severe damage. Save all warnings and instructions for
future references.

5
Kickback refers to the sudden, forceful movement of the
tool away from the workpiece that can cause the operator
to lose control or even cause injury. It is usually caused
when the disc gets stuck in the workpiece or by poor
operation. To avoid this, the following precautions should
be taken:
• Use discs in good condition and make sure they are
properly installed. Poorly installed, damaged, dull or worn
discs tend to jam in the material causing kickback.
• When operating the tool, hold it firmly with one hand
on the handle and the other hand on the auxiliary handle.
Always use both hands. Keep your body well balanced
and in a stable position with both feet on the ground to
resist the force of possible kickback.
• To make a cut, align the disc with the cutting line and
wait for the disc to reach full speed before starting to cut.
Do not start the tool with the cutting teeth resting on the
workpiece, this could cause kickback.
• To restart work within a cut, center the disc in the cut
and check that the teeth are not buried in the material.
• If you notice the disc bending or cutting stops during
tool operation, release the switch and hold the tool inside
the workpiece until the disc comes to a complete stop. Do
not attempt to remove the disc while it is still moving, it
could cause kickback.
Investigate and take corrective action to eliminate the
causes of the disc digging in.
• To minimize the risk of the disc binding and causing
kickback, remove all nails before cutting a piece of wood.
Wet, warped or pressure-treated lumber requires special
Caution during cutting. When cutting large planks, use
supports near both sides of the cutting line to prevent the
weight of the material itself from bending the plank and
closing the cut and trapping the disc. The gum and resin
from the wood that hardens on the cutting discs slows down
the saw. Use gum and resin remover, hot water or kerosene
to remove these buildups. DO NOT use gasoline.
• Be very careful when making a pocket cut in walls or
blind places. The disc may contact hidden objects and
cause kickback.
• While operating the tool, do not place your hand or body
in line with the cutting axis, as the possibility of serious
injury exists if kickback occurs.
• Before starting any cut, the depth of cut and bevel
adjustment knobs must be tightened and secured. If they
move during the cut, they can cause the disc to bend and
kickback may occur. Excessive depth of cut position
increases the load on the unit and the possibility of
bending the disc within the cut.
Safety rules for the use
of circular saws
Kickback
• Use only Truper Max chargers to charge
the tool battery. Using any other charger may result in fire
or risk of injury.
• Use only batteries specifically designed
for the tool. Other batteries may create a risk of injury or
fire.
• Connect the charger to an alternating current (AC) supply
only.
• Do not use the charger outdoors.
• Observe the “+/-” polarity when charging.
• Never recharge a leaking battery.
• Do not use batteries or the charger for purposes other
than those for which they were designed.
• Do not modify the battery or charger contacts.
• Do not expose the battery pack or the tool to fire or
extreme temperatures. Exposure to fire or temperatures
above 130 °C can cause an explosion.
• Never expose batteries to the fire, they
may explode.
• Batteries should be kept away from any
metallic object such as paper clips, coins, keys, nails,
screws or any other object that could cause the terminals
to make contact, and would cause a short circuit that could
cause burns or fires.
• Under extreme conditions, the battery
liquid may leak. If so, avoid any contact. If accidental
contact occurs, wash with abundant water, rinse with
lemon juice and vinegar. If the liquid enters in contact with
the eyes, wash with abundant water during several minutes
and look for medical help immediately. The liquid expelled
from the batteries could cause irradiation or burns.
• To maximize battery life, fully discharge
the battery at least once a month. Do not leave the battery
without recharging for more than three months. Always
charge the battery to its maximum capacity. Before using
the machine for the first time, charge the battery to its
maximum capacity.
• Avoid stopping constantly while cutting to prevent
damage to the battery.
Batteries and charger
ENGLISH
DANGER
DANGER
DANGER
DANGER
CAUTION
CAUTION
CAUTION
6
Retractable guard
General Warnings
• Before each use check the retractable guard and its
spring for proper operation, if the guard does not move
freely or does not close instantly, service it before
operating the tool.
• The retractable guard may operate sluggishly due to
damaged parts, gummy deposits or debris buildup. To
avoid this possibility, regularly clean the inside of both
guards and the disc shaft with kerosene or compressed air.
Before cleaning, switch off the tool and remove the discs.
• The retractable guard can be opened manually, only to
change the blades and to make a cutting or combination
cut. Open the retractable guard with its lever. As soon as
the blade enters the material, the lever must be released.
For all other types of cuts the retractable guard should
operate automatically. Never fix the retractable guard in
the open position.
• The retractable guard can be bent by a blow or fall.
Before operating the tool make sure that it moves freely
at all angles and depths of cut, and that it does not touch
the disc or any other part of the tool.
• Check that the retractable guard
covers the saw blade before placing the saw on a bench
or on the floor. A blade that is spinning by inertia can
cause the saw to move backwards, cutting whatever is in
its path. Verify that the disk stops moving after the tool is
turned off.
• Remember that the guards do not
protect you from the disc moving under the workpiece, so
you should never squat or reach under it while the tool is
running.
Dusts from cutting certain materials contain chemicals
known to cause cancer, birth defects and other
reproductive harm. Some of these chemicals are:
• Lead in lead-based paints.
• Arsenic and chromium in chemically treated wood.
The risk of exposure to these substances varies depending
on how often the work is done. To reduce exposure to
these chemicals, work in well-ventilated areas, and use
appropriate safety equipment, such as dust masks
specifically designed to filter out microscopic particles.
Toxic materials
• Move your hands away from the
cutting area and the cutting disc. When operating the tool
hold it firmly by the handle and auxiliary handle with both
hands to prevent accidental injury and prevent loss of
control.
• Accidental contact with a spinning
cutting disc can result in serious personal injury.
• NEVER hold the piece to be cut with
your hands or on one leg. Hold the workpiece properly to
avoid contact of the body with the cutting disc, prevent
the cutting disc from bending, or lose control of the tool
or workpiece.
• Do not attempt to remove waste
material when the cutting disc is rotating.
• Before each use check that the
retractable guard and its spring work properly, if the guard
does not move freely or does not close instantly correct
this points before operating the tool.
• While moving the tool do not bring
the disc close to your body. In case of accidental start, the
retractable guard can be opened when in contact with
your clothes.
• Operating the tool by holding it by its
insulated parts avoids discharges to the operator in case the
disc makes contact with hidden electrical wiring.
• ALWAYS keep the power cord away from the cutting
area. The power cord should NEVER hang over the
workpiece when making the cut.
• Always wear safety glasses with side protection. In case
of producing dust also use a dust mask.
It also increases the likelihood that the cut will close and
the available area above the disc will increase.
• When the disc jams or gets caught in the workpiece by
the saw cut, the disc stops and consequently the motor
reaction quickly directs the tool toward the operator.
• If the disc becomes warped or misaligned during the
cut, the cutting-edge teeth on the back of the disc can
become buried in the wood which can cause the disc to
come out of the cut gap and the tool to be directed
toward the operator.
Safety rules for the use
of circular saws
ENGLISH
DANGER
DANGER
DANGER
CAUTION
CAUTION
WARNING
WARNING
WARNING
WARNING
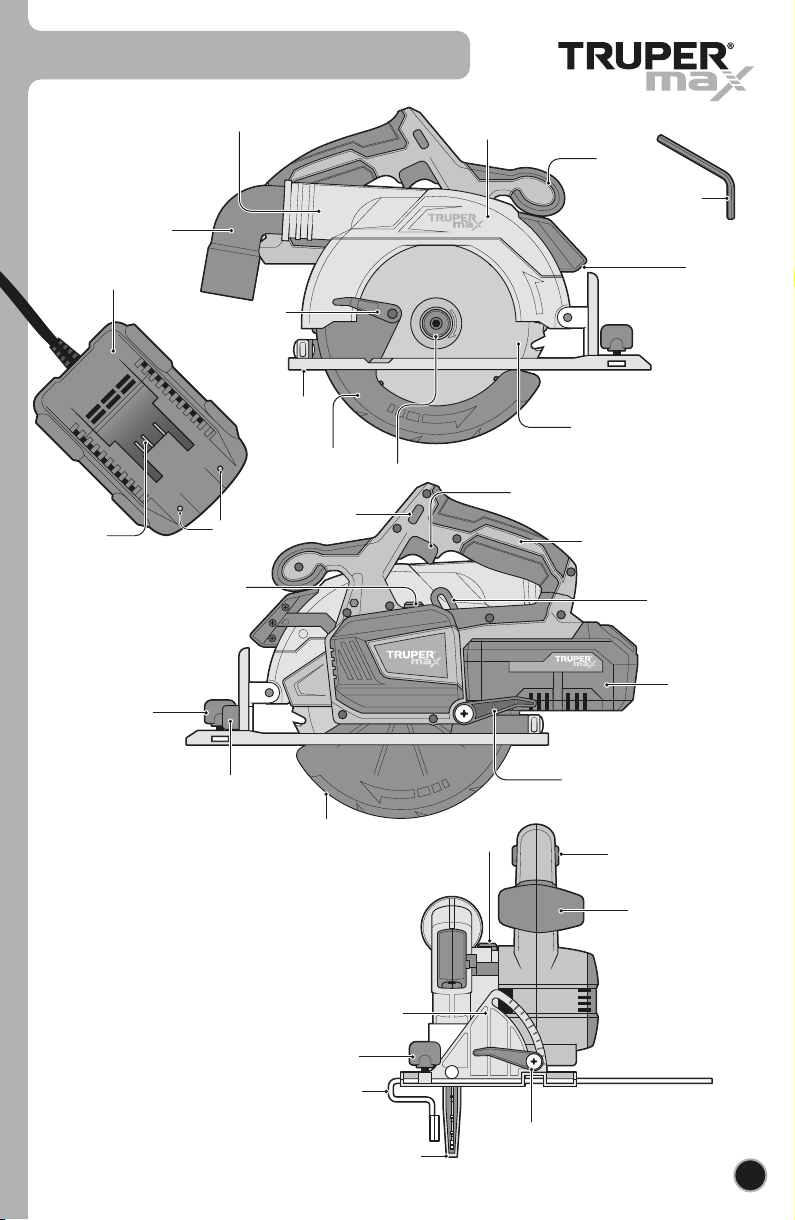
Retractable
guard
control lever
TRUPER ST-624 6-1/2”
tungsten carbide cut-off disc
Base
Shaft lock
button
Auxiliary
handle
Auxiliary
handle
Motor
housing
Fixed
guard
Cutting guide
Retractable
guard
Retractable
guard
Cutting angle
locking lever
Cutting guid
locking knob
Switch lock
button
Cutter guard
lock knob
Retractable
guard
45° lock
Outer flange
Cutting angle
locking lever
Cutting depth
lock lever
Sawdust
ejector
Dust
nozzle
Switch lock
button
Shaft
lock
button
Switch
LED light
Handle
Allen
key
Battery
Charger
Battery
connection
prongs
Charge
indicators
7
Parts
Sawdust ejector.
Sawdust is blown to the
rear and to the side, as far
away from the operator as
possible. The cooling air
from the motor is blown
out through the housing
and also assists in the
ejection of the sawdust.
Retractable guard.
The retractable guard
opens automatically when
the blade enters the
workpiece. When the cut is
completed, the retractable
guard is spring-loaded
closed to cover the blade.
Cutting depth
guide
ENGLISH

A
8
Preparation
Battery charging
NOTE: Depending on the conditions of use and ambient
temperature, the indication may differ slightly from the
actual capacity.
1. Plug the charger plug into a 127 V~ socket.
The green light of the charging indicator will turn on.
2. Insert the battery into the charger by sliding it as shown
in the picture. The green light will turn off and the red
light should turn on, indicating that charging has started.
• When the battery is fully charged, the green light will
turn on and the red light will turn off.
• Disconnect the charger from the power supply when
charging is complete.
• If the red light flashes, it is a sign that the battery has a delay caused by the heat; wait until the battery temperature is in
the proper range to be able to charge.
• The red light remains on exceeding the recommended charging time or if the red and green light flash alternately it is a
sign that the battery is defective; you must replace it or use a Authorized Service Center.
• Once the battery is charged, insert it into the receptacle
on the back of the motor housing.
• Slide the battery into the receptacle until you hear a click
to make sure it is properly seated.
• To remove the battery, press the latch (A) and slide the
battery out.
• To make sure the battery is charged, press the indicator
button (B). The color of the light indicates the charge level.
Batteries
Remaining battery capacity
1
2
Indicator
lamp
Illuminated
OFF
Green
Orange
Red
51% to 100%
Orange
Red
26% to 50%
Red
10% to 25%
Important load considerations
• Longer life and better performance can be obtained if the
battery unit is charged in room temperature between 5ºC
and 45ºC. Allow a hot battery pack to cool before charging.
• The charger and battery unit may heat up slightly during
the charging process. This is normal and does not represent
any problem. To make it easier to cool the battery unit after
use, avoid placing the charger or battery unit in a warm
place, such as a metal shed or trailer without thermal
insulation.
• The battery unit should be recharged when it is not able to
produce enough power for jobs that were easily performed
before. DO NOT CONTINUE to use it under these
circumstances. Follow the charging procedure.
• The best storage place is one that is cool and dry, away
from direct sunlight and excess heat or cold.
• For optimal results during extended storage times, it is
recommended to store the fully charged battery unit in a
cool, dry place outside the charger.
• The tool is equipped with a system that
automatically stops the tool to prolong both its useful life and
that of the batteries, this happens in the following cases:
Overload. When the tool is forced, the battery consumes
abnormally high current levels. Suspend overexertion work
and turn the tool back on.
Overheating. Let the tool and battery cool before turning it
back on.
Over-discharge. The battery level is low. In this case,
remove the battery from the tool and charge it.
Tool/battery protection system
B
ENGLISH
CAUTION
Battery failures

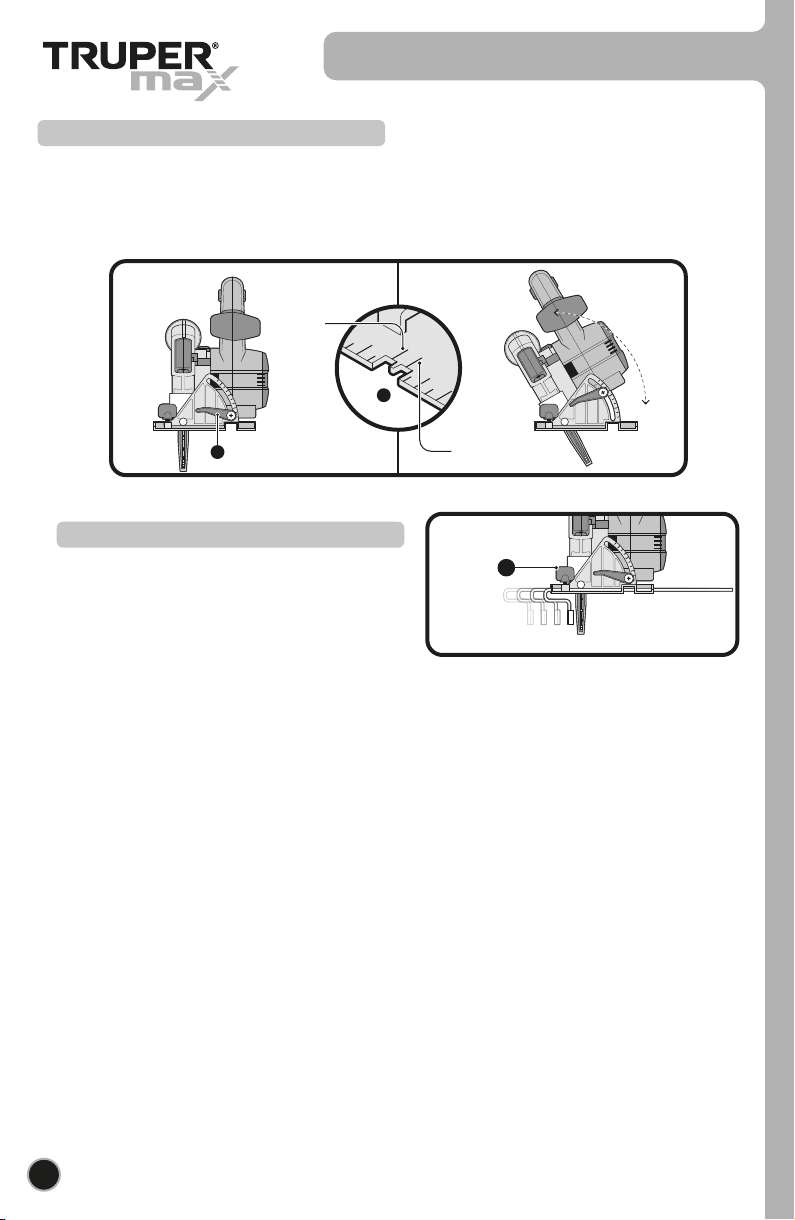
Cutting depth adjustment
1. Loosen the depth of cut lock lever (C).
2. With the base stationary, raise the housing until the blade protrudes from the base to the desired depth. Use the depth
guide (D) as a reference.
3. Tighten the depth of cut lock lever to prevent the housing from moving during cutting.
4. The depth of cut can be up to 2”.
• The cutting depth must be equal to the thickness of the workpiece or protrude from the workpiece by a
maximum of one tooth of the blade to avoid accidents.
Base
• Press the safety catch (A) to release the trigger switch.
• Press the switch (B) to start the disc spinning, the disc will
reach its maximum speed.
• To stop the disc, release the switch.
The circular saw is a multi-purpose tool for cutting soft or hard wood, chipboard, plywood, resopal-coated materials, etc.
This tool is not designed for cutting metal, masonry, concrete or brick materials. Use extreme caution
when cutting wet, pressure treated or knotty wood. Maintain a smooth, flat tool feed without reducing blade speed to
avoid overheating the blade tips.
C
D
A
B
Start up
9
Preparation
Start up
• Take the dust nozzle (A)and place it on the inside of the
sawdust ejector (B).
• Rotate the nozzle to the preferred direction to dislodge
the sawdust.
Dust nozzle assembly
A
B
ENGLISH
CAUTION
CAUTION
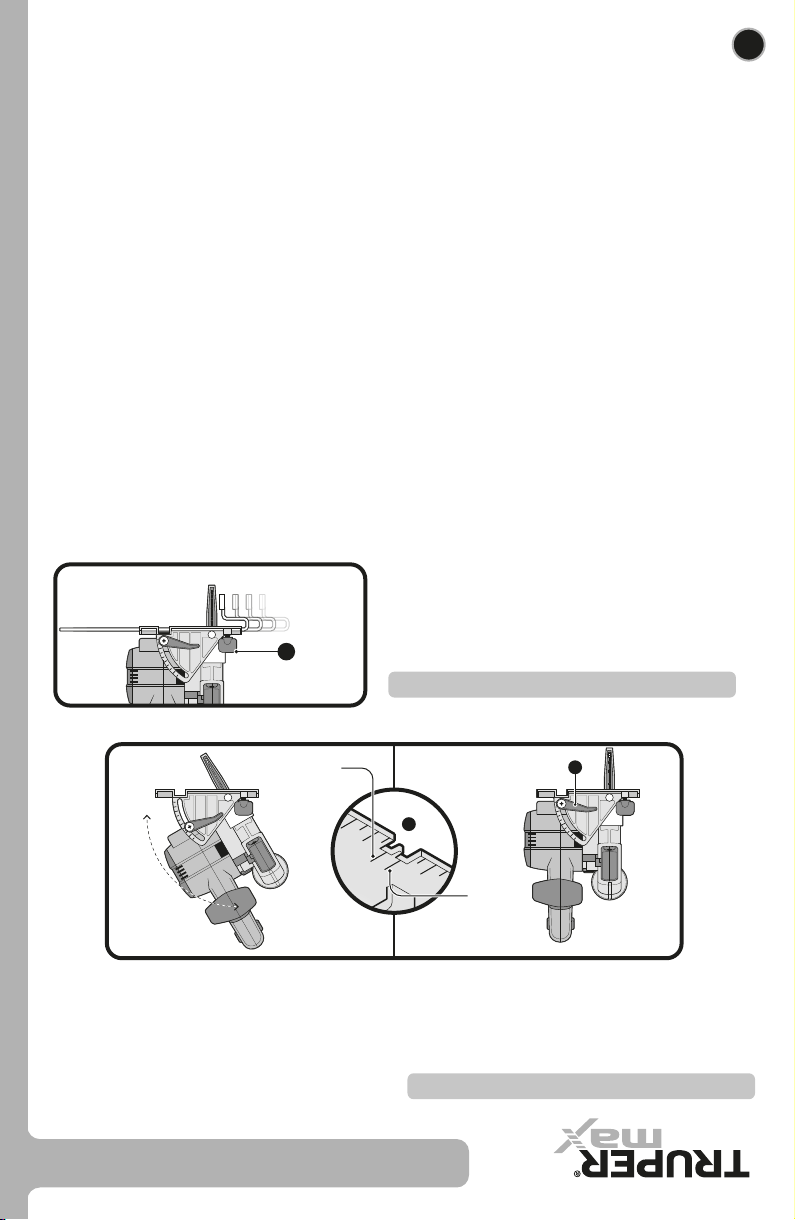
• Loosen the cutting angle adjustment knobs (D).
• With the base stationary, rotate the housing until the blade is at the desired angle.
• Tighten the cutting angle adjustment knobs to prevent the housing from moving during cutting.
• The tool can make cuts from 0° to 45°.
• The cutting line marked on the graduated scale on the base (E) changes depending on the angle set.
D
E
• To keep the width of the workpiece fixed when making cuts,
use the cutting guide.
• To adjust the width, loosen the knob (E) and move the
cutting guide to the desired position.
• This action improves the quality of the cut and reduces the
possibility of deformation of the cut-off disc.
E
10
Start up
Cutting angle adjustment
Cutting line adjustment
Cutting
line at 0°
Cutting
line at 45°
ENGLISH
They contain chemicals that can damage or destroy the
plastic.
• When using pressurized air to clean
particles ALWAYS wear safety glasses with side shields or
face shield, in case of high dust ejection, also wear a dust
mask.
It is not recommended to use this tool for extensive work
on fiberglass, plasterboard, drywall or plaster materials,
since its particles are highly abrasive to the components
of any power tool. In case of using the tool in any of these
materials it is very important that it is frequently cleaned
with pressurized air to increase the useful life of the tool.
11
•Cleaning, maintenance; method to keep tools sharp and
regular lubrication.
• Remember to remove the batteries from the tool before
cleaning or servicing.
• All tool components are an important part of the
insulation system and should only be serviced by a
Authorized Service Center.
• When servicing the tool, ALWAYS ask for
original spare parts.
• When cleaning plastic parts, avoid using solvents. Most
plastic materials are susceptible to damage from various
types of commercial solvents.
• To clean dirt, carbon or dust use a clean cloth or
pressurized air.
NEVER bring the tool into contact with
brake oil, petroleum-based products, penetrating oils, etc.
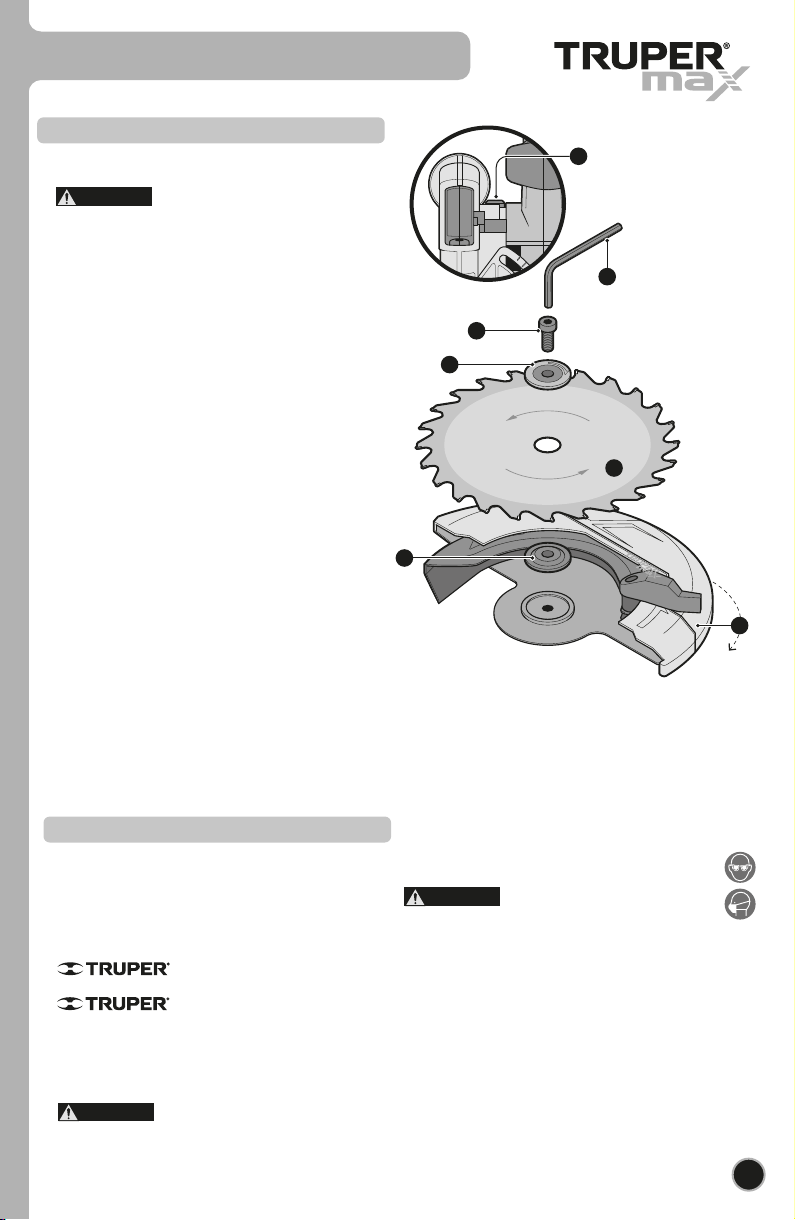
Once the cut-off disc wears out, they should be replaced
immediately.
The cut-off disc specified for this tool
are 6-1/2”. Do not use any other size. Failure to do so
may result in an accident or damage to the tool and void
your warranty.
• Do not use damaged or oversized washers and bolts.
The included bolts and washers are specially designed to
ensure proper operation and safety when using the tool.
• Use cut-off discs with holes of the correct size and shape
for the shaft. Otherwise, they may rotate in an eccentric
motion causing loss of control.
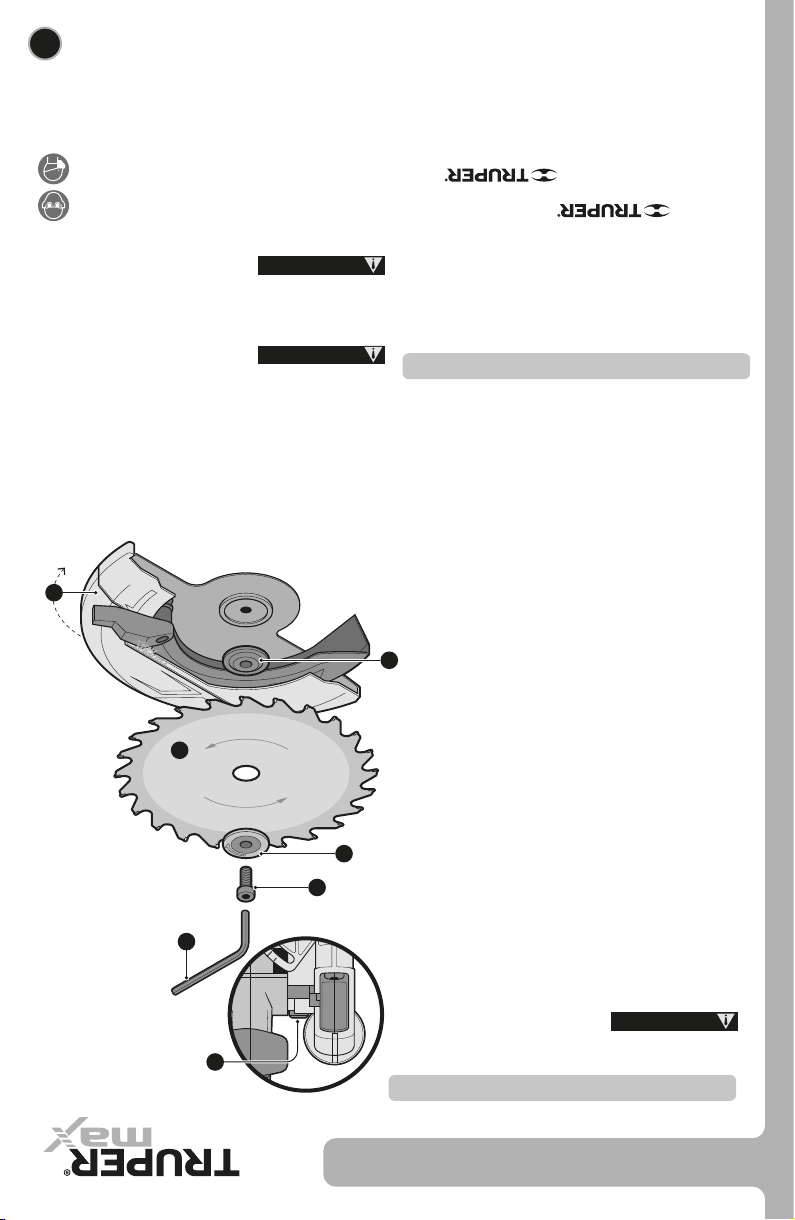
1. Remove the battery from the tool and set the cutting
depth to minimum, do not use abrasive discs (see page
10).
2. Fully open the retractable guard (F) and hold it in that
position.
3. Place the wrench (G) on the hex bolt (H) and press
and hold the spindle lock knob ( I). Turn the bolt
counterclockwise. The cutting disc will rotate at the same
time as the bolt, until the shaft is fully locked when the
locking knob is fully engaged.
4. Loosen and remove the bolt, remove the outer washer
(J), disc and inner washer (JI). Release the shaft locking
knob.
5. Place the inner washer (JI) and the new cut-off disc
(K). Make sure that the direction of the arrow printed on
the disc matches that of the arrow engraved on the tool
guard.
6. Place the washer (J) on the disc and insert the
hexagonal screw (H).
7. Press the shaft lock button again. Tighten the hex bolt
with the wrench (G) clockwise. Once the disc is secured,
release the spindle lock button.
Only clean, sharp and properly installed discs
can guarantee a good cut. Keep extra cutting
discs on hand so that sharp discs are always
available.
K
J
JI
H
I
G
F
Maintenance
Change of the cut-off disc
General maintenance
ENGLISH
WARNING
WARNING
WARNING
Notes
12 ENGLISH

13
ENGLISH
Authorized Service Centers
AGUASCALIENTES
BAJA
CALIFORNIA
BAJA
CALIFORNIA SUR
CAMPECHE
CHIAPAS
CHIHUAHUA
MEXICO
CITY
COAHUILA
COLIMA
DURANGO
ESTADO DE
MÉXICO
GUANAJUATO
GUERRERO
HIDALGO
JALISCO
MICHOACÁN
MORELOS
NAYARIT
NUEVO LEÓN
OAXACA
PUEBLA
QUERÉTARO
QUINTANA ROO
SAN LUIS
POTOSÍ
SINALOA
SONORA
TABASCO
TAMAULIPAS
TLAXCALA
VERACRUZ
YUCATÁN
DE TODO PARA LA CONSTRUCCIÓN
GRAL. BARRAGÁN #1201, COL. GREMIAL, C.P. 20030,
AGUASCALIENTES, AGS. TEL.: 449 994 0537
SUCURSAL TIJUANA
AV. LA ENCANTADA, LOTE #5, PARQUE INDUSTRIAL EL
FLORIDO II, C.P 22244, TIJUANA, B.C.
TEL.: 664 969 5100
FIX FERRETERÍAS
FELIPE ÁNGELES ESQ. RUIZ CORTÍNEZ S/N, COL. PUEBLO
NUEVO, C.P. 23670, CD. CONSTITUCIÓN, B.C.S.
TEL.: 613 132 1115
TORNILLERÍA Y FERRETERÍA AAA
AV. ÁLVARO OBREGÓN #324, COL. ESPERANZA
C.P. 24080 CAMPECHE, CAMP. TEL.: 981 815 2808
FIX FERRETERÍAS
AV. CENTRAL SUR #27, COL. CENTRO, C.P. 30700,
TAPACHULA, CHIS. TEL.: 962 118 4083
SUCURSAL CHIHUAHUA
AV. SILVESTRE TERRAZAS #128-11, PARQUE INDUSTRIAL
BAFAR, CARRETERA MÉXICO CUAUHTÉMOC, C.P. 31415,
CHIHUAHUA, CHIH. TEL. 614 434 0052
FIX FERRETERÍAS
EL MONSTRUO DE CORREGIDORA, CORREGIDORA # 22,
COL. CENTRO, C.P. 06060, CUAUHTÉMOC, CDMX.
TEL: 55 5522 5031 / 5522 4861
SUCURSAL TORREÓN
CALLE METAL MECÁNICA #280, PARQUE INDUSTRIAL
ORIENTE, C.P. 27278, TORREÓN, COAH.
TEL.: 871 209 68 23
BOMBAS Y MOTORES BYMTESA DE MANZANILLO
BLVD. MIGUEL DE LA MADRID #190, COL. 16 DE
SEPTIEMBRE, C.P. 28239, MANZANILLO, COL.
TEL.: 314 332 1986 / 332 8013
TORNILLOS ÁGUILA, S.A. DE C.V.
MAZURIO #200, COL. LUIS ECHEVERRÍA, DURANGO,
DGO.TEL.: 618 817 1946 / 618 818 2844
SUCURSAL CENTRO JILOTEPEC
PARQUE INDUSTRIAL # 1, COL. PARQUE INDUSTRIAL
JILOTEPEC, JILOTEPEC, EDO. DE MÉX. C.P. 54257
TEL: 761 782 9101 EXT. 5728 Y 5102
CÍA. FERRETERA NUEVO MUNDO S.A. DE C.V.
AV. MÉXICO - JAPÓN #225, CD. INDUSTRIAL, C.P. 38010,
CELAYA, GTO. TEL.: 461 617 7578 / 79 / 80 / 88
CENTRO DE SERVICIO ECLIPSE
CALLE PRINCIPAL MZ.1 LT. 1, COL. SANTA FE, C.P. 39010,
CHILPANCINGO, GRO. TEL.: 747 478 5793
FERREPRECIOS S.A. DE C.V.
LIBERTAD ORIENTE #304 LOCAL 30, INTERIOR DE PASAJE
ROBLEDO, COL. CENTRO, C.P. 43600, TULANCINGO,
HGO. TEL.: 775 753 6615 / 775 753 6616
SUCURSAL GUADALAJARA
AV. ADOLFO B. HORN # 6800, COL: SANTA CRUZ DEL
VALLE, C.P.: 45655, TLAJOMULCO DE ZUÑIGA, JAL.
TEL.: 33 3606 5285 AL 90
FIX FERRETERÍAS
AV. PASEO DE LA REPÚBLICA #3140-A, COL.
EX-HACIENDA DE LA HUERTA, C.P. 58050, MORELIA,
MICH. TEL.: 443 334 6858
FIX FERRETERÍAS
CAPITÁN ANZURES #95, ESQ. JOSÉ PERDIZ, COL.
CENTRO, C.P. 62740, CUAUTLA, MOR.
TEL.: 735 352 8931
HERRAMIENTAS DE TEPIC
MAZATLAN #117, COL. CENTRO, C.P. 63000, TEPIC, NAY.
TEL.: 311 258 0540
SUCURSAL MONTERREY
CARRETERA LAREDO #300, 1B MONTERREY PARKS,
COLONIA PUERTA DE ANÁHUAC, C.P. 66052, ESCOBEDO,
NUEVO LEÓN, TEL.: 81 8352 8791 / 81 8352 8790
FIX FERRETERÍAS
AV. 20 DE NOVIEMBRE #910, COL. CENTRO, C.P. 68300,
TUXTEPEC, OAX. TEL.: 287 106 3092
SUCURSAL PUEBLA
AV PERIFÉRICO #2-A, SAN LORENZO ALMECATLA,
C.P. 72710, CUAUTLACINGO, PUE.
TEL.: 222 282 8282 / 84 / 85 / 86
ARU HERRAMIENTAS S.A DE C.V.
AV. PUERTO DE VERACRUZ #110, COL. RANCHO DE
ENMEDIO, C.P. 76842, SAN JUAN DEL RÍO, QRO.
TEL.: 427 268 4544
FIX FERRETERÍAS
CARRETERA FEDERAL MZ. 46 LT. 3 LOCAL 2, COL EJIDAL,
C.P. 77710 PLAYA DEL CARMEN, Q.R.
TEL.: 984 267 3140
FIX FERRETERÍAS
AV. UNIVERSIDAD #1850, COL. EL PASEO, C.P. 78320,
SAN LUIS POTOSÍ, S.L.P. TEL.: 444 822 4341
SUCURSAL CULIACÁN
AV. JESÚS KUMATE SUR #4301, COL. HACIENDA DE LA
MORA, C.P. 80143, CULIACÁN, SIN.
TEL.: 667 173 9139 / 173 8400
FIX FERRETERÍAS
CALLE 5 DE FEBRERO #517, SUR LT. 25 MZ. 10, COL.
CENTRO, C.P. 85000, CD. OBREGÓN, SON.
TEL.: 644 413 2392
SUCURSAL VILLAHERMOSA
CALLE HELIO LOTES 1, 2 Y 3 MZ. #1, COL. INDUSTRIAL,
2A ETAPA, C.P. 86010, VILLAHERMOSA, TAB.
TEL.: 993 353 7244
VM ORINGS Y REFACCIONES
CALLE ROSITA #527 ENTRE 20 DE NOVIEMBRE Y GRAL.
RODRÍGUEZ, FRACC. REYNOSA, C.P. 88780, REYNOSA,
TAMS. TEL.: 899 926 7552
SERVICIOS Y HERRAMIENTAS INDUSTRIALES
PABLO SIDAR #132, COL . BARRIO DE SAN BARTOLOMÉ,
C.P. 90970, SAN PABLO DEL MONTE, TLAX.
TEL.: 222 271 7502
LA CASA DISTRIBUIDORA TRUPER
BLVD. PRIMAVERA. ESQ. HORTENSIA S/N, COL.
PRIMAVERA C.P. 93308, POZA RICA, VER.
TEL.: 782 823 8100 / 826 8484
SUCURSAL MÉRIDA
CALLE 33 #600 Y 602, LOCALIDAD ITZINCAB Y MULSAY,
MPIO. UMÁN, C.P. 97390, MÉRIDA, YUC.
TEL.: 999 912 2451
In the event of any problem contacting a Authorized Service Center, please see our
webpage www.truper.com to get an updated list, or call our toll-free numbers 800 690-6990 or 800 018-7873
to get information about the nearest Service Center.

14 www.truper.com
08-2022
102480 MAX-20SC
ENGLISH
Warranty
policy
3
YEARS
Code Model Brand
Stamp of the business. Delivery date:
Warranty. Duration: 3 years. Coverage: parts, components and workmanship against manufacturing or
operating defects, except if used under conditions other than normal; when it was not operated in
accordance with the instructive; was altered or repaired by personnel not authorized by .
To make the warranty valid, present the product, stamped policy or invoice or receipt or voucher, in the
establishment where you bought it or in Corregidora 22, Centro, Cuauhtémoc, CDMX, 06060, where you
can also purchase parts, components, consumables and accessories. It includes the costs of transportation of
the product that derive from its fulfillment of its service network. Phone number 800-018-7873.
Made in China. Imported by Truper, S.A. de C.V. Parque Industrial 1, Parque Industrial Jilotepec, Jilotepec,
Edo. de Méx. C.P. 54257, Phone number 761 782 9100.
14 ESPAÑOL www.truper.com
08-2022
102480 MAX-20SC
Póliza de
Garantía
Código Modelo Marca
3
AÑOS
Sello del establecimiento comercial. Fecha de entrega:
Garantía. Duración: 3 años. Cobertura: piezas, componentes y mano de obra contra defectos de fabricación
o funcionamiento, excepto si se usó en condiciones distintas a las normales; cuando no fue operado
conforme instructivo; fue alterado o reparado por personal no autorizado por Truper®. Para hacer efectiva la
garantía presente el producto, póliza sellada o factura o recibo o comprobante, en el establecimiento donde
lo compró o en Corregidora 22, Centro, Cuauhtémoc, CDMX, 06060, donde también podrá adquirir partes,
componentes, consumibles y accesorios. Incluye los gastos de transportación del producto que deriven de su
cumplimiento de su red de servicio. Tel. 800-018-7873. Made in/Hecho en China. Importador Truper, S.A. de
C.V. Parque Industrial 1, Parque Industrial Jilotepec, Jilotepec, Edo. de Méx. C.P. 54257, Tel. 761 782 9100.

Centros de Servicio Autorizados
13
ESPAÑOL
En caso de tener algún problema para contactar un Centro de Servicio Autorizado
consulte nuestra página www.truper.com donde obtendrá un listado actualizado, o llame al:
800 690-6990 ó800 018-7873 donde le informarán cuál es el Centro de Servicio más cercano.
AGUASCALIENTES
BAJA
CALIFORNIA
BAJA
CALIFORNIA SUR
CAMPECHE
CHIAPAS
CHIHUAHUA
CIUDAD DE
MÉXICO
COAHUILA
COLIMA
DURANGO
ESTADO DE
MÉXICO
GUANAJUATO
GUERRERO
HIDALGO
JALISCO
MICHOACÁN
MORELOS
NAYARIT
NUEVO LEÓN
OAXACA
PUEBLA
QUERÉTARO
QUINTANA ROO
SAN LUIS
POTOSÍ
SINALOA
SONORA
TABASCO
TAMAULIPAS
TLAXCALA
VERACRUZ
YUCATÁN
DE TODO PARA LA CONSTRUCCIÓN
GRAL. BARRAGÁN #1201, COL. GREMIAL, C.P. 20030,
AGUASCALIENTES, AGS. TEL.: 449 994 0537
SUCURSAL TIJUANA
AV. LA ENCANTADA, LOTE #5, PARQUE INDUSTRIAL EL
FLORIDO II, C.P 22244, TIJUANA, B.C.
TEL.: 664 969 5100
FIX FERRETERÍAS
FELIPE ÁNGELES ESQ. RUIZ CORTÍNEZ S/N, COL. PUEBLO
NUEVO, C.P. 23670, CD. CONSTITUCIÓN, B.C.S.
TEL.: 613 132 1115
TORNILLERÍA Y FERRETERÍA AAA
AV. ÁLVARO OBREGÓN #324, COL. ESPERANZA
C.P. 24080 CAMPECHE, CAMP. TEL.: 981 815 2808
FIX FERRETERÍAS
AV. CENTRAL SUR #27, COL. CENTRO, C.P. 30700,
TAPACHULA, CHIS. TEL.: 962 118 4083
SUCURSAL CHIHUAHUA
AV. SILVESTRE TERRAZAS #128-11, PARQUE INDUSTRIAL
BAFAR, CARRETERA MÉXICO CUAUHTÉMOC, C.P. 31415,
CHIHUAHUA, CHIH. TEL. 614 434 0052
FIX FERRETERÍAS
EL MONSTRUO DE CORREGIDORA, CORREGIDORA # 22,
COL. CENTRO, C.P. 06060, CUAUHTÉMOC, CDMX.
TEL: 55 5522 5031 / 5522 4861
SUCURSAL TORREÓN
CALLE METAL MECÁNICA #280, PARQUE INDUSTRIAL
ORIENTE, C.P. 27278, TORREÓN, COAH.
TEL.: 871 209 68 23
BOMBAS Y MOTORES BYMTESA DE MANZANILLO
BLVD. MIGUEL DE LA MADRID #190, COL. 16 DE
SEPTIEMBRE, C.P. 28239, MANZANILLO, COL.
TEL.: 314 332 1986 / 332 8013
TORNILLOS ÁGUILA, S.A. DE C.V.
MAZURIO #200, COL. LUIS ECHEVERRÍA, DURANGO,
DGO.TEL.: 618 817 1946 / 618 818 2844
SUCURSAL CENTRO JILOTEPEC
PARQUE INDUSTRIAL # 1, COL. PARQUE INDUSTRIAL
JILOTEPEC, JILOTEPEC, EDO. DE MÉX. C.P. 54257
TEL: 761 782 9101 EXT. 5728 Y 5102
CÍA. FERRETERA NUEVO MUNDO S.A. DE C.V.
AV. MÉXICO - JAPÓN #225, CD. INDUSTRIAL, C.P. 38010,
CELAYA, GTO. TEL.: 461 617 7578 / 79 / 80 / 88
CENTRO DE SERVICIO ECLIPSE
CALLE PRINCIPAL MZ.1 LT. 1, COL. SANTA FE, C.P. 39010,
CHILPANCINGO, GRO. TEL.: 747 478 5793
FERREPRECIOS S.A. DE C.V.
LIBERTAD ORIENTE #304 LOCAL 30, INTERIOR DE PASAJE
ROBLEDO, COL. CENTRO, C.P. 43600, TULANCINGO,
HGO. TEL.: 775 753 6615 / 775 753 6616
SUCURSAL GUADALAJARA
AV. ADOLFO B. HORN # 6800, COL: SANTA CRUZ DEL
VALLE, C.P.: 45655, TLAJOMULCO DE ZUÑIGA, JAL.
TEL.: 33 3606 5285 AL 90
FIX FERRETERÍAS
AV. PASEO DE LA REPÚBLICA #3140-A, COL.
EX-HACIENDA DE LA HUERTA, C.P. 58050, MORELIA,
MICH. TEL.: 443 334 6858
FIX FERRETERÍAS
CAPITÁN ANZURES #95, ESQ. JOSÉ PERDIZ, COL.
CENTRO, C.P. 62740, CUAUTLA, MOR.
TEL.: 735 352 8931
HERRAMIENTAS DE TEPIC
MAZATLAN #117, COL. CENTRO, C.P. 63000, TEPIC, NAY.
TEL.: 311 258 0540
SUCURSAL MONTERREY
CARRETERA LAREDO #300, 1B MONTERREY PARKS,
COLONIA PUERTA DE ANÁHUAC, C.P. 66052, ESCOBEDO,
NUEVO LEÓN, TEL.: 81 8352 8791 / 81 8352 8790
FIX FERRETERÍAS
AV. 20 DE NOVIEMBRE #910, COL. CENTRO, C.P. 68300,
TUXTEPEC, OAX. TEL.: 287 106 3092
SUCURSAL PUEBLA
AV PERIFÉRICO #2-A, SAN LORENZO ALMECATLA,
C.P. 72710, CUAUTLACINGO, PUE.
TEL.: 222 282 8282 / 84 / 85 / 86
ARU HERRAMIENTAS S.A DE C.V.
AV. PUERTO DE VERACRUZ #110, COL. RANCHO DE
ENMEDIO, C.P. 76842, SAN JUAN DEL RÍO, QRO.
TEL.: 427 268 4544
FIX FERRETERÍAS
CARRETERA FEDERAL MZ. 46 LT. 3 LOCAL 2, COL EJIDAL,
C.P. 77710 PLAYA DEL CARMEN, Q.R.
TEL.: 984 267 3140
FIX FERRETERÍAS
AV. UNIVERSIDAD #1850, COL. EL PASEO, C.P. 78320,
SAN LUIS POTOSÍ, S.L.P. TEL.: 444 822 4341
SUCURSAL CULIACÁN
AV. JESÚS KUMATE SUR #4301, COL. HACIENDA DE LA
MORA, C.P. 80143, CULIACÁN, SIN.
TEL.: 667 173 9139 / 173 8400
FIX FERRETERÍAS
CALLE 5 DE FEBRERO #517, SUR LT. 25 MZ. 10, COL.
CENTRO, C.P. 85000, CD. OBREGÓN, SON.
TEL.: 644 413 2392
SUCURSAL VILLAHERMOSA
CALLE HELIO LOTES 1, 2 Y 3 MZ. #1, COL. INDUSTRIAL,
2A ETAPA, C.P. 86010, VILLAHERMOSA, TAB.
TEL.: 993 353 7244
VM ORINGS Y REFACCIONES
CALLE ROSITA #527 ENTRE 20 DE NOVIEMBRE Y GRAL.
RODRÍGUEZ, FRACC. REYNOSA, C.P. 88780, REYNOSA,
TAMS. TEL.: 899 926 7552
SERVICIOS Y HERRAMIENTAS INDUSTRIALES
PABLO SIDAR #132, COL . BARRIO DE SAN BARTOLOMÉ,
C.P. 90970, SAN PABLO DEL MONTE, TLAX.
TEL.: 222 271 7502
LA CASA DISTRIBUIDORA TRUPER
BLVD. PRIMAVERA. ESQ. HORTENSIA S/N, COL.
PRIMAVERA C.P. 93308, POZA RICA, VER.
TEL.: 782 823 8100 / 826 8484
SUCURSAL MÉRIDA
CALLE 33 #600 Y 602, LOCALIDAD ITZINCAB Y MULSAY,
MPIO. UMÁN, C.P. 97390, MÉRIDA, YUC.
TEL.: 999 912 2451
Notas
12 ESPAÑOL
11
ESPAÑOL
• Limpieza, mantenimiento; método para mantener las
herramientas afiladas y lubricación regulares.
• Recuerde retirar las baterías de la herramienta antes de
limpiarla o darle mantenimiento.
• Todos los componentes de la herramienta son parte
importante del sistema de aislamiento y solamente se les
debe dar mantenimiento en un Centro de Servicio
Autorizado .
• Cuando mande la herramienta a mantenimiento, pida
SIEMPRE refacciones originales .
• Cuando limpie las partes de plástico, evite usar
solventes. La mayoría de los materiales plásticos son
susceptibles a dañarse con varios tipos de solventes
comerciales.
• Para limpiar suciedad, carbón o polvo use un trapo
limpio o aire a presión.
ADVERTENCIA
ADVERTENCIA
Una vez que los discos de corte se desgasten deben
reemplazarse de inmediato.
Los discos de corte especificados
para esta herramienta son de 165 mm (6-1/2”). No use
otra medida. De lo contrario se expone a accidentes o
daños a la herramienta invalidando su garantía.
• No utilice arandelas y pernos dañados o de otra
medida. Los pernos y arandelas incluidos están diseñados
especialmente para asegurar un buen funcionamiento y
brindar seguridad al usar la herramienta.
• Utilice discos de corte con orificios de la medida y forma
correcta para el eje. De lo contrario pueden girar con un
movimiento excéntrico provocando pérdida de control.
1. Retire la batería de la herramienta y ajuste la
profundidad de corte al mínimo, no utilizar discos
abrasivos. (consulte la página 10).
2. Abra por completo la guarda retráctil (F) y manténgala
en esa posición.
3. Coloque la llave (G) en el perno hexagonal (H) y
mantenga presionado el botón de bloqueo del eje ( I).
Gire el perno en sentido contrario a las manecillas del
reloj. El disco de corte girará al mismo tiempo que el
perno, hasta que el eje sea totalmente bloqueado cuando
el botón de bloqueo calce por completo.
4. Afloje y retire el perno, retire la arandela externa (J), el
disco y la arandela interna (JI). Suelte el botón de
bloqueo del eje.
5. Coloque la arandela interna (JI) y el disco de corte
nuevo (K). Asegúrese que la dirección de la flecha
impresa en el disco coincida con la de la flecha grabada
en la guarda de la herramienta.
6. Coloque la arandela (J) en el disco e inserte el tornillo
hexagonal (H).
7. Presione de nuevo el botón de bloqueo del eje. Apriete
el perno hexagonal con la llave (G) en el sentido de las
manecillas del reloj: Una vez que el disco esté asegurado,
suelte el botón de bloqueo del eje.
Sólo discos limpios, afilados y bien instalados
pueden garantizar un buen corte. Tenga a la
mano discos de corte extra para tener discos
afilados siempre disponibles.
K
J
JI
H
I
G
F
ADVERTENCIA
Mantenimiento
Cambio del disco de corte
Mantenimiento general NUNCA se debe poner la
herramienta en contacto con aceite para frenos,
productos con base de petróleo, aceites penetrantes, etc.
Contienen substancias químicas que pueden dañar o
destruir el plástico.
Cuando use aire a presión para
limpiar partículas use SIEMPRE lentes de seguridad con
protectores laterales o careta, en caso de expulsar mucho
polvo, use también una mascarilla contra polvo.
No es recomendable que esta herramienta se use para
trabajos extensos en materiales de fibra de vidrio, cartón
de yeso, emplastecidos o yeso, ya que sus partículas son
altamente abrasivas para los componentes de cualquier
herramienta eléctrica. En caso de usar la herramienta en
alguno de esos materiales es muy importante que se
limpie frecuentemente con aire a presión para aumentar
la vida útil de la herramienta.
• Afloje las perillas de ajuste del ángulo de corte (D).
• Con la base fija, gire la carcasa hasta que el disco tenga el ángulo deseado.
• Apriete las perillas de ajuste del ángulo de corte para evitar que la carcasa se mueva durante el corte.
• La herramienta puede hacer cortes de 0° hasta 45°.
• La línea de corte marcada en la escala graduada de la base (E) cambia dependiendo del ángulo configurado.
D
E
• Para mantener fijo el ancho de la pieza de trabajo al realizar
los cortes utilice la guía de corte.
• Para ajustar el ancho afloje la perilla (E) y recorra la guía de
corte a la posición deseada.
• Realizar esta acción mejora la calidad del corte y reduce la
posibilidad de la deformación del disco de corte.
E
10
Puesta en marcha
ESPAÑOL
Ajuste del ángulo de corte
Ajuste de la guía de corte
Línea de
corte a 0°
Línea de
corte a 45°

Ajuste de la profundidad de corte
1. Afloje la palanca de bloqueo de profundidad de corte (C).
2. Con la base fija, levante la carcasa hasta que el disco sobresalga de la base a la profundidad deseada. Utilice la guía de
profundidad (D) como referencia.
3. Apriete la palanca de bloqueo de profundidad de corte para evitar que la carcasa se mueva durante el corte.
4. La profundidad de corte puede ser de hasta 55 mm
• La profundidad de corte debe ser igual al grosor de la pieza de trabajo o sobresalir de esta la medida
de un diente del disco como máximo para evitar accidentes.
Base
• Presione el seguro (A) para liberar el gatillo interruptor.
• Presione el interruptor (B) para que el disco comience a girar,
el disco alcanzará su máxima velocidad.
• Para detener el disco suelte el interruptor.
La sierra circular es una herramienta multiuso para cortar madera suave o dura, aglomerado, contrachapado, materiales
con cubierta de resopal, etc.
Esta herramienta no está diseñada para cortar metal, ni materiales de mampostería, cemento o ladrillo.
Proceda con extrema precaución al cortar madera húmeda, tratada a presión o con nudos. Mantenga un avance plano y
suave de la herramienta sin reducir la velocidad del disco para evitar el sobrecalentamiento de las puntas del mismo.
C
D
A
B
Encendido
ATENCIÓN
ATENCIÓN
9
Preparación
Puesta en marcha
ESPAÑOL
• Tome la boquilla para polvo (A)y coloquela por el
interior del expulsor de aserrín (B).
• Gire la boquilla a la dirección que prefiera para desalojar
el aserrín.
Ensamble de boquilla para polvo
A
B
This manual suits for next models
1
Table of contents
Other Truper Cordless Saw manuals


Popular Cordless Saw manuals by other brands


Ryobi
Ryobi RWSL1801 Original instructions

HIKOKI
HIKOKI C 3605DA Handling instructions

Hitachi
Hitachi C 18DBAL Safety instructions and instruction manual

MOKENEYE
MOKENEYE RS01Z owner's manual

Parkside Performance
Parkside Performance PHKSAP 20-Li A1 Operation and safety notes

Makita
Makita JR180DWA instruction manual


