Truper expert MADE-6NX User manual
Instructivo de
Demolition hammer
6 kg SDS MAX
MADE-6NX
ModelCode
MADE-6NX
Applies for:
100890
14 Joules
Impact energy
CAUTION Read this manual thoroughly
before using the tool.
ENGLISH
ESPAÑOL
2
Technical Data
Power requirements
General power tool safety warnings
Safety warnings for the use of
demolition hammer drills
Parts
Mounting and adjustments
Start up
Maintenance
Notes
Authorized Service Centers
Warranty Policy
3
3
4
5
6
6
7
9
10
11
12
MADE-6NX
CAUTION
Contents
Keep this manual for future references.
The illustrations in this manual are for reference
only. They might be different from the real tool.
To gain the best performance of
the tool, prolong the duty life,
make the Warranty valid if
necessary, and to avoid hazards
of fatal injuries please read and
understand this Manual before
using the tool.
ENGLISH

IP Grade IP20
3
MADE-6NX
100890
SDS max
Class II
60 Hz
6 kg Demolition hammer SDS MAX
16 AWG x 2C with an insulation temperature of 221 °F
10 A
1200 W
Code
Description
Chuck
Voltage
Frequency
Current
Power
6 kg
14 Joules
Weight
Impact energy
Impact: 3100 strokes / min
Number of impacts
50 minutes work per 20 min rest. Maximum 6 hours daily
Work cycle
Conductors
Insulation
Power Cord Grips used is: Type “Y”.
Tool Build Quality: Reinforced insulation
Thermal insulation on motor winding: Class E
127 V~
Technical Data
ENGLISH
Power Requirements
WARNING
WARNING Avoid the risk of electric shock or severe injury. When the power cable gets damaged
it should only be replaced by the manufacturer or at a Authorized Service Center.
The build quality of the electric insulation is altered if spills or liquid gets into the tool while in use.
Do not expose to rain, liquids and/or dampness.
Before gaining access to the terminals all power sources should be disconnected.
Tools with double insulation and reinforced insulation are equipped
with a polarized plug (one prong is wider than the other). This plug will only fit in the
right way into a polarized outlet. If the plug cannot be introduced into the outlet, reverse
the plug. If it still doesn’t fit, call a qualified electrician to install for you a polarized
outlet. Do not alter the plug in any way. Both insulation types eliminate the need of both
a grounded third power cord with three prongs or a grounded power connection.
When using an extension cable, verify the gauge is enough for the
power that your product needs. A lower gauge cable will cause voltage drop in the line, resulting in power loss and
overheating. The following table shows the right size to use depending on cable’s length and the ampere capability shown in
the tool’s nameplate. When in doubt use the next higher gauge.
WARNING
WARNING
WARNING
from 0 A and up to 10 A
from 10 A and up to 13 A
from 13 A and up to 15 A
from 15 A and up to 20 A
18 AWG(*)
16 AWG
14 AWG
8 AWG
16 AWG
14 AWG
12 AWG
6 AWG
3 (one grounded)
from 6’ to 49’ | higher than 49’
Ampere
Capacity Number of
Conductors Extension gauge
*It is safe to use only if the extensions have a built-in artifact for over current protection.
AWG = American Wire Gauge. Reference: NMX-J-195-ANCE
When operating power tools outdoors, use a grounded
extension cable labeled “For Outdoors Use”. These extensions are especially designed
for operating outdoors and reduce the risk of electric shock.

4
Work area
Keep your work area clean, and well lit.
Cluttered and dark areas may cause accidents.
Never use the tool in explosive atmospheres, such as in the
presence of flammable liquids, gases or dust.
Sparks generated by power tools may ignite the flammable material.
Keep children and bystanders at a safe distance while operating
the tool.
Distractions may cause loosing control.
Electrical Safety
The tool plug must match the power outlet. Never modify
the plug in any way. Do not use any adapter plugs with
grounded power tools.
Modified plugs and different power outlets increase the risk of electric shock.
Avoid body contact with grounded surfaces, such as pipes,
radiators, electric ranges and refrigerators.
The risk of electric shock increases if your body is grounded.
Do not expose the tool to rain or wet conditions.
Water entering into the tool increases the risk of electric shock.
Do not force the cord. Never use the cord to carry, lift or unplug
the tool. Keep the cord away from heat, oil, sharp edges or
moving parts.
Damaged or entangled cords increase the risk of electric shock.
When operating a tool outdoors, use an extension cord suitable
for outdoor use.
Using an adequate outdoor extension cord reduces the risk of electric shock.
If operating the tool in a damp location cannot be avoided, use
a ground fault circuit interrupter (GFCI) protected supply.
Using a GFCI reduces the risk of electric shock.
Personal safety
Stay alert, watch what you are doing and use common sense
when operating a tool. Do not use a power tool while you are
tired or under the influence of drugs, alcohol or medication.
A moment of distraction while operating the tool may result in personal injury.
Use personal protective equipment. Always wear eye
protection.
Protective equipment such as safety glasses, anti-dust mask, non-skid shoes,
hard hats and hearing protection used in the right conditions significantly
reduce personal injury.
Prevent unintentional starting up. Ensure the switch is in the
“OFF” position before connecting into the power source and /
or battery as well as when carrying the tool.
Transporting power tools with the finger on the switch or connecting power
tools with the switch in the “ON” position may cause accidents.
Remove any wrench or vice before turning the power tool on.
Wrenches or vices left attached to rotating parts of the tool may result in personal
injury.
Do not overreach. Keep proper footing and balance at all times.
This enables a better control on the tool during unexpected situations.
Dress properly. Do not wear loose clothing or jewelry. Keep
hair, clothes and gloves away from the moving parts.
Loose clothes or long hair may get caught in moving parts.
If you have dust extraction and recollection devices connected
onto the tool, inspect their connections and use them correctly.
Using these devices reduce dust-related risks.
Power Tools Use and Care
Do not force the tool. Use the adequate tool for your
application.
The correct tool delivers a better and safer job at the rate for which it was designed.
Do not use the tool if the switch is not working properly.
Any power tool that cannot be turned ON or OFF is dangerous and should be
repaired before operating.
Disconnect the tool from the power source and / or battery
before making any adjustments, changing accessories or
storing.
These measures reduce the risk of accidentally starting the tool.
Store tools out of the reach of children. Do not allow persons
that are not familiar with the tool or its instructions to
operate the tool.
Power tools are dangerous in the hands of untrained users.
Service the tool. Check the mobile parts are not misaligned or
stuck. There should not be broken parts or other conditions
that may affect its operation. Repair any damage before
using the tool.
Most accidents are caused due to poor maintenance to the tools.
Keep the cutting accessories sharp and clean.
Cutting accessories in good working conditions are less likely to bind and are
easier to control.
Use the tool, components and accessories in accordance with
these instructions and the projected way to use it for the type of
tool when in adequate working conditions.
Using the tool for applications different from those it was designed for, could
result in a hazardous situation.
Service
Repair the tool in a Authorized Service Center
using only identical spare parts.
This will ensure that the safety of the power tool is maintained.
General power tool
safety warnings
WARNING! Read carefully all safety warnings and instructions listed below. Failure to comply with any of
these warnings may result in electric shock, fire and / or severe damage. Save all warnings and instructions for
future references.
This tool is in compliance with
the Official Mexican Standard
(NOM - Norma Oficial Mexicana).
ENGLISH

5
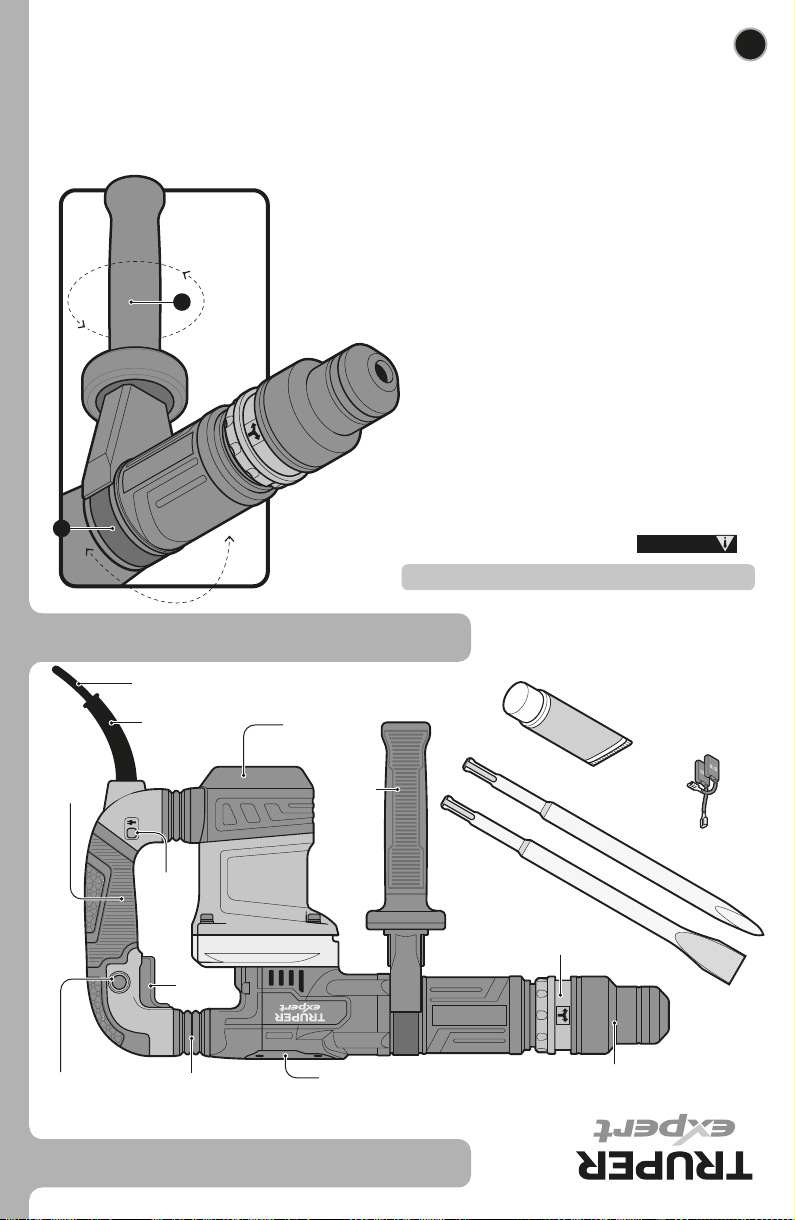
Correct way to hold
the hammer drill
Safety warnings for the use
of Hammer Drills
• The tool is designed to work with bits
or accessories with SDS-max shanks. Choose the
appropriate one for the material to be worked on, this
reduces the risk of serious injury and speeds up the work.
• Do not attempt to use bits that exceed the capacity of the
drill.
• Use well-sharpened and well-conditioned drill
bits/accessories to optimize the work.
Choose the appropriate drill or attachment
• Take your time to evaluate the work to be done and
make sure you have followed all the necessary precautions
before starting to drill.
• Fit the accessory correctly to the
chuck, otherwise it can be thrown out at high speed and
cause serious injury.
• Before hitting a wall, floor or ceiling,
make sure there are no embedded objects, such as wires
or electrical conduits or pipes.
• Make sure the switch is off (page 7
Start-up) before connecting the tool, otherwise it will start
working unexpectedly, which can cause serious injury.
• Turn off and disconnect the tool before
installing or replacing an accessory.
• This electric tool produces an
electromagnetic field during its operation that could
interfere with medical implants. To reduce the risk of
serious or fatal injury, it is recommended that people with
medical implants consult their physician and the
manufacturer of the implant before operating the tool.
Before operating the hammer drill
• Hold the tool by its handle and by
the auxiliary handle. Remember that loss of control can
cause personal injury.
• Hold the tool by its insulating surfaces, especially
when performing work where the cutting portion of
the drill may contact hidden wiring or the tool's own
power cord. Contact with a live wire also makes the
metal parts of the tool live and can cause an electric
shock to the operator.
• Do not subject the tool to excessive stress.
• If the drill bit gets stuck in the
workpiece, turn off the demolition hammer immediately.
Then remove the drill bit from the workpiece. Do not
attempt to remove jammed bits by turning the tool on
and off.
• Do not put too much pressure on the tool to speed up
the drilling. Otherwise, the drill bit will be damaged and
the efficiency of the tool will decrease as well as its life
span.
• The larger the chisel area, the greater
the reactive force, which can lead to a loss of control of
the tool. To avoid this possibility, hold the tool firmly with
both hands and maintain a balanced position on both feet
while drilling at 90°.
• Be careful and ready to relax the force as soon as the
drill bit penetrates the material. Sudden movements can
cause accidents.
• Do not touch the chisel or drill holes
immediately after drilling. Wait for them to cool down
before handling them. Do not try to cool them with water
or oil.
• Avoid placing the tool in a place with particles and/or
dust immediately after use, these can be absorbed into
the tool mechanism and thus damage it.
• Use headset protectors, when running services that
make noise above 85 dB. Exposure to noise can cause
hearing loss.
• Use a dust mask and dust extraction equipment if
necessary. Remember that working with materials such as
asbestos, lead paint, additives, some types of wood,
metals, or minerals is highly toxic.
• Wear safety goggles.
While operating the hammer drill
CAUTION
CAUTION
CAUTION
CAUTION
CAUTION
WARNING
WARNING
WARNING
DANGER
DANGER
ENGLISH
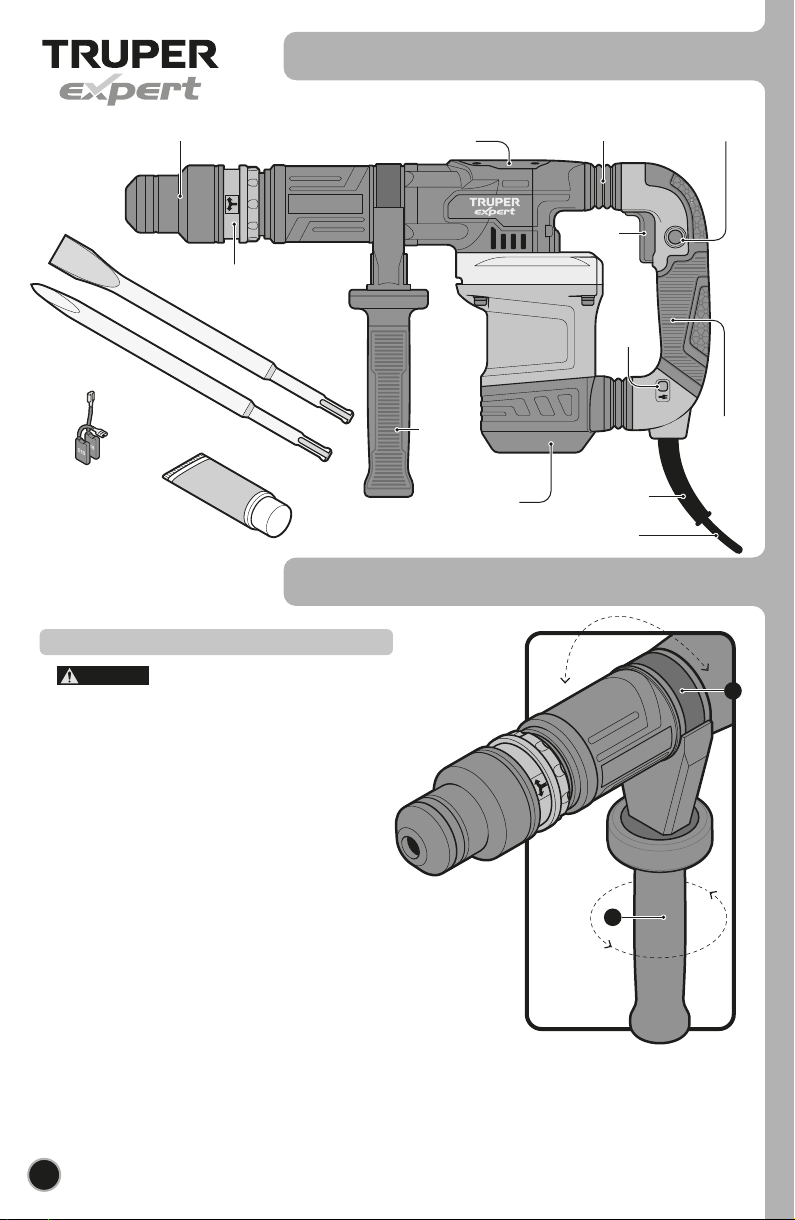
Parts
Continuous
use button
Auxiliary
handle
Trigger
switch
Anti-skid
handle
SDS max
Chuck collar
Ring for adjusting
the accessory angle
Power cord
protection
Fan and carbon
brushes cover
Power
cord
6
Mounting and adjustments
Flat chisel
Pointed chisel
Vibration
absorber
Oil deposit
cover
LED power
indicator
Spare carbon
brushes
Grease
tube
A
B
ENGLISH
Operate the power tool only with the
auxiliary handle installed.
• The auxiliary handle can be rotated to any position for a
secure, low-fatigue posture.
• Rotate the auxiliary handle grip (A) counterclockwise to
loosen the mount (B) and swing the auxiliary handle to
the desired position.
• Then, retighten the auxiliary handle grip by turning
clockwise.
• Make sure the mount band is positioned in the proper
section of the housing.
Auxiliary Handle
CAUTION

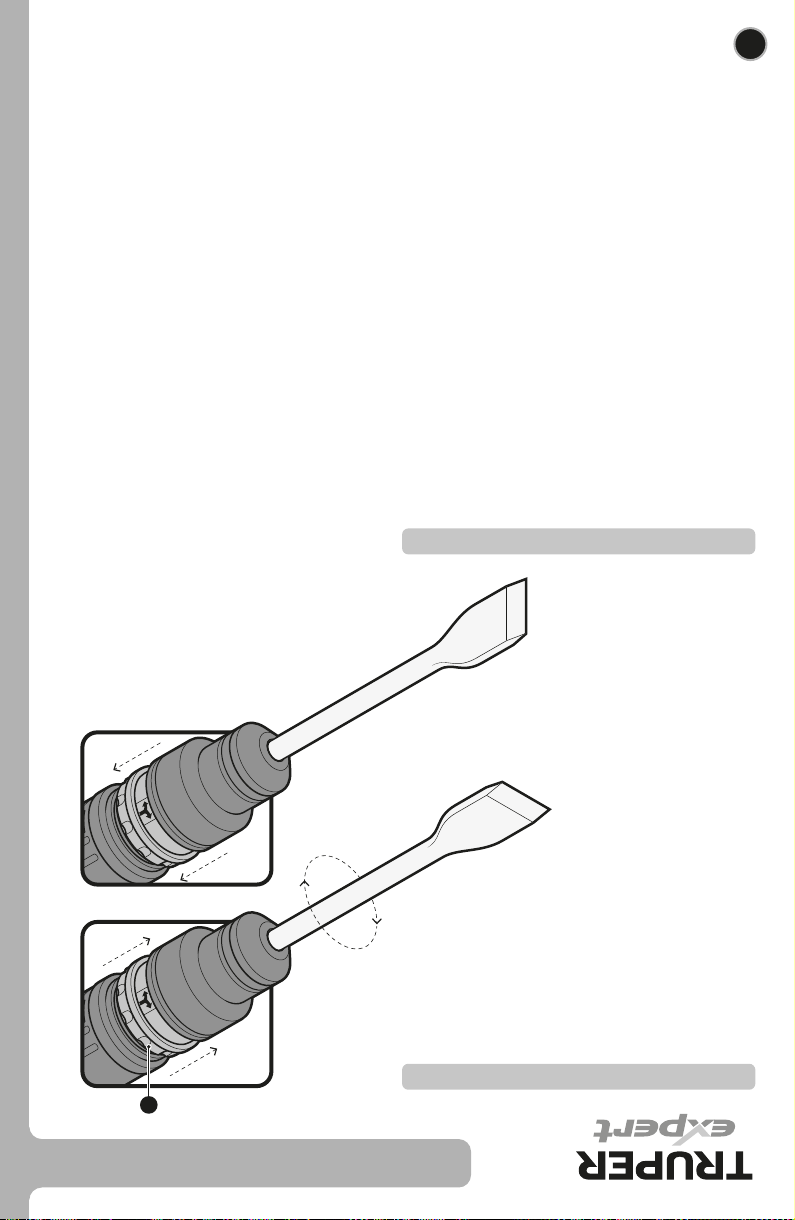
Mounting accessories
To prevent accidents, confirm that the switch is turned off and
disconnect the plug from the power supply.
Always wear gloves when changing accessories.
They can become extremely hot during operation.
• Clean the drill bit shank (A) and apply grease before inserting it.
• Insert the accessory into the chuck. Turn the accessory slowly to feel
for the point where it engages. At this point, pull the collar (B) as
indicated by the arrows push the bit all the way in.
• Pull the drill bit to confirm that it is fully secured.
• To remove the drill bit, pull the collar
completely in the direction of the arrows
and pull out the drill bit.
7
Mounting and adjustments
Start up
LED indicator (E)
• The LED indicator lights up when the tool is switched on. If the LED indicator
does not light up, the power cord or controller may be defective.
• The indicator starts flashing when the carbons have worn out, 8 hours later the
machine will automatically switch off and cannot be switched on again until the
carbons are replaced.
ON and OFF
• Intermittent operation:
Press the switch (C) to start the hammer running.
To interrupt its use, release the switch.
• Continuous operation:
Press the switch (C) and lock it, pressing the continuous use button (D).
To interrupt operation, press and then release the switch.
A
B
E
C
D
ENGLISH
CAUTION
WARNING

8
Start up
• SDS accessories require freedom to move within the
chuck, which causes eccentricity when the tool is unloaded.
However, the accessory automatically centers itself during
operation, without affecting drilling accuracy.
• When new, the tool requires a 5-hour working time to
reach maximum efficiency.
Additional Information
• The chisel can be adjusted in 12 positions. Depending on
the job to be done.
• Insert the chisel into the chuck as shown on page 7.
• Push forward and turn the ring (A) to change the chisel
to the desired position.
• Release the ring to return it to its position and engage the
chisel.
Chisel angle adjustment
A
ENGLISH

9
Maintenance
• The hammer drill crankshaft is lubricated with low
viscosity grease so that it can be used for a long period of
time without the need to replace the grease.
• Contact a Authorized Service
Center to replace the grease in case of leaks.
Applying non recommended grease
will cause the machine to clog, reducing its service life.
• Service to the tools shall only be carried out in a
Authorized Service center. Service
and maintenance carried out by unqualified persons can
be dangerous and may result in personal injury and
invalidate the product warranty.
Lubrication
Service
• Clean the machine with a soft cloth, dampened with soap
and water, preferably after each use.
• Always keep the vents clean and free of obstructions to
ensure proper cooling of the motor.
• Regularly inspect all mounting screws and make sure
they are tightened properly. If any of the screws are loose,
tighten them immediately.
• The carbons should be checked periodically, and always
be replaced by a Authorized Service
Center when they have worn out.
• After they have been replaced, ask to inspect if the new
carbons can move freely in the carbon holder and request
that the tool be turned on for 5 minutes to match the
contact of the carbons and commuter.
• Only use original replacement
carbons, specifically designed with the hardness and
electrical resistance for each type of motor. Out of
specification carbons can damage the motor.
• When changing the carbon brushes, always replace both
carbons.
• In case you have to replace the carbons yourself, please
follow this order:
1. Loosen the two fixing screws and remove the fan cover..
2. Remove the coil spring and the carbons.
3. After replacing the carbons, install the coil spring and fan
cover, tightening the set screws securely.
Cleaning and Care
Carbon Brush Replacement
WARNING
ENGLISH

10
Notes
ENGLISH

11
Authorized Service Centers
In the event of any problem contacting a Authorized Service Center, please see our webpage
www.truper.com to get an updated list, or call our toll-free numbers 800 690-6990 or 800 0187-8737 to get
information about the nearest Service Center.
DE TODO PARA LA CONSTRUCCIÓN
GRAL. BARRAGÁN #1201, COL. GREMIAL, C.P. 20030,
AGUASCALIENTES, AGS. TEL.: 449 994 0537
SUCURSAL TIJUANA
AV. LA ENCANTADA, LOTE #5, PARQUE INDUSTRIAL EL
FLORIDO II, C.P 22244, TIJUANA, B.C.
TEL.: 664 969 5100
FIX FERRETERÍAS
FELIPE ÁNGELES ESQ. RUIZ CORTÍNEZ S/N, COL. PUEBLO
NUEVO, C.P. 23670, CD. CONSTITUCIÓN, B.C.S.
TEL.: 613 132 1115
TORNILLERÍA Y FERRETERÍA AAA
AV. ÁLVARO OBREGÓN #324, COL. ESPERANZA
C.P. 24080 CAMPECHE, CAMP. TEL.: 981 815 2808
FIX FERRETERÍAS
AV. CENTRAL SUR #27, COL. CENTRO, C.P. 30700,
TAPACHULA, CHIS. TEL.: 962 118 4083
SUCURSAL CHIHUAHUA
AV. SILVESTRE TERRAZAS #128-11, PARQUE INDUSTRIAL
BAFAR, CARRETERA MÉXICO CUAUHTÉMOC, C.P. 31415,
CHIHUAHUA, CHIH. TEL. 614 434 0052
FIX FERRETERÍAS
EL MONSTRUO DE CORREGIDORA, CORREGIDORA # 22,
COL. CENTRO, C.P. 06060, CUAUHTÉMOC, CDMX.
TEL: 55 5522 5031 / 5522 4861
SUCURSAL TORREÓN
CALLE METAL MECÁNICA #280, PARQUE INDUSTRIAL
ORIENTE, C.P. 27278, TORREÓN, COAH.
TEL.: 871 209 68 23
BOMBAS Y MOTORES BYMTESA DE MANZANILLO
BLVD. MIGUEL DE LA MADRID #190, COL. 16 DE
SEPTIEMBRE, C.P. 28239, MANZANILLO, COL.
TEL.: 314 332 1986 / 332 8013
TORNILLOS ÁGUILA, S.A. DE C.V.
MAZURIO #200, COL. LUIS ECHEVERRÍA, DURANGO,
DGO.TEL.: 618 817 1946 / 618 818 2844
SUCURSAL CENTRO JILOTEPEC
AV. PARQUE INDUSTRIAL #1-A, C.P. 54240, JILOTEPEC,
EDO. DE MÉX. TEL: 761 782 9101 EXT. 5728 Y 5102
CÍA. FERRETERA NUEVO MUNDO S.A. DE C.V.
AV. MÉXICO - JAPÓN #225, CD. INDUSTRIAL, C.P. 38010,
CELAYA, GTO. TEL.: 461 617 7578 / 79 / 80 / 88
CENTRO DE SERVICIO ECLIPSE
CALLE PRINCIPAL MZ.1 LT. 1, COL. SANTA FE, C.P. 39010,
CHILPANCINGO, GRO. TEL.: 747 478 5793
FERREPRECIOS S.A. DE C.V.
LIBERTAD ORIENTE #304 LOCAL 30, INTERIOR DE PASAJE
ROBLEDO, COL. CENTRO, C.P. 43600, TULANCINGO,
HGO. TEL.: 775 753 6615 / 775 753 6616
SUCURSAL GUADALAJARA
AV. ADOLFO B. HORN # 6800, COL: SANTA CRUZ DEL
VALLE, C.P.: 45655, TLAJOMULCO DE ZUÑIGA, JAL.
TEL.: 33 3606 5285 AL 90
FIX FERRETERÍAS
AV. PASEO DE LA REPÚBLICA #3140-A, COL.
EX-HACIENDA DE LA HUERTA, C.P. 58050, MORELIA,
MICH. TEL.: 443 334 6858
FIX FERRETERÍAS
CAPITÁN ANZURES #95, ESQ. JOSÉ PERDIZ, COL.
CENTRO, C.P. 62740, CUAUTLA, MOR.
TEL.: 735 352 8931
HERRAMIENTAS DE TEPIC
MAZATLAN #117, COL. CENTRO, C.P. 63000, TEPIC, NAY.
TEL.: 311 258 0540
SUCURSAL MONTERREY
CARRETERA LAREDO #300, 1B MONTERREY PARKS,
COLONIA PUERTA DE ANÁHUAC, C.P. 66052, ESCOBEDO,
NUEVO LEÓN, TEL.: 81 8352 8791 / 81 8352 8790
FIX FERRETERÍAS
AV. 20 DE NOVIEMBRE #910, COL. CENTRO, C.P. 68300,
TUXTEPEC, OAX. TEL.: 287 106 3092
SUCURSAL PUEBLA
AV PERIFÉRICO #2-A, SAN LORENZO ALMECATLA,
C.P. 72710, CUAUTLACINGO, PUE.
TEL.: 222 282 8282 / 84 / 85 / 86
ARU HERRAMIENTAS S.A DE C.V.
AV. PUERTO DE VERACRUZ #110, COL. RANCHO DE
ENMEDIO, C.P. 76842, SAN JUAN DEL RÍO, QRO.
TEL.: 427 268 4544
FIX FERRETERÍAS
CARRETERA FEDERAL MZ. 46 LT. 3 LOCAL 2, COL EJIDAL,
C.P. 77710 PLAYA DEL CARMEN, Q.R.
TEL.: 984 267 3140
FIX FERRETERÍAS
AV. UNIVERSIDAD #1850, COL. EL PASEO, C.P. 78320,
SAN LUIS POTOSÍ, S.L.P. TEL.: 444 822 4341
SUCURSAL CULIACÁN
AV. JESÚS KUMATE SUR #4301, COL. HACIENDA DE LA
MORA, C.P. 80143, CULIACÁN, SIN.
TEL.: 667 173 9139 / 173 8400
FIX FERRETERÍAS
CALLE 5 DE FEBRERO #517, SUR LT. 25 MZ. 10, COL.
CENTRO, C.P. 85000, CD. OBREGÓN, SON.
TEL.: 644 413 2392
SUCURSAL VILLAHERMOSA
CALLE HELIO LOTES 1, 2 Y 3 MZ. #1, COL. INDUSTRIAL,
2A ETAPA, C.P. 86010, VILLAHERMOSA, TAB.
TEL.: 993 353 7244
VM ORINGS Y REFACCIONES
CALLE ROSITA #527 ENTRE 20 DE NOVIEMBRE Y GRAL.
RODRÍGUEZ, FRACC. REYNOSA, C.P. 88780, REYNOSA,
TAMS. TEL.: 899 926 7552
SERVICIOS Y HERRAMIENTAS INDUSTRIALES
PABLO SIDAR #132, COL . BARRIO DE SAN BARTOLOMÉ,
C.P. 90970, SAN PABLO DEL MONTE, TLAX.
TEL.: 222 271 7502
LA CASA DISTRIBUIDORA TRUPER
BLVD. PRIMAVERA. ESQ. HORTENSIA S/N, COL.
PRIMAVERA C.P. 93308, POZA RICA, VER.
TEL.: 782 823 8100 / 826 8484
SUCURSAL MÉRIDA
CALLE 33 #600 Y 602, LOCALIDAD ITZINCAB Y MULSAY,
MPIO. UMÁN, C.P. 97390, MÉRIDA, YUC.
TEL.: 999 912 2451
AGUASCALIENTES
BAJA
CALIFORNIA
BAJA
CALIFORNIA SUR
CAMPECHE
CHIAPAS
CHIHUAHUA
MEXICO CITY
COAHUILA
COLIMA
DURANGO
ESTADO DE
MÉXICO
GUANAJUATO
GUERRERO
HIDALGO
JALISCO
MICHOACÁN
MORELOS
NAYARIT
NUEVO LEÓN
OAXACA
PUEBLA
QUERÉTARO
QUINTANA ROO
SAN LUIS
POTOSÍ
SINALOA
SONORA
TABASCO
TAMAULIPAS
TLAXCALA
VERACRUZ
YUCATÁN
ENGLISH

12
100890
www.truper.com
12-2020
MADE-6NX
3
YEARS
Warranty
policy
Stamp of the business. Date of purchase:
This product is guaranteed for 3 years. To make the warranty valid or purchase parts and components you
must present the product in Corregidora 22, Col. Centro, Alc. Cuauhtémoc, CDMX C.P. 06060 or at the
establishment where you purchased it, or at any Truper®Service Center listed in the annex to the warranty
policy and/or in www.truper.com . Transportation costs resulting from compliance of this warranty will be
covered by
For questions or comments, call 800-690-6990. Made in China. Imported by Truper S.A. de C.V. Parque
Industrial 1, Jilotepec, Edo. de Méx. C.P. 54240
Code Model Brand
ENGLISH

12 ESPAÑOL
3
AÑOS
100890
Póliza de
Garantía
www.truper.com
12-2020
Sello del establecimiento comercial. Fecha de compra:
Código
MADE-6NX
Modelo Marca
Este producto está garantizado por 3 años. Para hacer válida la garantía o adquirir piezas y componentes deberá
presentar el producto en Corregidora 22, Col. Centro, Alc. Cuauhtémoc, CDMX C.P. 06060 o en el
establecimiento donde lo compró, o en algún Centro de Servicio Truper®de los enlistados en el anexo de la
póliza de garantía y/o en www.truper.com . Los gastos de transportación que resulten para su cumplimiento
serán cubiertos por
Para dudas o comentarios, llame al 800-690-6990. Hecho en China. Importado por Truper S.A. de C.V. Parque
Industrial 1, Jilotepec, Edo. de Méx. C.P. 54240

11
ESPAÑOL
Centros de Servicio Autorizados
En caso de tener algún problema para contactar un Centro de Servicio Autorizado
consulte nuestra página www.truper.com donde obtendrá un listado actualizado, o llame al:
800 690-6990 ó800 0187-8737 donde le informarán cuál es el Centro de Servicio más cercano.
AGUASCALIENTES
BAJA
CALIFORNIA
BAJA
CALIFORNIA SUR
CAMPECHE
CHIAPAS
CHIHUAHUA
CIUDAD DE
MÉXICO
COAHUILA
COLIMA
DURANGO
ESTADO DE
MÉXICO
GUANAJUATO
GUERRERO
HIDALGO
JALISCO
MICHOACÁN
MORELOS
NAYARIT
NUEVO LEÓN
OAXACA
PUEBLA
QUERÉTARO
QUINTANA ROO
SAN LUIS
POTOSÍ
SINALOA
SONORA
TABASCO
TAMAULIPAS
TLAXCALA
VERACRUZ
YUCATÁN
DE TODO PARA LA CONSTRUCCIÓN
GRAL. BARRAGÁN #1201, COL. GREMIAL, C.P. 20030,
AGUASCALIENTES, AGS. TEL.: 449 994 0537
SUCURSAL TIJUANA
AV. LA ENCANTADA, LOTE #5, PARQUE INDUSTRIAL EL
FLORIDO II, C.P 22244, TIJUANA, B.C.
TEL.: 664 969 5100
FIX FERRETERÍAS
FELIPE ÁNGELES ESQ. RUIZ CORTÍNEZ S/N, COL. PUEBLO
NUEVO, C.P. 23670, CD. CONSTITUCIÓN, B.C.S.
TEL.: 613 132 1115
TORNILLERÍA Y FERRETERÍA AAA
AV. ÁLVARO OBREGÓN #324, COL. ESPERANZA
C.P. 24080 CAMPECHE, CAMP. TEL.: 981 815 2808
FIX FERRETERÍAS
AV. CENTRAL SUR #27, COL. CENTRO, C.P. 30700,
TAPACHULA, CHIS. TEL.: 962 118 4083
SUCURSAL CHIHUAHUA
AV. SILVESTRE TERRAZAS #128-11, PARQUE INDUSTRIAL
BAFAR, CARRETERA MÉXICO CUAUHTÉMOC, C.P. 31415,
CHIHUAHUA, CHIH. TEL. 614 434 0052
FIX FERRETERÍAS
EL MONSTRUO DE CORREGIDORA, CORREGIDORA # 22,
COL. CENTRO, C.P. 06060, CUAUHTÉMOC, CDMX.
TEL: 55 5522 5031 / 5522 4861
SUCURSAL TORREÓN
CALLE METAL MECÁNICA #280, PARQUE INDUSTRIAL
ORIENTE, C.P. 27278, TORREÓN, COAH.
TEL.: 871 209 68 23
BOMBAS Y MOTORES BYMTESA DE MANZANILLO
BLVD. MIGUEL DE LA MADRID #190, COL. 16 DE
SEPTIEMBRE, C.P. 28239, MANZANILLO, COL.
TEL.: 314 332 1986 / 332 8013
TORNILLOS ÁGUILA, S.A. DE C.V.
MAZURIO #200, COL. LUIS ECHEVERRÍA, DURANGO,
DGO.TEL.: 618 817 1946 / 618 818 2844
SUCURSAL CENTRO JILOTEPEC
AV. PARQUE INDUSTRIAL #1-A, C.P. 54240, JILOTEPEC,
EDO. DE MÉX. TEL: 761 782 9101 EXT. 5728 Y 5102
CÍA. FERRETERA NUEVO MUNDO S.A. DE C.V.
AV. MÉXICO - JAPÓN #225, CD. INDUSTRIAL, C.P. 38010,
CELAYA, GTO. TEL.: 461 617 7578 / 79 / 80 / 88
CENTRO DE SERVICIO ECLIPSE
CALLE PRINCIPAL MZ.1 LT. 1, COL. SANTA FE, C.P. 39010,
CHILPANCINGO, GRO. TEL.: 747 478 5793
FERREPRECIOS S.A. DE C.V.
LIBERTAD ORIENTE #304 LOCAL 30, INTERIOR DE PASAJE
ROBLEDO, COL. CENTRO, C.P. 43600, TULANCINGO,
HGO. TEL.: 775 753 6615 / 775 753 6616
SUCURSAL GUADALAJARA
AV. ADOLFO B. HORN # 6800, COL: SANTA CRUZ DEL
VALLE, C.P.: 45655, TLAJOMULCO DE ZUÑIGA, JAL.
TEL.: 33 3606 5285 AL 90
FIX FERRETERÍAS
AV. PASEO DE LA REPÚBLICA #3140-A, COL.
EX-HACIENDA DE LA HUERTA, C.P. 58050, MORELIA,
MICH. TEL.: 443 334 6858
FIX FERRETERÍAS
CAPITÁN ANZURES #95, ESQ. JOSÉ PERDIZ, COL.
CENTRO, C.P. 62740, CUAUTLA, MOR.
TEL.: 735 352 8931
HERRAMIENTAS DE TEPIC
MAZATLAN #117, COL. CENTRO, C.P. 63000, TEPIC, NAY.
TEL.: 311 258 0540
SUCURSAL MONTERREY
CARRETERA LAREDO #300, 1B MONTERREY PARKS,
COLONIA PUERTA DE ANÁHUAC, C.P. 66052, ESCOBEDO,
NUEVO LEÓN, TEL.: 81 8352 8791 / 81 8352 8790
FIX FERRETERÍAS
AV. 20 DE NOVIEMBRE #910, COL. CENTRO, C.P. 68300,
TUXTEPEC, OAX. TEL.: 287 106 3092
SUCURSAL PUEBLA
AV PERIFÉRICO #2-A, SAN LORENZO ALMECATLA,
C.P. 72710, CUAUTLACINGO, PUE.
TEL.: 222 282 8282 / 84 / 85 / 86
ARU HERRAMIENTAS S.A DE C.V.
AV. PUERTO DE VERACRUZ #110, COL. RANCHO DE
ENMEDIO, C.P. 76842, SAN JUAN DEL RÍO, QRO.
TEL.: 427 268 4544
FIX FERRETERÍAS
CARRETERA FEDERAL MZ. 46 LT. 3 LOCAL 2, COL EJIDAL,
C.P. 77710 PLAYA DEL CARMEN, Q.R.
TEL.: 984 267 3140
FIX FERRETERÍAS
AV. UNIVERSIDAD #1850, COL. EL PASEO, C.P. 78320,
SAN LUIS POTOSÍ, S.L.P. TEL.: 444 822 4341
SUCURSAL CULIACÁN
AV. JESÚS KUMATE SUR #4301, COL. HACIENDA DE LA
MORA, C.P. 80143, CULIACÁN, SIN.
TEL.: 667 173 9139 / 173 8400
FIX FERRETERÍAS
CALLE 5 DE FEBRERO #517, SUR LT. 25 MZ. 10, COL.
CENTRO, C.P. 85000, CD. OBREGÓN, SON.
TEL.: 644 413 2392
SUCURSAL VILLAHERMOSA
CALLE HELIO LOTES 1, 2 Y 3 MZ. #1, COL. INDUSTRIAL,
2A ETAPA, C.P. 86010, VILLAHERMOSA, TAB.
TEL.: 993 353 7244
VM ORINGS Y REFACCIONES
CALLE ROSITA #527 ENTRE 20 DE NOVIEMBRE Y GRAL.
RODRÍGUEZ, FRACC. REYNOSA, C.P. 88780, REYNOSA,
TAMS. TEL.: 899 926 7552
SERVICIOS Y HERRAMIENTAS INDUSTRIALES
PABLO SIDAR #132, COL . BARRIO DE SAN BARTOLOMÉ,
C.P. 90970, SAN PABLO DEL MONTE, TLAX.
TEL.: 222 271 7502
LA CASA DISTRIBUIDORA TRUPER
BLVD. PRIMAVERA. ESQ. HORTENSIA S/N, COL.
PRIMAVERA C.P. 93308, POZA RICA, VER.
TEL.: 782 823 8100 / 826 8484
SUCURSAL MÉRIDA
CALLE 33 #600 Y 602, LOCALIDAD ITZINCAB Y MULSAY,
MPIO. UMÁN, C.P. 97390, MÉRIDA, YUC.
TEL.: 999 912 2451

10 ESPAÑOL
Notas

9
ESPAÑOL
• El cigüeñal del demoledor está lubricado con grasa de
baja viscosidad para que pueda ser utilizado durante un
largo período sin necesidad de reemplazar la grasa.
• Acuda a un Centro de Servicio Autorizado
para reemplazar la grasa en caso de
fuga.
Aplicar grasa no recomendada
hará que la máquina se atasque, reduciendo su vida útil.
• Limpie la máquina con un paño suave, humedecido con
agua y jabón, preferiblemente después de cada uso.
• Siempre mantenga las ventilas limpias y libres de
obstrucciones para garantizar un enfriamiento adecuado
del motor.
• Inspeccione regularmente todos los tornillos de montaje
y asegúrese de que estén apretados correctamente. En
caso de que alguno de los tornillos esté suelto, apriételo
inmediatamente.
• Los carbones deben revisarse periódicamente, y ser
reemplazados siempre por un Centro de Servicio Autorizado
cuando se hayan desgastado.
• Después de que hayan sido reemplazados, pida que se
inspeccione si los nuevos carbones pueden moverse
libremente en el porta-carbón y solicite que enciendan la
herramienta durante 5 minutos para emparejar el contacto
de los carbones y el conmutador.
• Sólo se deben de usar carbones de repuesto
originales, diseñados específicamente
con la dureza y la resistencia eléctrica adecuadas para cada
tipo de motor. Los carbones fuera de especificaciones
pueden dañar el motor.
• Cuando se haga el cambio de carbones siempre deben
reemplazarse los dos carbones.
• En caso de que tenga que reemplazar los carbones por sí
mismo, por favor siga este orden:
1. Afloje los dos tornillos de fijación y retire la cubierta del
ventilador.
2. Retire el resorte helicoidal y los carbones.
3. Después de reemplazar los carbones, instale el resorte
helicoidal y la cubierta del ventilador, apretando
firmemente los tornillos de fijación.
• El servicio de las herramientas debe ser realizado
únicamente en un Centro de Servicio Autorizado
. El servicio y mantenimiento realizado
por personas no calificadas puede resultar peligroso y
llegar a ocasionar daños personales además de invalidar la
garantía del producto.
LubricaciónLimpieza y cuidados
Cambio de carbones Servicio
Mantenimiento
ADVERTENCIA
8
Puesta en marcha
• Los accesorios SDS requieren de libertad para moverse
dentro del broquero, lo cual causa excentricidad cuando la
herramienta está sin carga. Sin embargo el accesorio se
centra automáticamente durante la operación, sin afectar la
precisión del taladrado.
• Cuando está nueva, la herramienta requiere de un lapso
de 5 horas de trabajo para alcanzar su máxima eficiencia.
Información adicional
• El cincel puede ser ajustado en 12 posiciones.
Dependiendo del trabajo a realizar.
• Introduzca el cincel en el broquero como se indica en la
página 7.
• Empuje hacia adelante y gire el anillo (A) para cambiar el
cincel a la posición deseada.
• Suelte el anillo para que regrese a su posición y
enganche el cincel.
Ajuste del ángulo del cincel
ESPAÑOL
A

Montaje de accesorios
Para prevenir accidentes, confirme que el interruptor esté
apagado y desconecte la clavija del suministro eléctrico.
Utilice guantes siempre que cambie los accesorios.
Pueden llegar a estar extremadamente calientes durante la operación.
• Limpie el zanco (A) del accesorio y aplique grasa antes de insertarlo.
• Inserte el accesorio en el broquero. Gire el accesorio lentamente
para sentir el punto en el que se enganche. En ese momento,
jale el collarín (B) como indican las flechas y empuje la
broca hasta el fondo.
• Jale la broca para confirmar que está
completamente asegurada.
• Para retirar la broca, jale por
completo el collarín en
dirección a las flechas y
jale la broca.
7
Montaje y ajustes
Puesta en marcha
LED indicador (E)
• El indicador LED se enciende cuando la herramienta está conectada. Si el LED
indicador no se enciende, puede que el cable de alimentación o el controlador
estén defectuosos.
• El indicador comienza a parpadear cuando se han desgastado los carbones, 8
horas después la máquina se apagará automáticamente y no podrá encenderse de
nuevo hasta reemplazar los carbones.
Encendido y apagado
• Operación intermitente:
Presione el interruptor (C) para que el martillo empiece a funcionar.
Para interrumpir su uso, suelte el interruptor.
• Operación continua:
Presione el interruptor (C) y bloquéelo, apretando el botón de uso continuo (D).
Para interrumpir su funcionamiento, presione y después suelte el interruptor.
ADVERTENCIA
ESPAÑOL
A
B
E
ATENCIÓN
C
D
Partes
Botón de
uso contínuo
Mango
auxiliar
Gatillo
interruptor
Mango
antiderrapante
Collarín del
broquero
SDS max
Anillo para ajustar el
ángulo del accesorio
Protector
del cabe
Cubierta
del ventilador
y carbones Cable de
alimentación
6
Montaje y ajustes
ESPAÑOL
Cincel plano
Cincel de punta
Amortiguador
de vibración
Cubierta
del depósito
de aceite
LED indicador
de energía
Mango auxiliar
Carbones
de repuesto
Tubo
de grasa
Opere la herramienta eléctrica
solamente con el mango auxiliar instalado.
• El mango auxiliar se puede rotar hasta cualquier
posición, para lograr una postura segura y de baja fatiga.
• Gire la empuñadura del mango auxiliar (A) en dirección
contraria a las manecillas del reloj para aflojar la montura
(B) y balancee el mango auxiliar a la posición deseada.
• Entonces, vuelva a apretar la empuñadura del mango
auxiliar girando en dirección a las manecillas del reloj.
• Asegúrese que la banda de la montura esté colocada en
la sección adecuada de la carcasa.
ATENCIÓN
A
B

5
Advertencias de Seguridad
para uso de demoledores
• La herramienta está diseñada para
trabajar con brocas o accesorios con zancos SDS-max. Elija
el apropiado para el material a trabajar, esto reduce el
riesgo de lesiones graves y agiliza el trabajo.
• No intente utilizar brocas que excedan la capacidad del
broquero.
• Utilice brocas / accesorios bien afilados y en buenas
condiciones para optimizar el trabajo.
Elija la broca o accesorio apropiados
• Tómese su tiempo para evaluar el trabajo a realizar y
asegúrese de haber respetado todas las precauciones
necesarias antes de comenzar a taladrar.
• Ajuste correctamente el accesorio
al broquero, de lo contrario, éste puede salir despedido a
gran velocidad y provocar lesiones graves.
• Antes de golpear en una pared, suelo o
techo, asegúrese de que no haya objetos empotrados,
tales como cables o conducciones eléctricas o tuberías.
• Asegúrese que el interruptor esté
apagado (página 7 Encendido y apagado) antes de
conectar la herramienta, de lo contrario ésta comenzará a
funcionar inesperadamente, pudiendo provocar lesiones
graves.
• Apague y desconecte la herramienta
antes de cambiar la velocidad de trabajo, así como de
instalar o reemplazar un accesorio.
Esta herramienta eléctrica produce
un campo electro-magnético durante su operación que
podría interfiere con implantes médicos. Para reducir el
riesgo de lesiones importantes o fatales, se recomienda a
las personas con implantes médicos, consultar con su
médico y con el fabricante del implante antes de operar la
herramienta.
Antes de operar el demoledor
• Sostenga la herramienta por su
mango y por el mango auxiliar. Recuerde que la pérdida
de control puede causar lesiones personales.
• Sostenga la herramienta por las superficies aislantes,
sobre todo al realizar trabajos en los que la parte de
corte de la broca pueda hacer contacto con cableados
ocultos o con el propio cable de alimentación de la
herramienta. El contacto con un cable conductor de
corriente hace que las piezas metálicas de la herramienta
también tengan corriente y puedan provocar una
descarga eléctrica al operador.
• No someta la herramienta a esfuerzos excesivos.
• Si la broca se atasca en la pieza de
trabajo, apague el demoledor de inmediato. Luego retire
la broca de la pieza de trabajo. No intente retirar las
brocas atoradas encendiendo y apagando la herramienta.
• No ejerza demasiada presión a la herramienta con tal de
acelerar la perforación. De lo contrario la broca se dañaría
y la eficiencia de la herramienta disminuiría al igual que
su vida útil.
• En cuanto más grande sea el
área del cincel, la fuerza reactiva es mayor, lo que puede
provocar una pérdida del control de la herramienta. Para
evitar esta posibilidad sujete firmemente la herramienta
con ambas manos y mantenga una posición equilibrada
sobre ambos pies mientras perfora a 90°.
• Esté atento y preparado para relajar la fuerza en cuanto
la broca atraviese el material. Los movimientos repentinos
pueden provocar accidentes.
• No toque el cincel ni las perforacio-
nes inmediatamente después de taladrar. Espere a que se
enfríen para manipularlas. No intente enfriarlas con agua
o aceite.
• Evite colocar la herramienta en un sitio con partículas
y/o polvo inmediatamente después de haber sido usada,
estas pueden ser absorbidas dentro del mecanismo de la
herramienta y así dañarla.
• Utilice protectores auriculares, cuando ejecute
servicios que hagan ruidos superiores a 85 dB. La
exposición al ruido puede causar pérdida auditiva.
• Utilice mascarilla antipolvo y un equipo extractor de
polvo si es necesario. Recuerde que trabajar materiales
como asbesto, pinturas con plomo, aditivos, algunos tipos
de madera, metales o minerales es altamente tóxico.
• Utilice gafas de seguridad.
Mientras opera el demoledor
ATENCIÓN
ATENCIÓN
ATENCIÓN
ATENCIÓN
ATENCIÓN
ADVERTENCIA
ADVERTENCIA
ADVERTENCIA
PELIGRO
PELIGRO
ESPAÑOL
Forma correcta de
sostener el demoledor
This manual suits for next models
1
Table of contents
Other Truper Power Hammer manuals


