TRX TRX-05W1 User manual

USER MANUAL
5W UHF CB RADIO
80 Australian and
New Zealand Channels
TRX05W1/ TRX05W1C
5W Maximum
Transmission Power
5W
17 Kilometre
Range*
Emergency
Siren
Dual Channel
Monitoring
3
3THREE
YEAR
WARRANTY

2
CONTENTS
1.0 WARNINGS ......................................................................... 4
1.1 Battery Pack....................................................................... 4
1.2 Antenna .............................................................................. 4
1.3 General............................................................................... 5
2.0 USER LICENSE INFORMATION ........................................... 5
3.0 INTRODUCTION .................................................................. 6
3.1 Features ............................................................................. 6
3.2 Package Contents.............................................................. 6
3.3 Product Overview ............................................................... 7
3.3.1 Product Overview – LCD Display.............................. 8
4.0 GETTING STARTED ............................................................. 9
4.1 Installing The Belt Clip ...................................................... 9
4.2 Speaker/Microphone Cover............................................... 9
4.3 Installing/Removing The Battery Pack.............................. 9
4.4 Charging The Battery Pack................................................ 9
4.5 Battery Level .................................................................... 10
5.0 OPERATION BASIC FUNCTIONS..................................... 10
5.1 Power/Volume.................................................................. 10
5.2 Channel Selection............................................................ 10
5.3 Dual Channel Monitoring................................................. 11
5.3.1 Disabling Dual Band Monitoring............................ 11
5.4 Transmit ........................................................................... 12
5.4.1 Side Keys................................................................. 12
5.5 Transmission Range ........................................................ 13

3
6.0 MAIN MENU SHORTCUTS ................................................. 13
7.0 MAIN MENU ...................................................................... 15
7.1 Menu Navigation .............................................................. 15
7.2 Main Menu Function Overview......................................... 16
8.0 ADDITIONAL FUNCTION INFORMATION ........................... 20
9.0 CTCSS FREQUENCY TABLE............................................... 22
10.0 DCS FREQUENCY TABLE .................................................. 22
11.0 UHF CHANNELS & FREQUENCIES.................................... 24
11.1 Legally Restricted................................................... 24
11.2 Special Use ............................................................. 24
11.3 General Channels................................................... 25
12.0 UHF FREQUENCIES .......................................................... 26
13.0 WARRANTY TERMS & CONDITIONS.................................. 27

4
1.0 WARNINGS
1.1 BATTERY PACK
• The battery pack should be fully charged before use.
Initially charging the battery pack after purchase or
extended storage (8 weeks or more) will not bring the
battery to full capacity. A charge/discharge cycle of two to
three times with use will bring the battery pack to its full
operational capacity.
• Always charge the Battery Pack using the provided
Charger. Improper charging may damage the Battery
Pack or cause the Battery Pack to explode.
• Switch off the CB before charging to ensure the battery
pack is charged properly.
• Avoid exposing the Battery Pack to temperatures below
-20ºC or above 60ºC.
• Never dismantle the Battery Pack or expose the internal
battery cell.
• Do not dispose of the Battery Pack in fire.
• Do not short-circuit the Battery Pack
• Dispose of the CB observing local regulations being
mindful of the Battery Pack.
• Do not attempt to access the internal battery cell.
1.2 ANTENNA
• Do not use this CB radio if it has a damaged Antenna.
• Do not hold the Antenna when the CB is in use as this
may reduce the range and may cause harm.
• Non-genuine Antennas, modifications or attachments
could damage the CB, will void the Warranty and breach
the CB’s compliance

5
1.3 GENERAL
• If you carry any kind of personal medical device, please
consult a doctor before using the Radios.
• Do not use the Radios in a potentially explosive setting
(e.g. around pumps, on the lower deck of a boat or
around a fuel storage area or around chemical products),
or near blasting caps.
• Ensure Radios are turned off if on an airplane or in a
hospital.
• Please seek advice from the Manufacturer or your
Physician if using this CB in proximity to Medial Devices
such as Pacemakers, Hearing Aids etc to ensure they are
adequately shielded from RF energy.
• To avoid interference, avoid using the Radios near
traditional radios.
• Clean the Radios with a damp cloth. Don’t use any
cleaning agents or solvents for cleaning.
• Do not modify the Radios in any way. In the event of
damage occurring, ensure that the Radios are checked
by a qualified professional.
2.0 USER LICENSE INFORMATION
The Citizen Band Radio Service (CBRS) is a two-way, short
distance, communications service that can be used by any
person in Australia and New Zealand, whether it is for
recreational or domestic purposes, or in connection with
work or business.
CBRS may be used for:
1. Any form of voice communications activity
2. Telemetry and telecommand applications.
This unit complies with Australian and New Zealand
approval requirements AS/NZS 4365:2011 including radio
communications (Electromagnetic Radiation Human
Exposure) standard 2003.

6
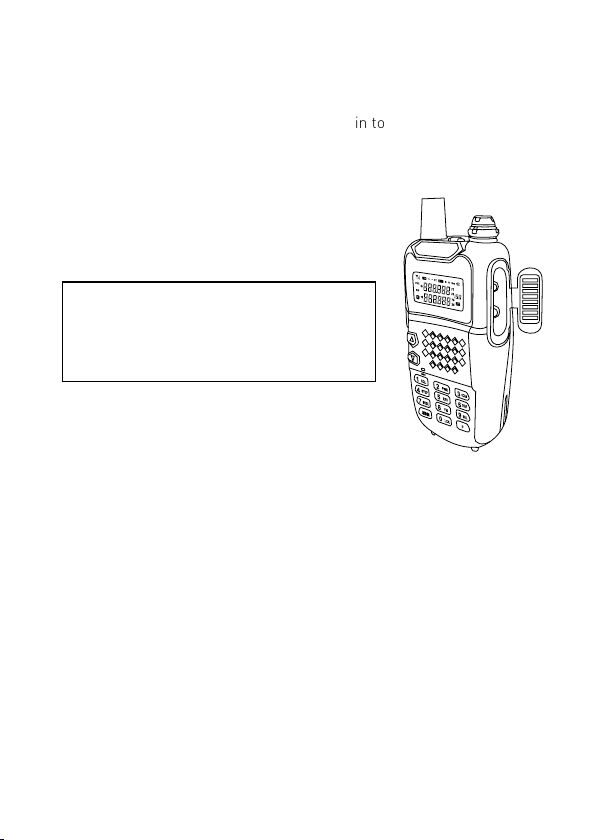
3.0 INTRODUCTION
Thank you for purchasing the TRX-5W1/TRX-5W1C UHF 80
Channel CB Radio. With a rugged ergonomic design and
maximum legal power, this CB offers a host of features
including our versatile Dual Channel Monitoring system,
inbuilt FM radio and Emergency Siren so please make sure
you read through this manual to ensure you get the most
out of your new CB Radio.
3.1 FEATURES
5W Transmit Power
17 Kilometre Range*
14 Hour Operating Time**
FM Radio
Diecast Aluminium Chassis
3.2 PACKAGE CONTENTS
1. CB Radio
2. Antenna
3. Li-ion Battery
4. Belt Clip
5. Desk Top Charger
6. 240V Adaptor
7. 12V Car Charge Lead
8. Carry Strap
9. User Manual
7
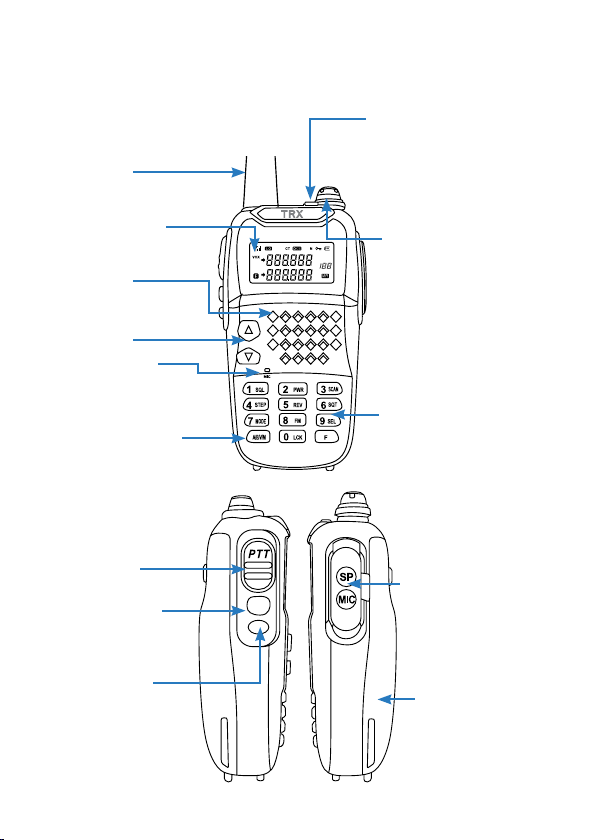
3.3 PRODUCT OVERVIEW
PTT Transmit
Button
Side Key 1
Instant Squelch
Side Key 2
Emergency Siren
Speaker/
Microphone Jacks
Located behind the
rubber cover.
Battery Pack
LED Indicator
Speaker
Channel Up/
Down
Microphone
Band Selector
Selects between
A & B reception
bands.
LED Indicator
Illuminates red while
transmitting.
Illuminates green when
receiving a signal.
Power/Volume
Rotate clockwise to
turn the CB on and
select the required
volume level.
Rotate counter
clockwise to turn the
CB off.
Key Pad
Antenna

8
3.3.1 PRODUCT OVERVIEW LCD DISPLAY
1 2 3 4 5 6 7
8
13
12
11
10 9
NO. ICON MEANING
1Transmit/Receive Indicator
2Transmit power set to 0.5W
3CTCSS activated
4DCS activated
5Narrow band.
6Keypad lock on
7Battery strength
8Menu item number
9Channel mode
10 Function key selected
11 Channel Band B
12 Channel Band A
13 VOX handsfree on
9
4.0 GETTING STARTED
4.1 INSTALLING THE BELT CLIP
Attach the belt clip by screwing it in to the back of the
battery with the screws provided.
4.2 SPEAKER/MICROPHONE COVER
Optional earpiece microphones and
speaker microphones can be installed
in the ports behind this cover.
4.3 INSTALLING/REMOVING THE
BATTERY PACK
To install the battery pack, insert the
bottom of the battery first in to the two locating slots then
press to clip the top of the Battery Pack in place.
To remove the Battery Pack, press the release tab on the
top of the battery then pull outwards and then up to remove
the Battery Pack from the CB.
4.4 CHARGING THE BATTERY PACK
The battery can be charged via either 240V or 12V. Plug
the AC adaptor or 12V Car Charger in to the back of the
charging cradle.
Slide the CB in to the cradle to begin charging. The battery
can also be charged separately in the charger.
NOTE:
This CB is not water resistant
while using the external Speaker/
Microphones or earpieces.
10
Once charging commences, the LED on the front of the
charger will illuminate red to indicate that the battery pack
is charging. When the battery pack is fully charged, the LED
will illuminate green.
NOTE:
It can take up to 3 hours to fully charge the battery.
4.5 BATTERY LEVEL
The Battery status can be viewed by selecting BATT in
the Main Menu (Function 15). This will display the current
battery voltage.
8.4V: 100% Charged
7.8V: 75% Charged
7.2V: 50% Charged
7.0V: 20% Charged
6.4V: 5%; Recharge now
4.0V: 0%; CB will shut down
5.0 OPERATION BASIC FUNCTIONS
5.1 POWER/VOLUME
To switch the CB on, rotate the
power/volume knob clockwise.
This also selects the volume
level. To turn the CB off, rotate
the knob anti-clockwise until the
knob clicks to the off position.
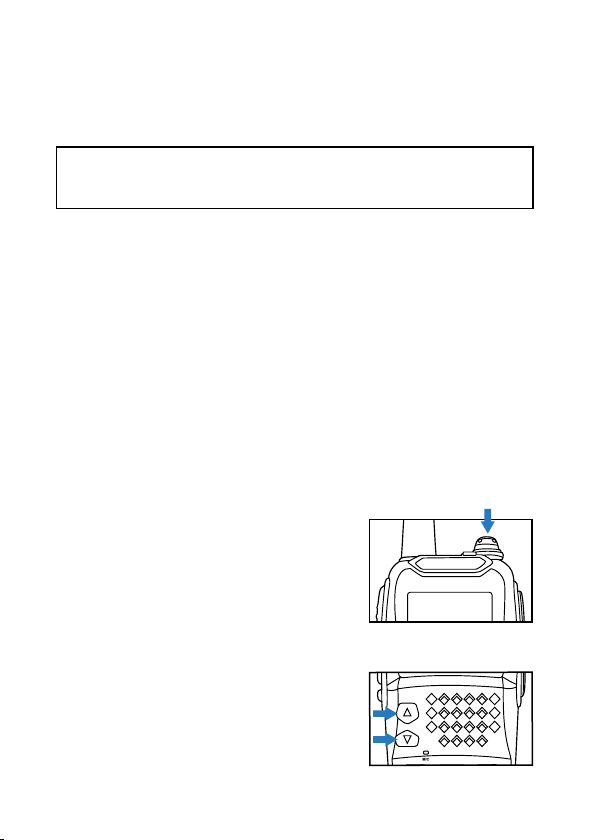
5.2 CHANNEL SELECTION
Press the up arrow to select the
next channel. Press the down
arrow to select the previous
channel. This can be done for
both channel bands A and B
(see next page).

11
5.3 DUAL CHANNEL MONITORING
This CB features the ability to monitor two CB channel
bands at once (Bands A & B). Both bands consist of UHF
CB Channels 1-80. The default setting allows you to select
two different channels to monitor (for example your desired
communication channel and say an Emergency channel),
with both channel numbers being clearly displayed on the
LCD screen
The currently selected band is indicated with an arrow as
shown below.
Bands A & B can be cycled by pressing
the A/B button on the keypad.
When using the CB and you are tuned
to a channel on Band A for example,
you will receive all communications on
this channel.
If there is a transmission on the channel you have selected
on Band B, the CB will automatically switch to Band B to
receive this communication and will stay on Band B giving
you the opportunity to reply if you wish.
After the communication has completed, you can return to
Band A by pressing the A/B button. Alternately, if the is a
transmission on Band A, the CB will automatically switch to
this band.
5.3.1 DISABLING DUAL BAND MONITORING
To quickly stop using this function, you can simply tune both
Band A & Band B to the same channel.
Channel A
Channel B
BANDS A & B KEY
12
The second option is to use Main Menu function 30 TDR
(see page 18) to select Manual Band Selection. By setting
this function to OFF, you can still program two different
channels in Band A and Band B but in this case only Band
A or Band B is displayed on the LCD screen at any one time
(selected by using the A/B button) and the band will not be
automatically swapped should you receive a transmission
from the non-selected band.
To go back to automatic band swapping, set the TDR
function to ON.
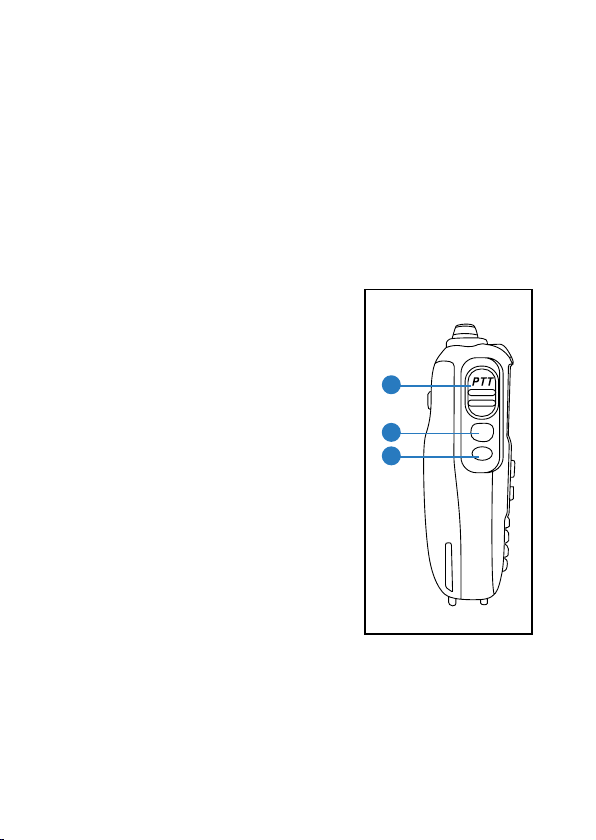
5.4 TRANSMIT
To transmit, press the (A) PTT
Transmit button on the side of
the CB. Release the button to
receive the reply.
5.4.1 SIDE KEYS
(B) Side Key 1: Instant Squelch
Press and hold this key to hear
all channel noise. This function
is useful if the signal you are
trying to receive is very weak.
To adjust the regular squelch
setting, please see the menu
shortcut on the next page.
(C) Side Key 2: Emergency Siren
& Personal Alarm
Press to activate the siren. Use the Power/Volume knob to
increase or decrease the siren volume to attract attention.
The siren will also be transmitted on the selected CB
channel to also attract attention. To stop the siren, simply
press Side Key 2 again or press the PTT button.
A
B
C

13
5.5 TRANSMISSION RANGE
The optimal transmit range for this CB is achieved in
flat, open outdoor areas. This is reduced where there are
obstructions such as buildings or rough terrain, or when
the CB is used in confined spaces such as vehicle to vehicle
communications.
Do not use these CB’s when less than 1.5m apart as this
may cause interference.
6.0 MAIN MENU SHORTCUTS
Several functions are available on this
CB Radio using keypad shortcuts. To
access these, press the Function key
(F) followed by the numerical keys as
identified in the diagram:
F + 1 SQL – Squelch Adjustment
Press Fthen 1 SQL to select Squelch adjustment. Use the
channel up/down keys to select your desired setting. Press
the Fkey again or PTT to exit the menu.
F + 2 PWR – Transmit Power Adjustment
The default transmit power of this CB is 5W. This can be
changed to 0.5W or 3W (to lengthen battery life) by pressing
Fthen 2 PWR. Use the channel up/down keys to select your
desired setting. Press the Fkey again or PTT to exit the
menu.
The following options are available:
1= 0.5W, 2= 3W, 3= 5W
NOTE:
1. Different transmit power levels can be set for each of
the channels.
2. When power level 1 is selected, will also be
displayed on the LCD screen.
FUNCTION KEY

14
F + 3 SCN – Channel Scan
Press Fthen 3 SCN to activate. Channel Scan is useful in
scanning the available CB channels to either find who is
transmitting nearby or to find a free channel to transmit on.
This function will scan all 80 channels and when there is a
transmission detected, the CB will pause on this channel
for around 3 seconds after the transmission is completed.
If there are no further transmissions after the 3 seconds,
the CB will continue scanning. Individual channels can be
added or deleted from the scan – see Menu Item 29,
Page 21.
F + 6 SQT – CTCSS & DCS Activate
Press Fthen 6 SQT to select the CTCSS & DCS menu. Use
the channel up/down keys to select your desired setting.
Press the Fkey again or PTT to exit the menu.
See page 21 for more information.
F + 7 MODE – CTCSS & DCS Value
Press Fthen 7 MODE to adjust the CTCSS or DCS value
if activated. Use the channel up/down keys to select your
desired setting. Press the F key again or PTT to exit the
menu. See page 21-23 for more information.
F + 8 FM - FM Radio
Press Fthen 8 FM to activate the FM Radio. Stations can be
manually selected by pressing the channel up/down keys,
select Scan (F + 3 SCN) to scan up to the next station.
While in FM mode, you can still receive CB Transmissions
& Transmit on your selected CB Channel. Once the
Transmission has completed, the FM Radio will resume
seconds. This feature can be disabled in the Main Menu,
Menu item 5 (page 16). To turn the FM Radio off, press F
then 8 FM again.

15
F Press & Hold – Keypad Lock
Keypad lock is a good setting to use once you have
configured the CB radio to your requirements.
Press and hold the Fkey for 2 seconds to activate the
keypad lock. Only the PTT/Transmit, instant squelch and
channel up/down functions are available when the keypad
is locked. Press and hold the Fkey for 2 seconds again to
deactivate the keypad lock.
NOTE:
The Emergency Siren is not operable while the keypad
lock is active.
7.0 MAIN MENU
7.1 MENU NAVIGATION
To navigate the Main CB Menu, please use the
following keys:
Press F + 9 SEL Enter Main Menu
Press Channel
Up/Down
Select menu item Up/Down
Press F To select menu item to be adjusted
Press Channel
Up/Down
To adjust menu item
Press F To confirm menu item selection
Press Channel
Up/Down
Continue to select menu item to be
adjusted
Press PTT/
Transmit
To exit menu

16
7.2 MAIN MENU FUNCTION OVERVIEW.
The following table lists all available Main Menu settings
on this CB. Please see detailed descriptions of selected
functions following the table.
MENU
ITEM LCD ID FUNCTION OPTIONS DEFAULT COMMENT
1Apo Auto Power
Off
OFF, 1-15
Hours OFF Select to automatically
power off CB
2bAt-SA Battery saver ON/OFF ON Prolongs battery life in
standby mode.
3bCLo Busy Channel
Lock ON/OFF OFF
Blocks transmission
if selected channel
is busy
4t-StoP Transmission
Stop ON/OFF OFF
Blocks transmission
on this channel if
selected
5rA-d8 Monitor CB in
Radio Mode ON/OFF ON
CB signals still
received when FM is
selected.
6tot Time Out
Timer 1-3 Minutes 3 Continual transmit
time limit.
7bEEP Key pad beep ON/OFF OFF
Turn on to hear a beep
when puttons are
pressed
8uo]CE Voice
Prompts ON/OFF OFF
Enables spoken
menus and channel
numbers.
9Abr
LCD
Backlight
Control
AUTO/OFF/
Cont AUTO Changes LCD
backlight operation
10 LoCk Keypad Lock
Options
ALL/Ptt/
KEY KEY
Control which
functions are locked
via keypad lock
11 CH-d9 n/a n/a n/a Not available
12 oFFsEt n/a n/a n/a Not available

17
MENU
ITEM LCD ID FUNCTION OPTIONS DEFAULT COMMENT
13 oPGSEt Power on
Message
OFF/DC/
NOTE OFF
Can select battery
voltage on startup or
message
14 PSd n/a n/a n/a Not available
15 dC Battery
Voltage n/a n/a Displays current
battery voltage
16 SCAn Scan Mode TO/CO CO Adjusts scan pause
time
17 voX-L VOX
Sensitivity 1-8 3 Adjusts sensitivity of
VOX activating
18 vox-d VOX End
Delay 0.5s - 5s 2s Delay when VOX stops
transmitting
19 roGEr Roger Beep ON/OFF OFF Roger beep when
transmission ends
20 StE Squelch Tail
Elimination ON/OFF OFF
Can emilinate noise
at the end of a
transmission
21 W]dnAr n/a n/a n/a Not available
22 deCodE n/a n/a n/a Not available
23 EnCodE n/a n/a n/a Not available
24 voX VOX
Handsfree ON/OFF OFF
Auto transmit for
Speaker/Microphones
etc
25 SqL Squelch Level 0-9 5 Adjusts squelch
sensitivity
26 txP Transmit
Power 1-3 3 1=0.5W, 2=3W and
3=5W

18
MENU
ITEM LCD ID FUNCTION OPTIONS DEFAULT COMMENT
27 StEP n/a n/a n/a Not available
28 S-d n/a n/a n/a Not available
29 SCnAdd Channels to
Scan ADD/DEL ADD Select channels to
scan.
30 tdr Dual/Single
Band Select ON/OFF ON Turn off/on dual band
reception
31 SAuECH n/a n/a n/a Not available
32 dELCH n/a n/a n/a Not available
33 bLEd Backlight
Delay 1s - 30s 6s Number of seconds
backlight remains on
34 Ct-dCS CTCSS/DCS
OFF/tone/
CTCSS/
DCS
OFF Use to select CTCSS
or DCS encryption
35 CHnANE n/a n/a n/a Not available
36 NSG n/a n/a n/a Not available
37 A-LoC Auto Keypad
Lock ON/OFF OFF Locks keypad after set
time (see below)
38 LOC-d Keypad Lock
Delay 1s - 30s 15s Adjusts delay time if
A-LoC is turned ON
39 r-bAnd Frequency
Range
76/87-
108Mhz
87-
108Mhz
Adjusts FM frequency
range.
40 r-StEP Radio Step 500/100K 100K Adjusts FM channel
step

19
MENU
ITEM LCD ID FUNCTION OPTIONS DEFAULT COMMENT
41 sa-RTO Battery Save
Level 1-1 to 1-9 1-4 No need to adjust for
standard use.
42 rP-StE n/a n/a n/a Not applicable
43 rPt-rL n/a n/a n/a Not applicable
44 Ptt-Id n/a n/a n/a Not applicable
45 PTT-Lt n/a n/a n/a Not applicable
46 SCr n/a n/a n/a Not applicable
47 SCr-no n/a n/a n/a Not applicable
48 AnI n/a n/a n/a Not applicable
49 AnI-ID n/a n/a n/a Not applicable
50 rESEt Reset Reset n/a Select to reset radio to
factory settings

20
8.0 ADDITIONAL FUNCTION INFORMATION
Busy Channel Lock: Menu Item 3
This feature can prevent Transmission on busy Channels.
Select ON and Transmissions will be blocked from the CB
if there is another Transmission occurring on the same
Channel. T-Stop will be displayed on the LCD screen if this
is the case to alert you that you are not Transmitting.
NOTE:
This setting applies to individual channels so select the
channel you wish to apply this setting to first.
Key Beep: Menu Item 7
To activate or deactivate a confirmation beep each time a
key or button is pressed on the CB, select ON/OFF for this
option.
VOX: Menu Item 24
VOX – Voice Activated Transmit allows you to talk handsfree
either just with the CB or using optional Speaker/
Microphone & Earpiece Microphones. To activate VOX, set
this function to ON.
The VOX Sensitivity, that is how loud your voice needs to
be before VOX transmission starts, is adjustable in Menu
Item: 17.
The amount of time until transmission stops after VOX is
triggered can be adjusted by Menu Item: 18.
This manual suits for next models
1
Table of contents
Other TRX Radio manuals

Popular Radio manuals by other brands


COMNET ERICSSON
COMNET ERICSSON PANTHER 300M installation manual

Silvercrest
Silvercrest SKR 800 B2 Operating instructions and safety instructions

Silvercrest
Silvercrest SWDR 500 B1 Operating instructions and safety instructions

Icom
Icom IC2e/a manual

MP-Man
MP-Man RT 3300 manual

Silvercrest
Silvercrest SKRP 1000 A1 operating manual


