Eton SOLARLINK FR500 User manual

SOLARLINK FR500
Self-Powered and Solar-Powered AM/FM/Shortwave Radio with
NOAA Weatherband, Flashlight, Siren and Cell Phone Charger
OWNER’S MANUAL


3
FR500 OWNER’S MANUAL
DO YOU NEED HELP?
If you need help, please contact us:
Monday-Friday, 8:30 a.m.-4:00 p.m., North American Pacific Time.
1-800-872-2228 from the U.S ; 1-800-637-1648 from Canada
650-903-3866, worldwide ; FAX: 650-903-3867 ; www.etoncorp.com
Etón Corporation, 1015 Corporation Way, Palo Alto, CA 94303, USA
WARNING
• Do not expose this appliance to rain or moisture.
• Do not submerge or expose for extended period to water.
• Protect from high humidity and rain.
• Only operate within specied temperature range (0 °C to 40 °C).
• Unplug immediately if liquid has been spilled or object have fallen into the
apparatus.
• Clean only with a dry cloth. Do not use detergents or chemical solvents as this
might damage the nish.
• Unplug and disconnect external antennas (not included) during lightning
storms.
• Do not remove cover [or back].
• Refer servicing to qualied service personnel.
Disposal
According to the European Directive 2002/96/EC all
electrical and electronic products must be collected
separately by a local collection system.
Please act according to your local rules and do not dispose of your old
products with your normal household waste.
ENVIRONMENT

FR500 OWNER’S MANUAL
4
The FR500 plays AM (520-1710 KHz), FM (88-108 MHz), SW (short-
wave, 5.8 – 12.2 MHz) and 7 NOAA Weather Channels:
Channel 1 162.400 MHz
Channel 2 162.425 MHz
Channel 3 162.450 MHz
Channel 4 162.475 MHz
Channel 5 162.500 MHz
Channel 6 162.525 MHz
Channel 7 162.550 MHz
MIN: Minute Adjusting
Power Supply Knob
Frequency Tuning Knob
Bouton de sélection des
bandes
Band Selecting Knob
DC in Jack (Adaptor)
Earphone Jack
Audio in Jack
PHONE CHARGER: USB Jack for
Charging the Cellphone (big)
DC in: USB Jack for Charging the
Radio (small)
Battery Compartment
Telescopic Antenna
Charging Light (left)
Power Light (right)
Multifunctional Knob
Hand Crank
Focus Lamp
Speaker
POWER: Power On/OFF
SLEEP: Sleep Power
SNOOZE: 5 Min Snooze
LIGHT: LCD Backlight
HR: HourAdjusting
TIME : clock adjust button
ALARM SET : set alarm time
AL/ON/OFF:open/close alarm function

FR500 OWNER’S MANUAL
5
FR500 OWNER’S MANUAL
VOLUME CONTROL
Turning the Volume Adjusting Knob (located on the lower right
of the radio) clockwise turns up the volume; counterclockwise turns
down the volume. Always turn down the volume before using
earphones.
POWERING AND TURNING ON THE FR500
The FR500 is powered with 3 AA batteries, the solar cell, the Dynamo
(rechargeable Ni-MH battery), the AC adapter (not included) or the DC
computer input. Select BATTERY, SOLAR or DYNAMO power with the
Power Supply Knob on the upper right side of the radio. The power
sockets are on the back of the radio, under the rubber covers. After
applying power, select the correct position with the Power Supply
Knob and by pressing the POWER button. Turn it off by placing the
Power Supply Knob in the Off position.
Note: the radio can be played while it’s charging.
BATTERY POWER
Install 3 AA batteries and set the power selector switch to the BAT-
TERY position.
POWER: Power On/OFF
SLEEP: Sleep Power
SNOOZE: 5 Min Snooze

FR500 OWNER’S MANUAL
6
SOLAR POWER
When you’re in sunlight set the power switch to the SOLAR position.
This position also recharges the Ni-MH rechargeable battery.
DYNAMO POWER
The rechargeable Ni-MH (nickel-metal-hydride) battery is in the battery
compartment. To use it plug the battery into the socket adjacent to
it, then set the power switch to the DYNAMO position. You may have
to charge the battery; to do this turn the crank for 90 seconds. The
rechargeable battery will eventually lose its ability to hold a charge.
Call Eton Corporation to order another one.
DC-IN 5V AC ADAPTER (not included)
This socket is located on the back of the radio, under the rubber plugs.
Plug in the AC adapter to the DC IN 5 volt socket. This also charges the
Ni-MH battery.
DC-IN USB COMPUTER SOCKET (USB cord not included)
This socket is located on the back of the radio, under the rubber plugs.
Plug in the AC adapter to the DC IN 5 volt socket. This also charges the
Ni-MH battery.

FR500 OWNER’S MANUAL
7
FR500 OWNER’S MANUAL
ANSWERS TO YOUR QUESTIONS
REGARDING CHARGING
How much operating time does hand cranking provide? Crank-
ing 120 times per minute, for 1 minute, plays the radio for about 4
minutes at low volume. Since volume is relative this may be higher or
lower depending on how loud the volume is.
How long does it take to fully charge the battery by hand
cranking? It is not practical to charge the battery via hand cranking.
Since the battery capacity is 600mAh (milliamp hours). Fully charging it
by cranking would take 3 hours at 120 turns per minute.
How do you switch from hand crank direct power to just
charging the battery? When in the OFF position, cranking or solar
cell is charging the cell phone or MP3; when the switch is at the other
3 positions, both the solar cell and cranking can charge the battery.
Can the solar cell power the radio on its own, or is it just used
to charge the battery? Yes, the solar cell can power the radio on its
own, and also charge the battery.
How long does it take the solar cell to charge the battery? It
will take 12-15 hours for the solar cell to charge the battery.
A fully charged battery will last about 6 hours at low volume when
receiving radio programs and about 5 hours at low volume when
receiving aircraft band.

FR500 OWNER’S MANUAL
8
ORDERING A CELL PHONE ADAPTER TIP
Send Eton Corporation a post card with your name, address and
preferably your email address (telephone number is OK). Include the
radio model and the brand and model of your cell phone (the model is
often found on the body of the cell phone, under the battery). The rst
adapter tip is free of charge; additional adapter tips are $5 each.
Alternately, you may call and order an adapter tip via our toll-free
number or send an email (go to www.etoncorp.com).
CHARGING CELL PHONES
If you revolve the Power Supply Knob to the OFF/PHONE CHAR-
GER position the radio will charge cell phones. Plug the cell phone
charging cord into the USB PHONE.
CHARGER
Jack at the rear of the radio. Plug the cell phone charging adapter tip
into the other end of the cord and then into the jack of the cell phone.
Then put the radio in the sun or revolve the hand crank to charge the
cell phone. About 10 minutes of cranking results in one or two short
emergency calls.

FR500 OWNER’S MANUAL
9
FR500 OWNER’S MANUAL
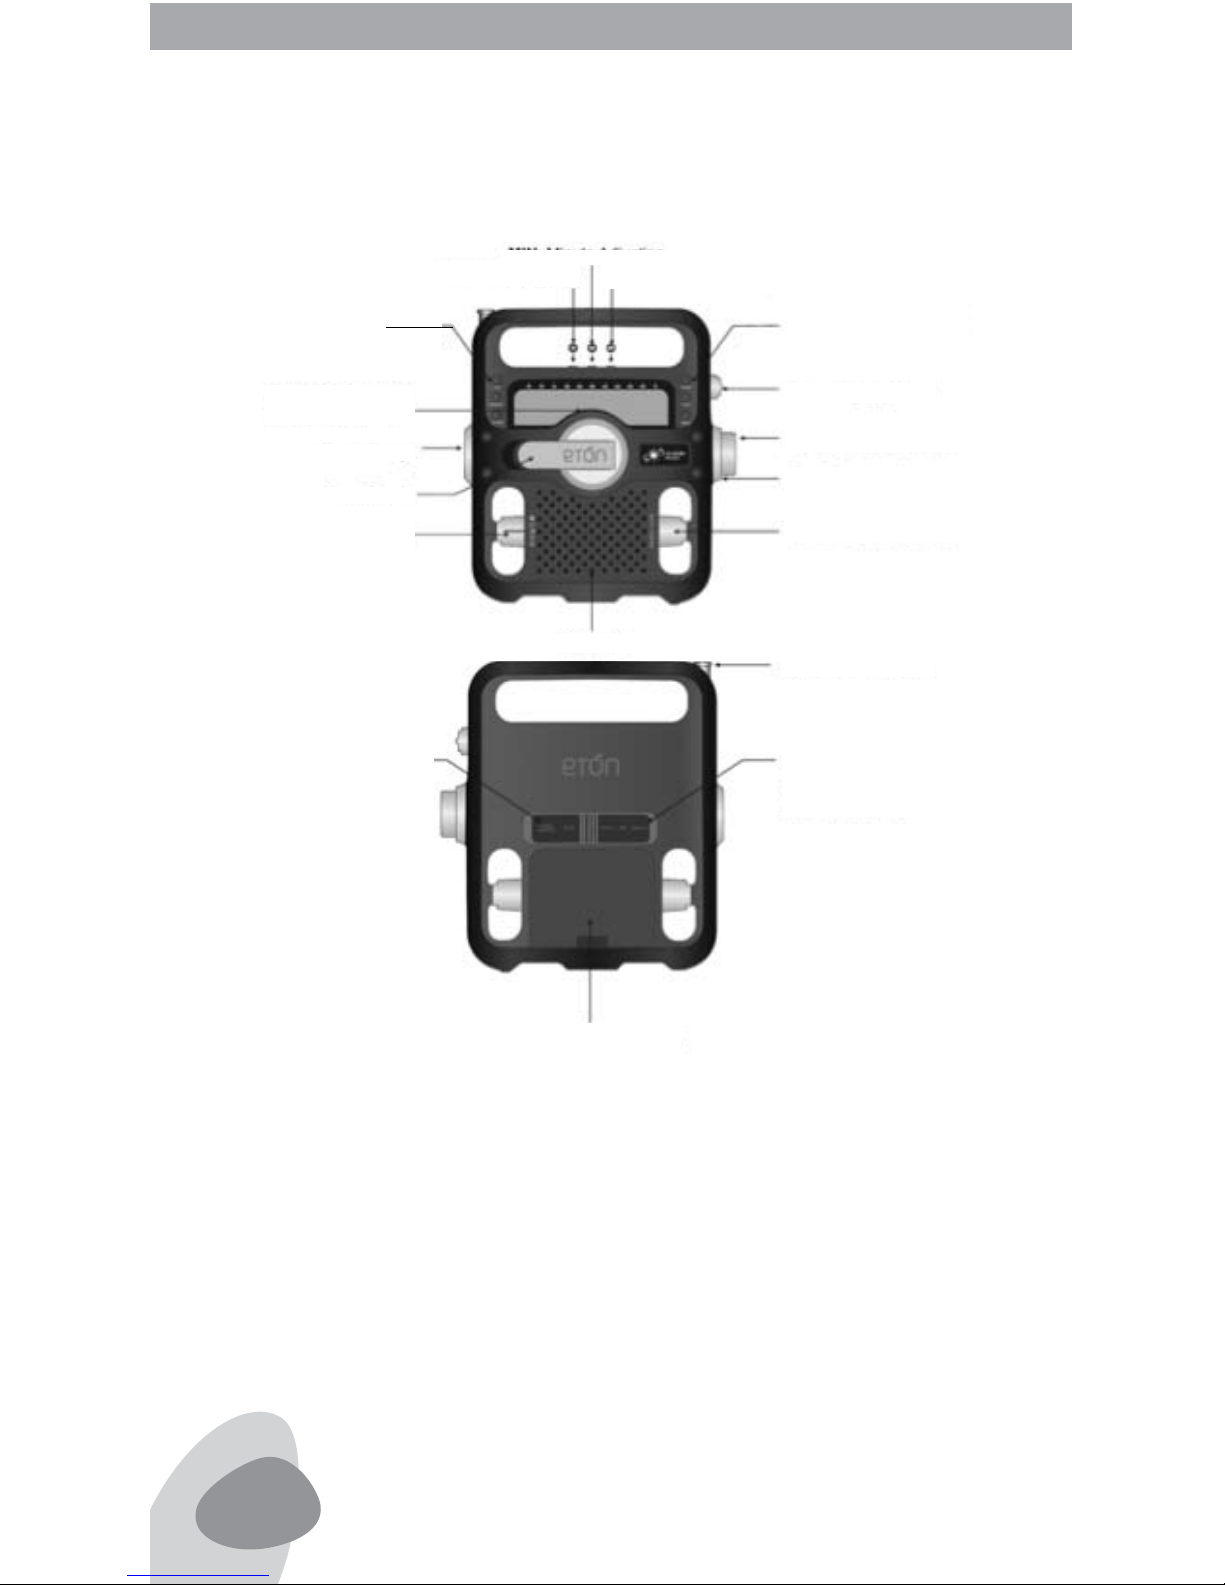
CHARGING AND POWER LIGHT
Charging Light
• If charged by turning the hand crank, the charging light is green.
• If charged by solar, the charging light is orange.
• If charged by the external adaptor, the charging light is red.
Power Light
• If the battery power is full, the power light is green.
• If the battery power is medium, the power light is orange.
• If the battery power is low, the power light is red, please charge.
LCD BACKLIGHT
Press the LIGHT button to turn on the LCD backlight. It will light for 5
seconds and then turn off.
SELECTING BANDS AND TUNING IN STATIONS
Turn the radio on. Select the band with the BAND Selection Knob
and by looking at the red light above the radio’s display. The red light
appears to the left of the band or the weather channel that you’ve
selected.
When listening to FM, Shortwave and Weather channels, pull up the
telescopic antenna all the way. When tuning AM stations the tele-
scopic antenna is not needed and can be lowered. Tune in stations by
revolving the Frequency Tuning Knob.
The weather frequencies are on channels WB1 through WB7. Try all
of them and nd the one that’s strongest; the strongest one is your
weather station. Tune to it before setting the Weather Alert feature,
described below.

FR500 OWNER’S MANUAL
10
SETTING THE WEATHER ALERT FEATURE
NOAA weather alerts warn you when a severe weather system is
approaching.
Turn on the radio and tune in the weather channel that has the
strongest signal. Then turn the Multifunction Knob (on the lower
left side of the front of the radio) up to the Weather Alert position
.Note that the weather alert LED lights up to the left of the weather
alert symbol above the display and to the farthest right. After you’ve
done this, the radio can be played on any other band, when an alert
comes it will be heard and you can change to the weather channel.
SETTING THE TIME AND ALARM
IThe clock is a 12-hour clock, showing PM in the display starting at
Noon. Turn off the radio. While pressing and holding the TIME or
ALARM SET button, toggle the HR button (located above the display)
to adjust the hour. Then toggle the MIN button (located above the
display) to set the minutes.
TURNING THE ALARM ON AND OFF
With the radio on or off press the AL ON/OFF button. Notice that
when it’s on, ALARM appears in the lower right of the display.

FR500 OWNER’S MANUAL
11
FR500 OWNER’S MANUAL
SNOOZE BUTTON
When the alarm activates, pressing the SNOOZE button deactivates it
for 5 minutes, then it starts again.
SLEEP FEATURE
The sleep timer can be activated with the radio turned on or off.
Activating the sleep timer enables the radio to play for 90, 60, 30 and
10 minutes, then shut off automatically.
To activate it press the SLEEP button (in the upper right corner of the
front of the radio). 90 minutes appears. If you don’t want it to play for
90 minutes, keep pressing the button over and over and notice that
the other minute selections appear. When it’s on the one you want,
stop pressing. The radio plays for the number of minutes and then
stops.

FR500 OWNER’S MANUAL
12
MULTIFUNCTION KNOB (lower left corner) CONTINUED
The function switch has ve positions. The top position is the ALERT
position, then the OFF, LIGHT, SOS and SIREN position. All positions
except OFF are labeled with an icon.
The ALERT position sets the Weather Channel alerts with the radio
on or off.
The OFF position turns the function switch off.
The LIGHT position turns the white lights on (left side of radio)
with the radio on or off.
The SOS position turns the red ashing light on. Can be used with
the radio on or off.
The SIREN position turns on the siren. Can be used with the radio
on or off.
EARPHONE JACK
Located on the back of the radio, under the rubber plugs. Plug in any
stereo earphones. Audio is heard in mono only. Always turn down the
volume before using earphone/headphoness.
AUDIO-IN JACK
Located on the back of the radio, under the rubber plugs, it enables
you to listen to other devices, such as an iPod, using a stereo 3.5 mm
(1/8 inch) cord to connected to it.

FR500 OWNER’S MANUAL
13
FR500 OWNER’S MANUAL
WARRRANTY REGISTRATION
To ensure full warranty coverage or product updates, registration of
your product should be completed as soon as possible after purchase
or receipt. You may use one of the following options to register your
product:
1. By visiting our website at http://www.etoncorp.com.
2. Mail in enclosed warranty card.
3. Mail your warranty card or information to following address; include
your name, full mailing address, phone number, email address, model
purchased, date purchased, retail vendor name:
Etón Corporation
1015 Corporation Way
Palo Alto, CA 94303 USA
LIMITED WARANTY
Retain the warranty information from your warranty card with your
proof of purchase or the Limited Warranty information can also be
viewed at www.etoncorp.com.
SERVICE FOR YOUR PRODUCT
To obtain service for your product, we recommend rst contacting
an Etón service representative at 1-800-872-2228 US, 1-800-637-
1648 Canada, (650) 903-3866, customersvc@etoncorp.com or your
respective country distributor in Europe (see enclosed list) for problem
determination and trouble-shooting. If further service is required, the
technical staff will instruct how to proceed based on whether the
radio is still under warranty or needs non-warranty service.

FR500 OWNER’S MANUAL
14
WARRRANTY
If your product is still in warranty and the Etón service representative
determines warranty service is needed, a return authorization will be
issued and instructions will be given. DO NOT ship your radio back
without obtaining the return authorization.
NON-WARANTY
If your product is no longer under warranty and requires service, the
Etón service representative will refer you to the nearest repair facility
that will best handle the repair.
For service outside North America, please refer to the distributor
information included at time of purchase/receipt.
NOTE FCC
The manufacturer is not responsible for any radio or tv interference
caused by unauthorized modications to this equipment. Such modi-
cations could void the user’s authority to operate the equipment.

FR500 OWNER’S MANUAL


17
FR500 MANUAL D’OPÉRATION
Vous avez besoin d’aide ?
Si vous avez besoin d’aide, contactez-nous SVP,
lundi-vendredi, 8:30 – 16:00, heure du Pacique nord-américain.
1-800-872-2228 des ÉU; 1-800-637-1648 du Canada;
650-903-3866, international; Télécopieur: 650-903-3867;
site web, www.etoncorp.com;
Etón Corporation , 1015 Corporation Way, Palo Alto, CA 94303, USA
AVERTISSEMENT
• Ne pas exposer cet appareil à la pluie à l’humidité.
• Ne pas plonger l’appareil dans l’eau ou le mettre en contact de l’eau pendant une période
prolongée.
• Protéger l’appareil en cas de pluie et de taux d’humidité élevé.
• Utiliser l’appareil uniquement en respectant la gamme de température spéciée
(0 °C à 40 °C).
• Débranchez immédiatement l’appareil si du liquide a été renversé ou si un objet est tombé
dans l’appareil.
• Nettoyer uniquement avec un chiffon sec. Ne pas utiliser de détergents ou de solvants
chimiques, vous risqueriez d’endommager le revêtement.
• Débranchez et déconnectez les antennes externes pendant les orages.
• Ne pas enlever le couvercle [ou l’arrière].
• Faire appel à un spécialiste pour d’éventuelles réparations.
Élimination
Conformément à la Directive Européenne 2002/96/EC, tous
les produits électriques et électroniques doivent être collec-
tés séparément par un organisme local de ramassage.
S’il vous plait, agissez en accord avec les règles locales et ne jetez pas
vos produits usagés avec vos déchets ménagers habituels.
ENVIRONNEMENT

FR500 MANUAL D’OPÉRATION
18
Le FR500 reçoit les ondes moyennes (AM, 520-1710 KHz), les ondes
ultracourtes (FM, 88-108 MHz), les ondes courtes (SW, 5.8 – 12.2 MHz)
et 7 canaux météorologiques NOAA :
Canal 1 162 400 MHz
Canal 2 162 425 MHz
Canal 3 162 450 MHz
Canal 4 162 475 MHz
Canal 5 162 500 MHz
Canal 6 162 525 MHz
Canal 7 162 550 MHz
min:programation des minutes
Bouton d’alimentation
électrique
Bouton de réglage des
fréquences
Bouton de sélection des
bandes
Bouton de réglage du volume
Prise DC in (adaptateur)
Prise pour oreillettes
Prise audio in
USB permettant de recharger
le téléphone portable (grande
taille)
DC in : prise USB permettant
de recharger
Compartiment des piles
Antenne télescopique
Lampe témoin de recharge
(à gauche)
Lampe témoin de fonction-
nement (à droite)
Bouton multifonction
Manivelle
Lampe focus
Bouton de réglage du volume
POWER : marche/ arrêt
SLEEP : minuterie d’endormissement
SNOOZE : répétition toutes les 5 min.
rétroéclairage LCD
programmation de l’heure
TIME : touche de program-
mation de l’heure
ALARM SET : programma-
tion de l’alarme
AL ON/OFF : activation/ dés-
activation de l’alarme

19
FR500 MANUAL D’OPÉRATION
REGLAGE DU VOLUME
Tournez le bouton de réglage du volume (situé sur la radio en bas
à droite) dans le sens des aiguilles d’une montre pour augmenter le
volume ; tournez-le dans le sens inverse des aiguilles d’une montre
pour baisser le volume. Baissez toujours le volume avant d’utiliser les
oreillettes.
MISE EN MARCHE DE LA FR500
La FR500 fonctionne avec 3 piles AA batteries, la cellule solaire, la dy-
namo (pile Ni-MH rechargeable), l’adaptateur AC (non fourni) ou l’entrée
DC USB. Sélectionnez le mode de fonctionnement BATTERY, SOLAR
ou DYNAMO à l’aide du bouton d’alimentation électrique situé sur la
radio en haut à droite. Les douilles se trouvent au dos de la radio sous
les protections en caoutchouc. Après avoir effectué le branchement
correspondant, sélectionnez la position correcte à l’aide du bouton
d’alimentation électrique et appuyez sur la touche POWER. Pour étein-
dre la radio, placez le bouton d’alimentation électrique en position Off.
Note : la radio peut être utilisée normalement pendant la recharge.
ALIMENTATION A PILES
Insérez 3 piles AA et placez le bouton d’alimentation électrique en
position BATTERY.
POWER : marche/ arrêt
SLEEP : minuterie d’endormissement
SNOOZE : répétition toutes les 5 min.

FR500 MANUAL D’OPÉRATION
20
ALIMENTATION SOLAIRE
Si vous vous trouvez dans la lumière du soleil, placez le bouton
d’alimentation électrique en position SOLAR. Cette position permet
également de recharger la pile Ni-MH rechargeable.
ALIMENTATION AVEC LA DYNAMO
La pile Ni-MH (nickel-métal-hydride) rechargeable s’insère dans le
compartiment des piles. Pour l’utiliser, branchez la pile dans la douille
adjacente, puis réglez placez le bouton d’alimentation électrique en
position DYNAMO. Il se peut que vous deviez recharger la pile ; pour ce
faire, tournez la manivelle pendant 90 secondes. La pile rechargeable
sera éventuellement difcile à recharger avec le temps. Dans ce cas,
contactez Eton Corporation pour en commander une autre.
ADAPTATEUR AC DC-IN 5V (non fourni)
Cette douille se trouve au dos de la radio sous les protections en
caoutchouc. Branchez l’adaptateur AC à la douille DC IN de 5 volts. Ceci
permet également de recharger la pile Ni-MH.
CONNEXION USB DC-IN (câble USB non fourni)
Cette douille se trouve au dos de la radio sous les protections en
caoutchouc. Elle permet de faire fonctionner la radio à partir d’un
ordinateur et également de recharger la pile Ni-MH. Branchez le câble
USB à l’ordinateur et aux connexions USB de la radio.
Other manuals for SOLARLINK FR500
3
Table of contents
Languages:
Other Eton Radio manuals

Eton
Eton FR250 User manual

Eton
Eton MICROLINK FR150 User manual

Eton
Eton Radio User manual

Eton
Eton Satellit 750 User manual

Eton
Eton FR1000 User manual

Eton
Eton FR1000 User manual

Eton
Eton BlackOut Buddy FR100 User manual

Eton
Eton FR250 User manual

Eton
Eton American Red Cross FR400 User manual

Eton
Eton SOLARLINK FR500 User manual

Eton
Eton SOLARLINKFR360 User manual

Eton
Eton Sound 100 User manual

Eton
Eton E5 User manual

Eton
Eton FRX5-BT User manual

Eton
Eton Microlink FR140 User manual

Eton
Eton ELITE 750 User manual

Eton
Eton FR250 User manual

Eton
Eton FIELD RADIO 550 User manual

Eton
Eton BlackOut Buddy FR100 User manual

Eton
Eton FR-300 User manual