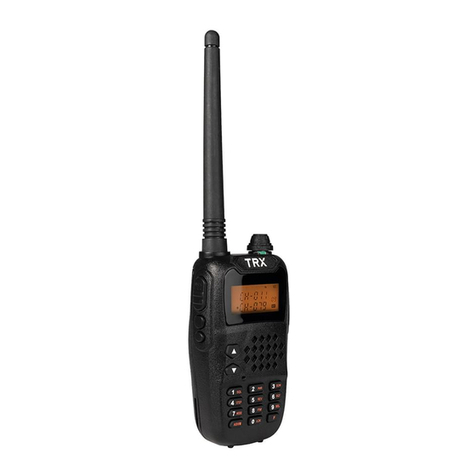
TRX TRX-05 Series User manual

USER MANUAL
TRX-05 SERIES UHF CB RADIO
TRX-05W


1
CONTENTS
1.0 CAUTIONS AND RECOMMENDATIONS................. 3
2.0 USER LICENSE INFORMATION............................ 4
3.0 INTRODUCTION................................................... 4
3.1 Features ........................................................ 5
3.2 Product Overview .......................................... 6
3.3 LCD Screen ................................................... 7
4.0 GETTING STARTED ............................................. 7
4.1 Battery Information ...................................... 7
4.2 Inserting The Batteries................................. 8
5.0 USING RECHARGEABLE BATTERIES................... 8
6.0 OPERATION ........................................................ 9
6.1 Power ON/OFF .............................................. 9
6.2 Adjusting The Volume .................................. 9
6.3 Low Battery Level Indicator.......................... 9
6.4 Transmitting/Receiving................................. 9
6.4.1 Receive.............................................. 9
6.4.2 Transmit.......................................... 10
6.5 Changing Channels..................................... 10
6.6 CTCSS Privacy Channels ............................ 11
7.0 VOX (HANDS FREE FUNCTION) ......................... 11
7.1 Channel Scan .............................................. 12
7.2 Squelch Off Function .................................. 13
7.3 Call Tones.................................................... 13

2
7.4 Roger Beep ................................................. 13
7.5 Backlit Display ........................................... 14
7.6 Battery Save Function................................. 14
7.7 Built-In Led Torch....................................... 14
7.8 Button Lock ................................................ 14
7.9 Specifications.............................................. 15
7.10 UHF Channels & Frequencies .................... 15
7.11 UHF Frequency List .................................... 17
8.0 WARRANTY TERMS & CONDITIONS ................. 19
9.0 NOTES .............................................................. 21

3
1.0 CAUTIONS AND RECOMMENDATIONS
• This UHF CB Handheld Radio is not waterproof.
Do not use near or around water or moisture.
• If you carry any kind of personal medical
device, please consult a doctor before using
the Radios.
• Do not use the Radios in a potentially explosive
setting (e.g. around pumps, on the lower deck
of a boat or around a fuel storage area or
around chemical products), or near blasting
caps.
• Ensure Radios are turned off if on an airplane
or in a hospital.
• Please seek advice from your Physician if you
intend to use this CB in proximity to Medial
Devices such as Pacemakers, Hearing Aids etc
to ensure they are adequately shielded from
RF energy.
• To avoid interference, avoid using the Radios
near traditional radios.
• Clean the Radios with a damp cloth. Don’t use
any cleaning agents or solvents for cleaning.
• Do not modify the Radios in any way. In the
event of damage occurring, ensure that the
Radios are checked by a qualified professional.
• Remove the batteries when Radios are not used
for an extended period of time.
• Do not mix used and new batteries to power
the Radios.
• Please note that the Radios cannot be used to
contact the emergency services.

4
2.0 USER LICENSE INFORMATION
The Citizen Band Radio Service (CBRS) is a two-
way, short distance, communications service that
can be used by any person in Australia and New
Zealand, whether it is for recreational or domestic
purposes, or in connection with work or business.
CBRS may be used for:
1. Any form of voice communications activity
2. Telemetry and telecommand applications.
This unit complies with Australian and New
Zealand approval requirements AS/NZS 4365:2011
including radio communications (Electromagnetic
Radiation Human Exposure) standard 2003.
3.0 INTRODUCTION
Thank you for purchasing this TRX-05XX series
UHF 80 Channel CB Radio. Light and easy to use,
TRX compact UHF CB’s are ideal for kids and
family activities. Featuring an inbuilt LED torch,
these UHF CB’s are great for camping, holidays,
workplaces and anywhere reliable short-range
communication is required.
Please read through the instructions carefully to
ensure you get the most out of your new CB.

5
3.1 FEATURES
• Up to 3km* communication range
• 80 channels
• 0.5W Transmit power
• Backlit LCD display
• Battery Level display
• Channel scan
• VOX (Hands free function)
• Auto Squelch
• 10 different call tones
• 38 CTCSS Privacy codes
• Squelch off function
• Integrated LED torch
• Button lock
• Uses AAA Alkaline and rechargeable batteries.
Includes USB cable for recharging batteries
(please only use NiMH rechargeable AAA
batteries).
*In an open area. Range may vary due to
environmental and/or topographical conditions.
NOTE: Each UHF CB Handheld Radio requires 3 x
AAA batteries (not included).

6
3.2 PRODUCT OVERVIEW
19
10
113
12
8
5
6
7
2
4
1. PPT (Transmit)
Button
2. Power On/Off
Button
3. Channel Down /
Squelch Button
4. Speaker
5. Antenna
6. LED Torch
7. Menu / Lock Button
8. LCD Screen
9. Microphone
10. Torch Button
11. Channel Up / Scan
Button
12. USB Charging Port

7
3.3 LCD SCREEN
4.0 GETTING STARTED
4.1 BATTERY INFORMATION
1. Each Radio uses 3 x AAA alkaline or 3 x
rechargeable AAA batteries for power (not
included).
2. We highly recommend the use of superior
quality batteries for maximum life and range.
3. To avoid damage to the radio do not mix old and
new batteries.
4. To prevent the batteries from deteriorating,
remove them from the radio if it will not be
used for a long period of time.
1
2
3
4
5
1. Channel Indicator
2. Battery Level
Indicator
3. CTCSS Code / OFF
4. Transmit/Receive
Indicator
5. Volume Level

8
4.2 INSERTING THE BATTERIES
1. Ensure the Radio is turned off before inserting/
replacing batteries.
2. Remove the rear belt clip from the device. To
remove the belt clip, pinch and hold belt clip at
the top of the CB and slide the belt clip up.
3. Remove the battery cover by sliding it down
while pressing the cover arrows then lift it
away.
4. Insert 3 x AAA batteries according to
the polarity symbols inside the battery
compartment.
5. Replace the battery cover by placing it on the
back of the CB radio and slide upwards until it
locks in place.
6. Re-install the belt clip as required.
5.0 USING RECHARGEABLE BATTERIES
TRX CB radios can be powered using rechargeable
Ni-MH batteries and are supplied with a direct USB
charging cable for each CB.
NOTE: You can only use the direct USB charging
cable for rechargeable batteries. Do not attempt to
recharge non-rechargeable batteries as this may
result in battery leakage and CB damage.
1. To recharge rechargeable batteries ensure they
are in their correct position inside the Radio
with the battery cover inserted.
2. Insert the micro USB cable into the Radio then
insert the other end of the cable into the power

9
source port. Charging time is approximately
12 hours.
6.0 OPERATION
6.1 POWER ON/OFF
1. Switch on the Radio: Press the Power button
The CB will beep the indicate it is powered up
and the LCD screen will illuminate .
2. Switch off the Radio: Press and hold on the
Power button for 3 seconds until you hear a
beep sound.
6.2 ADJUSTING THE VOLUME
1. To increase the volume, press the Up button.
2. Press the Down button to decrease the
volume.
3. The volume level can be seen on the Volume
Level Indicator
6.3 LOW BATTERY LEVEL INDICATOR
When the battery level gets low, the battery icon
on the LCD screen will flash and a beep sound will
be made indicating that the batteries need to be
replaced (for disposable batteries) or recharged
(for rechargeable batteries).
6.4 TRANSMITTING/RECEIVING
6.4.1 RECEIVE
NOTE: The radio is always in standby mode when
it is turned on and not transmitting. When a signal
is received on the current channel, the LCD will
display this via the Transmit/Receive indicator.

10
6.4.2 TRANSMIT
When you press the PTT Transmit button, the Radio
switches to Transmission mode.
1. Hold the device in a vertical position with the
Microphone 3-5cm away from your mouth.
2. While holding the PTT button, speak into the
microphone in a normal tone of voice.
3. Release the PTT button when you have finished
transmitting.
NOTE: For others to receive your transmission,
they must be on the same channel (and CTCSS
code if selected) as you.
NOTE: The optimal transmit range for this CB
is achieved in flat, open outdoor areas. This is
reduced where there are obstructions such as
buildings or rough terrain, or when the CB is
used in confined spaces such as vehicle to vehicle
communications.
Do not use these CB’s when less than 1.5m apart
as this may cause interference.
6.5 CHANGING CHANNELS
1. Press the MENU button once. The channel
number will flash on the LCD screen.
2. Press the UP /DOWN button to change the
channel.
3. Press the PTT button briefly to confirm the
channel and return to standby mode.
NOTE: If no button is pressed within 10 seconds
during channel setting, the Radio will return to
standby mode.

11
6.6 CTCSS PRIVACY CHANNELS
Continuous Tone-Coded Squelch System or
CTCSS is used to reduce the annoyance of
listening to other users on a shared two-way radio
communications channel. It is sometimes referred
to as privacy channels or sub-channels since it
has the effect of creating multiple virtual channels
which are all using the same radio frequency. It
does not encrypt the transmission, rather it mutes
other transmissions on the same CB channel that
are not transmitting using a CTCSS virtual channel.
To activate:
1. Press the MENU button twice. The current
CTCSS code will flash on the display.
2. Press the UP /DOWN button to change the
code. There are 38 available codes.
3. Press the PTT button to confirm and return to
standby mode.
4. Individual channels can be assigned different
CTCSS codes.
5. Always ensure the CB’s are set to the same
CTCSS code (or set to OFF – shown as “OF” on
the LCD display) otherwise you will not hear the
transmissions from the other CB’s.
7.0 VOX (HANDS FREE FUNCTION)
In VOX mode, the radio will transmit a signal when
it is activated by your voice or other sound around
you. To activate this function:

12
1. Press the MENU button three times: the
current VOX setting – “OF”, “1”, “2” or “3” - will
flash on the display with the VOX icon.
2. Press UP button to set the VOX sensitivity
level. - There are three levels – 1, 2, 3. Level 3
is the highest sensitivity level
3. Press DOWN button until “OF” appears on the
display to turn off VOX
4. Press the PTT button to confirm VOX level
chosen and return to standby mode.
5. VOX Operation is not recommended if you use
your device in a noisy or windy environment.
NOTE: VOX mode will be overridden when you
press the PTT button.
7.1 CHANNEL SCAN
Channel Scan is useful to scan the available CB
channels to either find who is transmitting nearby
or to find a free channel to transmit on.
1. Press and hold the UP button 2 seconds. The
“SCAN” function indicator will appear on the
LCD screen display and the channel will scan
continuously. Once an active channel is found,
the scanning will stop and you can listen to the
transmission.
2. When the transmission on the found channel
stops, the scanning will resume automatically.
NOTE: If you press PTT button while listening to a
found channel, the device will go back to standby
mode on the found channel.

13
7.2 SQUELCH OFF FUNCTION
Squelch blocks the background noise while there
are no transmissions on the selected channel
present. For weak signals, you can disable squelch
by pressing and holding the DOWN button.
7.3 CALL TONES
Call tones are a separate tone that can be
transmitted by the CB to alert other listeners that a
transmission is just about to commence. The Radio
has 10 different selectable call tones.
1. Press the MENU button 4 times until “CA” is
displayed on the LCD screen display and on
the current call tone number (or off setting) is
displayed.
2. Press the UP /DOWN button to scroll
through the different call tones available.
3. Press the PTT button to confirm your selected
call tone and return to standby mode.
4. To send a call tone, press the PTT button
briefly. A call tone is then sent. Once the call
tone stops, press the PTT button again to re-
commence transmission.
5. The call tone will only be sent again once there
is a pause of 20 seconds or more between
transmissions.
7.4 ROGER BEEP
After the PTT button is released at the end of a
transmission, the Radio can send out a Roger beep
to confirm that you have stopped talking.

14
1. Press the MENU button 5 times: “RO” will be
displayed on the LCD screen.
2. Press the UP /DOWN button enable or
disable the Roger beep – turn it ON or OFF.
3. Press the PTT button to confirm your selection
and return to the standby mode.
7.5 BACKLIT DISPLAY
Press any button to activate the LCD backlight.
The back light stay activated for approximately 5
seconds.
7.6 BATTERY SAVE FUNCTION
When the Radio has not been used for 6 seconds,
battery save mode is automatically activated. This
does not affect reception or transmission and
standby mode is automatically re-activated as soon
as a signal is detected.
7.7 BUILT-IN LED TORCH
The Radio has a built-in LED light that can be used
for lighting needs. Press the LED Light Button
when required.
7.8 BUTTON LOCK
1. Press and hold MENU button for 3 seconds to
lock the device.
2. Press and hold MENU button for 3 seconds to
unlock the device.

15
7.9 SPECIFICATIONS
7.10 UHF CHANNELS & FREQUENCIES
LEGALLY RESTRICTED
Channel 5 and 35
These are reserved as Emergency channels and
should only be used in an Emergency.
Channels 22 and 23
These are reserved for telemetry, telecommand
and packet data. Transmission on these channels
is blocked on this CB.
Channels 61, 62 and 63
Reserved for future allocation and Transmission on
these channels is blocked on this CB.
SPECIAL USE
Channel 10
4WD Clubs or convoys and National Parks
Channel 11
Is the calling channel and should be used to initiate
contacts/conversations. Once this is done, you
should then change to a free channel.
Channels:
80
Frequency:
476.4250 – 477.4125
Mhz
Range:
Up to 3km in an
open area
RF Output Power:
0.5W max
Battery:
3 x AAA (not included)

16
Channel 18
RV – Caravanner and Campers Convoy Channel
Channel 29
HWY – road safety channel Pacific Hey, Pacific
Motorway (NSW & QLD)
Channel 40
Australia wide road safety channel – primarily used
by Truckies and Pilot Vehicles.
GENERAL CHANNELS
Channels 1-8 & 31-38 plus 41-48 & 71-78
Duplex Channels. These channels are used for
Duplex operation in areas where there is a repeater
which provides extended range. If there is no
repeater in the area, these channels can also be
used for standard communication.
NOTE: This CB Radio does not have Duplex
operation.
Channels 9, 12-17, 19-21, 24-28, 30, 39, 49-60 &
79-80
General communication channels at all times.

17
7.11 UHF FREQUENCY LIST
Below is a complete listing of the channels
available and their corresponding frequencies:
CHANNEL FREQUENCY
Channel 1 476.4250
Channel 2 476.4500
Channel 3 476.4750
Channel 4 476.5000
Channel 5 476.5250
Channel 6 476.5500
Channel 7 476.5750
Channel 8 476.6000
Channel 9 476.6250
Channel 10 476.6500
Channel 11 476.6750
Channel 12 476.7000
Channel 13 476.7250
Channel 14 476.7500
Channel 15 476.7750
Channel 16 476.8000
Channel 17 476.8250
Channel 18 476.8500
Channel 19 476.8750
Channel 20 476.9000
Channel 21 476.9250
CHANNEL FREQUENCY
Channel 22 476.9500
Channel 23 476.9750
Channel 24 477.0000
Channel 25 477.0250
Channel 26 477.0500
Channel 27 477.0750
Channel 28 477.1000
Channel 29 477.1250
Channel 30 477.1500
Channel 31 477.1750
Channel 32 477.2000
Channel 33 477.2250
Channel 34 477.2500
Channel 35 477.2750
Channel 36 477.3000
Channel 37 477.3250
Channel 38 477.3500
Channel 39 477.3750
Channel 40 477.4000
Channel 41 476.4375
Channel 42 476.4625

18
UHF FREQUENCY LIST CONT'
CHANNEL FREQUENCY
Channel 43 476.4875
Channel 44 476.5125
Channel 45 476.5375
Channel 46 476.5625
Channel 47 476.5875
Channel 48 476.6125
Channel 49 476.6375
Channel 50 476.6625
Channel 51 476.6875
Channel 52 476.7125
Channel 53 476.7375
Channel 54 476.7625
Channel 55 476.7875
Channel 56 476.8125
Channel 57 476.8375
Channel 58 476.8625
Channel 59 476.8875
Channel 60 476.9125
Channel 61
Channel 62
Channel 63
Channel 64 477.0125
Channel 65 477.0375
CHANNEL FREQUENCY
Channel 66 477.0625
Channel 67 477.0875
Channel 68 477.1125
Channel 69 477.1375
Channel 70 477.1625
Channel 71 477.1875
Channel 72 477.2125
Channel 73 477.2375
Channel 74 477.2625
Channel 75 477.2875
Channel 76 477.3125
Channel 77 477.3375
Channel 78 477.3625
Channel 79 477.3875
Channel 80 477.4125
This manual suits for next models
1
Table of contents
Other TRX Radio manuals
