manuals.online logo
Brands
  1. Home
  2. •
  3. Brands
  4. •
  5. Groov-e
  6. •
  7. Radio
  8. •
  9. Groov-e Venice GV-DR04-BK User manual

Groov-e Venice GV-DR04-BK User manual

Other Groov-e Radio manuals

Groov-e GVSP480 User manual

Groov-e

Groov-e GVSP480 User manual

Groov-e Paris GV-DR03-BK User manual

Groov-e

Groov-e Paris GV-DR03-BK User manual

Groov-e VENICE User manual

Groov-e

Groov-e VENICE User manual

Groov-e Paris GV-DR03-BK User manual

Groov-e

Groov-e Paris GV-DR03-BK User manual

Groov-e GV-DR01 User manual

Groov-e

Groov-e GV-DR01 User manual

Groov-e GV-DR02 User manual

Groov-e

Groov-e GV-DR02 User manual

Popular Radio manuals by other brands

Grundig G6 AVIATOR owner's manual

Grundig

Grundig G6 AVIATOR owner's manual

Makita DMR114 instruction manual

Makita

Makita DMR114 instruction manual

PURE Move R3 manual

PURE

PURE Move R3 manual

Motorola CP040 Detailed service manual

Motorola

Motorola CP040 Detailed service manual

Bosch GPB18V-5C Operating/safety instructions

Bosch

Bosch GPB18V-5C Operating/safety instructions

Ocean Digital WR-230 user manual

Ocean Digital

Ocean Digital WR-230 user manual

Realistic TRC-457 owner's manual

Realistic

Realistic TRC-457 owner's manual

Uniden AX 144 owner's manual

Uniden

Uniden AX 144 owner's manual

SIGNIFY EA2173 instruction manual

SIGNIFY

SIGNIFY EA2173 instruction manual

auna multimedia 10026443 user manual

auna multimedia

auna multimedia 10026443 user manual

GME TX680 instruction manual

GME

GME TX680 instruction manual

Motorola MTM5 00 Series Basic service manual

Motorola

Motorola MTM5 00 Series Basic service manual

Tivoli Audio ONE+ owner's manual

Tivoli Audio

Tivoli Audio ONE+ owner's manual

Sirius Satellite Radio SDVK1 installation guide

Sirius Satellite Radio

Sirius Satellite Radio SDVK1 installation guide

Sirius XM RAdio EDGE user guide

Sirius XM RAdio

Sirius XM RAdio EDGE user guide

Trevi XF 100 user guide

Trevi

Trevi XF 100 user guide

EisSound KBSound iSelect user manual

EisSound

EisSound KBSound iSelect user manual

Kirisun DM588-02 user manual

Kirisun

Kirisun DM588-02 user manual

manuals.online logo
manuals.online logoBrands
  • About & Mission
  • Contact us
  • Privacy Policy
  • Terms and Conditions

Copyright 2025 Manuals.Online. All Rights Reserved.

Important safety information
• Keep the product and all its parts out of reach of small children.
• Do NOT leave it in high temperatures as electronic devices and plastic parts may warp in heat. No naked
flame sources, such as lighted candles, should be placed on the product.
• Do NOT leave it in low temperatures as moisture can form inside the product, which may damage the
circuit board.
• Do NOT attempt to open the product. This product does not contain any user serviceable parts.
Unauthorised handling of the device may damage it and will void your warranty.
• Disconnect your Radio from the mains power supply during thunderstorms.
• Always check that you have completely switched off your Radio, before you change or disconnect the
power supply.
• If the Radio will not be used for a long period of time, make sure that all of the batteries are removed from
the battery compartment and the mains power is unplugged.
• Never throw batteries in a fire or attempt to open the outer casing. Batteries should not be exposed to
excessive heat such as sunshine, fire or the like. Dispose of old batteries carefully.
• Batteries are harmful if swallowed, so keep away from young children.
Only use the power supply that came with the product. The specified external adaptor (Shenzhen KEYU
Power Supply Technology Co. Ltd. Model name: KA1508-0501000BSS). Using an unauthorised power
supply will invalidate your guarantee and may irrecoverably damage the product.
Caution: Danger of explosion if batteries are incorrectly replaced. Replace only with the same or
equivalent type.
Warning: To prevent possible hearing damage, do not listen to this radio at high volume levels for
long periods of time.
Setting up
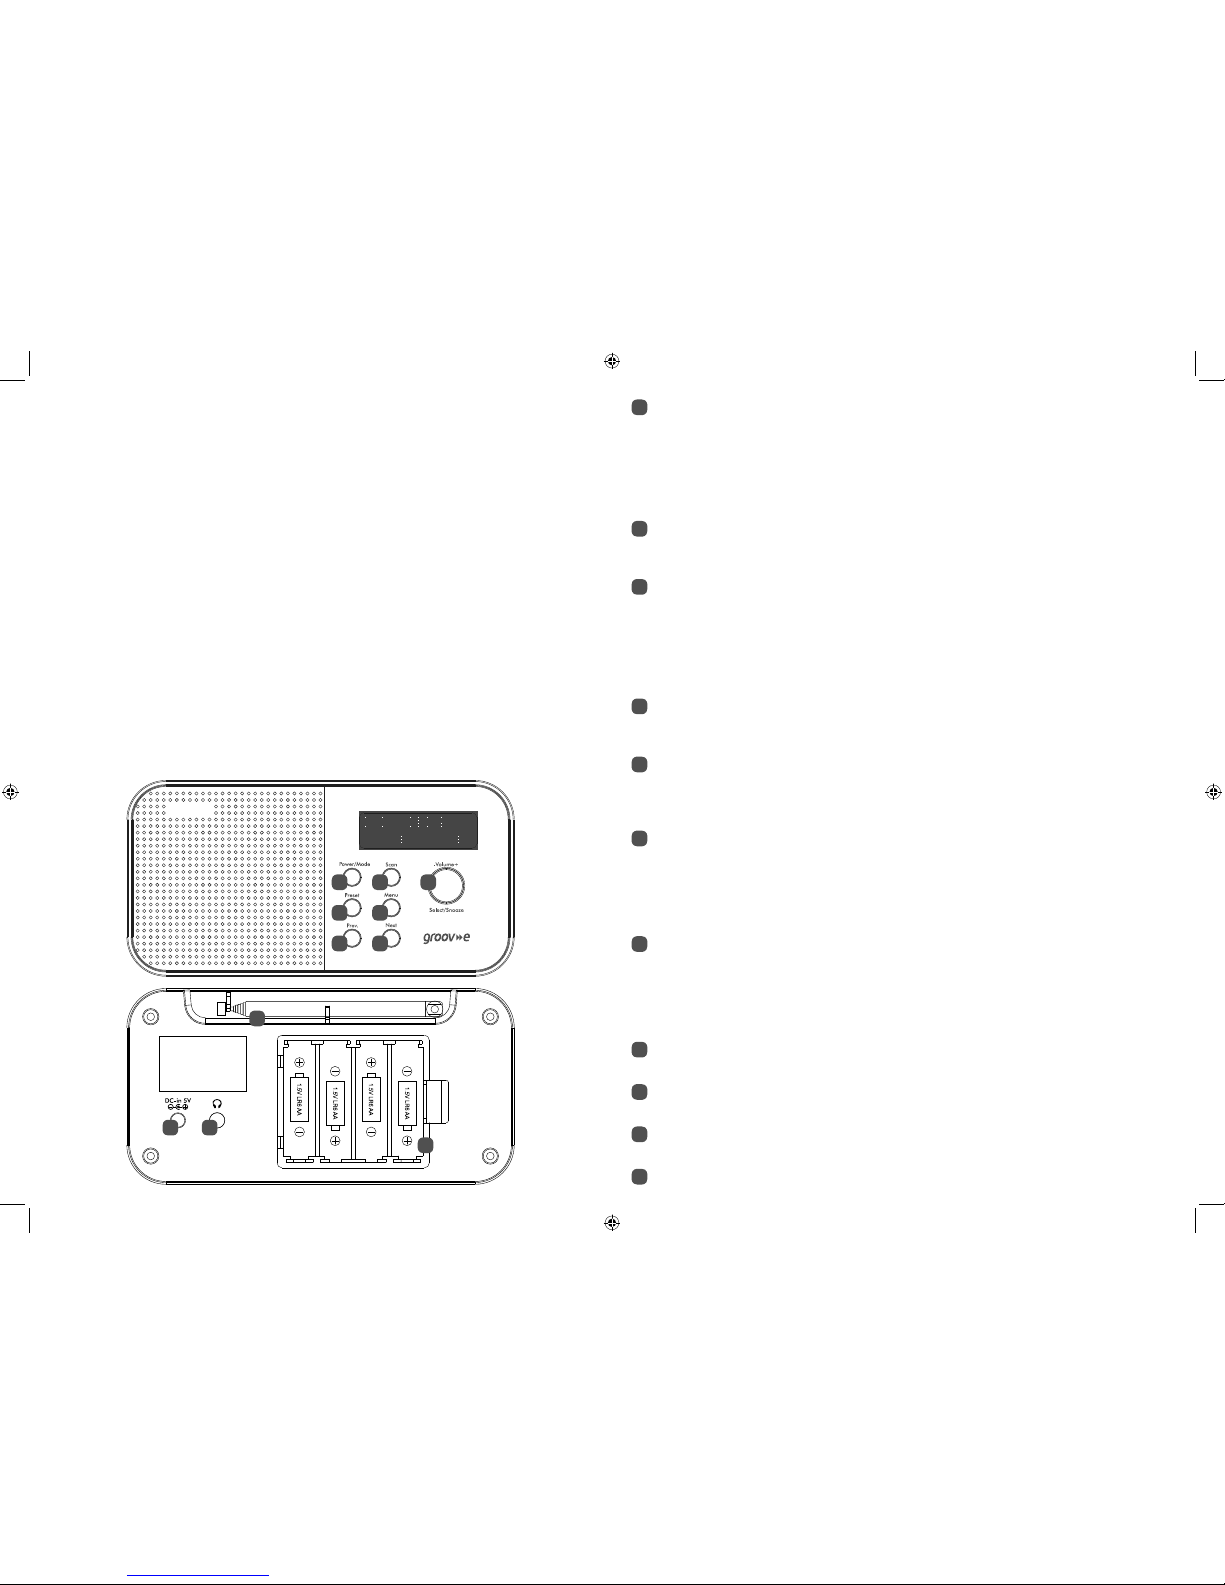
1. Connect the mains power lead into the socket on the back of the radio and fully extend the telescopic aerial
in a vertical position to obtain the maximum signal strength.
2. Plug the power adaptor into the mains power wall socket and switch on.
3. Short press the Power button. Your radio will switch on and on first use will begin an automatic scan for
DAB radio stations. The DAB radio station list is stored in the memory and so the next time you switch your
radio on, the station search does not take place.
4. Use the Prev. and Next buttons to scroll through the station list and press the rotary control to Select.
Inserting the batteries (optional)
Before installing the batteries (not included) please ensure that the radio is switched off and is unplugged from
the mains power supply.
1. On the back of the radio, push in the tab to release and remove the battery compartment cover. Insert 4 x
AA good quality alkaline batteries, making sure to note the ‘+’ and ‘-‘ markings and position the batteries the
correct way around. Replace the battery cover, making sure it ‘clicks’ shut.
2. For battery operation, please switch off the mains adaptor and remove the mains power plug from the back
of the radio.
Guarantee
This product is guaranteed for twelve months from the date of original purchase. Any defect that arises due to
faulty materials or workmanship will be repaired free of charge (or if applicable the product will be replaced or
the purchase price refunded) where possible during this period by the dealer from who your purchased the unit.
Groov-e, Unit J, Braintree Road, Ruislip, HA4 0EJ. www.groov-e.co.uk Tel: +44 (0)20 8845 7704
Disposal
This product should not be treated as normal household waste and it should be recycled. Please take it
to your nearest collection facility or for further details contact your local council or visit www.recycle-
more.co.uk.
Batteries contain substances that may be harmful to the environment and human health. Keep out of
the reach of children and seek immediate medical help if swallowed.
Batteries should not be disposed of in the normal household waste but taken to appropriate local
recycling facilities, where and when these are available.
Never throw batteries in a fire or attempt to open the outer casing.
Declaration of Conformance
Hereby, Groov-e declares that this product is in compliance with the essential requirements and other
relevant provisions of the Radio Equipment Directive 2014/53/EU.
Model: GV-DR04-BK
DAB: Band III, 174MHz - 240MHz
FM: 87.5MHz - 108MHz
Power/Mode
Short press: Power on.
Short press: Change the mode (DAB/FM).
Short press when the Alarm sounds: Alarm off
Long press: Standby mode.
Long press in Standby mode: Power off.
Preset: Long press: Store DAB or FM radio presets (10 DAB/10 FM). Press rotary control to confirm.
Short press: Recall stored DAB or FM radio presets. Press rotary control to confirm.
Rotary volume control/Select/Snooze:
Turn clockwise to increase the volume.
Turn anti-clockwise to decrease the volume.
Short press: Select a displayed DAB radio station in the station list/Select or confirm an option in
the Menu/Confirm or Select a radio Preset.
Short press when the Alarm sounds: Activates a 10 minute Snooze.
Menu: Long press: Enter the Menu options.
Short press: Change the displayed radio station information.
Short press within the menu: Steps back and exits the Menu.
Prev: Short press in DAB mode: Moves back through the DAB station list.
Short press in FM mode: Moves down the frequency band in 0.05MHz steps.
Short press in the Menu: Moves through the Menu options.
Short press in Preset Store or Recall: Moves through the presets (1-10)
Long press in FM mode: Scans down the frequency band.
Next: Short press in DAB mode: Moves forward through the DAB station list.
Short press in FM mode: Moves up the frequency band in 0.05MHz steps.
Short press in the Menu: Moves through the Menu options
Short press in Preset Store or Recall: Moves through the presets (1-10)
Long press in FM mode: Scans up the frequency band.
Telescopic antenna: Fully extend the antenna before you scan for DAB or FM stations.
Battery option: Requires 4 x AA alkaline batteries (not supplied).
Power socket
3.5mm Stereo Headphone socket
Scan: Short press in DAB mode: Rescans for DAB stations.
Short press in FM mode:Scans up the FM Frequency band.
Setting an Alarm
In DAB or FM mode:
1. Long press the Menu button to enter the Menu options.
2. Short press the Prev or Next buttons to scroll to ‘<System>’. Short press the rotary control.
3. Short press the Prev or Next buttons to scroll to ‘<Alarm>’. Short press the rotary control.
4. ‘<Alarm 1> is displayed’. Short press the rotary control or use the Prev or Next button to scroll to ‘<Alarm 2>’
(if required) and short press the rotary control.
5. ‘Alarm 1 (or 2) Setup’ is displayed. Short press the rotary control. ‘Alarm 1 (or 2) Wizard On time’ is displayed
and the hour digits for the alarm will flash.
6. Use the Prev or Next buttons to scroll and short press the rotary control to change and confirm the alarm
time, each alarm option and setting.
7. When you have completed the Alarm set up, ‘Alarm 1 (or 2) Wizard’ is displayed again, together with ‘Alarm
Off (or On)’.
8. Use the Prev or Next buttons to choose ‘Alarm On’ or ‘Off’ and short press the rotary control. ‘Alarm Saved’ is
displayed.
Stop the Alarm
When the alarm sounds, short press the Power/Mode button, ‘Alarm off’ is displayed. Alternatively, you can short
press the rotary control to Snooze (see Snooze function below).
Snooze
When the alarm sounds, you can short press the rotary control to snooze for 10 minutes. A snooze time
countdown will be displayed until the alarm sounds again.
1
9
2
3
4
5
6
7
8
11
10
1 2 3
4 5
6 7
8
9 10
11