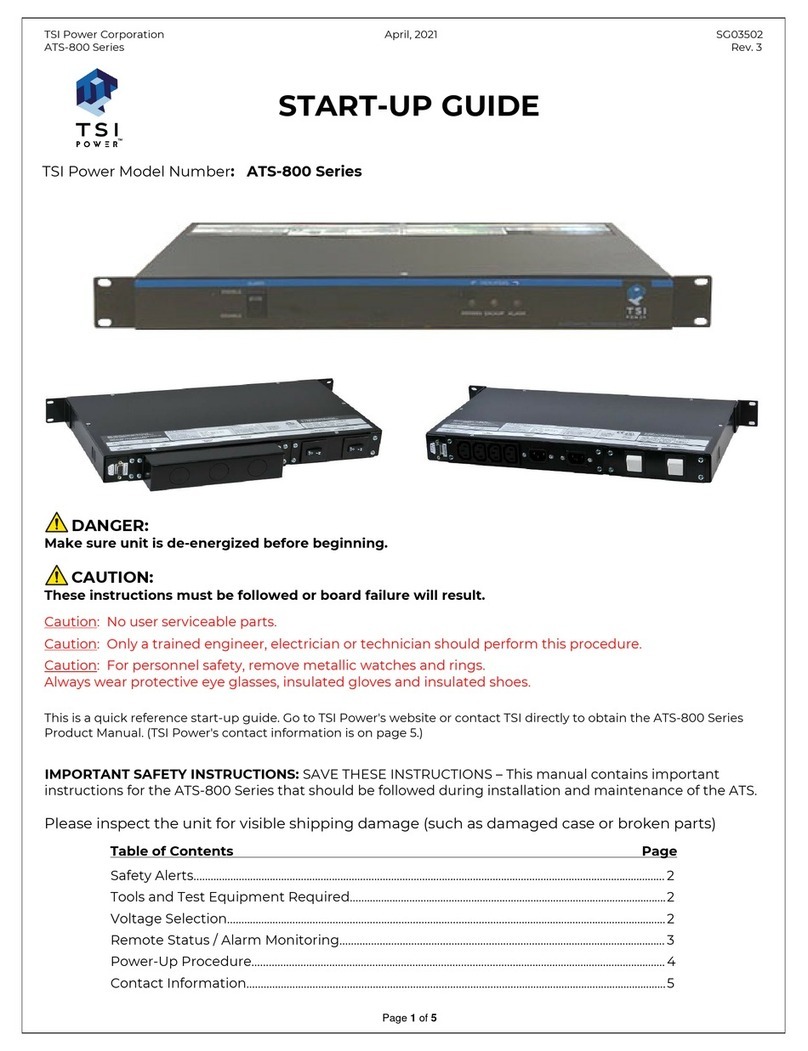
TSi Power ATS-1000 User manual

Operating Manual for ATS-1000 Automatic Transfer
Switch:
MC80003 – Hardwire 120 V-1000-2000,-4000,-6000,-8000 (15,20,30,40 A)
MC80004 – Plugs & Receptacles 120 V-1000-200x,-400x,-600x (15,20,30 A)
MC80005 – IEC 230 V-1000-3904,-5904 (15,20 A)
MC80006 – Plugs & Receptacles 208 V-1000-380x, -580x, -780x (15,20,30 A)
220, 240 V-1000-300x, -500x, -700x (15,20,30A)
MC80007 – Hardwire 208 V-1000-3800,-5800,-7800,-9800 (15,20,30,40 A)
220, 240 V-1000-3000, -5000, -7000, -9000 (15,20,30,40 A)
MC80008 – Hardwire 230 V-1000-3900, -5900, -7900, -9900 (15,20,30,40 A)
MC80003,4,5,6,7,8
Rev. 6, May, 2018
IMPORTANT SAFETY INSTRUCTIONS:
SAVE THESE INSTRUCTIONS – This manual contains important instructions for the ATS-
1000 Series that should be followed during installation and maintenance.

TSi Power Corporation MC80003,4,5,6,7,8
ATS-1000 Series Automatic Transfer Switches Rev. 6, May, 2018
TSi Power Corporation Proprietary Information 2
Table of Contents Page
1. GENERAL 5
1.1 Product Application .................................................................................... 5
1.2 Safety Alerts .............................................................................................. 6
1.3 General ATS Series Description ................................................................ 7
1.4 Overall Dimensions .................................................................................... 7
1.5 Construction ............................................................................................... 8
1.6 Rear Access .............................................................................................. 8
1.7 Component Locations ................................................................................ 8
2. MAJOR COMPONENT/CIRCUIT DESCRIPTIONS 11
2.1 ATS Series System Architecture ............................................................. 11
2.2 ATS Circuit Boards ................................................................................. 11
2.3 Input Primary/Backup Circuit Breakers .................................................... 15
2.4 Audible Alarm Switch .............................................................................. 15
3. INSTALLATION 16
3.1 Site Selection & Preparation…………………………………………………16
3.2 Required Tools........................................................................................ 16
3.3 Unpacking & Inspection .......................................................................... 16
3.4 Voltage Selection………………………………………………………………17
3.5 Installing the ATS .................................................................................... 17
3.6 AC Connections (Hardwire Versions)……………………………………….17
4. POWERING UP THE ATS SERIES 19
4.1 Start-Up & Functional (Electrical) Test Procedure…………………………19
4.2 Testing w/Actual Load Equipment (Computer) ........................................ 20
4.3 Remote Status / Alarm Monitoring .......................................................... 20

TSi Power Corporation MC80003,4,5,6,7,8
ATS-1000 Series Automatic Transfer Switches Rev. 6, May, 2018
TSi Power Corporation Proprietary Information 3
4.4 Remote Enable Function……………………………………………………. 21
5. REPAIRS, SERVICE & SPARE PARTS 21
5.1 ATS Series Field Repair (Recommended Replacement Parts) ............... 21
5.2 Returning Defective Circuit Board(s) for Repair ...................................... 22
5.3 Inventory Recommendations .................................................................. 22
6. REFERENCE 23
6.1 Specifications .......................................................................................... 23
6.2 Product Configurations............................................................................ 29
6.3 TSi Power Contact Information………………………………………………31

TSi Power Corporation MC80003,4,5,6,7,8
ATS-1000 Series Automatic Transfer Switches Rev. 6, May, 2018
TSi Power Corporation Proprietary Information 4
COPYRIGHT
Copyright © 2018 TSi Power Corporation. All rights reserved.
The information contained in this Document is the property of TSi Power Corporation and contains
confidential and proprietary information owned by TSi Power Corporation. Any duplication or disclosure
without the written approval of TSi Power Corporation is prohibited.
TRADEMARK
TSi Power, TSi, the TSi Logo and ATS-1000-15/20/30/40A are trademarks of TSi Power Corporation.
LIMITED WARRANTY
TSi Power Corporation warrants this product to be free from defects in materials and workmanship for
two (2) years from the date of purchase from TSi or its authorized representatives. TSi will repair (or at
its option, replace) any defective component(s) during this warranty period.
To make a request or claim for service under this limited warranty, the original purchaser must return the
product, in the original shipping container or equivalent, to TSi or its authorized agent, accompanied by
a written receipt showing the date of purchase and both the model name and serial number of the product.
Warranty does not cover transportation costs. Damage by misuse, accident or unauthorized tampering
of the product is not covered by the warranty. NO OTHER WARRANTIES ARE EXPRESSED OR
IMPLIED. TSI IS NOT LIABLE FOR CONSEQUENTIAL DAMAGES. THIS WARRANTY GIVES YOU
SPECIFIC LEGAL RIGHTS, AND YOU MAY ALSO HAVE OTHER RIGHTS WHICH VARY FROM
STATE TO STATE.
LIMITATION OF LIABILITY
IN NO EVENT SHALL TSI POWER CORPORATION BE LIABLE FOR ANY DAMAGES WHATSOEVER
(INCLUDING WITHOUT LIMITATION, DAMAGES FOR LOSS OF BUSINESS PROFITS, BUSINESS
INTERRUPTION, LOSS OF BUSINESS INFORMATION, OR OTHER PECUNIARY LOSS) ARISING
OUT OF THE USE OR INABILITY TO USE THIS PRODUCT, EVEN IF TSI OR ITS AGENT HAVE BEEN
ADVISED OF THE POSSIBILITY OF SUCH DAMAGES. SOME STATES DO NOT ALLOW THE
LIMITATION OR EXCLUSION OF LIABILITY FOR INCIDENTAL OR CONSEQUENTIAL DAMAGES,
SO THE ABOVE EXCLUSIONS MAY NOT APPLY TO YOU.
REVISION
NUMBER DATE REASON FOR REVISION
0 January, 2014 Initial release
1 December, 2014 Revised Section 4 – Powering Up The ATS Series
2 February, 2015 Revised Paragraphs 4.32 and 4.33
3 September, 2015 Revised Section 3
4. November, 2015 Updated Model Lineup
5. March, 2018 Updated MC80006 and MC80007 Models
6. May, 2018 Updated Spec Tables in Section 6

TSi Power Corporation MC80003,4,5,6,7,8
ATS-1000 Series Automatic Transfer Switches Rev. 6, May, 2018
TSi Power Corporation Proprietary Information 5
1. GENERAL
1.1 PRODUCT APPLICATION
The ATS series of automatic transfer switches is designed for applications where two or more
autonomous power sources are available. The ATS can be utilized as single or multiple units for
different levels of redundancy. Applications include but are not limited to telecom, computers,
data centers, industrial control, automatic test equipment, oil exploration and utilities.
The ATS works with asynchronous or out-of-phase power sources which allows them to be used
with a number of different sources. Customers with special requirements can be offered custom
programming to address special use situations. The ATS is fed by two AC power sources. When
the primary power source detector circuit senses a loss of power on that circuit, it immediately
switches the load over to the backup power source in under one cycle. Upon return of primary
power, the ATS will switch back in under one cycle. This is fast enough to be invisible to even
the most sensitive equipment.
Figure 1: Typical transfer between primary and backup power
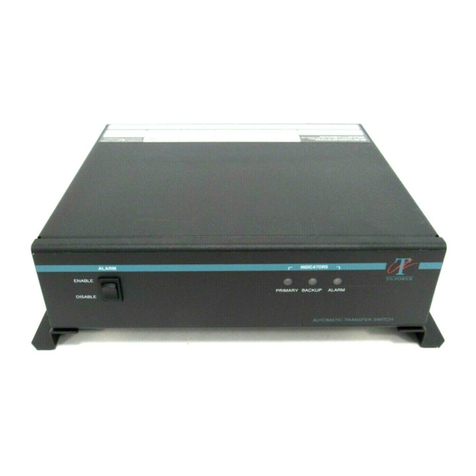
Figure 2: Front View of the Automatic Transfer Switch (ATS-1000-2000 Shown)

TSi Power Corporation MC80003,4,5,6,7,8
ATS-1000 Series Automatic Transfer Switches Rev. 6, May, 2018
TSi Power Corporation Proprietary Information 6
1.2 SAFETY ALERTS
SAFETY SIGNAL WORD DEFINITIONS
This document contains safety alert pictorial Symbols and Words that point out areas and
procedures that require special attention with regards to safety. These Symbols and Words are
defined in ANSI Z535.4-1998, Product Safety Signs and Labels.
DANGER:
DANGER indicates an imminently hazardous situation which, if not avoided, will result in
death or serious injury.
WARNING:
WARNING indicates a potentially hazardous situation which, if not avoided, will result in
death or serious injury.
CAUTION:
CAUTION indicates an imminently hazardous situation which, if not avoided, may result
in minor or moderate injury. It may also be used to alert against unsafe practices.
The safety alert pictorial symbol appears in this document to make users aware of important
operating and safety concerns.
NOTE: Specific models of the ATS Series may be ETL Listed to signify
conformance with UL, CSA or CE requirements. For actual Listings see
individual model specifications in Section 6.1. Users should install the ATS
only where permitted and carefully follow the instructions in this manual.
WARNING:
The ATS Series receives power from two AC sources. To prevent any hazardous
situations from occurring, always turn off both circuit breakers in the rear of the ATS unit
(see Fig. 4), as well as the upstream circuit breakers protecting both AC input sources to
the ATS unit before connecting or disconnecting the AC input and output wires to the
input & output terminal blocks or connecting the plug cables from the rear of the ATS
unit.

TSi Power Corporation MC80003,4,5,6,7,8
ATS-1000 Series Automatic Transfer Switches Rev. 6, May, 2018
TSi Power Corporation Proprietary Information 7
1.3 GENERAL ATS SERIES DESCRIPTION
Accepts inputs from asynchronous sources and can be used with most supply voltages,
including out-of-phase.
T
ransfer time of under one cycle between sources is fast enough for even the most
sensitive loads.
Audible alarm with enable / disable switch provides for unattended security.
LED status indicators for quick visual displays of fault conditions.
Higher than 99% efficiency means substantial energy savings (when the ATS is used
as a battery-less UPS).
Remote monitoring is provided through a DB-9 port.
Remote enable is provided through a DB-9 port.
70-90% reduction in both CAP-EX and OP-EX (when the ATS is used as a battery-
less UPS).
Built-in primary and backup rocker style circuit breakers are highly visible and easily
accessible on rear of unit.
The ATS allows redundant AC power to mission-critical equipment using any
combination of UPS, backup generator or other available autonomous AC power
sources.
Sturdy steel enclosure can be rack, wall or floor mounted with optional mounting
brackets.
AC Inputs are galvanically isolated.
RCD (Residual Current Device) compatible.
1.4 OVERALL DIMENSIONS
The ATS series enclosure dimensions are 16” (406mm) wide x 12” (305mm) deep x 3.25”
(83mm) high – see Fig. 3.
Figure 3: ATS Series Dimensions
16” (406mm)
3.25”
(83mm)
12”
(305
mm)
Audible Alarm
On/Off Switch
Green, Yellow & Red
Status Indicator LEDs

TSi Power Corporation MC80003,4,5,6,7,8
ATS-1000 Series Automatic Transfer Switches Rev. 6, May, 2018
TSi Power Corporation Proprietary Information 8
1.5 CONSTRUCTION
The ATS series enclosure is constructed of 16 gauge (.062 in. thk.), galvaneal steel and
finished with a cream colored polyester powder coating for long-lasting durability. The cover
is easily removeable for servicing and optional brackets are available for various rack, wall or
floor mounting configurations.
1.6
REAR ACCESS – See Figures, 4, 5 and 6
The DB-9 Connector, Primary and Backup circuit breakers and the Hardwire Termination
compartments are accessed from the rear of the ATS Series enclosure.
1.61 TOP-DOWN VIEW OF COVER SHOWING MAIN IDENTIFICATION LABEL AND
REAR COMPONENT LOCATIONS (for hardwire unit) – See Figure 4.
Figure 4: ATS-1000-8000 top-cover label showing rear compartments/components
1.7 COMPONENT LOCATIONS
1.71 TOP VIEW WITH COVER REMOVED - See Figures 5 and 6
Removing the top cover, exposes the main wiring and major components of the ATS Series.
Before removing the top cover, make sure that both input circuit breakers are in the “OFF”
position.
DB-9 Alarm
Interface
AC Output
Cover
Backup
Input
Cover
Primary
Input
Cover
Backup
Input
Breaker
Primary
Input
Breaker

TSi Power Corporation MC80003,4,5,6,7,8
ATS-1000 Series Automatic Transfer Switches Rev. 6, May, 2018
TSi Power Corporation Proprietary Information 9
DANGER:
If the unit has already been installed and prior to the removal of the top cover,
make sure that both the PRIMARY and BACKUP INPUT CONNECTORS in the back of the unit
have been disconnected (See Figures 5 and 6).
Figure 5: Rear view with top-cover removed showing Hardwired ATS-1000-15, 20 or
30 A models
Hardwire
Connector
Cover Screws
Primary AC
Input
Compartment
KO Cover
Backup 15 A,
20 A or 30 A
Circuit Breaker
Rear Cover
Mounting
Screws
Primary 15 A,
20 A or 30 A
Circuit Breaker
AC Output
Compartment
KO Cover
DB-9 Alarm
Signal Output
Connector
PZ00120-5
Main Control
Circuit Board
Backup AC
Input
Compartment
KO Cover

TSi Power Corporation MC80003,4,5,6,7,8
ATS-1000 Series Automatic Transfer Switches Rev. 6, May, 2018
TSi Power Corporation Proprietary Information 10
Figure 6: Rear view with top-cover removed showing Hardwired ATS-1000-models-40 A
models
PZ00127-5
Main Control
Circuit Board
Four Snap-On
Standoffs and
one M3x0.5.
Screw Mount
Circuit Board
Backup 40 A
Circuit Breaker
Primary 40 A
Circuit Breaker

TSi Power Corporation MC80003,4,5,6,7,8
ATS-1000 Series Automatic Transfer Switches Rev. 6, May, 2018
TSi Power Corporation Proprietary Information 11
2. MAJOR COMPONENT/CIRCUIT DESCRIPTIONS
2.1 ATS SYSTEM ARCHITECTURE – See Figure 7.
Figure 7: ATS-1000 System Architecture
2.2 ATS CIRCUIT BOARDS
2.21 Main Control Circuit Board Assemblies
Two main control circuit boards are used in the ATS Series. The PZ00120-5 is used in the 2000,
3000, 4000, 5000, 6000 and 7000 models, while the PZ00127-5 is used in the models 8000 and
9000. The circuit board assemblies are mounted to the chassis by means of four (4) snap-on
standoffs and one M3x0.5 Screw, see Figures 5 and 8 or 6 and 9.

TSi Power Corporation MC80003,4,5,6,7,8
ATS-1000 Series Automatic Transfer Switches Rev. 6, May, 2018
TSi Power Corporation Proprietary Information 12
Figure 8: PZ00120-5 Main Control Circuit Board Assembly for ATS-1000-2xxx,-3xxx,
-4xxx,-5xxx,-6xxx and -7xxx models
Circuit Board
Mounting
Holes for
Snap-On
Standoffs
(4 Corners)
JP13
(ATS ENABLE)
Circuit Board
Mounting Hole
for M3x0.5 PHP
Screw
JP1
(HIGH)
or JP2 (LOW

TSi Power Corporation MC80003,4,5,6,7,8
ATS-1000 Series Automatic Transfer Switches Rev. 6, May, 2018
TSi Power Corporation Proprietary Information 13
Figure 9: PZ00127-5 Main Control Circuit Board Assembly for ATS-1000-8xxx and –9xxx
models
2.22 DISPLAY CIRCUIT BOARD ASSEMBLY
Three colored LEDs are located on the right side of the front panel of the ATS housing and
attached by means of a ribbon cable and connector to the main control board. These LEDs, as
shown in Figure 10 signify the following:
Green “Primary” LED, ON, indicates Primary is driving the output.
Yellow “Backup” LED, ON, indicates Backup is driving the output.
Absence of either primary or backup AC source will be indicated by a flashing red “Alarm”
LED indicator and audible buzzer (beeper) alarm.
Note: The audible alarm can be turned off by setting the Audible Alarm switch, located on the
front panel, to the “OFF” position, see Figure 3.
Circuit Board
Mounting
Holes for
Snap-On
Standoffs
(4 Corners)
Circuit Board
Mounting Hole
for M3x0.5 PHP
Screw
JP13
(ATS ENABLE)
JP1 (HIGH)
or JP2 (LOW)

TSi Power Corporation MC80003,4,5,6,7,8
ATS-1000 Series Automatic Transfer Switches Rev. 6, May, 2018
TSi Power Corporation Proprietary Information 14
Figure 10: ATS Series Display Board Assembly
2.23 DB-9 ALARM PORT ASSEMBLY-See Figure 11
Signals can be transmitted by means of the DB-9 connector in the rear of the ATS unit that provide for
remote monitoring of alarms and the remote enable function. See Figures 5 and 11. Pin assignments
are outlined in section 4.3 and 4.45.
Figure 11: DB-9 Alarm Port Assembly
Primary AC
Green LED
Indicator
Backup AC
Yellow LED
Indicator
No Primary or
Backup AC
Input Red LED
Alarm
Connectorized
Ribbon Cable
to Main Control
Board

TSi Power Corporation MC80003,4,5,6,7,8
ATS-1000 Series Automatic Transfer Switches Rev. 6, May, 2018
TSi Power Corporation Proprietary Information 15
2.3 PRIMARY/BACKUP INPUT CIRCUIT BREAKERS-See Figure 12
One two-pole circuit breaker (located in the rear of the unit) connects the Primary AC to the ATS
unit and another two-pole circuit breaker connects the Backup AC to the ATS unit.
Note: If the output load current exceeds 125% of the circuit breaker ratings (15, 20, 30 or 40A),
then the input circuit breaker(s) will trip and prevent the possibility of overheating of the
components or wires inside the ATS Series units. Reduce the load if the circuit breaker trips. If
the circuit breaker trips, even without any load, then there is a faulty component on the board
assembly. The Board assembly must then be repaired at the factory (or replaced in the field).
Figure 12: Primary & Backup Type AC Input Two-Pole Circuit Breaker (30A shown)
2.4 AUDIBLE ALARM SWITCH-See Figure 13
Figure 13: P/N SE00002 Audible Alarm On/Off Switch

TSi Power Corporation MC80003,4,5,6,7,8
ATS-1000 Series Automatic Transfer Switches Rev. 6, May, 2018
TSi Power Corporation Proprietary Information 16
3. INSTALLATION
3.1 SITE SELECTION & PREPARATION
The ATS must be protected by an upstream branch circuit protector at 125% of
the ATS current rating per the National Electric Code or per local electric codes if
outside the United States (see ATS product ratings label for ATS current rating).
This product is intended for installation in “A PROTECTED ENVIRONMENT
ONLY”.
The ATS Series is designed to be mounted in a rack or on a horizontal surface
such as a desk, or be mounted to a floor or wall using the optional MK-5000C
brackets with hardware.
Note the following if an ATS without internal circuit breakers is being installed;
- For permanently connected equipment, a readily accessible disconnect device
shall be incorporated external to the equipment.
- For pluggable equipment, the socket-outlet shall be installed near the
equipment and shall be easily accessible.
- For all units, an upstream circuit breaker for both the Primary and the Backup
with the maximum current rating as shown on the ATS product label is required.
CAUTION: THE UNIT MUST BE PLACED IN A WELL - VENTILATED AREA TO
PREVENT RISK OF FIRE DUE TO OVERHEATING. VENTILATION SLOTS MUST NOT
BE OBSTRUCTED.
Select an area with enough space to provide sufficient clearance around the unit
to provide unrestricted access.
3.2 REQUIRED TOOLS
Set of standard hand tools
Wire stripper (for hardwired units)
3.3 UNPACKING & INSPECTION
3.31 The units are shipped in individual cartons and may come stacked on wooden pallets
depending on the size of the order. In this configuration, the units are placed on the
pallet, with protective material between them.
3.32 Carefully open the cartons, making sure not to damage the units, and remove the
protective wrap and packing material.
3.33 Before the units are removed from the cartons, inspect them for physical damage.
IMPORTANT: ONLY QUALIFIED PERSONNEL SHOULD PERFORM THE
INSTALLATION OF THIS PRODUCT.

TSi Power Corporation MC80003,4,5,6,7,8
ATS-1000 Series Automatic Transfer Switches Rev. 6, May, 2018
TSi Power Corporation Proprietary Information 17
3.34 If no damage is found, remove the units from the carton, open the top cover and again
inspect for damage. If damage is found in either steps 3.33 or 3.34, do not accept the
shipment and file a claim with the carrier. Contact TSi Power for assistance if necessary.
3.4 VOLTAGE SELECTION
3.41 If you have a 208, 220 or 240 V ATS the voltage selection can be changed. The factory
setting is either set to HIGH (220 to 240 V) or LOW (208 V) depending on what ATS
model was ordered. If the factory preset is not desired, performing the following steps will
change the voltage transfer points.
3.42 Make sure both Primary and Backup AC sources to the ATS are de-energized.
3.43 Remove the ATS case cover.
3.44 Locate the jumper at JP1 (HIGH) or JP2 (LOW). See figure 8 or 9.
3.45 To change the voltage selection simply move the Jumper from the JP1 (HIGH) to JP2
(LOW) position or JP2 (LOW) to JP1 (HIGH) position (depending on the factory preset of
your ATS).
3.46 Replace ATS case cover.
3.5 INSTALLING THE ATS
3.51 After the unit has been unpacked and inspected, attach any rack mounting brackets that
may have optionally been ordered to the ATS. Mount the ATS to the desired location on
the rack using the #10-32 UNF that have been provided (see Fig 14 for Front and Center
Rack-Mount Kits – MK5000C for Wall or Floor mount Kit not shown). If customer has
metric equivalent rack holes, M5X.8 screws should be used. If rack mounting brackets
have not been ordered, place the unit at the desired location near the load.
Note: Make sure that the unit has sufficient surrounding space to provide ample air
movement for ventilation.
3.6 AC CONNECTIONS (HARDWIRE VERSIONS)
NOTES:
1) Torque terminations from min. 1.5 Nm to max. 1.8 Nm (min. 13.28 in-lb to max. 15.93 in-
lb).
2) Be sure to follow electric safety and installation codes in the country of use.
3.61 Make sure that the up-stream Primary and Backup AC sources are de-energized
(switched OFF).

TSi Power Corporation MC80003,4,5,6,7,8
ATS-1000 Series Automatic Transfer Switches Rev. 6, May, 2018
TSi Power Corporation Proprietary Information 18
3.62 Incoming Primary and Backup Power Input, as well as, AC Power Output is through the
circular hole in the rear plates of the unit. Remove these rear plates and save hardware
before proceeding.
3.63 For units w/15 A Circuits Breakers use minimum 14 AWG (2.5mm²) wire [preferably 12
AWG (4mm²)]
For units w/20 A Circuit Breakers use minimum 12 AWG (4mm²) wire [preferably 10 AWG
(6mm²)]
For units w/30 A Circuit Breakers use minimum 10 AWG (6mm²) wire [preferably 8 AWG
(10mm²)]
For units w/40 A Circuit Breakers use minimum 8 AWG (10mm²) wire
For both power and earth conductors, TSi Power also recommends using stranded
copper wire with a 105 °C insulation system.
3.64 Allow for sufficient wire length to reach the wiring terminals and leave enough slack to
reduce the stress in the wires. Note: Two wires plus ground are required for primary and
backup input and ATS output.
3.65 Strip approximately 3/8" (10 mm) insulation from the end of each of the three (3) sets of
wires and terminate them in the wiring terminals as follows.
3.66 Using a slotted screwdriver, terminate the incoming primary wires on the terminal blocks
behind the rear cover marked “Primary Input”. These terminals are marked as follows:
LI for primary input line (or L1in for primary input phase 1)
NI for primary input neutral (or L2in for primary input phase 2)
PE for primary input protective earth (European systems); G for primary input earth
ground (North-American systems)
3.67 Using a slotted screwdriver, terminate the incoming backup wires on the terminal blocks
behind the rear cover marked “Backup Input”. These terminals are marked as follows:
LI for backup input line (or L1in for backup input phase 1)
NI for backup input neutral (or L2in for backup input phase 2)
PE for backup input protective earth (European systems); G for backup input earth
ground (North-American systems)
3.68 Using a slotted screwdriver, terminate the outgoing wires on the terminal blocks behind
the rear cover marked “AC Output”. These terminals are marked as follows:
LO for AC output (or L1out for AC output phase 1)
NO for AC neutral output (or L2out for AC output phase 2)

TSi Power Corporation MC80003,4,5,6,7,8
ATS-1000 Series Automatic Transfer Switches Rev. 6, May, 2018
TSi Power Corporation Proprietary Information 19
PE for output protective earth (European systems); G for output earth ground (North-
American systems)
3.69 Carefully insert each wire into the appropriate slot, taking care to ensure that all strands
are inserted properly. Tighten the terminal screw using a slotted screwdriver and torque
terminations from minimum 1.5 Nm to ma ximum 1.8 Nm (min. 13.28 in-lb to max. 15.93
in-lb). Perform a pull test to make sure the connection is secure. Do not apply excessive
torque to make sure that the terminal screws are not damaged. Note that failure to follow
these instructions can lead to malfunction or short circuit.
Figure 14: Two 19” / 482.6 mm Rack-Mounting Options for ATS Series
4. POWERING UP THE ATS SERIES
Before proceeding to the next step, make sure that both the ATS’s internal Primary
and Backup circuit breakers are in the OFF position.
4.1 START-UP & FUNCTIONAL (ELECTRICAL) TEST PROCEDURE
(1) Connect (or plug-in) both the Primary and Backup AC input connections (if using a
hardwired ATS model this was performed during step 3.6) and energize (turn on) the up-stream
Primary and Backup AC sources.
Important Note: Make sure that both Primary and Backup AC input voltages and
frequencies match those specified on the product label affixed to the
ATS unit (see Figure 4). The ATS will only operate when the input
voltage is within specified voltage and when the frequency is within
± 5 % of that specified. Both primary and backup must be the same
nominal frequency.
(2) Turn on the Backup AC circuit breaker in the rear of the ATS unit. Make sure that the
audible alarm switch (in front of the ATS unit) is in the “ENABLE” position.
Front 19” / 482.6 mm Rack-Mount
Kit MK-5019A
Center 19” / 482.6 mm Rack-Mount
Kit MK-5019F

TSi Power Corporation MC80003,4,5,6,7,8
ATS-1000 Series Automatic Transfer Switches Rev. 6, May, 2018
TSi Power Corporation Proprietary Information 20
(3) The yellow LED should turn on and the alarm sound must turn ON (red alarm LED must
turn on: green LED must be OFF).
(4) Turn on the Primary AC input circuit breaker in the rear of the ATS unit.
(5) The green LED must turn on after several seconds. The yellow LED, red LED and alarm
(sound) must turn off.
(6) Turn off the Primary AC input circuit breaker. The green LED must turn off. The yellow
Backup LED must turn ON and the red alarm LED and alarm (sound) must turn ON.
(7) Turn on the Primary AC input circuit breaker. After several seconds, the ATS must return
to the normal operating condition as noted in (5).
(8) Turn off the Backup AC input circuit breaker.
(9) The green LED must remain ON and the red alarm LED and alarm sound must turn ON
(the yellow LED will already be OFF if the unit is operating from the Primary AC source).
(10) Turn on the Backup input circuit breaker. After several seconds, the ATS must return to
the normal operating condition as noted in (5).
(11) De-energize (turn off) both the Primary and Backup AC sources.
4.2 TESTING WITH ACTUAL LOAD EQUIPMENT (SUCH AS COMPUTERS, PLC,
TELECOM EQUIPMENT, ETC.)
If the above test steps (1) through (10) are performed and the ATS is functioning properly, then
actual load equipment can be connected to (or plugged into) the output terminal block (or
output receptacle).
CAUTION: To avoid electric shock or accidents, ensure that both Primary & Backup
AC sources are de-energized before making the wire connection to the AC sources.
4.3 REMOTE STATUS / ALARM MONITORING
4.31 A DB-9 female connector in the rear of the unit provides status / alarm signals for remote
monitoring of the status of the ATS.
Primary AC Input Status DB-9 Pins are: _5__NO _1__NC__2_COM
Backup AC Input Status DB-9 Pins are: _6__NO _3__NC _4__COM
4.32 When Primary AC Input is present and IN SPECIFICATION, there is an OPEN circuit
between pin_5 and pin 2 . When Primary AC input is OUT OF SPECIFICATION, there
is a CLOSED circuit between pin 5 and pin 2 .
Table of contents
Other TSi Power Switch manuals