Tsuruga Electric Corporation 3568 User manual

I-01679
TSURUGA ELECTRIC CORPORATION
MODEL 3568
Digital Ohm Meter
Instruction Manual

2
Contents
1.Preface ………………………………………………………………………………… 3
1.1 Preparations prior to use …………………………………………….…………….. 3
1.1.1 Inspection ………………………………………………………….…………… 3
1.1.2 Storage …………………………………………………………….…….……… 3
1.1.3 Handle …………………………………………………………….…….……… 3
1.1.4 Loading of batteries ………………………………………….…….…………… 4
1.1.5 Battery alarm …………….………………………………….…….…………… 4
1.1.6 Connection of AC adaptor ……………….………………….…….…………… 4
2.Name of parts and functions …………………………………………………………. 5
2.1 Front panel ………………………………………………..……..……….………… 5
2.2 Rear panel …………………………………………………..…………….………... 7
3.Operation ……………………………………………………………………………… 8
3.1 Power supply ……………………………………………...……………..………. 8
3.2 Connection of measuring terminals …….……………………..………..……..…... 8
3.3 Connection of temperature sensor ………………..………….….…………….… 8
3.4 Key lock ……………………………………………………..……….……….…. 9
3.5 Change-over of measuring range ………………………………..…………..….. 9
3.6 Zero adjustment ……………………………………………..……………….…. 10
3.6.1 Key operation ………………………………………………………………... 10
3.6.2 Remote operation ……………………………………………………………. 10
3.7 Selection of sampling rate ………………………………….………..….…….... 10
3.8 Comparator operation …………………………………………………………... 11
3.8.1 Conditions for comparison ………………………….……………..….……... 11
3.8.2 Comparator output ………………………………………..……………………. 11
3.8.3 Setting method …………………………………..……….…………………..… 12
3.9 Buzzer …………………………………………………..………………….……… 13
3.9.1 Setting method …………………………………………………………………. 13
3.10 Manual mode …………………………………………………………………….... 14
3.11 Memory mode …………………………………………………………………..…. 14
3.11.1 Selection of memory …………………………………………………………… 14
3.11.2 Setting of memory ……………………………………………………………… 15
4.Remote control …………………………………………………………………………. 17
4.1 Remote connector …………………………………………………………………. 17
4.1.1 Pin operation …………………………………………………………………… 17
4.1.2 Remote operation of memory mode …………………………………………… 18
4.1.3 Timing chart of remote control ………………………………………………… 19
4.2 Remote control (input & output terminal block) ………………………………….. 20
5.Setting Method ……………………………………………………………………….. 21
5.1 Resistance measurement ………………………………..…………………………. 21
5.2 Temperature measurement ……………………….…………..…………………… 21
5.3 Temperature compensation function …………………………..…………...……… 22
5.3.1 Setting of standard temperature and temperature coefficient ………………….. 23
5.4 Temperature conversion function
(Measurement of risen temperature of copper coil) …………………………….. 24
5.5 Ratio display function …………………………………………..………..….….… 26
5.5.1 Setting of standard value and deviation ……………………………………….. 27
5.6 Character display ………………………………………………………………….. 28
6.Calibration ……………………………………………………………………………. 29
6.1 Materials to prepare …………..……………………………………..…………... 29
6.2 Calibration method …………………………………………………..…………… 29
6.2.1 Calibration of resistance measuring range …………………..………….……… 29
6.2.2 Calibration of temperature measuring range ……………………....…….…….. 30
7.Specifications …………………………………………………………………………. 31
7.1 Model name ………………………………………………………………..……… 31
7.2 Measuring range & accuracy ……………………………………………...….…… 31
7.3 General specifications ……………………………………………………..….…… 32
7.4 Table of initial set values (at delivery from factory) ………………………..…….. 33
7.5 External dimensions ……………………………………..…………………..……. 33
7.6 Interface (option) …………………………………………………………….….… 33

3
1. Preface
We thank you for your purchase of our MODEL 3568. For safety and proper use of this product,
please carefully read this instruction manual before the initial operation.
Model 3568 is is provided with a wide range from 300mΩto 300kΩand it can perform high precision
measurement of high resolution 10μΩ.
Also provided as standard are the temperature compensation function, ratio display function and
temperature conversion function which allows to measure the risen temperature of coil resistance.
With a comparator memory function of 30 patterns, it is also possible to preset the test conditions for
plural numbers of test samples.
Four different types of optional data output interfaces such as RS-232C etc. are provided for
the meter to serve a wide range of applications from stand alone use to systematized operation.
CAUTION
●To avoid break-down, malfunction or deterioration of life time,
do not use this product in such places where:
◆exposed to rain, water drops or direct sunlight.
◆high temperature or humidity, heavy dust or corrosive gas.
◆affected by external noise, radio waves or static electricity.
● Where there is constant vibration or shock
●Do not dismantle or modify this product.
1.1 ●Preparations prior to use
1.1.1 Inspection
When the meter is delivered, please check whether it conforms to the ordered specifications and has
not been damaged in transit. If any damage or inconvenience in operation is found, please inform
us of the model name and serial number of the product.
1.1.2 Storage
When the meter is not in use for long time, store it in the place of low humidity where the meter is
not exposed to the direct sunlight.
When the meter is stored for a long term, remove the batteries
1.1.3 Handle
Set up the handle, by slightly expanding it as the arrows show and inserting it into the locking slot.
handle
Lock ditch

4
1.1.4 Loading of batteries
①Attachment/detachment of rear battery lid
②Loading of batteries
1.1.5 Battery alarm
1.1.6 Connection of AC adaptor
Full charged
A little discharged
Less charged
(Blink)Batteries need to be replaced
Battery lid
SCREW
++
+
+
+
+
−
−
−
−
−
−
Box poles
Box poles
Attach or detach the lid by screwing
Put a six LR6 or R6P batteries in the battery
compartment, paying attention to their
direction.
Insert the battery box, bringing its poles
far side, and close the lid.
AC adaptor
Take a power supply from the commercial power source
with the AC adaptor.
Supply voltage of AC adaptor: 100~240V AC 50/60Hz
5
2. Name of parts and functions
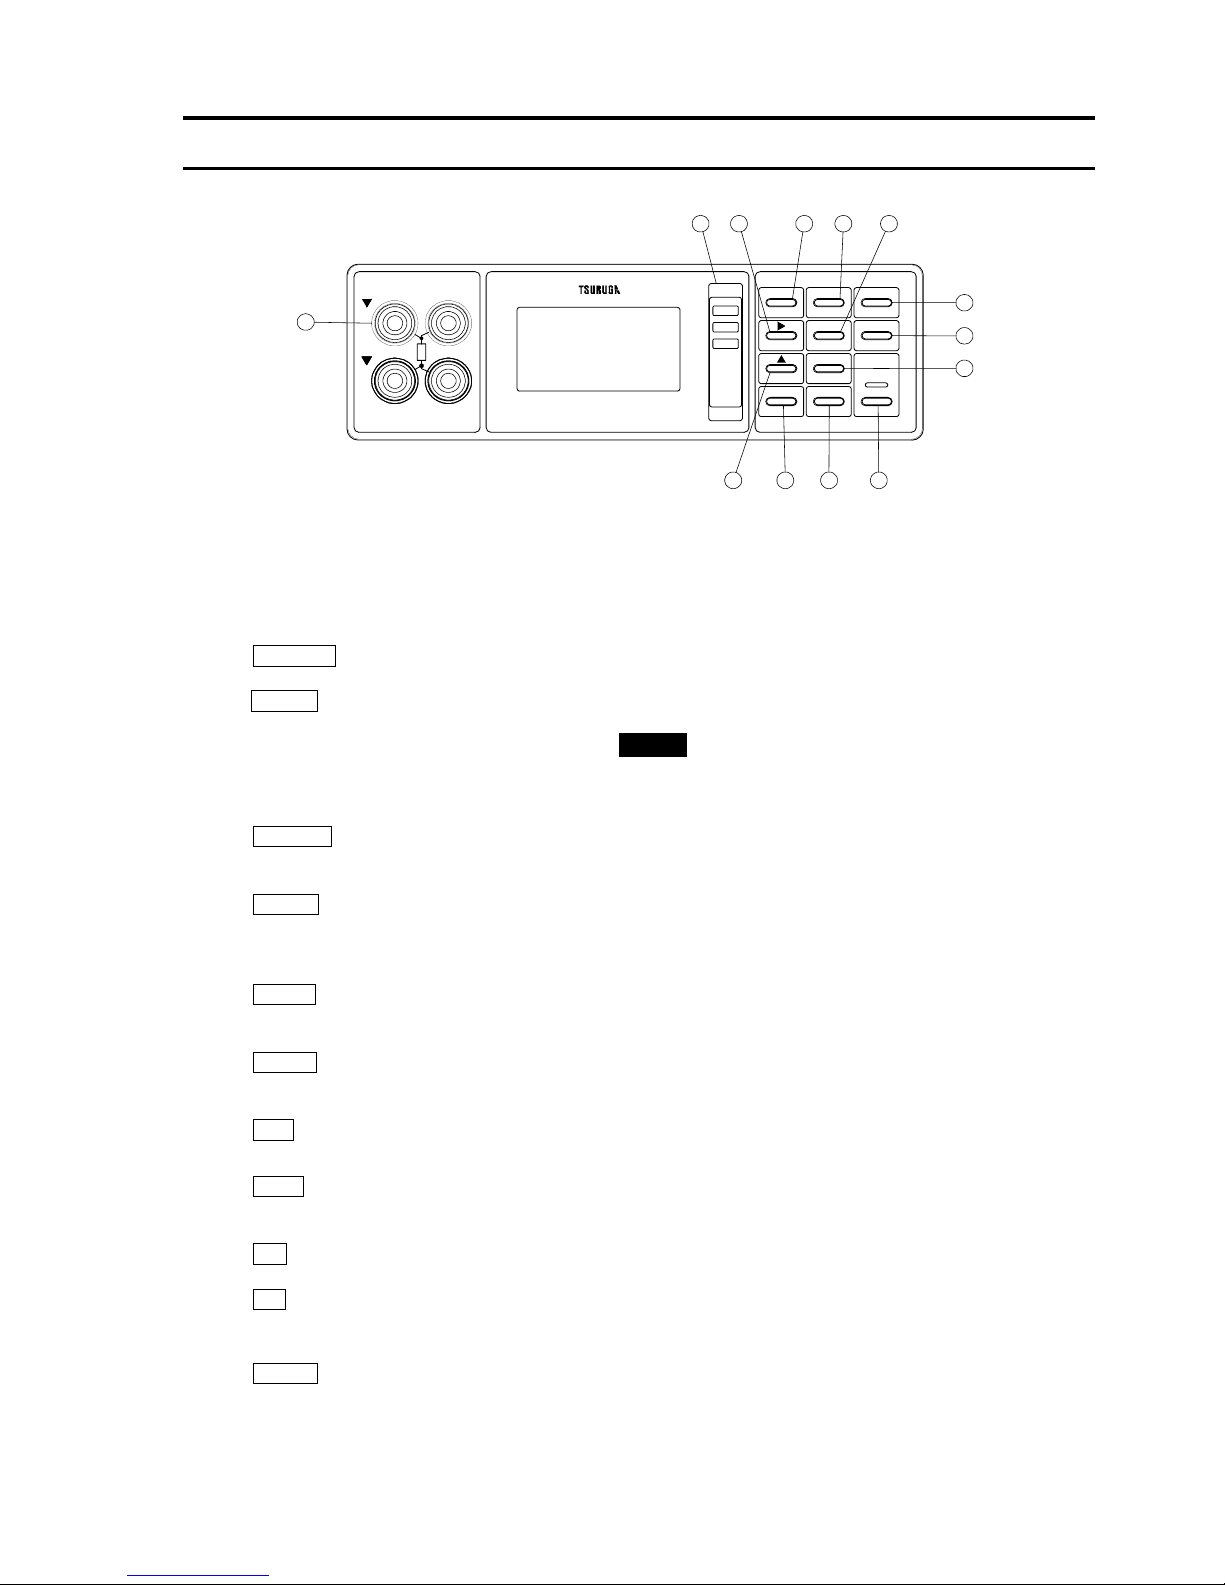
2.1 ●Front panel
①Measuring terminals SENSE Hi:+side terminal of voltage input.
SENSE Lo:−side terminal of voltage input.
SOURCE Hi:+side terminal of current output.
SOURCE Lo:−side terminal of current output.
②POWER key Key for power supply. The green lamp is lit up when the tester is turned ON.
③
SHIFT key Pressed when the functions indicated in orange color in ( ) are used.
(LOCK) When the key is pressed again, the function is cancelled.
While functioning, SHIFT mark is indicated.
(Switch to prohibit switch operation on the front panel. When it is pressed
continuously for 3 seconds or more, prohibition or release can be done.
During the prohibition,
LOCK lamp is lit up.)
④RANGE key Key to select range 300mΩ~30kΩor AUTO range.
(BUZZER) (Key to select buzzer operation and volume setting.)
⑤FUNC key Key to switch over to the resistance measurement / temperatur measurement
(SET) / temperature compensation /temperature conversion / ratio display.
(In memory mode, it is used to set the memory.)
⑥RATE key Key to select a sampling rate.
(MAN’L/MEM)) (Key to switch over manual-mode/memory-mode.)
⑦0 ADJ key ON/OFF key for zero adjustment function.
(ONLINE) (On-line key for RS-232C.)
⑧TE key Key to select the memory and finish of temperature conversion.
⑨SEL key Used for various setting.
COMP SET Key to use for the comparator setting.
⑩
key Used for various setting.
⑪▲ key Used for various setting. Also, it functions as print key when a printer
interface is fitted.
⑫LAMP key Key to turn ON/OFF the LCD back light.
⑬HI Lamp Red LED is lit up when the measured value is higher than high limit.
GO Lamp Green LED is lit up with good judgement.
LO Lamp Red LED is lit up when the measured value is lower than low limit.
COMP.
LO
GO
HI
SEL FUNC SHIFT
(LOCK)(SET)COMP.SET
RATE RANGE
(BUZZ)
0ADJ. POWER
(ONLINE)
LAMP T.E
(MAN′L/MEM)
Lo
Hi
SOURCESENSE
1
281211
7
4
3
6591013
LCD部
6
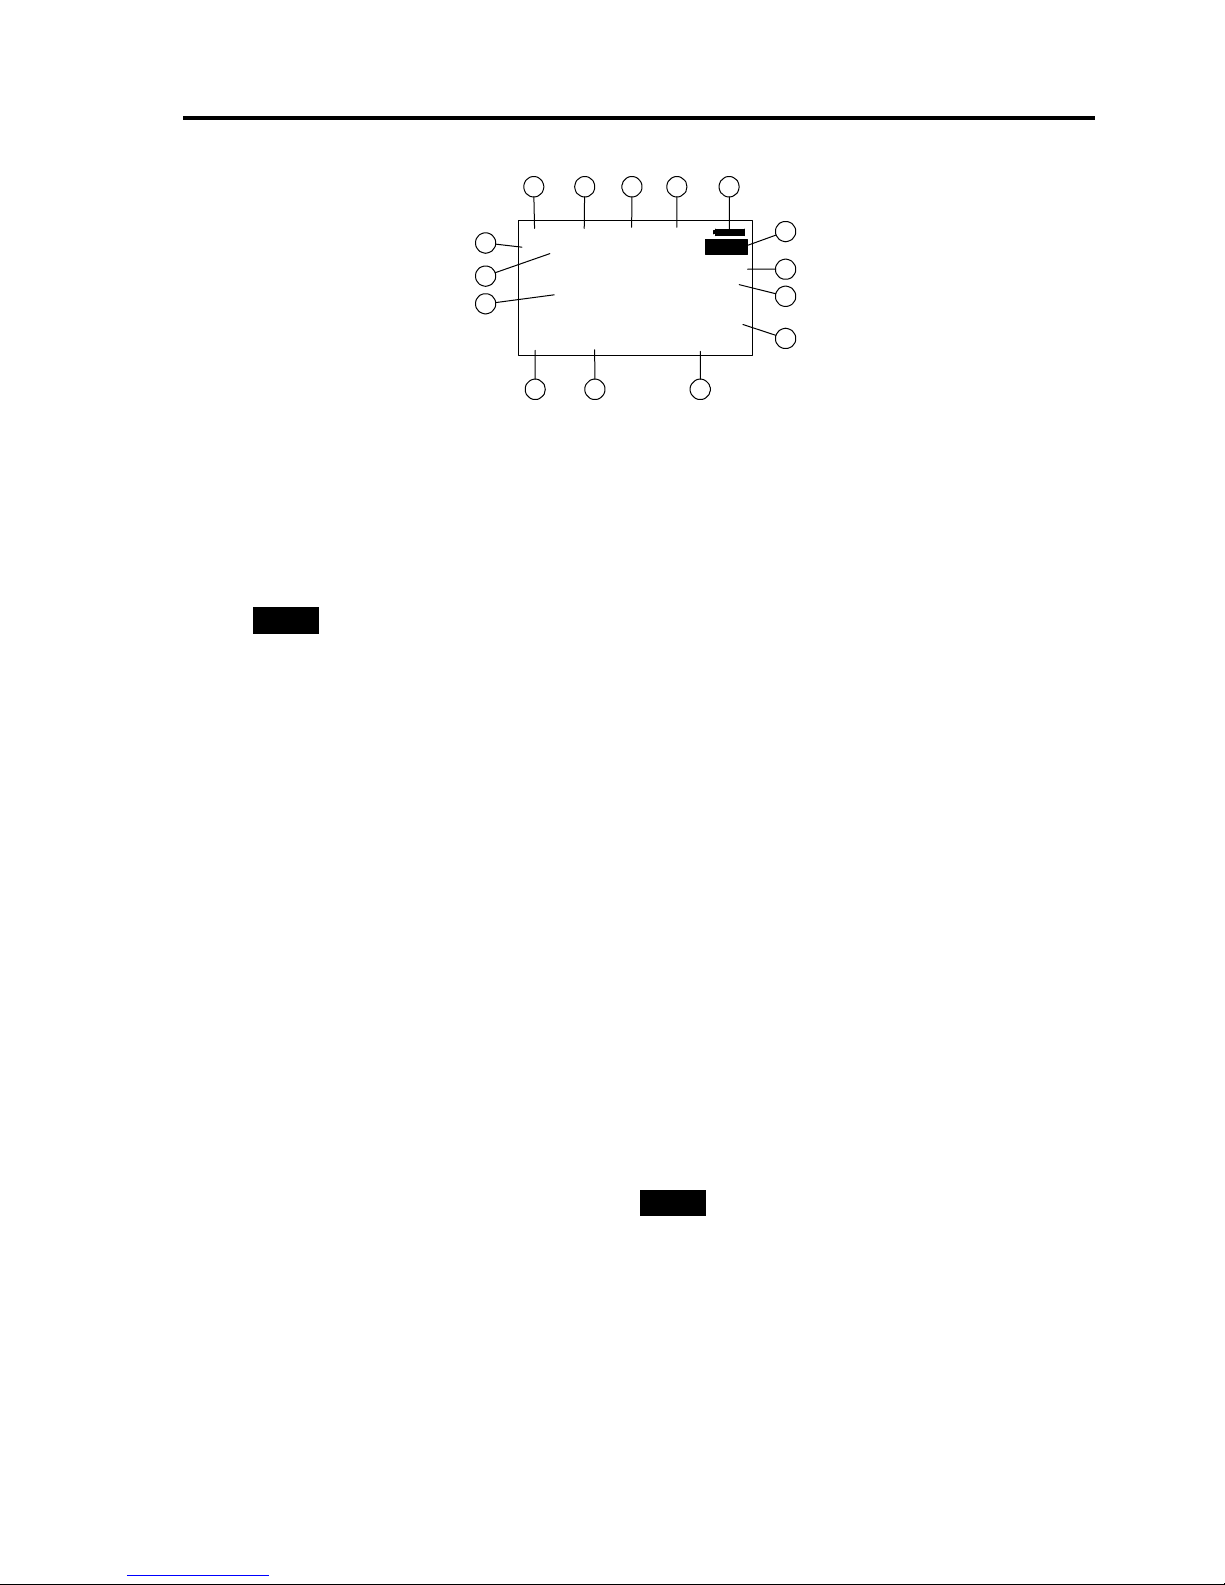
LCD WINDOW
⑭MEM It displays it in the memory mode.
MAN’L It displays it in the manual mode.
⑮ONLINE It displays it in the remote controlled.
⑯LOCK It displays it in the key lock.
⑰0 ADJ It displays it in zero adjustment operation.
⑱*** Battery Alarm.
⑲SHIFT Linked with SHIFT key.
⑳Resistance range Displays the range 300mΩ~30kΩbeing measured.
AUTO Displayed in AUTO range.
UNIT Displays the unit being measured.
LO SET Display Window Low limit of comparator is displayed.
DEV SET Deviation in ratio display is displayed.
HI SET Display Window High limit of comparator is displayed.
STD SET Standard value in ratio display is displayed.
No. Display Memory No. of memory mode is displayed.
It is not displayed in the manual mode.
Display Window Displays the measurement values and characters.
OHM Resistance measurement.
TEMP Tmperature measurement.
T.C Tmperature compensation function.
T.C RATIO Ratio display of tmperature compensation function.
OHM RATIO Ratio is display of resistance measurement.
TE T1 T1 action of the temperature conversion.
TE T2 T2 action of the temperature conversion.
FLit up at sampling rate 20 times/sec.
SLit up at sampling rate 4 times/sec.
*(Orange key) is enabled while the SHIFT key is displayed.
123.45
mΩ
mΩmΩ
HI SET LO SET
113.45
AUTO
300mΩ
0 ADJ.LOCK
30
No.
ONLINE
S
123.45
SHIFT
MEM
14 15 16 17 18
19
20
21
22
232425
26
27
28
OHM

7
2.2 ●Rear panel
Battery Box
AC adaptor jack
REMOTE connector
Connector for remote control.
Input, output terminal blocks
Terminals for input of hold and input, and output of comparator.
Pt100Ωconnector
Connector for connection of 3-wire system Pt100Ωresistance bulb.
Inlet for interface board
Section to fit an optional interface board.
29
31 32 33
34
30
DC 9V 1.2A
REMOTE
Pt100Ω
GCOM
GO
LCOM
LO HI
HCOM HOLD
COM RST

8
3. Operation
3.1 ●Power supply
Turn ON the power switch on the front panel. A pilot lamp is lit up and the meter immediately
enters the operable condition.
Although the meter will immediately be in operating status,
it is recommended to have a pre-heating time for 30 minutes or more.
The meter is provided with the function to retain the parameters, so it
memories the status of the followings even after the meter is switched OFF.
(1) Measuring function and range.
(2) Set values of comparator (30 program memories).
(3) Standard temperature and temperature coefficient of temperature compensation function.
(4) Standard resistance value of ratio display function.
(5) Status of key lock.
(6) Status of buzzer.
(7) Status of zero adjustment.
3.2 ●Connection of measuring terminals
Make a connection to the measuring terminals on the front panel (or rear panel) as Fig.3.2.1shows.
Fig.3.2.1
Note: Penetration of disturbing noise to the measuring terminals may cause instability or display
or auto range operation. Prevent the noise by connecting with shield wire the shield side
to
SOURCE Lo.
Fig.3.2.2 Connection of optional Kelvin clip (MODEL 5811-21).
3.3 ●Connection of temperature sensor
When the functions of temperature
measurement, temperature compensation
or temperature conversion is used,
connect an optional Pt100Ωsensor
(MODEL 5803-11) to the Pt100Ω
connector on the rear panel.
Black
Red
E
D
B
C
A
BCD
E
A
B
B
S(Shield)
SOURCE Hi
SENSE Hi
SENSE Lo
SOURCE Lo
Object
3568 Lead wires
Shield wire
be measure
d

9
3.4 ●Key lock
This is the switch to prohibit the key operation on the front panel so that the measuring condition
can not be carelessly altered.
LOCK lamp is lit up during the key locking. When required to operate other switch, do it after
releasing the key lock.
To make key lock
The key is locked when the SHIFT (LOCK) key is pressed for more than 3 seconds.
While the key is locked, LOCK mark is displayed at the upper side of the LCD.
To release key lock
When the SHIFT (LOCK) key is pressed again for more than 3 seconds, the key lock is
cancelled.
3.5 ●Change-over of measuring range
Select a measuring range (auto range or manual range) of resistance measurement.
This operation is disabled in memory mode and when the status is ONLINE or HOLD.
(1) Auto range
●The measuring range automatically steps up when the display value is 35000 or higher
and steps down when the display value is less than 3000.
●AUTO mark and the resistance range automatically detected are displayed at the right of the
LCD.
Selection of
AUTO range
When the RANGE key is pressed at the 300kΩrange, AUTO lamp is lit up and the
meter enters the auto ranging.
(2) Manual range
●The range is fixed at 300mΩ~300kΩ.
●The lamp of the selected range is lit up.
Change-over of range
Every time the RANGE key is pressed, the range mark (300mΩ~30kΩ) at the right of
the LCD changes.Select the desired range.
SHIFT
(LOCK)(SET)COMP.SET
FUNCSEL
ONLINE 0 ADJ.MAN'L
AUTO
300mΩ
123.45
S
123.45
mΩ
mΩmΩ
No. HI SET LO SET
30
(ONLINE)
(MAN′L/MEM)
(BUZZ)
POWER
T.ELAMP
0ADJ.
RANGERATE
LOCK
LCD
113.45
OHM
Keys to use
(SET)COMP.SET
FUNCSEL
0 ADJ.MAN'L
SHIFT
123.45
S
123.45
mΩ
mΩmΩ
HI SET LO SET
(ONLINE)
(MAN′L/MEM)
(BUZZ)
POWER
T.ELAMP
0ADJ.
RATE
LCD
113.45
(LOCK)
SHIFT
RANGE
300mΩ
AUTO
OHM
Keys to use

10
3.6 ●Zero adjustment
This is the function to suppress the resistance of tools and so on in resistance measurement.
The value currently measured is memorized as zero set value into the non-volatile memory and
afterwards, the value from which the zero set value is suppressed is displayed.
Display value = Measured value - Zero set value
●This function is enabled in manual mode and memory mode of the resistance measurement,
temperature compensation function, temperature conversion function and ratio display function.
●Zero set value is effective in all ranges.
●In case that the zero adjustment is made in the higher range, it may over-range in the lower range.
●Remote control is possible for this function.
●Remote control through the interface GP-IB, RS-232C or RS-485 is also possible.
Note: ●This function can not be operated during the temperature measurement and the hold.
●Zero adjustment is not released even if the memory is changed in memory mode.
3.6.1 Key operation
A press of the 0 ADJ. key activates the operable condition of zero adjustment.
During the zero adjustment, 0 ADJ. mark is displayed at the upper side of the LCD.
Pressing again of the 0 ADJ. key cancels the zero adjustment.
3.6.2 Remote operation
The zero adjustment is operable while the 0 ADJ pin on the rear panel REMOT connector is being
ON.
When the pin is turned OFF, the function is released.
Note: Zero adjustment work set up with the key operation is released by making this pin OFF.
3.7 ●Selection of sampling rate
Make a choice of sampling rate with key operation on the front panel.
●Remote control through the interface GP-IB, RS-232C or RS-485 is possible.
●Selection is not possible during the hold function.
The sampling rate changes by pressing the RATE key
S→M→F→SSlighting : 4 times/sec.
Mlighting : 20 times/sec.
(SET)COMP.SET
FUNCSEL
MAN'L
AUTO
300mΩ
123.45
S
123.45
mΩ
mΩmΩ
HI SET LO SET
(ONLINE)
(MAN′L/MEM)
(BUZZ)
POWER
T.ELAMP
RANGERATE
LCD
113.45
OHM
(LOCK)
SHIFT
0ADJ.
0 ADJ.
Keys to use
(SET)COMP.SET
FUNCSEL
MAN'L
AUTO
300mΩ
123.45
123.45
mΩ
mΩmΩ
HI SET LO SET
(ONLINE)
(MAN′L/MEM)
(BUZZ)
POWER
T.ELAMP
RANGE
LCD
113.45
OHM
(LOCK)
SHIFT
0 ADJ.
Keys to use
S
RATE
0ADJ.

11
3.8 ●Comparator operation
This is a digital comparator to make a comparison between displayed value and high or low limit
value. 30 pairs of high and low limit value (No.1~No.30) can be memorized.
●Memory can be selected by REMOTE connector.
●Selection of memory can also be done through the interface RS-232C.
Note: ●During the setting of high or low limit and recalling of the memory, the sampling is
stopped and the comparator output is held.
●Comparator does not operate at the temperature display.
3.8.1 Conditions for comparison
Display value ≧High limit value (HI SET) HI output
High limit (HI SET) >Display value >Low limit (LO SET) GO output
Display value ≦Low limit (LO SET) LO output
Note: Comparator makes comparison with absolute value.
As an example, in case that the high limit is set to 100.00mΩ,
HI is output when 10.00Ωis displayed in the 300Ωrange.
3.8.2 Comparator output
Open collector or relay contact output is output through the input/output terminals on the rear panel.
(refer to the article 4.2)
Display :
HI and LO : Red
GO : Green

12
3.8.3 Setting method
Comparator can not be set during the ONLINE, remote control through BCD data output interface
and hold.
Adjustable range High limit : -19999~35000 Note: The unit and decimal point are
Low limit : -19999~35000 set by
RANGE key.
This article explains the method how to set the high and low limit values for the resistance value in
manual mode.
●Refer to the article 5.5 for the setting of ratio display function.
●Refer to the article 3.11.2 for the setting in memory mode.
●When no key operation has been done for about 5 minutes during the setting, the meter returns
to measurement mode.
Change over to manual mode
①(refer to the article 3.10)
Selection of function
②Change over to resistance measurement or temperature compensation function by
FUNC key.
Setting of high limit
③Press COMP.SET key.
A cursor moves to the highest digit of HI SET high limit value, at the lower side of
the LCD.
Set a numeral with
and ▲keys.
Move the cursor with
key, then the selected characters are reversely displayed.
Setting of low limit
④Press COMP.SET key.
The highest digit of LO SET display blinks.
Set a numeral with
and ▲keys.
Move the cursor with
key, then the selected characters are reversely displayed.
Setting of comparator range
⑤Select the decimal point and unit with RANGE key.
Example shows that the HI SET is set to 123.45 mΩ, LO SET to 113.45m mΩ.
Finish of setting
⑥Press COMP.SET key.
Note 1:When the high limit and low limit value is out of the range to set, ERROR mark is
displayed at the item being out of the range, and the setting returns to ③or ④.
(SET)
FUNCSEL
MAN'L
AUTO
300mΩ
S
123.45
mΩ
(ONLINE)
(MAN′L/MEM)
(BUZZ)
POWER
T.ELAMP
RANGERATE
LCD
OHM
(LOCK)
SHIFT
113.45
LO SETHI SET
mΩ mΩ
123.45
COMP.SET
0ADJ.
0 ADJ.
Keys to use
13
3.9 ●Buzzer
Setting of buzzer is done with (BUZZ) key on the front panel.
●During the setting of buzzer, the sampling is stopped and the comparator output is held.
●Setting is disabled during ONLINE and hold.
●When no key operation has been done for about 5 minutes during the setting, the meter returns
to measurement mode.
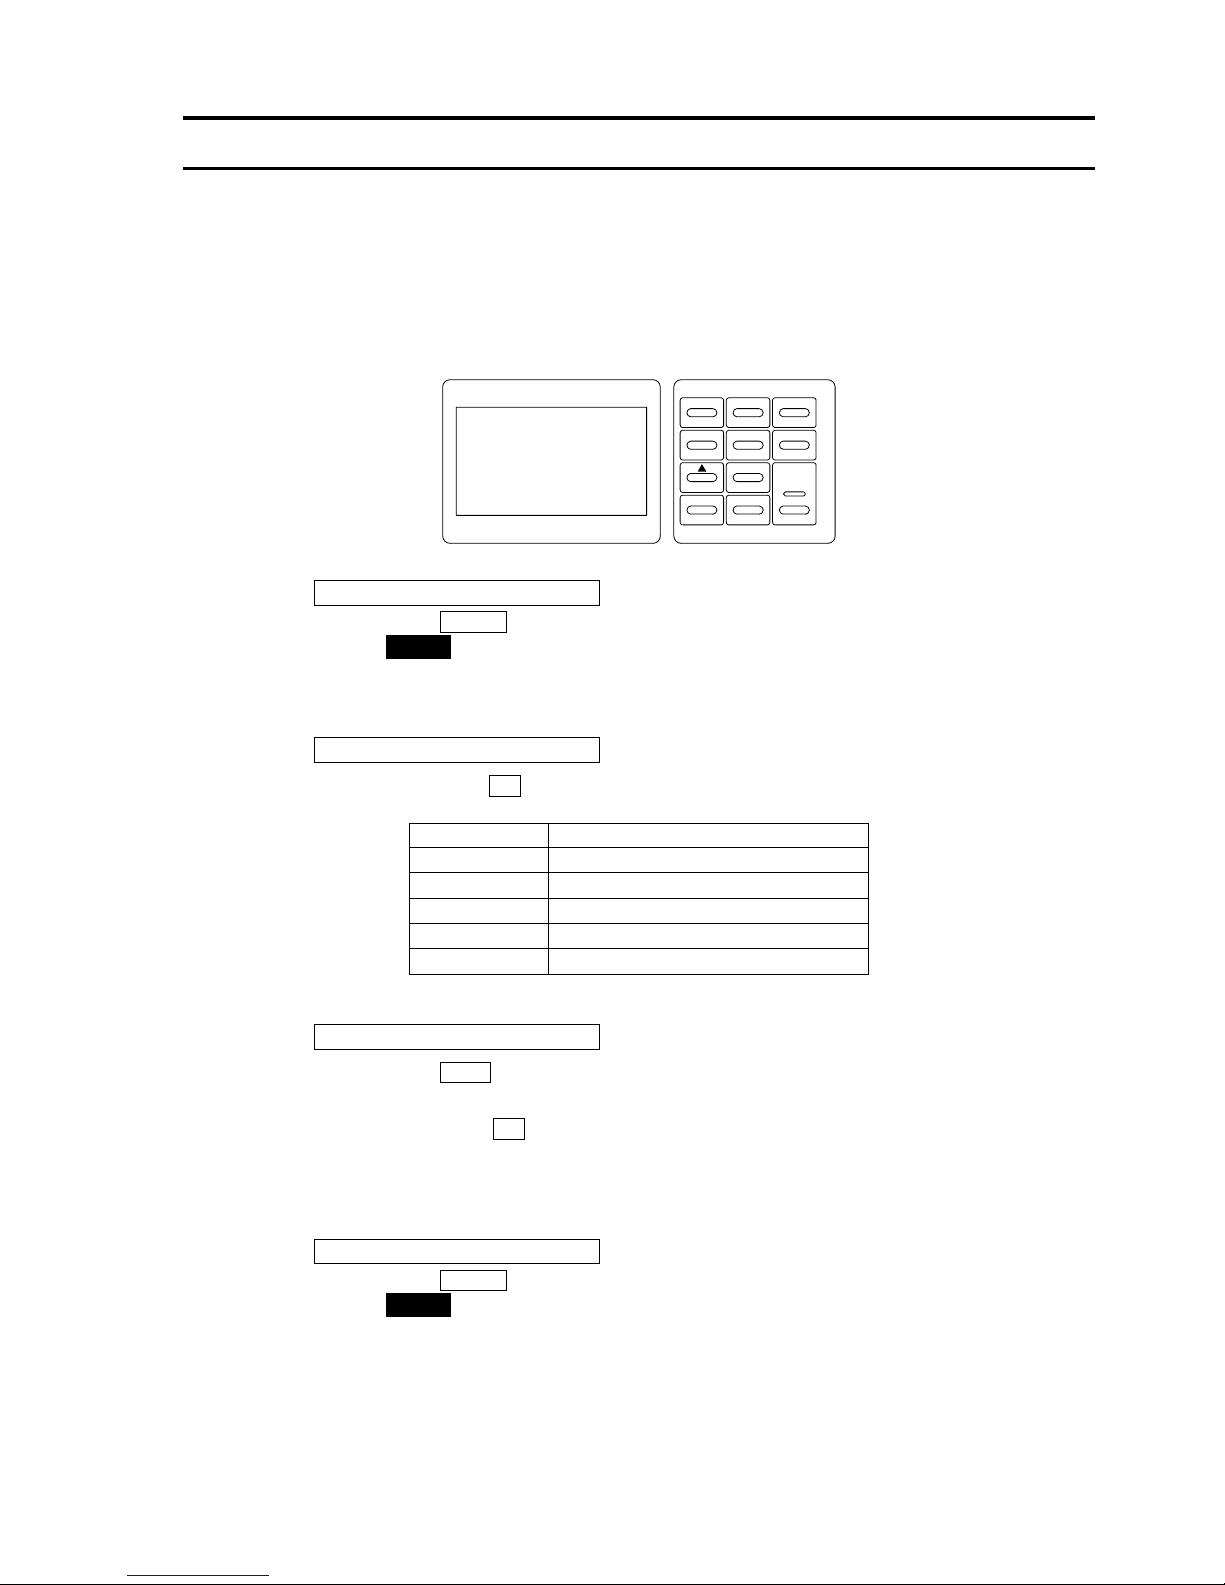
3.9.1 Setting method
Setting of buzzer
①Press SHIFT key.
SHIFT is displayed at the right of the LCD.
②Press (BUZZER) key.
The LCD changes to the screen for setting.
Selection of buzzer operation
③Select with ▲key.
Display Operation
Buzzer sounds at GO output.
Buzzer sounds at HI output.
Buzzer sounds at LO output.
Buzzer sounds at HI and LO output.
Buzzer is turned OFF.
Adjustment of sound volume
④Press SEL key.
Buzzer sounds.
Adjust with
▲key to a proper sound volume.
The volume is adjustable in 10 steps.
Example) Adjusted to buzzer OFF, sound volume 8.
Finish
⑤Press SHIFT key.
SHIFT is displayed at the right of the LCD.
⑥Press
(BUZZER) key.
LCD
BUZZER SET
MODE
VOL OFF
08
SHIFT
(BUZZ)
Keys to use

14
3.10 ●Manual mode
In this mode, the temperature measurement, temperature conversion function etc. can be operated.
●It is not possible to change over to manual mode when the ONLINE is lit up by remote operation.
Operating procedures
●Make a change of manual mode / memory mode with SHIFT key and (MAN’L/MEM) keys.
In the manual mode, MAN’L mark is displayed at the upper side of the LCD, and the memory No.
is not displayed.
3.11 ●Memory mode
In this mode, the measurement with either one of 30 stored memories is possible.
The sampling rate is common in this case.
3.11.1 Selection of memory
●By means of operation on the front panel
To enter memory mode
①Press SHIFT key.
SHIFT lamp is lit up.
②Press (MAN’L/MEM) key.
Memory No. is displayed.
To recall memory
③Press SEL key.
Select a memory No. and call it.
To finish memory mode
④Press SHIFT key.
SHIFT lamp is lit up.
⑤Press (MAN’L/MEM) key.
●By means of remote operation
Refer to Remote Connector (article 4.1).
LCD
(SET)
SEL
S
mΩ
(ONLINE)
(BUZZ)
POWER
T.ELAMP
RATE
(LOCK)
AUTO
300mΩ
RANGE
0ADJ.
0 ADJ.
SHIFT
(MAN′L/MEM)
MAN'L
mΩ
123.45
123.45
mΩ
HI SET LO SET
113.45
COMP.SET
FUNC
OHM
Keys to use
LCD
(SET)
S
mΩ
(ONLINE)
(BUZZ)
POWER
T.ELAMP
RATE
(LOCK)
AUTO
300mΩ
RANGE
0ADJ.
0 ADJ.
SHIFT
(MAN′L/MEM)
COMP.SET
FUNC
MEM
113.45
LO SETHI SET
mΩ
123.45
mΩ
30
No.
123.45
SEL
OHM
Keys to use

15
3.11.2 Setting of memory
Set the meter to memory mode. When the memory mode is engaged by MEM signal through
REMOTE connector, the setting of memory is not allowed.
The parameters which can be memorized into the memory are following three:
●Function (temperature measurement and temperature conversion function can not be set).
●Comparator setting
(high limit and low limit value, standard value of ratio display function, deviation)
●Range of resistance measurement.
Note: ●Compensation temperature ℃of temperature compensation function and temperature
coefficient
ppm of resistance can not be set. The values set in the manual mode
remain as common value for the respective memory.
●Setting is not allowed in the ONLINE status.
●Setting is not allowed during the hold.
●During the setting, the sampling is stopped and the comparator output is held.
●When no key operation has been done for about 5 minutes during the setting, the
meter returns to measurement mode.
Enter memory mode
①(Refer to article 3.11.1)
To set memory
②Press SHIFT key.
SHIFT is displayed at the right of the LCD.
Press (SET) key.
The LCD changes to the screen for setting.
Selection of memory No.
③The cursor moves to No. mark, memory number.
Select a memory No. with ▲key.
Example shows that the memory No.30 is selected.
Setting of function
④Press SEL key.
The cursor moves to FUNC.
⑤Select either one, OHM, T.C, T.C RATIO, OHM RATIO mark with ▲key.
Example shows that the resistance measurement is selected.
Setting of measuring range
⑥Press SEL key.
The cursor moves to RANGE Resistance Range.
⑦Select either one, 300mΩ~30kΩor
AUTO mark with ▲key.
Example shows that the 300Ωrange is selected.
LCD
(ONLINE)
(BUZZ)
POWER
T.ELAMP
RATE
(LOCK)
0ADJ.
SHIFT
COMP.SET
FUNC
123.45 Ω
30
LO SET
HI SET
RENGE
FUNC
No.
MEMORY SET
(SET)
(MAN′L/MEM)
SEL
RANGE
300 Ω300 Ω
124.45 Ω
OHM
Keys to use

16
Setting of comparator
*④When the OHM, T.C is selected in the setting of functions.*
⑥Press SEL key.
The cursor moves to the highest digit of HI SET high limit value.
Set a numeral with
and ▲keys.
Move the cursor with
key, then the selected characters are reversely displayed.
⑦Press SEL key.
The cursor moves to the highest digit of LOW SET high limit value.
Set a numeral with
and ▲keys.
Move the cursor with
key, then the selected characters are reversely displayed.
⑧Select the decimal point and unit with RANGE key.
Example shows that the high limit value is set to 124.45 mΩ,
low limit value to 123.45m mΩ, and the 300 Ωrange is selected.
Setting of ratio display
*④When the RATIO is selected in the setting of functions.*
⑥Press SEL key.
The cursor moves to the highest digit of STD Reference value.
Move the cursor with
key, then the selected characters are reversely displayed.
Set a numeral with
and ▲keys.
⑦Select the decimal point and unit with RANGE key.
⑧Press SEL key.
The cursor moves to the highest digit of DEV deviation.
Set a numeral with
and ▲keys.
Move the cursor with
key, then the selected characters are reversely displayed.
Example shows that the setting is made to 120.00Ω, deviation 5.0%.
Finish
⑨Press SHIFT key.
SHIFT is displayed at the right of the LCD.
Press (SET) key.
LCD
(ONLINE)
(BUZZ)
POWER
T.ELAMP
RATE
(LOCK)
0ADJ.
SHIFT
COMP.SET
FUNC
123.45 Ω
124.45 Ω
LO SET
HI SET
MEMORY SET
(SET)
(MAN′L/MEM)
SEL
No.
RENGE
30
300 Ω
RANGE
FUNC OHM
Keys to use
LCD
(ONLINE)
(BUZZ)
POWER
T.ELAMP
RATE
(LOCK)
0ADJ.
SHIFT
COMP.SET
FUNC
MEMORY SET
(SET)
(MAN′L/MEM)
SEL
STD
DEV 120.00 Ω
005.0 %
No.
RENGE
30
300 Ω
RANGE
FUNC OHM RATIO
Keys to use
17
4. Remote control
4.1 ●Remote connector
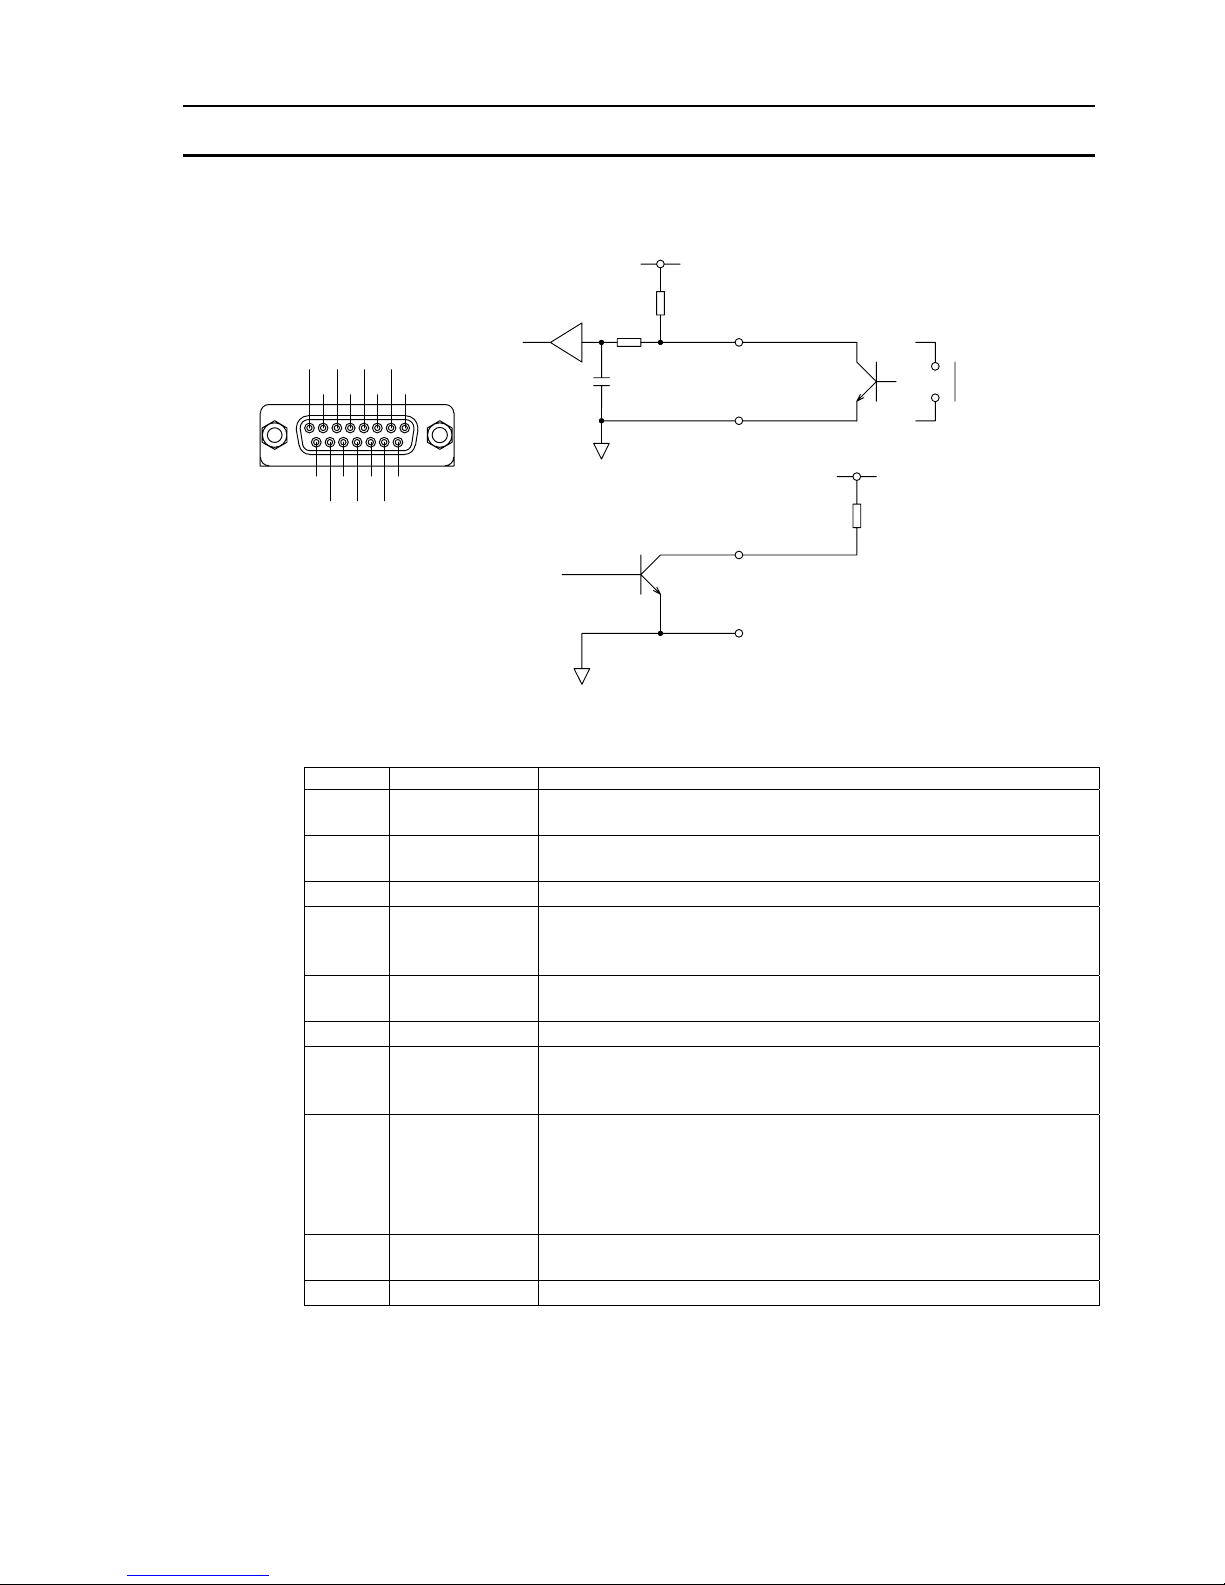
4.1.1 Pin operation
(Dsub15pin)
Pin No. Signal Function
1 0 ADJ input Zero adjustment is done by making this signal ON.
(Refer to the article 3.6)
2 PRINT input Remote print signal when fitted with printer interface.
(For detail, refer to the instruction manual of printer interface.)
3 MEM input Memory mode is selected by turning this signal ON.
4 TRIG input One shot sampling is done and the judgement result is output
by making this signal ON during the hold,
Min. ON time: 5 ms
5 SW input Broken line detection & self-check is started by making this
signal ON.
6 E0C output Transistor output is turned ON when finishedAD conversion.
7 CC ERR output Transistor output is made ON when the current does not flow
due to open circuit of SOURCE terminal, the error is detected
in broken line detection & self-check and so on.
9
10
11
12
13
M-SEL0
M-SEL1
M-SEL2
M-SEL3
M-SEL4
Input a memory No. and recall memory in memory mode.
14 HOLD input Same action as HOLD on input/output terminals is made.
They are internally connected as common.
8, 15 COM Common for input and output.
15
14
13
12
11
109
87654 2
3 1
COM
Input circuit(L=1.5V or less H=3.5〜5V I
IL
≦‑1mA)
Output circuit
Up to 30V
COM
+5V
18
4.1.2 Remote operation of memory mode
①As long as MEM signal is kept ON, the mode is memory mode.
●When moved to the memory mode, ONLINE lamp is lit up.
●Memory No. being selected is displayed.
Note: In case that the code other than specified is selected, it is not allowed to enter the
memory mode. Make an input of the code 1~30.
②Make an input of code of the memory No. and recall the memory.
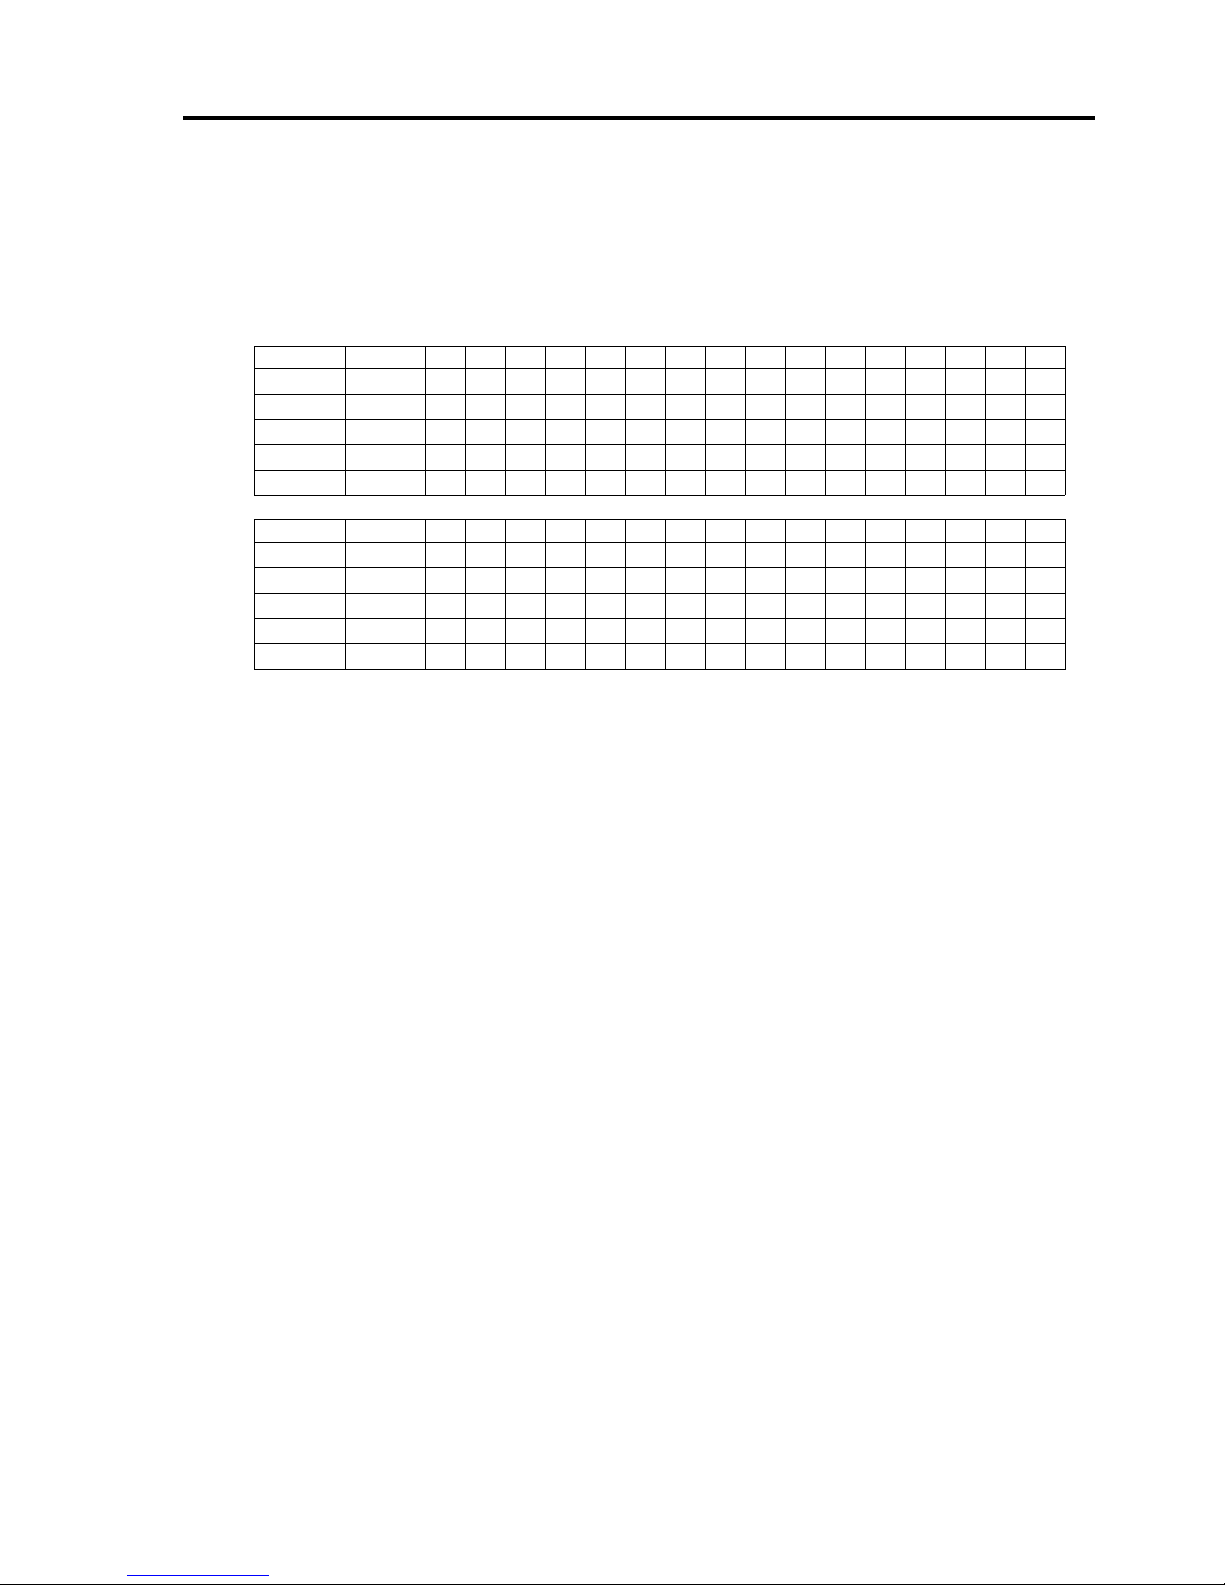
Memory code table
SignalWeight0123456789101112131415
M-SEL0 1
○○○○○○○○
M-SEL1 2
○ ○
○ ○
○○
○ ○
M-SEL2 4
○ ○ ○ ○
○○○ ○
M-SEL3 8
○○○○○○○ ○
M-SEL4 16
Signal Weight 16 17 18 19 20 21 22 23 24 25 26 27 28 29 30 31
M-SEL0 1
○○○○○○○○
M-SEL1 2
○ ○
○ ○
○○
○ ○
M-SEL2 4
○ ○ ○ ○
○○○ ○
M-SEL3 8
○○○○○○○ ○
M-SEL4 16 ○○○○○○○○○○○○○○○ ○
○: Makes ON
Blank:TurnsOFF
0, 31 : No change
③Turn OFF
MEM signal.
●Moving to the manual mode, ONLINE lamp is turned OFF.
●Finishes the memory mode.
19
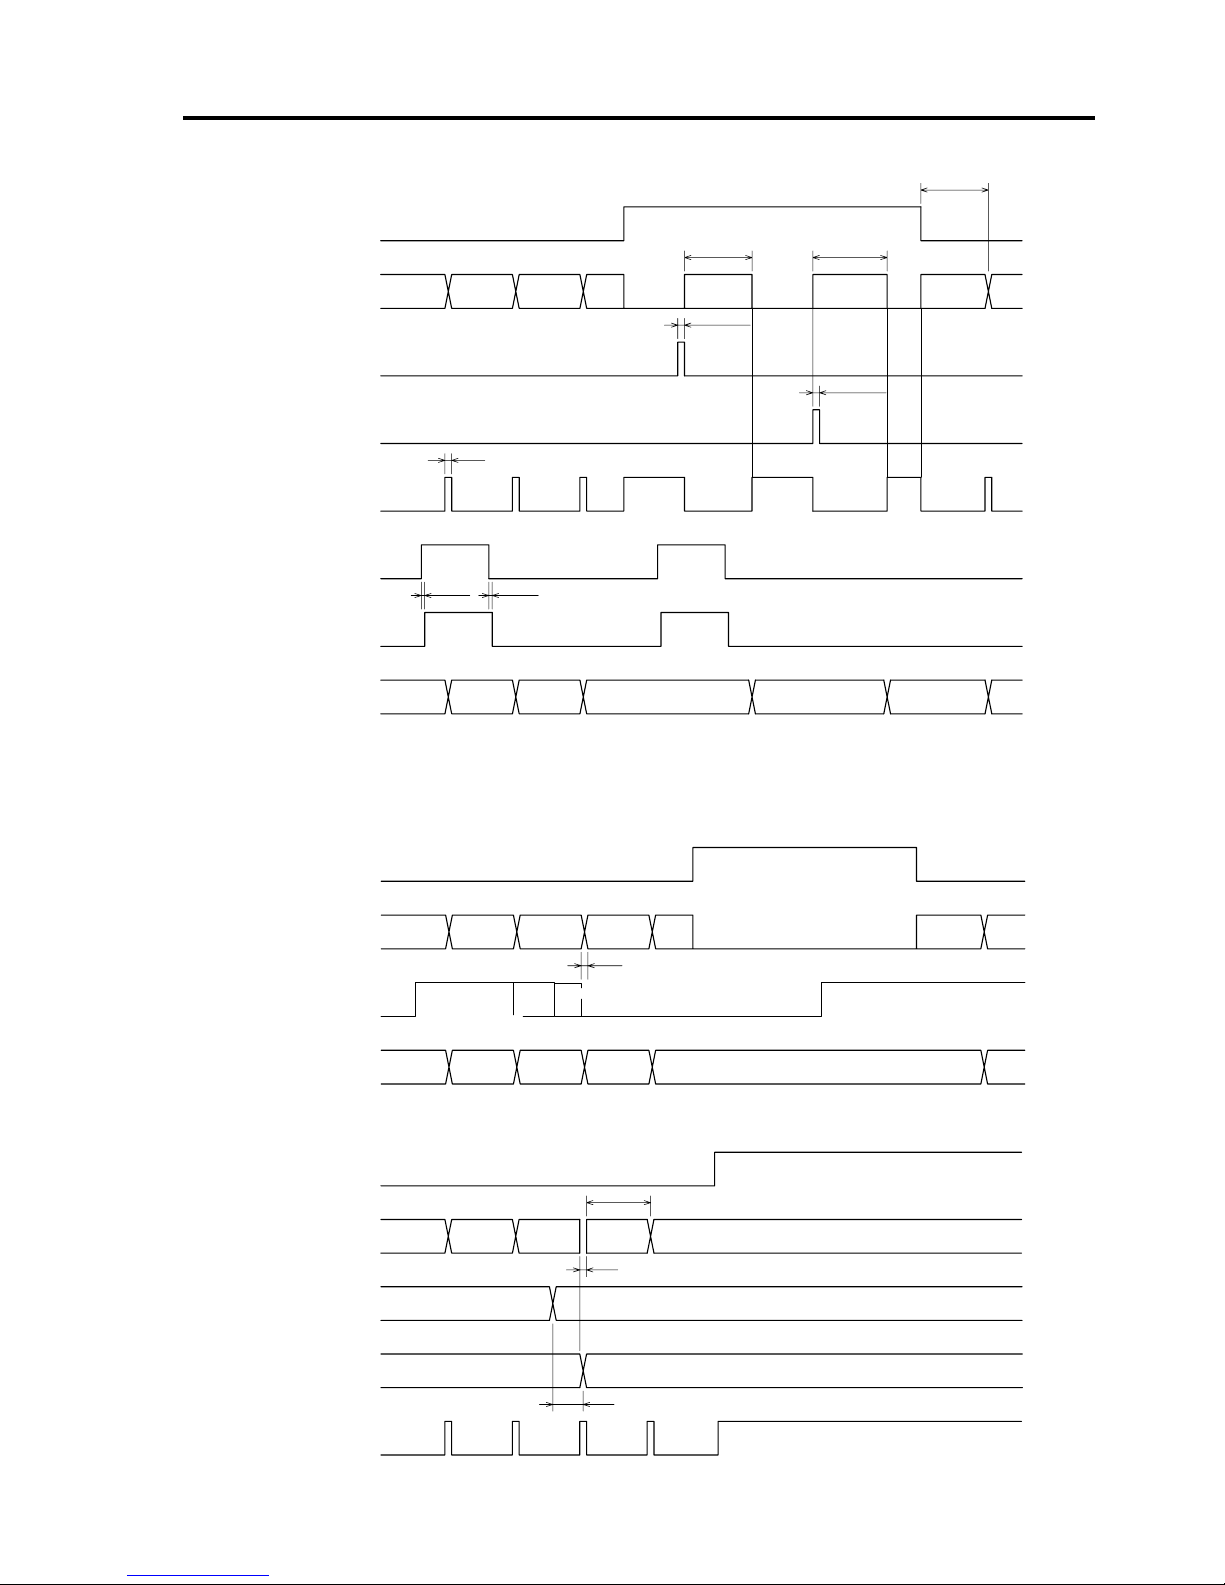
4.1.3 Timing chart of remote control
(1) Measurement action
Tsh = Sampling rate + 3ms
Sampling rate: F = 50ms S = 250ms
(2) Zero adjustment
(3) Change-over of memory (change-over of memory/manual is the same)
Ts = Sampling rate
MAX2ms MAX2ms
5ms
5ms or more
Tsh Tsh
Tsh
S
0
SAMPLING
RESET
HOLD
TRG
EOC
INPUT
CC ERR
DISPLAY
OFF
ON
CONNECTED
OPEN
OFF
ON
OFF
ON
OFF
ON
OFF
ON
S
1
S
2
S
3
S
4
S
5
S
6
S
7
S
0
S
1
S
2
S
4
S
5
S
6
5ms or more
S
1
SAMPLING
HOLD
DISPLAY
OFF
ON
S
2
S
3
S
4
S
6
S
7
S
1
‑S
1
S
2
‑S
1
S
3
S
4
S
6
‑S
4
S
5
O ADJ OFF
ON
S
0
1ms
SAMPLING
MEM
HOLD
FUNCTION
EOC
OFF
ON
Ts
6ms
8ms
M‑SEL 0〜4
RANGE
20
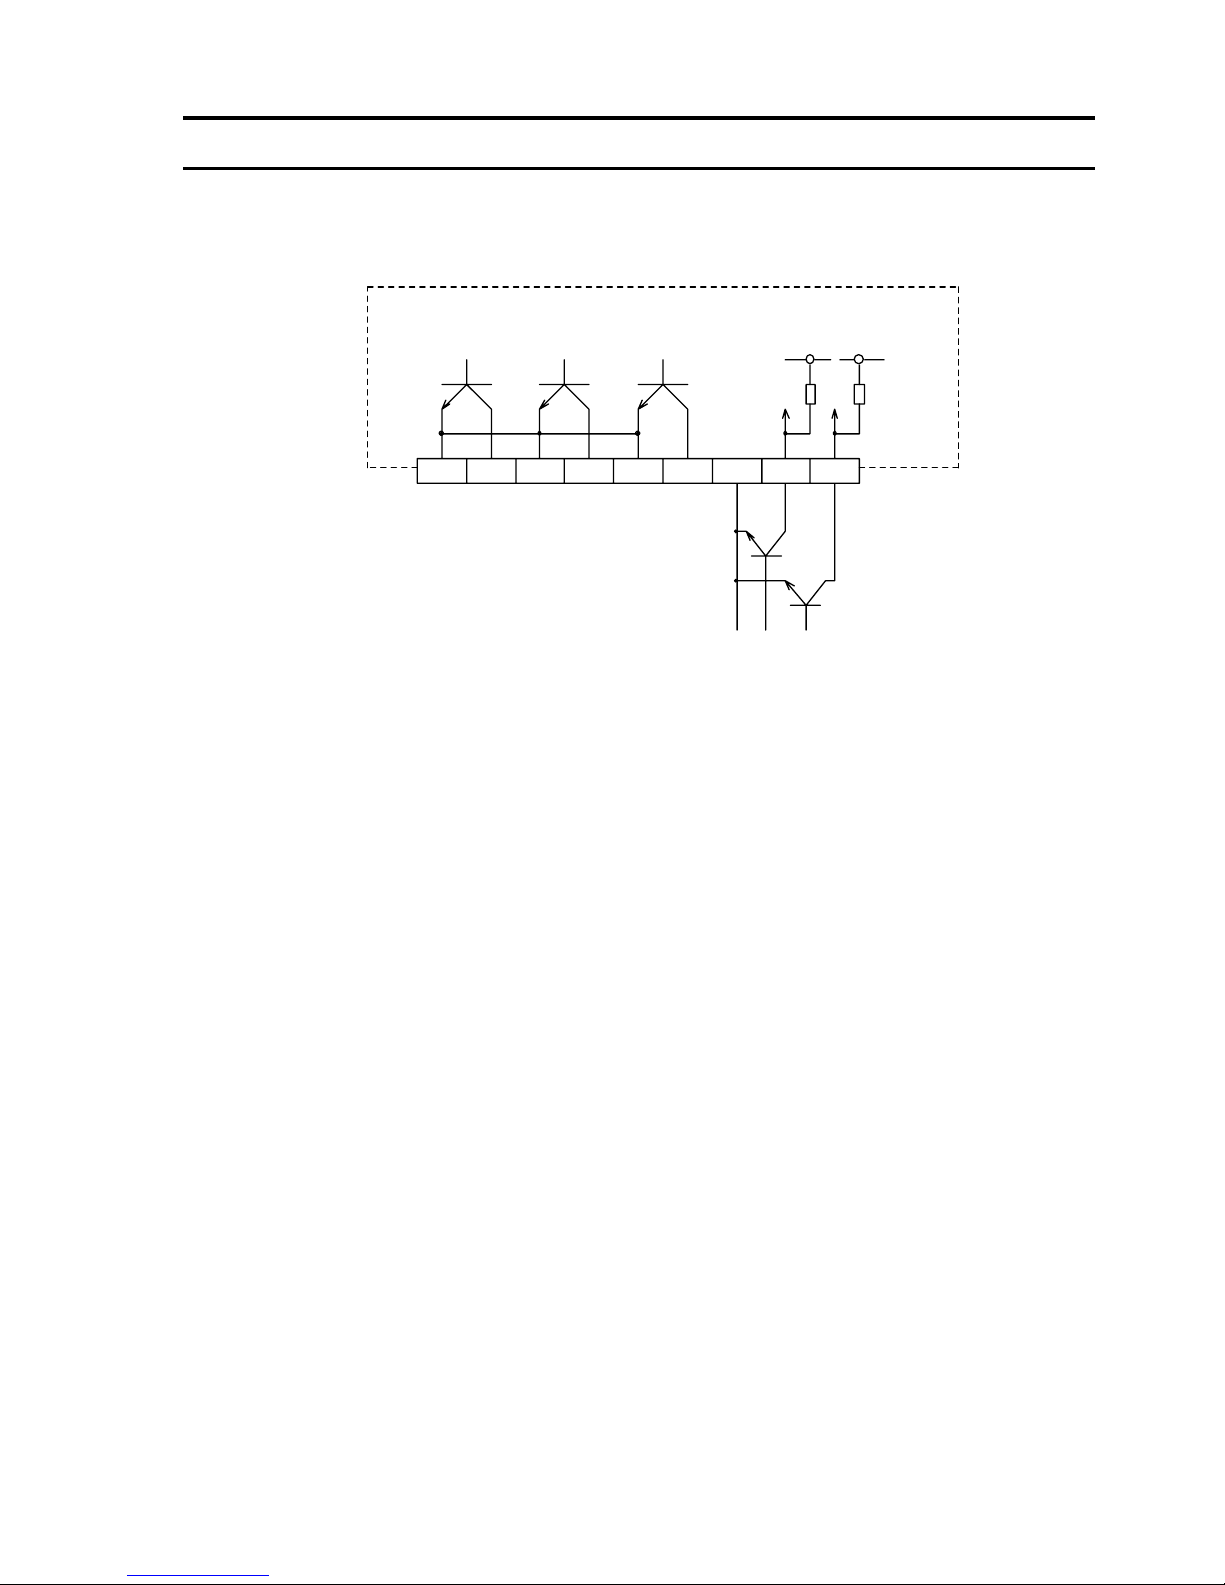
4.2 ●Remote control (input & output terminal block)
Terminal arrangement
(1)
HOLD terminal (hold)
By short-circuiting the
HOLD terminal on the rear panel to COM terminal, the display
value, comparator output and BCD data output are held. During the hold operation,
operation of all the switches is disabled.
(2)
RST terminal (reset)
By short-circuiting the
RST terminal on the rear panel to COM terminal, the comparator
output is reset and the comparator display is turned OFF.
○One shot sampling hold action
With the condition that
HOLD is short-circuited, one shot sampling hold can be done by
switching ON/OFF the
RST. Do one shot sampling hold with the manual range.
In case of auto range, it may cause an error.
(3) Comparator output
Open collector output :
HI, GO, LO, one for each, sink type
30V 30mA Max.
123456789
GCOM GO LCOM LO HCOM HI COM HOLD RST
+5V
3568
+5V
Open collector output
Table of contents
Other Tsuruga Electric Corporation Measuring Instrument manuals

Popular Measuring Instrument manuals by other brands


Nikon
Nikon Nivo Series instruction manual

Endress+Hauser
Endress+Hauser Levelflex FMP56 operating instructions

Raytech
Raytech TR-MARK III instruction manual

Monitor Technologies
Monitor Technologies TC-1 Installation and Operation Bulletin

Novus
Novus NHDR-6116-H2-II user manual

Rohde & Schwarz
Rohde & Schwarz ESH3-Z6 manual

Xylem
Xylem WTW pH/ION 3310 operating manual

Novatech
Novatech 1635 user manual

SBC
SBC Saia PCD ALD1D5FD Assembly and operating instructions

Termoprodukt
Termoprodukt Node Tele-1 user manual

Piera Systems
Piera Systems Canaree ARUBA quick start guide

PCB Piezotronics
PCB Piezotronics ICP HT352A25 Installation and operating manual