TT Toys Toys Italia 1978 Installation instructions

USO E MANUTENZIONE
USE AND CARE
UTILISATION ET ENTRETIEN
GEBRAUCH UND WARTUNG
EMPLEO Y MANUTENCION
USO E MANUTENÇÃO
GEBRUIK EN ONDERHOUD

(A)
(B)
(C)
(D)

ISTRUZIONI PER L’USO
Grazie per aver scelto questa automobilina giocattolo prodotta da TT Italia 1978.
Questo manuale istruzioni contiene indicazioni importanti per il montaggio sicuro, l’uso e la manutenzione dell’automobilina e deve essere
conservato per futuri impieghi.
Prima di cominciare:
leggere attentamente le istruzioni prima di usare per la prima volta l’automobilina. Utilizzare il prodotto solo dopo aver letto e compreso le istruzioni
per l’uso.
Avvertenze importanti
L’automobilina giocattolo soddisfa i requisiti previsti dalla normativa europea EN71, contrassegnata dal simbolo CE, ed è omologata da un istituto di
sicurezza esterno. Il prodotto è indicato per bambini a partire da 3 anni.
Avvertenze per i genitori
Occorre ricordare che il naturale impulso al gioco e la vivacità dei bambini possono produrre situazioni e
pericoli che escludono qualsiasi responsabilità da parte del produttore. Esercitare quindi i bambini e tutti gli
utenti del prodotto ad usare correttamente l’automobilina, prestare attenzione ai possibili pericoli e tenere
sempre i bambini sotto vigilanza per evitare cadute o collisioni tali da procurare lesioni all'utilizzatore o a
terzi. TT Italia 1978 declina ogni responsabilità per qualsiasi tipo di incidente che occorra durante l’uso
dell’automobilina giocattolo. L’ automobilina deve essere utilizzata su superfici piane, non ruvide o irregolari.
Non è consentito agganciare l’automobilina come rimorchio di altri veicoli.
Il veicolo può sostenere un carico massimo di 30 kg.
! ATTENZIONE:
Per ridurre il rischio di incidenti è necessaria la supervisione di un adulto. Non utilizzare il veicolo su
strade pubbliche, vie o piazze o in vicinanza di veicoli. Non utilizzare l’ automobilina in prossimità di
scale, declivi, zone di pendenza o specchi d’acqua. L’automobilina deve essere utilizzata da un solo
bambino per volta. Assicurarsi che i bambini indossino scarpe chiuse.
RISCHIO DI INCENDIO. Non escludere il fusibile. Rimpiazzarlo solo con un fusibile equivalente (20A)
Pericolo di soffocamento ! Tenere lontano il sacchetto di plastica contenuto nella confezione dalla portata dei bambini piccoli.
Non adatto ai bambini inferiori a 3 anni. Contiene parti piccole che potrebbero essere ingerite.
Prima di utilizzare il prodotto per la prima volta è necessario eseguire alcune operazioni di montaggio.
Le fasi di montaggio devono essere eseguite da una persona adulta in possesso di una abilità manuale sufficiente.
Per la pulizia del prodotto utilizzare detergenti non inquinanti e, in nessun caso, aggressivi o corrosivi.
Controllare periodicamente tutti i componenti per verificare eventuali segni di usura ed assicurarsi che le viti siano alloggiate e fissate correttamente.
Per mantenere inalterato il livello di sicurezza del veicolo, sostituire immediatamente eventuali componenti usurati e fare in modo che il veicolo non
venga usato finchè non è stato riparato.
Attenzione: utilizzare solo parti di ricambio originali
Condizioni di garanzia
L’automobilina TT Italia 1978 è un prodotto di qualità costruito con materiali pregiati.
Per questo motivo la TT Italia 1978 offre una garanzia di 2 anni a partire dalla data di acquisto. Qualora si riscontrino durante tale periodo guasti o
anomalie dovute a difetti di materiale o di fabbricazione, la TT Italia 1978 provvederà, a propria discrezione, a riparare il prodotto, a sostituirlo
oppure a rimborsare il prezzo d’acquisto.
Sono esclusi dalla garanzia danni causati da uso improprio, da interventi di personale non autorizzato o da naturale usura.
La presente garanzia non limita i diritti accordati al compratore dalle leggi vigenti in relazione a eventuali difetti materiali.
Per richieste di intervento, domande o reclami connessi alla garanzia, rivolgersi al proprio rivenditore.
Il presente certificato di garanzia è valido solamente se accompagnato dalla ricevuta di acquisto originale del prodotto.
AVVERTENZE VEICOLO ELETTRICO
Non utilizzare il veicolo sotto la pioggia.
Inserimento dei fusibili
I fusibili non vengono montati in fabbrica.
Prelevare i fusibili dalla busta contenente gli accessori e infilarlo nel portafusibili situato sotto l’automobilina.
Utilizzare solamente i normali fusibili per autoveicoli reperibili in commercio con capacità di carico pari a quelli forniti in dotazione (20 o 25 A in
base alla automobilina). Non utilizzare in alcun caso fusibili con capacità di carico superiore. Si potrebbe danneggiare l’impianto elettrico.
Localizzazione del connettore batteria.
Il connettore della batteria, da utilizzare per la ricarica della stessa, è solitamente posizionato sotto la vettura, o in alcuni casi può essere localizzato
sotto la capottina, dietro il paraurti posteriore, o sotto il cofano posteriore.
Caricare la batteria
La batteria è fornita parzialmente carica ma deve essere ricaricata completamente prima dell’uso almeno 10 ore ma non più di 20 ore.
Utilizzare solamente il carica batterie in dotazione.
Lasciare in carica la batteria per circa 16-20 ore prima di utilizzarla la prima volta.
Il tempo di caricamento è di circa 15 ore. Non caricare la batteria per un tempo superiore. In caso contrario, potrebbe danneggiarsi.
Quando il prodotto comincia a rallentare (durante l’uso normale) interrompetene l’uso e iniziate il processo di ricarica che duri almeno 8 ore ma non
più di 20 ore.
IT

Non lasciate scaricare totalmente la batteria.
Per ricaricare la batteria, collegare il connettore del carica-batterie al connettore della batteria. Collegare quindi il carica-batterie a una presa di
corrente.
Collegare il carica-batterie solamente a prese di corrente che abbiano una tensione conforme a quella indicata sul carica batteria stesso.
Staccare il carica-batterie dalla presa di corrente e dal connettore della batteria al massimo dopo 15 ore. Quindi unire i connettori della batteria.
Tempo di funzionamento circa 1,5 ore.
Attenzione: il carica batteria utilizzato con il giocattolo deve essere regolarmente controllato per verificare danneggiamenti al cavo di
alimentazione, alla spina, all’involucro e altri parti. In caso di danneggiamento il giocattolo non deve essere utilizzato fino a quando i danni
non siano stati riparati.
Il caricatore non è un giocattolo
Devono essere utilizzate solo batterie dello stesso tipo o equivalenti a quelle raccomandate.
Le batterie non ricaricabili non devono essere ricaricate.
Le batterie ricaricabili devono essere ricaricate sotto la supervisione di un adulto.
Diversi tipi di batterie o batterie nuove e usate non devono essere mischiate.
Le batterie devono essere inserite rispettando la corretta polarità.
Le batterie scariche devono essere rimosse dal giocattolo.
I morsetti di alimentazione non devono essere cortocircuitati.
Non colpire o urtare le batterie rischio di fuga di sostanze corrosive.
Non conservare le batterie insieme a generi alimentari o indumenti.
Non tirare i fili elettrici
Queste batterie sono molto resistenti e convenienti da utilizzare ma possono verificarsi alcuni cambiamenti chimici interni irreversibili se le batterie
verranno scaricate troppo o sovraccaricate.
RICORDATE: caricate completamente la batteria prima del primo utilizzo, rimuovetela quando il prodotto comincia a funzionare
lentamente e successivamente ricaricate completamente la batteria.
Se si permette l’utilizzo del prodotto quando rallenta fino ad uno stop completo e si lascia la batteria scarica per un lungo tempo la batteria
sarà irrimediabilmente danneggiata e probabilmente distrutta.
Se la batteria viene lasciata in carica per un periodo troppo lungo rispetto alle 20 ore previste la batteria sarà irrimediabilmente danneggiata
e probabilmente distrutta.
Informazioni circa il riciclo smaltimento delle batterie.Contributi alla protezione dell’ambiente.
Non gettare le batterie usate nei rifiuti domenstici. Depositarle nell’apposito centro di recupero batterie usate o presso un centro addetto
all’eliminazione di rifiuti speciali. Informarsi presso il proprio comune.
Pb Batterie al piombo / Cd Batterie al cadmio / Hg Batterie al mercurio
Come si ripone l’automobilina in caso di non uso
Quando l’automobilina non viene usata per un periodo abbastanza lungo oppure quando non si desidera che il bambino usi l’automobilina in
mancanza di un’adeguata sorveglianza, si deve staccare il collegamento a spina.
La batteria va ricaricata periodicamente almeno ogni sei mesi per circa 5 o 8 ore anche quando si cessa di usare l’automobilina per un lungo periodo .
Guasti: controllare i fusibili
L’impianto elettrico del veicolo è protetto da eventuali sovraccarichi tramite fusibili. In caso di guasti, verificare il funzionamento dei fusibili e dei
collegamenti a spina.
I fusibili funzionano correttamente se il filo fusibile non presenta alcuna interruzione.
(A) ISTRUZIONI GUIDA AUTO ELETTRICA 6V LEVA CAMBIO
Come si guida
Per guidare il veicolo in avanti, portare la leva del cambio nella posizione 1.
Azionando il pedale dell’acceleratore, si accendera il Led verde e la vettura si muove in avanti.
Per guidare il veicolo indietro, portare la leva del cambio nella posizione 2.
Azionando il pedale dell’acceleratore, si accendera il Led rosso e la vettura si muove indietro.
Rilasciando il pedale dell’acceleratore la vettura viene frenata da un freno elettrico.
Azionando il pedale del freno si toglie corrente all’impianto e si aziona il sistema frenante.
Posizionando la leva nella posizione centrale la vettura è in folle nessun movimento è consentito schiacciando il pedale dell’acceleratore, la macchina
è frenata.
(B) ISTRUZIONI GUIDA AUTO ELETTRICA 6V DUE PULSANTI
Come si guida
Per guidare il veicolo in avanti, schiacciare il tasto con la freccia verde, si accende il Led verde.
Azionando il pedale dell’acceleratore, la vettura si muove in avanti.
Per guidare il veicolo indietro, schiacciare il tasto con la freccia rossa, si accende il Led rosso.
Azionando il pedale dell’acceleratore, la vettura si muove indietro.
Rilasciando il pedale dell’acceleratore la vettura viene frenata da un freno elettrico.
(A) ISTRUZIONI GUIDA AUTO ELETTRICA 12V LEVA CAMBIO II VELOCITA’
Come si guida
Per guidare il veicolo in avanti, portare la leva del cambio nella posizione 1.
Azionando il pedale dell’acceleratore, si accendera il Led verde e la vettura si muove in avanti.
Per guidare il veicolo indietro, portare la leva del cambio nella posizione 2.
Azionando il pedale dell’acceleratore, si accendera il Led rosso e la vettura si muove indietro.
Rilasciando il pedale dell’acceleratore la vettura viene frenata da un freno elettrico.
Azionando il pedale del freno si toglie corrente all’impianto e si aziona il sistema frenante.
Posizionando la leva nella posizione centrale giallo la vettura è in folle nessun movimento è consentito schiacciando il pedale dell’acceleratore, la
macchina frenata.
Per aumentare le prestazioni della vettura spostare l’interruttore di sicurezza dalla posizione I alla posizione II.
(C) (D) ISTRUZIONI GUIDA AUTO ELETTRICA 12V TRE PULSANTI
Come si guida
Per guidare il veicolo in avanti, schiacciare il tasto con la freccia verde, si accende il Led verde.
Azionando il pedale dell’acceleratore, la vettura si muove in avanti.
Per guidare il veicolo indietro, schiacciare il tasto con la freccia rossa, si accende il Led rosso.

Azionando il pedale dell’acceleratore, la vettura si muove indietro.
Schiacciando il pulsante giallo la vettura è in folle nessun movimento è consentito schiacciando il pedale dell’acceleratore, la macchina frenata.
Azionando il pedale del freno si toglie corrente all’impianto e si aziona il sistema frenante.
Utilizzo del cruscotto opzionale.
Se la vettura è dotata del cruscotto opzionale, durante la marcia verranno visualizzate le informazioni relative a velocità e stato di carica delle batterie.
La velocità è indicata dall’accensione di una serie di led in scala cromatica.
Lo stato di carica delle batterie è indicato da una serie di led ed è visulizzabile anche a vettura ferma tramite l’apposito tasto presente sul cruscotto.
Si consiglia di ricaricare la batteria della vettura quando si accende solo l’indicatore luminoso di colore rosso alla base della scala.
Utilizzo del cambio velocità opzionale.
Se la vettura è dotata del cambio velocità opzionale, agendo sui due pulsanti si ottiene un aumento o un calo della velocità della vettura.
Il tasto blu corrisponde alla marcia più bassa, il tasto rosso corrisponde alla marcia più alta.
OWNER’S MANUAL
We are delighted that you have decided to purchase this TT Italia 1978 children’s car.
This owner’s manual contains important information for the safe assembly, handling and care of the car and has to be kept for future reference.
Important information
This children’s car complies with the regulations of European standard EN71, bears the CE symbol and has been approved by an external certification
organisation. It is suitable for children aged 3 and above.
Notes for parents
Please remember that the natural playfulness and temperament of children can lead to unpredictable situations and dangers for which the
manufacturer can not be held responsible. So you should educate children and users on how to use the car for children, draw their attention to possible
dangers and keep children supervised at all times to avoid falls or collisions causing injury to the user and third parties. TT Italia 1978 can not accept
any responsibility whatsoever for accidents resulting from the use of the car for children. The car children should be used on flat surfaces, not rough
and not irregular.
The car children only suitable for one person. Do not attach it to other vehicles. The maximum payload of the vehicle is 30 kg.
!WARNING:
To reduce the risk of injury, adult supervision is required.
Never use in roadways, near motor vehicles, on or near steep inclines or steps, swimming pools or other
bodies of water; always wear shoes, and never allow more than 1 rider.
RISK OF FIRE. Do not bypass the fuse. Replace only with equivalent fuse (20A)
Danger of asphyxiation! Keep the plastic bag supplied with the car out of the reach of small children.
Not recommended for children under 3 years. Small parts may be swallowed.
Depending on whether you have purchased the pedal or electric version of the children’s car, some assembly work may be required before you use the
car for the first time.
This assembly work and the battery charging must be completed by an adult with suitable skills.
Use environmentally friendly cleaning products and do not use aggressive or caustic ones.
The bearing bushes on the wheels and the drive cranks must be lubricated with a few drops of oil every three months.
Do not use the electric version of the car in rain.
Check all the parts at regular intervals for signs of wear and check the screw connections to ensure that they are secure. To maintain the high safety
level, worn parts must be replaced immediately and the car not used until it has been repaired.
Attention: use only original spare parts.
Warranty conditions
The TT Italia 1978 children’s car is a quality product made of quality materials.
TT Italia 1978 therefore grants a warranty of two years on it from the date of purchase. If a defect occurs during this time, caused by faulty material or
workmanship, TT Italia 1978 shall, at its own discretion, repair
or replace the product or reimburse the purchase price.
Damage caused by incorrect treatment, unauthorised repairs and natural wear and tear are not covered by the warranty.
This warranty does not affect the statutory rights of the purchaser relating to defects.
If you wish to make a claim under the warranty, please contact your sellers.
The following warranty document is only valid if it bears by the purchase receipt is attached to it.
WARNINGS ELECTRIC CARS
Do not use the electric version of the car in rain.
Put in the fuses
The fuse is not fitted at the factory.
Take the fuses out of the accessories bag and insert them in the fuses holder on the underside of the car.
Only use a conventional motor vehicle fuses with a capacity of 20A or 25A. Do not use a higher capacity fuses since otherwise the electrical system
may be damaged.
Localisation of the battery connectors.
EN

The battery connectors to use for the charge is usually located under the car or in some case under the hood, under the back bumper, or inside the rear
baggage.
To charge the battery
The battery is supplied partly charged but must be fully charged before use: at least 10 hours but no more than 20 hours.
Only use the charger supplied with the car.
The battery must be charged for approx. 16 - 20 hours before the car can be used for the first time.
The average charging time is approx. 15 hours. Do not exceed this time since otherwise the battery will be damaged.
When the product begins to slow down (in normal use) remove it from use and start the charging process for at least 8 hours but no more than 20
hours.
Do not let it fully discharge.
To charge the battery connect the plug on the charger to the red battery plug, then connect the charger to a socket.
Only connect the charger to sockets whose voltage is identical to that shown on the charger.
Disconnect the charger from the power supply and the battery plug at the latest after 15 hours. Then connect the on-board plug to the battery plug.
Approximately time of use 1,5 hours.
Attention: the charger used with the toy has to be regularly examined for damage to the cord, plug, enclosure and other parts. In the event of such
damage, the toy must not be used until the damage has been repaired.
The charger is not a toy.
Attention:
Only batteries of the same or equivalent types as recommended are to be used.
Non-rechargeable batteries are not to be recharged.
Batteries must only be recharged by an adult or under adult supervision.
Do not mix different types of new or used batteries.
Batteries must be inserted facing in the right direction (match the battery polarity signs: +/-)
Used batteries must be removed from the toy.
The battery terminals must not be short-circuited.
Do not allow batteries to knocked or banged there is a risk of leakage of corrosive substances.
Do not store batteries with food or among clothing.
Do not pull on the electric wires.
These types of battery are very robust and convenient to use but some irreversible, internal chemical changes will occour it they are discharged too
much or overcharged too much
Remember:
Charge the battery fully before first use, remove from use when the product starts to slow down and then fully charge the battery again.
Is the product is allowed to run down completely, and if the battery is left discharger for a long period, the battery will be irrevocably damaged.
If the battery is left on charge for extended periods, more then 20 hours, it will be irrevocably damaged.
Information on battery recycling.
Battery elimination. We must help protect the environment.Batteries must not be thrown away with household waste. They can be disposed of in a
used batery recycling centre or a special waste elimination centre.
Your town hall can provide information.
Pb batteries with lead. / Cd batteries with Cadminm / Hg batteries with mercury.
To store the car
If the car is not to be used for a lengthy period or if you do not want your child to drive it without supervision, disconnect the plug connector.
The battery should be recharged at regular intervals at least every 6 months between 5 and 8 hours, even if the car is not used for a long period of
time.
Troubleshooting: To check the fuse
The electrical system in the car is protected from overloads by a fuse.
If the system suffers any faults check the fuse and the plug connections.
The fuse is on the underside of the car.
The fuse is OK if the fusible wire is not broken.
(A) DRIVE INSTRUCTIONS ELECTRIC CAR 6V GEAR LEVER
How to drive
To drive forward move the lever gear to the position 1.
Pressing the gas pedal the green led will light up and the car start to move forwards.
To drive backwards move the lever gear to the position 2.
Pressing the gas pedal the red led will light up and the car start to move backwards.
Leaving the gas pedal an electrical brake will stop the car.
Pressing the brake pedal you cut off the current on the wiring and you activate the braking system.
Setting the lever in the central position, the car is in neutral and no movement are allowed pressing the gas pedal, the car is braked.
(B) DRIVE INSTRUCTIONS ELECTRIC CAR 6V TWO BUTTONS
How to drive
To drive forward push the button with the green arrow, a green led will switch on.
Pressing the gas pedal the car start to move forward.
To drive backwards the button with the red arrow a red led will switch on.
Pressing the gas pedal the car start to move backwards.
Leaving the gas pedal the electrical brake will stop the car.
(A) DRIVE INSTRUCTIONS ELECTRIC CAR 12V GEAR LEVER II SPEED
How to drive
To drive forward move the lever gear to the position 1.
Pressing the gas pedal the green led will light up and the car start to move forwards.
To drive backwards move the lever gear to the position 2.
Pressing the gas pedal the red led will light up and the car start to move backwards.
Leaving the gas pedal an electrical brake will stop the car.

Pressing the brake pedal you cut off the current on the wiring and you activate the braking system.
Setting the lever in the central position, the car is in neutral and no movement are allowed pressing the gas pedal, the car is braked.
To increase the speed of the car switch the security button from position I to position II
(C) (D) DRIVE INSTRUCTIONS ELECTRIC CAR 12V THREE BUTTONS
How to drive
To drive forward push the button with the green arrow, a green led will switch on.
Pressing the gas pedal the car start to move forward.
To drive backwards the button with the red arrow a red led will switch on.
Pressing the gas pedal the car start to move backwards.
Leaving the gas pedal the electrical brake will stop the car.
Pushing the yellow button, the car ins in neutral and no movement are allowed pressing the gas pedal, the car is braked.
Pressing the brake pedal you cut off the current on the wiring and you activate the braking system.
Using the optional dashboard.
If your car has the optional dashboard, during the use will be displayed some information concerning the speed and the batteries charge status.
The speed is indicated between a series of coloured led that switch on gradually.
The batteries charge status is showed by a series of coloured led, from green to red, and it is possible to check the batteries charge status also when
you are not using the car, by pushing the dedicated button.
It’s better to recharge the car batteries when the red led indicator at the bottom of the scale is switched on.
Using the optional gear change.
If your car has the optional gear change, you can increase or decrease the car speed by pushing the two buttons.
The blue button will select the slower speed, the red button will select the highest speed.
MODE D’EMPLOI
Merci d’avoir choisi cette petite voiture fabriquée par TT Italia 1978.
Ce manuel d’instructions contient des informations importantes pour un montage sûr, l’utilisation et l’entretien de la voiture. Il dois être
conservé pour un usage ultérieur.
Avant de commencer :
Lire attentivement les instructions avant d’utiliser la voiture pour la première fois. N’utiliser le produit qu’après avoir lu et compris les instructions
d’utilisation.
Avertissement important
La voiture « jouet » répond aux qualités requises par la norme européenne EN71, symbolisée par le logo CE, et est homologuée par un laboratoire
extérieur de certification. Le produit est conseillé pour les enfants à partir de 3 ans.
Avertissement pour les parents
Il convient de se souvenir que le dynamisme naturel et la vivacité des enfants à jouer peuvent mener à des situations de danger qui excluent toutes
responsabilités de la part du producteur.
Les enfants et tous les utilisateurs doivent donc s’entraîner à utiliser correctement la voiture. Faire attention aux possibles risques e surveiller toujours
les enfants.
TT Italia 1978 décline toutes responsabilités sur les accidents liés à l’usage de la voiture.
La voiture n’est pas homologuée pour un usage sur route. Ne pas utiliser le véhicule dans les rues, et sur les voies et places publiques.
S’assurer que les enfants portent des chaussures fermées.
Ne pas utiliser la voiture à proximité d’escaliers, de zones pentues ou de plans d’eau.
En présence d’escaliers, en bloquer l’accès en sorte qu’ils ne représentent pas de danger pour l’enfant.
La voiture ne doit être utilisée que par un seul enfant dans le cas d’une voiture monoplace.
Ne pas accrocher la voiture comme remorque à d’autres véhicules.
La voiture peut supporter un poids maximum de 30 kg.
!ADVERTISSEMENT:
Afin de réduire les risques de blessures, surveillance d'un adulte est nécessaire.
Ne pas utiliser dans les chaussées, près de véhicules à moteur, sur ou à proximité de fortes pentes ou des
marches, des piscines ou d'autres plans d'eau, toujours porter des chaussures, et ne jamais laisser plus de 1
coureur.RISQUE D'INCENDIE. Ne pas court-circuiter le fusible. Remplacez-la uniquement par un fusible
équivalent (20A)
Danger d’étouffement ! Ne pas laisser le sac plastique contenu à l’intérieur de la boite à la portée des enfants.
La voiture n’est pas adaptée aux enfants de moins de 3 ans. Elle contient des petites parties qui pourraient être avalées.
Avant d’utiliser le produit pour la première fois, il est nécessaire de procéder à quelques opérations de montage.
Ces opérations de montage doivent être réalisées par une personne adulte dotée d’une habilité manuelle suffisante.
Pour le nettoyage du produit, utiliser un détersif non polluant, et en aucun cas agressif ou corrosif.
Contrôler périodiquement tous les composants pour vérifier d’éventuels signes d’usure et s’assurer que les visses sont mises et vissées correctement.
Pour maintenir inaltérable le niveau de sécurité du véhicule, changer immédiatement les composants éventuellement usés et faire en sorte que le
véhicule ne soit pas utilisé avant que celui-ci ne soit réparé.
Attention: n’utiliser que des pièces de rechange originales.
Conditions de garanties
La voiture TT Italia 1978 est un produit de qualité fabriqué avec des matériaux qualitatifs.
Pour ce motif, la société TT Italia 1978 offre une garantie de 2 ans à partir de la date d’achat.
FR

Si pendant ce laps de temps, des dysfonctionnements ou des anomalies dus à des défauts de matériaux ou de fabrication, apparaissaient, la société TT
Italia 1978, procédera selon son bon vouloir, a réparer le produit, à le changer ou à rembourser le prix d’achat.
Sont exclus de la garantie, les dommages causés par un usage inapproprié, par une intervention de personnels non autorisés, et par une usure naturelle
du produit.
La présente garantie ne limite pas les droits accordés à l’acheteur dans le cadre des lois en vigueur en relation avec d’éventuels défauts de matériaux.
Pour toutes demandes d’interventions, questions ou réclamations liées à la garantie, se référer à son revendeur.
Le présent certificat de garantie n’est valable que s’il est accompagné de la preuve d’achat originale du produit.
NOTICE VEHICULE ELECTRIQUE
Ne pas utiliser le véhicule en cas de pluie.
Insertion des fusibles.
Les fusibles ne sont pas montés à l’usine.
Prendre les fusibles de l’enveloppe des accessoires et les introduire dans le porte fusible qui se trouve sous la voiture.
Utiliser seulement les fusibles standards pour les voitures avec la même capacité de charge des fusibles en dotation (20 ou 25 A selon le modèle de
voiture). Ne jamais utiliser de fusibles avec une capacité de charge supérieure, parce qu’ils pourraient endommager l’équipement électrique.
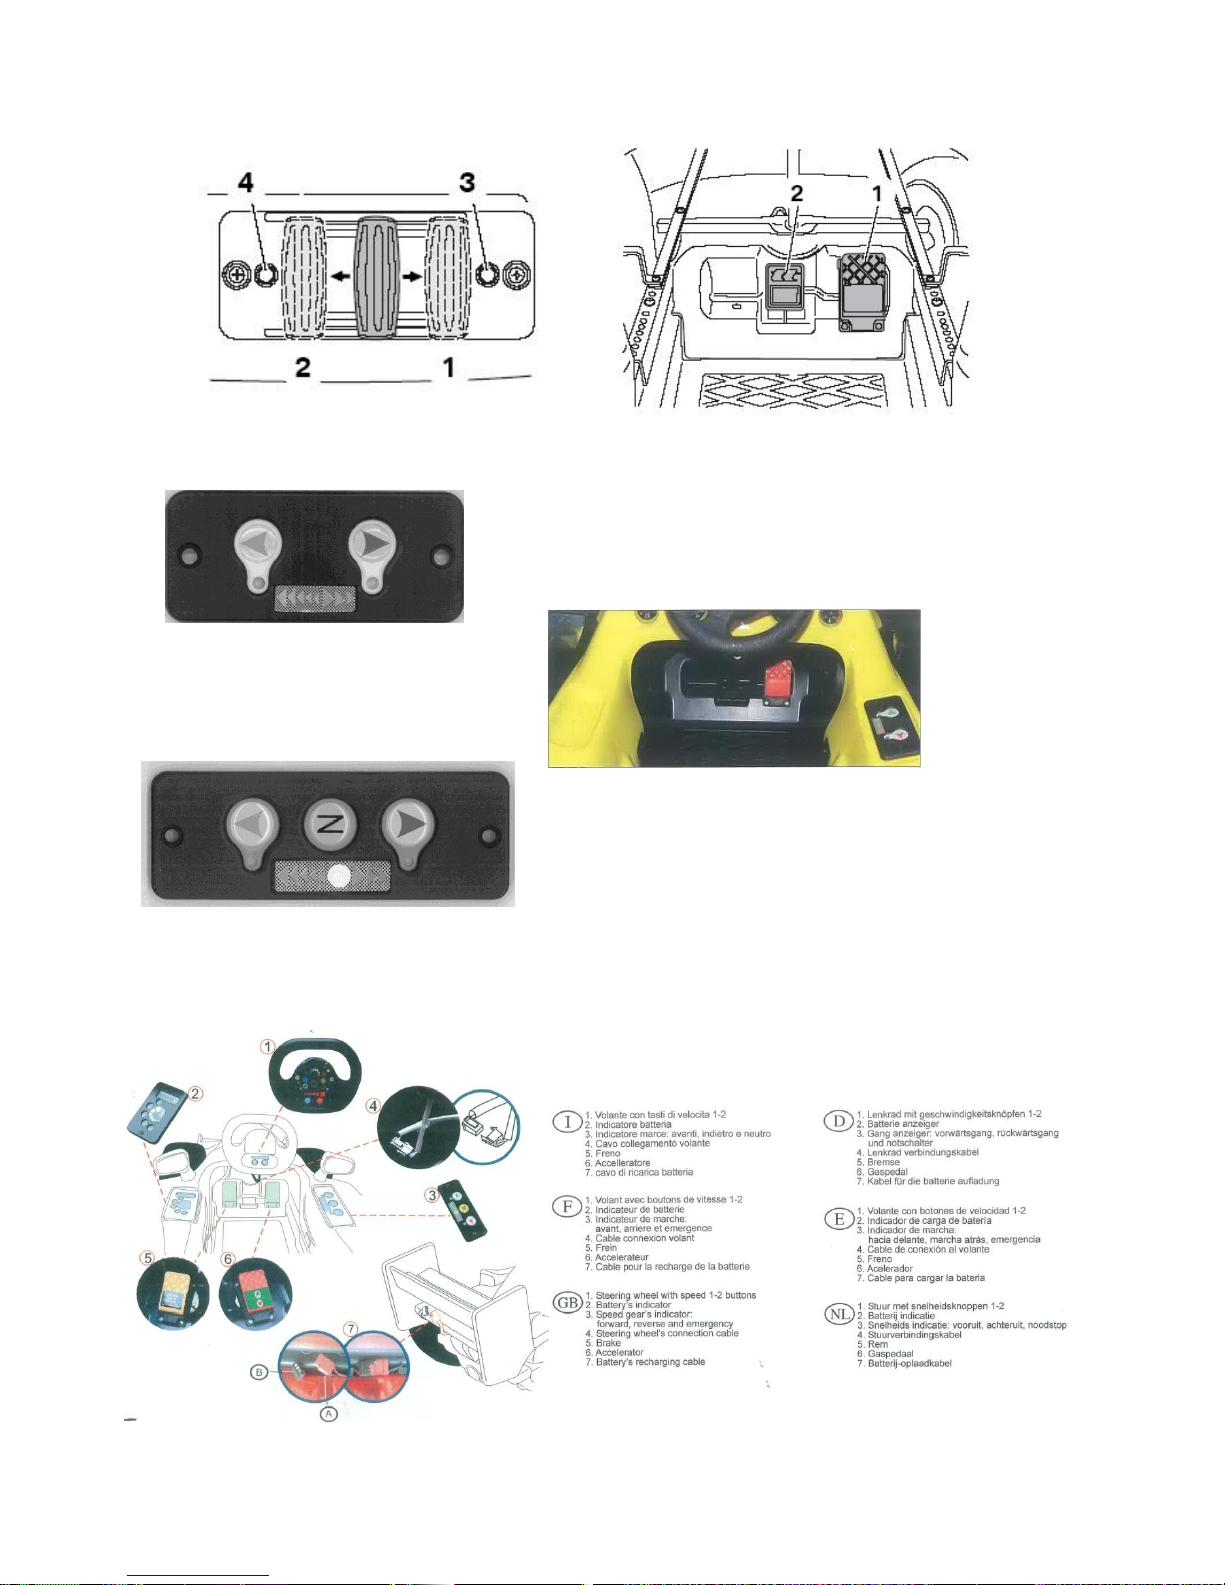
Localisation des fils de connexion de la batterie.
Les fils de connexion pour charger la batterie, se trouvent, selon les modèles, sous la voiture ou sous la capote, derrière le pare-choc arrière ou sous le
coffre arrière (voir les images).
Charger la batterie.
La batterie est fournie partiellement chargée, mais il faut la recharger complètement avant de la utiliser, au moins pendant 10 heures, mais pas plus de
20 heures.
Utiliser seulement le chargeur en dotation avec la voiture.
Avant d’utiliser la voiture pour la première fois, charger la batterie pendant 16-20 heures.
Le temps de charge est d’environ 15 heures. Ne pas charger la batterie plus longtemps, autrement elle risque d’être endommagée.
Quand le produit commence à ralentir (en utilisation normale), vous devez vous arrêter et recharger de la batterie au moins pendant 8 heures mais pas
plus de 20 heures.
Ne pas laisser que la batterie se decharge completement.
Pour charger la batterie joindre le fil de connexion du chargeur avec le fil de connexion de la batterie.
Puis brancher le chargeur à une prise de courant.
Brancher le chargeur seulement à des prises ayant la même tension que celui-ci.
Détacher le chargeur de la prise de courant et du fil de connexion de la batterie après 15 heures maximum.
Joindre le fil de connexion noir au fil de connexion de la batterie.
Temps moyen de fonctionnement: 1 heure 30”.
Attention: contrôler régulièrement le chargeur utilisé avec le jouet pour vérifier d’éventuels défauts au câble d’alimentation, à la fiche et aux
autres composants. En cas de signes d’usure ne plus utiliser le jouet jusqu’à que celui-ci ne soit pas réparé.
Le chargeur n’est pas un jouet.
Attention: Utiliser seulement des batteries identiques à celles recommandées.
Les batteries ne doivent être chargées que par un adulte ou sous sa surveillance.
Différents types de batteries neuves ou usagées ne doivent pas être mélangées.
Les batteries doivent être mises en place en respectant la polarité.
Les batteries usagées doivent être enlevées du jouet.
Les bornes d’une batteries ne doivent pas être mises en court circuit.
Ne pas donner de choc sur les batteries, risque du fuite de substances corrosives.
Ne pas stocker les batteries avec des denrées alimentaires, ni avec des vêtements.
Ne pas tirer sur les fils électriques.
Ce type de batterie est très résistant et pratique à utiliser, mais des changements chimiques irréversibles peuvent avoir lieu si la batterie est chargée
trop longtemps ou laissée déchargée trop longtemps.
Attention : charger complètement la batterie avant la première utilisation.
Quand le produit commence à ralentir vous devez vous arrêter et recharger la batterie de suite. Si le produit est utilisé jusqu'à l’arrêt
complet et que la batterie n’est pas chargée correctement pendant longtemps, elle sera irrémédiablement détériorée.
Si la batterie est laissée en charge pendant plus de 20 heures, elle sera irrémédiablement détériorée.
Information pour le recyclage des batteries: élimination des batteries.
Contribuons à la sauvegarde de l’environnement. Les batteries usées ne doivent pas être jetées dans les ordures ménagères. On peut les déposer dans
un centre de récupération de batteries usées ou d’élimination de déchets spéciaux. S’informer à la mairie.
Pb Batteries au plomb / Cd Batteries au cadmium / Hg Batteries au mercure.
Rangement de la voiture en cas de non utilisation..
Quand la voiture n’est pas utilisée pendant une longue période ou pour en empêcher l’utilisation sans surveillance débrancher la prise.
Charger régulièrement la batterie au moins tous les six mois pour 5 –8 heures même si la voiture n’est pas utilisée.
Disfonctionnement: contrôler les fusibles.
L’équipement el. de la voiture est protégé en cas de surcharge par des fusibles.
En cas de disfonctionnement vérifier l’état des fusibles et des connexions prise.
Les fusibles fonctionnent bien si le fil fusible n’a aucune interruption.
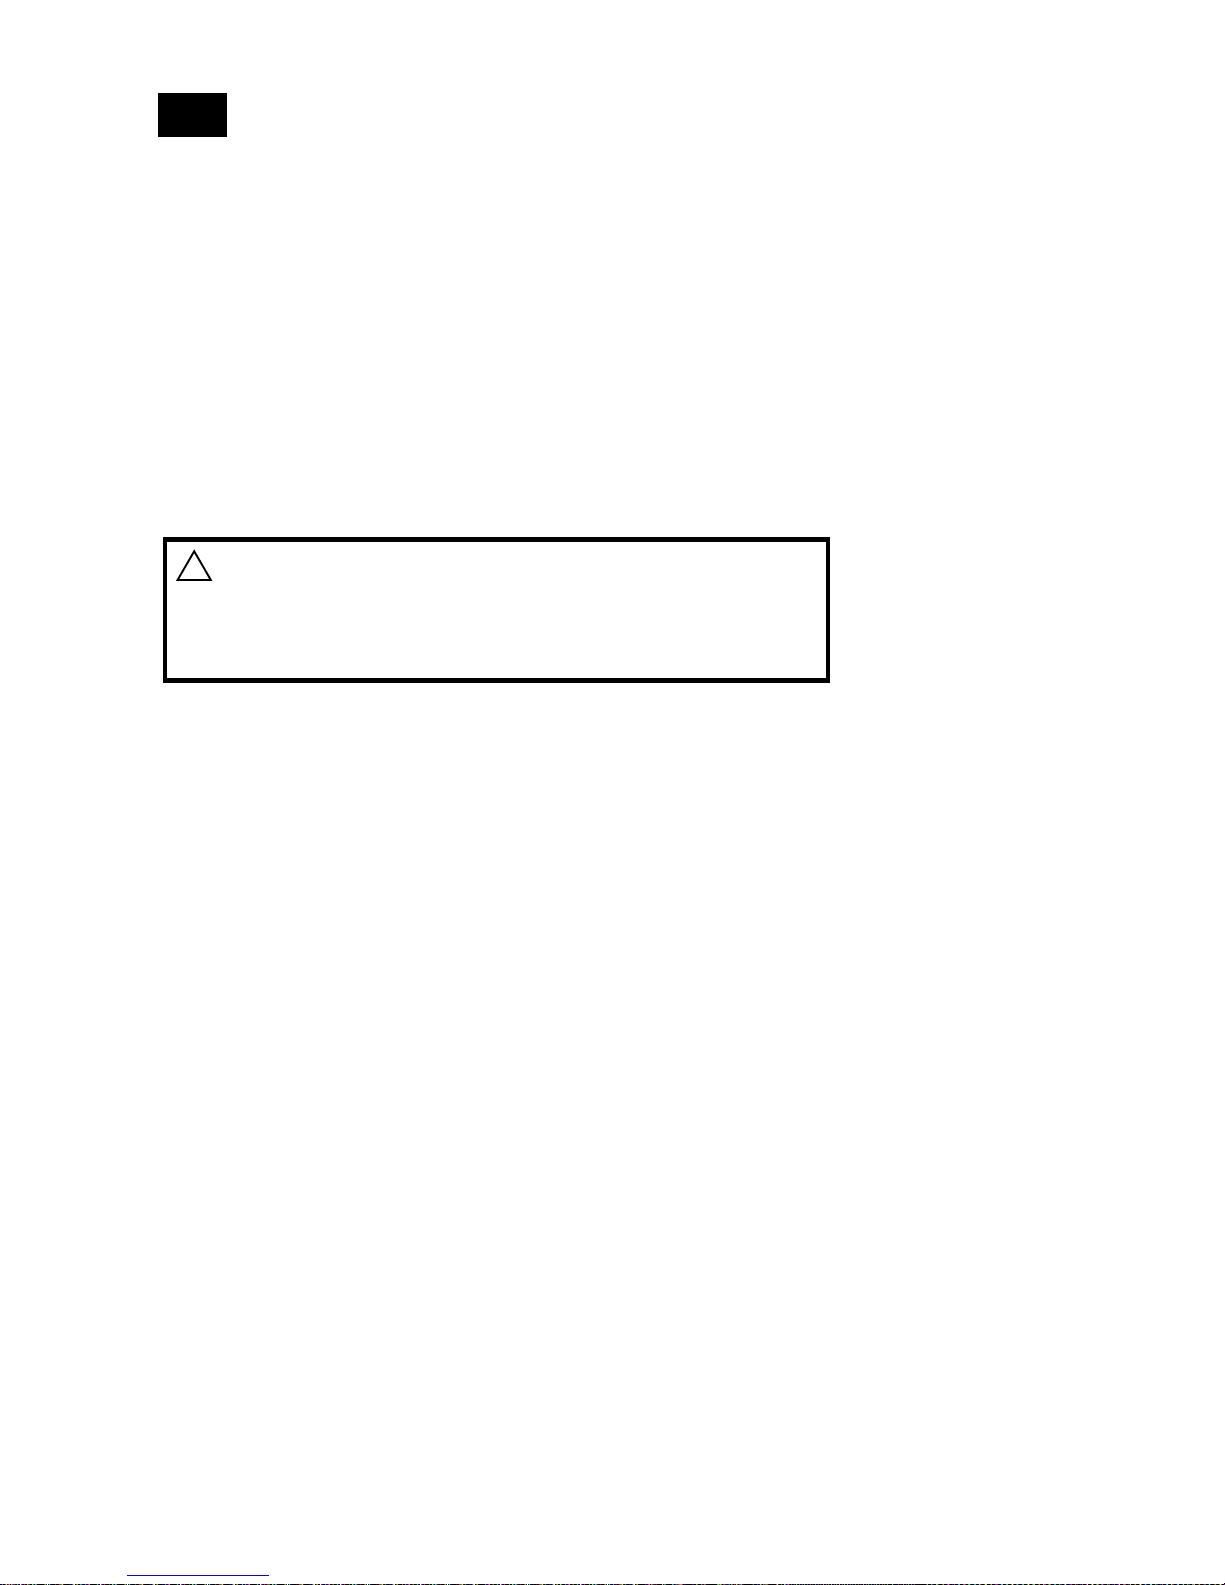
(A) INSTRUCTIONS DE CONDUITE POUR VOITURE 6V AVEC LEVIER
Comment conduire la voiture
Pour avancer, mettre le levier sur la position 1.
Lorsqu’on actionne la pédale d’accélérateur, une diode verte s’allume et la voiture avance.
Pour reculer, mettre le levier sur la position 2.
Lorsqu’on actionne la pédale d’accélérateur, une diode rouge s’allume et la voiture recule.
Si la pédale d’accélérateur n’est pas actionnée, un frein électrique arrête la voiture.
Lorsqu’on actionne la pédale de frein, le courant se coupe et le système de freinage s’active.

En mettant le levier en position centrale, la voiture ne bougera pas. Même si on actionne la pédale d’accélérateur, la voiture ne bouge pas.
(B) INSTRUCTIONS DE CONDUITE POUR VOITURE 6V AVEC DEUX BOUTONS
Comment conduire la voiture
Pour avancer, appuyer sur le bouton avec la flèche verte, une diode verte s’allumera.
Lorsqu’on actionne la pédale d’accélérateur, la voiture avance.
Pour reculer, appuyer sur le bouton avec la flèche rouge, une diode rouge s’allumera.
Lorsqu’on actionne la pédale de l’accélérateur, la voiture recule.
Si la pédale d’accélérateur n’est pas actionnée, un frein électrique arrête la voiture.
(A) INSTRUCTIONS DE CONDUITE POUR VOITURE 12V AVEC LEVIER ET II VITESSES
Comment conduire la voiture
Pour avancer, positionner le levier sur la position 1.
Lorsqu’on actionne la pédale d’accélérateur, une diode verte s’allume et la voiture avance.
Pour reculer, positionner le levier sur la position 2.
Lorsqu’on actionne la pédale d’accélérateur, une diode rouge s’allume et la voiture recule.
Si la pédale d’accélérateur n’est pas actionnée, un frein électrique arrête la voiture.
Lorsqu’on actionne la pédale de frein, le courant se coupe et le système de freinage s’active.
En mettant le levier en position centrale, la voiture ne bougera pas. Même si on actionne la pédale d’accélérateur, la voiture ne bouge pas.
Pour augmenter la vitesse de la voiture, pousser le bouton de sécurité de la position I à la position II.
(C) (D) INSTRUCTIONS DE CONDUITE POUR VOITURE 6V AVEC TROIS BOUTONS
Comment conduire la voiture
Pour avancer, appuyer sur le bouton avec la flèche verte, une diode verte s’allumera.
Lorsqu’on actionne la pédale d’accélérateur, la voiture avance.
Pour reculer, appuyer sur le bouton avec la flèche rouge, une diode rouge s’allumera.
Lorsqu’on actionne la pédale d’accélérateur, la voiture recule.
Si la pédale d’accélérateur n’est pas actionnée, un frein électrique arrête la voiture.
Si on actionne le bouton jaune, la voiture ne bougera pas. Même si on actionne la pédale d’accélérateur, la voiture ne bouge pas.
Lorsqu’on actionne la pédale de frein, le courant se coupe et le système de freinage s’active.
Utilisation du tableau du bord à option.
Si vous avez un tableau du bord à option sur votre voiture, pendant l’utilisation vous verrez des informations concernant la vitesse et l’état de charge
des batteries.
L’indication de la vitesse de la voiture est fournie par une série de leds qui s’allument graduellement.
L’état de charge des batteries est fourni par une série de leds qui s’allumeront du vert au rouge.
Il est préférable de recharger les batteries quand la led rouge s’allume.
Utilisation des boutons de changement de vitesse
Si vous avez des boutons permettant le changement de vitesse sur votre voiture, vous pouvez alors augmenter ou diminuer la vitesse de la voiture avec
ces deux boutons.
Le bouton bleu va diminuer la vitesse, le bouton rouge va augmenter la vitesse.
BEDIENUNGSANLEITUNG
Wir freuen uns, dass Sie sich für dieses Kinderfahrzeug, welches von Firma TT Italia 1978 hergestellt wird, entschieden haben.
Diese Bedienungsanleitung enthält wichtige Hinweise für sichere Montage, Umgang und Pflege des Fahrzeugs und sollte für zukünftige
Anwendungen aufbewahrt werden.
Bevor es losgeht:
Lesen Sie bitte diese Anleitung vor dem ersten Einsatz Ihres Kinderfahrzeugs durch. Erst wenn Sie die Bedienungsanleitung gelesen und verstanden
haben, sollten Sie loslegen.
Wichtige Hinweise
Das Kinderfahrzeug entspricht den Bestimmungen der Europa Norm EN 71, gekennzeichnet durch das CE-Symbol, und ist durch ein externes
Sicherheitsinstitut geprüft. Das Produkt ist für Kinder ab 3 Jahren geeignet.
Hinweise für Eltern
Bedenken Sie bitte, dass durch das natürliche Spielbedürfnis und das Temperament von Kindern unvorhersehbare Situationen und Gefahren auftreten
können, die eine Verantwortung seitens des Herstellers ausschließen. Unterweisen Sie deshalb die Kinder bzw. Benutzer über den richtigen Umgang
mit dem Fahrzeug, machen Sie auf mögliche Gefahren aufmerksam und behalten Sie die Kinder unter ständiger Aufsicht. Firma TT Italia 1978
übernimmt keine Haftung für jegliche Art von Unfällen, die durch den Gebrauch des Kinderfahrzeugs entstehen.
Das Kinderfahrzeug ist kein straßentaugliches Fahrzeug. Es darf daher nicht auf öffentlichen Strassen, Wegen oder Plätzen eingesetzt werden. Die
Kinder müssen beim Fahren geschlossene Schuhe tragen.
Das Fahrzeug darf nicht in der Nähe von Treppen, Abhängen und abschüssigem Gelände oder Wasserfläche gefahren werden. Treppen im Umfeld
sind so zu sichern, dass die Kinder auf keinen Fall gefährdet sind. Das Kinderfahrzeug darf nur mit einer Person besetzt werden, im Falle eines
Einsitzer-Fahrzeugs.
En Anhängen an andere Fahrzeuge ist nicht zulässig. Das Fahrzeug darf mit maximal 30 kg belastet werden.
!ACHTUNG:
Um das Risiko von Verletzungen zu reduzieren, unter Aufsicht von Erwachsenen.
Nie in Straßen zu verwenden, in der Nähe von Kraftfahrzeugen, auf oder nahe Steigungen oder Stufen, Schwimmbädern
oder anderenGewässer; immer Schuhe tragen, und nie mit mehr als 1 Fahrer.
Brandgefahr. Weder der Sicherung. Ersetzen Sie nur mit gleichwertigen Sicherung (20A)
DE

Erstickungsgefahr ! Den im Lieferumfang enthaltenen Plastikbeutel von Kleinkindern fernhalten.
Nicht für Kinder unter 3 Jahren geeignet. Enthält Kleinteile, die verschluckt werden können.
Vor der ersten Benutzung sind einige Montagearbeiten erforderlich. Diese Montagearbeiten sind von einem Erwachsenen durchzuführen, der über
ausreichende handwerkliche Fähigkeiten verfügt. Verwenden Sie zur Pflege dieses Fahrzeugs umweltfreundliche, keinesfalls aggressive oder ätzende
Reinigungsmittel. Überprüfen Sie regelmäßig alle Teile auf möglichen Verschleiß sowie die Verschraubungen auf ordnungsgemäßen Sitz. Damit das
hohe Sicherheitsniveau des Fahrzeugs erhalten bleibt, sind verschlissene Teile sofort auszutauschen und das Fahrzeug bis zur Instand-setzung der
Benutzung zu entziehen.
Achtung: Verwenden Sie nur original Ersatzteile.
Garantiebedingungen
Das Kinderfahrzeug TT Italia 1978 ist ein Qualitätsprodukt aus hochwertigen Materialien. Deshalb gewährt Firma TT Italia 1978 eine Garantie von
2 Jahren ab Kaufdatum. Soweit innerhalb dieser Zeit ein Mangel auftritt, der auf einen Material- oder Herstellungsfehler beruht, übernimmt Firma TT
Italia 1978 nach eigenem Ermessen die Reparatur, den Austausch des Produktes oder eine Rückerstattung des Kaufpreises. Von der Garantie
ausgeschlossen sind Schäden durch unsachgemäße Behandlung, Fremdeingriffe oder natürlicher Verschleiß. Durch diese Garantie werden die
gesetzlichen Rechte des Käufers in Zusammenhang mit etwaigen Sachmängeln nicht eingeschränkt. Wenn Sie die Garantieansprüche geltend machen
möchten, wenden Sie sich an Ihren Händler. Der folgende Garantieschein ist nur gültig, wenn er dem Originalkaufbeleg des Produktes beigelegt wird.
HINWEISE FÜR ELEKTROFAHRZEUGE
Das Fahrzeug darf nicht bei Regen benutzt werden.
Einsetzen der Sicherungen
Die Sicherungen werden nicht im Werk montiert. Entnehmen Sie deshalb die Sicherungen aus dem Beutel, welches die Zubehörteile enthält und
stecken Sie diese in den Sicherungskasten, welcher sich unter dem Fahrzeug befindet.
Nur handelsübliche Kfz-Sicherungen mit einer Belastbarkeit gleich wie die gelieferten von (20 - 25A je nach Fahrzeug) verwenden. Keinesfalls höher
belastbare Sicherungen verwenden. Die elektrische Anlage kann beschädigt werden.
Lokalisierung des Verbindungsstückes der Akkus
Das Verbindungsstück der Akkus für das Aufladen befindet sich gewöhnlich unter dem Fahrzeug, oder kann sich manchmal auch unter der Haube,
hinter der hinteren Stoßstange oder hinter dem hinteren Kofferraum befinden (siehe Hinweis auf Skizze).
Akkus laden
Das Ladegerät nur an Steckdosen anschließen, deren Spannung mit der auf dem Ladegerät angegebenen übereinstimmt. Nur das mitgelieferte
Ladegerät verwenden. Vor der ersten Benutzung müssen die Akkus ca. 16 –20 Stunden aufgeladen werden. Die sonst übliche Ladezeit beträgt ca. 15
Stunden. Diese darf nicht überschritten werden, da sonst die Akkus geschädigt werden kann. Zum Aufladen der Akkus Stecker des Ladegerätes mit
Akkustecker verbinden. Ladegerät an eine Steckdose anschließen. Nach maximal 15 Stunden Ladegerät vom Stromnetz und Akkustecker trennen.
Anschließend Bordstecker mit Akkustecker zusammenstecken.
Die mögliche Fahrzeit beträgt ca. 1,5 Stunden.
Achtung: Das mit dem Spielzeug verwendete Ladegerät muss regelmäßig überprüft werden, um jegliche Schäden des Stromzufuhrkabels,
der Stecker, der Stromummantlung und andere Teile zu vermeiden. Im Falle einer Beschädigung darf das Spielzeug nicht benutzt werden
bis diese Schäden behoben sind.
Das Ladegerät ist kein Spielzeug.
Achtung: Es dürfen nur Batterien des gleichen Typs oder entsprechend empfohlene Batterien verwendet werden.
Die Batterien dürfen nur von einem Erwachsenen oder unter seiner Aufsicht aufgeladen werden.
Keine verschiedenen, neuen und gebrauchten Batterien vermischen.
Gebrauchte Batterien aus dem Spielzeug entfernen.
Die Klemmen einer Batterie nicht kurzschließen.
Ihn bei Beschädigung nicht vor seiner Reparatur wiederverwenden.
Keinen Stoss auf die Batterien ausüben.
Leckagerisiko korrosiver Substanzen.
Die Batterien nicht zusammen mit Ledensmitteln oder Kleidungsstücken aufbewahren.
Nicht an den Stromdrähten ziehen.
Information für das Recycling von Batterien: Entsorgung der Batterien. Tragen auch Sie zum Umweltschutz bei. Leere Batterien dürfen nicht mit
dem Hausmüll entsorgt werden. Sie können sie beieiner Sammelstelle für leere Batterien oder Sondermüll abgeben. Informieren Sie sich bei den
lokalen Behörden.
Pb Bleibatterien / Cd Kadmiumbatterien / Hg Quecksilberbatterien.
Aufbewahrung des Fahrzeugs bei Nichtbenutzung
Wenn das Fahrzeug für längere Zeit nicht benutzt wird oder falls nicht gewünscht wird, dass das Kind das Fahrzeug bei einer fehlenden Aufsicht
fährt, muss man die Steckverbindung trennen.
Die Batterie sollte von Zeit zu Zeit wiederaufgeladen werden, auch wenn das Fahrzeug für längere Zeit nicht benutzt wird.
Bei einer Störung : Steckverbindungen überprüfen.
Die elektrische Anlage des Fahrzeugs ist durch Sicherungen vor Überlastung geschützt. Bei Störungen prüfen Sie bitte die Sicherungen sowie die
Steck-verbindungen. Die Sicherungen sind in Ordnung, wenn der Schmelzdraht keine Unterbrechung aufweist.
(A) Fahrbedienung für Elektro-Fahrzeuge 6V mit Schalthebel
Wie fahre ich mit dem Fahrzeug
Um vorwärts zu fahren, stelle den Schalthebel auf Position 1.
Wenn man das Gaspedal betätigt, leuchtet ein grünes Licht und das Auto fährt vorwärts. Um rückwärts zu fahren, stelle den Schalthebel auf Position
2.

Wenn man das Gaspedal betätigt, leuchtet ein rotes Licht und das Auto fährt rückwärts. Beim nicht Betätigen des Gaspedals wird das Auto durch eine
elektronische Bremse gestoppt. Beim Betätigen des Bremspedals wird die Stromzufuhr unterbrochen und das Bremssystem aktiviert. Wenn der
Schalthebel auf Position Mitte gestellt wird, reagiert das Fahrzeug nicht und auch beim Betätigen des Gaspedals bleibt das Fahrzeug standhaft.
(B) Fahrbedienung für Elektro-Fahrzeuge 6V mit zwei Knöpfen
Wie fahre ich mit dem Fahrzeug
Um vorwärts zu fahren, drückt man den Knopf mit dem grünen Pfeil und ein grünes Licht leuchtet. Wenn man das Gaspedal betätigt, fährt das Auto
vorwärts. Um rückwärts zu fahren, drücke man den Knopf mit dem roten Pfeil und ein rotes Licht leuchtet. Wenn man das Gaspedal betätigt, fährt das
Auto rückwärts. Beim nicht Betätigen des Gaspedals wird das Auto durch eine elektronische Bremse gestoppt.
(A) Fahrbedienung für Elektro-Fahrzeuge 12V mit Schalthebel und II Geschwindigkeit
Wie fahre ich mit dem Fahrzeug
Um vorwärts zu fahren, stelle den Schalthebel auf Position 1.
Wenn man das Gaspedal betätigt, leuchtet ein grünes Licht und das Auto fährt vorwärts. Um rückwärts zu fahren, stelle den Schalthebel auf Position
2. Wenn man das Gaspedal betätigt, leuchtet ein rotes Licht und das Auto fährt rückwärts. Beim nicht Betätigen des Gaspedals wird das Auto durch
eine elektronische Bremse gestoppt. Beim Betätigen des Bremspedals wird die Stromzufuhr unterbrochen und das Bremssystem aktiviert. Wenn der
Schalthebel auf Position Mitte gestellt wird, reagiert das Fahrzeug nicht und auch beim Betätigen des Gaspedals bleibt das Fahrzeug standhaft. Um
die Geschwindigkeit des Fahrzeuges zu verändern, schalte man den Sicherheitsknopf von Position I auf Position II.
(C) (D) Fahrbedienung für Elektro-Fahrzeuge 6V mit 3 Knöpfen
Wie fahre ich mit dem Fahrzeug
Um Vorwärts zu fahren, drückt man den Knopf mit dem grünen Pfeil und ein grünes Licht leuchtet. Wenn man das Gaspedal betätigt, fährt das Auto
vorwärts. Um rückwärts zu fahren, drückt man den Knopf mit dem roten Pfeil und ein rotes Licht leuchtet. Wenn man das Gaspedal betätigt, fährt das
Auto rückwärts. Bei nicht Betätigen des Gaspedals wird das Auto durch eine elektronische Bremse gestoppt. Drückt man auf den gelben Knopf
reagiert das Fahrzeug nicht und auch beim Betätigen des Gaspedals bleibt das Fahrzeug standhaft. Beim Betätigen des Bremspedals wird die
Stromzufuhr unterbrochen und das Bremssystem aktiviert.
Benutzung des optionalen Bordcomputers
Falls das Fahrzeug einen Bordcomputer besitzt, können Sie während der Fahrt Informationen über die Geschwindigkeit und den Ladezustand der
Batterien sehen. Die Geschwindigkeitsanzeige des Fahrzeuges wird durch eine Leuchtserie, die sich stufenweise einschaltet, angezeigt. Der
Ladezustand der Batterien wird durch eine Leuchtserie angezeigt, welcher von grün auf rot schaltet und es ist möglich den Ladezustand der Batterie
zu prüfen auch wenn Sie das Fahrzeug nicht benutzen, indem Sie den bestimmten Knopf drücken. Am besten sollte man die Batterien laden, wenn die
rote Lichtanzeige auf der unteren Skala leuchtet.
Benutzung der Schaltknopfgeschwindigkeit
Falls das Fahrzeug eine Schaltknopfgeschwindigkeit besitzt, können Sie die Geschwindigkeit des Fahrzeuges beschleunigen oder verringern, indem
Sie diese beiden Knöpfe drücken. Der blaue Knopf wählt die geringere Geschwindigkeit und der rote Knopf wählt die höhere Geschwindigkeit.
INSTRUCCIONES DE USO
Gracias por elegir este coche fabricado por TT Italia 1978
Este manual de instrucciones contiene informaciones importantes para un montaje seguro, la utilización y mantenimiento del coche.
Recomendamos guardarlo para una consulta posterior.
Antes de empezar
Lea atentamente las instrucciones antes de utilizar el coche por primera vez. Utilizar solamente después de haber leído y entendido las instrucciones.
Advertencia importante
El coche “juguete” responde a las cualidades requeridas por las normas europeas EN, simbolizadas por el logo CE y es homologado por un
laboratorio exterior de conformidad. El producto es recomendado para niños a partir de 3 años.
Advertencia para los padres
Por favor recuerde que la alegría natural y temperamento de los niños puede resultar en imprevisible
situaciones y peligros, para los cuales el fabricante no puede ser considerado responsable. Por lo tanto, debe
Instruir a los niños oa los usuarios sobre cómo utilizar el coche de los niños, llamar su atención sobre los posibles peligros
y mantener a los niños bajo supervisión en todo momento para evitar caídas o choques que provoquen lesiones al usuario y
terceros. TT Italia 1978 no puede aceptar ninguna responsabilidad de ningún tipo por accidentes derivados del uso de
el coche de los niños. El coche de los niños tienen que ser usados en superficies planas, no áspero y no irregular.The
coche infantil sólo es adecuado para una persona. No lo conecte a otros vehículos. La carga útil máxima de
el vehículo es de 30 kg.
!ADVERTENCIA:
Para reducir el riesgo de lesiones, se requiere supervisión de un adulto.
Nunca deben usarse en carreteras, cerca de vehículos de motor, o en pendientes pronunciadas o cerca de escaleras, piscinas
u otros cuerpos de agua, siempre use zapatos, y nunca permitir que más de un piloto.
RIESGO DE INCENDIO. No pase por alto el fusible. Reemplace solamente con un fusible equivalente (20A)
¡Peligro de asfixia! No dejar al alcance de los niños el plástico incluido en la caja.
El coche no es recomendado para niños menores de 3 años. Incluye pequeñas piezas que podrían ser ingeridas.
Antes de utilizar el producto por primera vez, es necesario proceder a algunas operaciones de montaje.
Estas operaciones han de ser realizadas por una persona adulta con suficiente habilidad manual.
Para la limpieza del producto utilizar un detergente no contaminante y en ningún caso agresivo o corrosivo.
ES

Verificar periódicamente todos los componentes para verificar eventuales signos de desgaste y asegurarse que los tornillos están correctamente
puestos y atornillados.
Para que se mantenga inalterable el nivel de seguridad del vehículo, cambie inmediatamente los componentes eventualmente usados y procurar no
utilizar el vehículo antes de que este arreglado.
Cuidado: Utilizar sólo piezas de recambios originales.
Condiciones de garantía.
El coche TT Italia 1978 es un producto de calidad fabricado con materiales cualitativos.
Por este motivo la sociedad TT Italia 1978 le ofrece una garantía de 2 años.
Si durante ese tiempo, fallos de funcionamientos o anomalías aparecieran debidas a defectos de materiales o de fabricación, la sociedad TT Italia
1978 procederá según su criterio arreglar el producto, cambiarlo o rembolsar el importe del precio de compra.
Quedan excluidos de la garantía, los daños causados por una utilización inapropiada, por una intervención de personal no autorizada y por un desgaste
natural del producto.
La presente garantía no limita los derechos acordados al comprador en el cuadro de las leyes vigentes en relación a eventuales defectos de materiales.
Para cualquier petición de intervención, preguntas o reclamación en relación a la garantía, dirigirse a su revendedor.
El presente certificado, sólo es válido si esta acompañado de una prueba de compra original del producto.
NOTICE VEHICULE ELECTRIQUE
No utilizar el vehículo en caso de lluvia
Insertar los fusibles.
Los fusibles no se montan en fábrica
Coger los fusibles del sobre de accesorios e introducirlos en el porta fusibles situado bajo el coche.
Utilizar sólo fusibles estándar para coches con la misma capacidad de carga que los fusibles incluidos (20 o 25A según el modelo de coche). No
utilizar jamás fusibles con una carga superior ya que podrían dañar el equipo eléctrico.
Localizar los cables de conexión de la batería
Los cables de conexión para cargar la batería se sitúan según los modelos, bajo el coche o bajo el capó, detrás de los parachoques traseros o bajo el
maletero trasero (ver imágenes).
Cargar la batería
La batería del coche está parcialmente cargada pero deberá ser cargada durante un período de al menos 10 horas pero no más de 20 horas para su
óptimo rendimiento.
Utilizar solamente el cargador incluido con el coche.
Antes de utilizar el coche por primera vez cargar la batería durante 16-20 horas.
El tiempo de carga es de aproximadamente de 15 horas. No cargar más tiempo la batería sino podría sufrir daños.
Cuando el producto pierde rapidez (durante su uso normal), empieza su carga de al menos 8 horas pero no más de 20 horas.
No dejes la bateris descargada
Para cargar la batería unir el cable de conexión del cargador con el cable de conexión de la batería.
Enchufar el cargador a un enchufe.
Enchufar el cargador únicamente a enchufes que tengan la misma tensión que este.
Retirar el cargador de la batería y del cable de conexión de la batería después de 15 horas máximo.
Unir el cable de conexión al cable de conexión de la batería.
Tiempo durante de funcionamiento: 1 hora 30´´.
Cuidado: controlar regularmente el cargador utilizado con el juguete para verificar, eventuales defectos del cable de alimentación, conector y
otros componentes.
En caso de signos de desgaste, no utilizar el juguete hasta que este arreglado.
El cargador no es un juguete.
Cuidado: utilizar únicamente baterías idénticas a las recomendadas.
Las baterias deben ser cargadas por un adulto o bajo su vigilancia.
No deben mezclarse diferentes tipos de baterias, sean nuevas o usadas.
Las baterias deben ser colocadas respetando la polaridad.
Las baterias usadas deben ser retiradas del juquete.
Los bornes de una bateria no deben ser peuestos en corto circuito.
No golpear las baterias, riesgo de escape de substancias corrosivas.
No guardar la baterias con productos alimenticios ni con la vestimenta.
No tirar de los cables eléctricos.
Este tipo de batería es muy robusta y de alto rendimiento pero sufrirá cambios internos químicos si se carga demasiado o se deja descargada.
Recuerda: Carga la batería por completo antes de su primer uso, retirar para su recarga cuando empieza a perder potencia. Si se permite una descarga
extrema o que se quede mucho tiempo descargada, se dañará la batería y puede quedar inutilizable. Si la batería se queda cargando durante períodos
demasiado extendidos de tiempo, más de 20 horas, también producirá daños y puede perder completamente su potencia.
Informacion para el reciclado de las baterias: eliminacion de las baterias.
Contribuyamos a la preservacion del entorno. Las baterias usadas no deben ser desechadas junto a la basura comun.
Se las puede depositar en un centro de recuperacion de baterias usadas o de eliminacion de desechos especiales.
Informarse en el ayuntamiento.
Pb Baterias de plomo / Cd Baterias de cadmio / Hg Baterias de mercurio
Guardar el coche en caso de no ser utilizado.
Cuando no se utilice el coche durante un largo periodo o para impedir su utilización sin vigilancia, desconectar el enchufe,
Carga regularmente la batería, al menos cada seis meses, entre 5 y 8 horas, aunque no se utiliza el coche.
Mal funcionamiento: controlar los fusibles.
El equipo eléctrico del coche esta protegido en caso de sobrecarga por fusibles.
En caso de un mal funcionamiento, verificar el estado de los fusibles y de las conexiones.
Los fusibles funcionan bien si el cable del fusible no tiene ninguna interrupción.

(A) INSTRUCCIONES DE CONDUCIR EL COCHE ELÉCTRICO 6 V PALANCA DE MARCHAS
Como conducir
Para ir hacia delante, mueve la palanca de marchas a la posición 1.
Al pisar el acelerador se enciende una luz verde y el coche avanza.
Para ir marcha atrás, mueve la palanca a la posición 2.
Al apretar el acelerador, se enciende la luz roja y el coche irá marcha atrás.
Si dejas de apretar el pedal del acelerador un freno eléctrico parará el coche.
Al apretar el freno, cierra la corriente y se activa el sistema de frenado.
Al colocar la palanca en la posición central, el coche se queda en punto muerto y no permite ningún movimiento si pisas el pedal del acelerador,
porque el coche está frenado.
(B) INSTRUCCIONES DE CONDUCIR EL COCHE ELÉCTRICO 6V DOS BOTONES
Como conducir
Para conducir hacia delante, aprieta el botón con la flecha verde y una luz verde LED se encenderá.
Al pisar el acelerador, el coche avanza.
Para ir marcha atrás aprieta el botón con la flecha roja y una luz roja LED se encenderá.
Pisa el pedal del acelerador y el coche irá marcha atrás.
Al soltar el pedal del acelerador, el freno eléctrico parará el coche.
(A) INSTRUCCIONES DE CONDUCIR EL COCHE ELÉCTRICO 12 V CAMBIO DE MARCHAS II VELOCIDADES
Como conducir
Para ir hacia delante, mueve la palanca de marchas a la posición 1.
Al pisar el acelerador se enciende una luz verde y el coche avanza.
Para ir marcha atrás, mueve la palanca a la posición 2.
Al pisar el acelerador, se enciende la luz roja y el coche irá marcha atrás.
Si dejas de apretar el pedal del acelerador un freno eléctrico parará el coche.
Al pisar el freno, cierra la corriente y se activa el sistema de frenado.
Al colocar la palanca en la posición central, el coche se queda en punto muerto y no permite ningún movimiento al pisar el pedal del acelerador,
porque el coche está frenado.
Para aumentar la velocidad del coche, cambia el botón de seguridad de la posición I a la posición II.
(C) (D) INSTRUCCIONES DE CONDUCIR COCHE ELÉCTRICO 12 V DE TRES BOTONES
Como conducer
Para conducir hacia delante, aprieta el botón con la flecha verde y una luz verde LED se encenderá.
Al pisar el acelerador, el coche avanza.
Para ir marcha atrás aprieta el botón con la flecha roja y una luz roja LED se encenderá.
Pisa el pedal del acelerador y el coche irá marcha atrás.
Al soltar el pedal del acelerador, el freno eléctrico parará el coche.
Al apretar el botón amarillo, el coche está en punto muerto y no permite ningún movimiento si pisas el acelerador porque queda frenado el coche.
Al pisar el pedal del freno se corta la corriente y activas el sistema de frenado.
El uso del salpicadero opcional
Si tu coche tiene el salpicadero opcional, durante su uso se verá información sobre la velocidad y la carga de las baterías.
La velocidad se indica a través de una serie de luces LED que se encienden gradualmente según la velocidad.
El estado de la carga de las baterías se ve a través de una serie de luces LED que van desde verde (máxima carga) a rojo. Es posible ver la carga de las
baterías también cuando no estás utilizando el coche al apretar el botón correspondiente.
Es mejor recargar las baterías cuando la luz LED roja está al fondo de la escala de la carga.
El uso del cambio de marchas opcional
Si tu coche tiene un cambio de marchas, puedes aumentar o disminuir la velocidad al apretar los dos botones. El botón azul selecciona una velocidad
más despacio y el botón rojo seleccionará la velocidad más rápida.
INSTRUÇÕES
Agradecemos a escolha deste carrinho fabricado por TT Italia 1978
Este manual de instruções contém informações importantes para uma montagem perfeita, uma utilização e manutenção segura do carrinho.
Recomendamos guardá-lo para consulta posterior.
Antes de iniciar:
Leia atentamente as instruções antes de utilizar o carrinho. Utilizar apenas após leitura e compreensão das instruções.
Advertência importante:
O carrinho “brinquedo” satisfaz as qualidades exigidas pelas normas europeias EN, simbolizadas por logo CE e está homologado por um laboratório
exterior de certificação. O produto está recomendado para crianças a partir dos 3 anos.
Advertência para os pais:
Lembre-se que a jovialidade natural e temperamento das crianças pode resultar em imprevisíveis
situações e perigos, para os quais o fabricante não pode ser responsabilizado. Você deve, portanto,
instruir as crianças ou usuários de como usar carro das crianças, chamar a atenção para os possíveis perigos
e manter as crianças sob supervisão em todos os momentos, para evitar quedas ou colisões prejuízo para o usuário e
terceiros. TT Italia 1978 não pode aceitar qualquer responsabilidade de qualquer tipo de acidentes decorrentes do uso de
carro das crianças. Carro das crianças tem que ser o uso em superfícies planas não, áspera e não irregular.The
carro das crianças só é adequado para uma pessoa. Não anexá-lo a outros veículos. A carga máxima de
o veículo é de 30 kg.
PT

!AVISO:
Para reduzir o risco de lesões, de um adulto é necessária.
Nunca use em rodovias, perto de veículos a motor, em ou perto de declives íngremes ou etapas, piscinas ou outros
corpos de água, sempre usam sapatos, e nunca permitir que mais de um motociclista.
RISCO DE INCÊNDIO. Não ignorar o fusível. Substitua apenas com fusível equivalente (20A)
¡Perigo de asfixia! Não deixar o saco de plástico incluído na caixa ao alcance das crianças.
O carrinho não é recomendado para crianças com idade inferior a 3 anos. Inclui peças pequenas que podem ser ingeridas.
Antes de utilizar o produto pela primeira vez, é necessário proceder a algumas operações de montagem.
Estas operacões de montagem devem ser realizadas por um adulto com uma habilidade manual suficiente.
Para limpar este produto deve utilizar-se um detergente suave e nunca agressivo ou corrosivo.
Verificar periodicamente todos os componentes para detectar eventuais sinais de desgaste e assegurar-se que os parafusos estão colocados e apertados
correctamente.
Para manter o nível de segurança do carrinho, deve mudar imediatamente os componentes eventualmente gastos e não utilizar o carrinho antes de
estar completamente reparado.
Atenção: Utilizar apenas peças de substituição de origem.
Condicões de garantia.
O carrinho TT Italia 1978 é um produto de qualidade, fabricado com materiais qualitativos.
Por este motivo a sociedade TT Italia 1978 oferece-lhe 2 anos de garantia.
Se durante este tempo aparecerem falhas no funcionamento ou anomalias causadas por defeito de materiais ou de fabrico, ficará ao critério da
sociedade TT Italia 1978 reparar o produto, substituí-lo ou reembolsar o cliente pelo preço de compra.
A presente garantia exclue os danos causados por utilização imprópria, por intervenção de pessoal não qualificado e por desgaste natural do produto.
A presente garantia não limita os direitos acordados ao comprador no quadro das leis vigentes em relação a eventuais defeitos de material.
Para quaisquer pedidos de intervenção, questões ou reclamações em relação à garantia, devem dirigir-se ao revendedor.
O presente certificado de garantia é válido apenas se acompanhado de prova de compra original do produto.
INSTRUÇÕES VEÍCULO ELÉCTRICO
Não utilizar o veículo com tempo de chuva.
Inserção dos fusíveis.
Os fusíveis não são montados na fábrica.
Retirar os fusíveis da caixa dos acessórios e introduzi-los no porta-fusíveis situado por baixo do carrinho.
Utilizar apenas fusíveis standard para carrinhos com a mesma capacidade de carga que os fusíveis incluídos (20 ó 25 A de acordo com o modelo do
carrinho). Nunca utilizar fusíveis com uma carga superior porque podem danificar o equipamento eléctrico.
Localização dos cabos de ligação da bateria
Os cabos de ligação para carregar a bateria situam-se, consoante os modelos, na parte de baixo do carrinho, debaixo do capot, por trás do para-
choques traseiro ou debaixo da mala traseira ( ver imagens).
Carregar a batería
A bateria é fornecida parcialmente carregada, mas deve ser totalmente carregada antes de se começar a utilizar. Esse carregamente deverá ser de, pelo
menos 10 horas, mas não mais de 20 horas.
Ligar o carregador unicamente a fichas com a mesma voltagem.
Utilizar apenas o carregador incluído com o carrinho.
Antes de utilizar o carrinho pela primeira vez, deixe a bateria a carregar durante 16-20 horas.
O tempo de carga é de aproximadamente 15 horas. Não deixar a bateria a carregar por muito mais tempo, caso contrário pode sofrer danos.
Quando o produto começar a abrandar (durante a sua utilização normal), deve parar e recarregar a bateria, pelo menos durante 8 horas, mas nunca
mais de 20 horas.
Não deixar a bateria descarregar totalmente.
Para carregar a bateria, unir o cabo de ligação do carregador com o cabo de ligação da bateria.
Ligar o carregador a uma ficha de corrente eléctrica.
Retirar o carregador da bateria e do cabo de ligação após 15 horas no máximo.
Unir o cabo de ligação ao cabo de ligação da bateria.
Tempo máximo de funcionamento: 1 hora 30´´.
Atenção: verificar regularmente o carregador utilizado no carrinho para detectar eventuais defeitos do cabo de alimentação, ficha e outros
componentes.
Em caso de sinais de desgaste, não utilizar o produto até que esteja completamente reparado.
O carregador não é um brinquedo.
Atenção: utilizar unicamente baterias idênticas às recomendadas.
As baterias devem ser instaladas respeitando a polaridade.
As baterias sò devem ser recarregadas por um adulto ou na presença desta.
Não se devem misturar baterias de tipos de diferentes ou novas e usadas.
As baterias gastas devem ser retiradas do brinquedo.
Os terminais de uma batteria não devem ser colocados em curto-circuito.
Evite os choques nas baterias, risco de fuga de substancias corrosivas.
Não armazene as baterias junto de géneros alimentares ou vestuàrio.
Não puxe pelos fios eléctricos.
Este tipo de bateria é muito resistente e prático de utilizar, mas a carga da bateria durante demasiado tempo poderá provocar alterações quimicas
irreversiveis para o seu bom desempenho. O mesmo acontece se se deixar a bateria demasiado tempo descarregada.

Atenção: Carregue totalmente a bateria antes da primeira utilização. Se deixar descarregar totalemte a bateria esta começa a perder a sua
capacidade e acaba por se estragar. Se deixar a bateria a carregar durante mais de 20 horas, ela ficará irremediavelmente detriorada.
Informação para reciclagem das baterias. Contribuamos para a conservação do ambiente.
As baterias usadas não devem ser colocadas nos lixos domésticos. Podem ser colocadas num centro de baterias usadas ou de eliminaçso de lixos
especiais.
Informa-se na camara municipa.l
Pb Baterias de chumbo / Cd Baterias de Cadmio / Hg baterias de mercurio.
Guardar o carrinho em caso de não utilização.
Devem desligar a ficha do carrinho quando este não for utilizado durante um longo período de tempo ou para evitar a sua utilização sem vigilância.
Carregue a bateria com alguma regularidade. Pelo menos de 6 em 6 meses, entre 5 e 8 horas, mesmo que o carrinho não tenha sido utilizado.
Ainda que o carrinho não seja utilizado, devem carregar regularmente a bateria.
Mau funcionamento: controlar os fusíveis.
O equipamento eléctrico do carrinho está protegido contra sobrecarga dos fusíveis.
Em caso de mau funcionamento, verificar o estado dos fusíveis e das ligações.
Os fusíveis funcionam bem se o cabo do fusível não tiver nenhuma interrupção.
(A) INSTRUÇÕES DE CONDUÇÃO DE VEÍCULO ELÉCTRICO 6V COMO MUDANÇAS NO VOLANTE
Como conduzir
Para andar para a frente mude a mudança para a posição 1.
Carre no acelarador para o carro começar a andar.
Para fazer marcha-a-trás, mude a manete das mudanças para a posição 2.
Ao carregar no acelarador, acende-se uma luz vermelha e o carro começa a andar para trás.
Ao deixar de pressionar o acelarador, um travão eléctrico irá fazer parar o carro.
Ao carregar no pedal do travão corta a corrente e activa o sistema de travagem.
Ao colocar a anete das mudanças na posição central, o carro está em ponto morto. Não reage a qualquer acelaradela.
(B) INSTRUÇÕES DE CONDUÇÃO DE VEÍCULO ELECTRICO DE 6V E 2 BOTÕES
Como conduzir
Para avançar pressione o butão com a seta verde. Uma luz verde acender-se-á.
Ao carregar no acelarador o carro começa a andar.
Para fazer marcha-a-trás, carregue no botão com a seta vermelha e a marcha-a-trás fica activa.
Ao carregar no acelarador o carro começa a andar para trás.
Ao levanter o pé do acelarador o sistema de travagem eléctrico fará parar o carro.
(A) INSTRUÇÕES DE CONDUÇÃO DE VEÍCULO ELÉCTRICO DE 12V COM MUDANÇAS NO VOLANTE E 2 VELOCIDADE
Como conduzir
Para andar em frente coloque a manete das mudanças na posição 1.
Ao carregar no acelarador acende-se uma luz verde e o carro começa a andar para a frente.
Para fazer marcha-a-trás, coloque a manete das mudanças na posição 2
Ao carregar no acelarador o carro começa a andar para trás.
Ao retirar o pé do acelarador o sistema de travagem eléctrico fica activo.
Ao carregar no travão corta a corrente e active o sistema de travagem.
Ao colocar a manete das mudanças na posição central o carro fica em ponto morto. Não reage a qualquer acelaradela.
Para aumentar a velocidade do carro, troque o botão de segurança da posição I para a posição II.
(C) (D) INSTRUÇÕES DE CONDUÇÃO DE VEÍCULO ELÉCTRICO 12V COM 3 BOTÕES
Como conduzir
Para andar para a frente carregue na seta verde e acender-se-á uma luz verde.
Carregue o acelarador para que o carro começa a andar para a frente.
Para frazer marcha-a-trás, carregue na seta vermelha e uma luz vermelha acender-se-á.
Carregue o acelarador e o carro começa a andar para trás.
Ao levanter o pé do acelarador o sistema de travagem electrico activar-se-à.
Ao pressionar o botão amarelo o carro fica em ponto morto. Não responderá a qualquer acelaradela e estará travado.
Ao pressionar o pedal do travão cortará a corrente do carro e activará o sistema de travagem.
Utilização do computador de bordo
Se o seu carro tiver computador de bordo, durante a utilização poderá obter algumas informações que dizem respeito à velocidade e ao estao das
baterias.
A velocidade num painel digital em que as luzes se acendem gradualmente.
O estado das beterias está indicado num painel de digital de luzes que vai do verde ao vermelho . É também possível verificar o estado das baterias
mesmo sem estar a usar o carro. Basta carregar no botão com indicação de “Bateries”.
É aconselhável carregar as baterias do carro quando a luz vermelha se acende.
Utilização do função de velocidade opcional
Se o seu carro tiver uma função de velocidade opcional, pode aumentar ou diminuir a velocidade carregando nos respectivos botões.
O botão azul é para moderar a velocidade enquanto que o vermelho é para aumentar a mesma.
EIGENAARS HANDBOEK
Wij zijn verheugd, dat u heeft besloten tot de aankoop van deze TT Italia 1978 auto.
Dit eigenaars handboek bevat belangrijke informatie over het veilig monteren, en het onderhoud van deze auto. Bewaar deze informatie voor latere
raadplegingen.
Belangrijke informatie
Deze kinderauto voldoet aan de Europese standaard EN 71 eisen, draagt het CE-teken en is TÜV goedgekeurd. Het is geschikt voor kinderen van 3
jaar en ouder.
NL

Opmerkingen voor de ouders
Houd er rekening mee dat de natuurlijke speelsheid en het temperament van kinderen kan leiden tot onvoorziene
situaties en gevaren, waarvoor de fabrikant kan niet aansprakelijk worden gesteld. Je moet daarom
instrueren de kinderen of gebruikers van hoe de kinderen de auto te gebruiken, vestigen hun aandacht op de mogelijke gevaren
en houd kinderen onder toezicht te allen tijde aan valpartijen en botsingen met letsel voor de gebruiker te vermijden en
derden. TT Italia 1978 kan enige aansprakelijkheid van welke aard dan niet te aanvaarden voor ongevallen als gevolg van het gebruik van
de kinderen de auto. De kinderen van de auto te hebben om gebruik te maken op een vlakke ondergrond, niet ruw en niet irregular.The worden
kinderzitjes voor slechts geschikt voor een persoon. Maak hem niet vast aan andere voertuigen. De maximale laadvermogen van
het voertuig is 30 kg.
!WAATSCHUWING:
Om het risico op letsel te verkleinen, is toezicht van een volwassene vereist.
Gebruik nooit in wegen, in de buurt motorvoertuigen, op of bij steile hellingen of trappen, zwembaden of andere
Wateren; draag altijd schoenen en nooit toestaan meer dan 1 rijder.
RISICO VAN BRAND. Niet overbrug de zekeringhouder. Vervang de batterij alleen met een gelijkwaardige zekering (20A)
Gevaar voor verstikking! Houd de plastic zak van de auto buiten handbereik van pasgeborenen en kinderen. Dit om verstikkingsgevaar te
voorkomen.
Niet geschikt voor kinderen beneden de 3 jaar. Kleine onderdelen kunnen worden ingeslikt.
Afhankelijk van de trap of elektrische versie van deze kinderauto, dient enig montage werk te worden verricht voordat de auto voor de eerste keer
gebruikt kan worden.
Montage en het plaatsen van de batterij dient te worden verricht door een volwassene met de nodige vaardigheden.
Gebruik milieuvriendelijke en geen agressieve of bijtende schoonmaakmiddelen.
De draaiende delen aan de wielen en trappers moeten elke 3 maanden met een paar druppels olie gesmeerd worden. Gebruik de elektrische versie niet
in de regen.
Controleer regelmatig alle delen op slijtage en controleer de schroefverbindingen om van veiligheid verzekerd te zijn.
Om de veiligheid te waarborgen, dienen de defecte delen direct vervangen te worden. Gebruik de auto niet tot dat deze is gerepareerd.
Attentie: gebruik uitsluitend originele onderdelen.
Garantie condities:
De TT Italia 1978 auto is een kwaliteitsproduct gemaakt van uitsluitend hoogwaardige materialen.
TT Italia 1978 geeft daarom gedurende 2 jaar na aankoopdatum garantie op materiaal en/of fabrieksfouten.
TT Italia 1978 zal, naar eigen inzicht, het artikel repareren of vervangen en/of het aankoopbedrag vergoeden.
Schade ontstaan door onjuist gebruik/reparaties en slijtage vallen niet onder de garantie.
Deze garantie heeft geen invloed op de wettelijke verplichtingen van de koper met betrekking tot defecten.
Indien u aanspraak op garantie wenst te maken, dient u contact op te nemen met uw verkoper.
Het garantie bewijs is uitsluitend geldig als het vergezeld gaat van de aankoopnota/kassabon.
WAARSCHUWING (ELEKTRISCHE AUTO’S)
Gebruik de elektrische versie niet in regen.
De zekering is niet in de fabriek geplaatst.
Neem de zekering uit het zakje van de accessoires en plaats deze in de zekeringhouder onder de auto.
Gebruik uitsluitend een gangbare autozekering van 20 A of 25 A. Gebruik beslist geen zekering met een hogere waarde, daar het elektrische systeem
anders beschadigd kan worden.
De aansluitingen van de batterijlader bevinden zich gewoonlijk onder de auto of soms onder de motorkap of achterbumper.
Het opladen van de batterij.
De batterij is gedeeltelijk opgeladen en dient dus voor gebruik volledig geladen te worden.Minimaal 10 uur, maar niet meer dan 20 uur.
Sluit de oplader uitsluitend aan op verbindingen met het gelijke voltage, zoals op de lader vermeld staat.
Gebruik alleen de meegeleverde oplader.
De batterij moet 16 –20 uur opgeladen worden, voordat de auto voor de eerste keer gebruikt kan worden.
De gemiddelde laadtijd is ongeveer 15 uur.
Overschrijdt deze tijd niet om beschadiging van de batterij te voorkomen.
Zodra het motorvermogen bij normaal gebruik afneemt, dient de batterij herladen te worden voor tenminste 8 uur, maar niet langer dan 20 uur.
Laat batterij niet geheel leeg worden.
Altijd de batterij pas opladen als hij geheel leeg is.
Om op te laden dient de plug van de lader verbonden te worden met de plug van de batterij.
Steek de oplader in een stopcontact.
Stop het laden van de batterij na max. 15 uur.
Verbindt nu de plug met de batterij plug om te kunnen rijden.
Max. gebruikstijd 1,5 uur.
Attentie: De oplader dient regelmatig op beschadigingen van draad, aansluitingen etc. gecontroleerd te worden.In geval van dergelijk schade
dient deze eerst hersteld te worden, alvorens de lader te gebruiken.
De oplader is geen speelgoed.
Attentie: Uitsluitend batterijen met gelijke waarden als voorgeschreven gebruiken.
De accu’s mogenslechts door volwassenen of onder toezicht van volwassenen opgeladen worden.
Gebruik slechts het aanbevolen type accu’s of gelijkwaardige producten.
Dit speelgoed dient allen te worden gebruikt met de aanbevolen oplader.
Verschillende types accu’s of oude en nieuwe accu’s mogen niet gelijktijdig gebruikt worden.
Lege en versleten accu’s dienen uit het speelvoertuig verwijderd te worden.

De polen van de accu’s mogen niet kortgesloten te worden.
Gebruik de transformator, indien deze beschadigingen vertoont, nooit voordat de nodige reparaties uitgevoerd zijn.
Bescherm de accu’s tegen schokken. Risico op lekken van corrosieve middelen.
Berg de accu’s niet op in de nabijheid van levensmiddelen of kleding.
Trek niet aan de elektrische bedrading.
Deze types batterijen zijn uiterst compact en gemakkelijk in gebruik, echter soms kunnen interne chemische veranderingen ontstaan, als ze te
veel/lang leeg staan en/of te veel overladen worden.
LET OP: De batterij geheel vol laden voor het eerste gebruik en stop het gebruik zodra het vermogen minder wordt, dan de batterij opnieuw
laden.Als de batterij geheel leeg gereden wordt en voor een langere tijd onopgeladen blijft staan, zal deze beschadigen en onbruikbaar worden.
Informatie voor de recycling van accu’s: vernietiging van accu’s. Voor een bijdrage aan het behound van het milieu. De gebruikte accu’s
dienen niet te worden weggegooid met het huisvuil. Ze kunnen worden gebracht naar een recyckingscentrum voor gebruikte accu’s of voor de
verwijdering van specifiek afval. Informatie verkrijgbaar op het stadhuis.
Pb Loodaccu’s / Cd Cadmiumaccu’s / Hg Kwikaccu’s
Bij niet gebruik van de auto.
Als de auto voor een langere periode niet gebruikt wordt of u niet wilt dat uw kind zonder toezicht rijdt, verbreek de verbindingen met de
batterij.
De batterij dient met een regelmaat van 6 maanden, tussen de 5 en 8 uur geladen te worden, zelfs wanneer de auto voor een langere tijd niet gebruikt
wordt.
Probleemoplossing.
Het controleren van de zekering.
Het elektrische systeem van de auto is met een zekering beschermd tegen overbelasting.
Als het systeem storingen vertoont, dienen de zekering en alle aansluitingen gecontroleerd te worden.
De zekering bevindt zich onder de auto.
De zekering is oké als hij niet is doorgebrand (gesmolten) is.
(A) Rij instructies voor elektrische auto 6V met versnellingshendel
Hoe te rijden
Om vooruit te rijden, de versnellingshendel in positie 1 zetten.
Als het gaspedaal wordt ingedrukt, licht het groene lampje op en de auto gaat vooruit.
Om achteruit te rijden, de versnellingshendel in positie 2 zetten.
Als het gaspedaal wordt ingedrukt, licht het rode lampje op en de auto gaat achteruit.
Laat het gaspedaal los en een elektrische rem stopt de auto.
Door op het rempedaal te drukken, wordt de stroomtoevoer onderbroken en het remsysteem geactiveerd.
In de centrale positie, staat de hendel in de neutraal stand en is er geen beweging als het gaspedaal wordt ingedrukt, de auto is geblokkeerd.
(B) Rij instructies voor elektrische auto 6V met twee knoppen
Hoe te rijden
Om vooruit te rijden, druk op de knop met de groene pijl, een groen lampje gaat aan.
Druk op het gaspedaal en de auto gaat vooruit.
Om achteruit te rijden, druk op de knop met de rode pijl, een rood lampje gaat aan.
Druk op het gaspedaal en de auto gaat achteruit.
Laat het gaspedaal los en de elektrische rem stopt de auto.
(A) Rij instructies voor elektrische auto 6V met versnellingshendel en 2 snelheden
Hoe te rijden
Om vooruit te rijden , de versnellingshendel in positie 1 zetten.
Als het gaspedaal wordt ingedrukt, licht het groene lampje op en de auto gaat vooruit.
Om achteruit te rijden, de versnellingshendel in positie 2 zetten.
Als het gaspedaal wordt ingedrukt, licht het rode lampje op en de auto gaat achteruit.
Laat het gaspedaal los, een elektrische rem stopt de auto.
Door op het rempedaal te drukken, wordt de stroomtoevoer onderbroken en het remsysteem geactiveerd.
In de centrale positie, staat de hendel in de neutraal stand en ie er geen beweging als het gaspedaal wordt ingedrukt, de auto is geblokkeerd.
Om de snelheid van de auto te verhogen, dient de veiligheidsknop van positie I in positie II gezet te worden.
(C) (D) Rij instructies voor elektrische auto 12V met drie knoppen
Hoe te rijden
Om vooruit te rijden, druk op de knop met de groene pijl, een groen lampje gaat aan.
Druk op het gaspedaal en de auto gaat vooruit.
Om achteruit te rijden, druk op de knop met de rode pijl, een rood lampje gaat aan.
Druk op het gaspedaal en de auto gaat achteruit.
Laat het gaspedaal los en de elektrische rem stopt de auto.
Door op de gele knop te drukken, staat de auto in de neutraal stand en is er geen beweging als het gaspedaal wordt ingedrukt, de auto is geblokkeerd.
Druk op het rempedaal om de stroomtoevoer te onderbreken en het remsysteem te activeren.
Gebruik van het optionele dashboard
Als je auto is uitgerust met een optioneel dashboard, zal tijdens het gebruik hierop informatie verschijnen omtrent de snelheid en de staat van de
batterijen.
De snelheid wordt weergegeven door een serie gekleurde lampjes, die geleidelijk oplichten.
De staat van de batterijen wordt aangegeven door een serie gekleurde lampjes, van groen naar rood, het is mogelijk om dit ook te controleren als de
auto niet in gebruik is, druk hiervoor de desbetreffende knop.
Het is beter de batterijen op te laden, als het rode lampje onderaan brandt.
Gebruik van de optionele versnellingshendel
Als je auto is uitgerust met de optionele versnellingshendel, kan je de snelheid verhogen of verlagen door op de twee knoppen te drukken.
De blauwe knop voor snelheid te verminderen, de rode knop voor snelheid te verhogen.

TT ITALIA 1978
SP 39 Km 2.0
20060 Colturano (Milano) Italy
Tel. +39 02 98 23 76 07
Email: info@tt-italia.com
www.tt-italia.com
Table of contents
Languages:
Popular Toy manuals by other brands

Twoey Toys
Twoey Toys Big Book Stroller 1150 Aassembly Instructions

Lionel
Lionel C-420 owner's manual

Fisher-Price
Fisher-Price 77149 instructions

Rail King
Rail King NW-2 Operating instrutions

Faller
Faller BEER GARDEN 180564 Assembly instructions

Seagull Models
Seagull Models WESTLAND LYSANDER MK. III 55CC SEA216 Assembly manual