TTI ReelStrike Service manual

Operator’s HandBook
ReelStrike™& Strike™
www.tti.com.au
Manufacturer of “The Safest Tanks in Motion”

Product HandBook
ReelStrike™ & Strike™
1800 816 277www.tti.com.au
2
Contents
Safety 4
General Safety Instructions 5
General Information 6
Specifications 6
Description 7
Machine Limitations 10
Driving Stability 10
Spray Boom Calibration 10
Calibration Procedure 10
ReelStrike & Strike Operating Instructions 10
Before first use 10
Filling the ReelStrike & Strike Tank 13
Operating Instructions 16
Clean-up and Decontamination 21
Maintenance 22
Periodic Checks 22
Maintenance Schedule 22
Maintenance Tasks 24
Trouble Shooting 24
Pump 24
Risk Assessment 25
Warranty 26
Warranty Policy 26
What this Warranty Does Not Cover? 26
How to Obtain Service Under this Warranty? 26
Warranty Limitations 26

Product HandBook
ReelStrike™ & Strike™
1800 816 277www.tti.com.au
3
Disclaimer
All information, illustrations, and specifications contained in this manual are based on the latest product
information available at the time of this publication’s printing. TransTank International (TTi) reserves the right
to alter and substitute specifications and methods at any time, in line with our commitment to continuous
improvement.
No patent liability is assumed with respect to the use of information contained within this manual. While
every precaution has been taken in the preparation of this manual, TTi assumes no responsibility for errors or
omissions.
Thankyou forpurchasingaTTi ReelStrike& StrikeSpotSprayerunit, which
will provide many years of reliable service when operated and maintained
in accordance with this manual.
TTi manufacture a range of ReelStrike & Strike units, either 200 or 400 litre tanks, supplied with a 12-volt
electric pump and fitted with hose, hose reel and spray boom options. This manual describes the operation,
driving stability and maintenance procedures applicable to all units, noting additional requirements to
options where necessary.
All TTi ReelStrike & Strike tanks are rotationally moulded from quality polyethylene, purpose designed and
manufactured to high standards. The ReelStrike & Strike is a Utility Terrain Vehicle (UTV) tub-mounted unit
designed for everything from herbicide or pesticide spraying. The ReelStrike & Strike can also be mounted
on the back of a utility or trailer.
The ReelStrike & Strike unit is supplied complete, tested and ready to mount to your vehicle. TTi warrants
that the ReelStrike & Strike has been designed and built for its intended purpose as a pesticide/herbicide
spray unit.
The owner is responsible to ensure that the equipment is operated in accordance with this manual, with
Australian WorkSafe requirements, applicable road rules and local council regulations. TTi is not liable for
any loss, injury or death resulting from the failure to observe all safe working regulations as required by law.
Included with your ReelStrike & Strike unit is the following documents:
• Operator’s Handbook (this manual, which includes the Warranty Registration Card)
• Tank Quality Check Form. This is your verification that the unit has been quality checked, and verifies
the serial number affixed to the unit.

Product HandBook
ReelStrike™ & Strike™
1800 816 277www.tti.com.au
4
Safety
This manual is intended for use by personnel experienced in the use of this and similar equipment. Read and
understand this manual before attempting to operate or perform routine maintenance on this equipment.
Your safety is of prime priority.
A WARNING highlights an essential operating or maintenance procedure, practice,
condition or statement, which, if not strictly observed, could result in injury or death
of personnel, or long-term health hazards.
A CAUTION highlights an essential operating or maintenance procedure,
practice, condition or statement, which, if not observed, could result in damage
or destruction of equipment.
A NOTE highlights or clarifies an essential systems description, operating or
maintenance procedure, condition or statement.

Product HandBook
ReelStrike™ & Strike™
1800 816 277www.tti.com.au
5
General Safety Instructions
1. This unit is designed and manufactured solely for the purpose of carrying and spraying herbicides
and pesticides. Under no circumstances should it be used for any other purpose. It must never be
used for transporting fuel.
2. Only authorised and trained personnel are to operate this equipment. Operators must have read and
fully understood this manual before operating the ReelStrike & Strike unit.
3. Do not operate the ReelStrike & Strike unit anywhere near bystanders, livestock, watercourses or
any non-targeted vegetation that may be in danger from spray drift contamination.
4. Wind direction and speed must be taken into account, as windy conditions may endanger the operator
or damage to adjacent non-target vegetation. Avoid spraying on hot and sunny days or when wind
speed exceeds 6.5km/h.
5. Do not operate this equipment while under the influence of alcohol or any drugs that could impair
your capabilities in any way.
6. PPE appropriate to the chemicals being used must be worn at all times when operating the ReelStrike
& Strike. As a minimum, the PPE should include coveralls, gloves and boots. A face shield and PVC
apron are recommended depending on the task. It is recommended that the following documents
should be read and understood by the operator:
• ⦁Australian Standard for Chemical protective clothing AS3765
• ⦁Australian Standard for Respiratory protection devices AS1715
7. Ensure the capacity of the vehicle is suitable for the loaded mass of the ReelStrike & Strike. Refer
to the vehicle’s operator manual for safe working loads, correct securing points and relevant
safety instructions. Do not exceed the carrying and braking capacity as specified by the vehicle
manufacturer. As a guide, one litre of water weights one kilogram (kg), therefore a full 200 litre
ReelStrike & Strike unit will weigh in excess of 250kg.
8. The unit must be securely restrained on the vehicle. Ensure all fasteners are tightened and secure
before operation.
9. Care should be taken at all times, particularly when operating on rough or steep terrain. Drivers
should be aware of fluid surge affecting the vehicle’s centre of gravity.
10. The ReelStrike & Strike must never be left unattended while being filled with fluids.
11. Do not operate the pump when there is no fluid in the tank.
12. Do not disconnect any hoses, nozzles or filters while the equipment is operating. Disconnecting any
components while under pressure may result in uncontrolled fluid discharge which may be hazardous.
13. Ensure any electrical connections are properly configured, to prevent damage such as shorting or
reverse polarity.
14. At completion of operation, switch the pump off and relieve any residual pressure by squeezing the
spray gun trigger or opening an optionally fitted spray boom valve.
15. At completion of the operation, decontaminate the ReelStrike & Strike tank and spray lines. Drain
any residue chemicals and store in a sealed container. Dispose of any unwanted chemicals and tank
rinse residue in accordance with current environmental and workplace health and safety regulations.
16. The ReelStrike & Strike has safety labels affixed to various locations on the unit. These labels should
be kept clean and legible, and replaced if damaged.
17. Any unauthorised modifications to this equipment may affect its function and create a serious safety
risk. Any unauthorised modifications will void any warranty on the unit.

Product HandBook
ReelStrike™ & Strike™
1800 816 277www.tti.com.au
6
General Information
Specifications
Tank UV resistant polyethylene tank complete – 200 or 400 litres mounted on
galvanised steel forkable frame
Standard Equipment Remco 12V electric pump – 8.3 litres/min 100psi, c/w 3.6m electrical lead with
cigarette plug
Pressure regulator
6m hose with spray gun
Pressure regulator
Options Remco 12V electric pump – 11.4 litres/min 60psi
Remco 12V electric pump – 15.1 litres/min 100psi
Remco 12V electric pump – 19.1 litres/min 60psi
30m hose on hose reel with spray gun
BoomTech nozzle kit with tailgate bracket
HitchIt attachment with boomless nozzle
HitchIt attachment with 4m Versatile Spray Boom
Description
The TTi ReelStrike & Strike Spot Sprayer unit is designed to carry and distribute herbicides or pesticides
using a self-contained pump and various fluid dispensing systems, refer to Figure 1 for a typical example.
The ReelStrike & Strike variants are configured in two different styles, both designed to fit into the trays of
UTVs:
• 200 litre tank unit with:
• 6m hose and spray gun (Strike) or
• 30m hose on hose reel with spray gun (ReelStrike & Strike)
• 400 litre tank unit with:
• 6m hose and spray gun (Strike) or
• 30m hose on hose reel with spray gun (ReelStrike & Strike)

Product HandBook
ReelStrike™ & Strike™
1800 816 277www.tti.com.au
7
The Strike is fitted with a 6m hose while the ReelStrike has the hose reel and 30m of hose. Either
configuration is suitable for fitting to a conventional utility tray or trailer.
Figure 1 – ReelStrike & Strike Purpose-built UTV Spot Sprayer
The Strike has the features shown in Figure 2, with the ReelStrike is shown in Figure 3.
Figure 2 – Component Identification – 400 litre Strike unit

Product HandBook
ReelStrike™ & Strike™
1800 816 277www.tti.com.au
8
Figure 3 – Component Identification – 400 litre ReelStrike & Strike with hose reel
Pump
The ReelStrike & Strike is fitted as standard with an 8.3 L/min 100psi 12V Remco electric pump. Optionally
available are larger capacity Remco electric pumps, with increased delivery from 11.4 L/min to 19 L/min.
If the spray gun or spray boom is not in operation when the pump is running, the fluid bypasses back into
the tank.
BoomTech Nozzle Kit
An optional BoomTech nozzle kit can be mounted to the vehicle or trailer with a tailgate bracket. The
BoomTech has two volume adjustable nozzles, ideal for fence lines, orchard, blanket and end row spraying.
The BoomTech nozzle kit requires a minimum pump capacity of 11.4 L/min, requiring the selection of one of
the three larger pump options available for the ReelStrike & Strike units.
Boomless Nozzle Kit
An optional brass boomless nozzle kit can be mounted to the optional HitchIt attachment, which fits any
50mm Hayman Reece tow hitch. The nozzle is available in four sizes and is ideal for blanket spraying,
especially in rough country spraying and for locust control. By swapping nozzle plates, the nozzle can be
used for either a 90 or 180-degree spray swath.
Versatile Spray Boom
An optional 4m Versatile spray boom can be mounted to the vehicle or trailer with U-bolt clamps or using
the optional HitchIt attachment. The 1.2m wide spray boom has three adjustable centre nozzles and two
off-centre end jets to provide a range of spray volumes and patterns, which can achieve a 4m width swath.
The spray boom is operated by a manual valve to start up or stop spray operations. When the valve is
closed, the fluid bypasses back into the tank.

Product HandBook
ReelStrike™ & Strike™
1800 816 277www.tti.com.au
9
6m Hose and Spray Gun
For the Strike unit, a manually coiled 6m long 10mm diameter hose is connected to a trigger actuated
PowerJet spray gun with adjustable brass nozzle. The nozzle adjusts from jet through to mist sprays
by rotating the nozzle head. When the trigger is squeezed, the fluid is discharged; when the trigger is
released, the fluid bypasses back into the tank. The spray gun is stowed by means of two storage clips
located on the side of the tank.
30m Hose Reel and Spray Gun
The ReelStrike has an manually operated hose reel containing 30m of 10mm diameter hose is connected
to a trigger actuated PowerJet spray gun with adjustable brass nozzle. The hose is pulled out manually
from the reel and retracted using the handle on the side. The spray gun is stowed by means of two storage
clips located on the side of the tank.
The nozzle adjusts from jet through to mist sprays by rotating the nozzle head. When the trigger is
squeezed, the fluid is discharged; when the trigger is released, the fluid bypasses back into the tank.
Pressure Regulator
A pressure regulator and pressure gauge are fitted to the pump discharge flange to control line pressure
and prevent pump cavitation. The regulator is adjustable depending on the operation requirements – for
boom spraying, the regulator is to be set to approximately 3 bar; with spot spraying via the hose reel the
regulator is set to approximately 5 bar.
Suction Filter
A filter is installed on the suction line adjacent to the pump. The filter has a removeable filter element for
easy cleaning.
Manually Operated Valve
A manually operated valve is fitted to the optional spray boom feed line. The valve switches from the hose
feed to the spray boom feed.
Frame
The chassis frame of the ReelStrike & Strike unit is an all steel, fully welded construction and hot dip
galvanised for corrosion resistance. The ReelStrike & Strike unit has an additional upper structure to
support the hose reel. The frames incorporate forklift pockets.
Tank
All TTi tanks are constructed from UV resistant, virgin material polyethylene. The tank is fully drainable
and has an internal basket strainer under the filling cap.
⦁

Product HandBook
ReelStrike™ & Strike™
1800 816 277www.tti.com.au
10
Machine Limitations
The Strike and ReelStrike & Strike units are subject to operating limitations. It is the operator’s responsibility
to ensure that this equipment is being operated safely and within these limitations.
Driving Stability
The ReelStrike & Strike unit is heavy when filled with fluid. To maintain stability while operating this unit:
• Ensure the vehicle tyres are inflated to their correct pressure at all times. Underinflated tyres can cause
excessive lateral motion of the tyre, which may cause a rollover.
• Allow extra room for braking and turning when the tank is full.
• Ensure any side gradient (slope) is accounted for, especially when the ReelStrike & Strike tank is full, as
the vehicle may have a higher centre of gravity.
Spray Boom Calibration
Accurate calibration is an essential element of any spraying function as it ensures that the chemical is
applied at the rate specified on the product label. Application in excess of the recommended rate may be
dangerous, can damage crops and is uneconomical.
Calibration must be carried out:
• When spraying for the first time with new spray equipment
• At the beginning of each season
• After changes of nozzle tips, spraying pressure or vehicle speed
• After every 100 hectares of spraying
PPE appropriate to the chemicals being used must be worn at all times when calibrating the ReelStrike &
Strike. As a minimum, the PPE should include coveralls, gloves and boots. A face shield and PVC apron are
recommended.
Calibration Procedure
Check the label on the chemical container for the application rate and recommended spray nozzle type,
refer to Figure 4, which shows the TeeJet AIXR nozzle application chart. To apply a specific rate of chemical
to the target surface, work out the:
• total sprayer output,
• travel speed, and
• the swath width.
Using these parameters, the application rate is calculate as follows.

Product HandBook
ReelStrike™ & Strike™
1800 816 277www.tti.com.au
11
Measure Total sprayer output [L/min]
Set the pressure at the correct level for spraying determined by the type of nozzles. All nozzles used for
spraying should be left on. For initial trials, set the pressure regulator at approximately 2 bar and adjust as
needed.
• Fill the spray tank with clean water, refer to Filling the ReelStrike & Strike Tank procedure below. Run the
sprayer at the correct pressure with all nozzles operating.
• Place a measuring jug under first nozzle for one minute, then measure how much water is in the jug.
• Repeat for all nozzles. Nozzle output should not vary by more than 10%. If it does, the nozzle could be
worn or damaged and should be replaced.
• Add all the jug measurements to find the total sprayer output in litres per minute.
Measure the travel speed [km/h]
The normal speed for spraying with small boom sprayers is 4–10 km/h. The slower the travel, the higher the
application rate. Adjust travel speed to suit ground conditions.
• Measure how many seconds it takes to travel 100 metres with the sprayer attached and half full.
• Calculate your travel speed by inserting the time in seconds into the following formula: Travel speed
(km/h) = distance travelled in metres (say 100m) x3.6 / Time taken (in seconds)
Calculate spray application rate [L/Ha]
First, measure the swath width in metres. For general broadcast spraying, the swath width is equal to the
number of nozzles multiplied by the nozzle spacing. For band spraying, the swath width is equal to the total
of all the band widths. Calculate the application rate using the following formula:
Application rate (L/ha) = (600 x total sprayer output (L/min)) / (swath width (m) x travel speed (km/h))
Example: If total sprayer output is 5 L/min, speed is 8 km/h, and swath width is 4m, the application rate =
(600 x 5 = 62.5 L/ha)/(4 x 8)
If the application rate is less than specified, increase the pressure and repeat calibration to achieve the
correct rate. Once the required rate is achieved, note the following parameters for future reference when
using this particular chemical:
• ⦁Nozzle Fitted
• ⦁Type (Drop Size)
• ⦁Application Rate
• ⦁Spray Pressure
• ⦁Forward Speed

Product HandBook
ReelStrike™ & Strike™
1800 816 277www.tti.com.au
12
Figure 4 – AIXR Application Chart

Product HandBook
ReelStrike™ & Strike™
1800 816 277www.tti.com.au
13
ReelStrike & Strike Operating Instructions
Before first use
Your ReelStrike & Strike Spot Spray Unit is delivered fully assembled and ready to be fitted onto the
vehicle. Before use, it needs to be set up using the following instructions:
• Complete the warranty registration online at ⦁ www.tti.com.au/warranty-registration, or use the
Warranty Registration Card at the back of this handbook.
• Store this handbook, along with the Tank Quality Check Form and pump unit’s manual in a safe and
easily accessible place for future reference.
• Read and thoroughly understand this handbook, paying particular attention to all safety requirements,
before using the ReelStrike & Strike for the first time.
• Check that all fittings, valves, hoses and electrical leads are secure following transit, and are not
damaged in any way.
• Inspect the tank for any damage or abrasions that may occur during transit.
• Position your ReelStrike & Strike unit onto the vehicle and mount securely, either using tie-down straps
to suitable points on the steel frame or other suitable devices, refer to Figure 2 and Figure 3. The tie-
down straps must be rated to at least the total mass of the unit when filled with fluid. Alternatively, the
integrated tank frame may be bolted to the vehicle.
CAUTION: The unit must be securely mounted to the vehicle. Failure to do so may
result in the unit moving or falling off the moving vehicle. Warranty is conditional on
the unit being correctly mounted.
CAUTION: Ensure any electrical connections are configured correctly to prevent
shorting or reverse polarity. Warranty is conditional on the electrical systems being
correctly connected.
WARNING: The operator must fully understand all aspects of this handbook. Do not
operate the ReelStrike & Strike unit if you are unfamiliar with its operation until you
have read this handbook.
Product HandBook
ReelStrike™ & Strike™
1800 816 277www.tti.com.au
14
• Install the supplied electrical cable and connect it to the vehicle’s power supply (cigarette lighter
socket) or battery (via alligator clips). The ON/OFF switch is cable mounted and easily accessible to
the operator from the driver’s seat.
• For the optional BoomTech nozzle kit, mount the bracket to the vehicle’s tailgate and connect the
hose to the manually operated valve near the tank.
• For the optional Boomless Nozzle kit, mount the optional HitchIt to the vehicle and securely install the
nozzle kit to the top of the HitchIt.
• Where the optional Versatile Boom is ordered (refer to Figure 5), install it to the vehicle and connect
the hose to the manually operated valve near the tank.
• It is recommended that at first use, the ReelStrike & Strike is filled with water for calibration purposes
and for the operator to become familiar with the characteristics of the unit, refer to Calibration
Procedure.
⦁
Figure 5 – Versatile Boom Arrangement
Filling the ReelStrike & Strike Tank
WARNING: Ensure the filling area is in an open, well-ventilated space if filling with
chemicals. Follow the instructions provided with the chemicals or the applicable
Safety Data Sheet.

Product HandBook
ReelStrike™ & Strike™
1800 816 277www.tti.com.au
15
Mixing and filling the ReelStrike & Strike unit should be undertaken at a carefully chosen site, away from
any risk of spillages draining into water courses or into environmentally sensitive areas. Children and
animals must always be kept away from mixing and filling operations.
The ReelStrike & Strike unit’s tank is filled as follows:
⦁
CAUTION: If an optional boom or boomless spray nozzle kit is fitted, ensure the
manually operated isolating valve is CLOSED.
• Check that the optional boom kit isolating valve near the pump is CLOSED.
• Open the tank filler by twisting and lifting the cap.
• Withdraw the internal basket strainer and inspect it for any debris. Clean it if required and reinstall it
into the top of the tank.
• Follow the chemical manufacturer’s instructions and safety precautions carefully, taking note of the
order in which the products are added to the tank.
• Measure the correct quantities of chemicals using clean measuring containers specifically for this
purpose only, then add the chemicals to the tank.
• Rinse out the measuring containers and any empty containers and pour all rinsing liquid into the
ReelStrike & Strike tank.
WARNING: Do not overfill the tank. This may result in chemical spillage.
CAUTION: The ReelStrike & Strike must never be left unattended while being filled
with fluid.
• Top up the tank with water to the required level, ensuring it is not overfilled.
• Thoroughly mix the contents by stirring with a suitable paddle or starting the pump to allow
recirculation through the pump and back into the tank.
• Upon completion of filling the ReelStrike & Strike tank, replace the filler cap and twist to tighten.
• Wash off any spillage from outside the tank.
CAUTION: If an optional boom or boomless spray nozzle kit is fitted, ensure the
manually operated isolating valve is CLOSED.

Product HandBook
ReelStrike™ & Strike™
1800 816 277www.tti.com.au
16
• Close the chemical supply containers and store appropriately. Any empty containers must be
thoroughly rinsed and set aside for collection and disposal in compliance with environmental and
work safety requirements.
Operating Instructions
The ReelStrike & Strike is started and operated as follows:
• Confirm the tank contains the required chemical or water quantity.
⦁
NOTE: Ensure the pressure regulator is set to the minimum position.
• At the pump, check that the pressure regulator is set to the minimum position by turning the knob
anti-clockwise, refer to Figure 6.
Figure 6 – Pressure Regulator
• If fitted with a spray boom option, check that the isolating valve adjacent to the tank is in the CLOSED
position.
• For spraying operations, refer to:
• Hose Spray Operation
• Spray Boom Operation
• BoomTech and Boomless Nozzle Spray Operation

Product HandBook
ReelStrike™ & Strike™
1800 816 277www.tti.com.au
17
Hose Spray Operation
Set up and operation of the hose spray system is conducted as follows:
⦁
WARNING: Suitable PPE must be worn by the operator when conducting manual
hose spraying operations.
• Position the vehicle at a suitable point of the operations area.
• If the ReelStrike & Strike unit is fitted with a spray boom option, ensure the isolating valve adjacent to
the tank is in the CLOSED position.
• Check that the pressure regulator is set to its minimum setting. Start up the pump by turning the
electric pump’s cable-mounted switch to ON. The fluid will now be circulating through the system
and returning to the tank via the bypass circuit.
• Set the pressure regulator to approximately 5 bar – this can be fine-tuned as require
• Uncoil the hose manually from the Strike unit, or pull the hose from the ReelStrike & Strike’s hose reel
to unwind it from the reel.
• Aim the hose’s PowerJet spray gun in the required direction and squeeze the trigger. Adjust the spray
pattern by rotating the brass nozzle tip.
• Use a constant speed when spraying and release the trigger at the end of each swath or change
of direction, to prevent overdosing. Work in parallel lines when spraying large areas, rather than
swinging from side to side.
WARNING: Do not spray in windy conditions, where spray drift contamination may
occur.
NOTE: If an optional boom or boomless spray nozzle kit is fitted, ensure the
manually operated isolating valve is CLOSED.
CAUTION: Ensure not to over-run the hose when pulling it out from the reel, as this
may damage the hose or the fittings.

Product HandBook
ReelStrike™ & Strike™
1800 816 277www.tti.com.au
18
• At the end of the task, release the spray gun trigger and switch the pump OFF. The fluid will
automatically recirculate through the system and return to the tank via the bypass circuit until the
pump is switched OFF.
• With the pump now turned OFF, aim the spray gun in the required direction and squeeze the trigger.
Thiswill releasethe residualpressurein thehose,which willresultina smallamountoffluid discharging.
• With the hose pressure released, the hose is ready to stow back on the ReelStrike & Strike. Refer to
the following section applicable to the hose option supplied with your unit.
6m Hose
The Strike unit is provided with a 6m hose and spray gun. To stow the hose, simply coil it loosely around
the tank and clip the spray gun into its holder on the side of the tank.
3m Hose Reel
The ReelStrike is provided with 30m of hose on a manually operated hose reel, refer to Figure 7. To
retract the hose, turn the handle at the side of the hose reel to wind it onto the spool, guiding the hose
as necessary to ensure even distribution across the width of the reel. Allow enough slack in the hose to
stow the spray gun in its holder on the side of the tank.
The reel has a four-position locking device to prevent the hose unwinding during transit.
Figure 7 – 30m Hose Reel

Product HandBook
ReelStrike™ & Strike™
1800 816 277www.tti.com.au
19
Spray Boom Operation
WARNING: Before commencing spraying, plan the work effectively to minimise
potential contamination of adjacent areas.
Set up and operation of the Versatile Boom is conducted as follows:
WARNING: Do not spray in windy conditions, where spray drift contamination may
occur. Spray drift can be reduced by lower nozzle height, lower pressures or by
fitting larger nozzles.
• Set the required spray selection by opening or closing the individual control valves on the spray nozzle
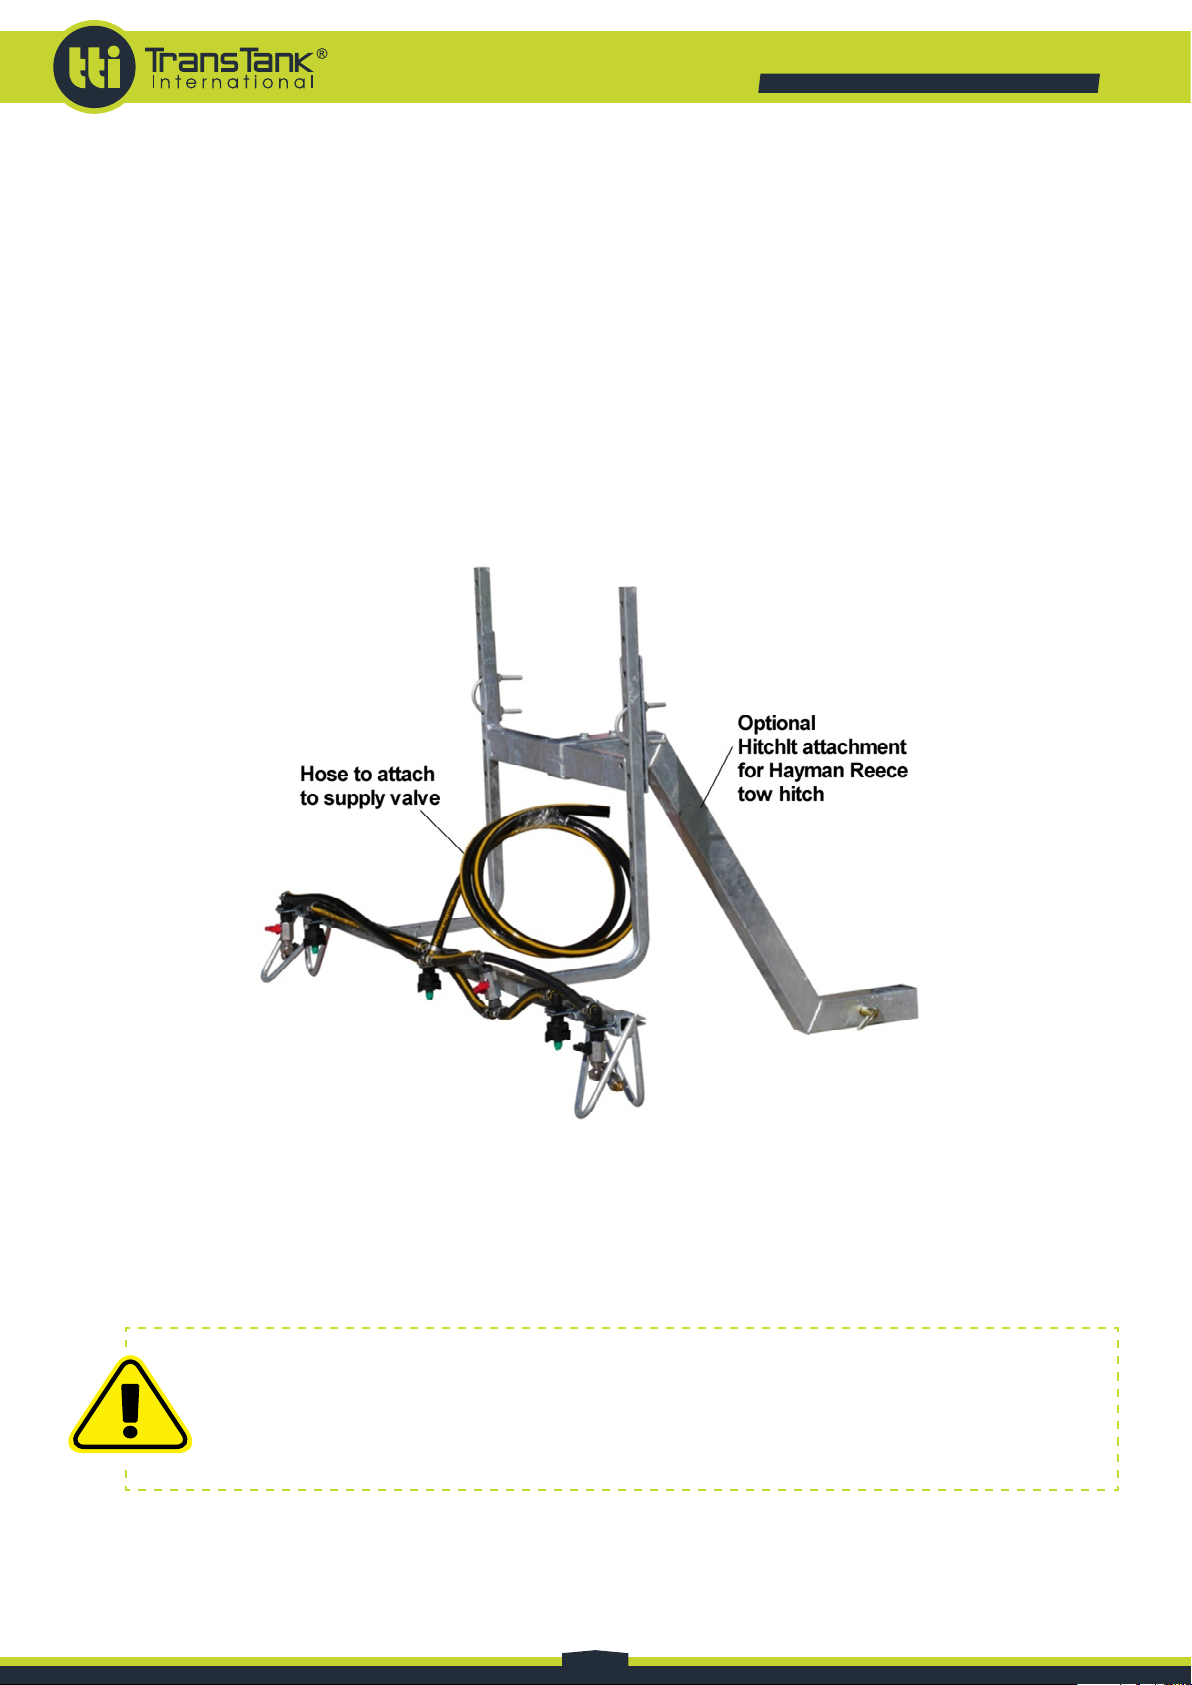
lines, refer to Figure 8.
• Position the vehicle at the starting point of the operations area.
Figure 8 – Spray Boom Details

Product HandBook
ReelStrike™ & Strike™
1800 816 277www.tti.com.au
20
• Turn the isolating valve (adjacent to the pump) on the boom spray line to the OPEN position.
• Set the pressure regulator to the correct setting as determined during calibration.
• With the vehicle’s engine running and the operator in the driver’s seat, start the pump by turning the
electrical lead-mounted switch to ON. The fluid will now start to discharge from the boom spray
nozzles.
• Commence driving the vehicle at the speed determined during calibration to achieve the required
spray outcome.
• At the end of each swath or before turning around, switch the pump OFF. When commencing the next
swath, turn the pump switch back to ON.
BoomTech and Boomless Nozzle Spray Operation
⦁
WARNING: Before commencing spraying, plan the work effectively to minimise
potential contamination of adjacent areas.
• The optionally fitted BoomTech nozzle kit and boomless nozzle spray kit are operated as follows:
• For the boomless nozzle kit, set the required spray pattern by swapping the nozzle plate for either the
90 degree or 180 degree swath. The BoomTech nozzle kit does not require any adjustment.
• Position the vehicle at the starting point of the operations area.
• Turn the isolating valve (adjacent to the pump) on the boom spray line to the OPEN position.
• Set the pressure regulator to the correct setting as determined during calibration.
• With the vehicle’s engine running and the operator in the driver’s seat, start the pump by turning the
electrical lead-mounted switch to ON. The fluid will now start to discharge from the boom spray
nozzles.
• Commence driving the vehicle at the speed determined during calibration to achieve the required
spray outcome.
• At the end of each swath or before turning around, switch the pump OFF. When commencing the next
swath, turn the pump switch back to ON.
WARNING: Do not spray in windy conditions, where spray drift contamination may
occur. Spray drift can be reduced by lower nozzle height, lower pressures or by
fitting larger nozzles.
This manual suits for next models
1
Table of contents
Other TTI Paint Sprayer manuals


Popular Paint Sprayer manuals by other brands


DeVilbiss
DeVilbiss TEKNA TB-1002-D Technical bulletin

WAGNER
WAGNER Power Painter owner's manual

DeVilbiss
DeVilbiss T-AFPV Operation manual

NEW BRUNSWICK SCIENTIFIC
NEW BRUNSWICK SCIENTIFIC G25-KC Guide to operations

Annovi Reverberi
Annovi Reverberi AR Spray 16 Original instructions

Graco
Graco Series B Instructions-parts list