Tubo AIR User manual


Dear User:
Thanks for purchasing TUBO AIR Electric Folding Bike, an electric power assisted
bike brought to you by TUBO Bikes. TUBO AIR is not only a time-saver, but also a
clean
and pollution -free machine . In order to reach your best safety and comfort , please
read this manual to be familiar with the operation before a ride .
TUBO Bikes appreciates
your purchase and your eort to be part of the carbon reduction
world.
2nd
Edition.
2020 May
Release.
Pictures
may
be
subject
to
change.
Copyright
TUBO Bikes is a brand of Electric Garage Srl
.
All
rights
reserved.
Disclaimer
Electric Garage does not
guarantee
on
the
contents,
marketability,
and
suitability
of
certain
purposes
of
this
User's
Manual.
And
the
company
keeps
the
right
to
amend
its
contents.
Any
change
of
contents
will
not
be
notied.
Contents
I. Terminology...............................................................................................1
II. Specication table....................................................................................2
III. Contents of package.................................................................................3
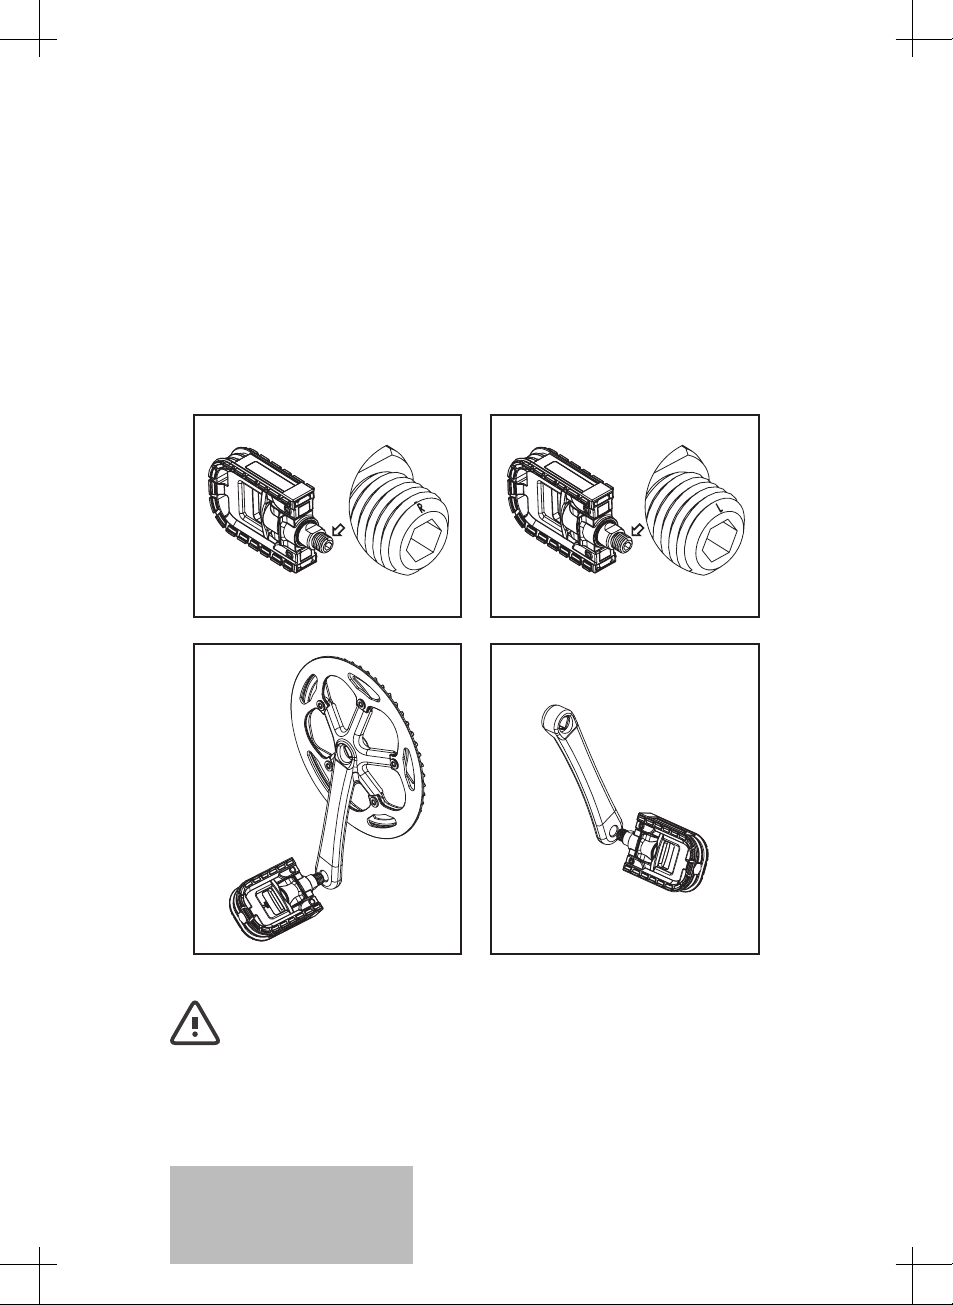
IV. Assembly of accessory..............................................................................4
V. Basic safety inspection.............................................................................4
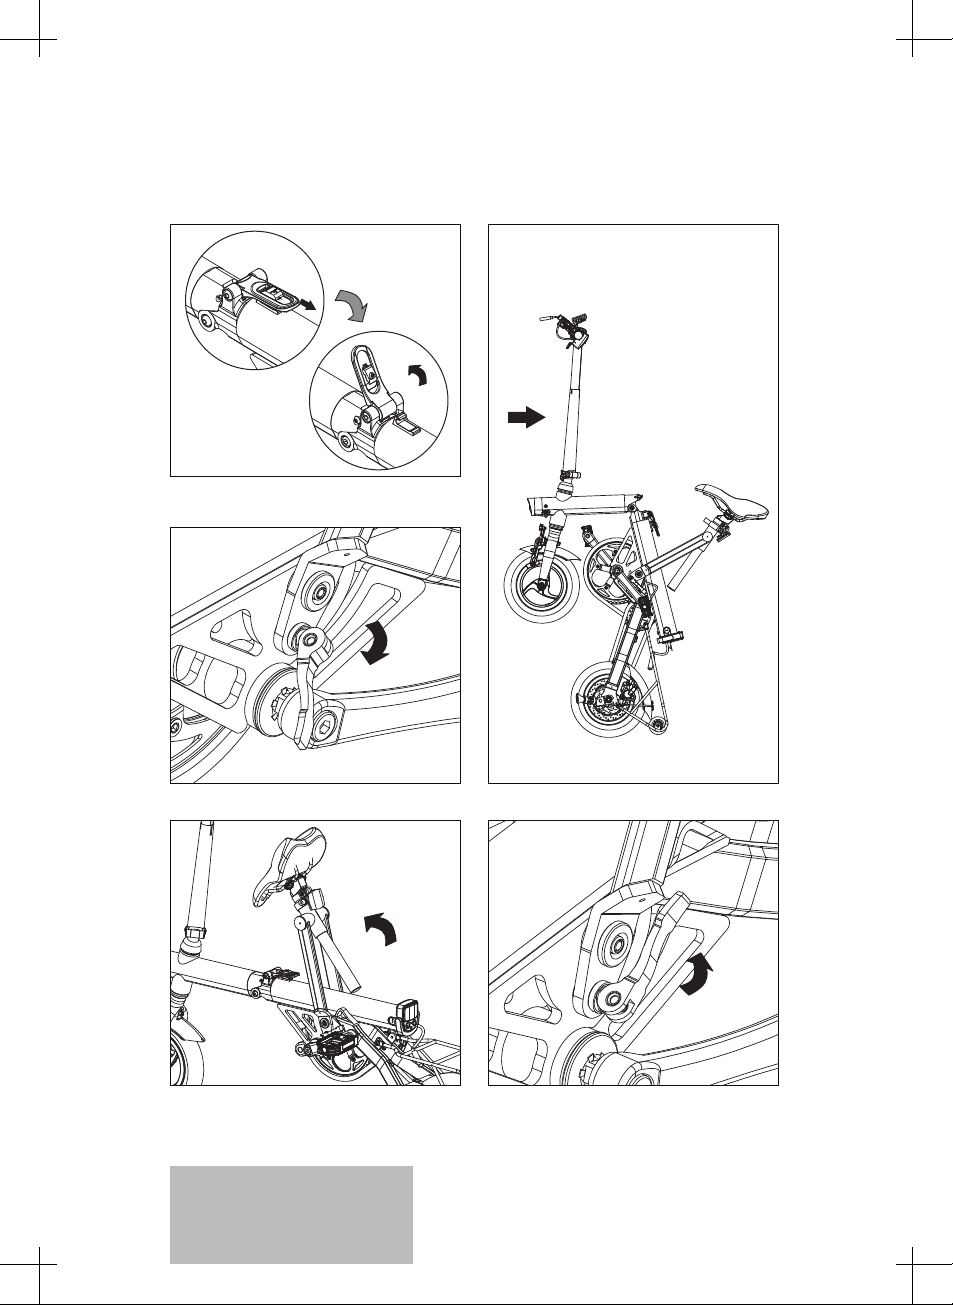
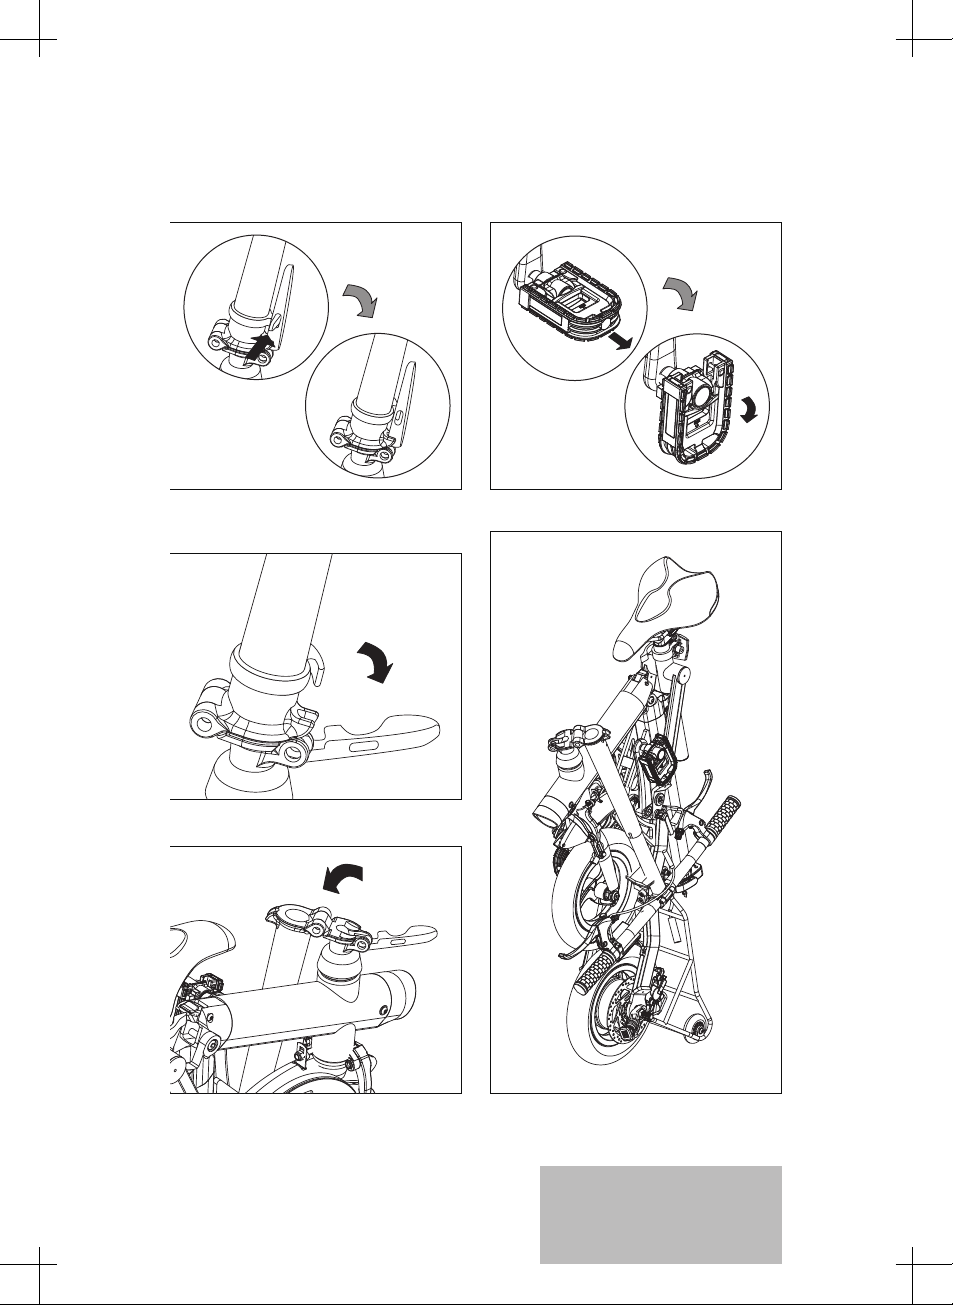
VI. Steps of folds..............................................................................................6
VII. Lithium battery set....................................................................................8
VIII. Charger set................................................................................................8
IX. Battery charge & notications.................................................................9
X. Multiple function panel.........................................................................10
XI. Illumination system................................................................................15
XII. Inspections before a ride.......................................................................16
XIII. Awareness on a ride................................................................................17
XIV. Operations on the ride............................................................................17
XV. Choosing accessories.............................................................................18
XVI. General maintenance.............................................................................19
XVII. Quick troubleshoots...............................................................................21
Signs
Warning (safety-related concerns, misuse of which may pose a danger)
Attention (correct usage, inspections and key preparations)
Prohibition (restrictions due to safety concerns)
Questions (contacts and solutions)

25
26
16
12
13
7
1
14 15
11
3
4
2
5
6
9
8
10
17
19 18
21
20
22
23
24
TUBO AIR
10” Rear Motor Electric Folding Bike
1. Front Reector (Silver)
2. Brake Lever
3. Handlebar Quick Release
4. Multiple Function Panel
5. Telescopic Head Tube Quick Release
6. Foldable Head Quick Release
7. LED Headlight
8. Front Caliper Brake
9. Front Tire
10. Integrated wheel rim
11. Quick Release on the frame
12. Saddle
13. Rear Reector (Red)
I. Terminology
14. Seat Post
15. Seat Post Quick Release
16. Seat Tube
17. Foldable Pedal
18. Crankset
19. Idler-Wheel
20. Chain
21. Rear Disc Brake
22. Rear Tire
23. Integrated Brushless Hub Motor
24. Assisted Wheel
25. Luggage Carrier
26. Rear Warning Light / Lithium Battery
1

Note
1.Please return the
battery to an
authorized shop
or dealer for
recycle purpose
after the battery is
replaced.
2.Riding distance
and speed will
change according
to the conditions
of road and traffic,
rider’s body
weight and riding
habits, and the
conditions of the
motor and battery.
3.Folding time will
change according
to the user’s
operation and
familiarity.
Updates of product
specification and
reference figures
won’t be notified
again.
6061 Aluminum Alloy
10×2”
82 x 55 x 30 (cm)
13 Kg
52:22:16:14
Fixed-Gear
C-Brake (F); Disc Brake (B)
Speed Sensor
36V
2.6Ah
Lithium Battery
1-2 hr
100-240V
1.8A
42V
2.0A
3-Step Boost
DC Brushless Motor
Rear Brushless Hub Motor
250W
25 km
15 km
100 kg
140-190 cm
1-3 sec
Bike Frame
Wheel Diameter
Folded Size
Bike Weight
Gear Ratio
Gear Shift
Brake
Motor Sensor
Battery Rated Voltage
Battery Capacity
Battery Type1
Charging Time
Adaptor Input Voltage
Adaptor Input Current
Adaptor Output Voltage
Adaptor Output Current
Power Boost Mode
Motor Type
Motor Form
Motor Rated Power
Speed Limit
Riding Distance2
Weight Limit
Height Limit
Folding Time3
II. Specication Table
2

Reector (Front) Reflector (Rear)
Pedal Saddle
Charger Set
III. Contents of Package
Package includes the following contents:
•Bike x1
•User's Manual x1
•Reector (Front) x1
•Reector (Rear) x1
•Pedal x2
•Saddle x1
•Charger Set x1
If any part is missing or damaged, please contact the dealer ASAP.
3

Right Pedal
Right Crank
Left Pedal
Left Crank
IV. Assembly of Accessory
1. Check pedals marked ''R'' and ''L''. R for right crank. L for left crank.
2. Assemble the left pedal counter-clockwise and right pedal clockwise.
3. Wrench towards the front wheel for tightening, or towards the back
wheel for releasing.
4. Please check the assembly every six months in order to maintain the
riding safety.
V. Basic Safety Inspection
1. You must be responsible for following all regulations of your country.
It is advised to comply with all the local laws, specications and trac
rules. Do not ride into any bike-restricted area.
4

2. Please conrm a suitable wheel size before your purchase.
3. Before each ride, adjust the height of the saddle and make sure the seat
post quick release is locked and the saddle is not moving.
4. Adjust the telescopic head tube to preferred distance, and conrm it is
rmly locked afterwards.
5. Before each ride, make sure the handles have been unfolded, the quick
release has been rmly locked, and the security button is on.
6. Before each ride, make sure the foldable stem locking component is
rmly locked, and the security button has been locked on.
7. Before your rst ride, please ensure you fully understand how to oper-
ate the vehicle, or consult TUBO Bikes
for
basic
operations.
8.
If any part is loosening, please nd an authorized shop for a maintenance
check.
9. Seat tube should be pulled to its locking position before each ride.
10. During the folding process, make sure your hands are kept o from any
folding mechanisms, such as folding points or quick releases.
11. Check all quick release spots and tire pressure before each ride.
For any operational questions, please contact TUBO
Bikes
customer service: info@tubobikes.com
Folding Mechanisms Foldable Head Tube Quick Release
5

14
2
3 5
Pull the red security lock for the Foldable
Stem Quick Release.
Open up the Seat Post Quick Release.
Lean the saddle forward to its folding
position.
Lock up Seat Post Quick Release.
Fold the front wheel to stand up the bike.
VI. Steps of Folds
Folding Steps
6

6
7
8
9
Done
Twist open the Handlebar Quick
Release Security Lock.
Push the pedal in and fold it down.
Open the Handlebar Quick Release.
Fold down the handlebar.
Complete folding.
7

1.Handle
2.Security Lock
(Counter-clockwise to
Unlock)
3.Power Switch
4.Charging Port
1
2
4
3
1.Adaptor body
2.Female plug
3.Indictor(Red: charging;
Green: charged)
4.Power output
5.Cord
6.Power input
7.Male plug
1
3
5
7
2
4
6
VII. Lithium Battery Set
Lithium battery specication
This battery is done with hermetic sealing. Do not disassemble it on
your own. This may pose a danger.
Do not attach metals or other objects to battery terminals. This may
cause shortage and pose a danger.
Store in a cool dry place and avoid re. Keep away from the reach of
children.
If the battery is stored at a zero-power state, the battery will be
over-stressed. This may prevent the battery from being charged again.
If the battery is stored at a fully-charged sate, a part of capacity might
be lost and cause a shorter battery lifetime.
VIII. Charger Set
Adaptor and Power Cord
8

This battery can be charged either
attached or detached to the bike.
Charging steps:
1. Attach the charger to the battery.
2. Plug the charger into a wall socket.
3. Unplug the charger when fully
charged.
4. Detach the charger from the
battery.
IX. Battery Charge & Notifications
TUBO AIR is equipped with a high quality lithium battery , with a longer
battery life and charge cycle. During its lifetime, it performs well without
the need to add any water or maintenance . The battery requires a
charger to charge the power , in order to provide the bike with assisted
power for an easy cycling performance.
Maximum Time of charge: 1.5 hours.
Notications When Using the Charger
1. Conrm the wall socket meets the local wall socket type as shown on
the adaptor before using the charger.
2. This charger is for indoor use only and should be kept away from any
hot sources, such as heater, dryer, etc., when in use.
3. The charger should be clear of any covering, to avoid causing re.
4. To avoid any causes of danger, do not move the charger when in use.
This is especially restricted to children.
5. The charger should be used and stored away from any humid places.
Water and other liquids are restricted from entering into the charger.
6. If the charger does not perform properly, please contact the dealer. Do
not x it on your own, as it may pose a risk of damage or danger.
7. If input and output power cord is damaged, contact the dealer for
replacement. Do not replace the cord with any other power cords.
8. Conrm the rated power voltage and current meet with the local input
power sources.
9. It is prohibited to use the charger on non-rechargeable batteries or non-
authorized brands or certain models of batteries.
9

Note:1.This adaptor only takes AC voltage (100V-240V) of home appliances,
and outputs DC voltage 42.0V and current 2.0A.
2. Place the charger properly during the use. Keep it with a distance
of 30 cm from the wall. Do not cover it up with anything. Keep the
cord away from any place that might trip people.
Notications during Charging Process
1. For home safety and the benefit of battery, use a TUBO AIR-assigned
charger only. (A non-authorized charger might cause re.)
2. Choose a dry and well ventilated place to use the charger. Avoid direct
sunlight to the charger and battery.
3. To ensure the best charging performance, choose a location with
indoor temperature between 0 C and 40 C while charging. When the
temperature is too low, the charging performance will go down and
the electricity might not able to be charged into the battery. When the
temperature is too high, the battery might not be fully charged and may
thus aect the mileage.
4. Turn the power o after each ride. If the bike hasn’t been used for a
long time, the battery should be stored fully charged and recharge per
two months interval, and the bike should be stored in cool dry places.
5. The battery capacity will reduce with time and with each charge.
Therefore be sure to follow this User's Manual to ensure the best
battery lifetime and performances.
Warning
The battery that comes with TUBO AIR Electric Folding Bike should be
used with the assigned charger only. This is to ensure the best lifetime
and performance of the battery set and safety concerns. If the charger is
lost, do not use a charger of other brands or dierent models. It is advised
to take the battery to the dealer for confirmation before a new battery
is purchased . If the charger is not working properly , please bring the
charger or the model number to TUBO Bikes shops or the dealers . Using
the battery and charger improperly may pose a re.
PS:If the battery is damaged, please bring it to TUBO Bikes
shops or authorized dealers to recycle.
10

KM/H
KM
PAS
TRIPODO
1
24 5
6
79
10
8
3
X. Multiple Function Panel
Functions
TUBO AIR Multiple Function Panel can control and switch into various
functions for vehicle information display. Below are its main functions:
• Odometer (ODO)
• Trip meter (TRIP)
• Current Speed
• Headlight illumination (including panel light)
• Boost-gear setting
• Battery life
• Error code
Terminology
11

KM/H
KM
PAS
TRIP
Power
Power
1. Power
2. Plus(+) Button
3. Minus(-) Button
4. Speed display
5. Boost-gear display (3 gears)
6. Battery life
7. Meters (ODO/TRIP)
8. Error display
9. Lights display
10. Pick
Be aware of the trac before operating the panel to avoid danger.
Operation
1. Power on/o
Power on:
Press the power button to start the
panel.
Power o:
Long press the power button for 3
secs to shut it o.
12

KM/H
KM
PAS
TRIP
Power
Headlight
KM/H
KM
PAS
TRIP
Power
KM/H
KM
PAS
TRIP
+key
gear
2. Headlight and Panel Light on/o
Headlight on:
Press the power button to turn
headlights and panel lights on.
Headlight o:
Press the power button to turn
headlights and panel lights o.
3. Gear Switch
When the power is on, press + / - key to switch the boost-gears and change
motor output power. Maximum power is 3.
Gear Up:
Press + key to get 1 gear up and the
boost power increased.
13

KM/H
KM
PAS
TRIP
─key
gear
Gear Down:
Press - key to bring 1 gear down and
the boost power decreased.
4. Battery Display
Five boxes: Full Capacity at 100%
Empty box: power completely runs
out. (Please avoid this for better
battery performances.)
One box flashing: 20% power
capacity. Charge instantly.
14

1. Light Body
1. Reflector (built-in LED warning light)
2. Rear Light Switch (on the back)
Rear light on: turn the switch to ON
Rear light off: turn the switch to OFF
Operate when the panel is on.
1. Headlight on: press the power
2. Headlight off: press the power
Rear Light Terminology Rear Light Operation
1
1
2
5. Error Display
When the electronic control system is faulty, this error sign will
show on the panel, and stop the vehicle from working. The
error sign won't go away until troubleshoot is done. (Reboot
won't work).
KM/H
KM
TRIP
Error display
Error Code
When the error sign happens, please contact TUBO Bikes for
troubleshoot: info@tubobikes.com
XI. Illumination System
Headlight Terminology Headlight Operation
Error Code:
When error happens, please keep
the Code and contact TUBO Bikes.
15

1. Light Body
1. Reflector (built-in LED warning light)
2. Rear Light Switch (on the back)
Rear light on: turn the switch to ON
Rear light off: turn the switch to OFF
Operate when the panel is on.
1. Headlight on: press the power
2. Headlight off: press the power
Rear Light Terminology
Rear Light Operation
1
1
2
LED Headlight has a high luminance level. Do not look directly at it.
This may cause visual damage.
Headlight is powered by the lithium battery. Turn it o when not in use,
to avoid power waste.
Turn the rear light on in the dark to warn vehicles behind.
XII. Inspections before a Ride
1. Make sure the kickstand has been folded up completely.
2. Turn on the power to inspect the battery level. Ensure the all indicators
and the power cut o brake levers are working property.
3. Turn on the power. If there is a faulty power, please conrm the power is
switched to a proper spot. If the malfunction still happens, please bring
the bike to a shop or dealer for maintenance.
4. Headlight is working properly.
5. Check the tire pressure. Do not ride with a low tire pressure. This can
cause damage to the tire and rim. (Best pressure is 35-60 psi.)
6. Check the brake. Confirm the right brake controls the rear brake, and
the left brake controls the front. When using the brake lever, it should
be at half grip distance from the normal position.
7. Loosening check. Confirm the bike body has no obvious loosening
issues. If it does, check screws or related parts before a ride. If still not
able to x the problem, bring the bike to a shop or dealer.
16

Turn on
lithium
battery
power
switch.
Inspect
its
battery
level.
Start the
multiple
function
panel.
Turn on
the rear
warning
light.
Turn on
head-
light.
Enjoy
your ride.
XIII. Awareness on a Ride
1. Co-riding is prohibited! According to traffic regulations, riding with
any passengers is highly restricted.
2. At places where the visibility is poor, turn on the lights for safety
concerns.
3. On snowy, icy, muddy or bumping places, or wet iron plates, where
the vehicle tends to slide over, please stop riding.
4. Ride properly and respect other vehicles and safety concerns. Do not
perform snake-riding, single-hand riding, bouncing and so on.
5. Do not ride under conditions of alcohol, medication or illness. These
cause human body to react slowly and cause danger.
6. Do not perform single-hand riding. Unless necessary, please keep
both hands on the grip properly. Wear a rain coat on rainy days.
7. Be aware of safety when carrying goods.
8. During a ride, never wear clothing that might cause danger, such as a
dress that may get caught by the wheel or gear.
9. Do not get your limbs or objects too close to a rolling spot, such as
the wheel, chain, gear, etc., to avoid any cause of danger.
10. Wading depth: The bike is an electronic product. Avoid using the
vehicle on a place where wading depth reaches 10 cm, to avoid water
damage on motor or electronic system.
11. When moving the bike, please turn o the power in case the motor is
activated and causes unintentional acceleration.
12. Whenever a sharp brake occurs, simultaneously perform both brakes
for the highest level of safety. To prevent rolling over, never use the
front brake at the rst place. Left brake lever controls the front brake
and right brake lever controls the rear brake.
13. Highly recommend to wear a lately-certied helmet that is suitable
to you. Adjust the helmet and maintain it according to instructions.
Wearing a proper helmet can avoid causing serious damage to the
head and neck.
14. Riding without wearing a helmet may cause casualty or death.
XIV. Operations on the Ride
Riding procedure:
17

1. Power Switch
1.1 Please turn on the power switch
1.2 This bike is meant be driven primarily by human power. Put hands
rmly on the grip. Gently step on the pedal to start the ride.
1.3 Turn the power o once nishing the ride, to ensure the best battery
lifetime and performance.
2. Headlight
2.1 Press the power key on the panel to start the headlight and do it again
to turn it o. Properly use illumination for your safety.
3. Power Cut O Brake Lever
3.1 For a safe ride, the brake lever will temporarily shut off the power
whenever it is activated, and power will regain when releasing the
brake.
4. Riding
4.1 Before riding, the rider should keep both feet on the ground, test all
switches and functions on the handle to get familiarized. Test the
brake and get familiar for best security.
4.2 Gently touch the pedal for acceleration and follow regulations to enjoy
the ride with ease and comfort.
XV. Choosing Accessories
Cover Bag—Optional
TUBO AIR folded size—82 cm x 55 cm x 30cm
We can provide a suitable bag for users to carry the folded bike onto the
Metro, bus and train for purchase on request.
High Capacity Lithium Battery (with
Extended Tube)—Optional
We can also provide additional High Capacity Battery Sets (with extended
tube) for purchase on request, which gives a longer distance of ride.
18
Table of contents