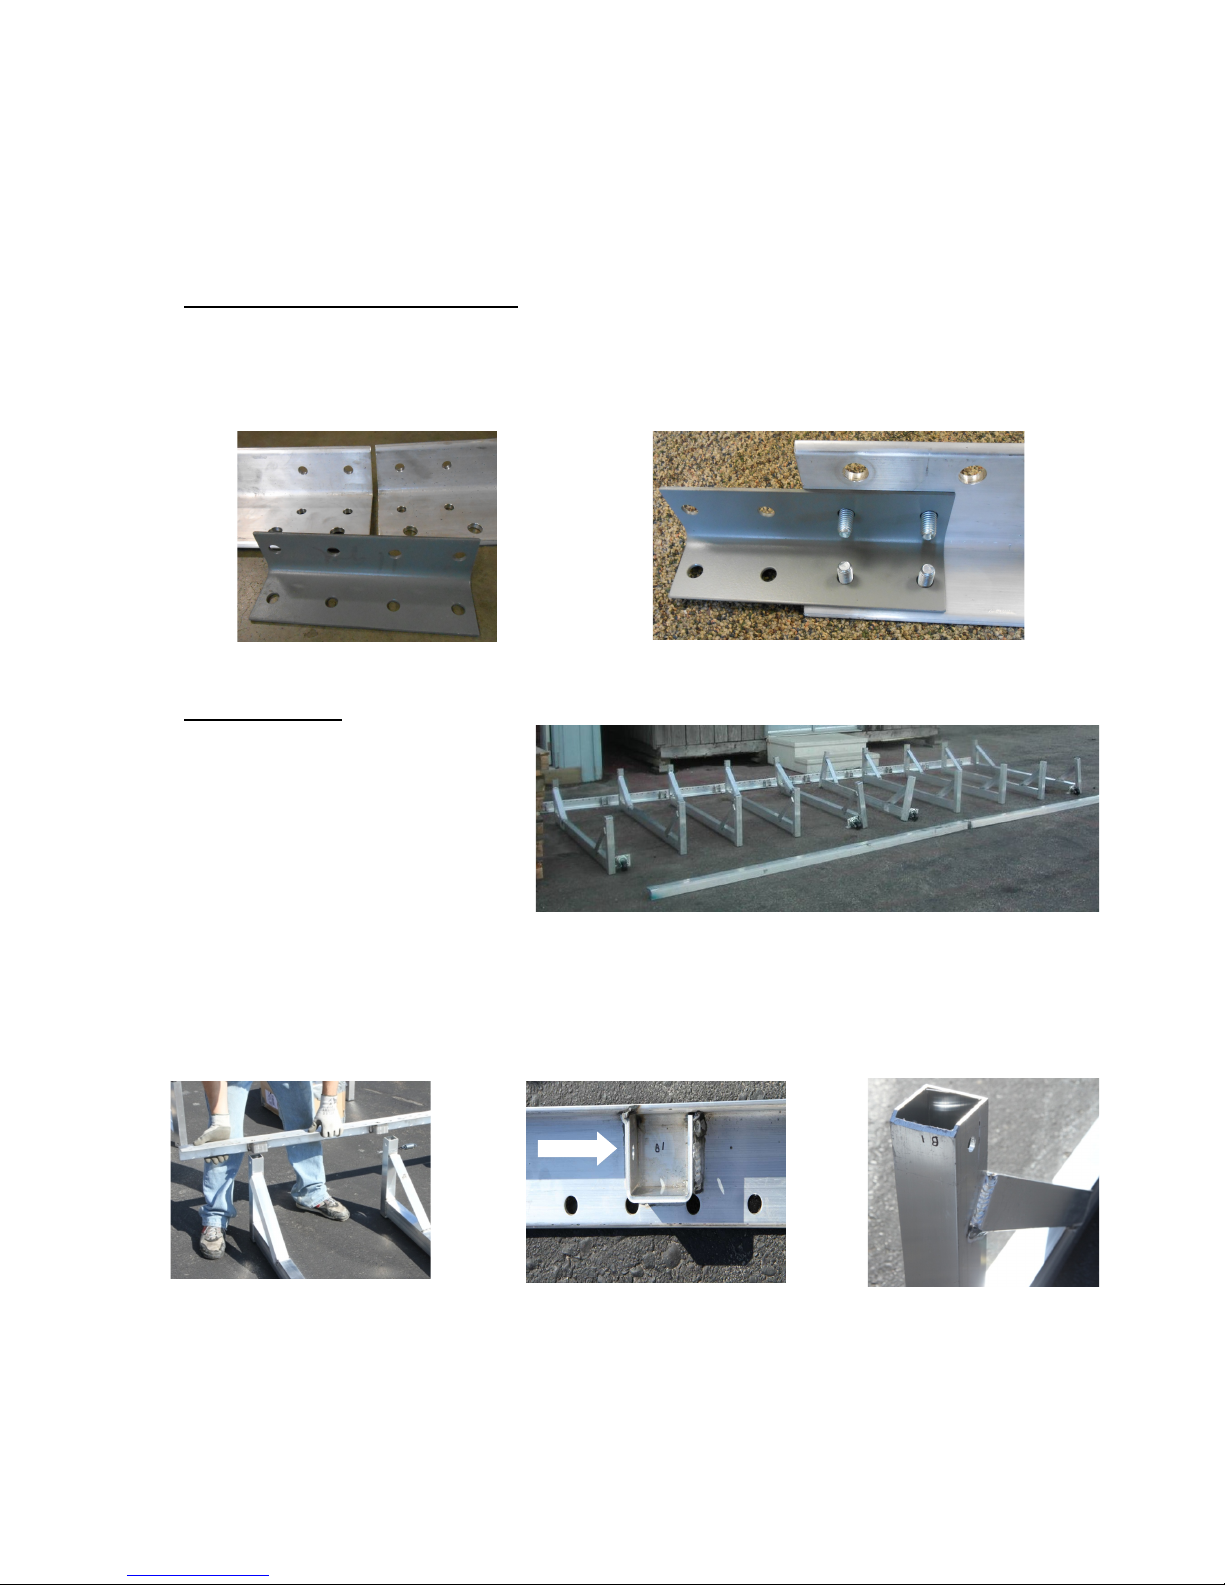
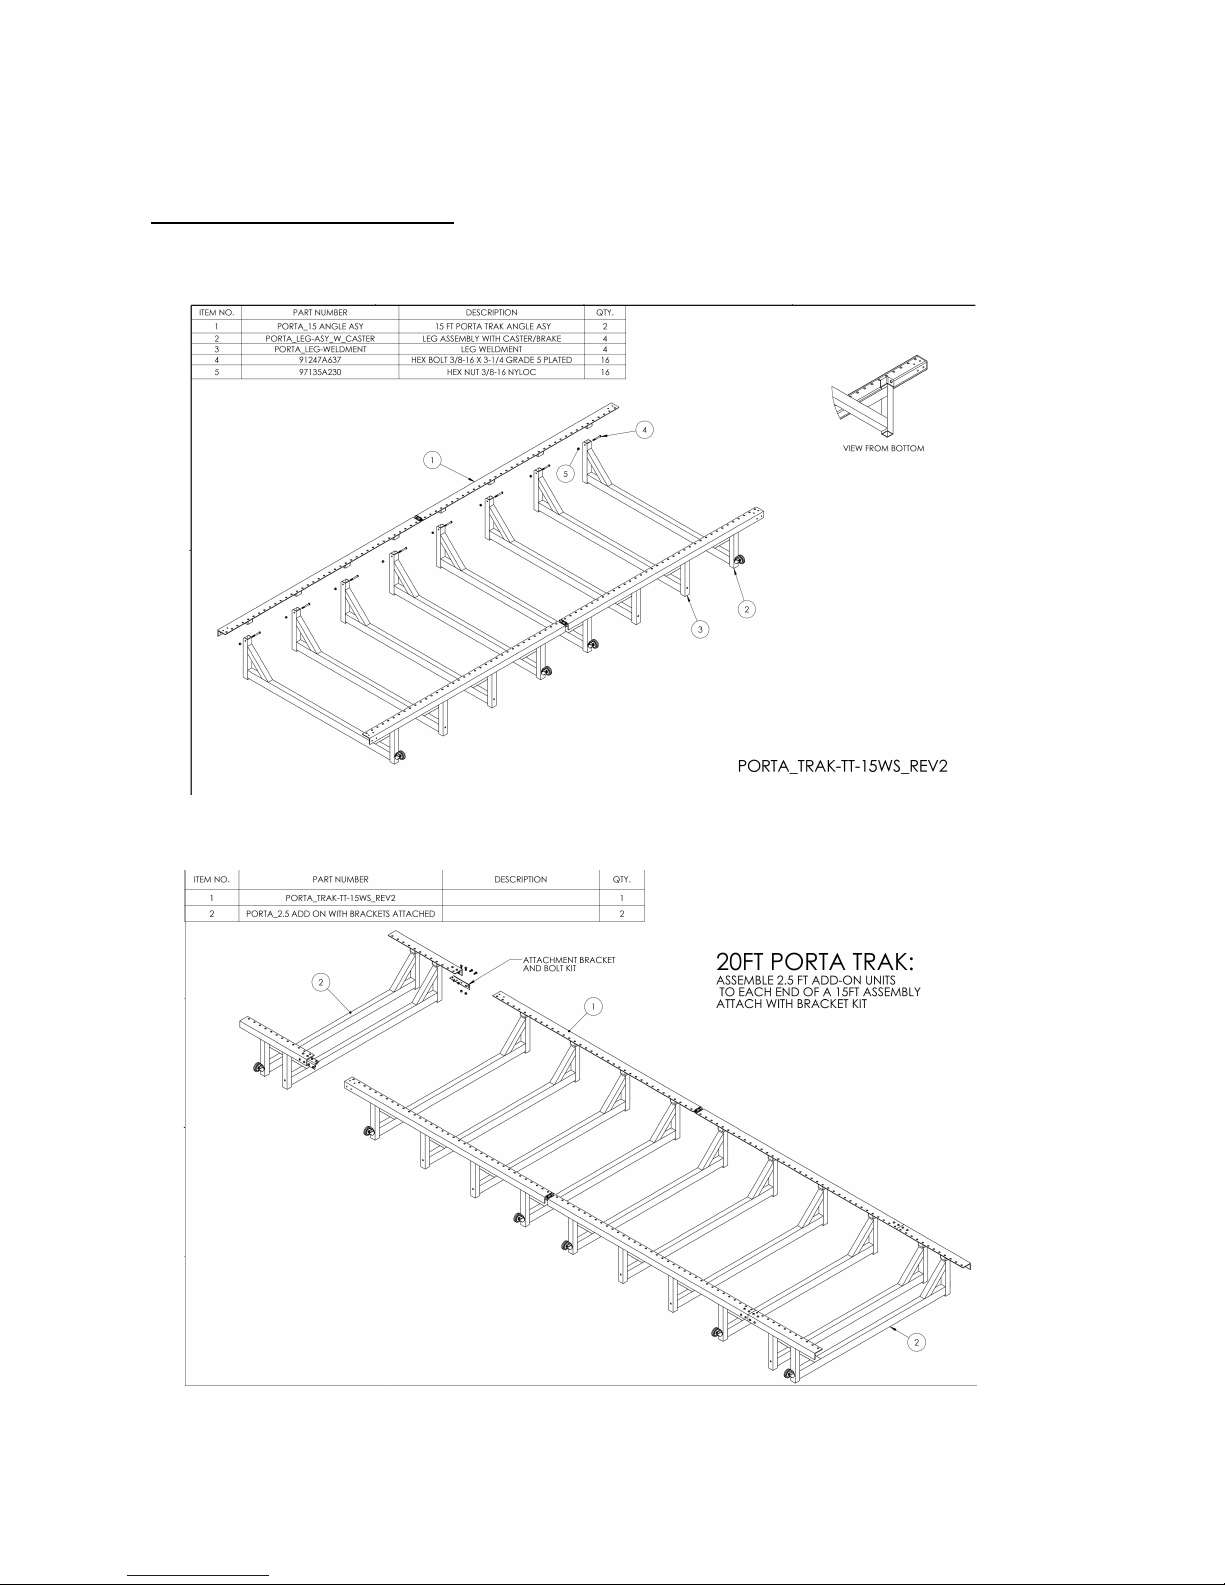
Tumbl Trak Porta Trak User manual

Tumbl Trak™ [email protected] www.tumbltrak.co.uk 44 (0)2971 167 949
1
PORTA TRAK OWNERS MANUAL
Please read the instructions thoroughly before setting up the
Porta Trak. Carefully follow how to spring the bed step by step.
Table of Contents:
I. Rail and Frame Parts List
II. Rail and Frame Assembly
III. Springing the Porta Trak Bed
IV. Diagrams
1. Appendix A) Assembly Diagram
V. Porta Trak Checklist and Care
a. After Assembly check list
b. Maintenance Checks for the Porta Trak
c. Tumbling with Porta Trak
d. Safety Suggestions for Use on the Porta Trak
**TOOLS NEEDED FOR ASSEMBLY**
7/32 Hex wrench
Two 9/16 wrench
Congratulations on your acquisition of a Tumbl Trak™ product! The Tumbl Trak™ Line of
Equipment has been designed and developed with the gymnastics coach and athlete in mind. Tumbl
Trak™ is dedicated to helping young athletes train smarter.

Tumbl Trak™ [email protected] www.tumbltrak.co.uk 44 (0)2971 167 949
2
I. Rail and Frame Parts List
15’ Porta Trak
[Qty 2]: 15’ hinged rails
[Qty 4]: Legs w/ Casters
[Qty 4]: Legs w/ no Casters
[Qty 16]: Hex Bolt 3/8-16 x 3-1/4 Grade 5 Plated
[Qty 16]: Hex Nut 3/8-16 Nyloc
* You will need two 9/16 wrenches
20’ Porta Trak
[Qty 2]: 15’ hinged rails
[Qty 6]: Legs w/Casters
[Qty 6]: Legs w/ no Casters
[Qty 2]: 2.5’ extension rail pieces (left)
[Qty 2]: 2.5’ extension rail pieces (right)
[Qty 4]: Attachment plates w/ 32 ‘3/8 x 1 in.
Allen Head Bolts & Nuts
[Qty 20]: Hex Bolt 3/8-16 x 3-1/4 Grade 5 Plated
[Qty 20]: Hex Nut 3/8-16 Nyloc
*You will need a 7/32 Hex wrench and two 9/16 wrenches
30’ Porta Trak
[Qty 4]: 15’ hinged rails
[Qty 8]: Legs w/ Caster
[Qty 8]: Legs w/ no Casters
[Qty 2]: Attachment plates w/ 16 ‘3/8 x 1 in. Allen Head
Bolts & Nuts
[Qty 16]: Hex Bolt 3/8-16 x 3-1/4 Grade 5 Plated
[Qty 16]: Hex Nut 3/8-16 Nyloc
*You will need a 7/32 Hex wrench and two 9/16 wrenches

Host
Fig. 2
II. Rail and Frame Assembly
1. Rail Assembly for 20’ and 30’ Units
A. Assemble hinge rails prior attaching to legs.
B. Use the attachment plates to fasten the 15’ hinged rail to the 2.5’ extension rail piece (Appendix
A) with the 3/8-16 x 3-1/4 Hex Bolts and Nuts (See Fig. 1). Ensure the threads of the screws are
facing inside the rail (See Fig 2). Secure with Hex Nuts.
*Refer to Appendix A. assembly Diagrams
2. Frame Assembly
A. Lay the 2 assembled Porta Trak
rails parallel to each other
approximately 6 feet apart with
holes facing inward.
B. Stand the legs upright so that the
plastic cap end is on the floor.
The legs will run perpendicular to
the length of the Porta Trak (like
railroad ties). Place legs with casters as indicated in Appendix A (See Fig. 1).
C. Connect the legs to the rails by placing rails onto legs (See Fig. 2). Install the ‘3/8-16 x 1/4 Hex
Bolts provided through the holes indicated in Fig. 3&4 and fasten nuts. The Hex Bolts provided
are meant to be longer than the Porta Trak legs to prevent damage to the aluminum frame
from over tightening.
*Refer to Appendix A. Assembly Diagrams
Fig. 1
Fig. 1 Fig. 2

Tumbl Trak™ [email protected] www.tumbltrak.co.uk 44 (0)2971 167 949
4
Fig. 5
III. SPRINGING THE BED
1. Springing the Bed
A. Decide which end of the bed will be used as the "take off"
end. Start springing the bed on this end. **The “take-off
end” is where the athletes dismount onto a mat.
B. Hook two spring ends on the first D-ring (the silver rings
that are sewn along the edges of the bed). Take the first
spring in the first D-Ring and attach to the first hole in the
rail. You will then take the second spring in the first
D-Ring and attach it to the second hole in the rail. (See
Fig. 5)
C. The third spring will attach to the second D-ring and hook
to the third rail hole.
ALWAYS ATTACH HOOKS DOWNWARDS!!! (See figure 8 at bottom)
D. Repeat on the other side. Use the Springing Tool if necessary (See Section 2 for Springing Tool
instructions).
E. Springing the bed will be much easier and quicker if you have another person hand springing the
opposite side first on the Porta Trak while you are using the Springing Tool to spring your side.
When hand springing the opposite side of the Porta Trak, be sure to stay at least 4-5 springs
ahead of the person using the Springing Tool. It will be necessary to skip a Rail Hole (not a D-
ring) within the first 15-20 holes to keep the bed wrinkle free. The D-Ring (not rail hole) on the
bed across from the hinge will be skipped, to allow the Porta Trak to fold. (Figure 8). If you are
setting up the Porta Trak by yourself, hand spring 4-9 springs on one side then alternate to the
other side and continue to use the Springing tool to spring 2-7 springs before you alternate to the
other side again. By continuing down the bed further on the hand sprung side, the amount of
effort to hand spring will remain low. When the bed is attached properly, it should be smooth
and tight.
H. The last 2-3 springs will attach to the frame at an angle. This will keep the bed tight.
I. After all D-rings have springs attached to them, double spring the last d-rings on each side of
the frame. The springs may be difficult to hook, but will provide extra support for the end of the
bed.
For Safety and liability reasons, the Porta Trak’s polypropylene bed should be replaced every 5-6 years
Because of the manufacturer’s variance in the length of Porta Trak beds, your bed may be slightly shorter or longer than
the length of the Workstation frame.
Skipped D
-
Ring at Hinge
16th Rail Hole Skipped
Porta Trak Only
Figure 8
(Spring angle slightly
exaggerated)

Tumbl Trak™ [email protected] www.tumbltrak.co.uk 44 (0)2971 167 949
5
Fig. 6
Fig. 7
2. Using the Springing Tool
This model has been designed for easier use. The bent
end of the thicker rod fits in a frame hole one down
from the hole into which you want to place the spring.
Use the smaller hook to stretch the spring onto the
tool handle. With your other hand, help place the
spring into the desired hole. **Watch your hands!!!
You should use gloves (See Fig. 6).
(Watch this video for a demonstration on how to use
the springing tool)
https://www.youtube.com/watch?v=Qo4vp_kDFUsl
3. Attaching the Frame Pads and End Caps
A. Attach the pressure sensitive loop Velcro on the
outer edge of the holes on the Porta Trak rails
leaving 6” extra at each end to attach the endcaps.
B. Align the pre-sewn Velcro on the pads with the
Velcro strip on the Porta Trak rails.
C. Make sure the springs, frame, and bed flaps are
covered by the pads.
D. Attach an endcap to each of the four corners of the
Porta Trak.
E. Use the extra 6” of Velcro to wrap around the
endcap and fasten the Velcro to the underside of
the rail (See Fig. 7).
4. Folding the Porta Trak
You will need to remove the pads on the frame before folding. Folding the frame with the pads still
attached may cause the hinge to break. Two or more people are recommended to lift the end of the
Porta Trak, make sure to check for overhead clearance.
5. Transporting the Porta Trak
After the unit is folded, lift the folded Porta Trak onto the side with the wheels attached. The unit
should be slowly rolled when moving. To open, again use two or more people. The pads will need to
be put back on when you set it back up. Reverse procedure to setup after transference.
Be very careful when folding and transporting any Porta Traks. Always use appropriate assistance.
Fig. 7
Table of contents